Use this information at your own risk. I do not claim responsability for any damage you might cause to your equipment, yourself or others.
The first guide "xrandr Guide" will show you how to use xrandr to overclock your monitor, which is done after you log on, so your monitor will be set to its default when booting and can be switched after logging in.
The second guide "edid Guide" will show you how to edit the "edid", which allows overriding information supplied by the monitor, so you can have the modes you want set when your operating system starts.
If your goal was to bypass the 16-235 color range on Intel GPUs, you can use this command instead: xrandr --output DP1 --set "Broadcast RGB" "Full" replacing DP1 with your output, you can add this command to an executable script in your ~/.config/autostart-scripts folder to have it run on log in.
For Nvidia GPUs you need to add Option "ModeValidation" "AllowNonEdidModes,NoEdidMaxPClkCheck,NoMaxPClkCheck" to the "Screen" section of the /etc/X11/xorg.conf.d/ conf file (20-nvidia.conf for example). You can then add the Modelines to your xorg.conf file in the "Monitor" section.
- xrandr This should be already installed on GNU/Linux distros.
- gnu coreutils This should be already installed on GNU/Linux distros.
- gcc This is used to compile cvt12 from source.
- cvt12 Instructions on downloading/compiling will be shown later in the guide.
- wget For downloading files.
For the edid guide:
- wine This will be used to install a Windows edid editor, since linux edid editors are uncommon. It's possible to hex edit the edid, but it's much more complicated.
- AW Edid Editor I will use this edid editor throughout the guide, it might be possible to use an alternative edid editor, although the guide might not be as simple to use. This edid editor installs without any issues in wine.
We will find a modeline that works using cvt12 and xrandr and set the mode on login using an executable script in the ~/.config/autostart-scripts folder.
$ xrandr | grep -Pio '.*?\sconnected'

We are interested in: HDMI1
We will compile a modified version of cvt to get access to CVT v1.2 reduced blanking timings. Most distributions use cvt from x.org which only supports CVT 1.1 currently, CVT 1.1 does not allow reduced blanking on any refresh rates other than multiples of 60Hz.
Download and compile cvt12:
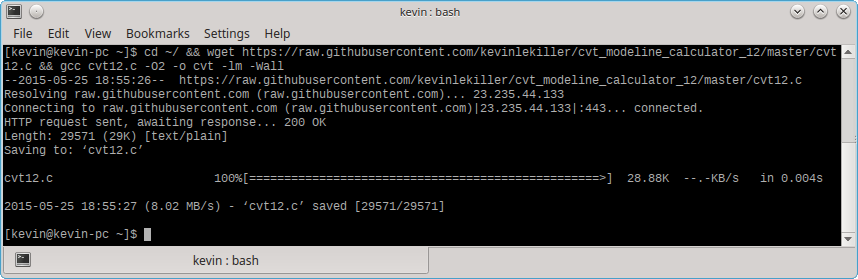
$ cd ~/ && wget https://raw.githubusercontent.com/kevinlekiller/cvt_modeline_calculator_12/master/cvt12.c && gcc cvt12.c -O2 -o cvt12 -lm -Wall
The parameters are: screen_width screen_height refresh_rate.
-b uses CVT v1.2 reduced blanking timings - remove this if you use a CRT monitor.
If your LCD is old, you might have to use -r instead, which uses CVT v1.1 reduced blanking timings.
If you want to get a refresh rate that works well for watching movies or tv, pass the -o argument, note this requires the -b option.
The -o argument will for example, convert 72Hz to 71.928Hz, so when you watch 23.976fps content it will play smoothly.
Note: If you use mpv with --video-sync=display-resample, mpv will automatically correct the speed of the video to match your monitor's refresh rate.
$ cd ~/ && ./cvt12 1920 1080 72 -b

We are looking for this: Modeline "1920x1080_72.00_rb" 167.28 1920 1968 2000 2080 1080 1103 1108 1117 +hsync -vsync
Strip anything after "1920x1080 in the quotes, so it looks like this: Modeline "1920x1080" 167.28 1920 1968 2000 2080 1080 1103 1108 1117 +hsync -vsync
Note: If your display goes blank or out of range while testing, type in this command to set it to its default timings:
xrandr --output HDMI1 --auto
Change the following commands based on what you got on the last step.
Create a new mode with xrandr:
xrandr --newmode "1920x1080_72.00_rb" 167.28 1920 1968 2000 2080 1080 1103 1108 1117 +hsync -vsync
Move the mode to the "HDMI" output:
xrandr --addmode HDMI1 1920x1080_72.00_rb
Set your monitor to the specified mode (sets your monitor to 72hz):
xrandr --output HDMI1 --mode 1920x1080_72.00_rb
If the display goes out of range, you can try tuning the modeling.
Once you have found working modeline(s), you can add them on logon.
There are multiple ways to do this, I will show one, see here for more options.
Create a script in ~/.config/autostart-scripts/, for example ~/.config/autostart-scripts/xrandr.sh
Add the lines you want to it, for example:
OUTPUT=HDMI1
# If you want it to automatically find your monitor, uncomment this (this might not work on multiple monitors):
#OUTPUT="$(xrandr | grep -Po "^[HD].+? connected" | grep -Po "^\S+")"
xrandr --newmode "1920x1080_72.00_rb"  167.28  1920 1968 2000 2080  1080 1103 1108 1117 +hsync -vsync
xrandr --addmode "$OUTPUT" 1920x1080_72.00_rb
xrandr --newmode "1920x1080_56.71"  172.5   1920 1952 2648 2680   1080 1102 1113 1135  -hsync -vsync
xrandr --addmode "$OUTPUT" 1920x1080_56.71
Make it executable for your user: chmod u+x ~/.config/autostart-scripts/xrandr.sh
If you want to set a your monitor to a specified mode when logging in, add that also:
xrandr --output "$OUTPUT" --mode 1920x1080_72.00_rb
This is another guide, if you want the changes above to be more permanent, or if you want all the users on your computer to access the modes.
If your monitor has an older EDID version (1.3 or earlier, a monitor without a displayport or hdmi 2.0 connectors for example) it might not have a detailed timing block, you can use the xrandr guide above instead.
$ lspci | grep -Pi 'intel.*graphics'

We are interested in the following: 00:02.0
$ xrandr | grep -Pio '.*?\sconnected'
We are interested in: HDMI1
$ sudo find /sys/devices/ -name edid

We are interested in:
/sys/devices/pci0000:00/0000:00:02.0/drm/card0/card0-HDMI-A-1/edid
Note the 00:02.0 and HDMI-A-1, which correspond to the information we got in the above steps.
Remember the HDMI-A-1, which we will require later on.
$ sudo cp /sys/devices/pci0000:00/0000:00:02.0/drm/card0/card0-HDMI-A-1/edid ~/edid.bin
$ cat ~/edid.bin && echo ""

You will see mostly unintelligible text, you might see the monitor's model number and serial number.
You can use this to confirm this is indeed the edid file for the monitor.
If not, we can confirm in one of the following steps.
We will compile a modified version of cvt to get access to CVT v1.2 reduced blanking timings. Most distributions use cvt from x.org which only supports CVT 1.1 currently, CVT 1.1 does not allow reduced blanking on any refresh rates other than multiples of 60Hz.
Download and compile cvt12:
$ cd ~/ && wget https://raw.githubusercontent.com/kevinlekiller/cvt_modeline_calculator_12/master/cvt12.c && gcc cvt12.c -O2 -o cvt12 -lm -Wall
Optional reading: Article on wikipedia about reduced blanking.
Overclocking the monitor will raise the pixel clock frequency.
Pixel clock frequency limits:
HDMI 1.0, 1.1, 1.2 & DVI = 165MHz
HDMI 1.3, 1.4 = 340MHz
HDMI 2.0 = 600MHz
DisplayPort = 500MHz?
Note that the monitor, the GPU and the cable all need to support the minimum version to gain access to a higher pixel clock frequency limit (a HDMI 1.2 monitor with a 1.3 GPU is still limited to 165MHz). If you're unsure, using a DisplayPort cable is recommended.
By using reduced blanking we can get a higher overclock.
For example, without reduced blanking 71Hz is 207.25MHz pixel clock. With reduced blanking, this drops to 164.96MHz. Unfortunately we can't get to 72Hz without manually tuning the modeline if we are limited to 165MHz.
The parameters are: screen_width screen_height refresh_rate.
-b uses CVT v1.2 reduced blanking timings - remove this if you use a CRT monitor.
If your LCD is old, you might have to use -r instead, which uses CVT v1.1 reduced blanking timings.
If you want to get a refresh rate that works well for watching movies or tv, pass the -o argument, note this requires the -b option.
The -o argument will for example, convert 72Hz to 71.928Hz, so when you watch 23.976fps content it will play smoothly.
Note: If you use mpv with --video-sync=display-resample, mpv will automatically correct the speed of the video to match your monitor's refresh rate.
$ cd ~/ && ./cvt12 1920 1080 72 -b
We are looking for this: Modeline "1920x1080_72.00_rb" 167.28 1920 1968 2000 2080 1080 1103 1108 1117 +hsync -vsync
Strip anything after "1920x1080 in the quotes, so it looks like this: Modeline "1920x1080" 167.28 1920 1968 2000 2080 1080 1103 1108 1117 +hsync -vsync
Head to this page
If that webpage is down, I've backed it up here, download it (right-click save as) and open it in your browser.
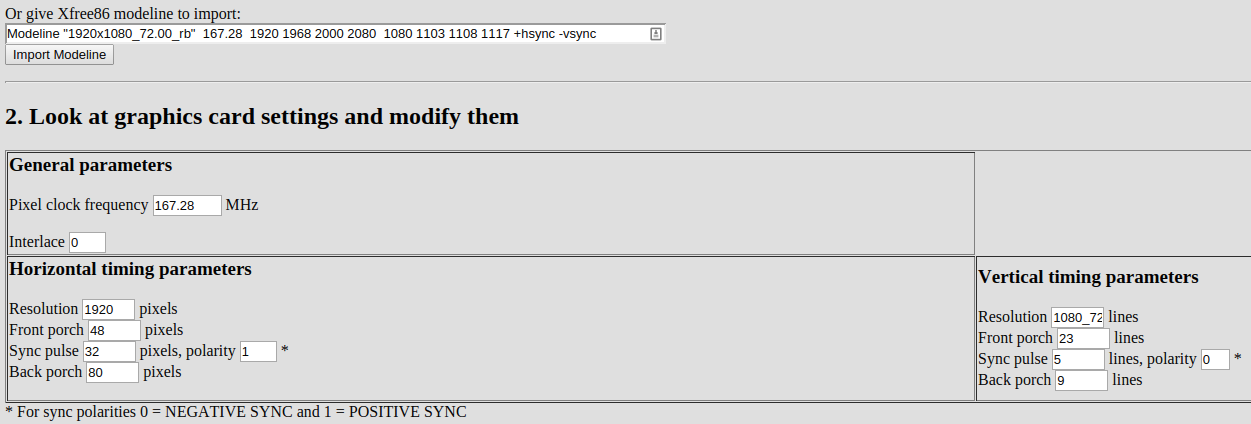
Paste in the modeline from the above step into the box over the Import Modeline button.
Click Import Modeline.
Keep this web page open, we will need it in the next steps.
This step is not recommended unless you are desperate to get the overclock you want but limited by pixel clock frequency. Skip this step if you are not.
If you are limited to a 165MHz pixel clock for example, you can change the modeline manually to try to get under the limit.
For example, let's say this is the modeline we want, which is 71.93Hz: Modeline "1920x1080" 167.11 1920 1968 2000 2080 1080 1103 1108 1117 +hsync -vsync
Open a new tab in your browser and open this site again. Put in the modeline you want (for example, the one I just posted above).
Change 167.11MHz to 164.50MHz or so, and play around with the porch and sync values then click calculate on step 3 on that web page, until you get 71.93Hz again.
For example after some messing around I got this: Modeline "1920x1080" 164.50 1920 1962 2001 2079 1080 1088 1094 1100 +hsync -vsync
You can start the program and open the file manually or start it from the shell with the file as a parameter:
$ wine ~/.wine/drive_c/Program\ Files\ \(x86\)/ANALOG\ WAY/AW\ EDID\ Editor/AWEDIDEditor.exe ~/edid.bin
You might be able to confirm this is the edid for your monitor by using the information on the top left of the GUI in the Standard Data tab or in the Detailed Data tab, look for Display Product Name.
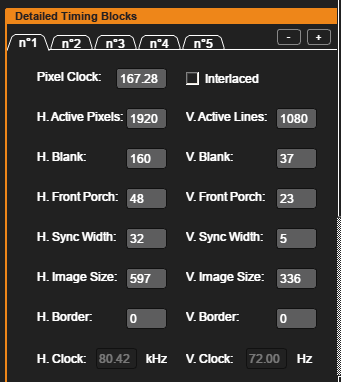
Head to the "CEA Extension" tab.
On the right, under the "Detailed Timing Blocks" section, click on the "n#" tab until you find your wanted resolution, alternatively, use a resolution you never will use and edit it.
To use the data on the website in the edid editor program I've written the following: (left is program, right is website)
Pixel Clock -> Pixel clock frequency _ MHz
Interlaced -> Interlace
H. Active Pixels -> Resolution _ pixels
H. Blank -> (you must calculate the following: Front porch _ pixels + Sync pulse _ pixels + Back porch _ pixels)
H. Front Porch -> Front porch _ pixels
H. Sync Width -> Sync pulse _ pixels
H. Image Size -> This is wideness in millimeters of your monitor, you shouldn't change this.
H. Border -> You shouldn't change this, this changes where the pixels start on the monitor.
V. Active Pixels -> Resolution _ lines
V. Blank -> (you must calculate the following: Front porch _ lines + Sync pulse _ lines + Back porch _ lines)
V. Front Porch -> Front porch _ lines
V. Sync Width -> Sync pulse _ lines
V. Image Size -> This is height in millimeters of your monitor, you shouldn't change this.
V. Border -> You shouldn't change this, this changes where the pixels start on the monitor.
V.Sync Polarity -> If Sync pulse _ lines, polarity _ * is 1 , put a checkmark, otherwise remove the checkmark.
H.Sync Polarity -> If Sync pulse _ pixels, polarity _ * is 1 , put a checkmark, otherwise remove the checkmark.
Change all these settings with the information in the previous step.
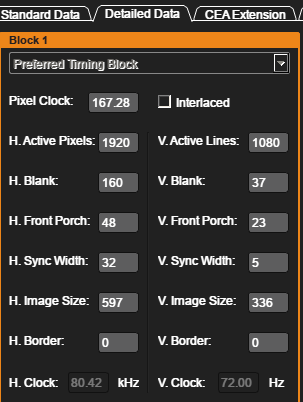
Head to the Detailed Data tab.
If you see the "Preferred Timing Block" and it is the resolution you are using (1920x1080 for example), continue this step, otherwise, skip to the next step.
If you change this, this will set the the default timings/resolution for the monitor (which is not very useful, unless your distro is unable to remember the last refresh rate you used when rebooting).
Use the settings we used in the last step.
Save the file by doing File->Save As, NOT FILE->SAVE, File->Save does not function correctly in wine. Call the new file edid_custom.bin and exit AW Edid Editor.
You can make linux use the modified edid file when starting.
Copy the edid file to an appropriate folder:
$ sudo mkdir -p /usr/lib/firmware/edid/ && sudo cp ~/edid_custom.bin /usr/lib/firmware/edid/edid_custom.bin
Note: Change HDMI-A-1 for what we found in an earlier step.
If you don't use grub, see this page, you need to add drm_kms_helper.edid_firmware=HDMI-A-1:edid/edid_custom.bin to your kernel parameter.
With grub you can do it the following way (change nano to the editor of your choice):
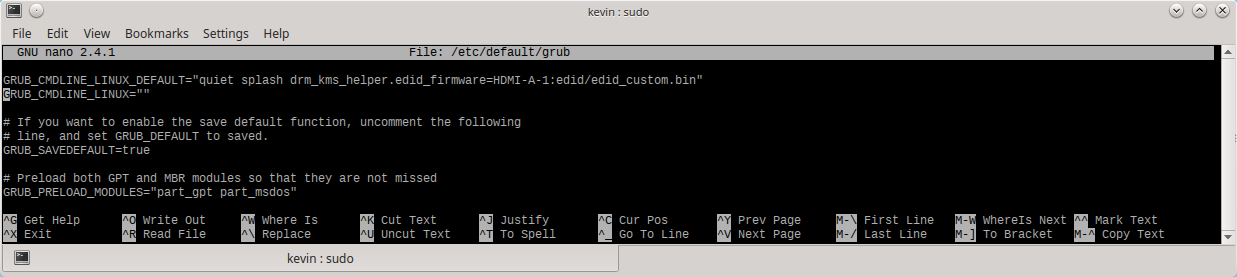
$ sudo nano /etc/default/grub
Look for a line similar to this: GRUB_CMDLINE_LINUX_DEFAULT="quiet splash"
Add the following to the end: drm_kms_helper.edid_firmware=HDMI-A-1:edid/edid_custom.bin
It should now look like this: GRUB_CMDLINE_LINUX_DEFAULT="quiet splash drm_kms_helper.edid_firmware=HDMI-A-1:edid/edid_custom.bin"
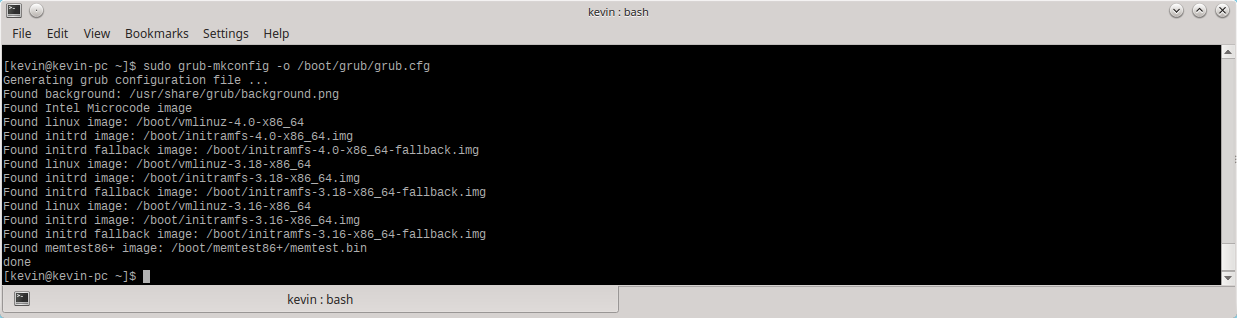
Now you can regenerate your grub.cfg file:
$ sudo grub-mkconfig -o /boot/grub/grub.cfg
Reboot the computer. You can do this in the GUI or in the shell like this:
$ sudo reboot
Try setting the refresh rate:
$ xrandr -s 1920x1080 -r 72
If your monitor works fine, continue to the next step.
If your monitor goes "out of range", this means your overclock has failed. Revert back to the "preferred" modeline:
xrandr --output HDMI1 --preferred
Follow the above steps, using a lower overclock.
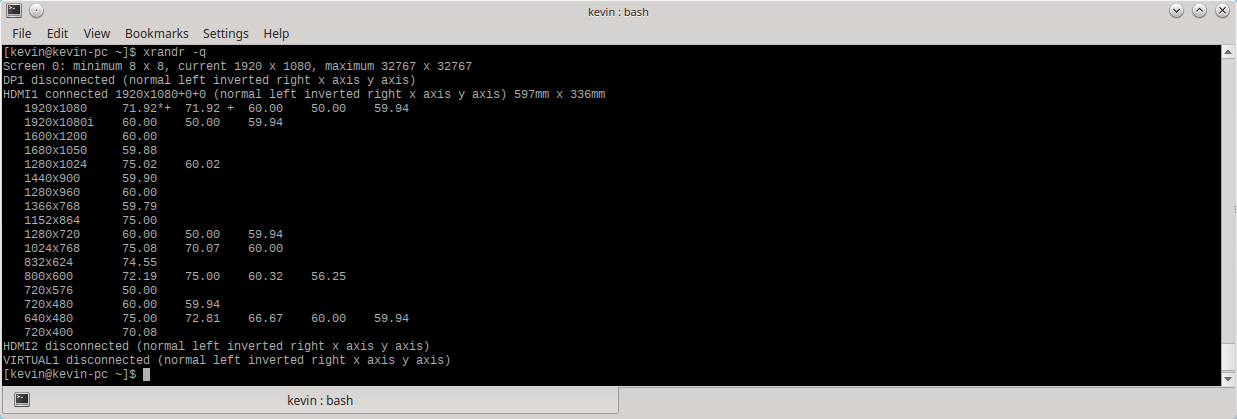
Run the following command:
$ xrandr -q
For example, I see 71.92Hz is my refresh rate, which confirms it worked (I did not use the timings above, hence why you don't see 72Hz).
Your monitor OSD might have the info also.
This step is not recommended.
Some monitors allow writing edid information back into it.
The advantage to this is it will survive operating system re-installations, since the information will be inside the monitor.
On most monitors that do support it, you need to enter "service mode", you will have to research this for your particular monitor. Some also require the monitor to be not displaying anything.
Writing the edid file to the monitor can be dangerous, be forewarned.
You can use the edid-rw tool.
Please read README and install the pre-requisite software on that page before using.
First you should try finding which number the edid is in.
$ sudo ./edid-rw 0 | edid-decode
Increment 0 until you see the edid data that corresponds to your monitor.
Once you see it, you can write your custom edid file changing 0 for the number you found above.
$ sudo ./edid-rw -w 0 < ~/edid_custom.bin
You can verify it was written by reading it again:
$ sudo ./edid-rw 0 | edid-decode