


Hubot adapter for Rocket.Chat!
Feel free to join us in the #hubot channel to discuss hubot, and any scripts you might be working on.
BREAKING CHANGES: v2.x.x contains major breaking changes. Starting with this version:
- CoffeeScript BOTs will no longer be supported, all new bot scripts should be written in NodeJS 8 compatible JavaScript
- Only Hubot v3 will be supported
- you should only use Rocket.Chat Server version 0.63.0 or higher
- Yeoman generator support is discontinued, you should start your project with our hubot v3 boilerplate
- NodeJS 8 or later is required for operations
- The latest ES6 syntax in NodeJS 8, including the popular async-await, is fully supported
v1.x.x versions of the adapter is only compatible with 0.37.1 and higher of Rocket.Chat Server. Yes, you should be able to continue using v1.x.x adapter and CoffeeScript bots with the most up-to-date version of the server.
If you are using Rocket.Chat 0.35.0 or earlier, please use v0.1.4 of the adapter. (releases between 0.35.0 and 0.37.1 are not recommended for hubot operations)
If you want to integrate Rocket.Chat with GitHub or GitLab. Make sure you visit the Rocket.Chat.Ops project before starting. We already have many scripts that add webhook events and access GitHub/GitLab APIs. You can easily extend these scripts for your custom application.
If you are writing CoffeeScript bots, need Hubot 2.x and v1.x.x or v0.x.x of the adapter, please see instructions for v1.x.x of the adapter.
The following instructions are ONLY for v2.x.x of the adapter.
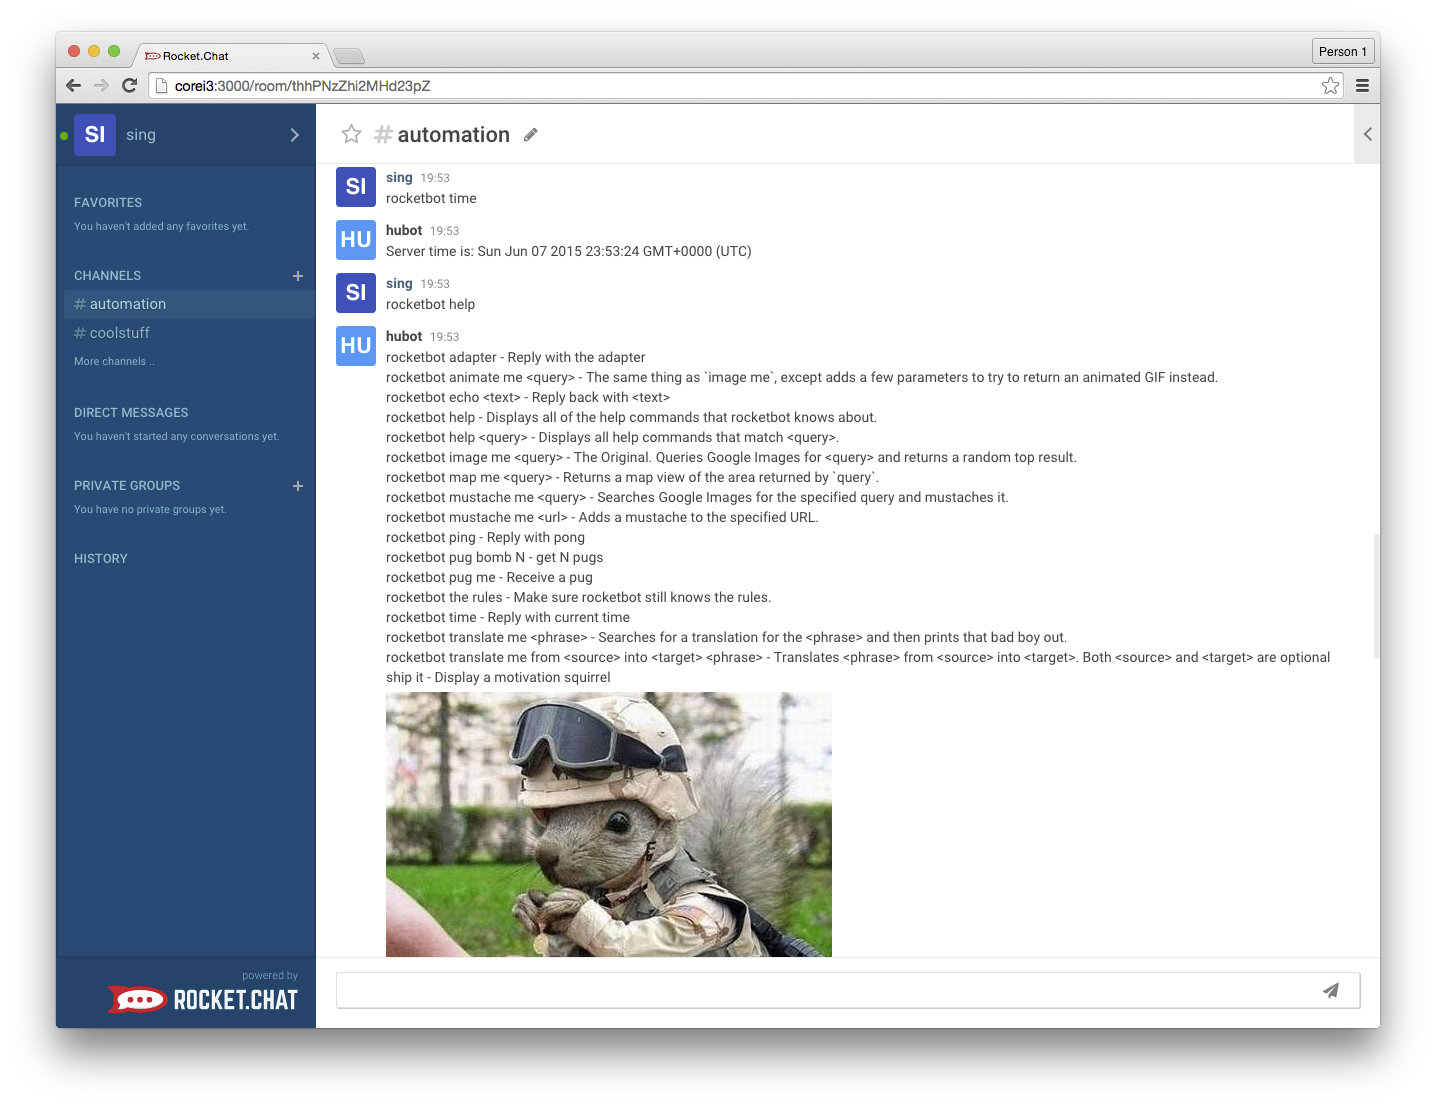
Here is a sample run:
We have a couple of ways for you to get up and started with the Rocket.Chat adapter.
You can quickly spin up a docker image with:
docker run -it -e ROCKETCHAT_URL=<your rocketchat instance>:<port> \
	-e ROCKETCHAT_ROOM='general' \
	-e RESPOND_TO_DM=true \
	-e ROCKETCHAT_USER=bot \
	-e ROCKETCHAT_PASSWORD=bot \
	-e ROCKETCHAT_AUTH=password \
	-e BOT_NAME=bot \
	-e EXTERNAL_SCRIPTS=hubot-pugme,hubot-help \
	rocketchat/hubot-rocketchat
If you want to include your own custom scripts you can by doing:
docker run -it -e ROCKETCHAT_URL=<your rocketchat instance>:<port> \
	-e ROCKETCHAT_ROOM='general' \
	-e RESPOND_TO_DM=true \
	-e ROCKETCHAT_USER=bot \
	-e ROCKETCHAT_PASSWORD=bot \
	-e ROCKETCHAT_AUTH=password \
	-e BOT_NAME=bot \
	-e EXTERNAL_SCRIPTS=hubot-pugme,hubot-help \
	-v $PWD/scripts:/home/hubot/scripts \
	rocketchat/hubot-rocketchat
An admin user is required to create the account for the bot to login to.
- From Administration > Users menu
- Select
+to make a new user - Enter Name, Username, Email (tick verified) and Password
- Disable Require password change
- Select
botfrom role selection and click Add Role - Disable Join default channels recommended, to avoid accidental listening
- Disable Send welcome email
- Save
Use these credentials in the bot's environment ROCKETCHAT_USER and
ROCKETCHAT_PASSWORD
Note that for bots email, a common workaround to avoid creating multiple
accounts is to use gmail +addresses, e.g. youremail+botnam@gmail.com.
See this issue for more
Please see our boilerplate bot [Getting Started docs here][getting-started]!
The boilerplate is essentially just a simple node package that requires Hubot, the Rocket.Chat adapter and Coffeescript for its execution...
"dependencies": {
    "coffeescript": "^2.2.2",
    "hubot": "3",
    "hubot-rocketchat": "^2.0.0"
}
The bot can then be executed using a bin file in production, as seen here.
Or via the package scripts locally using npm run local or yarn local
Using the boilerplate example, to start the bot in production, use
bin/hubot -a rocketchat - will install dependencies and run the bot with this
adapter.
More info in Hubot's own docs here
In local development, the following can be set in an .env file. In production
they would need to be set on server startup.
The Rocket.Chat adapter implements the Rocket.Chat Node.js SDK to load all settings from the environment. So the following are just some of those settings, relevant to Hubot. It has some additional configs, documented here.
| Env variable | Description |
|---|---|
| Hubot | A subset of relevant Hubot env vars |
HUBOT_ADAPTER |
Set to rocketchat (or pass as launch argument) |
HUBOT_NAME |
The programmatic name for listeners |
HUBOT_ALIAS |
An alternate name for the bot to respond to |
HUBOT_LOG_LEVEL |
The minimum level of logs to output (error) |
HUBOT_HTTPD |
If the bot needs to listen to or make HTTP requests |
| Rocket.Chat SDK | A subset of relevant SDK env vars |
ROCKETCHAT_URL* |
Local Rocketchat address (start before the bot) |
ROCKETCHAT_USER* |
Name in the platform (bot user must be created first) |
ROCKETCHAT_PASSWORD* |
Matching the credentials setup in Rocket.Chat |
ROCKETCHAT_ROOM |
The default room/s for the bot to listen in to (csv) |
LISTEN_ON_ALL_PUBLIC |
DEPRECATED - DO NOT USE |
RESPOND_TO_DM |
If the bot can respond privately or only in the open |
RESPOND_TO_EDITED |
If the bot should reply / re-reply to edited messages |
RESPOND_TO_LIVECHAT |
If the bot should respond in livechat rooms |
| `INTEGRATION_ID | Name to ID source of messages in code (e.g Hubot) |
* Required settings, unless running locally with testing defaults:
- url:
localhost:3000 - username:
bot - password:
pass
Be aware you must add the bot's user as a member of the new private group(s) before it will respond.
We have a couple of ways for you to get up and started with the adapter below.
You can quickly spin up a docker image with:
docker run -it -e ROCKETCHAT_URL=<your rocketchat instance>:<port> \
	-e ROCKETCHAT_ROOM='general' \
	-e RESPOND_TO_DM=true \
	-e ROCKETCHAT_USER=bot \
	-e ROCKETCHAT_PASSWORD=bot \
	-e HUBOT_NAME=bot \
	-e EXTERNAL_SCRIPTS=hubot-help,hubot-diagnostics \
	rocketchat/hubot-rocketchat
If you want to include your own custom scripts you can by doing:
docker run -it -e ROCKETCHAT_URL=<your rocketchat instance>:<port> \
	-e ROCKETCHAT_ROOM='general' \
	-e RESPOND_TO_DM=true \
	-e ROCKETCHAT_USER=botname \
	-e ROCKETCHAT_PASSWORD=botpass \
	-e HUBOT_NAME=botname \
	-e EXTERNAL_SCRIPTS=hubot-help,hubot-diagnostics \
	-v $PWD/scripts:/home/hubot/scripts \
	rocketchat/hubot-rocketchat
Here are all of the options you can specify to configure the bot.
On Docker you use: -e VAR=Value
Regular hubot via: export VAR=Value or add to pm2 etc
If ROCKETCHAT_URL is using https://, you MUST setup websocket
pass-through on your reverse proxy (NGINX, and so on) with a valid certificate
(not self-signed). Directly accessing Rocket.Chat without a reverse proxy via
https:// is not possible.
Try:
rocketbot ping
And:
rocketbot help
The example bot under scripts directory responds to:
rocketbot report status
First clone the source and then move into the directory.
git clone git@github.com:RocketChat/hubot-rocketchat.git
cd hubot-rocketchat
Now we start the docker container.
docker run -it -e ROCKETCHAT_URL=<your rocketchat instance>:<port> \
	-e ROCKETCHAT_ROOM='general' \
	-e RESPOND_TO_DM=true \
	-e ROCKETCHAT_USER=bot \
	-e ROCKETCHAT_PASSWORD=bot \
	-e HUBOT_NAME=bot \
	-e EXTERNAL_SCRIPTS=hubot-help,hubot-diagnostic \
	-v $PWD:/home/hubot/node_modules/hubot-rocketchat rocketchat/hubot-rocketchat
In a Hubot instance once hubot-rocketchat is added by npm or yarn, you can
replace the package with a development version directly:
cd node_modulesfrom the bot's project rootrm -rf hubot-rocketchatto delete the published versiongit clone git@github.com:RocketChat/hubot-rocketchat.gitto add dev versioncd hubot-rocketchatmove to dev pathnpm installinstall dependencies
Setting up a locally linked package is easier for continued development and/or using the same development version of the adapter in multiple bots.
- Change directory to your development adapter path
npm linkoryarn linkto set the origin of the link- Change directory to your bot's project root
npm link hubot-rocketchatoryarn link hubot-rocketchatto create the link
- The first time you run the docker container, the image needs to be pulled from the public docker registry and it will take some time. Subsequent runs are super fast.
- If you are not running Linux (i.e. if you are on a Mac or PC), you cannot use $PWD to mount the volumes. Instead, read this note here (the 2nd note on the page: If you are using Boot2Docker...) to determine the absolute path where you must place the git-cloned directory.
If you want to use docker-compose for this task, add this for v0.1.4 adapter (this must be inserted in your docker-compose.yml):
# hubot, the popular chatbot (add the bot user first and change the password before starting this image)
hubot:
  image: rocketchat/hubot-rocketchat:v0.1.4
  environment:
    - ROCKETCHAT_URL=your-rocket-chat-instance-ip:3000 (e.g. 192.168.2.240:3000)
    - ROCKETCHAT_ROOM=general
    - RESPOND_TO_DM=true
    - ROCKETCHAT_USER=username-of-your-bot
    - ROCKETCHAT_PASSWORD=yourpass
    - BOT_NAME=bot
    - GOOGLE_API_KEY=yourgoogleapikey
# you can add more scripts as you'd like here, they need to be installable by npm
    - EXTERNAL_SCRIPTS=hubot-help,hubot-seen,hubot-links,hubot-diagnostics,hubot-google,hubot-reddit,hubot-bofh,hubot-bookmark,hubot-shipit,hubot-maps
  links:
    - rocketchat:rocketchat
# this is used to expose the hubot port for notifications on the host on port 3001, e.g. for hubot-jenkins-notifier
  ports:
    - 3001:8080
If you wish that your bot listen to all public rooms and all private rooms he is joined to let the env "ROCKETCHAT_ROOM" empty like in the example above and set the env "LISTEN_ON_ALL_PUBLIC" to true.
Please take attention to some external scripts that are in the example above, some of them need your Google-API-Key in the docker compose file.
Alternative Node.js installation with Node Version Manager (nvm) in a local environment on Debian/Ubuntu
# adduser hubot
# su - hubot
$ curl -o- https://raw.githubusercontent.com/creationix/nvm/v0.33.2/install.sh | bash
$ exit
# su - hubot
$ nvm install v4.8.5
$ npm update -g
$ npm install -g yo generator-hubot
$ mkdir hubot
$ cd hubot
$ yo hubot (answer questions and use "rocketchat" as adapter)
$ npm install coffee-script -save
Make sure ~/hubot/bin/hubot is executable: chmod 755 ./bin/hubot
If you need a redis database: apt install redis-server
Set node version: export NODE_VERSION=default
If you want to start your hubot with systemd use nvm-exec:
ExecStart=/home/hubot/.nvm/nvm-exec /home/hubot/hubot/bin/hubot --adapter rocketchat
See EnvironmentFile directive for using environment variables in systemd units
You can specify the adapter during setup.
First you need to install hubot
npm install -g yo generator-hubot
Then you need to start the setup of the bot
mkdir myhubot
cd myhubot
yo hubot --adapter="rocketchat@1"
It'll ask you a few questions.
Alternatively you can actually answer the questions in one command:
yo hubot --owner="OWNER <owner@example.com>" --name="bot" --description="Bot" --adapter="rocketchat@0.1"
Also be sure to remember the name you specify. This is what the bot will respond to in Rocket.Chat.
You will need to tell the adapter where your install is and what login information to use.
export ROCKETCHAT_ROOM='general'
export RESPOND_TO_DM=true
export ROCKETCHAT_USER=bot
export ROCKETCHAT_PASSWORD=bot
export ROCKETCHAT_AUTH=password
Then start with: bin/hubot -a rocketchat
If you already have hubot setup you can add the adapter.
By doing: npm install hubot-rocketchat@2
You will need to tell the adapter where your install is and what login information to use.
export ROCKETCHAT_ROOM='general'
export RESPOND_TO_DM=true
export ROCKETCHAT_USER=rocketbot
export ROCKETCHAT_PASSWORD=bot
export ROCKETCHAT_AUTH=ldap
Then starting your bot specifying the adapter: bin/hubot -a rocketchat
Try:
rocketbot ping
And:
rocketbot help
The example bot under scripts directory responds to:
rocketbot report status
We like to make development as easy on ourselves as possible. So passing the love on to you!
We'd love to have your help improving this adapter. PR's very welcome 😄
First clone the source and then move into the directory.
git clone git@github.com:RocketChat/hubot-rocketchat.git
cd hubot-rocketchat
Now we start the docker container.
docker run -it -e ROCKETCHAT_URL=<your rocketchat instance>:<port> \
	-e ROCKETCHAT_ROOM='general' \
	-e RESPOND_TO_DM=true \
	-e ROCKETCHAT_USER=bot \
	-e ROCKETCHAT_PASSWORD=bot \
	-e ROCKETCHAT_AUTH=password \
	-e BOT_NAME=bot \
	-e EXTERNAL_SCRIPTS=hubot-pugme,hubot-help \
	-v $PWD:/home/hubot/node_modules/hubot-rocketchat rocketchat/hubot-rocketchat
Installed in hubot you'd hop over into node_modules.
Delete the hubot-rocketchat folder.
Then clone the git repo.
git clone git@github.com:RocketChat/hubot-rocketchat.git
cd hubot-rocketchat
npm install
Look under the scripts directory, you will find a very basic bot there.
Just add your own script in the directory to have it loaded. If you are new to hubot script writing, find out more here.
If you find a bug or compatibility problem, please open an issue.
If you have any enhancements or feature requests, create an issue. If you like what you see, please star the repo.
Finally, if you have created a bot that other users may find useful, please contribute it.
- The first time you run the docker container, the image needs to be pulled from the public docker registry and it will take some time. Subsequent runs are super fast.
- If you are not running Linux (i.e. if you are on a Mac or PC), you cannot use $PWD to mount the volumes. Instead, read this note here (the 2nd note on the page: If you are using Boot2Docker...) to determine the absolute path where you must place the git-cloned directory.
While it is functional, the current adapter is very basic. We need all the help we can get to add capabilities.
Become part of the project, just pick an issue and file a PR.
The adapter code is under the src directory. To test modified adapter code, exit (ctrl-c) the container and run it again.
Q: I am not trying to stage a denial of service attack, why would I ever want to write a bot?
A: There are many positive and productive use cases for bots. Imagine a customer service support chat. As soon as a customer enters the support channel, a bot immediately identifies the customer and then:
- fetches recent sales information from the sales dept server
- fetches personal information from the customer data base
- fetches latest notes made by her/his salesperson from the CRM system
- scans the customer's facebook and twitter posts
- obtains details of the last support ticket for this customer
Putting it altogether and then private message the service rep with the information.
Another use-case is a load test bot, imagine a bot that accepts the command:
rocketbot loadtest europe 25, asia 50, usa 100, canada 10
This command specifies a distribution of test bot instances, to be created across globally located data centers.
Once received, the bot:
- parses the distribution
- concurrently ssh to remote Kubernetes controllers and spawns the specified number of test bot instances to start the load test
Q: The architecture of hubot-rocketchat looks interesting, can you tell me more about it?
A: Sure, it is based on hubot-meteorchat. hubot-meteorchat is the hubot integration project for Meteor based chats and real-time messaging systems. Its driver based architecture simplifies creation and customization of adapter for new systems. For example, the hubot-rocketchat integration is just hubot-meteorchat + Rocket.Chat driver.
Learn more about hubot-meteorchat and other available drivers at this link.