Multiple-Object-Style-Transfer
All source files in this repository are released under the Apache 2.0 license, the text of which can be found in the LICENSE file.
A project created within the MWML Incubator, the goal of our project is to extend neural style transfer, using multiple styles, to multiple objects identified by the Detectron2 architecture. Previously, neural style transfer was limited to stylizing the entirety of a single image using one style image. In this project, we aim to improve upon the control of this style transfer by allowing users to select which objects to stylize and the style image to be used. Multiple objects can be stylized using different multiple styles (style images can either be uploaded by the user or chosen from a pre-set dictionary of styles) in one pass of the program, resulting in a single output image where objects within the image are stylized according to the specifications of the user.
We highly recommend visiting the Google Colab Notebook. The authors used it to primarily develop this program due to the computational resources it provides. This code has not been tested on a local device as we did not have access to the appropriate hardware. View the Google Colab Notebook here. A quick demo can be found in the repo or you can watch the video below.
Demo
Fast Style Transfer
Let's see an example of how multiple object transfer can be used on an input image. Our project includes this input image by default within the program as well as some default style images as well.
Take the following input image, called the content image.

In traditional Neural Style Transfer, this content image can be stylized by using a style image. The entire content image is transformed and takes on the stylization of the provided style image. An excellent example of this is shown in TF-Hub Fast Style Transfer for Arbitrary Styles notebook published by the TensorFlow Hub Authors. Our project uses their code to achieve multiple object style transfer. Let's look at what Fast Style Transfer can do. (The following in an example for the previously mentioned notebook).

While this is quite an excellent result, it does not provide a granular level of control within the content image. Say that we wanted only to stylize the person riding the horse or the horse itself. Perhaps you wanted to stylize the horse with a fire style while the man riding the horse was to be stylized using oceanic waves. This level of control introduces new challenges to the initial project, primarily the usage of computer vision in identifying objects and applying multiple styles to different objects within the image. Let's look at how computer vision is utilized in this project.
Computer Vision Using Detectron2
For our project, we use the Detectron2 structure set up by the Facebook AI Research (FAIR) team. The GitHub Repo can be found here.
We implemented the Detetctron2 code in our program to identify the objects in the image and their corresponding object binary masks - a pixel-wise image with pixels being 0 or 1 is the associated pixel in the content image is a part of the mask.
An example of this object detection can be seen here.

From here, the appropriate objects, masks and classes can be identified for stylization.
Creating Masks
After each object and its corresponding mask has been identified appropriately, multiple styles are chosen by the user. The user will then identify which objects should be attributed to each particular style. Again, multiple objects can be attributed to a single style.
Here, the objects of each style have their masks combined to form a single aggregate mask for each style. The result is a list of styles and aggregate masks for each style. An example of an aggregate mask has been shown below, which contains multiple objects within it. True values are shown in yellow while false values are shown in purple.

The final step is to create an inverse mask, which can be accomplished by creating a tensor of ones of the same shape as the content image and subtracts the masks of all selected objects. The end result is an inverse mask that can extract all pixels that should not be stylized.
Extracting Objects from Stylized Images
Here, the content image and style images are passed into the neural style transfer architecture. This will result in multiple content images, each stylized according to the input specifications.
To extract the appropriate objects from each style, the aggregate masks for each style can be broadcast into the stylized content images. Doing so results in an image where only the objects for each associated style are extracted. The net result is a list of images, each containing objects of a single style. The example below shows extraction of several objects from a stylized content image.

Finally, an inverse image is created. This consists of the content image and the inverse mask being broadcasted together. This results in an image where all chosen objects are absent. In essence, this is the background for our stylized objects.
An inverse image is shown below. Note that more objects are absent than the stylized objects shown above. This is because the missing objects are being stylized using a different one than the style above.

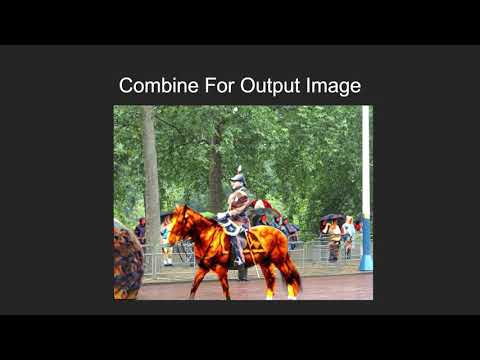
Creating the Final Image
To build a final image, each of the stylized object images must be combined along with the inverse image (background). This can be done simply by adding each object image onto the inverse image (as the shapes of each image has been preserved). In practice, each object image can be thought of as a layer and this is the process of merging each layer to have the net effect of reconstructing the final image. This results in a full image, where all pixels have been filled in, creating the true stylized image.
This is the resulting image when three different styles have been applied to all the objects within a content image. The three image files were 'fire', which was applied to the horse, 'kanagawa_great_wave', which was applied to the rider, and 'kandinsky_composition_7', which was applied to everything else.

An important note to make here is that layers must be pixel-exclusive; otherwise fringe effects are prone to occur. This may lead to some fringe effects where certain objects are discolored into a pink and green blob. Update: This problem has since been resolved by the authors. Please refer to the Limitations, Issues, and Fixes section for further reading.
Applying Light Style
Images processed in this manner tend to be vibrant with high contrast to the original image, given that the provided styles were also of an appropriate strength and intensity. While this may prove useful in certain situations, in others, it might be too overstated. As such, a light application of this program can be utilized by calling apply_light in the last few lines of the code, after the StyObj has been initialized. An example of light stylization vs normal stylization can be seen below.

Using Different Style Weights (Generalization of Light Style)
The Style Object may be initialized with a weight that takes a value between 0 and 1. 1 denotes applying the full style, whereas 0 denotes the original image.
Limitations, Issues, and Fixes
The limitation of this program can be easily identified: it stems from the capabilities of the two models it extends. The accuracy to which each object is identified is limited by the efficacy of the Detectron2 model. Similarly, the degree to which each image can be stylized depends on the fidelity of the neural style transfer architecture.
It is recommended that images of size 640 x 640 be chosen. While this program is fully capable of using higher resolution images, it becomes more and more computationally expensive. We were unable to test this limitation due to our limited hardware capabilities.
Another limitation of this program is that it does not provide a trainable model. In pursuit of greater speed and efficiency, this capability was compromised. Both the Detectron2 and neural style transfer architecture have been pre-trained on the COCO dataset.
Finally, some derivative issues arise when these models are applied in conjunction. Some portions of the resultant image might become oddly distorted. This results when two layers occupy the same space - the result of adding these two layers creates an interference that distorts the final image. This originates from the Detectron2 structure, where objects may be identified with pixels being attributed to more than a single object. This effect carries over the course of the program and results in layers which are not pixel exclusive. One solution to this could be to re-train the Detecron2 on an image. This will compromise in speed while increasing accuracy. The authors are attempting to address this issue in further edits.
Update: The issue of fringe effects was fixed in a later commit. This problem arose when layers were being added to the inverse image (the base) - several layers overlapped due to the mask overlap defined by the Detectron2. The solution was also in this final merging step. Instead of adding the pixels of each layer to the base image, pixels were only added if there was not a base pixel already present. This ensures that layers do not overlap, and the final result is a picture that preserves stylization fidelity. This solution was implemented here and not upstream so as avoid bugs with stylizing the content image.
Updates
8/1/2020: Fringe Effects issue resolved. Explanation located above.
8/3/2020: Light Stylization was added to the project. An explanation has been provided above in the demo.
8/7/2020: Different style weights added to the project.
8/8/2020: Added demo.mp4 file.
8/20/2020: Uploaded demo file to YouTube and added link to README doc.
Acknowledgements
This work could not have been done without the code provided the FaceBook AI Research Team's Detectron2 and The Tensorflow Hub Author's Neural Style Transfer. We would also like to thank the Made With ML Team for all the help they provided us, as well as a special shoutout for Goku Mohandas, who both organized the incubator and answered all of our last-minute questions. Thank you!