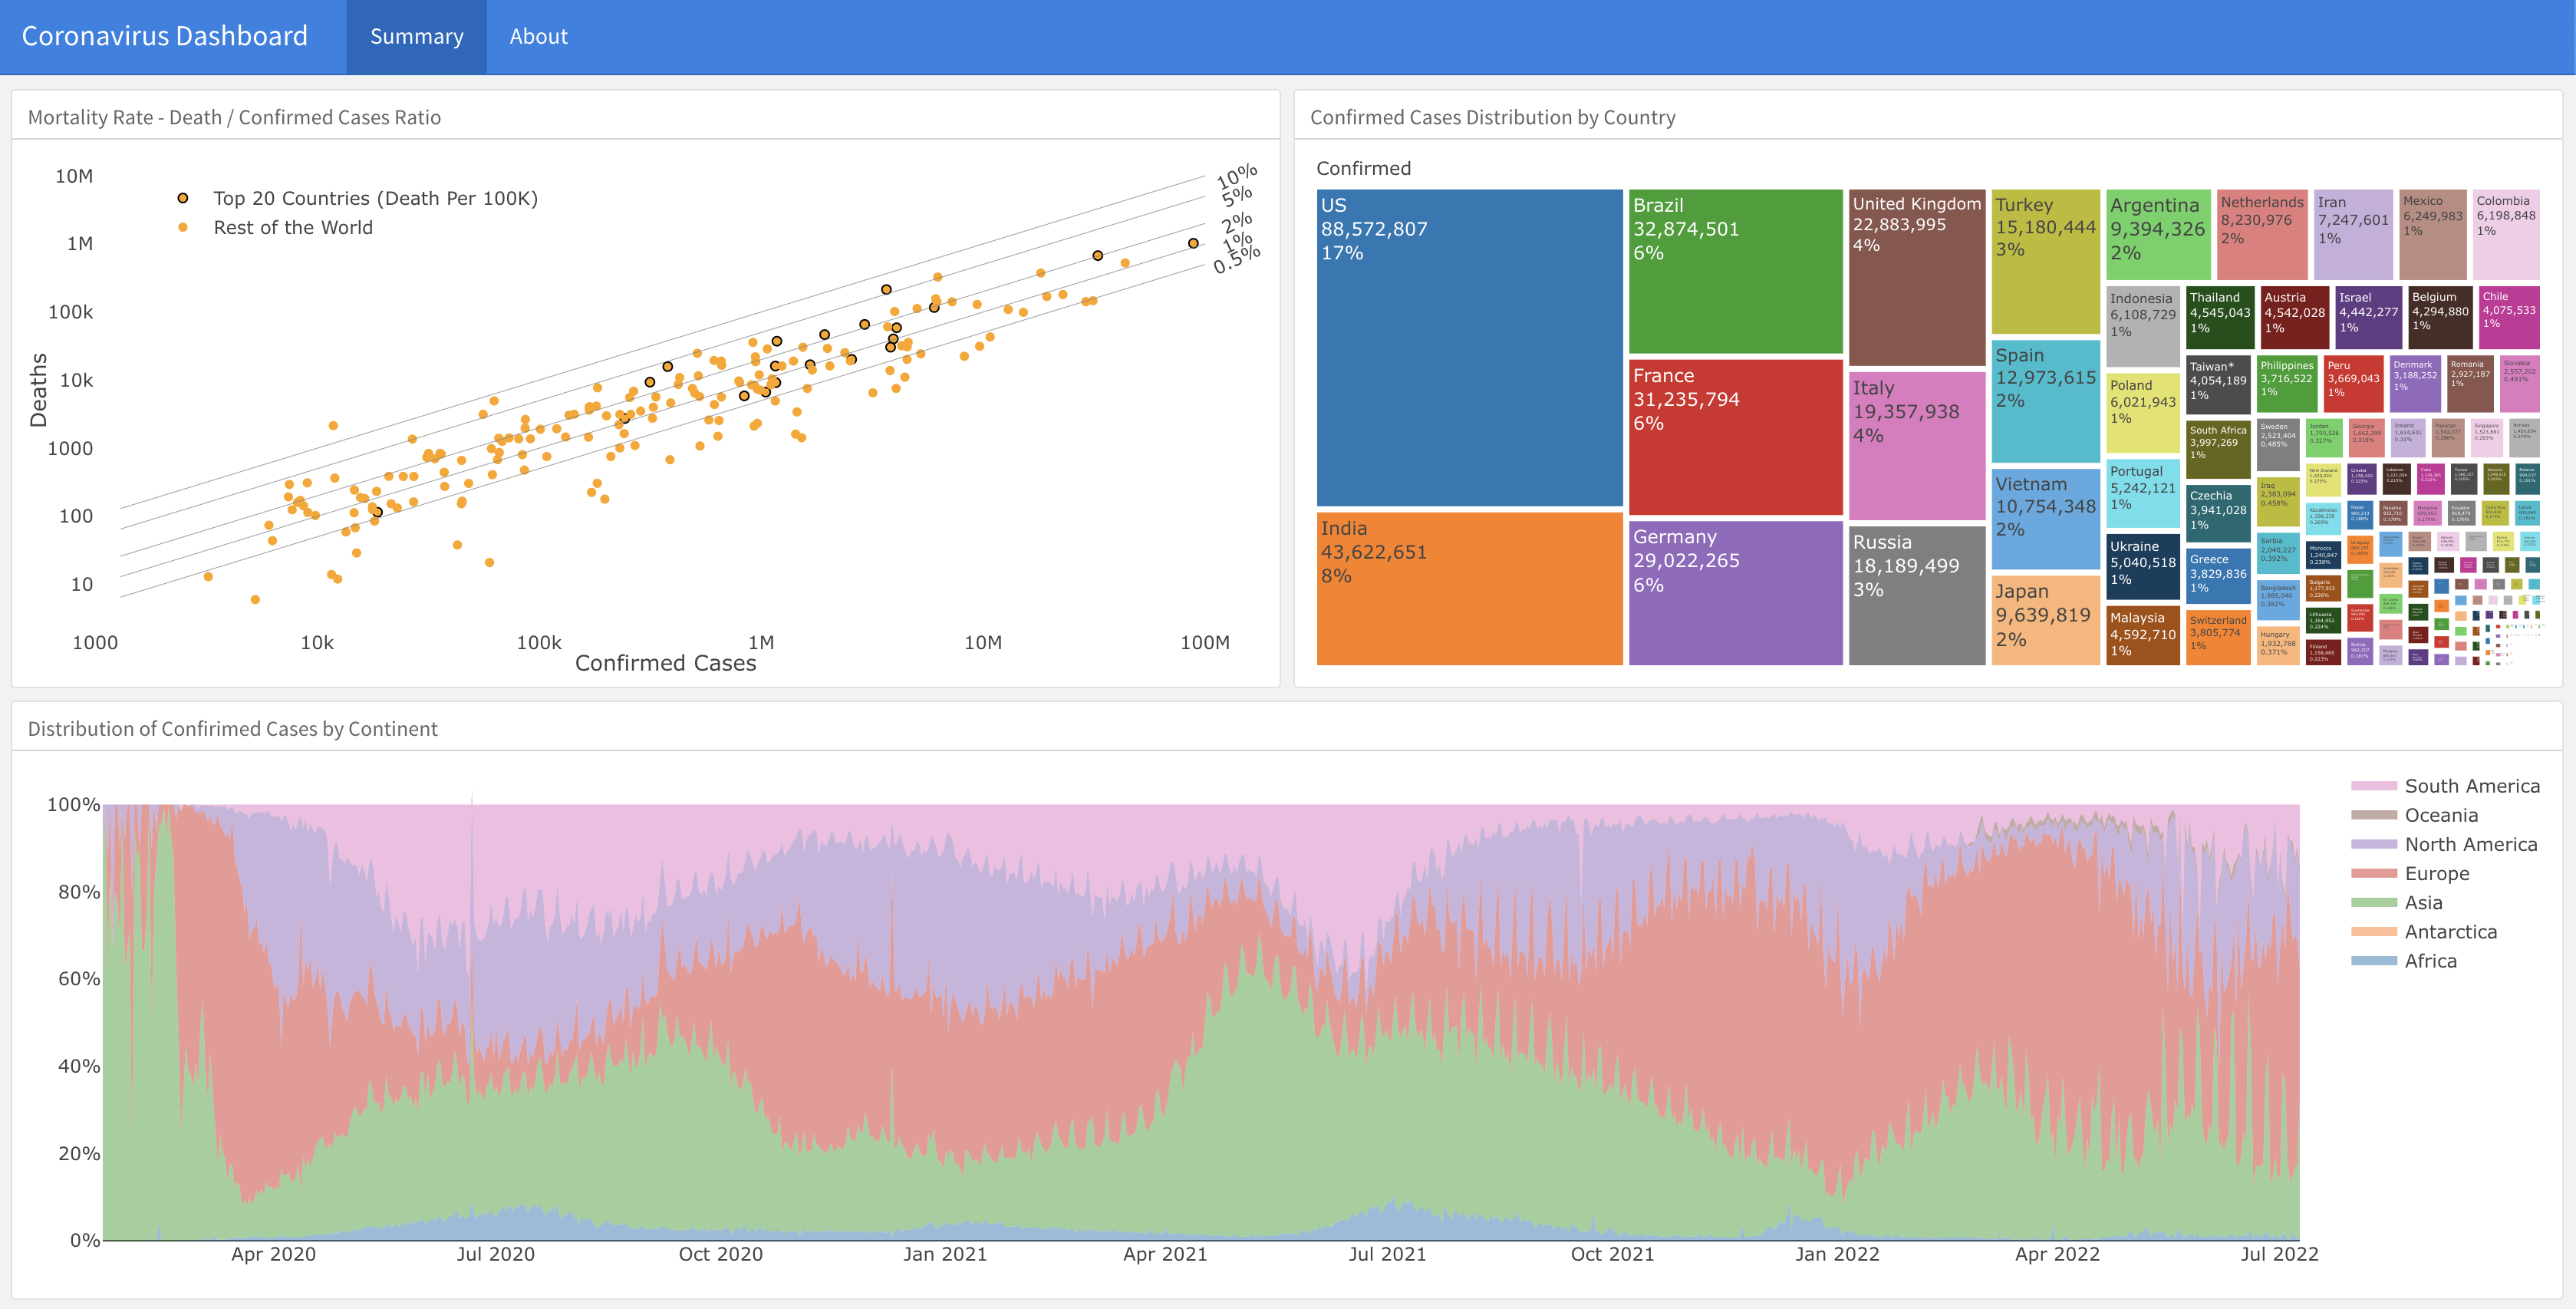
This repo provides a step-by-step guide and a template for deploying and automating a flexdashboard dashboard on Github Pages with Docker and Github Actions.
- Motivation
- Tutorial prerequisites
- Repository structure
- Workflow
- Dashboard scope
- Dashboard prototype
- Set Docker environment
- Customize the image
- Code prototype
- Dashboard development
- Deploy on Github Pages
- Testing
- Set automation with Github Actions
- Summary
- Next steps
- License
v0.1.0:
- Set docker environment ✅
- Set Github Pages workflow ✅
- Build an example dashboard ✅
- Set automation with Github Actions ✅
- Create documentations ✅
- Add prerequisites ✅
- Environment variables setting ✅
v0.2.0:
- Create a status badge
- Set version and release version
- Add VScode settings.json file
- Add Github codespace setting
As its name implies, the flexdashboard package provides a flexible framework for creating dashboards. It is part of the Rmarkdown ecosystem, and it has the following features:
- Simple
- Set the dashboard layout with the use of rows and columns format
- Customize the dashboard theme using CSS or the bslib package
- Use built-in widgets such as value boxes and gauges
- Create interactive (and serverless) dashboards leveraging R data visualization tools (e.g., Plotly, highcharter, dychart, leaflet, etc.), tables (gt, reactable, reactablefrm, kable, etc.), and htmlwidges tools such as crosstalk.
- Build dynamic dashboards with Shiny
This tutorial will focus on deploying flexdashboard to Github Pages and automating the dashboard data refresh with Github Actions and Docker. Github and Docker offer both enterprise and free tools. Throughout this tutorial, we will leverage the free versions.
Github Actions is a CI/CD tool enabling scheduling and triggering jobs (or scripts). In the context of R, here are some useful use cases:
- Package testing - Triggering R CMD Check when pushing new code (see this example)
- Data automation - Build data pipelines with Rmarkdown or pull data from APIs
- Refresh data, rerender flexdashboard and redeploy on Github Pages (see coronavirus and covid19italy packages supporting dashboards)
Docker is a CI/CD tool that enables seamless code deployment from development to production environments. By creating OS-level virtualization, it can package an application and its dependencies in a virtual container. Or in other words, the code that was developed and tested in the dev env will run with the exact same env (e.g., the same OS, compilers, packages, and other dependencies) on prod. Docker can run natively on Linux systems and with Docker Desktop (or equivalent) on macOS and Windows OS.
Docker is a great tool for automating tasks in R, in particular, when deploying R code with Github Actions (e.g., R CMD Check, Rmarkdown, Quarto, or Flexdashboard). In this tutorial, we will build a development environment and use it to build the dashboard and then leverage it to deploy it on Github Actions. There are two main IDEs for developing with Docker in R:
- RStudio server
- VScode
We will set cover how to set a development environment with the two and discuss the pros and cons of each IDE.
This tutorial was built under the assumption that no previous (or minimum) experience with Docker and Github Actions. While it covers some of the basics of Docker that will help you deploy a flexdashboard with Docker, it is not a Docker tutorial. If you wish to dive deeper into Docker and Github Actions, I highly recommend checking the following tutorials:
- Docker Tutorial for Beginners by TechWorld with Nana
- GitHub Actions Tutorial - Basic Concepts and CI/CD Pipeline with Docker by TechWorld with Nana
- Docker Tutorial for Beginners - A Full DevOps Course on How to Run Applications in Containers by Moonshot (via freeCodeCamp)
- Docker Tutorial for Beginners by Amigoscode
Those tutorials focus on a general introduction to Docker. I also recommend watching the Docker for R users tutorial by Rahul Sangole and myself, from the useR! 2022 conference.
To run this tutorial, you will need the following requirements:
- Install Docker Desktop
- Have a Docker Hub account
- Have a Github account
- Set environment variables
- Either RStudio Desktop (preferred) or VScode IDE
To install Docker Desktop, go to the Docker Desktop website and follow the installation instructions based on your OS.
Note: Different OS (i.e., Linux, Mac, Windows) may have different system requirements. The requirements information by OS are available on the Docker Desktop documentation under the install section.
The Docker Hub is the "Github" of container images. It enables you to store your container images and pull and use other users' containers. To register and create an account go to https://hub.docker.com and follow the registration instructions.
After installing Docker Desktop and setting account on Docker Hub, open Docker Desktop, and from the command line, login to Docker Hub:
docker loginFor the login, you will have to enter your user name and password, and should expect the following output if the login was successful:
Login with your Docker ID to push and pull images from Docker Hub. If you don't have a Docker ID, head over to https://hub.docker.com to create one.
Username: rkrispin
Password:
Login Succeeded

Logging in with your password grants your terminal complete access to your account.
For better security, log in with a limited-privilege personal access token. Learn more at https://docs.docker.com/go/access-tokens/
Note: Docker Hub is completely public (at the free tier). Any image you push and store there will be available for all other users. NEVER store credentials, passwords, or any other sensitive information on your Docker images.
It is a good practice to use in a project like this environment variables. It will enable us to seamlessly adjust the project to the user setting (e.g., user local folders and RStudio settings) without changing the project core code. We will use in this tutorial the following environment variables:
FLEX_IMAGE- The development image name, if you are using the tutorial image it should be set asrkrispin/flex_dash_env:dev.0.0.0.9000. Otherwise, set it to the one you plan to useTUTORIAL_WORKING_DIR- The path for the tutorial folder (e.g., the cloned repository). This variable will be used to bind your Docker container with your local machine. This will be mainly relevant if you are using the RStudio server as your working IDERSTUDIO_CONFIG_PATH- The path for the local RStudio config folder. Typically it would be your home directory +.config/rstudio. This variable will be used to mirror your local RStudio settings (color theme, code snippets, panel settings, etc.) to the Rstudio server on the container.
Below is the list of the tutorial repository main folders:
.
├── .devcontainer
├── .github
├── .vscode
├── bash
├── data
├── dev
├── diagrams
├── docker
├── docs
└── images
In brief, the uses of the above folders:
- The
.devcontainerfolder contains the VScode Docker settings, and the.vscodecontains the workspace (project folder) settings - We will use the
.githubfolder to set the Github Actions workflows - The
bashfolder will be used to store bash scripts that will be used on the Github Actions workflow - We will use the
datafolder to store any data objects required for the dashboard - Throughout the development process, we will use the
devfolder for prototype the dashboard data visualizations - We will store and draw.ai diagrams we will create for this tutorial
- The
dockerfolder contains all the Docker image settings files (e.g.,Dockerfileand some helper files) - The
docsfolder will be used to store the rendered dashboard files - All the images in the README file will be stored in the
imagefolder
Most of it, I hope, will make more sense as you progress in the tutorial stages.
A typical workflow will include the following steps
- Scope - define the project requirements and derive dependencies
- Prototype - transform the scope into a sketch
- Dockerize - set initial development environment
- Develop - build the dashboard functionality and data visualization
- Deploy - push the dashboard to Github Pages
- Automate - build the dashboard refresh with Github Actions
Typically, you may update the Docker image throughout the development process if additional requirements (or dependencies) beyond the scope will be needed.
Create a worldwide COVID19 tracker which will include:
- Distribution of confirmed cases by continent
- Cases distribution by country:
- Confirmed
- Death
Expected dependencies:
- Dashboard - flexdashboard
- Data - coronavirus
- Data visualization - highcharter
- Utility - dplyr, tidyr, lubridate
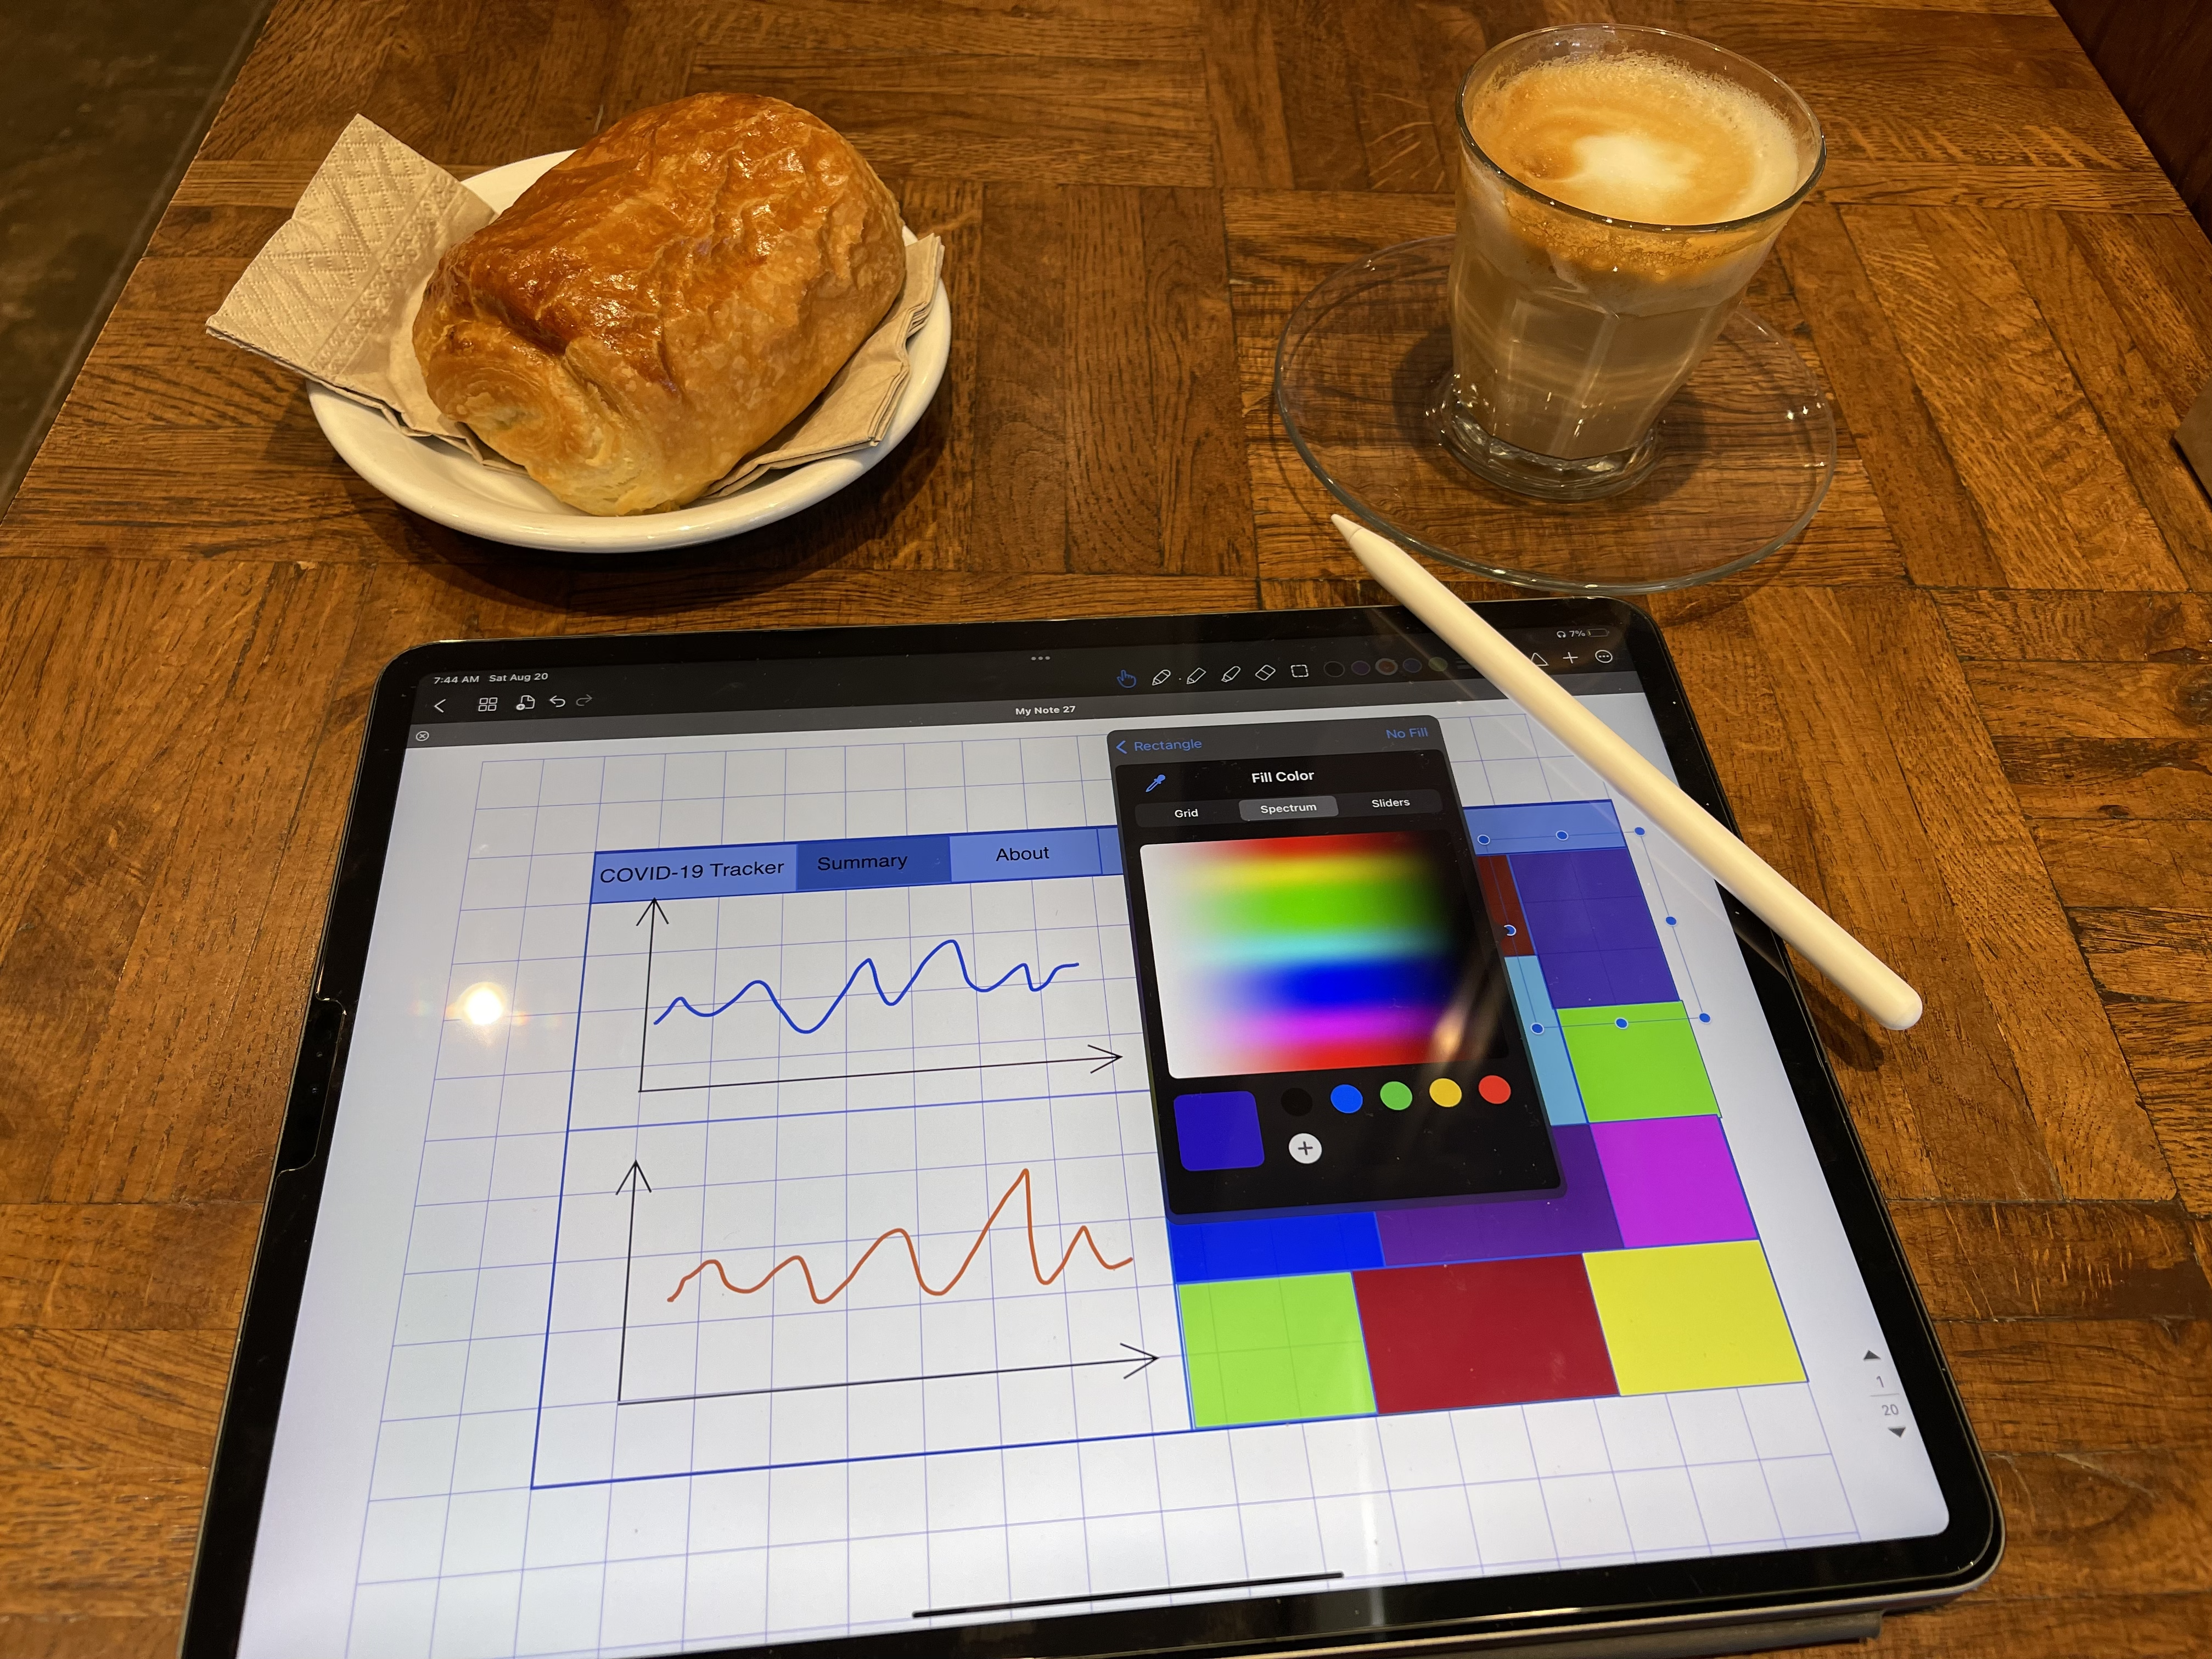
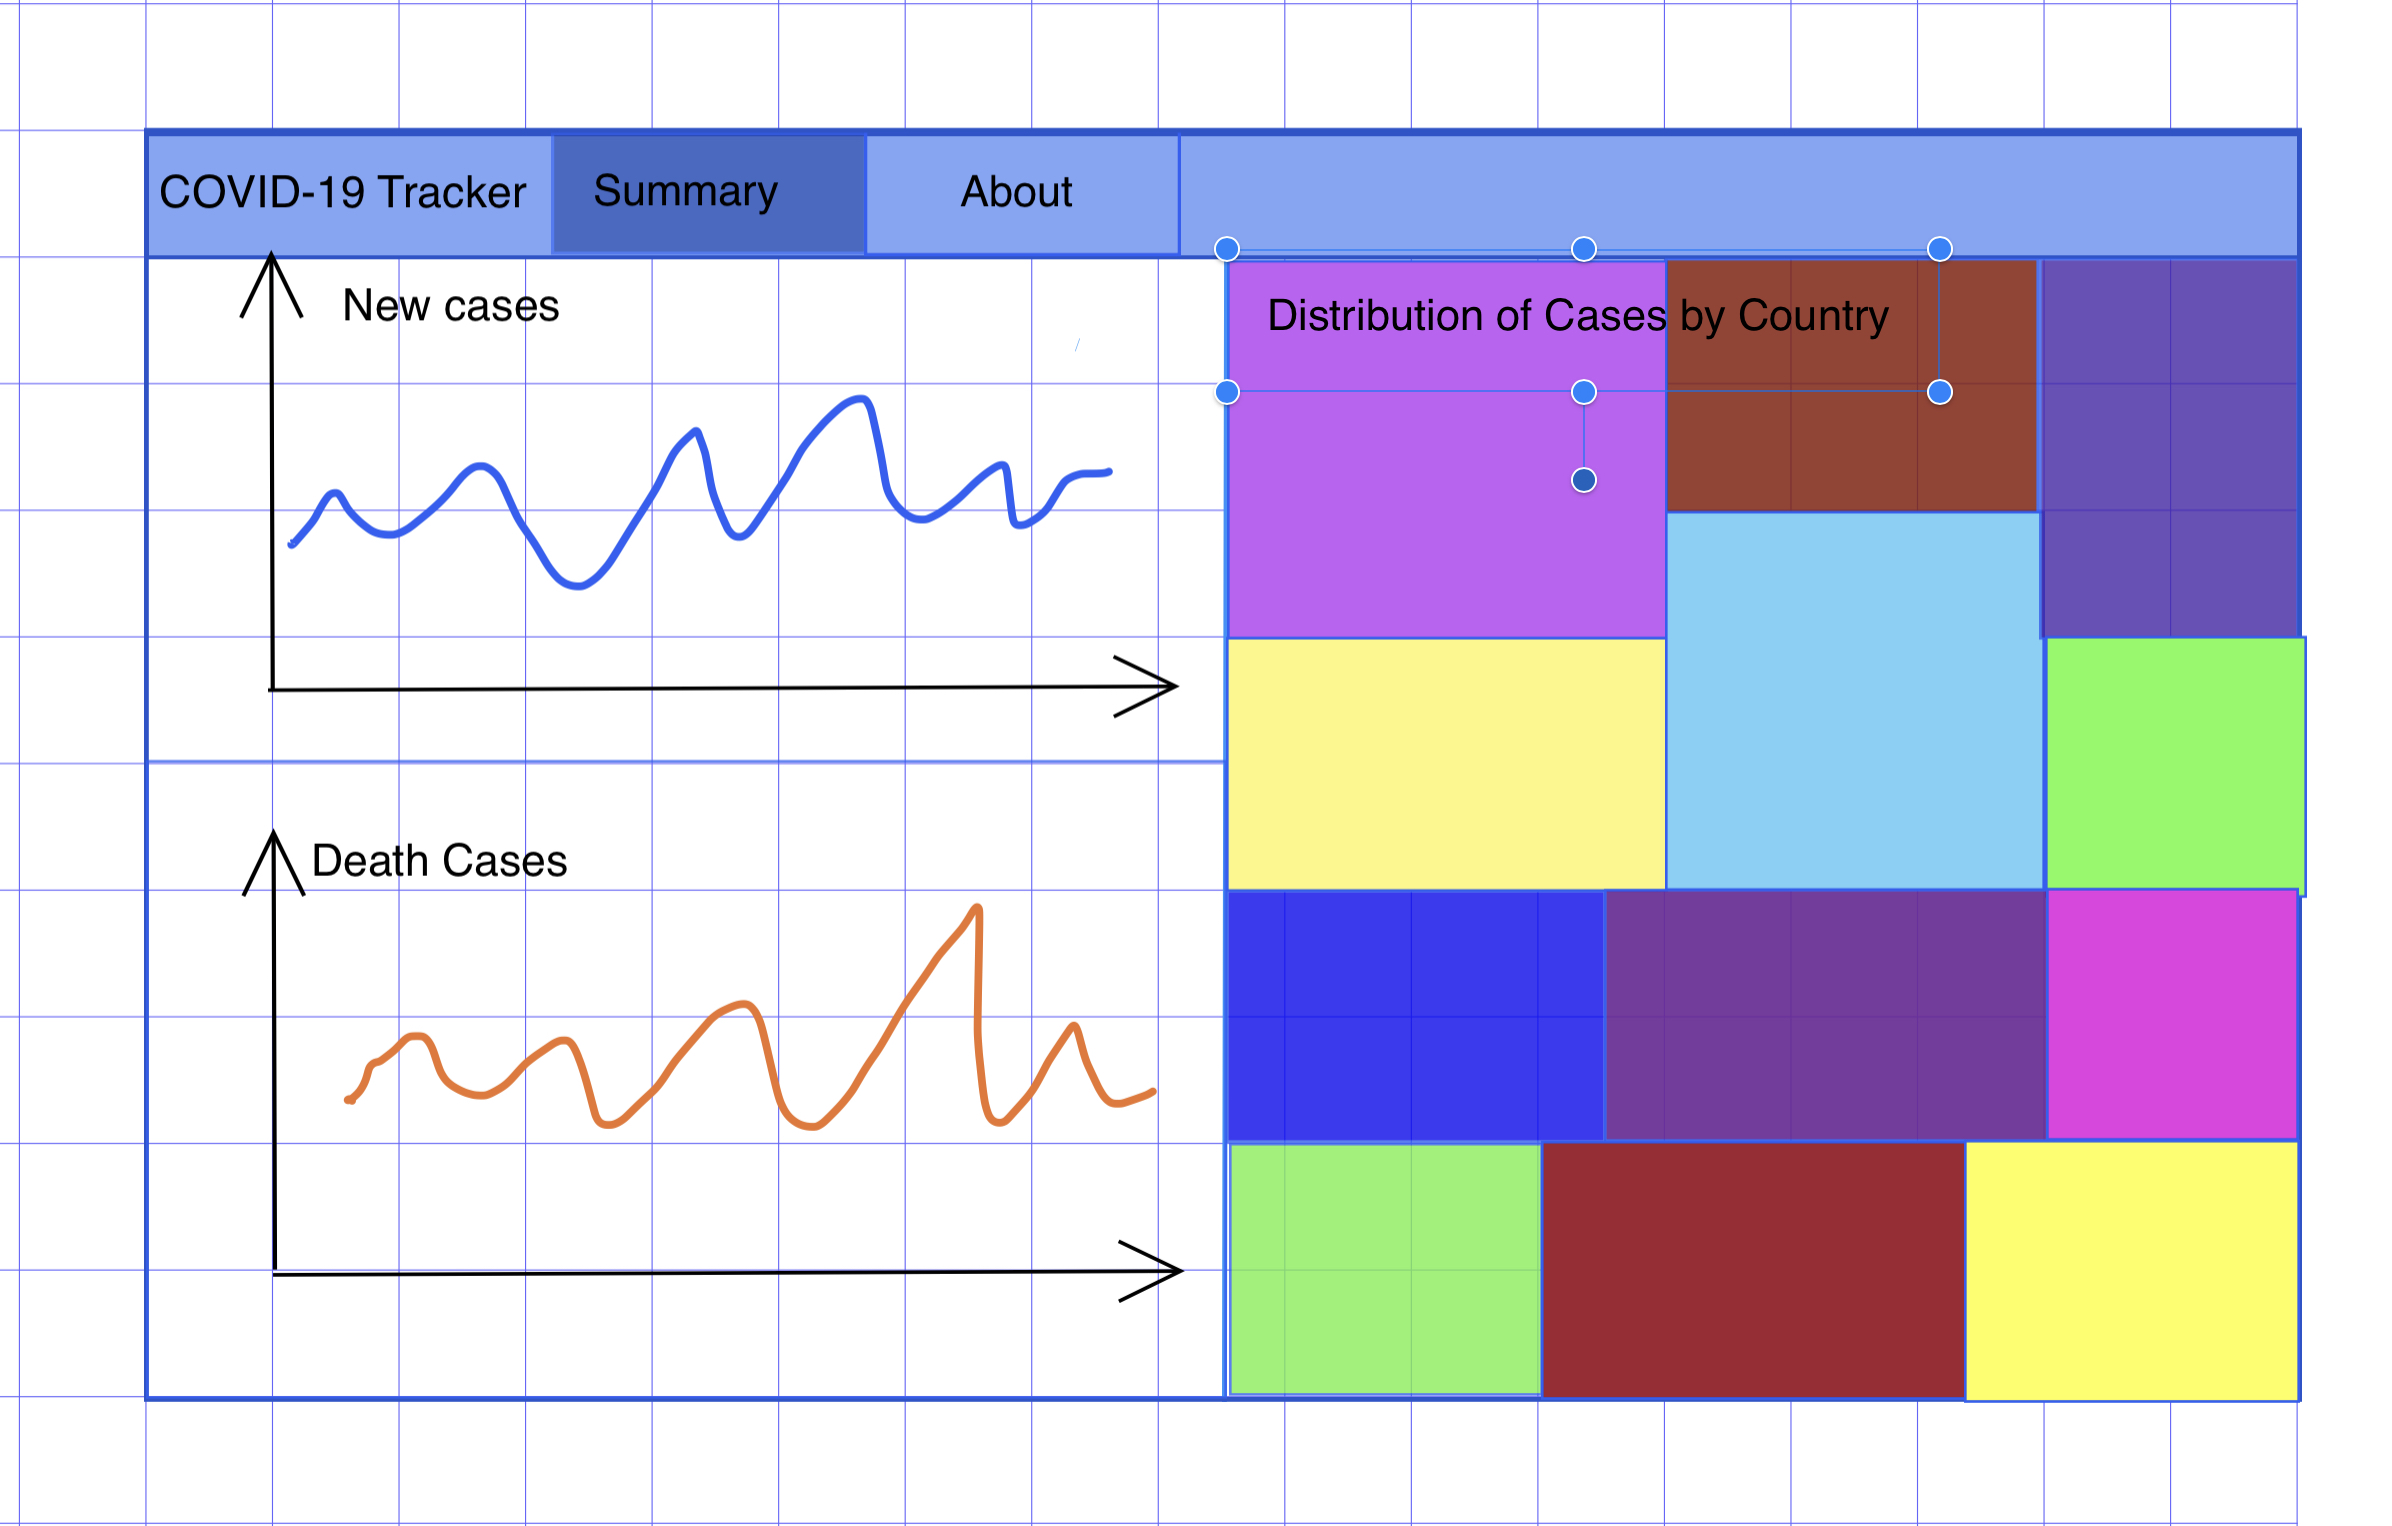
After setting a clear scope, I found that it is useful to prototype and put your thoughts on a piece of paper, drow.io, iPad, or any other tool you find useful. The goal is to translate the scope into some sketches to understand the data inputs, required transformation, type of visualization, etc. In addition, a narrow scope with a good prototype will potentially save you some time and cycles when starting to code the dashboard. That being said, you should stay open-minded to changes in the final output, as what may look nice on the sketch may turn out less appealing on the final output.
As the focus of this tutorial is on the deployment itself and not on the data visualization, we will keep the dashboard simple and create the following three plots:
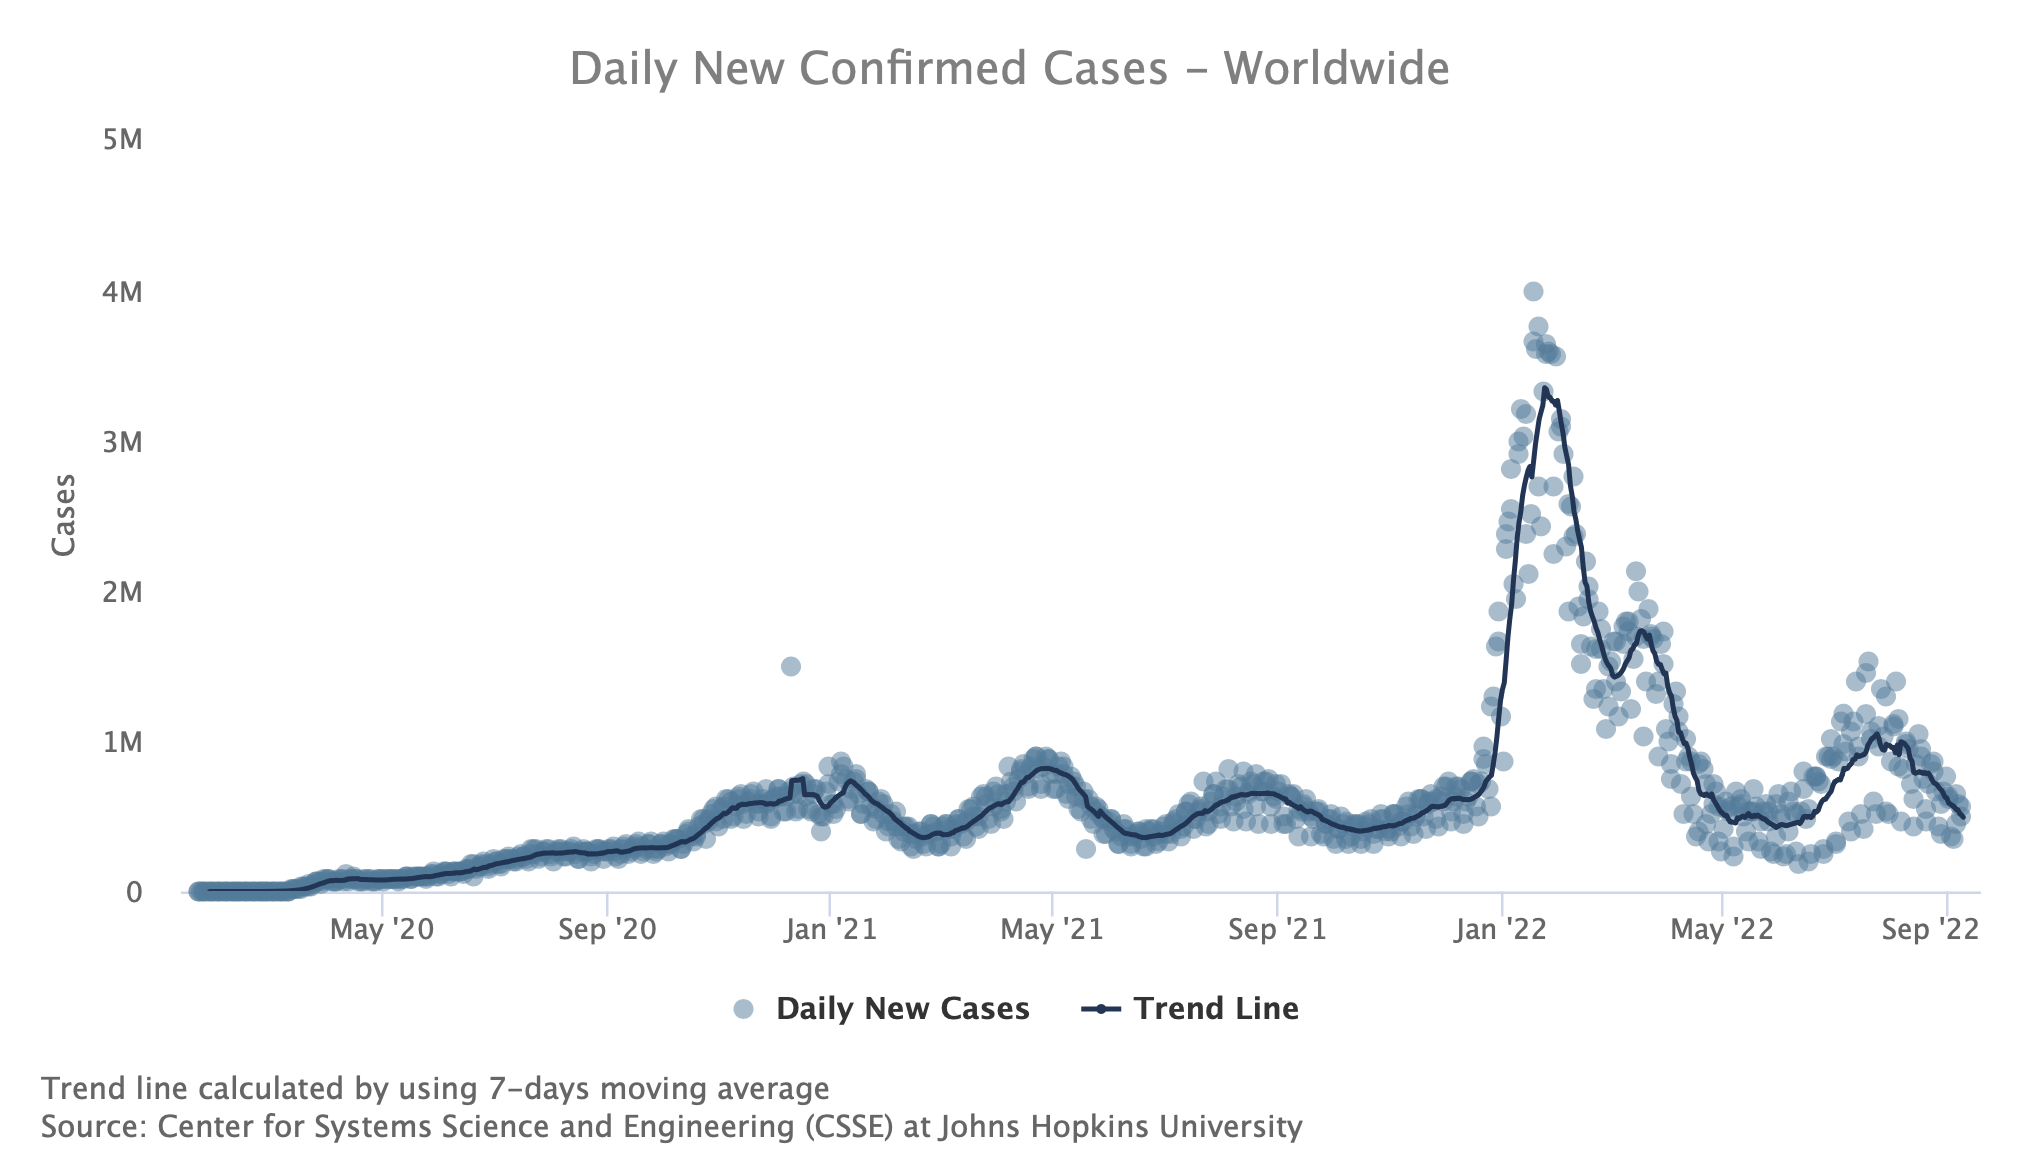
- Daily new cases (either by continent or worldwide), using scatter plot with trend line
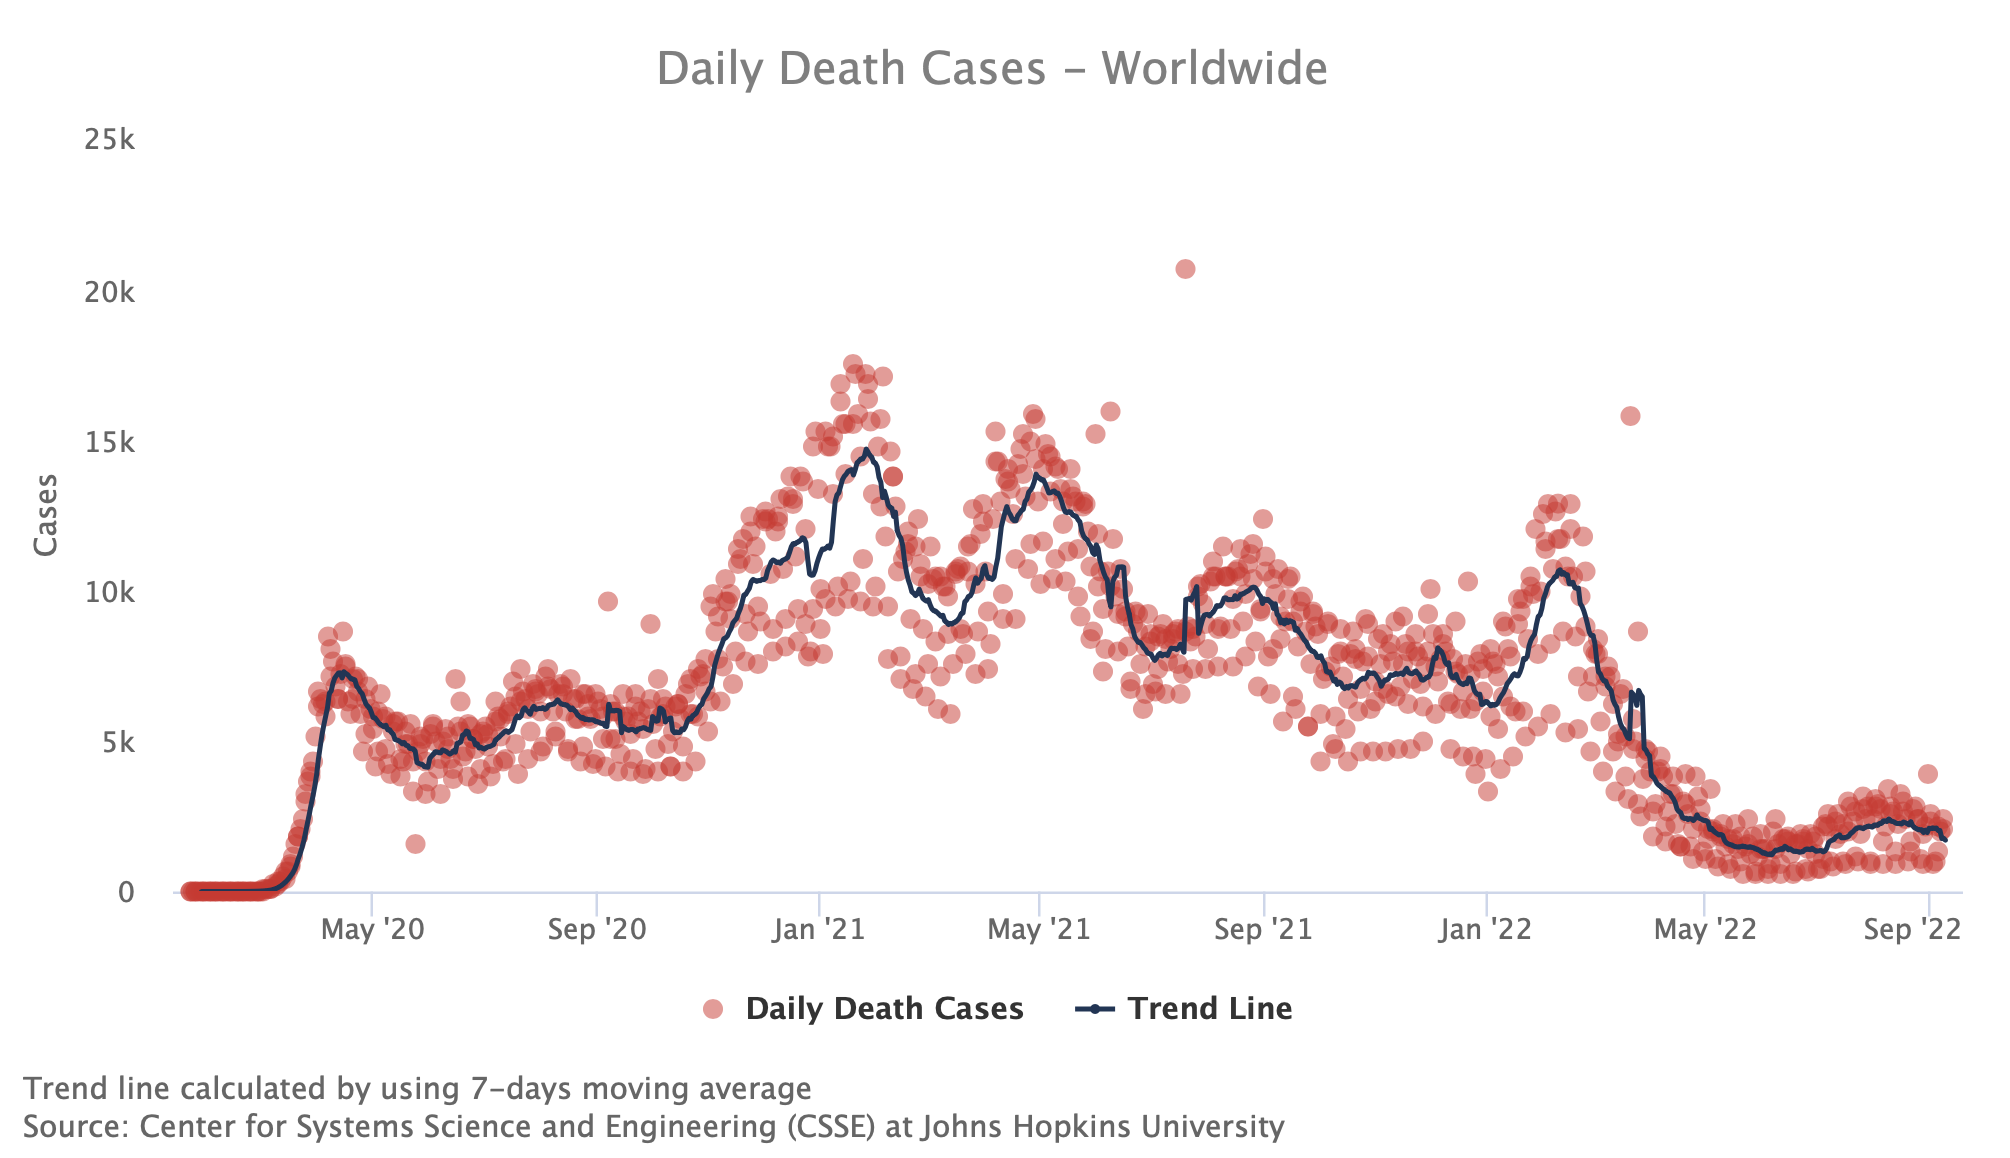
- Daily death cases (either by continent or worldwide), using scatter plot with trend line
- Distribution of cases by country using treemap plot
We will leverage the highcharter package to create those plots.
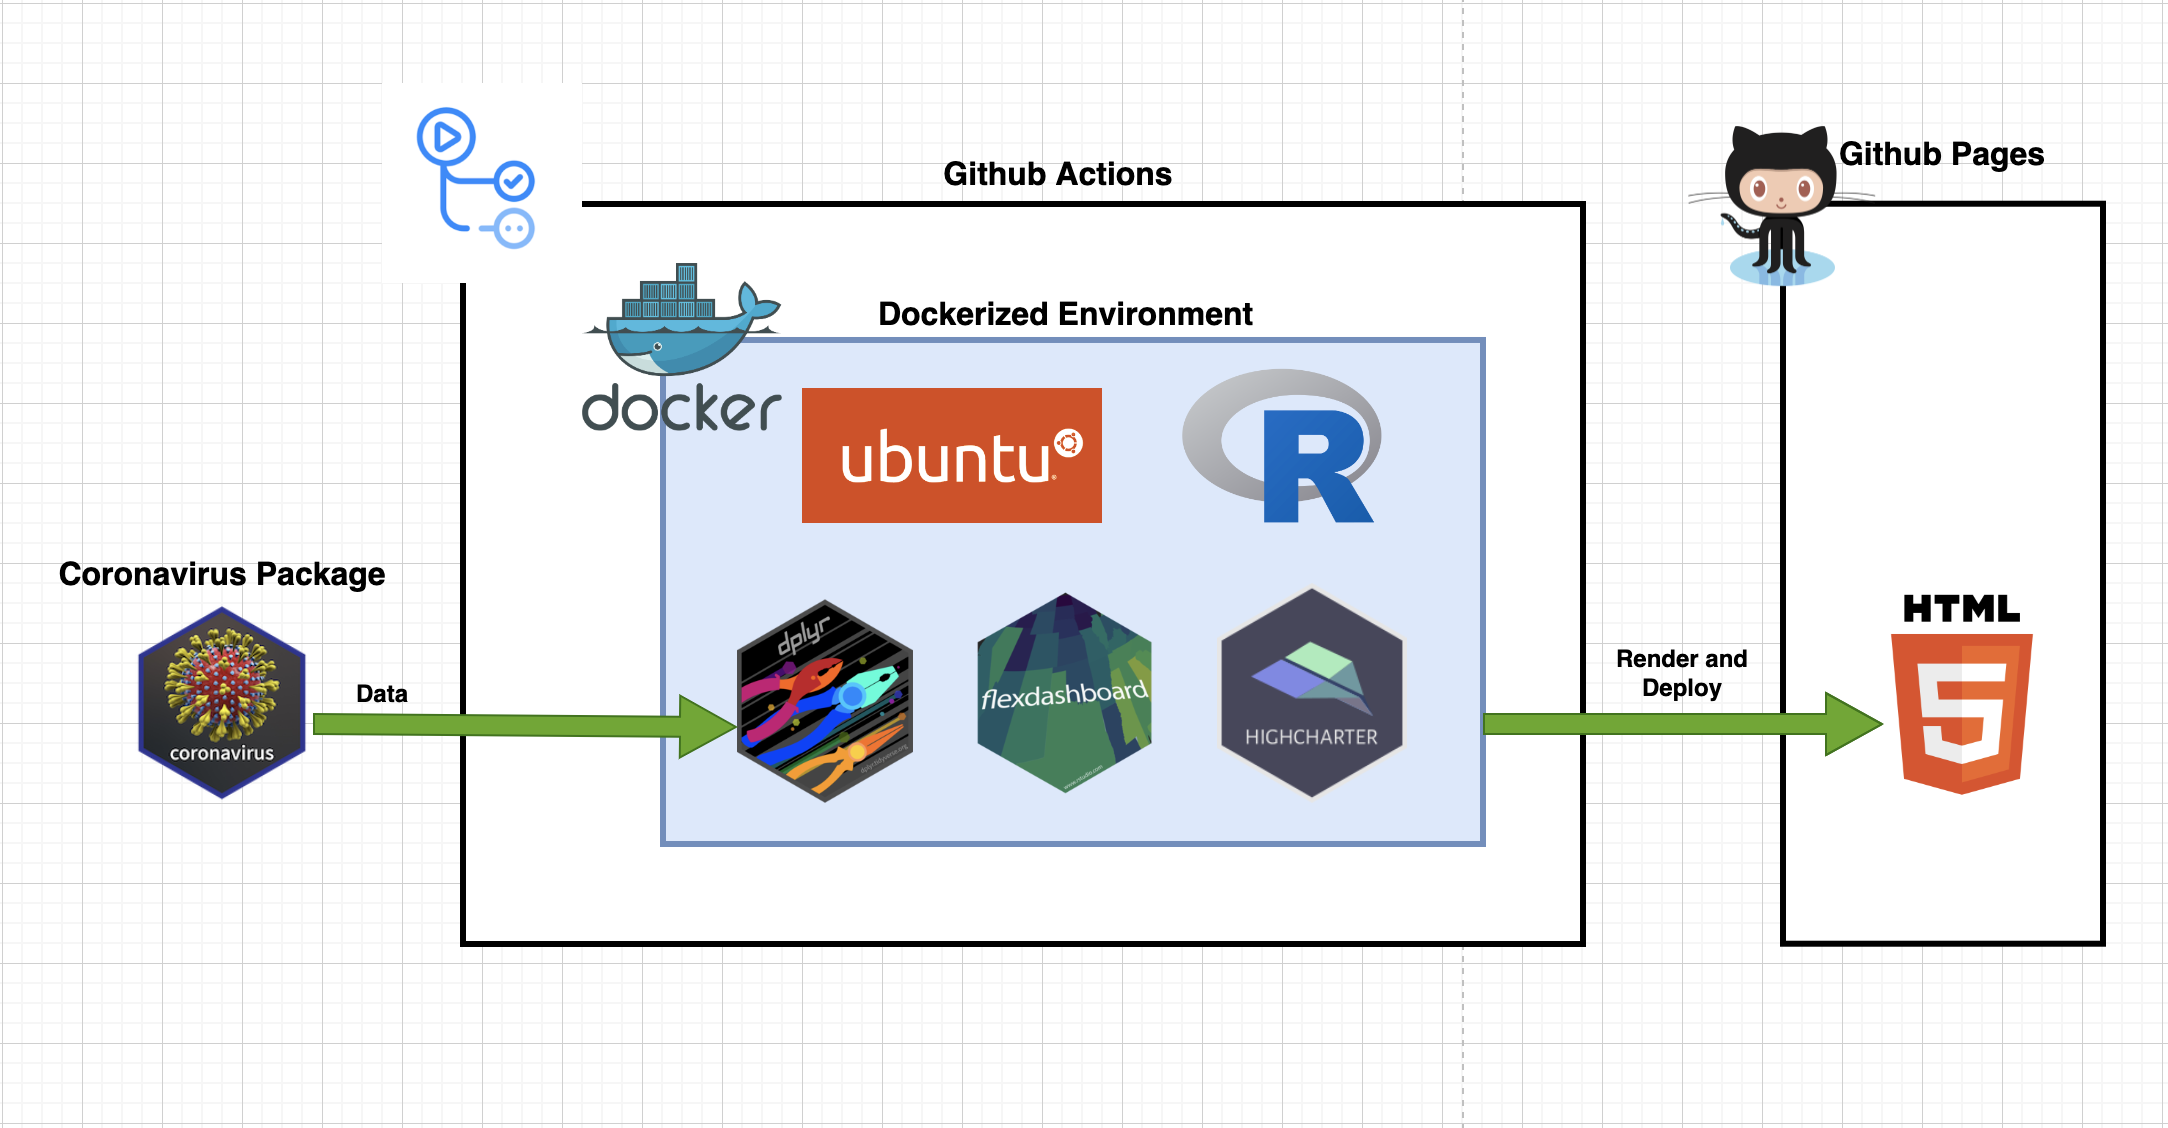
Once we have defined the scope and have a simple prototype, we better understand the dashboard requirements (e.g., data, packages, etc.), and we can start thinking about the dashboard's general architect. The below diagram describes the general workflow we will use to create the dashboard:
- Data source - coronavirus package
- Orchestration - Github Actions
- Environment - Docker
- Deployment - Github Pages
Besides having Docker Desktop, the main requirement for building a Docker image is a Dockerfile file. The Dockerfile contains a list of instructions for the docker build command about how to construct the image. There are multiple approaches for setting up a Docker environment with the Dockerfile. My approach is minimizing the Dockerfile length by using utility files and automating the process using bash scrips. This makes the Dockerfile cleaner, yielding a smaller image size with fewer layers. Below is the tree of the docker folder in this tutorial:
.
├── Dockerfile
├── build_docker.sh
├── install_packages.R
├── install_python.R
├── install_quarto.sh
└── packages.json
This includes the following four files:
Dockerfile- the image manifest provides a set of instructions for the docker engine about how to build the imagebuild_docker.sh- a bash script to automate the build of the image and push to Docker Hubinstall_packages.R- an R script that installs the dependencies of the project as set in thepackages.jsonfileinstall_packages.R- an R script that installs the Python dependencies of the project as set in thepackages.jsonfileinstall_quarto.sh- a Bash script that installs Quartopackages.json- a JSON file with a list of the project packages and their version
Before diving into more details, let's review the Dockerfile.
The Dockerfile provides a set of instructions for the docker engine about how to build the image. You can think about it as the image's recipe. It has its own unique and intuitive syntax following this structure:
COMMAND some instructionsDocker can build images automatically by reading the instructions from a Dockerfile. In this tutorial, we will use the following Dockerfile:
# Pulling Rocker image with RStudio and R version 4.2
FROM rocker/rstudio:4.2

# Setting environment variables
ARG CONDA_ENV=flex_dashboard
ENV CONDA_ENV=$CONDA_ENV

ARG PYTHON_VER=3.8
ENV PYTHON_VER=$PYTHON_VER

ARG QUARTO_VERSION=1.1.149
ENV QUARTO_VERSION=$QUARTO_VERSION

# Disabling the authentication step
ENV USER="rstudio"
CMD ["/usr/lib/rstudio-server/bin/rserver", "--server-daemonize", "0", "--auth-none", "1"]

# Install jq to parse json files
RUN apt-get update && apt-get install -y --no-install-recommends \
    jq \
    libxml2-dev \
    zlib1g \
    g++-11 \
    libz-dev \
    freetype2-demos \
    libpng-dev \
    libtiff-dev \
    libjpeg-dev \
    make \
    fontconfig \
    libfribidi-dev \
    libharfbuzz-dev \
    libfontconfig1-dev \
    git \
    vim \
    && rm -rf /var/lib/apt/lists/*

# installing R packages
RUN mkdir packages
COPY install_packages.R packages/
COPY install_python.R packages/
COPY packages.json packages/
RUN Rscript packages/install_packages.R

# Installing Quarto
COPY install_quarto.sh packages/
RUN  bash packages/install_quarto.sh $QUARTO_VERSION


# Install miniconda
RUN sudo apt update && apt-get install -y --no-install-recommends \
    software-properties-common \
    && sudo add-apt-repository -y ppa:deadsnakes/ppa \
    && sudo apt update

RUN wget --quiet https://repo.anaconda.com/miniconda/Miniconda3-latest-Linux-x86_64.sh -O ~/miniconda.sh \
    && /bin/bash ~/miniconda.sh -b -p /opt/conda \
    && export PATH=/opt/conda/bin:$PATH \
    && conda init bash \
    && conda install conda-build

# Set environment
RUN . /root/.bashrc \
    && conda create -y --name $CONDA_ENV python=$PYTHON_VER

RUN echo "conda activate $CONDA_ENV" >> ~/.bashrc
RUN Rscript packages/install_python.R

# Add Rprofile with VScode settings
COPY .Rprofile ~/

EXPOSE 8787
The above Dockerfile has the following components:
-
Base image - We will use the rocker/rstudio:4.2` image as the base image for this project. This image contains R version 4.2.0 and the RStudio server installed and will be used as the development environment.
-
Setting arguments and environment variables - We will use the
ARGargument to set the build arguments and theENVargument to set the environment variables. The main distinction between theARGand theENVarguments:- The
ARGargument enables the user to assign variables dynamically during the build time. - The
ENVargument enables to set of environment variables that are available both during the build and run time (as opposed toARGs variables that are available only during the build time). - One way to set dynamic environment variables is to set them first as arguments and then assign them to environment variables. Not sure if this is the best practice, but it is a convenience to have some of the arguments available after the build time, mainly for debugging.
To run R in VScode, we will use radian, an alternative R console with multiline editing and rich syntax highlight. Radian is Python-based, therefore, we will set Conda to set a Python environment. The
CONDA_ENVandPYTHON_VERwill be used to set the Conda environment and its version. In addition, we will use theQUARTO_VERSIONargument to set the Quarto version. - The
-
Disabling the authentication - By default, the RStudio server requires a user name and password. We will use the
ENVcommand to define the environment variableUSERand set it asrstudioand theCMDcommand to disable the authentication step. -
Installing Dependencies - Generally, rocker images will have most of the Debian packages, C/C++ compliers, and other dependencies. However, often you may need to install additional requirements based on the packages you add to the image. In our case, we will use the
RUNcommand to install jq, a command line tool for parsingJSONfiles, and the libxml2 Debian package that is required to install the lubridate package. -
Installing the R packages - To install additional R packages, we will make a new directory inside the image called
packagesand copy theinstall_packages.Randpackages.jsonfiles that will be used to install the required R packages. -
Install Quarto - We will use the
install_quarto.shbash script to install Quarto. We will use theQUARTO_VERSIONargument to set the version (1.1.149). -
Set Python Environment - We will set the Python environment with Conda and then install radian. This step requires if you are planning to develop with VScode (or down the road when flexdashboard will be available for Python, Julia, and Observable with Quatro)
-
Rprofile - we will copy the
.Rprofilefile with the VScode settings to the image -
Expose port - Last but not least, we will use the
EXPOSEcommand to expose port 8787 (default) for the RStudio server (as set on the base docker).
We will define all required packages and their versions on the packages.json file:
{
    "packages": [
        {
            "package": "cpp11",
            "version":"0.4.2"
        },
        {
            "package": "flexdashboard",
            "version":"0.5.2"
        },
        {
            "package": "dplyr",
            "version":"1.0.9"
        },
        {
            "package": "tidyr",
            "version":"1.2.0"
        },
        {
            "package": "highcharter",
            "version":"0.9.4"
        },
        {
            "package": "readr",
            "version":"2.1.2"
        },
        {
            "package": "coronavirus",
            "version":"0.3.32"
        },
        {
            "package": "lubridate",
            "version":"1.8.0"
        },
        {
            "package": "languageserver",
            "version":"0.3.13"
        },
        {
            "package": "httpgd",
            "version":"1.3.0"
        },
        {
            "package": "markdown",
            "version":"1.1"
        },
        {
            "package": "viridis",
            "version":"0.6.2"
        }


    ],
    "debug_mode": [
        {
            "package": "ragg",
            "version":"1.2.2"
        }
    ],
    "python_packages": [
        {
            "package": "radian",
            "version": "0.6.3"
        }
    ]
}
Note that the JSON file has three sections:
packages- Defines the R packages to install from CRAN (or CRAN archive)debug- used when some packages "refused" to get installed and enables a quick debugging mode to track the error (or identify which Debian packages are missing...)python_packages- defines the Python packages to install on the conda environment
To build the Docker image, we will use build_docker.sh file, which builds and pushes the image to Docker Hub:
#!/bin/bash

echo "Build the docker"

docker build . --progress=plain \
               --build-arg QUARTO_VERSION=1.1.149 \
               --build-arg CONDA_ENV=flex_dashboard \
               --build-arg PYTHON_VER=3.8 \
               -t rkrispin/flex_dash_env:dev.0.0.0.9000

if [[ $? = 0 ]] ; then
echo "Pushing docker..."
docker push rkrispin/flex_dash_env:dev.0.0.0.9000
else
echo "Docker build failed"
fi
This bash script simply builds the docker and tags it as rkrispin/flex_dash_env:dev.0.0.0.9000, and then, if the build was successful, push it to Docker Hub. As you can see on the docker build command, we are using the --build-arg argument to define the Dockerfile arguments. To execute this script from the command line:
bash build_docker.shWe will review two approaches to setting a development environment using:
- RStudio server
- VScode
Of the two, when working with flaxdashboard, RStudio is the preferred choice. There are some advantages to developing with VScode, mainly when working in a dockerized environment and multiple languages. On the other hand, it is less suitable to work with Rmarkdown documents such as flexdashboard.
There are multiple methods to spin a docker image into a running container. Before going to the robust method using the docker-compose, let's review the basic method with the run command:
docker run -d -p 8787:8787 rkrispin/flex_dash_env:dev.0.0.0.9000The docker run command (or run in short) enables you to launch a container. In the above example, we used the following arguments:
-d(or detach mode) to run the container in the background and-pargument maps between the container and the local machine ports, where the right to the:symbol represents the port that is exposed on the container, and the one on the left represents the port on the local machine. In the above example, we mapped port 8787 on the docker to port 8787 on the local machine
We close the run command with the name of the image we want to launch.
Note: If you got the following error, check if your Docker desktop is open:
docker: Cannot connect to the Docker daemon at unix:///var/run/docker.sock. Is the docker daemon running?.
See 'docker run --help'.
If the image is unavailable locally, it will try to pull it from the default hub (make sure you logged in, it might take a few minutes to download it). If the image was successfully launched, it should return the container ID, for example:
ac26ec61e71bc570a2ed769ba2b0dbef964d536f7d7cc51b61ea3e8542953cb1You can use the docker ps command to check if the image is running:
docker ps

CONTAINER ID   IMAGE                                   COMMAND                  CREATED         STATUS         PORTS                    NAMES
ac26ec61e71b   rkrispin/flex_dash_env:dev.0.0.0.9000   "/usr/lib/rstudio-se…"   4 minutes ago   Up 4 minutes   0.0.0.0:8787->8787/tcp   sweet_elion
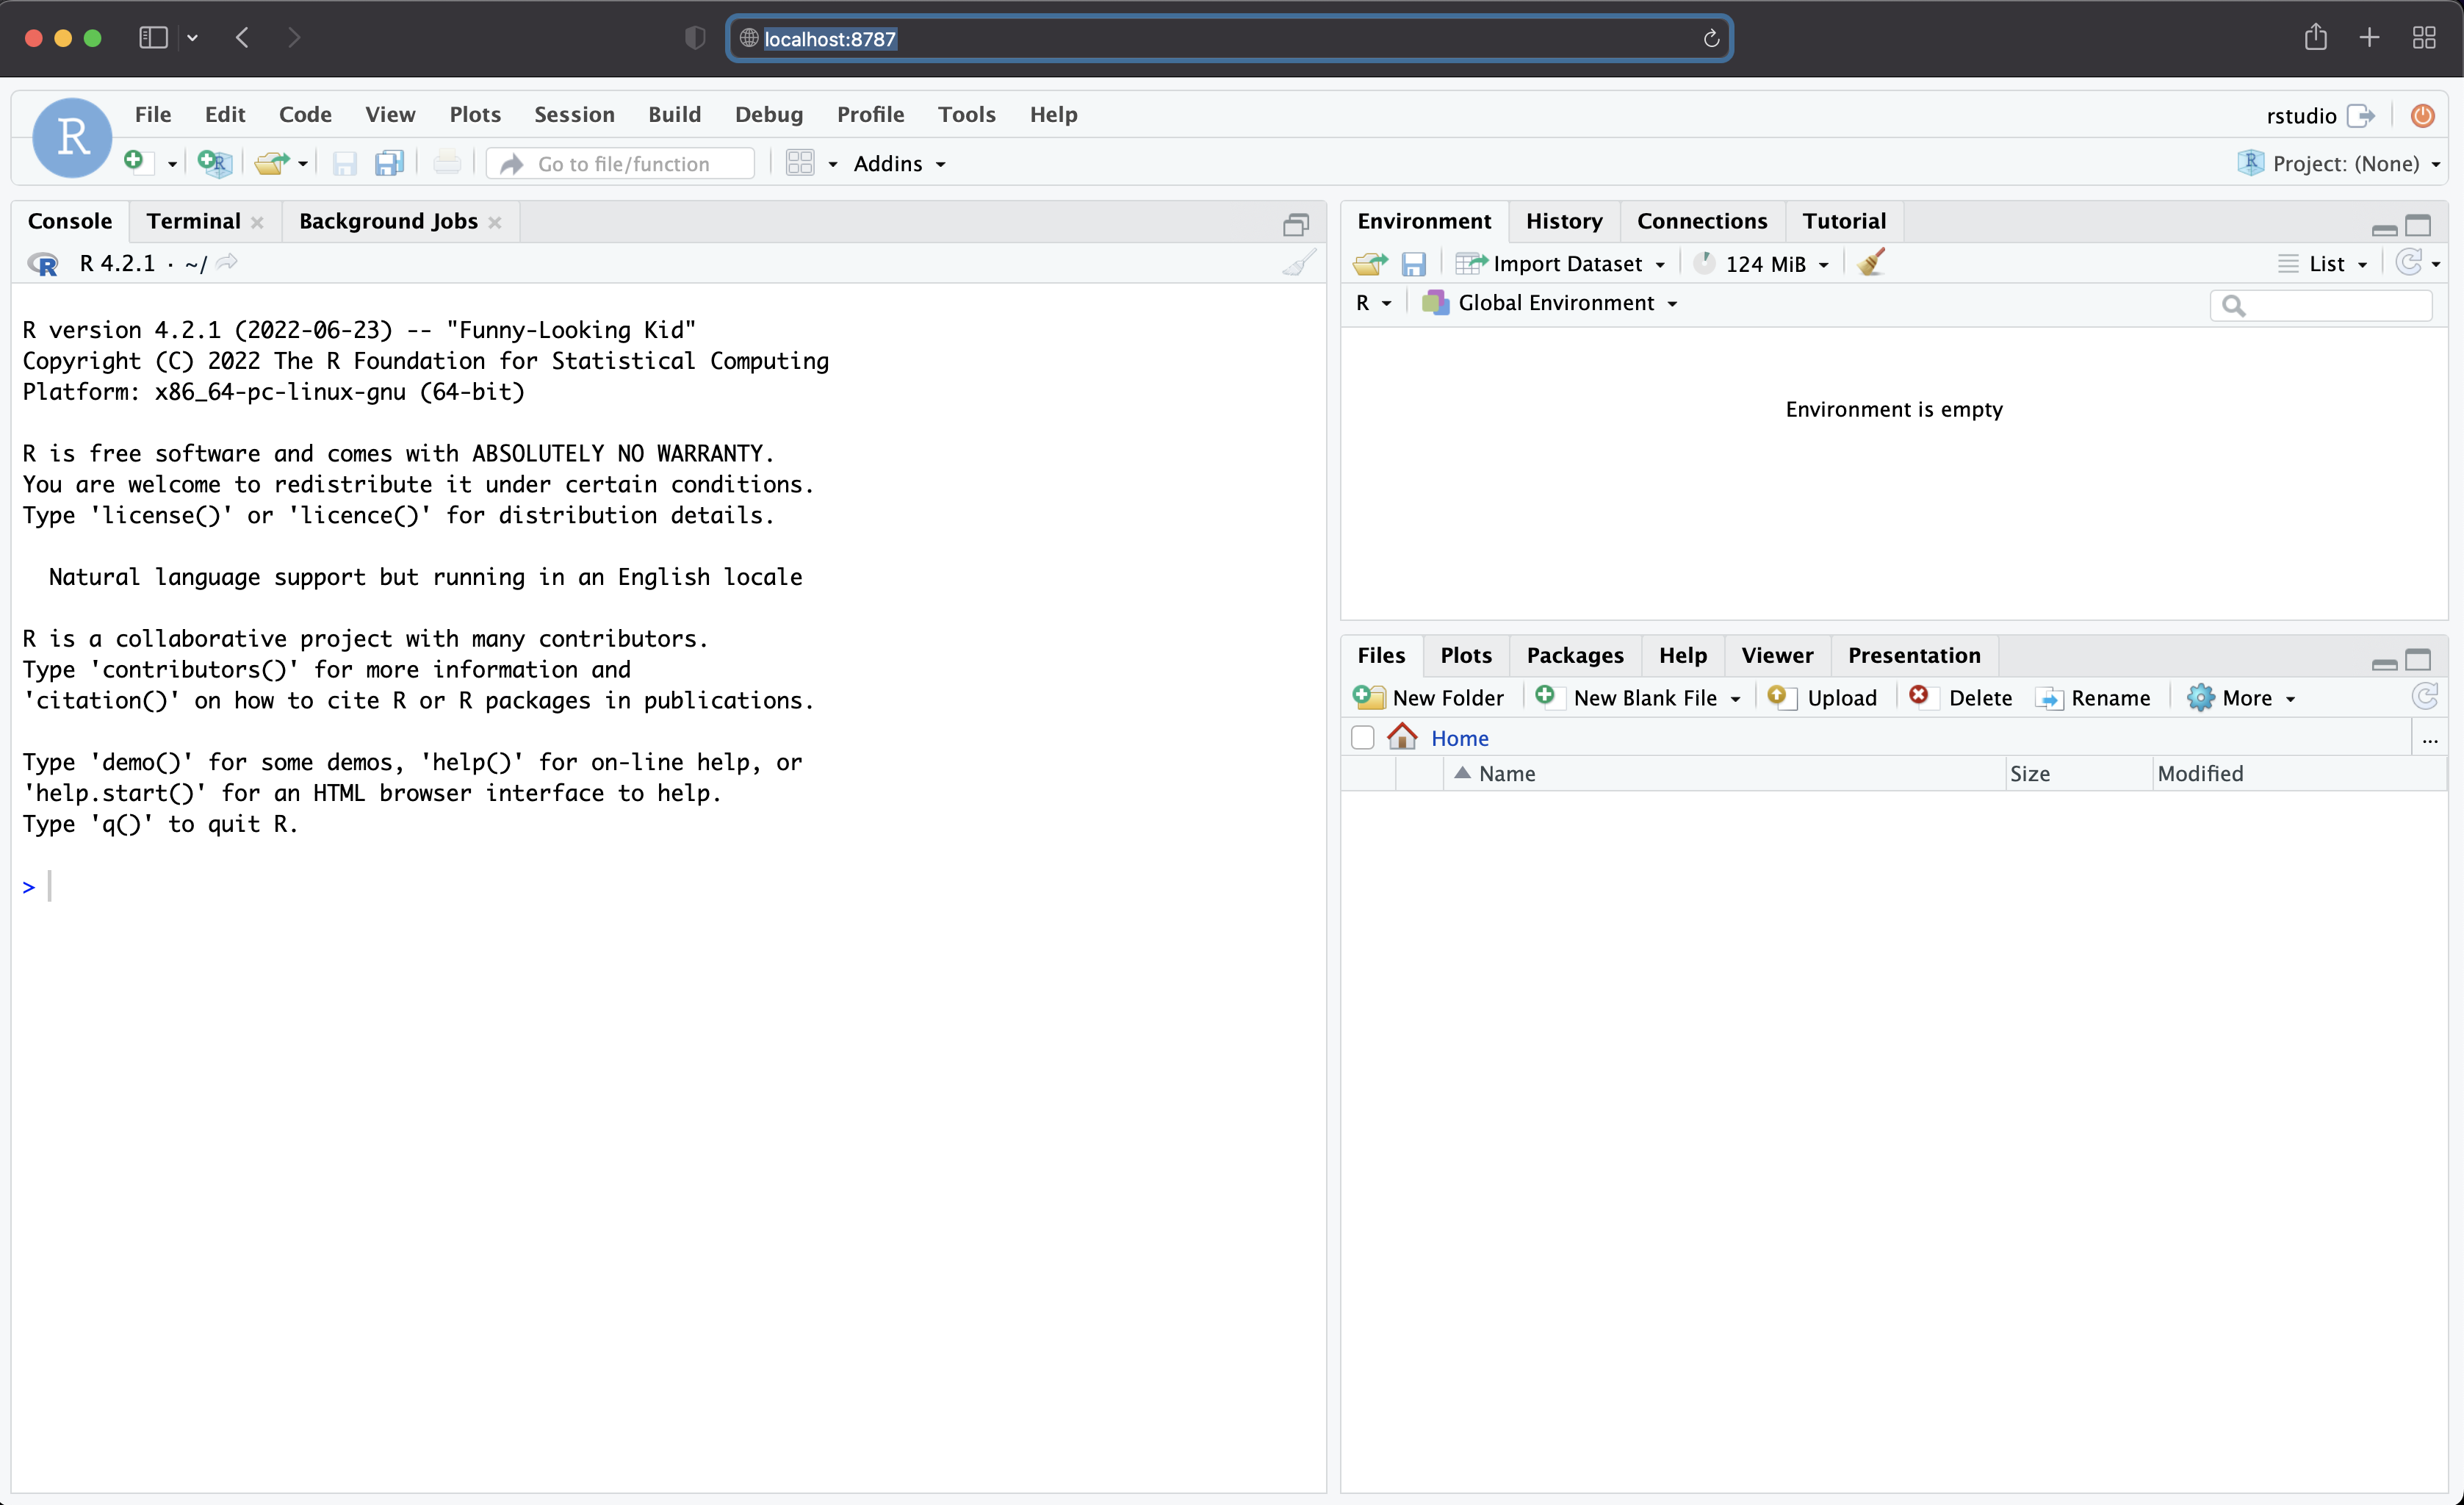
Now you can go to your browser and use http://localhost:8787 to access the Rstudio server from the browser:
Does it sufficient to start developing our dashboard? The answer is NO!
We have a functional environment, yet we are still missing a couple of elements to make this container fully functional as a development environment. For example, although we can access the container from the browser, it is still an isolated environment as we can't save or commit changes in the code. Let's add the -v argument to mount a local volume with the container. This will enable you to work inside the container and read and write data from your local machine. If the container is already running, use the docker kill (yes, not the best wording for a command...), followed by the container ID (see the docker ps output for the container ID) to stop the running containers:
docker kill ac26ec61e71bLet's repeat the previous command and add the -v argument to mount the container to your local folder:
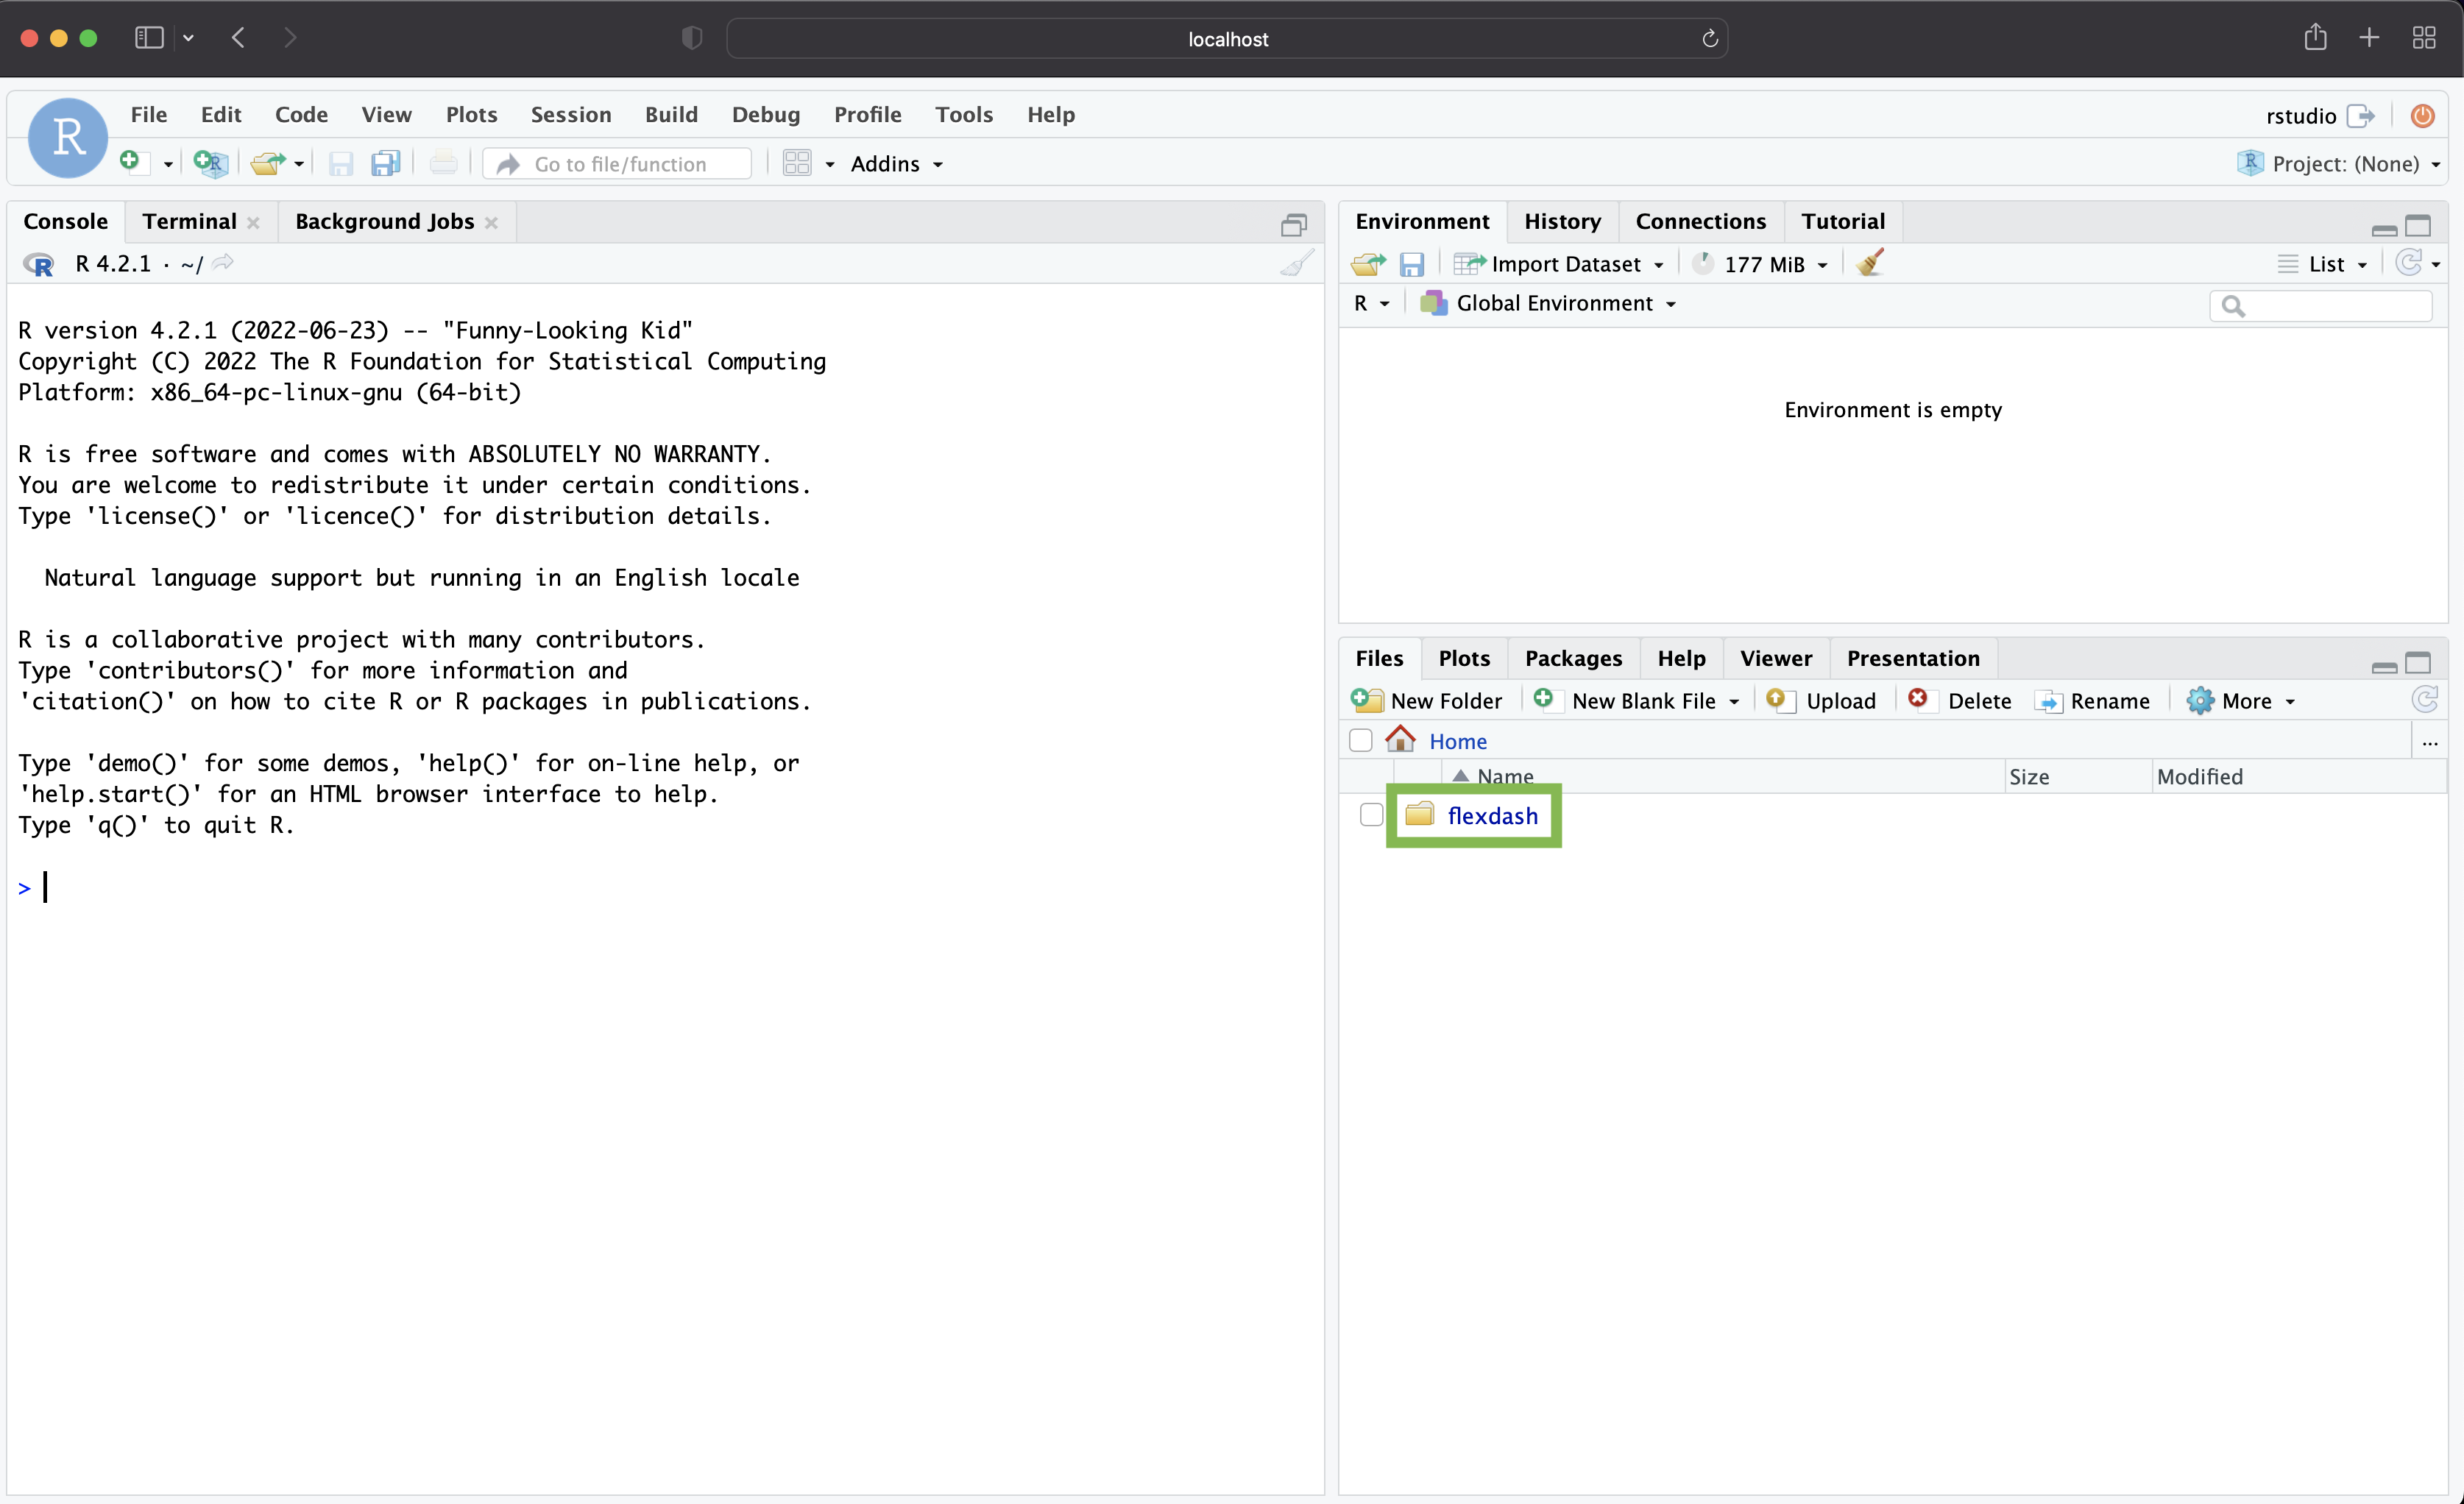
docker run -d -p 8787:8787 -v $TUTORIAL_WORKING_DIR:/home/rstudio/flexdash rkrispin/flex_dash_env:dev.0.0.0.9000You can see now, after binding the local folder to the docker with the -v argument, the flexdash folder (marked with a green rectangle on the next screenshot) is now available inside the container:
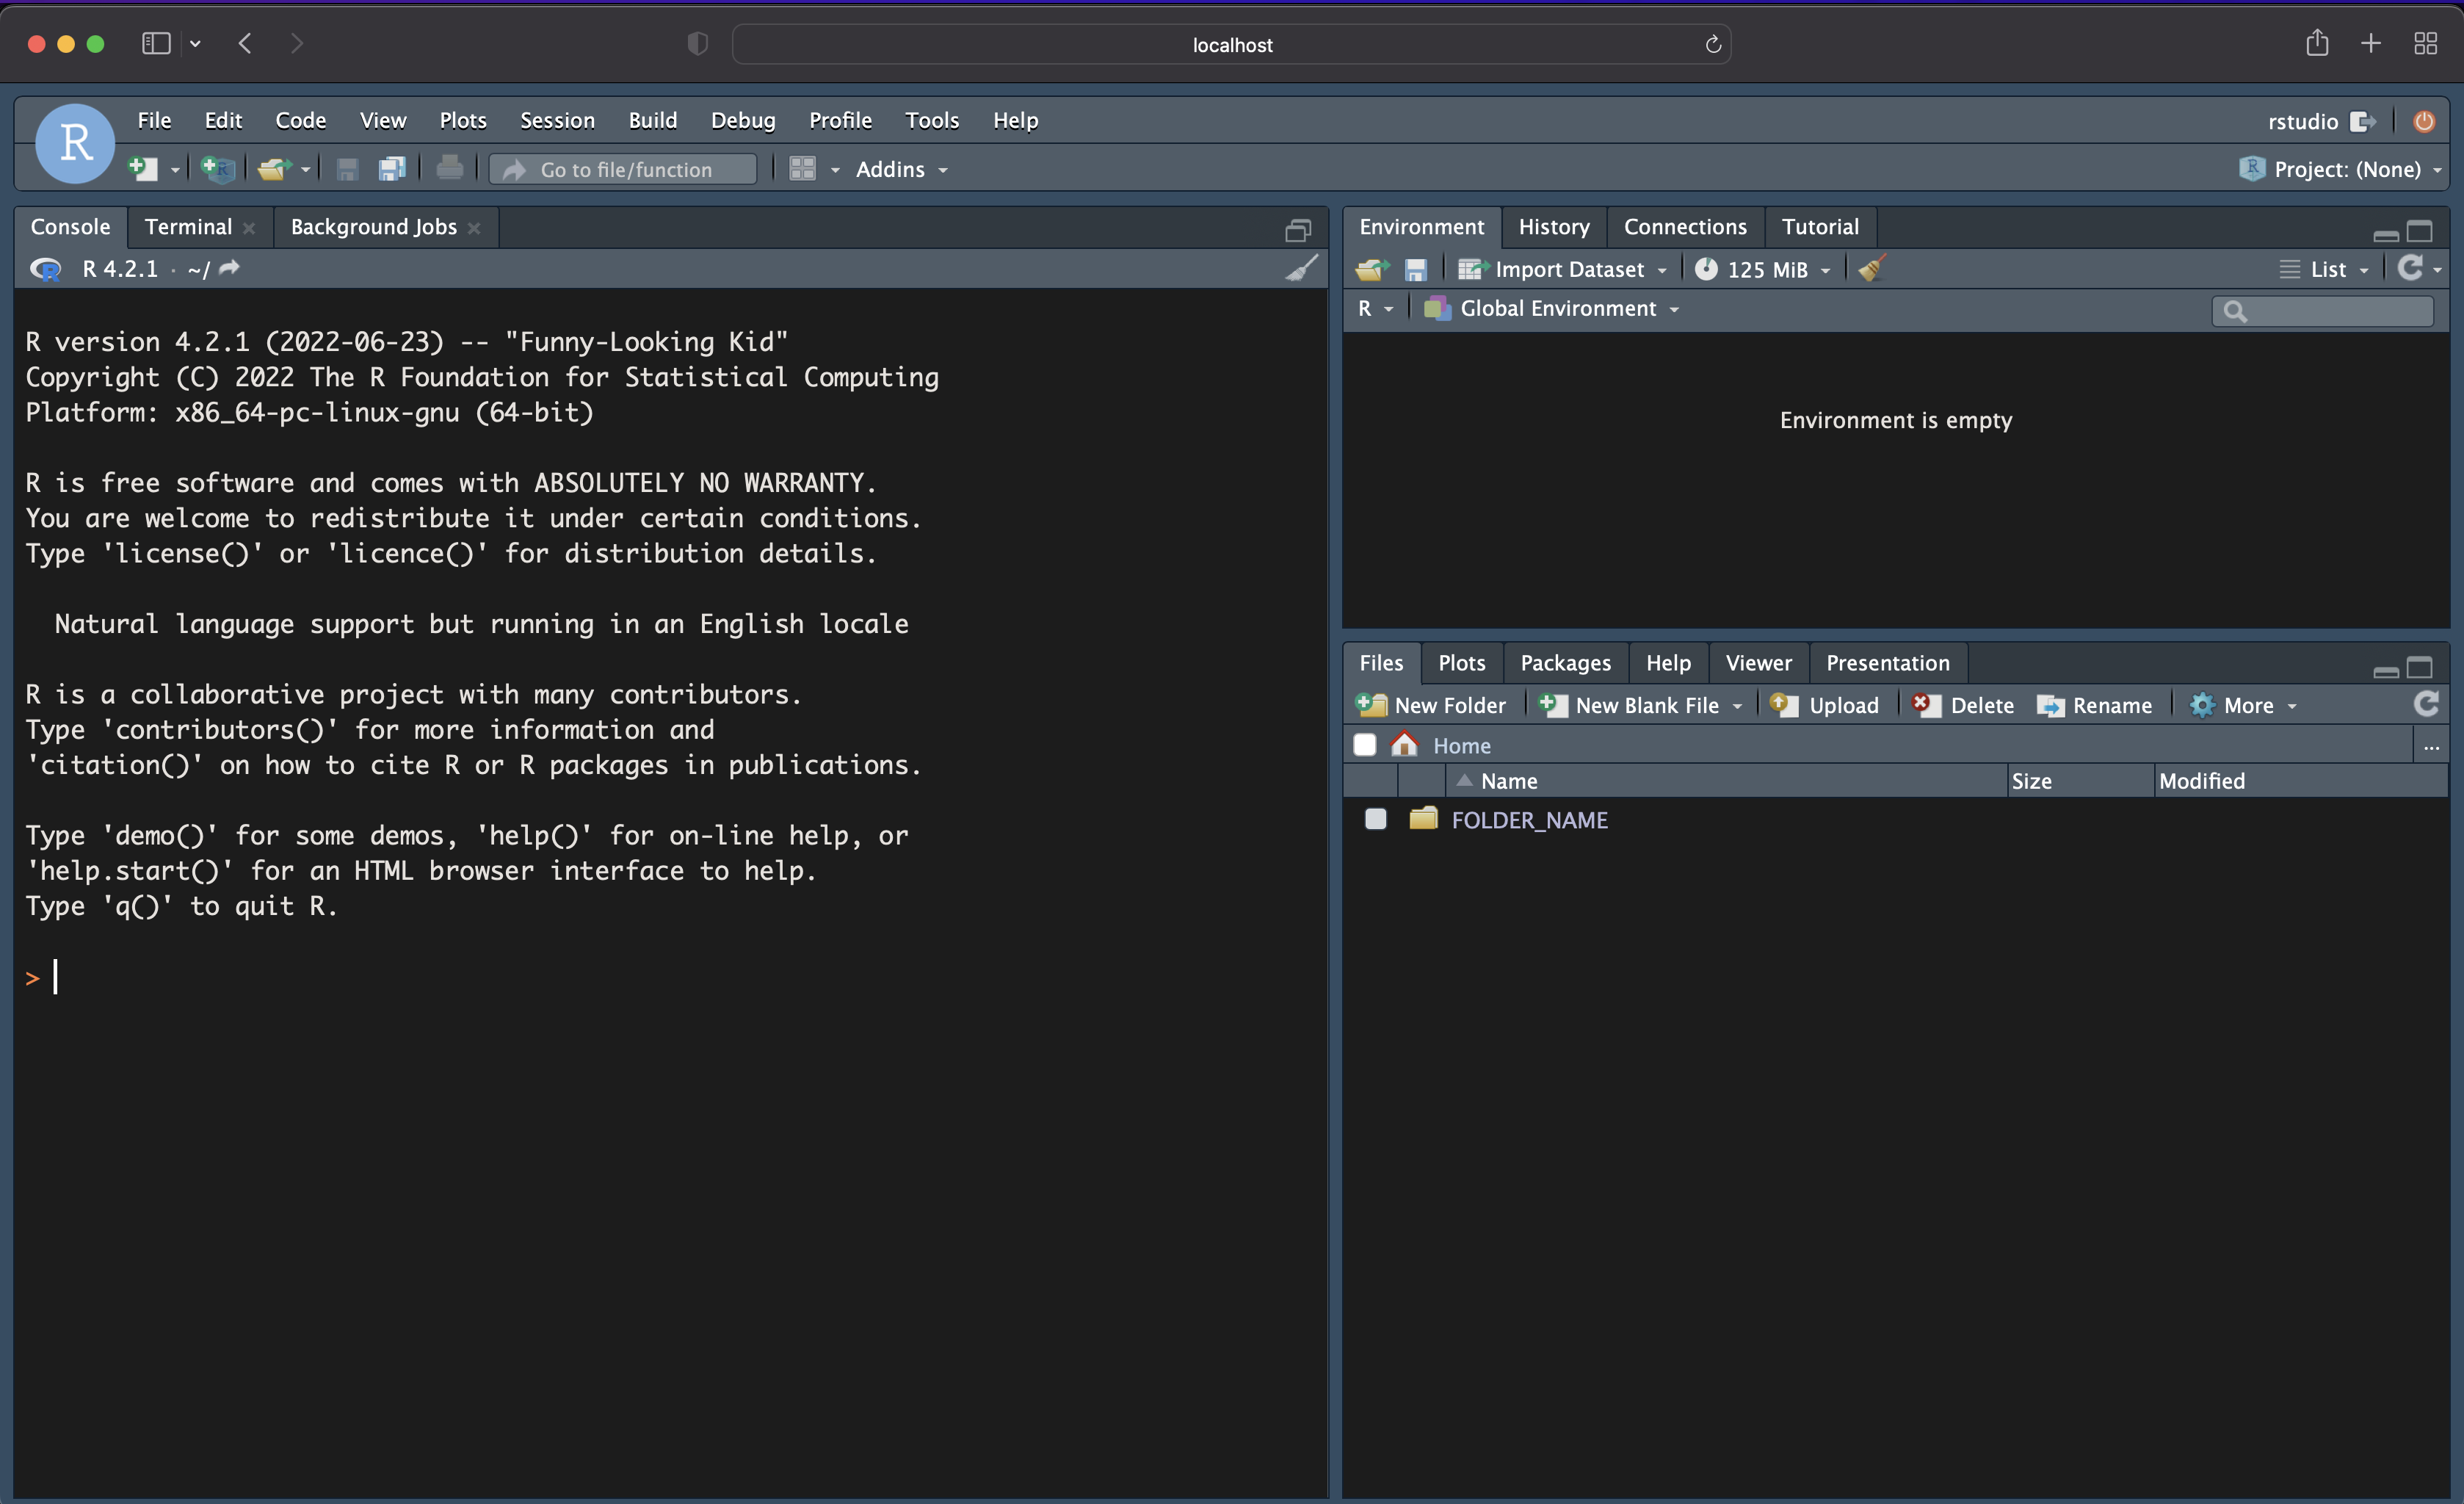
Note that the $TUTORIAL_WORKING_DIR environment variable represents the local folder path on my machine, the /home/rstudio/ folder is the root folder on the container, and flexdash is the name of the mounted folder inside the container. To run it on your local machine, you should modify in the following example YOUR_LOCAL_PATH with your folder local path and FOLDER_NAME with the folder name you want to use inside the container:
docker run -d -p 8787:8787 -v YOUR_LOCAL_PATH:/home/rstudio/FOLDER_NAME rkrispin/flex_dash_env:dev.0.0.0.9000Does it sufficient to start developing our dashboard? Technically, yes, we can now develop and test our code inside the container and save the changes on the local folder (and commit the changes with git). But before we continue, let's mount our local RStudio config file with the one on the container. This will mirror your local RStudio setting to the RStudio server running inside the container:
docker run -d -p 8787:8787 \
 -v YOUR_LOCAL_PATH:/home/rstudio/FOLDER_NAME \
 -v $RSTUDIO_CONFIG_PATH:/home/rstudio/.config/rstudio \
 rkrispin/flex_dash_env:dev.0.0.0.9000
Now, I have inside the container the same setting (e.g., color theme, code snippets, etc.):
Note: Your local R setting file should be, by default, under your root folder, for example, the path on my machine - /Users/ramikrispin/.config/rstudio.
As you add more elements to the docker run, it becomes convoluted to run it each time you want to spin the container. The docker-compose command provides a more concise method to launch a docker container using the docker-compose.yml file to set the docker run arguments and use the docker-compose up command to launch to the container (and docker-compose down to turn it off). Following the above example, here is how we customize those options with docker-compose:
docker-compose.yml:
version: "3.9"
services:
  rstudio:
    image: "$FLEX_IMAGE"
    ports:
      - "8787:8787"
    volumes:
      - type: "bind"
        source: "$TUTORIAL_WORKING_DIR"
        target: "/home/rstudio"
      - type: "bind"
        source: "$RSTUDIO_CONFIG_PATH"
        target: "/home/rstudio/.config/rstudio"
Once we understand how docker run is working, it is straightforward to understand, set, and modify the above docker-compose.yml file according to your needs. As before, we set the image, ports, and volumes in the corresponding sections of the yaml file. Note that I am using three environment variables to set the docker image (FELX_IMAGE), the local folder to mount (TUTORIAL_WORKING_DIR), and the RStudio config file (RSTUDIO_CONFIG_PATH). Typically, this file is saved on the project/repository root folder. To launch the Docker container, from the path of the file, run on the command line:
docker-compose up -dLike before, we added the detach argument -d to keep the terminal free after launching the container. When you are done with the container, you can turn it off by using:
docker-compose downThe main advantage of VScode is the seamless integration with Docker. While it is a great development framework when working with multiple languages (e.g., R, Python, bash, etc.) and setting Dockerfiles, on the other hand, it is not the ideal development environment when working with flexdashboard. That might change in the future with Quarto.
Setting
To set containerized environment with VScode, we will create the devcontainer.json file under the .devcontainer folder. The devcontainer.json has the same functionality as the docker-compose.yml file. It provides VScode with a set of instructions about the Docker environment settings. Below you can see the devcontainer.json we will use in this project:
{
    "name": "flexdashboard-development",
    "image": "${localEnv:FLEX_IMAGE}",
    "customizations": {
        "vscode": {
            "settings": {
                "python.defaultInterpreterPath": "/opt/conda/envs/flex_dashboard/bin/python"
            },
            "extensions": [
                "quarto.quarto",
                "ms-azuretools.vscode-docker",
                "ms-python.python",
                "rdebugger.r-debugger",
                "ms-vscode-remote.remote-containers",
                "yzhang.markdown-all-in-one",
                "reditorsupport.r",
                "redhat.vscode-yaml",
                "REditorSupport.r",
                "REditorSupport.r-lsp",
                "RDebugger.r-debugger"
            ]
        }
    },
    "mounts": [
        "source=${localEnv:TUTORIAL_WORKING_DIR},target=/home/,type=bind,consistency=cache"],
    "remoteEnv": {
        "VAR1": "TEST1",
        "VAR2": "TEST2"
    },
    "postCreateCommand": "radian"
}
Key arguments:
name- defines the environment nameimage- defines the image that will be used for the environment. Similar to thedocker-compose.yml, we will use theFLEX_IMAGEenvironment variable to set the image namepython.defaultInterpreterPathunder the setting argument is used to define the default Python path for the Python interpreter. We will use the conda environment we set on the Dockerfile (flex_dashboard) as the default. The extensions section, as the name implies, defines the environment extensionsmount- enables binding between the local folders and those inside the docker. The nice thing about VScode is that you don't need to mount your project folder with the container. As example, I mount the local folder (using the TUTORIAL_WORKING_DIR environment variable) with the home directory inside the Docker.remoteEnv- can be used to set environment variables. As an example, I set two environment variables -VAR1andVAR2postCreateCommand- set the command to run after the launch of the container is done. In the case above, we setradianto be the default.
Open the folder inside a container
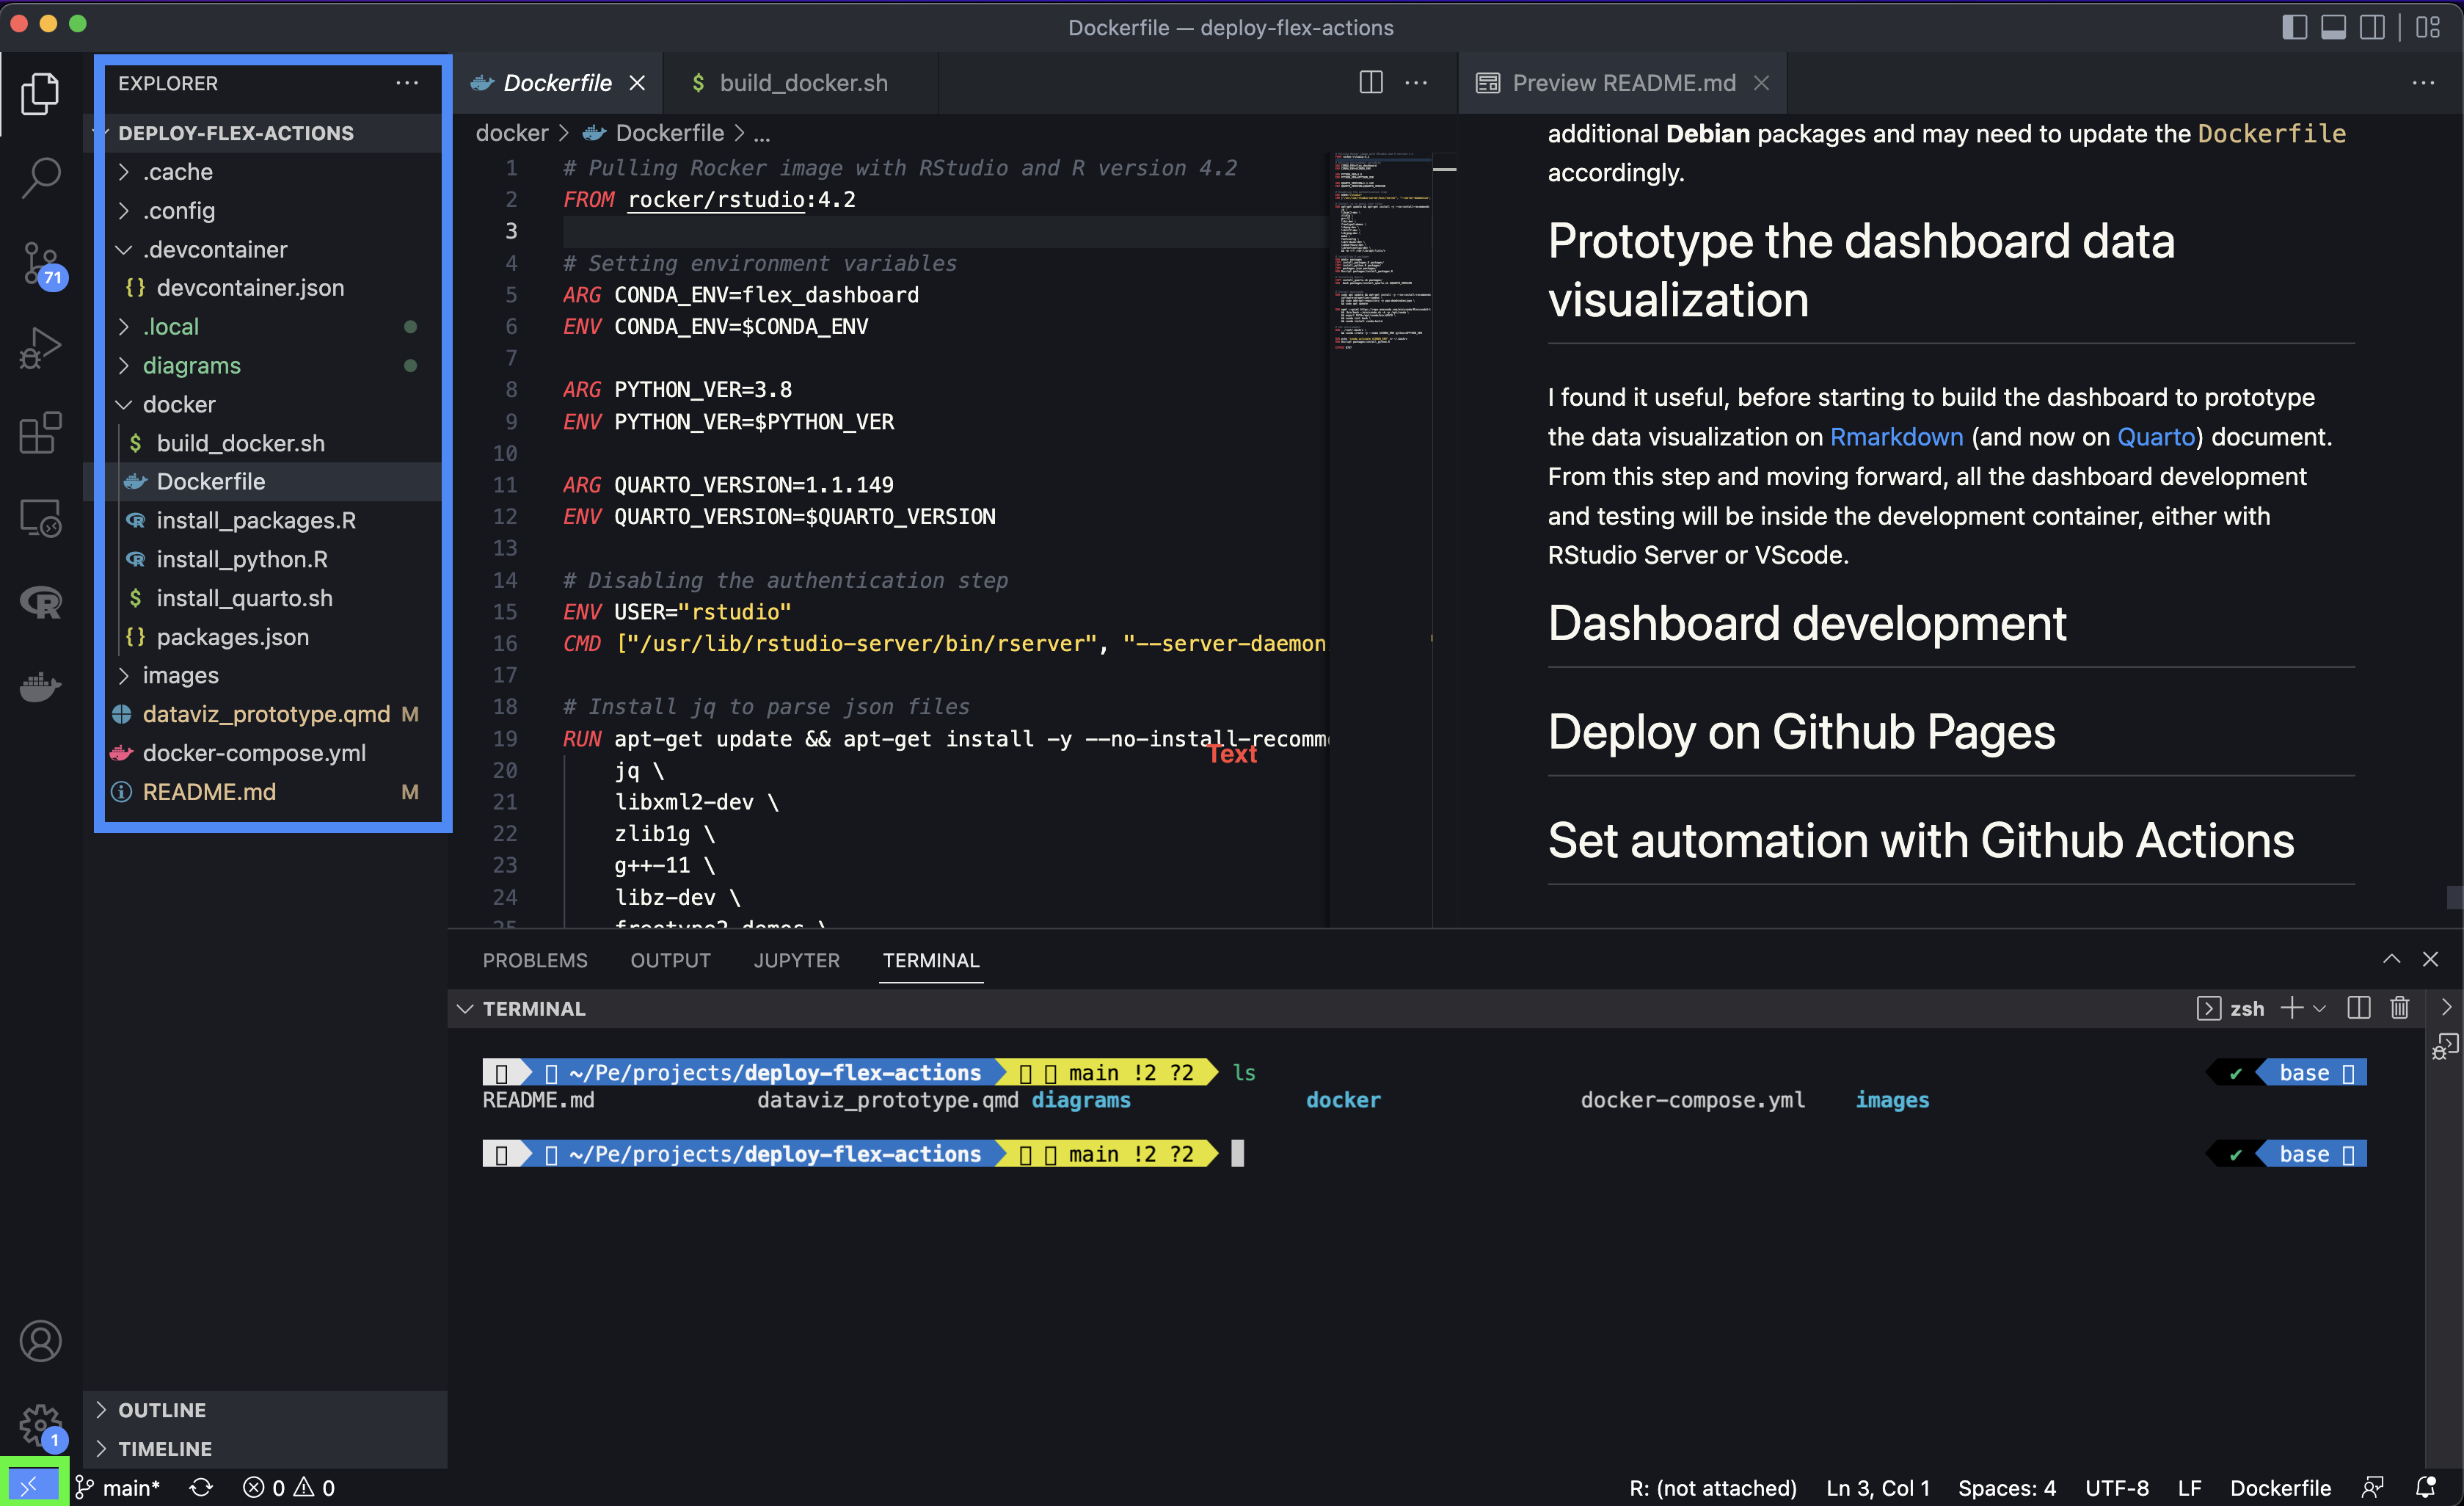
Once the .devcontainer.json file is ready, it is straightforward to open the folder inside a container. Let's start by opening the project folder - on the main menu, go to File -> Open Folder..., and select the project folder. In the screenshot below, you can see the project folder marked with a blue rectangle:
The next step is to click on the >< symbol (marked with the green rectangle) on the bottom left corner, which will open a menu on the top of the screen, and select the Reopen in Container option.
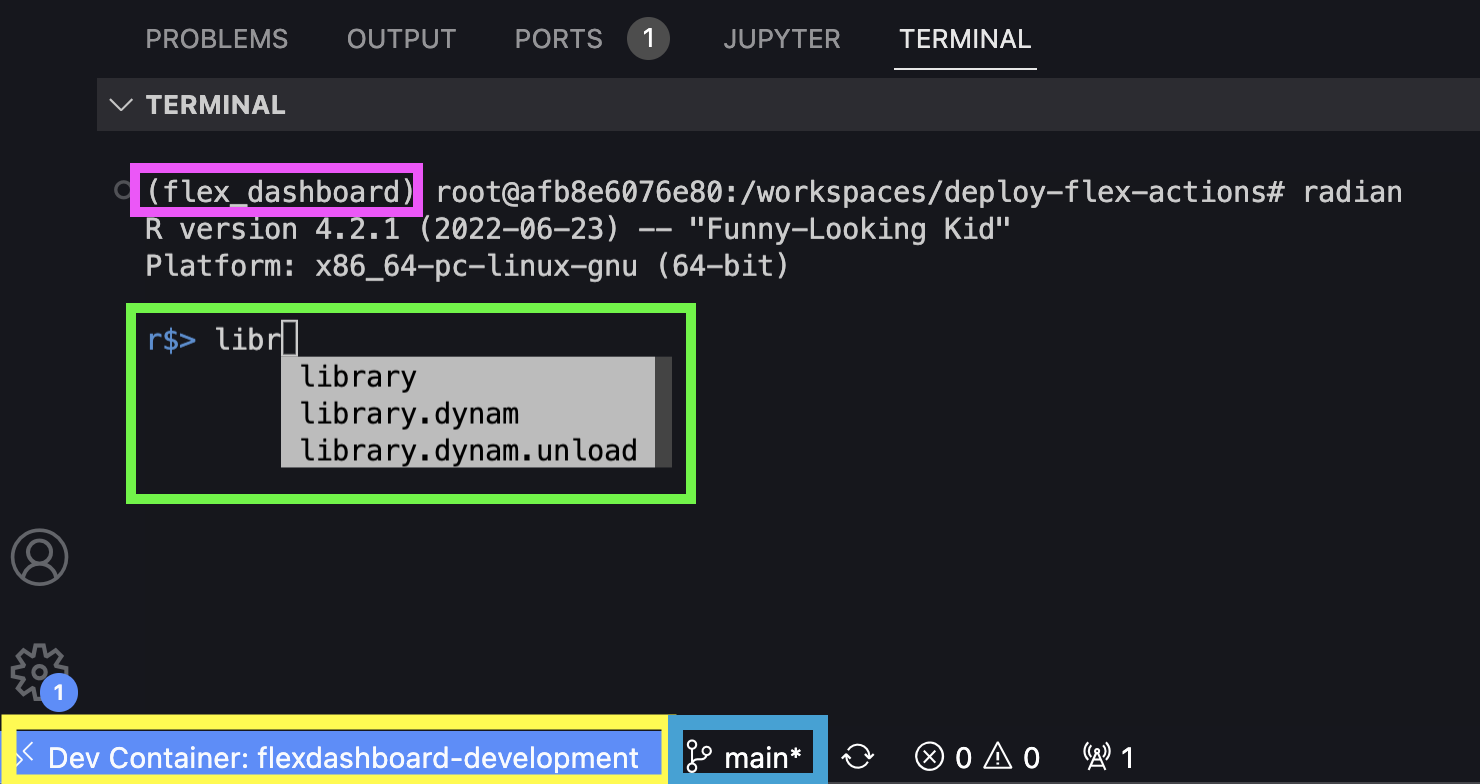
You can test your environment by opening the terminal. You should expect to see a similar view as in the screenshot below (depending on your setting). The Conda environment name that you logged in is in the brackets (e.g., flex_dashboard marked in purple). If you type radian or r, it will open the default R console with radian (marked with green). In addition, you can see at the bottom the project name as defined on the devcontainer.json file (marked in yellow) and the branch name (marked in blue).
Last but not least, if you make any changes in the image, you will have to refresh the environment by selecting the Rebuild Container option (click on the >< symbol to open the container menu).
If the above packages (in the packages.json file) meet your requirements, then you are good to go and start to develop (with minimal effort in setting your global environment variables). If you have additional or different requirements, you can update the packages.json file according to your environment requirements and re-build the docker image using the build_docker.sh file. The only caveat for this is that for some packages, you may need to install additional Debian packages and may need to update the Dockerfile accordingly.
I found it useful, before starting to work on the dashboard itself, to create all the plots I plan to use on the dashboard on a Rmarkdown document (and now with Quarto). This enables you to prepare the data, test, and customize your ideas from the prototype step. The Quarto doc I used for this tutorial is under the dev folder.
From this step forward, all the dashboard development and testing will be inside the development container, either with RStudio Server or VScode. I will use RStudio Server for the dashboard development. To launch the container, use the docker-compose command:
docker-compose up -dYou should expect the following output:
Creating network "deploy-flex-actions_default" with the default driver
Creating deploy-flex-actions_rstudio_1 ... done
Now, you can go to your browser and open http://localhost:8787 to open your RStudio Server inside the development container.
Based on the dashboard scope and prototype plan above, we will need the following data transformation:
- Daily cases (confirmed and death) by country
- Total daily cases (confirmed and death)
For creating those dataset we will use the coronavirus package, which provides daily snapshot of the John Hopkins COVID19 dataset.
We will use those datasets to generate the following three plots:
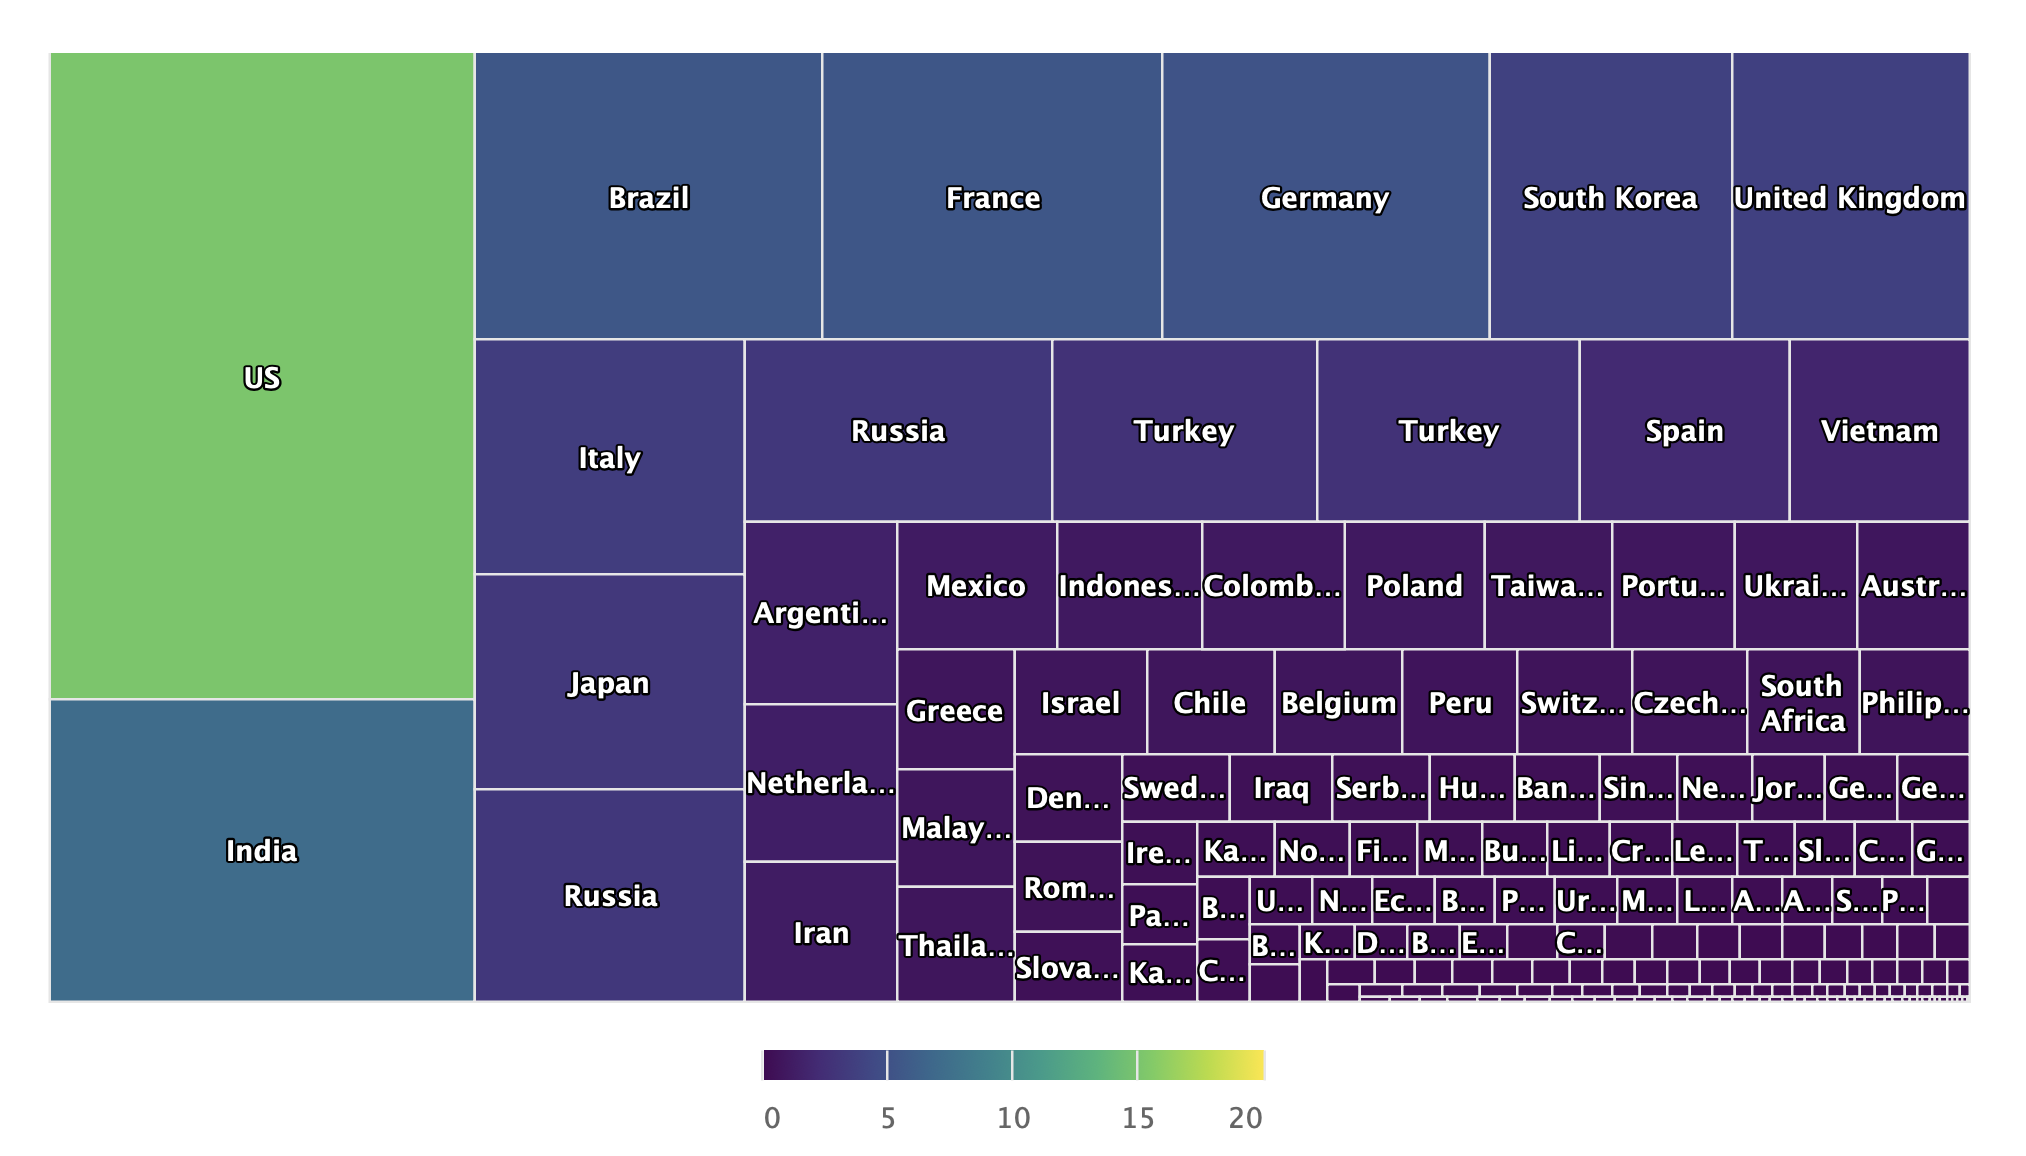
- Total cases distribution by country using a treemap
- Plot daily new cases using a time series plot
- Plot daily death cases using a time series plot
After creating the treemap plot, I realized that due to the skewness of the top countries (both percentage and absolute numbers), the use of treemap is less effective:
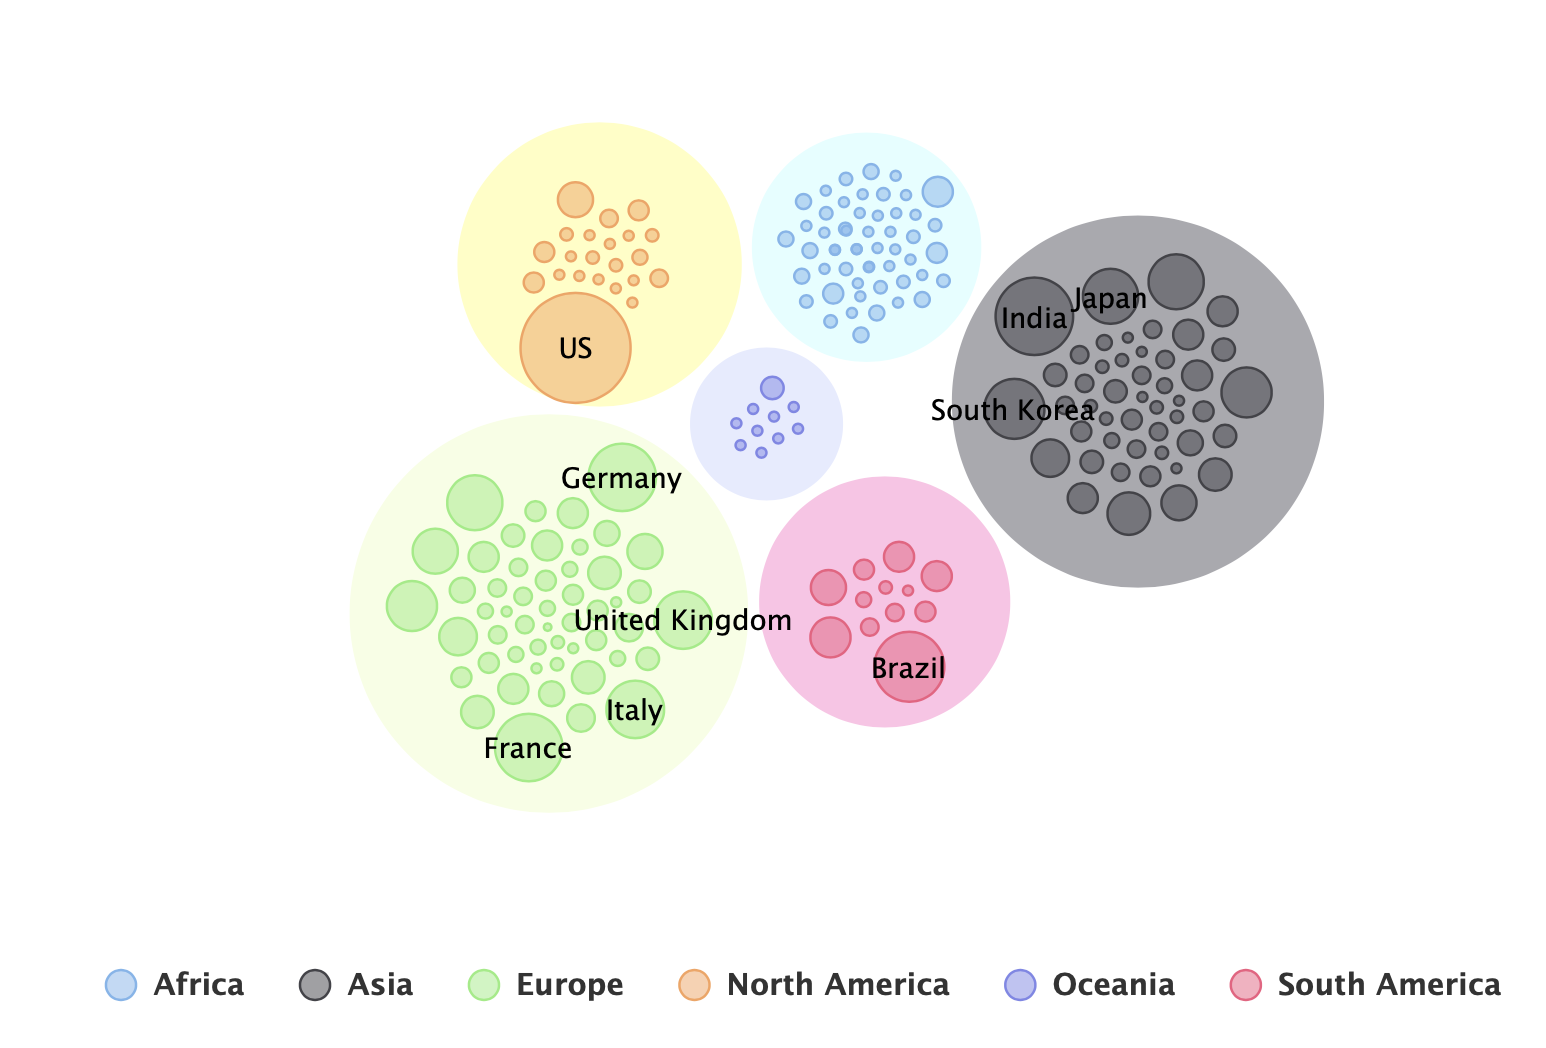
Looking into the highcharter package documentation, I came across the packed bubble chart example, and decided to use it instead of the treemap:
To generate this view, I loaded the GIS codes mapping file from the John Hopkins COVID19 tracker repository. This table was used to add the continent field.
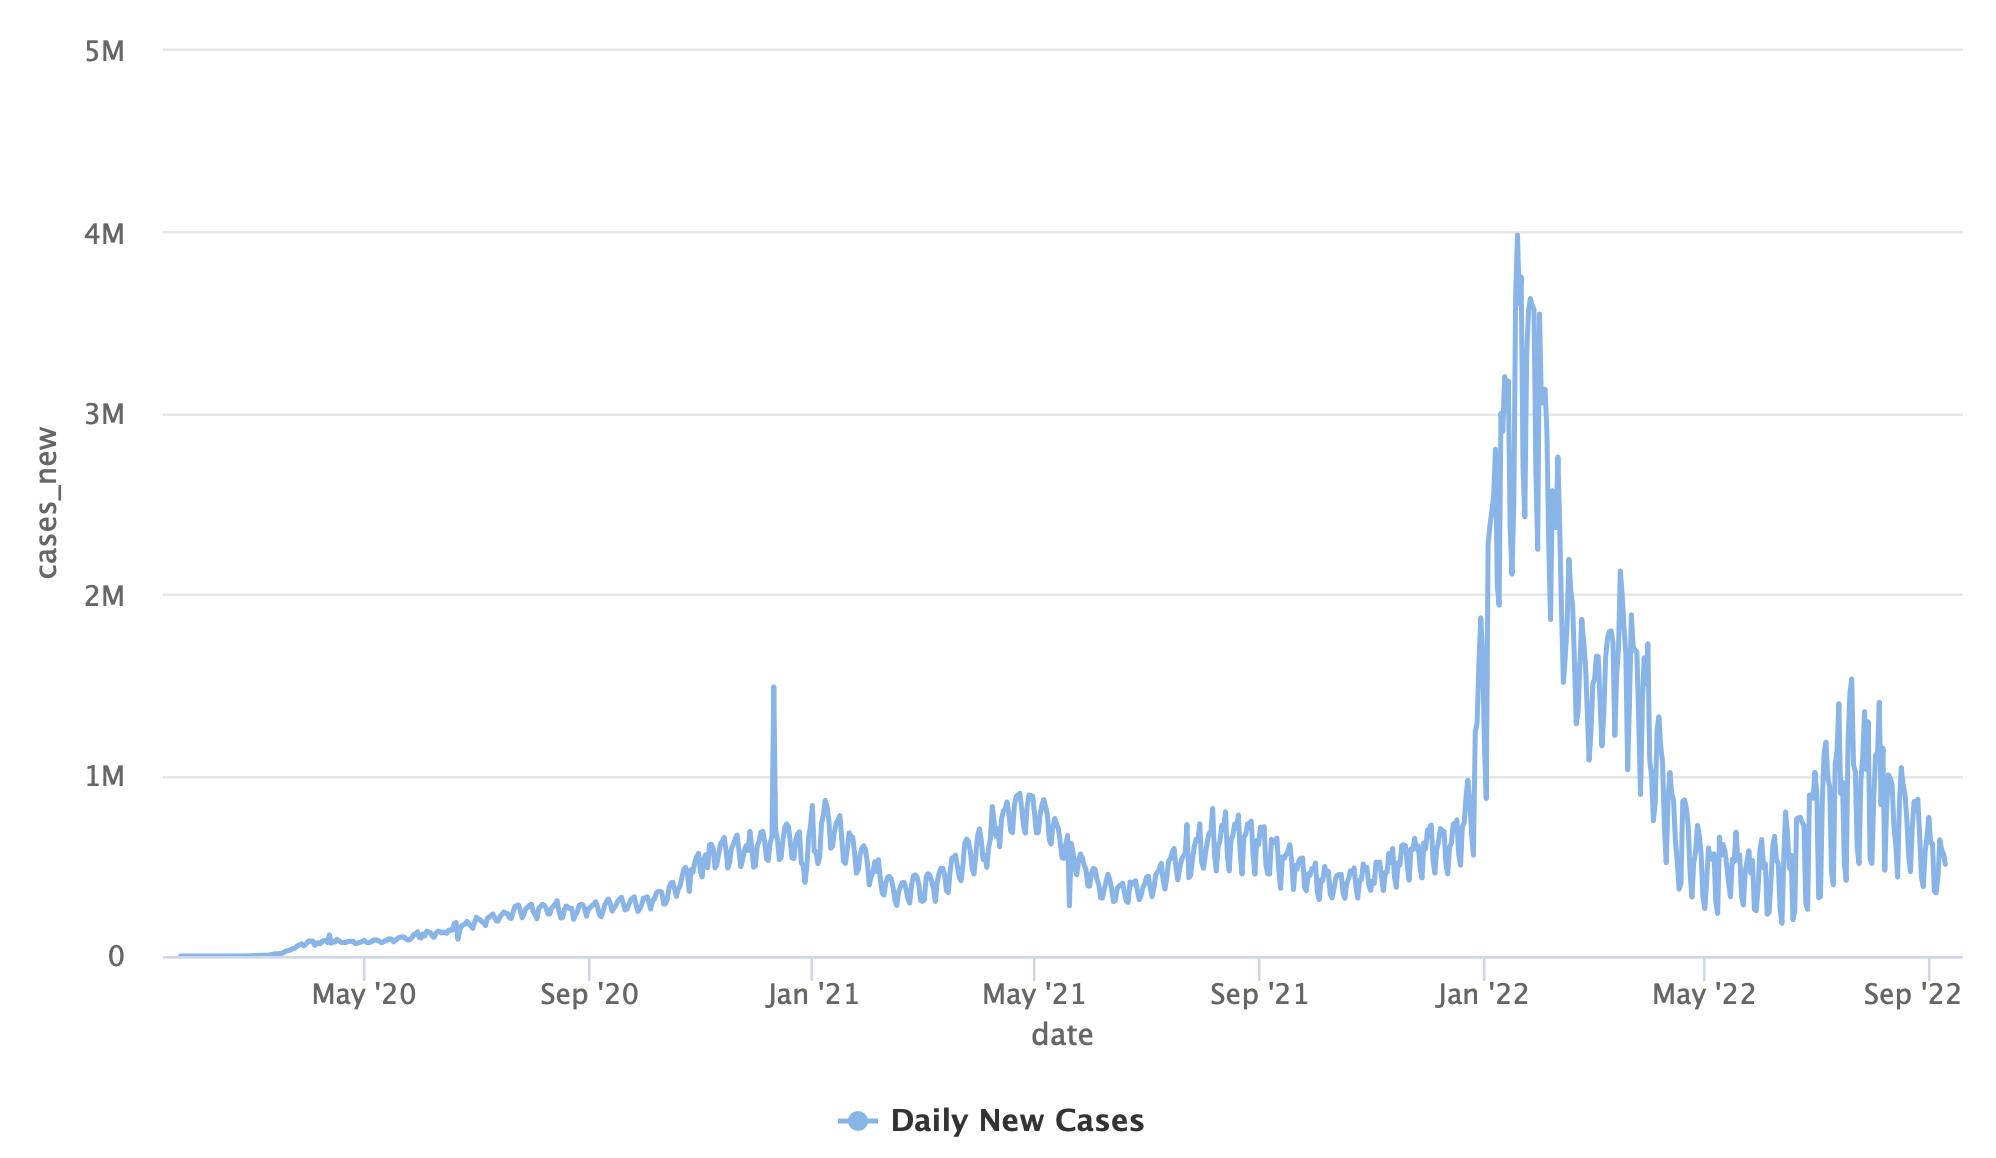
Next, I used the aggregate cases data to create a time series view of the worldwide daily new cases. I started with this basic plot:
And customized the plot (e.g., add titles, legends, trend line, etc.):
Using the same logic, I create a similar plot for the new death cases:
Now that we have the data transformation and plots finalized, we can move to the next step and paste the code on the flexdashboard template.
Before we start to build the dashboard, we will have to set the _site.yml, which enables us to define the site options. We will use the name and output_dir arguments to define the site name and rendering output-dir, respectively:
name: "COVID19 Tracker"
output_dir: docs
This will direct the output of the flexdashboard files to the docs folder, which will enable to build a site with Github Pages.
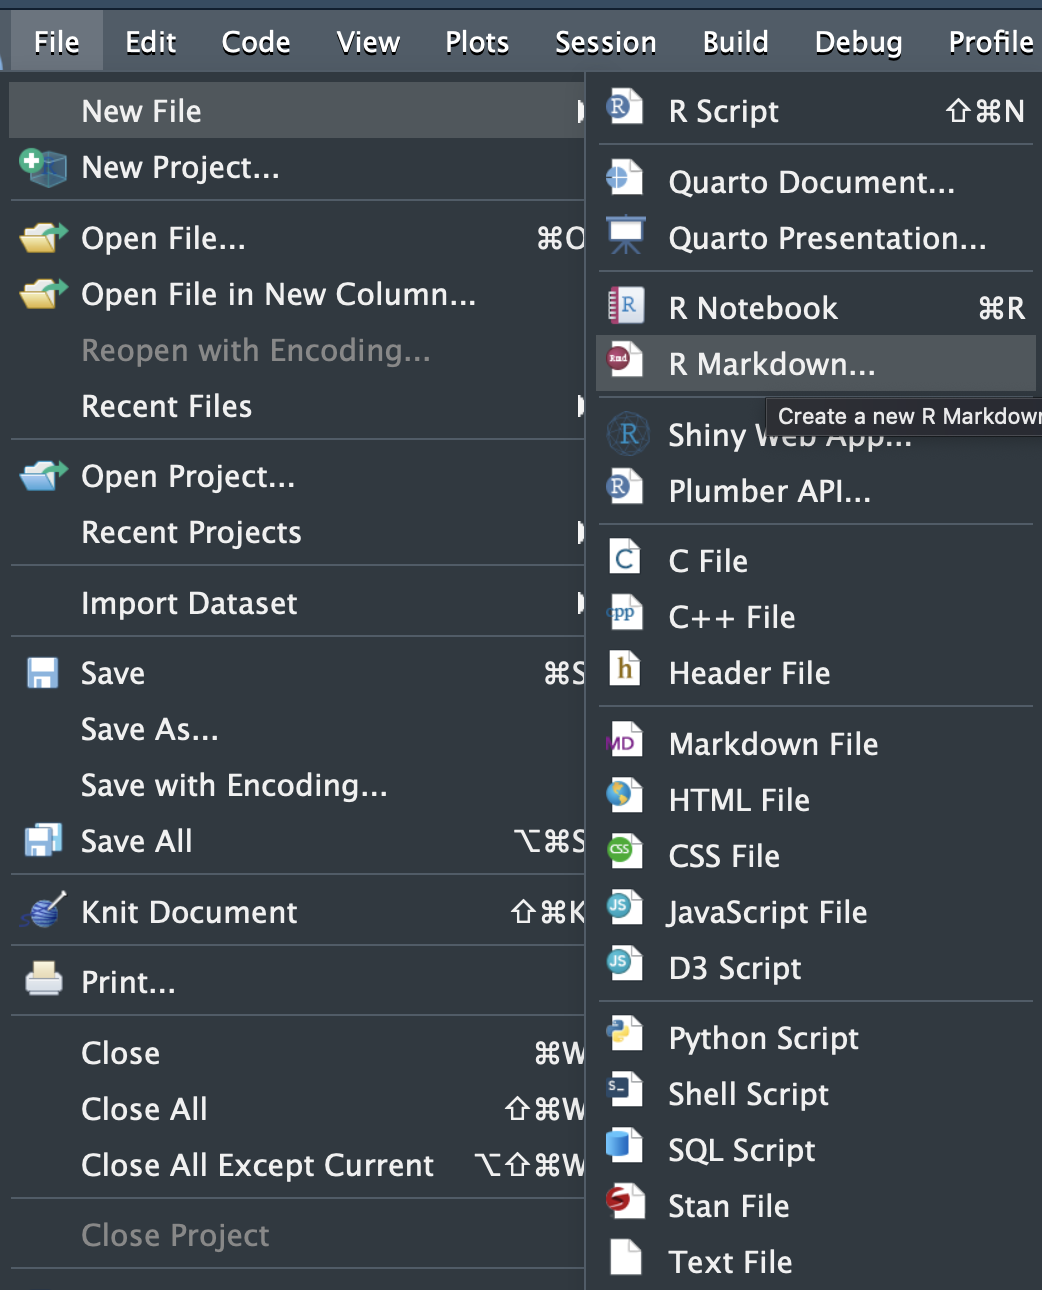
It is straightforward to create a new flexdashboard template with RStudio - open the File menu and select the New File and R markdown... options:
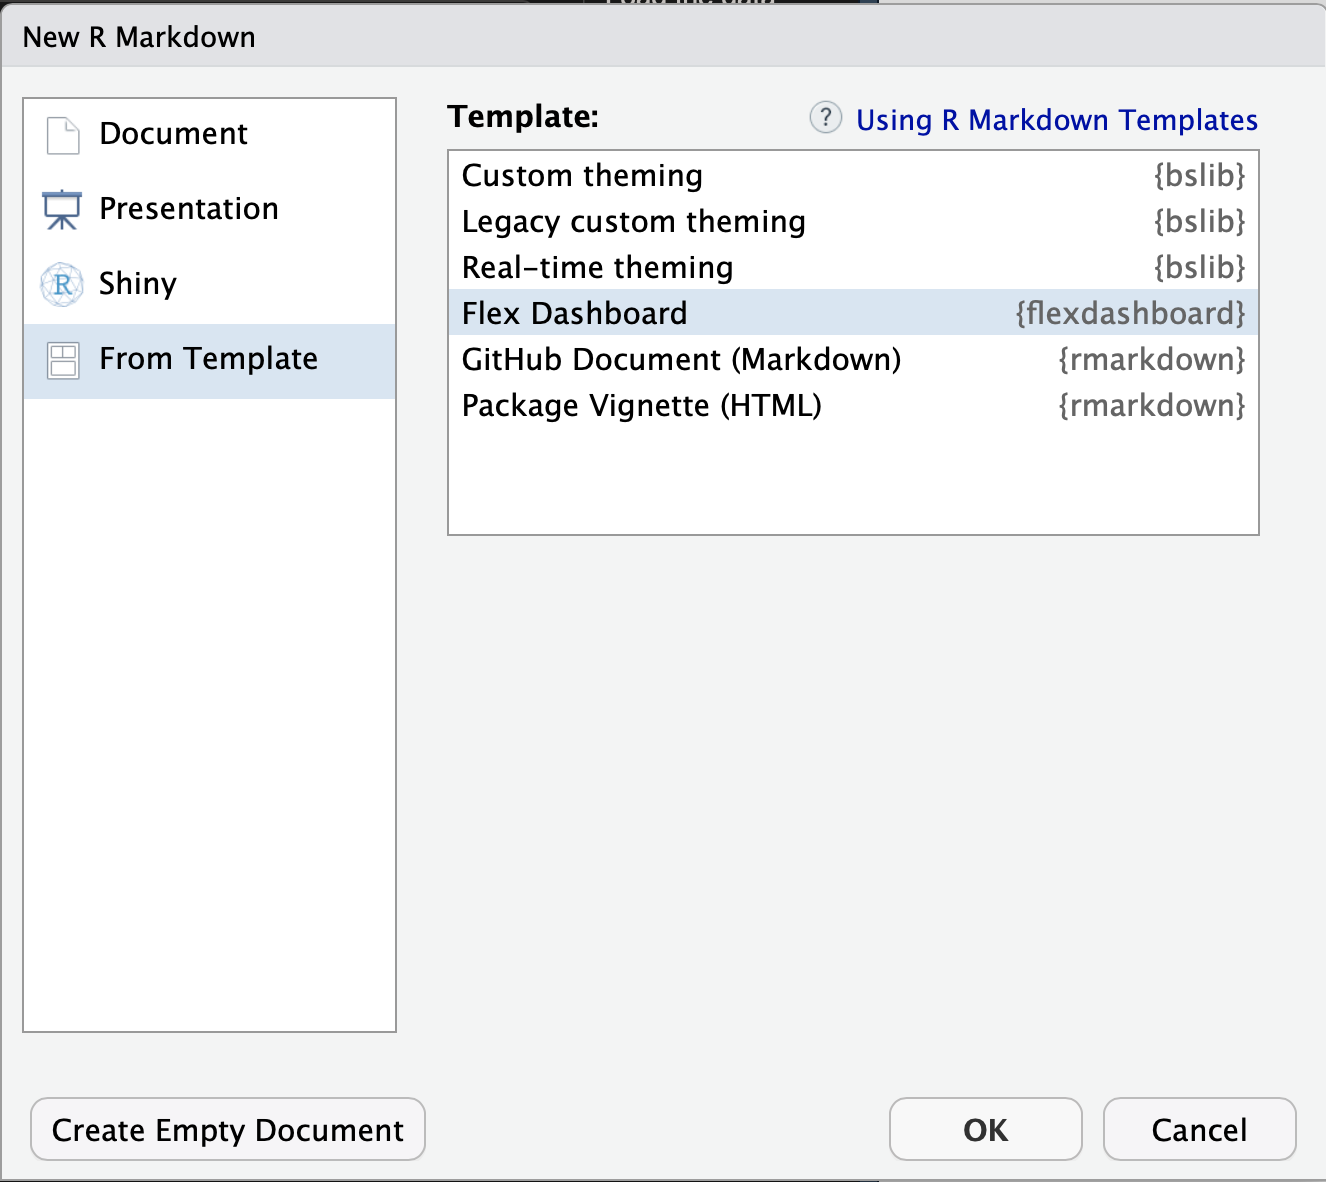
Next, on the New R Markdown window, select From Template option and then the Flex Dashboard option:
This will generate the following template (showing only the yaml header):
---
title: "Untitled"
output:
  flexdashboard::flex_dashboard:
    orientation: columns
    vertical_layout: fill
---
Note: As far as I know, there is no simple way to create a flexdashboard template in VScode. Therefore, if you are using VScode, you can copy the above yaml header to your Rmd file.
We will name the template file as index.Rmd, which will generate an index.html that will be used as the website file.
You can check if the setting of the _site.yml file was done properly by rendering the index.Rmd file. At the first run, it expected to create the docs folder with the website files:
.
├── data
├── dev
│   └── dataviz_prototype_files
│       └── libs
│           ├── bootstrap
│           ├── clipboard
│           ├── highchart-binding-0.9.4
│           ├── highcharts-9.3.1
│           │   ├── css
│           │   ├── custom
│           │   ├── modules
│           │   └── plugins
│           ├── htmlwidgets-1.5.4
│           ├── jquery-3.5.1
│           ├── proj4js-2.3.15
│           └── quarto-html
├── diagrams
├── docker
├── images
└── site_libs
    ├── bootstrap-3.3.5
    │   ├── css
    │   │   └── fonts
    │   ├── fonts
    │   ├── js
    │   └── shim
    ├── header-attrs-2.16
    ├── jquery-3.6.0
    └── stickytableheaders-0.1.19

29 directories
Once we have the dashboard functionality prototyped on the Quarto doc, it is straightforward to populate the visualization on the dashboard template:
YAY! The dashboard is ready, let's deploy it on Github pages.
By this point, about 95% of the work is done. Setting a Github Page required the website files under the docs folder, which we already created.
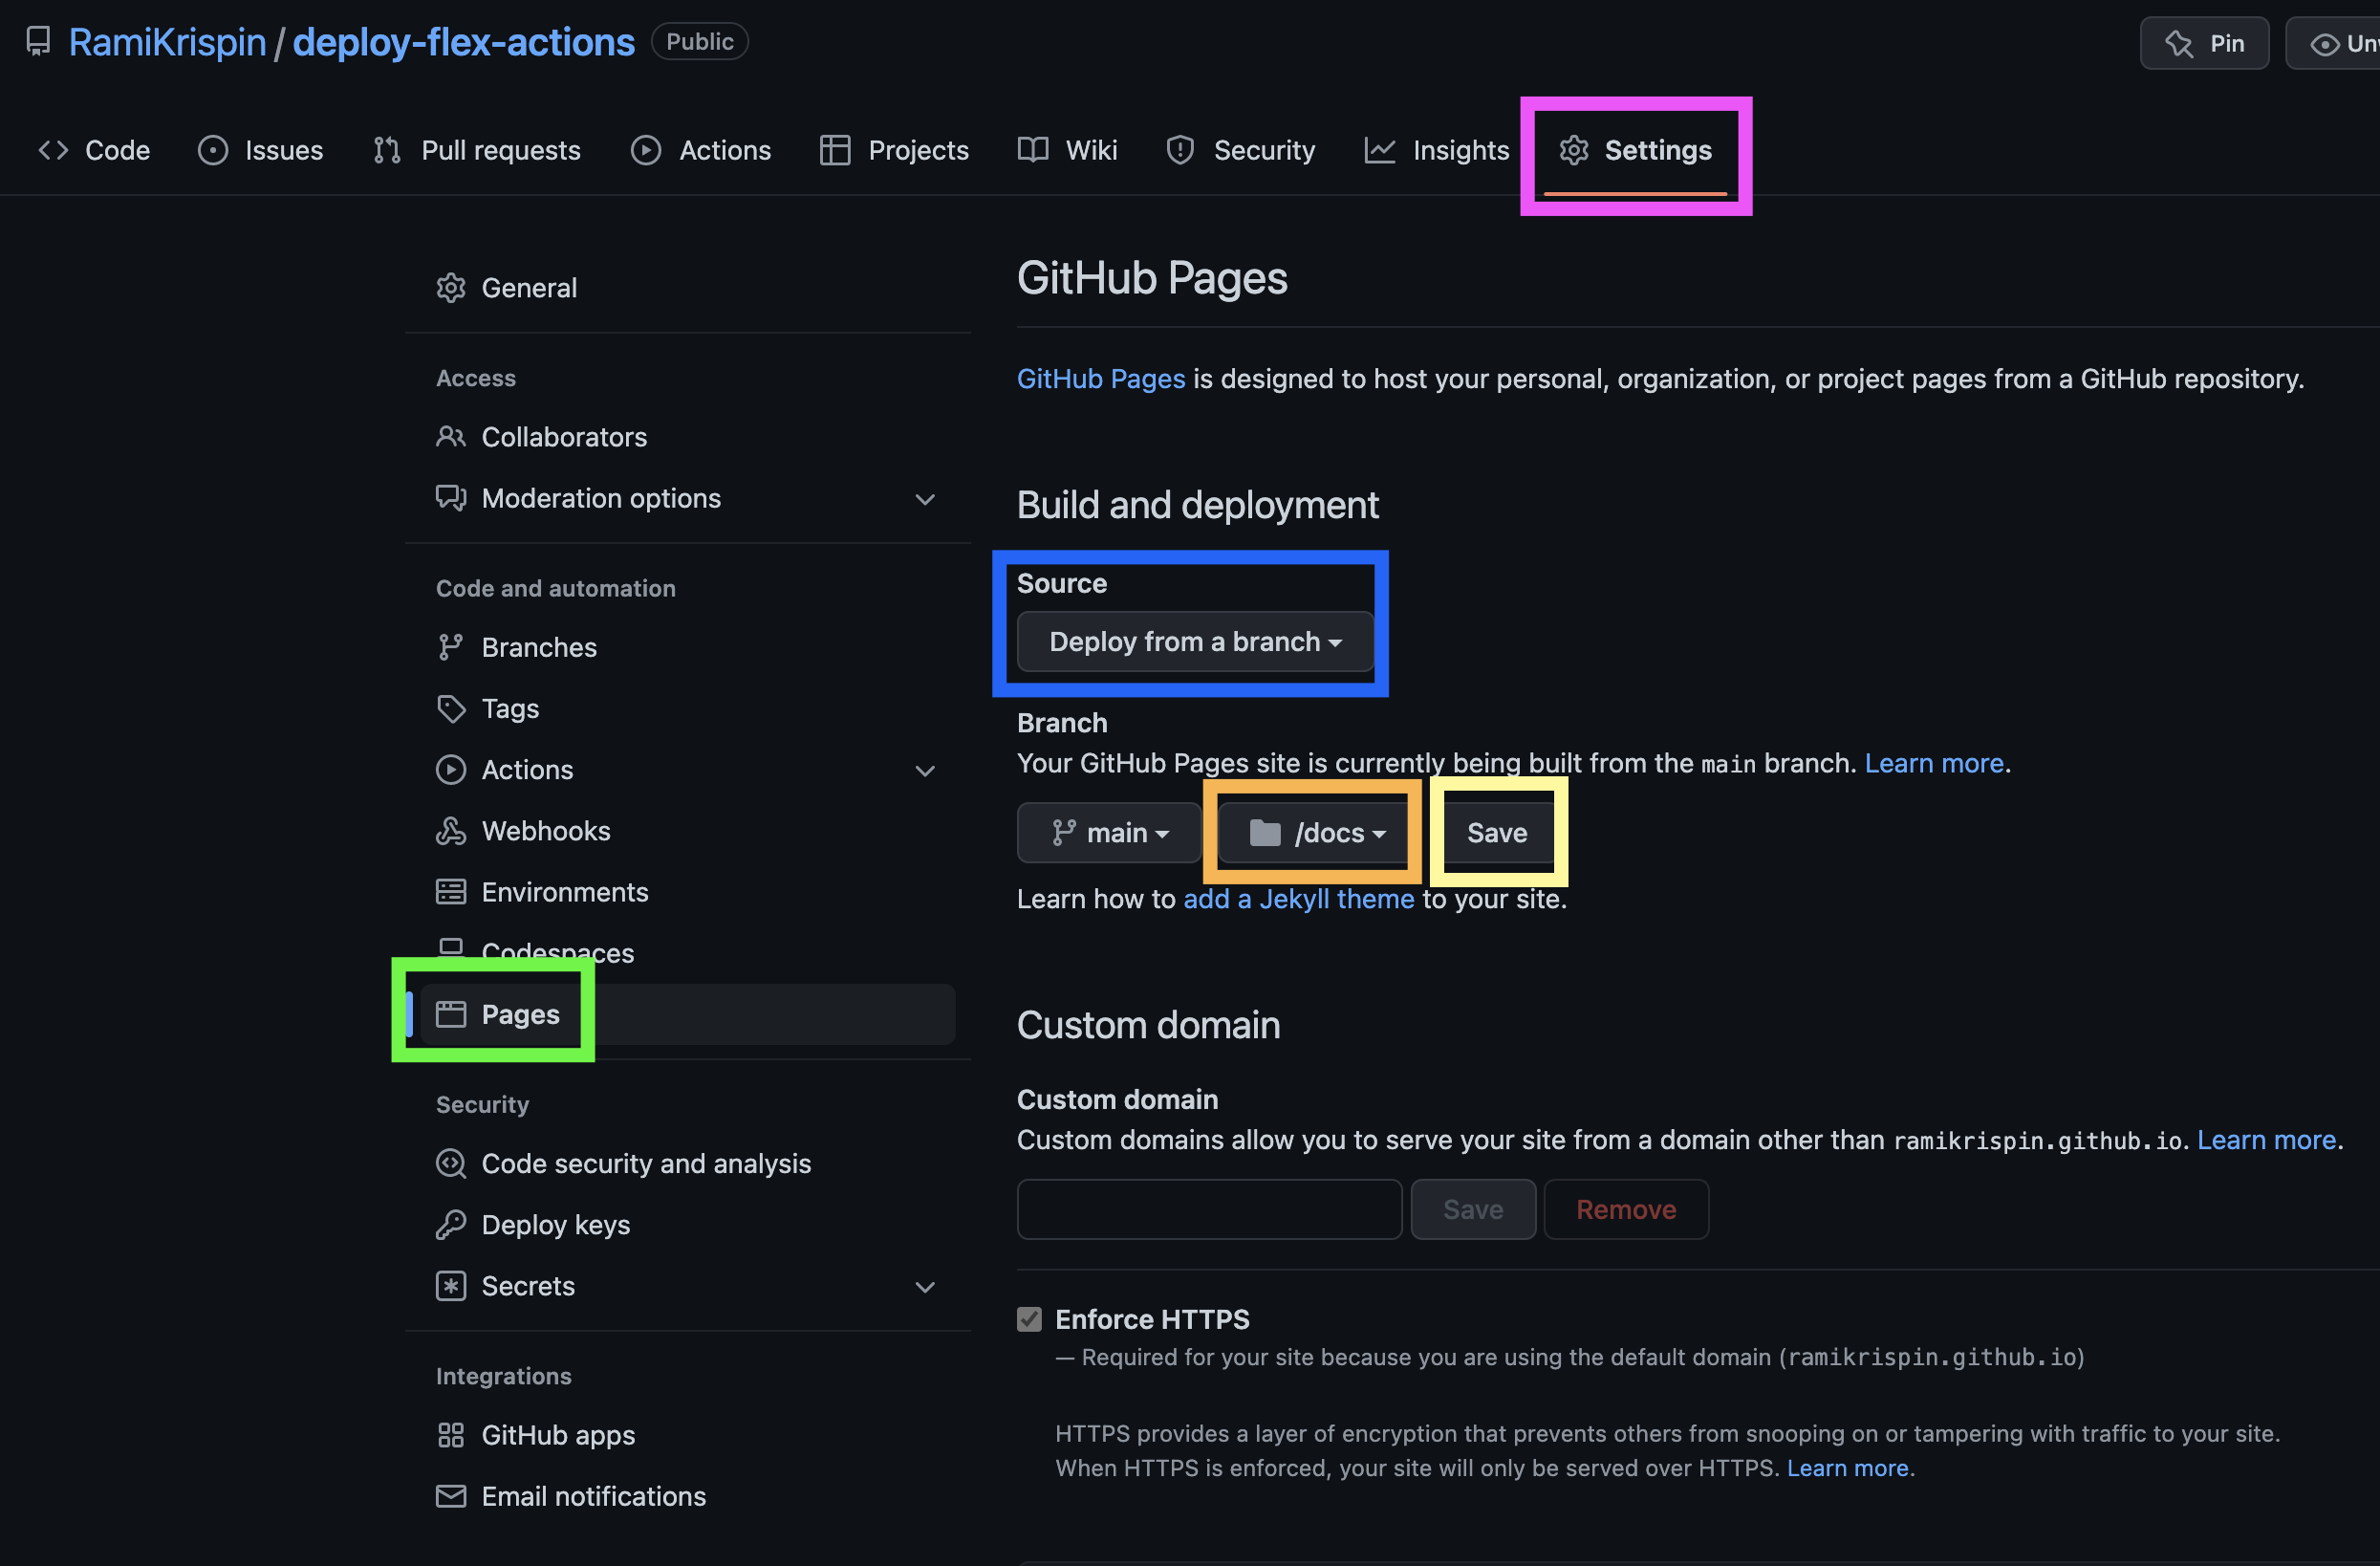
On the repo main menu, select the Settings (marked in purple) tab and then the Pages option (marked in green) to open the Github Pages settings:
Under the Source option (marked in blue) select Deploy from a branch, and then select the docs folder (marked in orange). Last but not least, click the Save button (marked in yellow).
It might take a few minutes until the website is render and you should see the link for the website on that page (refresh the page if you cannot see it). Github Pages use the following website address patern:
https://GITHUB_USER_NAME.github.io/REPO_NAME/In this case, the link for this tutorial dashboard is:
https://ramikrispin.github.io/deploy-flex-actions/
Under the Source option (marked in blue) select Deploy from a branch, and then select the docs folder (marked in orange). Last but not least, click the Save button (marked in yellow).
It might take a few minutes until the website is rendered, and you should see the link for the website on that page (refresh the page if you cannot see it). Github Pages use the following template to set the website address:
https://GITHUB_USER_NAME.github.io/REPO_NAME/
In this case, the link for this tutorial dashboard is: https://ramikrispin.github.io/deploy-flex-actions/
Before we continue to the automation step with Github Actions, let's test what we have built so far. The main goal of the testing stage is to check the dashboard can be rendered and update the data in a similar environment as it would run with Github Actions. Hence, we would render the dashboard inside the container directly from the terminal.
It is always a good practice to restart the container before testing. This will ensure that it will not include any packages you installed during the run time (as opposed to those installed during the build time). To reset the container, let's use the docker-compose command:
docker-compose downAnd then relaunch the development environment with:
docker-compose up -dYou can confirm that your container is up by using the docker ps command:
docker ps

CONTAINER ID   IMAGE                                   COMMAND                  CREATED         STATUS         PORTS                    NAMES
d594356d8ccc   rkrispin/flex_dash_env:dev.0.0.0.9000   "/usr/lib/rstudio-se…"   3 minutes ago   Up 3 minutes   0.0.0.0:8787->8787/tcp   deploy-flex-actions_rstudio_1
Next, let's ssh to the container and open the bash shell on the terminal using the docker exec command:
docker exec -it d594356d8ccc /bin/bash Where the d594356d8ccc is the container ID, from the docker ps output above, and /bin/bash defines the type of shell we want to open. This will lead you to the bash terminal inside the container:
(flex_dashboard) root@d594356d8ccc:/# You can note that the (flex_dashboard) represents the conda environment we set, and the d594356d8ccc after the root@ represents the container ID. You can inspect the container root folder with the ls command:
(flex_dashboard) root@d594356d8ccc:/# ls
bin  boot  dev  etc  home  init  lib  lib32  lib64  libexec  libx32  media  mnt  opt  packages  proc  rocker_scripts  root  run  sbin  srv  sys  tmp  usr  var
We can find our local bind folder (as set on the docker-compose.yml file) inside the container under the home/rstudio folder:
(flex_dashboard) root@d594356d8ccc:/# cd home/rstudio/
(flex_dashboard) root@d594356d8ccc:/home/rstudio# ls
bash  data  dev  diagrams  docker  docker-compose.yml  docs  images  index.Rmd  README.md  _site.yml
Let's now test the rendering process by calling the Rmarkdown render_site command from the terminal with the Rscript command:
(flex_dashboard) root@d594356d8ccc:/home/rstudio# Rscript -e "rmarkdown::render_site()"To confirm that the dashboard was rendered, go to the docs folder and check the time the files were modified last with the ls -l command:
(flex_dashboard) root@d594356d8ccc:/home/rstudio# cd docs
(flex_dashboard) root@d594356d8ccc:/home/rstudio/docs# ls -l
total 752
drwxr-xr-x  3 root root     96 Sep 17 10:16 bash
drwxr-xr-x  4 root root    128 Sep 17 10:16 data
drwxr-xr-x  7 root root    224 Sep 17 10:16 dev
drwxr-xr-x  4 root root    128 Sep 17 10:16 diagrams
drwxr-xr-x  8 root root    256 Sep 17 10:16 docker
-rw-r--r--  1 root root    306 Sep 17 10:16 docker-compose.yml
drwxr-xr-x 25 root root    800 Sep 17 10:16 images
-rw-r--r--  1 root root 762993 Sep 17 10:16 index.html
drwxr-xr-x 10 root root    320 Sep 17 10:16 site_libs
(flex_dashboard) root@d594356d8ccc:/home/rstudio/docs# date
Sat 17 Sep 2022 10:22:34 AM UTC
Note: You can also check and confirm the changes from your local folder by using the git status command and see changes on the docs folder (assuming there were no changes before). Also, make sure you commit those changes before setting the workflow to avoid future git merging conflicts.
By this point, we set a development environment with Docker, built a dashboard, tested it inside the container, and deployed it on Github Pages. The next step is to set a workflow on Github Actions which will rerender the dashboard daily to get up-to-date with the data available on the coronavirus package.
While we can run commands directly with Github Actions using the run argument (we will cover it in the next section), it is limited to one command at a time. Therefore, I found it more concise and efficient to use a helper script to run multiple steps with a single run step. To render the dashboard and update the website with the changes, we will need the following:
- Run the Rmarkdown render_site function from the terminal
- Commit the changes back to the
mainbranch on the origin (e.g., Github)
The following bash script executes the above requirements:
bash/render_dashboard.sh
echo "Rendering the dashboard..."
if [[ "$1" = ""  || "$2" = "" ]] ; then
    echo "The git user.name and/or user.email are missing"
    exit 0
else
    echo "Git user.name is $1"
    echo "Git user.email is $2"
fi


Rscript -e "rmarkdown::render_site()"

# Fix github issue
git config --global --add safe.directory /__w/deploy-flex-actions/deploy-flex-actions


if [[ "$(git status --porcelain)" != "" ]]; then
    git config --global user.name $1
    git config --global user.email $2
    git add *
    git commit -m "Auto update dashboard"
    git push
fi
The script required the following inputs from the user:
- Github account user name
- Github account user email
It starts with testing if the user entered the Github account name and email (as used in their Github account). If one or both are missing, it will exit the script. Otherwise, it renders the dashboard and pushes the changes created during the rendering time.
For example, here is how you should execute your code from the terminal:
bash bash/render_dashboard.sh "YOUR_GITHUB_USER_NAME" "YOUR_GITHUB_LOGIN_EMAIL"
The file is saved under the bash folder, and we can now continue to the last step - setting the workflow.
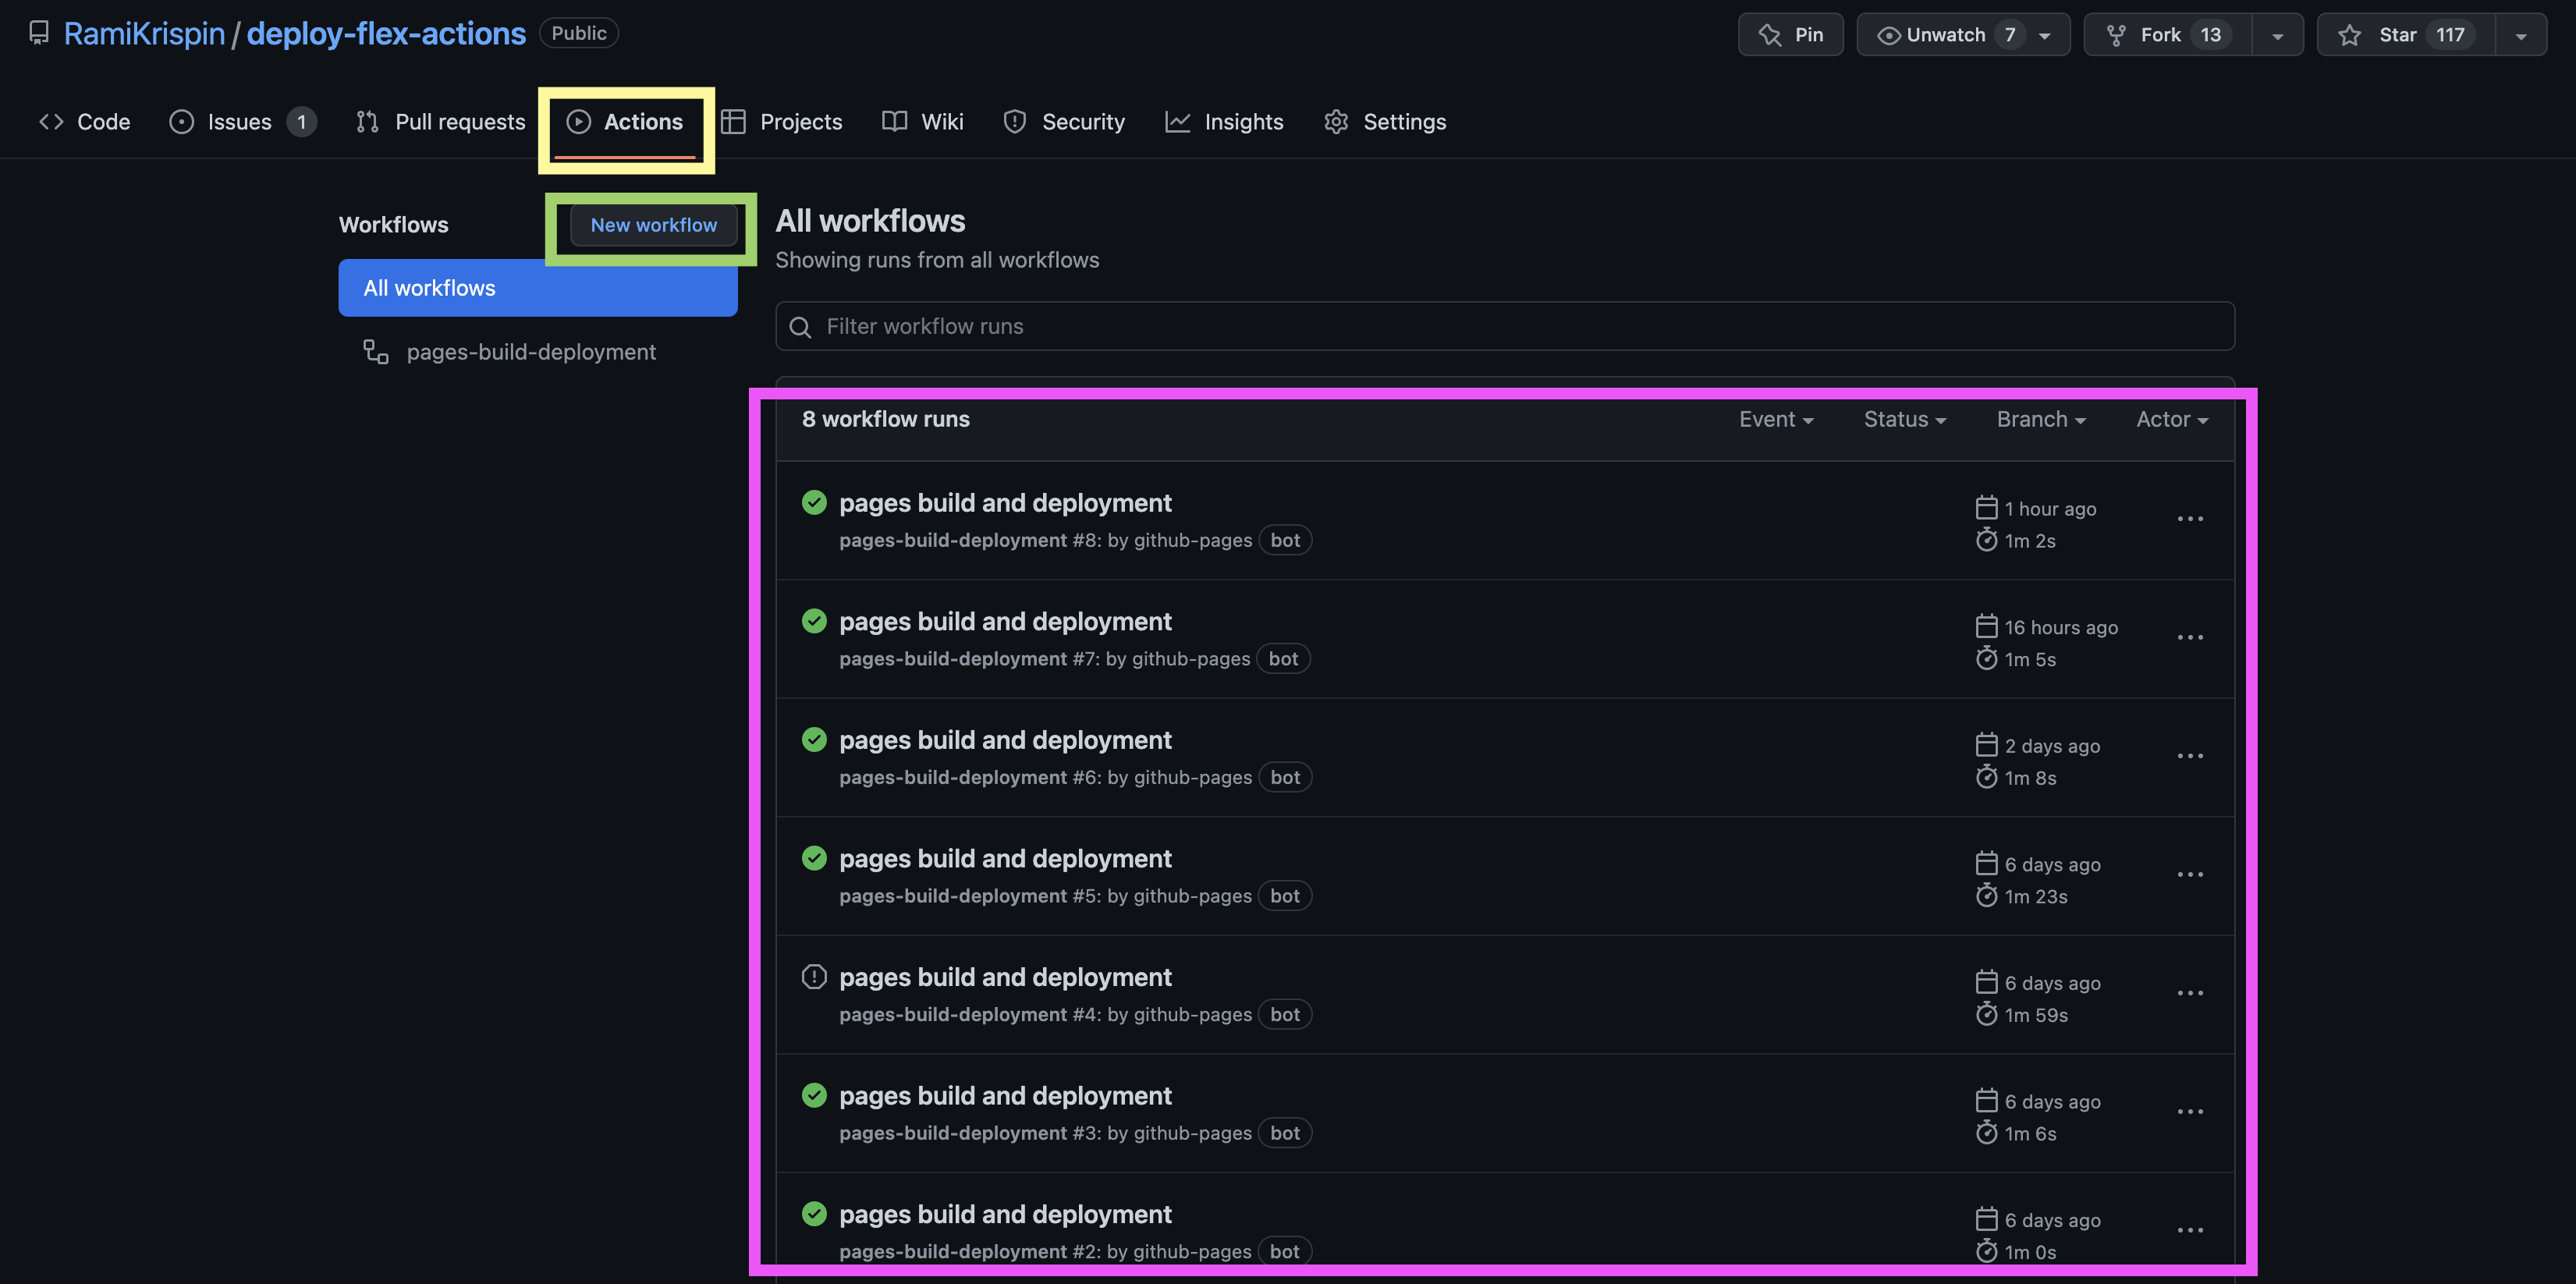
Let's start with creating a new workflow by opening the Actions tab (marked in yellow on the screenshot below) on the repository's main menu and selecting the New workflow button (marked in green).
Note: The deployment to Github Pages triggered a daily workflow to refresh and deploy the website on Github Pages (marked in purple). Although the name of this action state "build and deploy", it is not refreshing and rendering the dashboard. Therefore we will have to run a dedicated action for that.
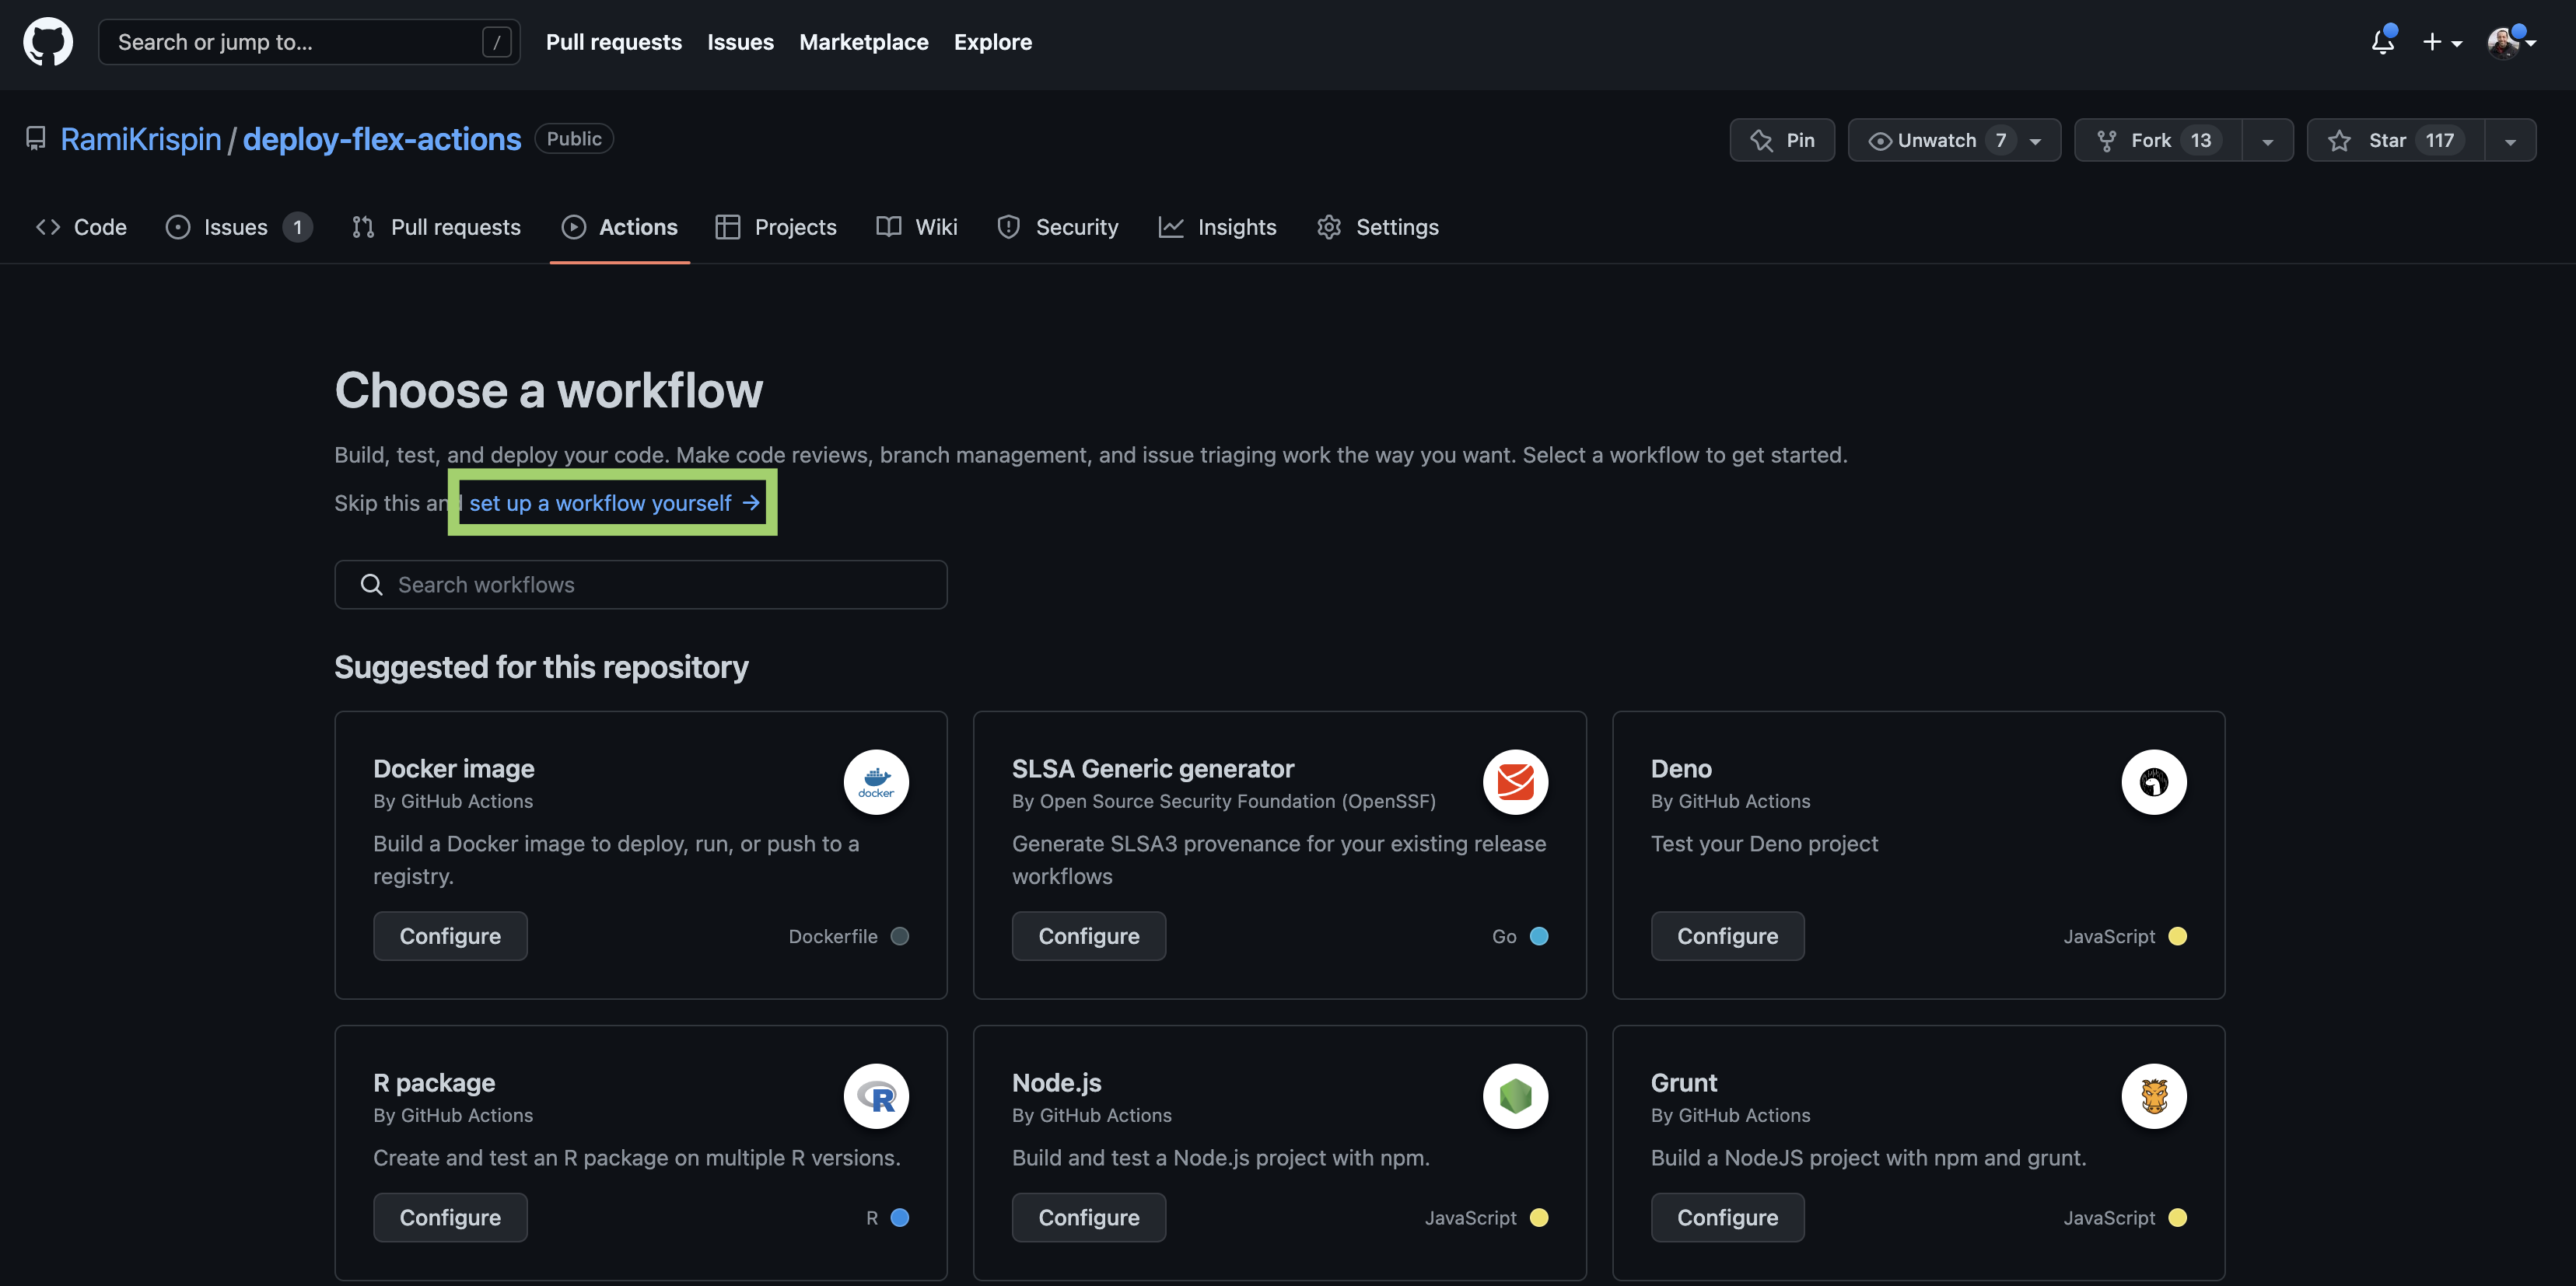
In the next step, we will select the type of workflow. There is no specific built-in workflow for our use case. Therefore we will select the set up a workflow yourself (marked in green) option:
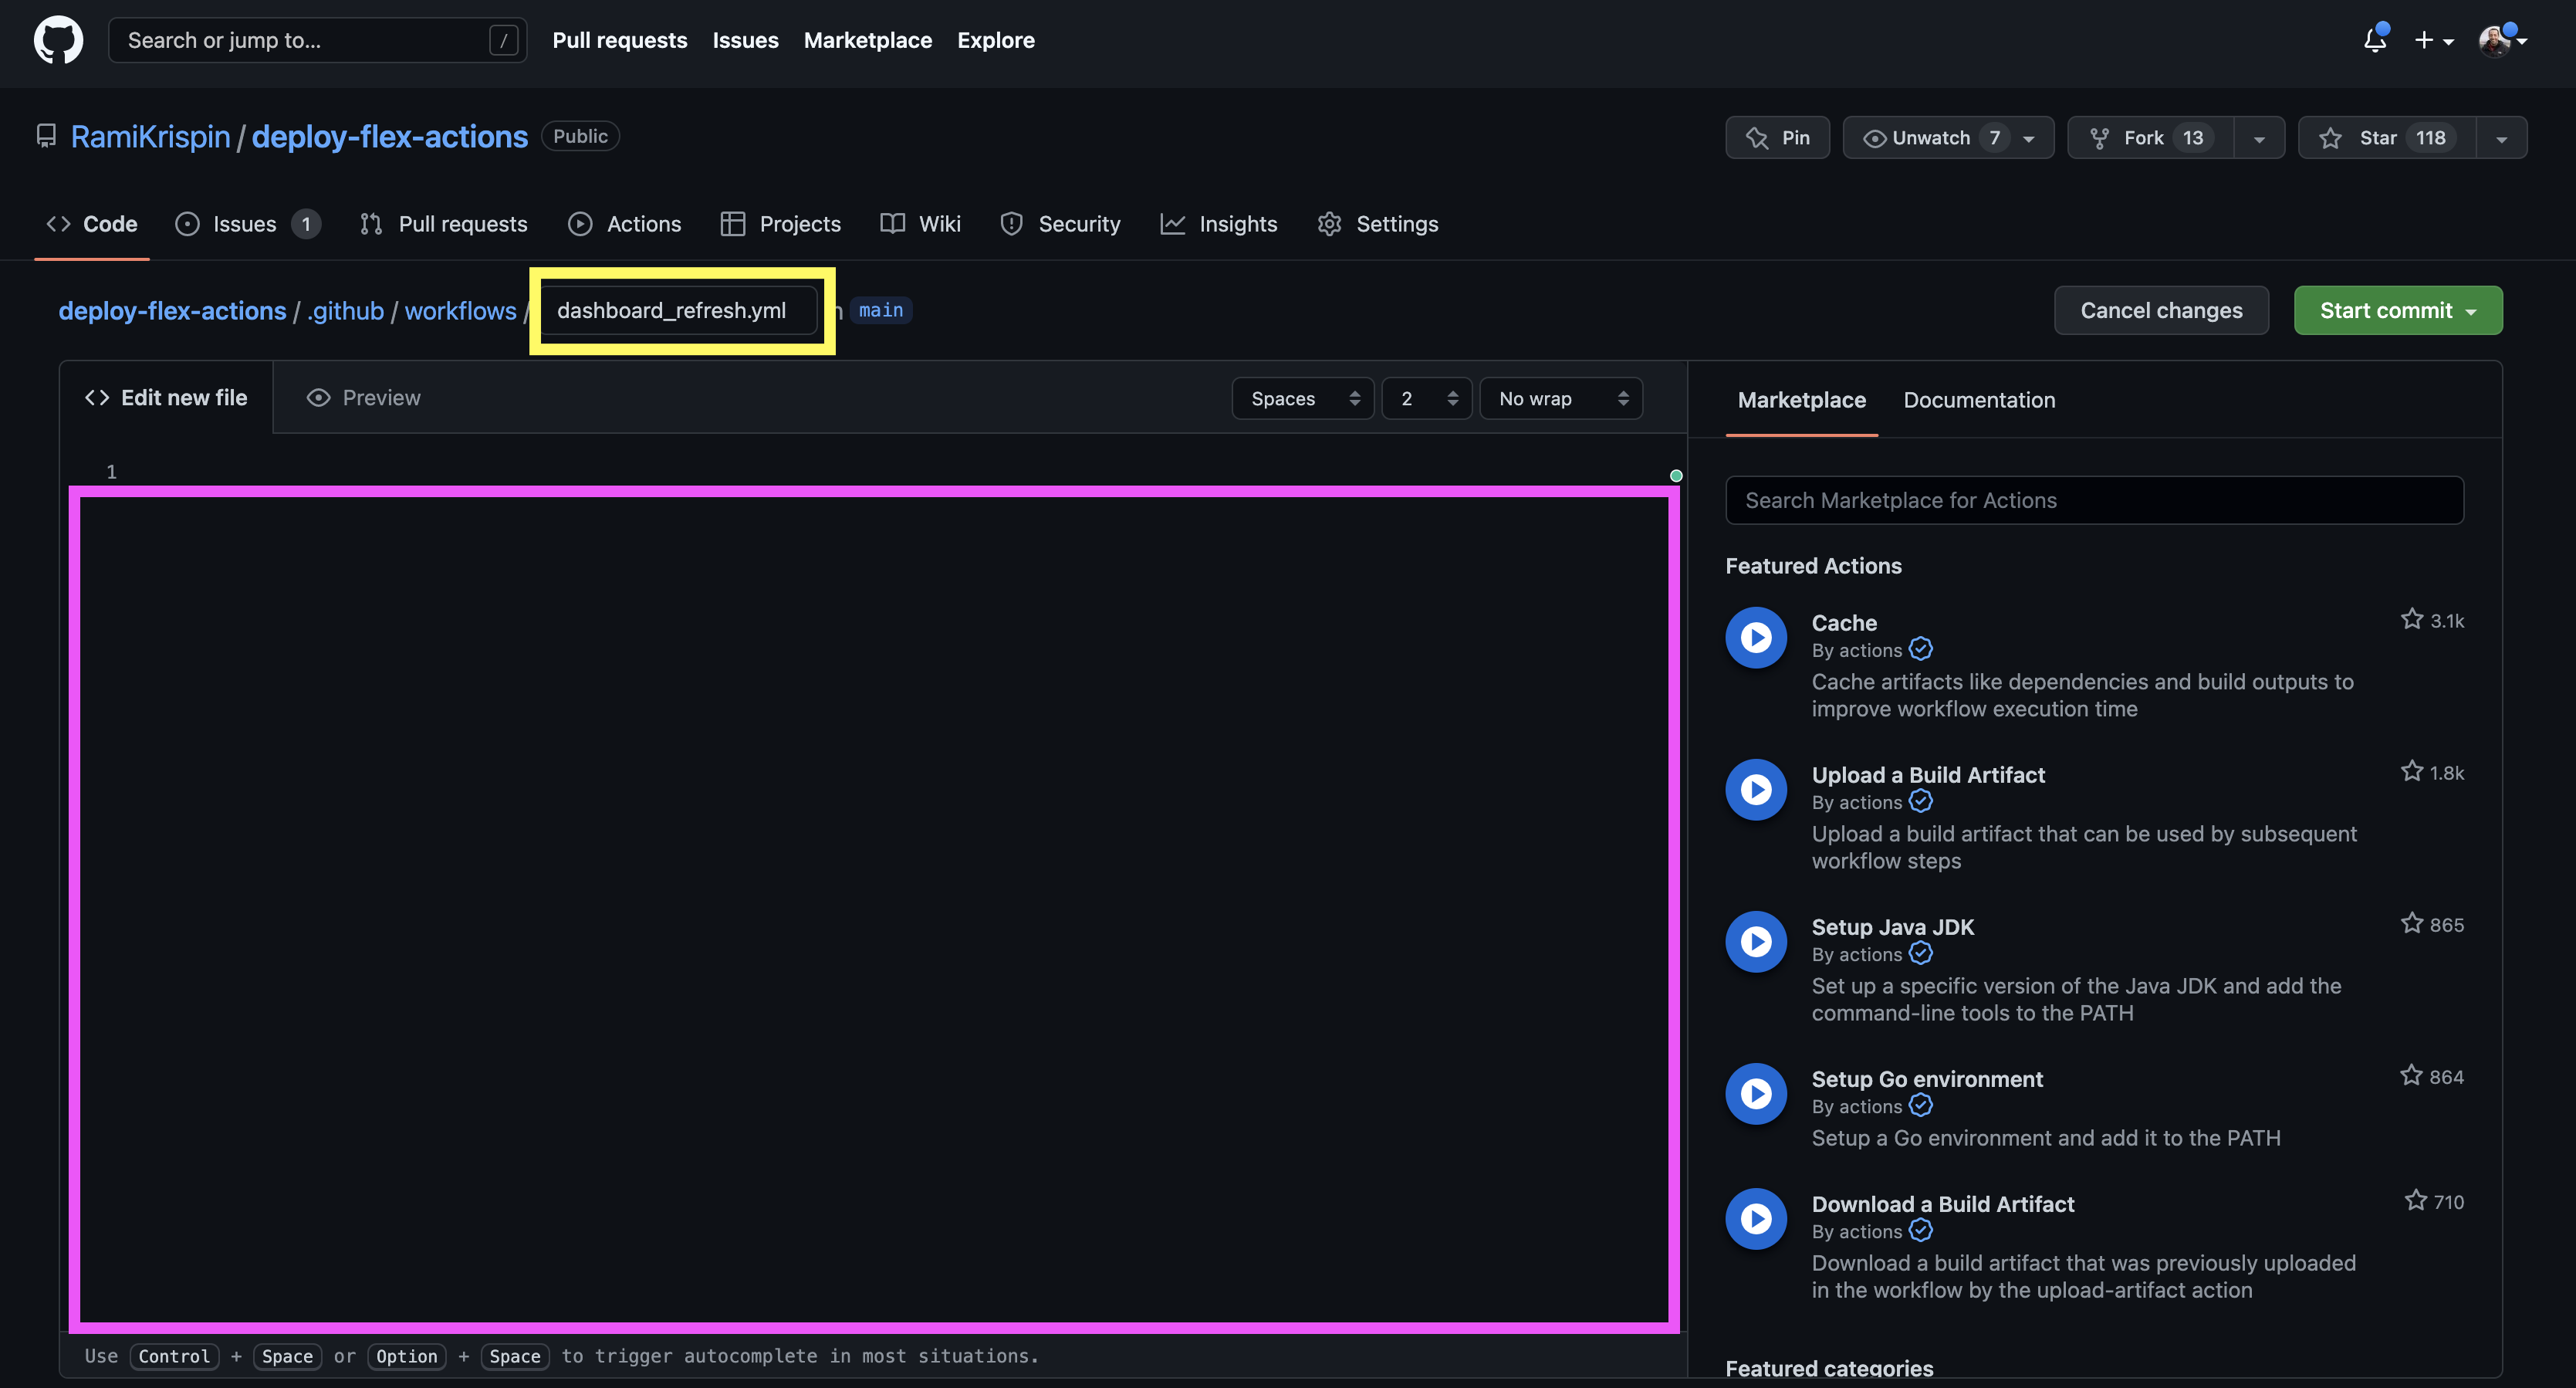
Last but not least, we will set the workflow. Github will automatically generate a file named main.yml under the folder .github/workflows/.
To add some context, let's rename the file name to dashboard_refresh.yml (marked in yellow above), remove the built-in code example (marked in purple) and replace it with the following code:
name: Dashboard Refresh

on:
  schedule:
    - cron:  '0 */12 * * *'
jobs:
  refresh-the-dashboard:
    runs-on: ubuntu-20.04
    container:
      image: rkrispin/flex_dash_env:dev.0.0.0.9000
    steps:
    - name: checkout_repo
      uses: actions/checkout@v2
      with:
        ref: 'main'
    - name: Render Rmarkdown
      run: bash ./bash/render_dashboard.sh "YOUR_GITHUB_USER_NAME" "YOUR_GITHUB_LOGIN_EMAIL"
Let's review the key arguments of the above yml file:
name- Defines the workflow nameon- Defines the trigger method of the job. In our use case, we will set a scheduled job to run every 12 hours:- The cron setting on Github Actions follows the regular structure of minute, hour, day of the month, month, and day of the week.
- In the above setting,
0 */12 * * *represents - running every 12 hours at the beginning of the hour - The crontab guru is a nice resource to translate cron settings into human language format
jobs- Defines the jobs to execute during the run time. In our case, we have a single job to run, and we define it asrefresh-the-dashboardruns-on- Sets the OS system to run the job. So far, I have used Ubuntu-18.04. However, Github announced that they deprecated this version. Therefore, we will use the recommended version - Ubuntu-20.04.container- This argument enables us to run the job inside a containerized environment (which was the main reason for setting a dockerized development environment).image- As the name implies, set the image name. In this case, we will use the same image we used for the development
steps- Defines the executions steps of the job using the following arguments:name- Defines the step namerun- Executes code on the command line
- We will use the following steps:
- Checkout from the repo (equivalent to git clone), and use the
refargument to define the branch we want to use for the job. - Once we checked out, we can call, reference, and run files from the repo (with respect to the branch we referenced)
- We will use the
runargument to call the bash script that we created to render the dashboard and push the changes
- Checkout from the repo (equivalent to git clone), and use the
After setting the workflow on the Github interface, I recommend syncing the changes on the origin with your local branch by using git pull.
This tutorial covered the foundation of using Docker + Github Actions to deploy and continuously update a flexdashboard dashboard on Github Pages. We review the development process, from scoping and prototyping the dashboard to developing a dockerized environment and setting a workflow on Github Actions to automate the dashboard. While we did not dive too deep into Docker and Github Actions, I hope this tutorial provides you with a good entry point (and motivation) for using those tools for your own projects.
So what is next? Practice.
Docker could be painful sometime, but it is worth the investment. In my opinion, there is no better way to learn it than building and getting your hand "dirty" with breaking and getting "fun" errors. Here are a couple of suggestions for fun projects:
- Build a tracker dashboard. You probably want to find an open API that provides hourly, daily or weekly updates. For example:
- Chicago crime tracker
- Seattle bike rents tracker
- Consumption of electricity in the US (demand and supply)
- Air quaility tracker
- Deploy and run statistical and machine learning models on streaming data:
- Demand for electricity forecast
- Weather forecast
- Deploy a data pipeline
My recommendation is to start with a simple project and then add complexity. Good luck!
This is the first version of this tutorial. There are a couple of other topics that I did not include due to time limitations, but I would love to add them in the future. That includes topics such as Docker optimization, unit testing, more robust VSCode settings, etc. In addition, with the expected release of flexdashboard to the Quarto ecosystem, I would love to translate this tutorial to Julia, Observable, and Python.
Last but not least, all feedback is welcome! Please feel free to open an issue if you have any feedback about the tutorial or found some code issues.
This tutorial is licensed under a Creative Commons Attribution-NonCommercial-ShareAlike 4.0 International License.
