As part of my Milestone 3 project with Code Institute, I was challenged with designing, developing and implementing a back-end web application using Python and the flask micro-framework. Users are required to have the ability to create, read, update and delete(CRUD) data entries on a fully responsive full stack web application.
I decided to create an online healthy cooking recipe website which promotes healthy meals. All the recipes are tasty, eye catching and healthy nutritious meals, proving to the user that eating healthy doesn’t have to be mundane. Each recipe includes everyday ingredients that you can find in your local supermarket, and have easy to follow preparation and cooking methods that accommodates people of all cooking skill levels. Logged in users are able to add, edit, delete and update their own recipes. This website is a one stop shop for all your healthy recipes.

The idea of a recipe website isn't something new, but this website is moving the goal post's by making The Fitness Kitchen, a one stop shop for all your healthy recipes. Everyone has endless access to different recipe's, from Influencers to tv chefs, and from websites or social media pages to the old fashioned recipe book. One problem user's face, is they have to trawl through all these mediums to find the recipe they are looking for. The Fitness Kitchen is the solution. Registered Users can add, edit and delete their own recipes and have access to all the other recipes uploaded to the website. Un-registered users also have access to the recipes on the website the main difference being they don't have access to the CRUD functionality.
Users can filter the recipes to select meals from the following categories: breakfast/lunch/dinner/vegetarian/gluten free.
-
As a user I want to see healthy nutritious meals that encourage me to cook and eat healthy.
- When the user comes to the main page of the site they are greeted with all the various recipes and a brief supporting summary of each meal.
-
As a user I want the recipes to be broken into categories so I can filter the recipes shown to me.
- Reason for filtering option where user can select between breakfast, lunch or dinner food recipes and also a vegetarian filter.
-
As a user I want to get a more detailed look once I click on the recipe.
- Supporting html page for each recipe with detailed information for the meal and the method of preparation.
-
As a user I want to be able to add my own recipes so I can use this website as a one stop shop for all my recipes.
- Reason for ‘Add Your Own Recipe Page’.
-
As a user I want to be able to delete or update/edit the recipes I added to the website.
- Reason for users being able to edit/delete their recipes.
-
As a user I want to easily understand the purpose of the site and learn what the owner’s beliefs are.
- Reason for about page.
-
As a site owner, I want to ensure my website is secure, and I want to keep a dataset of my users.
- Reason for login/registration.
After reading the project brief i formulated a idea and jotted down notes and rough sketches on pen and paper. These ideas evolved into creating user stories which helped me formulate a plan to draw up some wireframes. I used Balsamic to build the wireframes. I created mockups for desktop, tablet and mobile viewports, so i could have an idea of what my website would look like, and i could follow a plan to avoid scope creep.
Desktop Wireframes (Click dropdown for images)


Tablet Wireframes (Click dropdown for images)

Mobile Wireframes (Click dropdown for images)

I used Bootstrap 4 to build the framework of the website. Bootstrap was the main tool frame responsible for making the PCN website responsive. This means the website automatically resizes itself to look good on all devices, be it mobile, tablet, laptop or desktop.
-
Black - Black is the dominant colour throughout this website. Black is elegant, sophisticated and it implies a premium brand. The black background gives prominence to the content on the site.
-
Burnt Orange - (#BF5D1D) This Burnt Orange colour is consistently used throughout the website's call to action buttons, flash messages and other subtle styling. This shade of orange is juxtaposed well with the elegant black to offer a modern feel which fits well within the health industry.
-
Silver - (#B7B4B2) This Silver colour is the main font colour for the body of the website. It is also used in the borders of the entry forms to offer a 3d feel against the black background.
-
Gold - (#BC9982) This Light shade of gold is used predominantly for the headings of the website. The light cold contrast well with the background and paired with the Oswald font it gives a classy feel.
-
#111111 (Lighter Shade of Black)
-
#46B123ED (Green)
-
#DC3545 (Red)
-
Whitesmoke
-
White
The “Oswald” font is the font used for all the headings and the “Open Sans” font is the font used for the body of the website. Sans serif is set as the fallback font in case for any reason the font isn't being imported into the site correctly.
Imagery is a reoccurring theme throughout the website. I felt images played a vital role in influencing a users decision in choosing a recipe. The Hero image especially works well in drawing the user in and given the website a very modern feel.
I created the logo on Tailor Brands. Although it is a paid service i feel the level of detail and quality of the template they use is worth it. I decided to go with a logo with a slogan for personal reasons, as i have used mostly initial styled logos in the past. The slogan here "Eat Yourself Healthy" acts like a call to action, enticing the user to navigate the website and hopefully register an account. The Red logo color and the black font works well against the clean hero image.
The homepage sets up to be enticing while at the same time obvious to the user the purpose of the website. The hero image paired with the logo, sets the theme of the website as a healthy food recipe site.
-
There is two obvious call to actions:
-
Flash Message - Informs users that they must register an account to add their own recipes.
-
Recipes Button - Users are prompted to click 'Recipes' button to bring them to the main recipes page.
-
Homepage (Click dropdown for images)

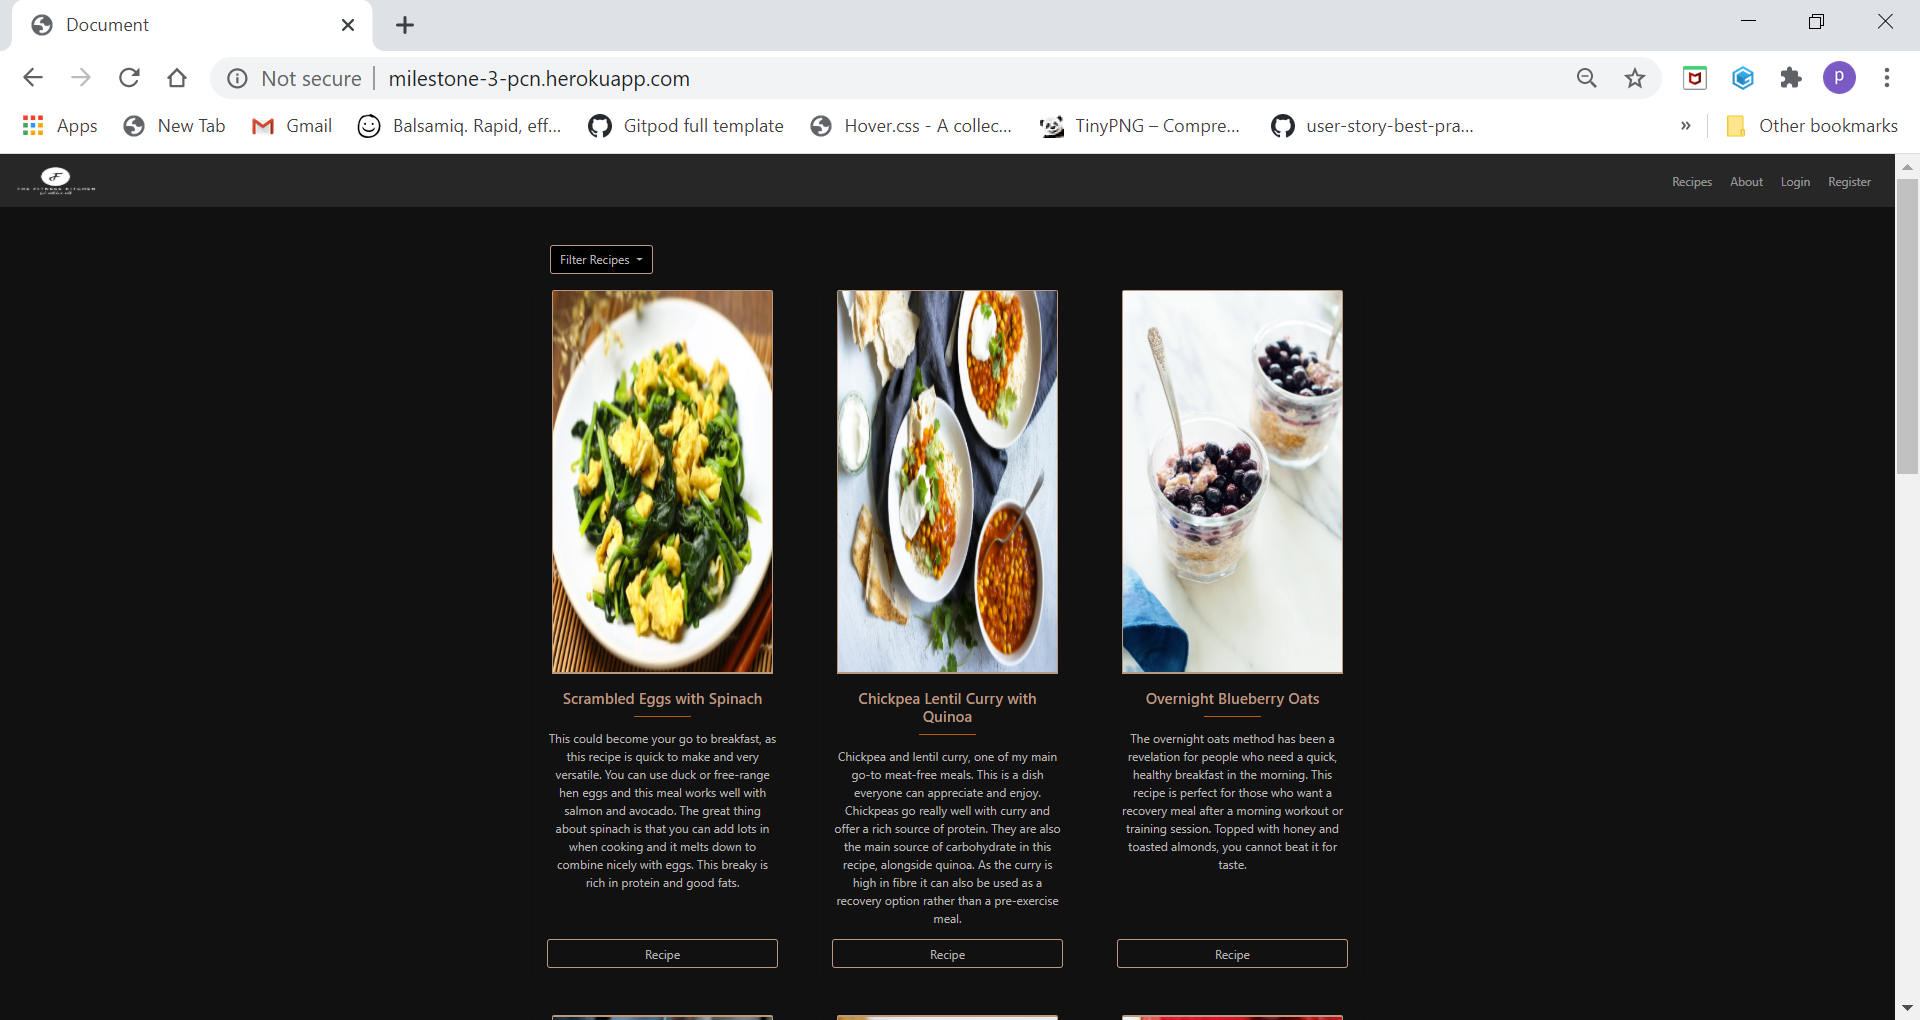
Although this is not the homepage of the site, it is the main page of the website. Each recipe is presented in the form of a Bootstrap card. Users get a snippet of the recipe, and can get more details of each recipe if they click the button on the bottom of each recipe card deck. Users can also use the filtered dropdown to select different recipe categories(breakfast/lunch/dinner/vegetarian/gluten free). I included a pagination feature on this page, to safeguard against the future growth of this website where users would potentially have to scroll endlessly whilst browsing the website. With the pagination function, the recipe's page is capped at 9 recipes per page.
Users do not need to be logged in to access this page.
Card Deck (Click dropdown for images)

Filter Dropdown (Click dropdown for images)

Pagination (Click dropdown for images)

The About page is to reaffirm to the user the purpose of the website. The user will be able to gain trust that 'The Fitness Kitchen' is a genuine brand and set up for genuine reasons.
Login is not required for this page, as this may be the final affirmation the user needs before registering an account with 'The Fitness Kitchen'
About Page (Click dropdown for images)


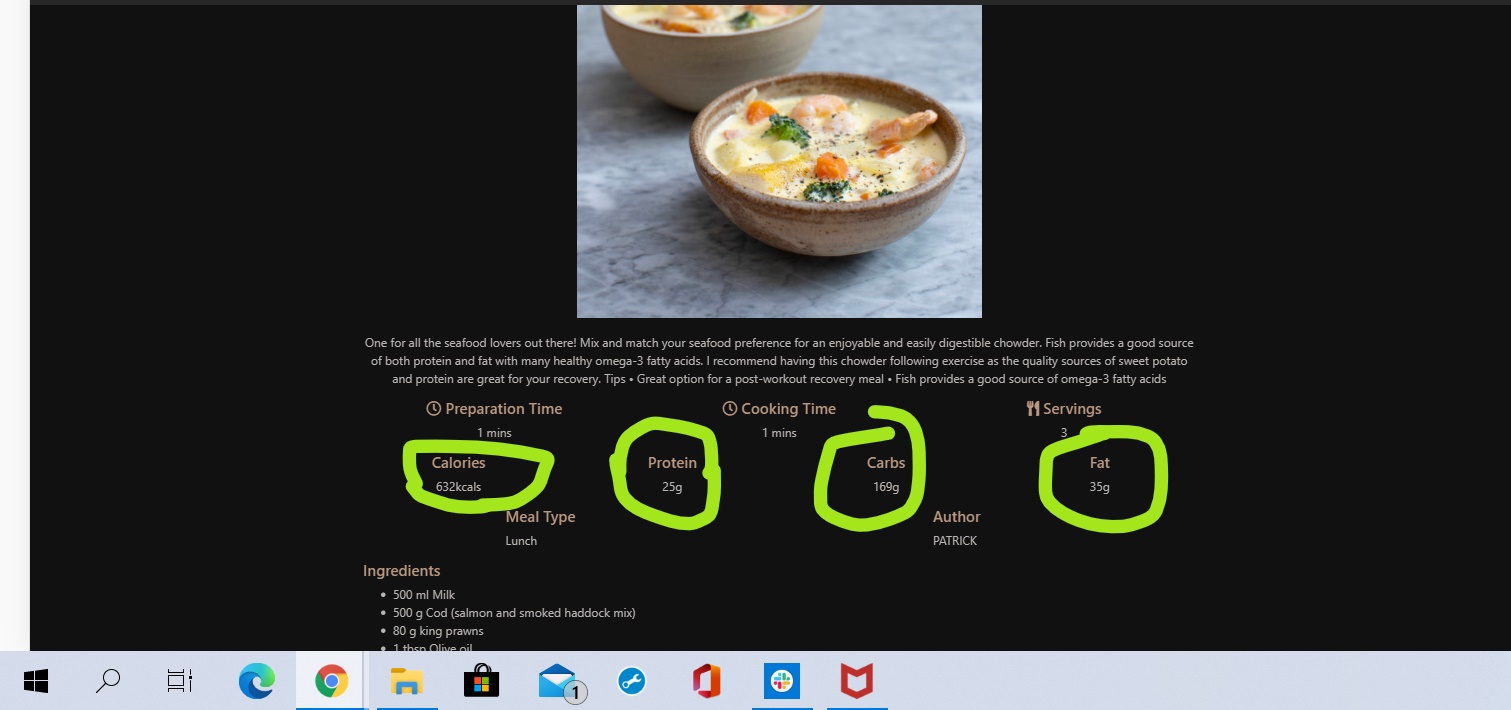
Once the user clicks the recipe button on the card deck they are brought to that specific recipes details, ingredients and method. Users are not required to log in to access these pages. If the user is logged in and they are the author of that specific recipe they have access to edit and delete the recipe.
Default View (no edit/delete) (Click dropdown for images)

Edit and Delete Buttons appear if the user is logged in and they've created the recipe (Click dropdown for images)

The Add and Edit recipe pages are very similar. The only main difference is that the fields are pre-populated with the fields the user inputted when they initially added the recipe. All fields are required so the user can't leave any blank recipes.
Login is required for these pages.
Add Recipe (Click dropdown for images)

Edit Recipe (Click dropdown for images)

The Delete Recipe functionality doesn't have a page on its own, but if the user is logged in and they wish to delete their recipe, they are presented with a model to confirm deletion. This is to safeguard against a user deleting a recipe unintentionally.
Users must be logged in, and they must be the creator of that specific recipe in order to have access to delete the recipe.
Delete Recipe (Click dropdown for images)

If users are logged in , they can click the 'My Recipe' tab on the nav bar and it will showcase only the recipes the user has added. Pagination is also included on this page for the very same reasons outlined above in the Recipes Page.
My recipes (Click dropdown for images)

Authentication wasn't required for this Milestone Project, but after I implemented the CRUD functionality and I had a minimum viable product, i decided to implement a login and registration. Having authentication allows for a more secure website. Users can't delete other user's recipes. Authentication also allows the website to be more personal. Users have their own 'My Recipes section' and are also greeted with their session username in the flash messages.
If users are already logged in and unintentionally get redirected to the 'Login' page by the browser, they will be redirected to their own recipes page and a flash message will greet them "You are already logged in". I decided against redirecting logged in users away from the 'Register' page as it's not a distinct possibility that a user may want to register another account.
Bcrypt was used to hash the passwords in the database. Otherwise, I as the site owner, would be able to see everyones password in the database.
Login Page (Click dropdown for images)

Register Page (Click dropdown for images)

Enter ( /login ) in the browser and Already Logged, redirected with message (Click dropdown for images)

Personal greeting upon Logging in (Click dropdown for images)

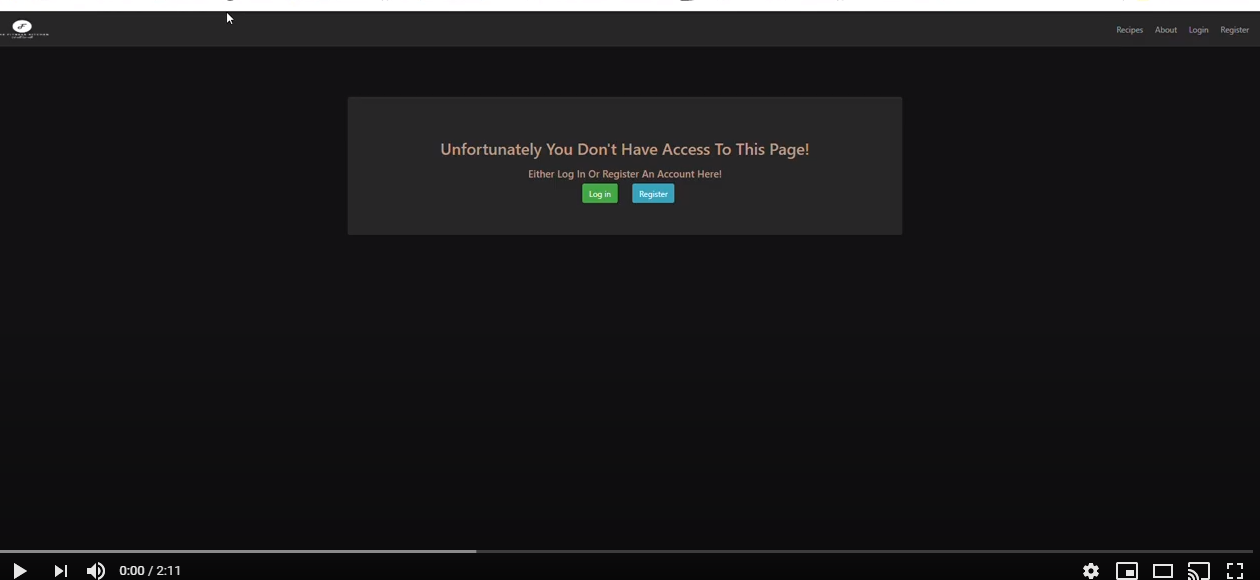
if a user is not logged in and tries intentionally or unintentionally to reach a page that requires a session log in, then they will be greeted with this message below. Users have the option to log in, register or else navigate back by clicking the previous button on the browser tab.
Access Denied (Click dropdown for images)

I created a customized error page incase a user gets a 404 message
Access Denied (Click dropdown for images)

The base.html contains the basic layout which is common to all the other templates, and it is from this base template that we extend the layout for other pages. We modify the parent template(base.html) using the child templates (e.g the pages listed above). The {% extend base.html %} must be the first tag in the child templates. This tag tells the template engine that this template extends from the parent template or ( base.html ).
We then use Template inheritance eg.
{% block content %}
{& endblock %}
To override the base.html page and add our custom code to the child elements.
The Base.Html page in this website contains all the relevant links to our bootstrap framework, font awesome, css files, Jquery and other relevant meta tags. The Base.html also sets the template for the navbar and flash messages used throughout the website and the reoccurring css styles like font, colour, background colour etc.
The Navbar differs slightly for users who are logged in and users who are not.
Users who are logged in see 'Recipes / About / Login / Register".
Users who are not logged in see "Recipes/ Add Recipes / My Recipes / Logout".
Navbar for logged in users (Click dropdown for images)

Navbar for user's who are not logged in (Click dropdown for images)

- HTML5 - is the standard markup language for documents designed to be displayed in a web browser.
- CSS3 - Cascading Style Sheets is a style sheet language used for describing the presentation of a document written in a markup language like HTML.
- Python - Python is an interpreted, high-level, general-purpose programming language.
- Javascript/Jquery - JavaScript is among the most powerful and flexible programming languages of the web. It powers the dynamic behavior on most websites.**
** JavaScript wasn't used directly in this project but it was imported by Bootstrap for some of the functionality(eg. Collapsible Navbar, Model)
-
- Bootstrap was used to assist with the responsiveness and styling of the website.
-
- Flask is a lightweight WSGI web application framework. It is designed to make getting started quick and easy, with the ability to scale up to complex applications.
-
- Google fonts were used to import the 'Oswald' font and the 'Open Sans' font into the style.css file which is used on all pages throughout the website.
-
- Font Awesome was used on throughout the website to add icons for aesthetic and UX purposes.
-
- Git was used for version control by utilizing the Gitpod terminal to commit to Git and Push to GitHub.
-
- GitHub is used to store the projects code after being pushed from Git.
-
- Balsamiq was used to create the wireframes during the design process.
-
- Python style guide checker. PEP8 is a tool to check your Python code against some of the style conventions in PEP 8.
-
- MongoDB is a cross-platform document-oriented database program.
-
The W3C Markup Validator and W3C CSS Validator Services
- Used to validate the HTML and CSS of the project to ensure there were no syntax errors in the project.
-
CRUD functionality is the main features of the project.
- Create Logged in users can create a new recipe by submitting the add recipe form. Users who are not registered can also create an account.
- Read All users have access to see all the recipe cards and can select each recipe for more details if they are logged in or not.
- Update Logged in users can edit only their own recipes.
- Delete Logged in users can delete only their own recipes.
-
Locate - Users can filter recipes under different categories in the dropdown menu.
-
Pagination - is used on the recipes page and my recipes page in order to de-clutter the website page.
- I would look to improve the process of uploading an image to MongoDB
- Currently users can only upload images by providing the web address. I found this Pretty Printed tutorial on Youtube which could help with this functionality, but with the tight two week time frame i didn't have time to implement this.
- Filter by date on 'Recipes' page and 'My Recipes Page'.
- This would help so fresh content is shown first.
- Admin Account
- Currently i only have access to delete and change data from MongoDB. It would be more efficient to have permission and access to manage the website from an Admin Account.
- Users Interaction
- Allow users to comment on other recipes and also rate recipes.
- Full Text Search
- I felt this would be more appropriate for when the website grows and their is more content for the user to search through.
- Delete an Account.
- Allow users access to delete their own account so they don't feel trapped by The Fitness Kitchen.
- Message if user has no recipes uploaded.
- Currently if a user is logged in and the navigate to the 'My Recipes' section they are greeted with the message below.
- If i had the time i would impliment an if statement which checks if the user has 0 recipes, and if so, they would be greeted with a message "you have no recipes, add recipes here".
No Recipes Message(Click dropdown for images)

Manual testing was the only requirement to access the functionality, usability and responsiveness and data management of my full stack web application. Debugging was carried out on an ongoing basis throughout the development of the project. Whilst coding i would run my code in the browser and check for any bug issues and make changes and fixes on an ad hoc basis. Some of the debugging i carred out, is mentioned in the responsiveness sub section below.
I carried out manual testing and documented any errors/random side-effects captured in the Chrome Developer Tools. I loaded the website several times, and forced browser refresh to try and catch any errors but thankfully there was none.
Dev Tool Testing (Click dropdown for images)

I carried out PEP8 testing to improve the readability and consistency of my Python code. Below is my pass result.
PEP8 (Click dropdown for images)

I also passed the W3C CSS Validator.
CSS Validator (Click dropdown for images)

I tested the code on W3C HTML VALIDATOR.
I got some errors in the code but this was down to the Jinga templating
HTML Validator (Click dropdown for images)

.png)
I carried out extensive testing of the responsiveness of my website, by checking how the website rendered on different devices and on lower screen widths. I have showcased screngrabs of how the website pages rendered on desktop/laptop view, tablet and mobile view.
Testing in Chrome Developer Tools was carried out on an ongoing basis to check the responsiveness and carried out debugging of issues.
Whilst working on the project i didn't like how the fruit and vegetables on the Hero Image went out of view on smaller screen widths below 992px. I implemented a media query to solve this issue.
Home Page Responsiveness (Click dropdown for images)


During debugging, i didn't like the look of how the recipes page rendered on iPad only (not iPad Pro) so i made a media query for tablet screen widths, which changed the image size and font size. I didn't provide screen grab's for the filtered recipes pages or the 'My Recipe's Page, as they follow the same template.
Recipe Page Responsiveness (Click dropdown for images)


I just provided the screen grab's of the add recipe form as the edit form follows the same template. The form fields are single columns on smaller screen widths.
Add/Edit Recipe Page Responsiveness (Click dropdown for images)


Nothing was changed for these pages as they rendered fine on all devices
Login Page Responsiveness (Click dropdown for images)


Registration Page Responsiveness (Click dropdown for images)


Access Denied Page Responsiveness (Click dropdown for images)


I created a Testing Matrix in Excel to record my findings.
Testing Matrix (Click dropdown for images)

-
The main points from this type of testing
-
The Website was tested on Google Chrome,Internet Explorer, Microsoft Edge, Mozilla Firefox and Safari browsers.
-
The website was viewed on a variety of devices such as Desktop, Large Monitor, Laptop, iPhone7, iPhone 8 & iPhoneX and other samsung devices.
-
A large amount of testing was done to ensure that all pages were linking correctly.
-
Friends and family members were asked to review the site and point out any bugs and/or user experience issues.
-
Yet again, Internet Explorer performed poorly. Buttons are either positioned incorrectly or don’t appear at all. Horizontal rules are also out of position on Internet Explorer.
-
-
As a user I want to see healthy nutritious meals that encourage me to cook and eat healthy.
-
On the Recipes page the user is greeted with a page full of eye catching reicpe images encouraging the user to browse through the diffrent options. Upon clicking the recipe button under the recipe card they are interested in, they are brought to the recipe_selected page, which shows more information on that specific recipe.
-
Each recipe contains their macronutrients so they can identify if they specific meal can fit their daily needs and be healthy.
User wanting healthy nutritious meals(Click dropdown for images)
-


-
As a user I want the recipes to be broken into categories so I can filter the recipes shown to me.
- On the recipes page users can click the dropdown and they can select between the different meal categories.
User Story Filter Categories(Click dropdown for images)
- As a user I want to get more detailed look once I click on the recipe.
- Users get more specific details on the relevant recipe when they click the recipe button on the bottom of the card deck.
- As a user I want to be able to add my own recipes so I can use this website as a one stop shop for all my recipes.
- Users who are logged in can add their own recipes. When they click the My Recipes tab, they are presented with a page full of their own recipes only.
User Story Add Recipes(Click dropdown for images)
- As a user I want to be able to delete or update/edit the recipes I added to the website.
- Users who are logged in can edit and delete their own recipes only.
User Story Edit/Delete(Click dropdown for images)

- As a user I want to easily understand the purpose of the site and learn what the owner’s beliefs are.
- Reason for the About page so the user can get a better understanding of the app and the brand.
- As a site owner, I want to ensure my website is secure, and I want to keep a dataset of my users.
- Reason For Login/Registration.
-
As a site owner i want to be able to control who can delete content as part of the crud functionality requirements.
- One of the main reasons for creating the authentication was to stop someone coming onto my site and deleting all the recipes. Their is an if statement set up which protects the content being deleted unless the user is the author of that recipe.
User Story If Statement(Click dropdown for images)

In the video i have uploaded below, you can get a brief snippet of how i tested my defensive design around authentication for this project.
Pages like 'My Recipes', 'Add Recipes', 'Edit Recipes' required session login. I tested the website by typing the url of those pages into the address bar and as planned i was greeted with the access denied page. I also tested if i could access the 'Login' page whilst logged, and as planned i was redirected away from the 'Login' page. I also tested imputting incorrect data into the login and registration pages and the correct reponses were rendered.
Click the image or the link here Youtube Video
I first set up my repository on Github. Github is a hosting platform which stores and presents my code. When logged into GitHub i click the green button on the right handside under repositories to create a new repository. After creating a repository on github i click the green 'Gitpod' button which opens my repository in Gitpod. I don't ever create projects directly in Gitpod, i create them in Github, and use the green button to open my project and begin coding.
Gitpod is an IDE (integrated development environment) that allows for software development.
Once i have inserted some code, i can run my page in the browser and within seconds, i can view the web version of my page.
Gitpod is where i develop my project, write code and complete debugging issues.
An important note, after i have created the repo in Github, I then open the repository each time from the Gitpod homepage, which shows me my most recent workspaces. If I were to click the green button in Github every time, this would just create a new version of my repository each time.
In Gitpod, the next step is to commit any significant work and push it to Github.
This project it is hosted on Heroku and i have outlined below how to deploy your project on Heroku.
You will also need to create an account with MongoDB.
To deploy this project to heroku, take the following steps:
-
Create a
requirements.txtfile using the terminal commandpip freeze > requirements.txt. -
Create a
Procfilewith the terminal commandecho web: python app.py > Procfile. -
git addandgit committhe new requirements and Procfile and thengit pushthe project to GitHub. -
Create a new app on the Heroku website by clicking the "New" button in your dashboard. Give it a name and set the region to Europe.
-
From the heroku dashboard of your newly created application, click on "Deploy" > "Deployment method" and select GitHub.
-
Confirm the linking of the heroku app to the correct GitHub repository.
-
In the heroku dashboard for the application, click on "Settings" > "Reveal Config Vars".
-
Set the following config vars:
- The MONGO URI: - To get you MONGO_URI read the MongoDB Atlas documentation here
- SECRET_KEY: <your_secret_key>
- DEBUG: False
- PORT: 5000
- IP: 0.0.0.0

-
In the heroku dashboard, click "Deploy".
-
In the "Manual Deployment" section of this page, made sure the master branch is selected and then click "Deploy Branch".
-
The site is now successfully deployed.
To run this project on your own IDE follow the instructions below. Ensure you have an IDE such as GitPod and the following installed:
- PIP
- Git
- Python3
- If you are using the Code Institute Full template the above will already be installed
- A MongoDB account sign up here
- After installing all required modules to make your functions work you need to run the command pip3 freeze -r requirements.txt in the CLI. This will create a requirements file, which later in the project, can be updated with the same command if you were to add more modules.
- In your local IDE create a file called env.py
- Inside the env.py file, create a SECRET_KEY variable and a MONGO_URI to link to your own database.
- Make sure to immediately add env.py to a .gitignore file so it's not committed and pushed to the repository where anyone can then see the SECRET_KEY and MONGO_URI
- You can now run the application with the command python app.py
The term "schema" refers to the organization of data as a blueprint of how the database is constructed. My database collection was made up of 3 databases; Recipes, Recipe Categories and Users.
The Recipes database stored all the information that users imputted when adding and editing recipes. It stored all the key information such as ingredients, methods etc.
The Recipe Categories database stored all the meal types. This was used to filer the recipes on the dropdown in the recipes page.
The Users database stored the user information. This information is checked when the users inputs their login details. You can see too that bcrypt has succesfully hashed the passwords in the image below.


- I followed this online tutorial on Youtube to create the authentication. I needed to change the code myself as this video was 4 years old. The (Flask-Brypt)[https://flask-bcrypt.readthedocs.io/en/latest/) documentation helped with this.
- I used this Stack Overflow post to come up with a way to upload my video on authentication testing to the README file.
- The Fitness Kitchen logo was created using Tailor Brands
- Shutterstock was the source for the Hero image and About image.
- Davey Nutrition was the source for the recipe images.
- Font Awesome was the source of all the icons.
- All of the recipe content was taken from Davey Nutrition's online reicpes.
- The rest of the content was written by myself.
-
My mentor, Precious Ijege was a great help. The three mentor sessions were invaluable. He explained every suggestion in a clear concise manner, and pointed out bugs i would never have seen.
-
My tutor, Cormac Lawlor was very supportive during the project. Being a past student himself, he was aware of certain issues i was facing and was always at hand to offer support.
-
Brian O' Grady and Matt Rudge's teaching of the course content, in particular the 'Task Manager' mini project was a great help in growing my Flask and python skils prior to commencing this project.
-
slack channels were a great help in particular the dara-centric-dev channel. Although i didn't ask a question directly in the channel, seeing issues that were similar to mine being resolved was a great help in this project.