Update: The code has been modified to use Sepolia as Rinkeby Testnet is not supported anymore.
Update: You should use
ipfs://instead ofhttps://ipfs.io/for your tokenURI


This is a repo to work with and use NFTs smart contracts in a python environment, using the Chainlink-mix as a starting point.
If you'd like to see another repo using random NFTs that are deployed to mainnet, check out the D&D package.
Please install or have installed the following:
- Install Brownie, if you haven't already. Here is a simple way to install brownie.
pip install eth-brownieOr, if that doesn't work, via pipx
pip install --user pipx
pipx ensurepath
# restart your terminal
pipx install eth-brownie- Clone this repo
brownie bake nft-mix
cd nft
npm install -g ganache-cliIf you want to be able to deploy to testnets, do the following.
- Set your environment variables
Set your WEB3_INFURA_PROJECT_ID, and PRIVATE_KEY environment variables.
You can get a WEB3_INFURA_PROJECT_ID by getting a free trial of Infura. At the moment, it does need to be infura with brownie. You can find your PRIVATE_KEY from your ethereum wallet like metamask.
You'll also need testnet Sepolia ETH and LINK. You can get LINK and ETH into your wallet by using the Sepolia faucets located here. If you're new to this, watch this video.
You can add your environment variables to the .env file:
export WEB3_INFURA_PROJECT_ID=<PROJECT_ID>
export PRIVATE_KEY=<PRIVATE_KEY>
Then, make sure your brownie-config.yaml has:
dotenv: .env
You can also learn how to set environment variables easier
Or you can run the above in your shell.
There are 2 types of NFTs here.
SimpleCollectibles.solAdvancedCollectibles.sol
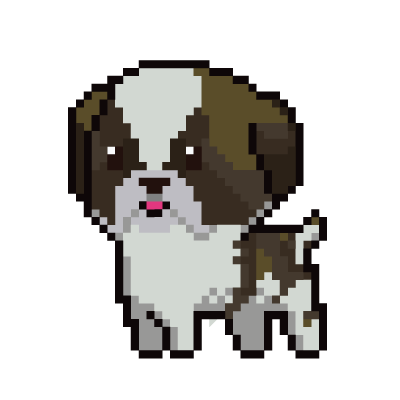
They each deploy unique dogs. The advanced version gives you a random breed (out of a Pug, Shiba Inu, and St. Bernard).
The advanced collection uses a Chainlink VRF to deploy the random dog.
You can 100% use the Sepolia testnet to see your NFTs rendered on opensea, but it's suggested that you test and build on a local development network so you don't have to wait as long for transactions.
The simple collectibles work on a local network, however the advanced requires a testnet. When the video tutorial was launched, Rinkeby was used, but ever since it was discontinued we have switched to Sepolia as it is the testing standard for NFT platforms. You will need testnet Sepolia ETH and testnet Sepolia LINK. You can find faucets for both in the Chainlink documentation.
brownie run scripts/simple_collectible/deploy_simple.py --network sepolia
brownie run scripts/simple_collectible/create_collectible.py --network sepolia
You'll need testnet ETH and testnet LINK in the wallet associated with your private key.
brownie run scripts/advanced_collectible/deploy_advanced.py --network sepolia
brownie run scripts/advanced_collectible/create_collectible.py --network sepolia
Then:
brownie run scripts/advanced_collectible/create_metadata.py --network sepolia
brownie run scripts/advanced_collectible/set_tokenuri.py --network sepolia
The simple contract and the advanced contract can be verified if you just set your ETHERSCAN_TOKEN.
There are some helpful scripts in helpful_scripts.py.
After running the scripts from the For the Advanced ERC721 section
- Create the metadata
Metadata is the URI needed to upload data. You can either:
- Upload to IPFS yourself
- Use the metadata already created when you cloned this repo.
Download IPFS
Set export IPFS_URL=http://127.0.0.1:5001 and export UPLOAD_IPFS=true environment variables
Run the IPFS daemon: ipfs daemon
Then Run
brownie run scripts/advanced_collectible/create_metadata.py --network sepolia
Alternatively, you could upload the uri manually:
Add the file created in metadata/sepolia/NAME.json to IPFS or Pinata.
Just run:
brownie run scripts/advanced_collectible/create_metadata.py --network sepolia
- Set the tokenURI Run
brownie run scripts/advanced_collectible/set_tokenuri.py --network sepolia
And after some time, (you may have to wait up to 20 minutes for it to render on opensea), you should see your NFT on opensea! It'll look something like this.
If you want to auto-upload to pinata instead of IPFS automatically, you can do so by getting a Pinata API Key.
You'll need the following environment variables (you can get them from Pinata)
PINATA_API_KEY
PINATA_API_SECRET
Then run:
python scripts/upload_to_pinata.py
brownie test
pip install black
pip install autoflake
autoflake --in-place --remove-unused-variables -r .
black .
To get started with Brownie:
- Chainlink Documentation
- Check out the Chainlink documentation to get started from any level of smart contract engineering.
- Check out the other Brownie mixes that can be used as a starting point for your own contracts. They also provide example code to help you get started.
- "Getting Started with Brownie" is a good tutorial to help you familiarize yourself with Brownie.
- For more in-depth information, read the Brownie documentation.
Shoutout to TheLinkMarines on twitter for the puppies!
Any questions? Join our Discord
This project is licensed under the MIT license.