Interactive tool that helps visualize national curriculum data stored in Wikidata. It also shows metrics about Wikipedia articles that are relevant to the curriculum. This is a boilerplate that will support the implementations in several countries and languages.
Credits to Wikipedia e Scuola Italiana for the original implementation. Idea and leadership: Iolanda pensa Web design and visualisation by Giovani Profeta - repo Work group: Federico Benvenuti, Valerio Iannucci, Luca Martinelli, Paolo Fichera Support and collaboration: Wikimedia Italia
-
Install Git (if not already installed): If you haven't already installed Git on your computer, you can download and install it from the official Git website: https://git-scm.com/downloads
-
Open a Terminal or Command Prompt: Depending on your OS(operating system), open a terminal window. This is where you'll run Git commands.
-
Navigate to the Directory Where You Want to Clone the Repo: Use the cd command to navigate to the directory where you want to create a local copy of the repository. For example:
$ cd /path/to/desired/directory
-
Get the Clone URL: Go to the Wikicurricula Boilerplate GitHub repository: https://github.com/wikicurricula-uy/wikicurricula-boilerplate. On the repository's GitHub page, click the green "Code" button. This will reveal the clone URL. Copy the URL provided there.
-
Clone the Repository: Use the git clone command followed by the URL of the Git repository you want to clone. The basic syntax is:
git clone <repository-url>.git
git clone https://github.com/wikicurricula-uy/wikicurricula-boilerplate.git
-
Wait for Cloning to Complete: Git will start cloning the repository. Depending on the size of the repository and your internet connection, this may take a moment. Once the cloning process is complete, you'll see a message indicating that the repository has been cloned.
-
Navigate into the Cloned Repository: Use the cd command to move into the directory that was created by the git clone command:
cd repo-nameThis directory will have the same name as the repository. i.e
cd wikicurricula-boilerplate
-
Check the visuals:
-
You can go to your file explorer and under the directory you've just created by cloning the wikicurricula-boilerplate repository, descend into the "visualization", you will find an
index.htmlfile. Open this file with any browser of you choice -
If you are using a code editor like Visual Studio Code install the "live server" extension. After installation, right click on the
index.htmlfile in the visualization folder and select "open with Live erver" option. This will start a server port : 5500 and a new browser window should automatically open, displaying your index.html file. The Live Server extension will serve your HTML file on a local development server with live reloading, allowing you to see changes in real-time as you edit the HTML, CSS, or JavaScript files associated with your project.
This steps works for other visualization in the project.
-
-
Create a GitHub Account: If you don't already have a GitHub account, go to the GitHub website and sign up for a free account.
-
Fork the Repository: Click the "Fork" button at the top right corner of this repository's page. This will create a copy (fork) of the repository under your GitHub account.
-
Clone Your Fork:
-
On your forked repository's page, click the "Code" button, and then copy the repository's URL.
-
Open your terminal/command prompt and navigate to the directory where you want to clone the repository using the cd command
-
Use the git clone command to clone the repository to your local machine: replacing "repository_url" with your fork URL you copied:
git clone wikicurricula-boilerplate.git -
-
Create a New Branch:
- Change directory into the newly cloned repository directory using cd command.
cd wikicurricula-boilerplate - Create a new branch for your changes and switch into the new branch with the command:
git checkout -b. For example:
git checkout -b fixing-the-footer-branchIt's a good practice to give it a descriptive name that indicates the purpose of your changes. Semantic branching is also a good practice
- Change directory into the newly cloned repository directory using cd command.
-
Make Changes: Make the necessary code changes or additions in your branch using your preferred code editor.
-
Stage changes and Commit the changes with a meaningful commit message: for example
    git add .
    git commit -m "Added a new feature"
- Push Changes to Your Fork:
Push your branch to your forked repository on GitHub with the command:
git push origin <branch-name
git push origin fixing-the-footer-branch
- Create a Pull Request (PR):
- Go to your forked repository on GitHub. You will notice a notification banner, signifying that you have recently pushed a new branch. Click on the "Compare & pull request" button.
- Review the PR. Ensure to provide a title and description to explain your changes.If everything appears satisfactory, proceed to Submitting the PR by clicking the "Create pull request" button
Toolforge is simply a hosting environment for developers working on services that provide value to the Wikimedia movement. It provides web servers, data access, job management, and other features to help developers maintain tools and bots. It is a Free, reliable, and scalable cloud hosting for web services using PHP, Python, Node.js, Java, and other languages or frameworks.It also hosts continuous bots, and scheduled tasks. An example of a tool hosted on Toolforge is: WikiTools, a light tools for Wikipedia authors and wordcount, simple word counter built with Python.
- Basic Knowledge of some programming knowledge
- Basic Knowledge of Unix command line
- Basic Knowledge of SSH (SSH client like Putty or WinSCP or Linux command line)
A Toolforge account is required to get started. It is bascicaly creating a "Wikimedia developer account", and a "Wikimedia account".
-
Wikimedia account: Also known as"Wikimedia single user login (SUL)" account. It allows you to log into general wikis like Wikipedia, MediaWiki, and MetaWiki. Click here to create account. Create Account -
a Wikimedia developer account: for access to the Toolforge project. Click the link to register. Create Account or you can create a developer account through the Toolforge admin console if you already have a wikimedia account. Follow this steps:- Goto
Toolforge admin consolehttps://toolsadmin.wikimedia.org/ and follow this steps: - Click on
Get Started - You will be taken to a Toolforge-admin-console login page. Click on the
sign Uplink. - On the "Create a Wikimedia developer account" page, press/click the
Login using Wikimedia accountbutton. Enter your Wikimedia account username and password. - Once you're logged in, you'll be directed back to Toolsadmin. There, you'll be guided through the process of setting up an LDAP username, a UNIX shell username, and a password. Additionally, you'll be asked to provide your email address and consent to the terms of service and code of conduct specific to technical spaces.
- Submit the form to complete creating your Wikimedia developer account.
- Goto
Now that you have the two(2) required accounts, follow the steps to deploy"
-
Go to the the Toolforge admin console and log in using your LDAP username
-
Once you're logged in, Go to the settings page in Toolsadmin to link your Wikimedia and Phabricator accounts to Toolforge. You might not have a Phabricator account, create one following the directions provided on the registration page.
-
Create a new tool account / tool by clicking on the "Tools" tab to go to the tools page in Toolsadmin. If you're not a Toolforge member yet, start from step 1 but if you are, go to step 2
- Request Toolforge membership
Submit a Toolforge membership request and wait for its approval.
Your request will be reviewed, and you will receive confirmation within a week.
You will be notified through your Wikitech user account.
After you are added as a Toolforge member, log out and then log in again at toolsadmin.wikimedia.org.
Doing this is required for your membership to take effect.
After your Toolforge membership has been approved, create new tool accounts. Each individual bot, web service or other tool should have a tool account. 2. Click the "Create new tool" link at the bottom of the "Your tools" sidebar. Follow the instructions in the tool account creation form. Note the instructions below about Naming your tool. For example You can name the tool: "wikicurricula-uy" 3. After you create the tool account, log off, then log back in to access the new tool account.
-
Connect to Toolforge servers using SSH Currently, the only way to interact with Toolforge is through a command-line interface. If you prefer to develop using IDEs like Visual Studio Code or Eclipse, you can mount the home directory of your tool onto your local Linux machine or virtual machine (VM) Learn more at https://wikitech.wikimedia.org/wiki/Help:Toolforge/Tool_Accounts
- Install an SSH client, if you do not have one already. Windows 10 (version 1803+) comes with OpenSSH built in. Popular clients include OpenSSH and PuTTY.
- Generate an SSH key. SSH uses public-key cryptography to securely authenticate you to the server. You can generate one by entering the following in the terminal.
ssh-keygen -t ed25519 -C "your_email@youremail.com"Use the email you wish to associate with the SSH Key, and then press enter. When prompted Enter file in which to save the key, click enter to choose the default. Type a secure passphrase, and click enter. Retype the secure passphrase, and click enter. The terminal will display information about the files your identification and public key will be saved in:
~/.ssh/id_ed25519- private key (as the name suggests, keep this private!)~/.ssh/id_ed25519.pub- public key A fingerprint and randomart image for the key will be generated.- Add your public SSH key to your developer account under the settings page of the Toolforge admin console. Copy the contents of
~/.ssh/id_rsa.pubinto the New SSH Key field and click Add SSH key.
-
Log in to Toolforge
- Use your SSH client or terminal or command prompt to connect to Toolforge through the login.toolforge.org bastion host. Remember to use the shell username you picked when creating your Wikimedia developer account. You can check your username at toolsadmin.
$ ssh -i <path-to-ssh-private-key> <shell-username>@login.toolforge.org- On your first connection, your SSH client will ask you to verify the "fingerprint" of the server. Ensure that the fingerprint shown matches ones shown on Help:SSH Fingerprints.
- After you connect, the command prompt displays your username and the internal name of the host to which you are connected:
<shell-username>@tools-sgebastion-10:~$ -
From the command line, use the
becomecommand to switch to the tool account for the tool you want to work on:$ become <toolname>Where "toolname" is the name you chose when creating the tool. You should see the command prompt change to:
tools.<toolname>@tools-sgebastion-10:~$ -
Serving static files In Toolforge, tools are typically created using programming languages like Python, Node.js, or other supported options. However, when it comes to hosting a static website, there's no need to develop a specialized tool. Instead, you can leverage the web space provided by Toolforge.
To deploy the Wikicurrícula Boilerplate on Toolforge, simply upload your files to the tool's
$HOME/www/staticdirectory. Once uploaded, your content will be accessible directly via the following URL: tools-static.wmflabs.org/toolname.No additional action is required on the tool's part—just ensure your files are placed in the designated folder and set to be readable. It should all seamlessly 'just work'.
After switching to the tool's account, execute the following commands to upload the files for the Wikicurrícula Boilerplate into the $HOME/www/static directory of the 'wikicurricula-uy' space:
     mkdir -p $HOME/www/static
     cd $HOME/www/static
     git clone https://github.com/wikicurricula-uy/wikicurricula-boilerplate.git
A practice on migrating Uruguay's Wikicurricula from it's current hosting (Github Pages) to Toolforge was doen and can be found at: https://tools-static.wmflabs.org/wikicurricula-uy/wikicurricula-uy.github.io/index.html
- Go to the Wikicurricula Boilerplate GitHub repository
- Fork the repository
- Open up your terminal or command prompt
- Navigate to the directory where you want to store the project.
- Run the following command to clone the repository to your computer:
git clone repository-url - Wait for it to clone the repository and when it is done, you'll see wikicurricula bolierplate folders on your system.
- Do a
cd wikicurricula-boilerplateto navigate to the boilerplate on your terminal - To contribute to the project or work on any task, you'll need to create a new branch. Use the
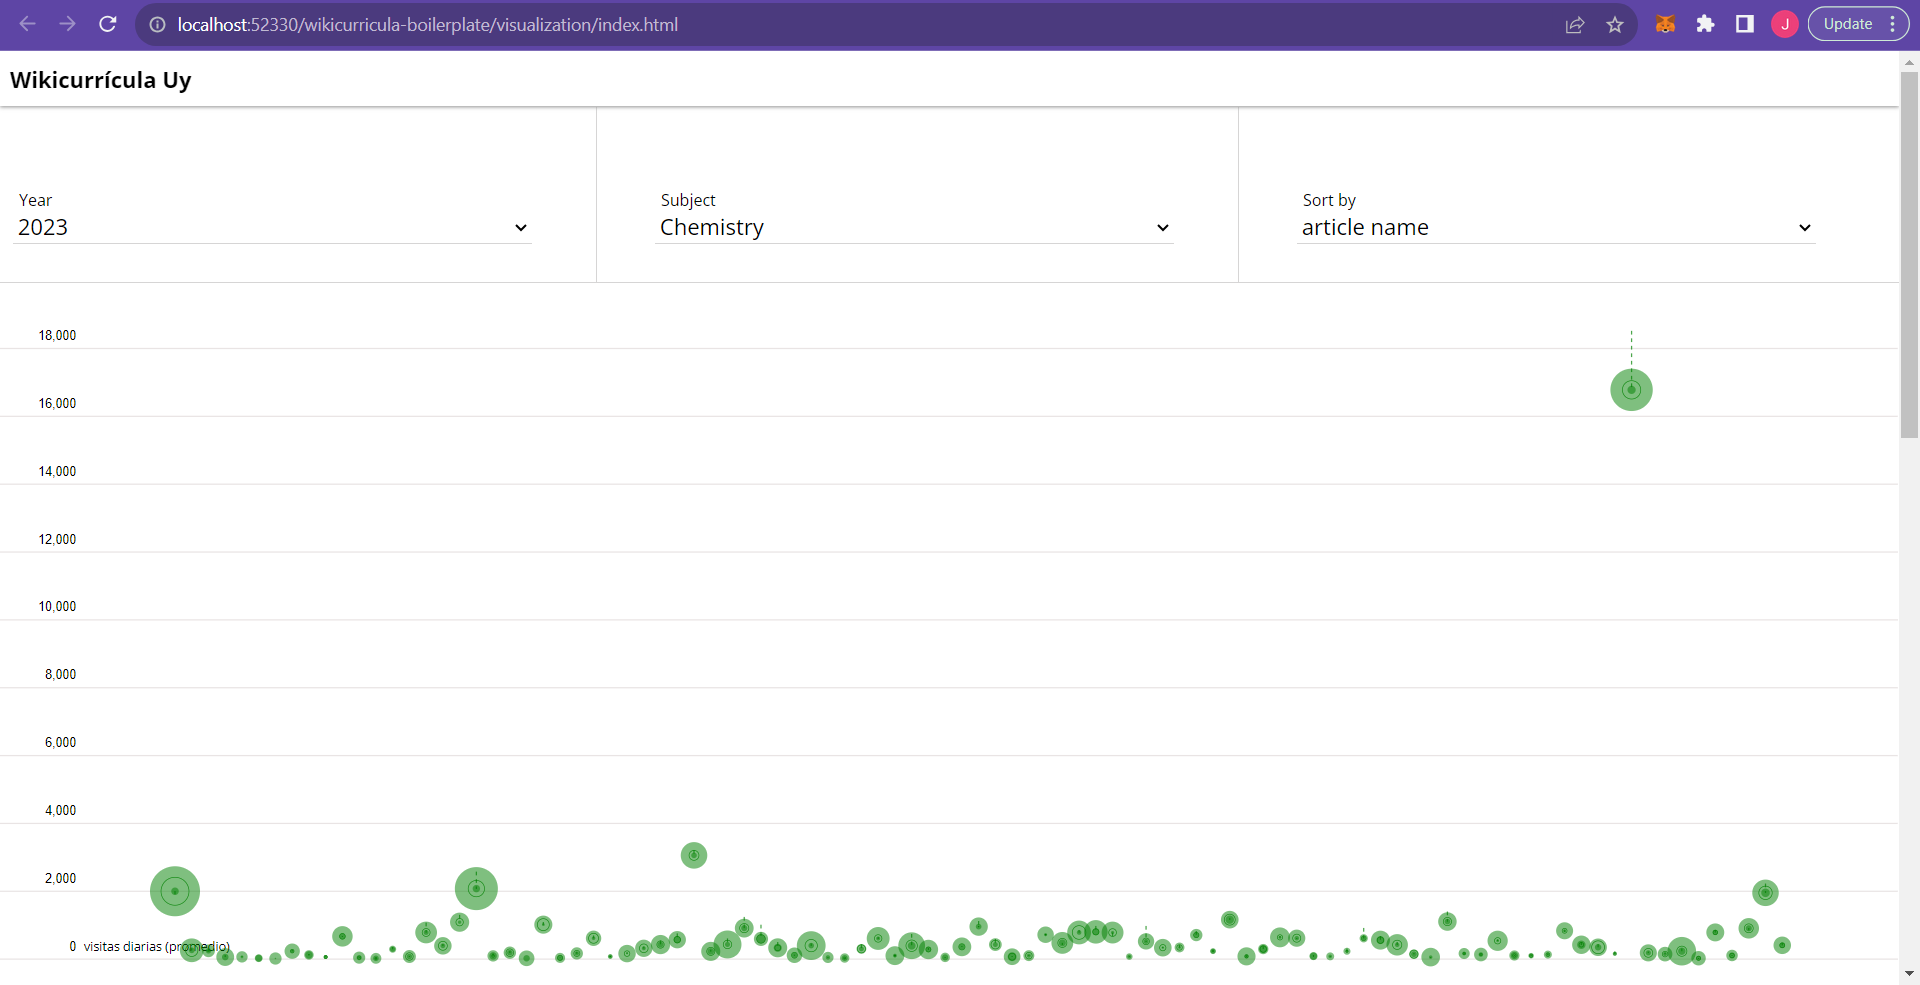
git checkout -b branch-namecommand to create and switch to the newly created branch. Replace 'branch-name' with the name of your branch. - Now you'll need to open up the local instance of the visualization on your web browser. To do this, open the index.html located in the 'visualization' folder of the project in your IDE, right-click on any part of the interface, and choose the 'Open in Default Browser' option or the 'Open with Live Server' option. This will open up the visualization in your web browser and will display a page like this:
- To open up the other visualizations in your web browser, go to the folder titled 'autori' and locate the index.html file and use the above step to view it in your web browser. Do the same for the 'avvisi' folder.
- After working on any task and you're ready to send it in for review, do a
git add .. - Next, run the
git commit -m 'commit message"to commit the changes. - Push the changes from your branch by using the
git push -u origin branch-namecommand. - Now if you go to your forked repo on your GitHub, you'll see the branch that was pushed with the changes you worked on.
- Click the "Compare and pull request" button. The next page that opens up, click on the "Create pull request" button.
- Now you've succesfully created a pull request.
- The project maintainers will review your work and merge it to the main branch of the project repo if it's satisfactory or give you feedback where necessary.

This is a detailed step-by-step guide on how to feed the visualization with data from a new curriculum. Before going into that, you'll need to learn how to build and run the Wikidata query.
-
Obtain the wikidata query. This has already been provided here.
-
When it opens up, you'll see a page as shown in the image below:
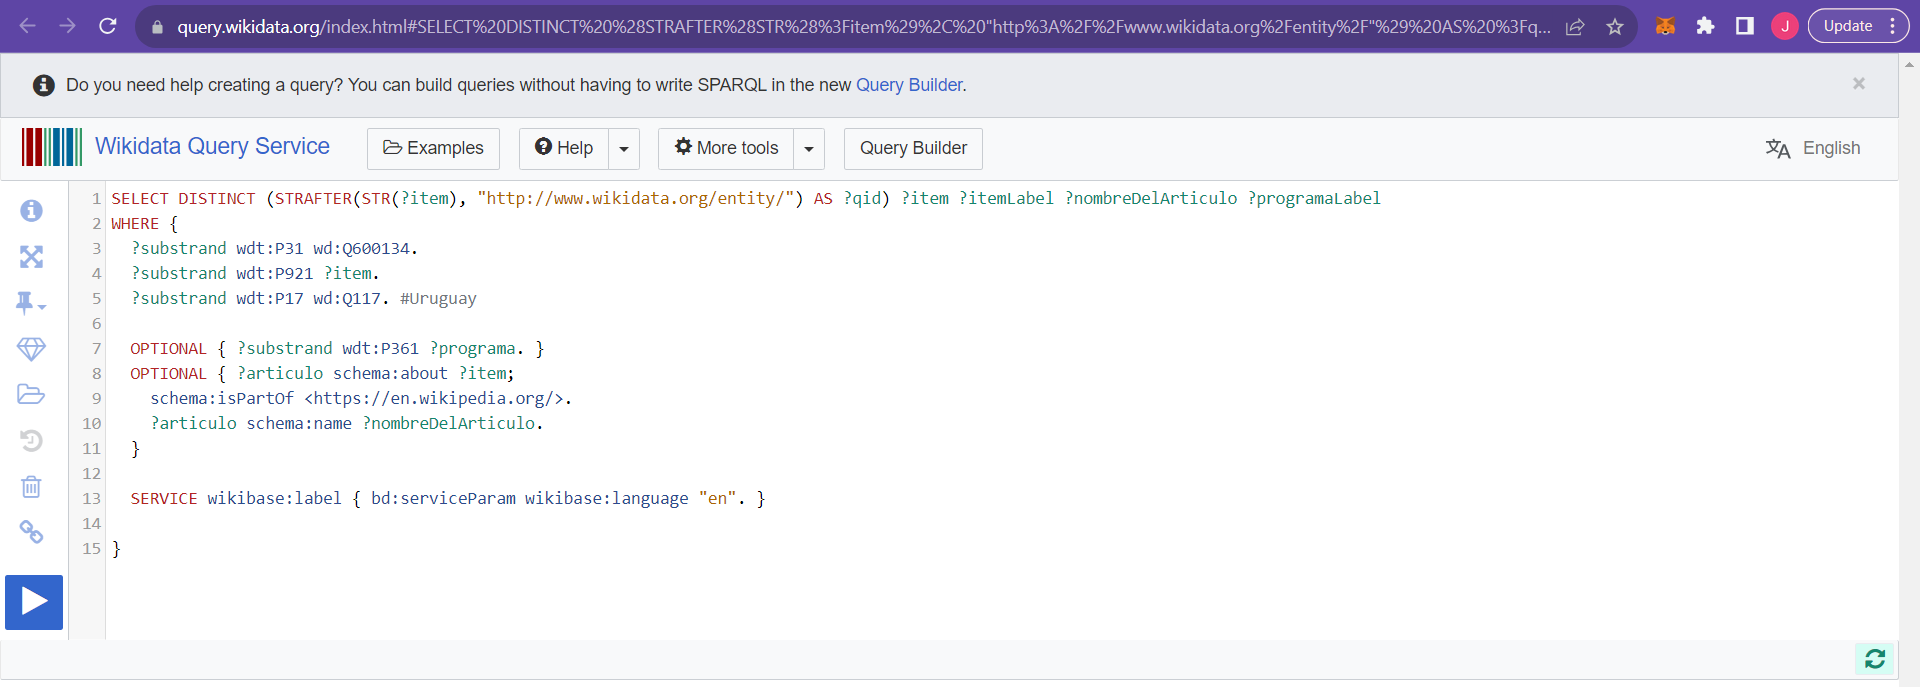 This wikidata curriculum provides the SPARQL to extract structured data and the Wikidata Query needed to retrieve the specific curriculum data has already been provided. Now, you'll need to execute the query.
 -
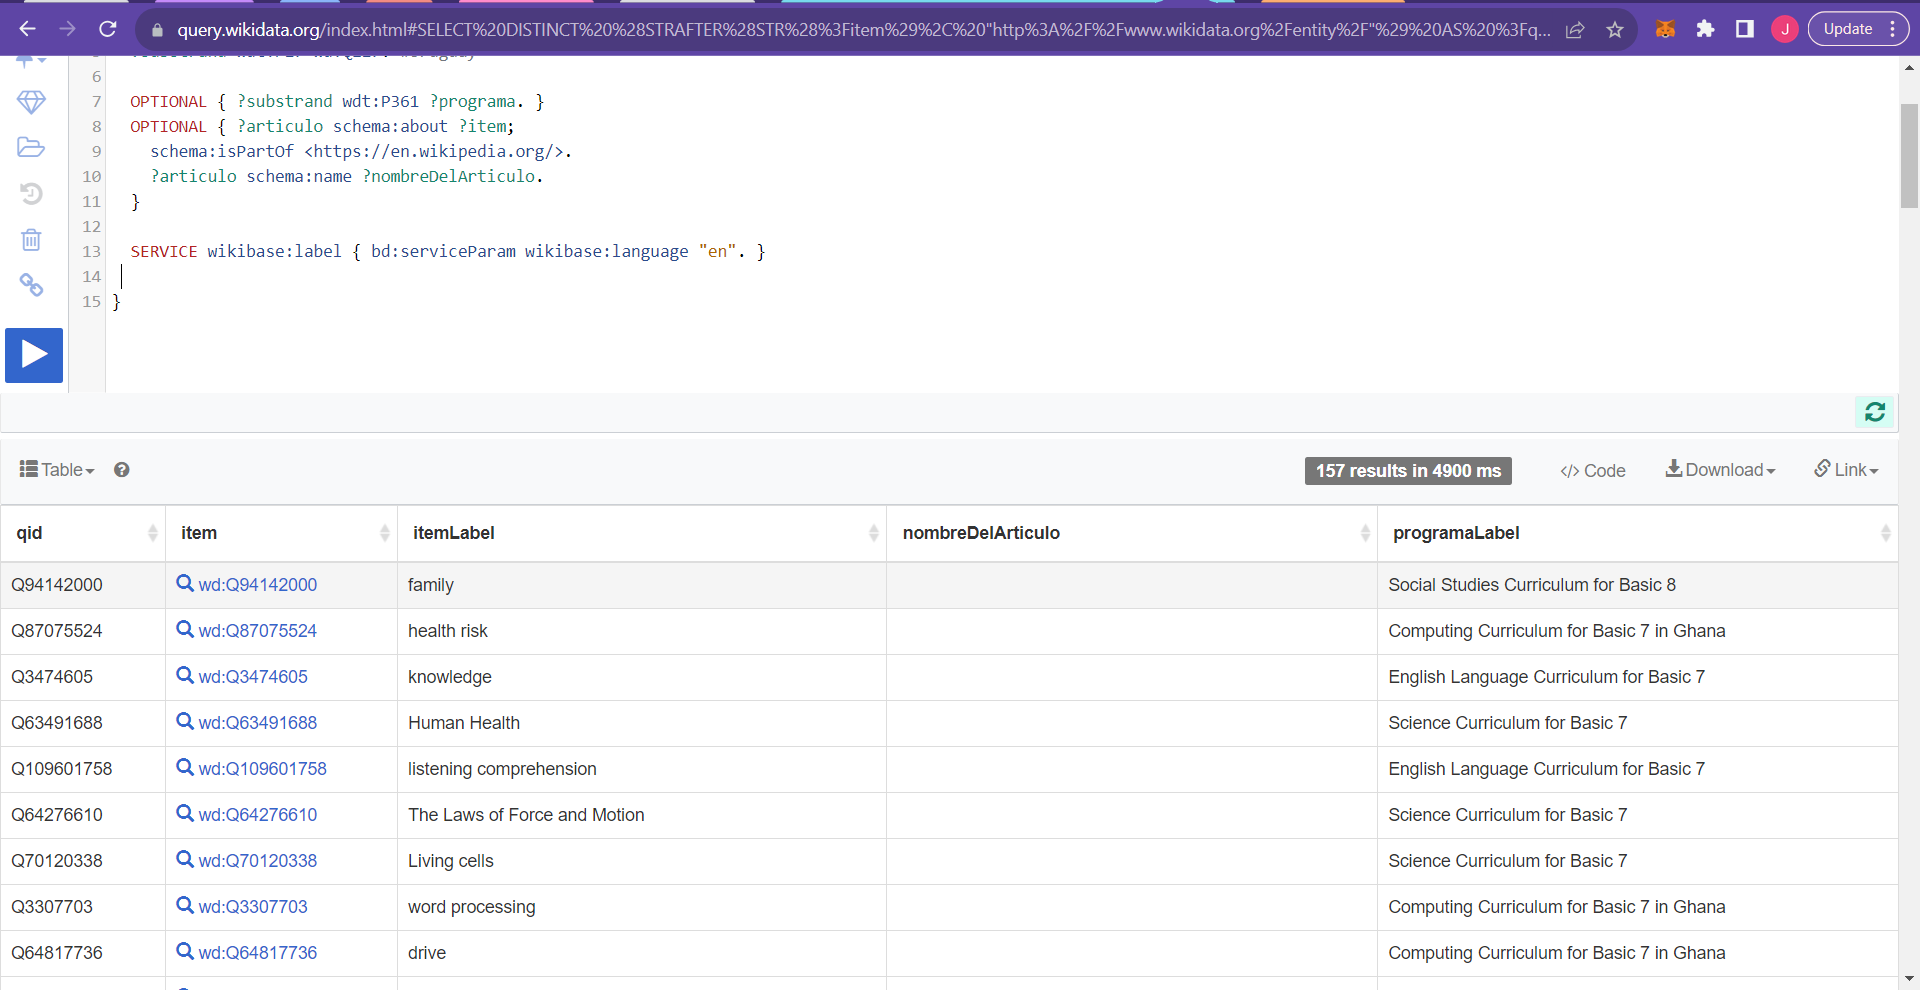
To execute the query, click on the 'run' button/icon on the left-hand sidebar of the page. This will retrieve and display the curriculum data in tabular format at the bottom of the page, like so:
 NB: Tabular format is the default format for displaying the data but it can also be displayed in other formats like Graph builder, Line chart, Bar chart, Area chart, tree map, and so on. To change the display form, click on the "Table" dropdown located at the header of the terminal the data is being displayed in. Select the format you want it displayed in.
 -
After executing the query and retriveing the data, you can download or export the results in vaious formats like JSON, CSV, TSV, or HTML. Click on the "Download" dropdown located at the header of the table format where the curriculum data is being displayed. Select the "CSV file" option and wait for it to download.
-
Rename it if you must and then import it into the 'data-gathering' folder of wikicurricula-boilerplate project in your editor.

