![]()
Oficial firmware for Pocketgo 2 and Pocketgo 2 v2 (this has reset button)
If it is the first time you install the ROGUE CFW, please do not update from STOCK or another base system, use the sd_image.bin and burned in a new microsd (recommended a 16Gb of good speed), because if you can not have system failures.
If you need to update your ROGUE CFW, then use the update .opk packages.
first check that your linux system has the packages installed:
bison flex gettext texinfo wget cpio python unzip mercurial subversion libncurses5-dev libc6-dev-i386 bzr libssl-dev g ++ - multilib rsync java-wrappers mtools gcj-4.9-jdk
clone the repository with the command:
git clone --recursive https://github.com/Ninoh-FOX/toolchain
If you don't have the GCW0 build environment installed on your system there are two steps.
if you have debian 9, just download the binarion package at:
https://github.com/Ninoh-FOX/toolchain/releases
and extract this in /opt/gcw0-toolchain
If you have a different Linux distribution, run the rebuild.sh script that is inside the toolchain folder to create the correct / opt / gcw0-toolchain for your system.
Once all this is configured, the steps to compile the system are:
for Pocket Go 2 (not reset button)
: ~/toolchain$ make pocketgo2_defconfig : ~/toolchain$ make -f Makefile.pg2 -j4
for Pocket Go 2 v2 (with reset button)
: ~/toolchain$ make pocketgo2v2_defconfig : ~/toolchain$ make -f Makefile.pg2v2 -j4
When the whole process is finished you can create the installation packages or the sd_imagen.bin with the following commands:
for Pocket Go 2
: ~/toolchain/updaters$ ./create_kernel_pocketgo2.sh (this creates a kernel update package)
: ~/toolchain/updaters$ ./create_updater_pocketgo2.sh (this creates a complete system update package)
: ~/toolchain/updaters/imager_pocketgo2$ sudo ./create_sdimage.sh (this creates the sd_image.bin file)
for Pocket Go 2 v2
: ~/toolchain/updaters$ ./create_kernel_pocketgo2v2.sh (this creates a kernel update package)
: ~/toolchain/updaters$ ./create_updater_pocketgo2v2.sh (this creates a complete system update package)
: ~/toolchain/updaters/imager_pocketgo2v2$ sudo ./create_sdimage.sh (this creates the sd_image.bin file)
https://github.com/Ninoh-FOX/POCKETGO2_ROGUE_CFW/releases/tag/v1.4
https://github.com/Ninoh-FOX/POCKETGO2_ROGUE_CFW/releases/tag/v1.3
https://github.com/Ninoh-FOX/POCKETGO2_ROGUE_CFW/releases/tag/v1.2
https://github.com/Ninoh-FOX/POCKETGO2_ROGUE_CFW/releases/tag/v1.1
https://github.com/Ninoh-FOX/POCKETGO2_ROGUE_CFW/releases/tag/v1.0.9
https://github.com/Ninoh-FOX/POCKETGO2_ROGUE_CFW/releases/tag/v1.0.8
https://github.com/Ninoh-FOX/POCKETGO2_ROGUE_CFW/releases/tag/v1.0.7
https://github.com/Ninoh-FOX/POCKETGO2_ROGUE_CFW/releases/tag/v1.0.6
https://github.com/Ninoh-FOX/POCKETGO2_ROGUE_CFW/releases/tag/v1.0.5
https://github.com/Ninoh-FOX/POCKETGO2_ROGUE_CFW/releases/tag/v1.0.4
https://github.com/Ninoh-FOX/POCKETGO2_ROGUE_CFW/releases/tag/v1.0.3
https://github.com/Ninoh-FOX/POCKETGO2_ROGUE_CFW/releases/tag/v1.0.2
https://github.com/Ninoh-FOX/POCKETGO2_ROGUE_CFW/releases/tag/v1.0.1
-
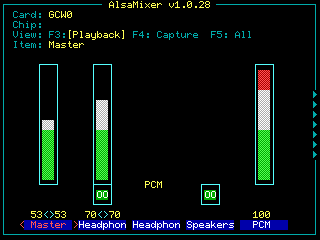
The volume control has been returned from the master channel since the crashing problem has been corrected when updating the alsa packages, allowing better control of the sound from alsamixer to level the pcm, headphones and master volumes separately.
-
Fixed a kernel configuration that did not allow to switch to rootfs backup by pressing X when starting the console.
-
The kernel has been patched with the latest generic linux kernel 3.12.74 package.
-
fixed battery drain on some v2 models when console was off.
-
DRM functions of superior kernels have been introduced in case in the future it is possible to update the ETNAVIV drivers in 3.12 (this would allow the graphics in Mario 64 port to be seen correctly).
-
Updated SDL1 to OD beta version
-
SDL2 has been updated from version 2.0.3 to version 2.0.12, thus allowing sound in applications that previously did not support it in the previous version (for example, in Mario 64 port it works perfectly).
-
Several packages have been updated, including the compilation form, so they have been optimized.
-
Added compatibility with most OPKs that are being released for OD beta.
-
the sound control has been returned directly by PCM, apparently the control by Master was not compatible with some emulators.
-
If you need to lower the global volume of the console, and I do not mean to lower the volume or increase the volume with the keys, it is if the minimum volume is too high, you can adjust it from alsamixer (sound mixer) in the Headphone channel, This volume level will be saved even if you restart the console, so you can adjust it to your liking.
- changed alsasound config
- changed poweroff screen mode
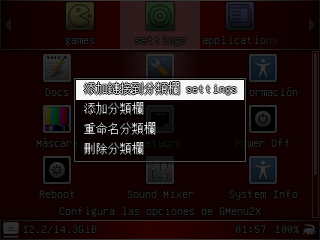
- Gmenu2X now save the last rom open and remember the list.
- You can now poweroff the screen in anytime when the level brithgness is the minimal, press power vol- again (note: if you poweroff the brithgness the sound only work fine with mp3 player files.)
-gmenu2x- Several changes have been added, including:
NOTE: you will have to delete the file /media/data/.linker so that you can reconfigure gmenu2x, and calm, it has been modified so that it saves the personal changes of the opks
- option to change brightness
- new theme in pixel mode (this does not support all fonts)
- New way to monitor the battery.
- the titles can now be read in two lines there are more changes, but I don't remember them all XD
-kernel-
-
boot mode has been changed, now read mininit-syspart file from boot partition. This way you can update without having to recompile the kernel.
-
cleaned unnecessary drivers.
-
gpu frequency corrected according to the cpu.
-
Battery capacity has been corrected.
-General-
- Added ROGUE Manual
- Added news combo keys (see the manual)
- Updated some libraries.
-NEW-
- Added PocketGo2 v2 platform.
NOTE: PG2 and PG2V2 has differents bootloader, kernel and mapped keys. Install your correct version please.
-SOUND-
- Finally, all sounds problems is fixed, yes, fixed, now the default volume control is Master, and the volumen keys works with this, anyway, you can change the pcm and heardphones values is you wish and the console save the changes for the next reboot.
-Gmenu2-
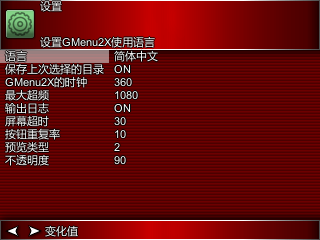
- Update GMENU2x, now it shows the internal language of the game, if it has it, according to the selected language.
- Add Korean, Japanese and Chinese languages.
- fixed some missing texts.
- Optimized themes, now overwrites system icons too.
- Changed multi-language fonts to a much more comfortable one to read.
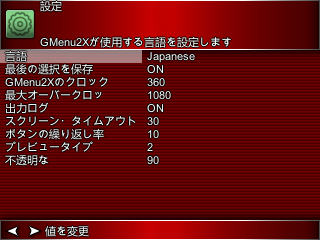
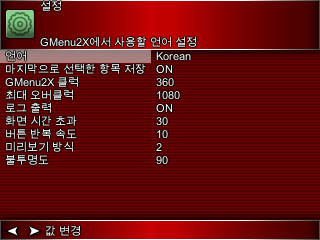

IMPORTANT: You have to delete the file /media/data/.linker so that all the changes are overwritten, otherwise there will be opks that lose the name.
-Sound-
- Now the volume of the headphones is also saved.
- the Master volume control is now accessible from the SOUND MIXER, it is no longer necessary to modify the speaker to lower the volume.
-System-
- Fixed mapping of joystick emulation as dpad in versions 1.0.5 and 1.0.6
- Optimized the clock of the GPU, now it is to the maximum recommended by the chip. (before 360Mhz, now 500Mhz)
- Optimized the USB core, there will be no more random restarts when the console was disconnected from the computer.
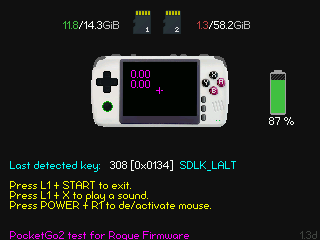
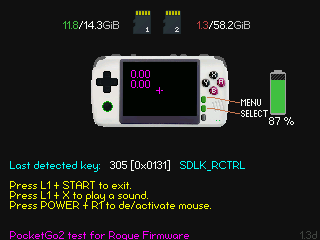
- Add the new keys combo for dis/enable the analog stick (POWER+L1), so the keys combos is the follow list:
- POWER = Screen on/off in gmenu2x.
- POWER+A = Change the resolution screen to fullscreen in hardware mode.
- POWER+B = switch analog stick to dpad.
- POWER+X = Screenshot capture.
- POWER+L1 = Dis/enable analog stick
- POWER+R1 = enable mode mouse (stick is cursor, L2&R2 the mouse buttons)
- POWER+VOL+ or VOL- = change the brightness screen
- POWER+UP or DOWN DPAD = change the sharpness
- POOWER+SELECT = kill aplication
- POWER+START = Reboot
- Gmenu2x now support all characters of the WORLD!!


You may erase the file /media/data/.linker for that this has effect.
- Update libs in system and kernel.
- Recompilded code with the new toolchain
- Update linux-firmware package
- Update Gmenu2x, now you can config the opacy level in the backgroun preview imagen game.
- Removed inessesaries funtions of the kernel again.
- Fixed R2 not recognition in some motherboards (again)
- Update scripts, now you can format in ext4 and you can do a better backup of the home folder.
- Remove Esoteric from the rootfs, but you can install this from opk.
- Removed inessesaries funtions.
- Fixed and updated SDL2 libraries.
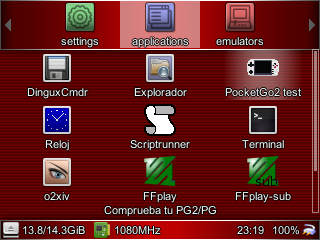
- Insert Scriptrunner app, now you can format the external sdcard in fat32, exfat or ext3 in the console.
- Fixed errors in games that not run.
- Fixed R2 time reactions.
- Recompiled PCSX4ALL
- Fixed Gmenu2x duplicate icons when this is edit
- Fix clock hour reset when poweroff the console.
- Gmenu2x now can show two type of previews (put in /(romsdir)/.previews/).
- ajust the joystick (again).
- Updated the file system, partition and expansion scripts again.
- Gmenu2x analog stick control is removed
- Adjusted the battery.
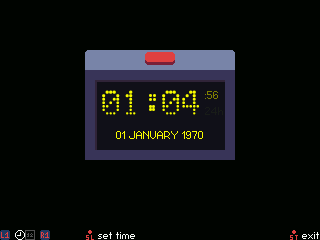
- Update of the Stock Clock application with a new redesign. thanks to Rafa Vico (https://github.com/RafaVico)

- Text editor, corrected opk buttons. thanks to Rafa Vico (https://github.com/RafaVico)
- Added the hardware tester POCKETGO 2. thanks to Rafa Vico (https://github.com/RafaVico)

- Support to read the second sdcard in fat32, exFAT, ntfs, ext4 (recommended) and ext3 format.
NOTE: for that the ext4 sdcard works, you need format this from command lines since the console, if you go to use the pc, then format in ext3.
- Added key combinations with the power button:
- POWER + VOL + or VOL-: Adjust the brightness of the screen.
- POWER + SELECT: Close the current application.
- POWER + START: Restart the console.
- POWER + B: The analog stick will work as DPAD.
- POWER + A: Change the aspect ratio with the screen in Hardware mode.
- POWER + R1: Mouse emulation (Stick is movement and the L2 and R2 buttons the buttons)
- POWER + DPAD up / dowm: Adjust the sharpness.
- POWER + X: Take a screenshot.
-
In Gmenu2x the power button can turn the screen off or on.
-
You can change the cpu to maximum or minimum in gmenu2x for the opk, the same to change the name, description, icon and file filter.
For a correct installation, the first time it is advisable to flash the sd_image in an sdcard with Win32DiskImager for example, too you need format the sdcard two times with SD Formatter before of flasher the sdcard.
https://sourceforge.net/projects/win32diskimager/
if W32DI NOT WORK fine, try them https://www.balena.io/etcher/ or you can type in a terminal the follow command:
sudo dd if=sd_image.bin of=/dev/(sdcard_partition)
https://www.sdcard.org/downloads/formatter/
One time that the program finish, put the sd in the console, NOT RESIZE THE PARTITION FROM PC!! The firmware has a script for auto resize!!
You can also use flasher.opk for the same, but it takes much longer and being a console that has the SD1 (TF1) of the system at hand because I do not see it really necessary, even so, it is in the release. If you would like to use it, it is advisable to put it in the apps folder of the SD2 (TF2).
For future updates you will only need to use the update.opk, which is used just like any application launched from GMENU2X. You can use it in both the apps folder of SD1 (TF1) or SD2 (TF2).
First you need a pc or vm with Debian 9.11 64 bits.
$ sudo apt-get update
$ sudo apt-get install bison flex gettext texinfo wget cpio python unzip mercurial subversion libncurses5-dev libc6-dev-i386 bzr squashfs-tools
$ git clone https://github.com/Ninoh-FOX/toolchain.git
$ cd toolchain
$ make rg350_defconfig BR2_EXTERNAL=board/opendingux
$ make
$ . board/opendingux/gcw0/make_upgrade.sh
======================================================
To build and use the buildroot stuff, do the following:
- run 'make menuconfig'
- select the packages you wish to compile
- run 'make'
- wait while it compiles
- Use your shiny new root filesystem. Depending on which sort of root filesystem you selected, you may want to loop mount it, chroot into it, nfs mount it on your target device, burn it to flash, or whatever is appropriate for your target system.
You do not need to be root to build or run buildroot. Have fun!
In order to do an offline-build (not connected to the net), fetch all selected source by issuing a
$ make source
before you disconnect. If your build-host is never connected, then you have to copy buildroot and your toplevel .config to a machine that has an internet-connection and issue "make source" there, then copy the content of your dl/ dir to the build-host.
Buildroot supports building out of tree with a syntax similar to the Linux kernel. To use it, add O= to the make command line, E.G.:
$ make O=/tmp/build
And all the output files (including .config) will be located under /tmp/build.
You can specify a config-file for uClibc:
$ make UCLIBC_CONFIG_FILE=/my/uClibc.config
And you can specify a config-file for busybox:
$ make BUSYBOX_CONFIG_FILE=/my/busybox.config
To use a non-standard host-compiler (if you do not have 'gcc'), make sure that the compiler is in your PATH and that the library paths are setup properly, if your compiler is built dynamically:
$ make HOSTCC=gcc-4.3.orig HOSTCXX=gcc-4.3-mine
Depending on your configuration, there are some targets you can use to use menuconfig of certain packages. This includes:
$ make HOSTCC=gcc-4.3 linux-menuconfig
$ make HOSTCC=gcc-4.3 uclibc-menuconfig
$ make HOSTCC=gcc-4.3 busybox-menuconfig
Please feed suggestions, bug reports, insults, and bribes back to the buildroot mailing list: buildroot@buildroot.org
Download this git Go to kenel folder.
$ make ARCH=mips pocketgo2_defconfig
$ make ARCH=mips vmlinuz.bin -j4
$ make ARCH=mips modules -j4
$ ./create_modules_fs.sh