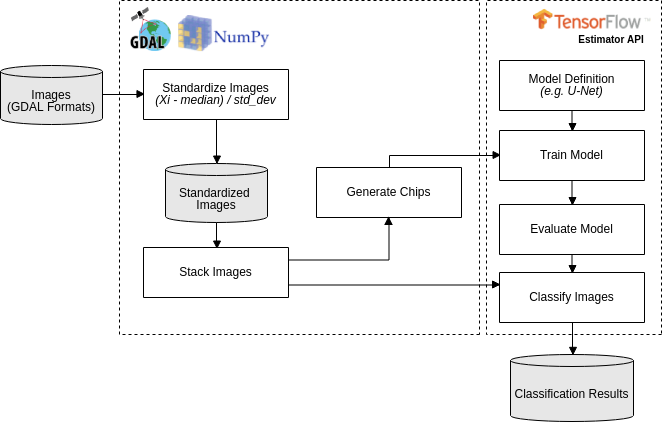
Deep-learning applied to semantic segmentation of remote sensing data, according to this workflow:
Download the Forest toy data in https://storage.googleapis.com/nextgenmap-dataset/dl-semantic-segmentation/forest_toy.zip and follow the instructions below (...if you are hurry, run all the thing by run_forest_toy.sh):
- Standardize the two images, the one will be used to train the model e another one that will be classified:
$ ./standardize_imgs.py -n 0 -b 1 2 3 4 -i forest_toy/raw_data/mosaic_201709.tif forest_toy/raw_data/mosaic_201801.tif -o forest_toy/stand_data- Stack the standardized image and the forest map (e.i. the reference data):
$ ./stack_imgs.py -i forest_toy/stand_data/mosaic_201709_stand.tif -r forest_toy/raw_data/forest_201709.tif -o forest_toy/stand_data/forest_201709_model_input.vrt- Generate the chips (i.e. a set of pixels with regular squared size) without data augmentation (see usages):
$ ./generate_chips.py -f 0,0 -r -l -u -i forest_toy/stand_data/forest_201709_model_input.vrt -o forest_toy/chips- Train a U-net model, for 20 epochs, using default hyperparameter (see usages):
$ ./train_model.py -e 20 -i forest_toy/chips -o forest_toy/model/- Follow the trainning process using tensorboard:
$ tensorboard --logdir=forest_toy/model/- Evaluate the trained model:
$ ./evaluate_model.py -m forest_toy/model- Classify the other image:
$ ./classify_imgs.py -m forest_toy/model -i forest_toy/raw_data/mosaic_201801.tif -o forest_toy/result- Check the classification result, forest_toy/result/mosaic_201801_pred.tif, in QGIS:
standardize_imgs.py
usage: standardize_imgs.py [-h] -i IMAGES [IMAGES ...] -b BANDS [BANDS ...] -n
                           IN_NODATA [-d OUT_NODATA] [-t] -o OUTPUT_DIR
                           [-c CHUNK_SIZE]

STEP 01/06 - Standardize multiple images using the formula: (value - median) /
std_dev. The median and std_dev will be calculate by band (e.g. blue, red)
considering all images.

optional arguments:
  -h, --help            show this help message and exit
  -i IMAGES [IMAGES ...], --images IMAGES [IMAGES ...]
                        <Required> List of input images.
  -b BANDS [BANDS ...], --bands BANDS [BANDS ...]
                        <Required> The image bands that will be standardized.
  -n IN_NODATA, --in-nodata IN_NODATA
                        <Required> Nodata value of input images.
  -d OUT_NODATA, --out-nodata OUT_NODATA
                        Nodata value of standardized images. It will be
                        ignored when convert-int16 is enabled. [DEFAULT=-50]
  -t, --convert-int16   Convert the standardized images to int16, multiply its
                        pixel values by scale factor 10000. It will reduce the
                        size of the output files and use -32767 as nodata
                        value. [DEFAULT=false]
  -o OUTPUT_DIR, --output-dir OUTPUT_DIR
                        <Required> Output directory that will have the
                        standardized images.
  -c CHUNK_SIZE, --chunk-size CHUNK_SIZE
                        The amount of data that will be processed, per time,
                        by standardization process. In case of memory error
                        you should decrease this argument. [DEFAULT=1000]
stack_imgs.py
usage: stack_imgs.py [-h] -i IMAGES [IMAGES ...] [-b BANDS [BANDS ...]]
                     [-r REFERENCE] -o OUTPUT

STEP 02/06 - Stack multiple images into a sigle Virtual Dataset-VRT image. If
informed, the reference image will the last band.

optional arguments:
  -h, --help            show this help message and exit
  -i IMAGES [IMAGES ...], --images IMAGES [IMAGES ...]
                        <Required> List of input images.
  -b BANDS [BANDS ...], --bands BANDS [BANDS ...]
                        The bands that should be stacked. [DEFAULT=All]
  -r REFERENCE, --reference REFERENCE
                        Image with reference data, that should have only these
                        pixel values: 0=without information, 1=object of
                        interest, 2=not an object of interest.
  -o OUTPUT, --output OUTPUT
                        <Required> The name of VRT output image
generate_chips.py
usage: generate_chips.py [-h] -i IMAGE -o OUTPUT_DIR [-n NODATA]
                         [-s CHIP_SIZE] [-p PAD_SIZE] [-f OFFSET [OFFSET ...]]
                         [-r] [-u] [-l] [-d]

STEP 03/06 - Generate a several chips (i.e. a set of pixels with regular
squared size) considerering the input image. The last band will be used as
expected output result, and should have only these pixel values: 0=without
information, 1=object of interest, 2=not an object of interest. If a chip has
only pixel values equal to 0, into reference band, the chip will discarded.

optional arguments:
  -h, --help            show this help message and exit
  -i IMAGE, --image IMAGE
                        <Required> Input image that will be used by chip
                        generation process.
  -o OUTPUT_DIR, --output-dir OUTPUT_DIR
                        <Required> The output directory that will have the
                        generated chips.
  -n NODATA, --nodata NODATA
                        Nodata value of input image. [DEFAULT=-50]
  -s CHIP_SIZE, --chip-size CHIP_SIZE
                        Size of the chip with output result. A chip always
                        will be a square. [DEFAULT=100]
  -p PAD_SIZE, --pad-size PAD_SIZE
                        Padding size that will establish the size of input
                        chip, with spectral data. A padding size of 93px and a
                        chip size of 100px will result in a input chip of
                        286px. [DEFAULT=93]
  -f OFFSET [OFFSET ...], --offset OFFSET [OFFSET ...]
                        As a data augmentation option, offset argument will be
                        used to produce chips with a percentage of overlap. An
                        offset 0,50 will generate chips with 50 percent of
                        overlap in the axis y. [DEFAULT=0,0]
  -r, --rotate          As a data augmentation option, rotate argument will
                        rotate all the chips at angles 90, 180 and 270
                        degrees. [DEFAULT=false]
  -u, --shuffle         Shuffle generated chips. If the generated chips is
                        only for test propose, you should set false here.
                        [DEFAULT=true]
  -l, --flip            As a data augmentation option, flip argument will
                        flip, in the left/right direction, all the chips.
                        [DEFAULT=false]
  -d, --discard-nodata  Chips with nodata values will be discard by chip
                        generation process. You shouldn't considerer put true
                        here. [DEFAULT=false]
train_model.py
usage: train_model.py [-h] -i CHIPS_DIR [-s SEED] [-t EVAL_SIZE]
                      [-f SCALE_FACTOR] [-e EPOCHS] [-b BATCH_SIZE]
                      [-l LEARNING_RATE] [-d DROPOUT_RATE] [-r L2_REGULARIZER]
                      -o OUTPUT_DIR [-m TENSORBOARD_MAXOUTPUT]

STEP 04/06 - U-Net Training approach using several chips.

optional arguments:
  -h, --help            show this help message and exit
  -i CHIPS_DIR, --chips-dir CHIPS_DIR
                        <Required> Input directory of chips that will be used
                        by training process.
  -s SEED, --seed SEED  Seed that will be used to split the chips in train and
                        evaluation groups. [DEFAULT=1989]
  -t EVAL_SIZE, --eval-size EVAL_SIZE
                        Percentage size of the evaluation group. [DEFAULT=0.2]
  -f SCALE_FACTOR, --scale-factor SCALE_FACTOR
                        Scale factor that will multiply the input chips before
                        training process. If the data type of input chips is
                        integer you should considerer use this argument.
                        [DEFAULT=1.0]
  -e EPOCHS, --epochs EPOCHS
                        Number of epochs of the training process.
                        [DEFAULT=100]
  -b BATCH_SIZE, --batch-size BATCH_SIZE
                        Batch size of training process. In case of memory
                        error you should decrease this argument. [DEFAULT=32]
  -l LEARNING_RATE, --learning-rate LEARNING_RATE
                        Learning rate of training process. [DEFAULT=0.00005]
  -d DROPOUT_RATE, --dropout-rate DROPOUT_RATE
                        Dropout rate of model. Small values here may help
                        prevent overfitting. [DEFAULT=0.5]
  -r L2_REGULARIZER, --l2-regularizer L2_REGULARIZER
                        Dropout rate of model. Small values here may help
                        prevent overfitting. [DEFAULT=0.5]
  -o OUTPUT_DIR, --output-dir OUTPUT_DIR
                        <Required> The output directory that will have the
                        trained model and the tensorboard logs.
  -m TENSORBOARD_MAXOUTPUT, --tensorboard-maxoutput TENSORBOARD_MAXOUTPUT
                        The number of chips that will presented by tensorboard
                        during the training process. [DEFAULT=2]
evaluate_model.py
usage: evaluate_model.py [-h] -m MODEL_DIR [-s EVAL_SIZE] [-i CHIPS_DIR]

STEP 05/06 - Evaluate a trained model.

optional arguments:
  -h, --help            show this help message and exit
  -m MODEL_DIR, --model-dir MODEL_DIR
                        <Required> Input directory with the trained model and
                        the tensorboard logs.
  -s EVAL_SIZE, --eval-size EVAL_SIZE
                        Percentage size of chips that will be used in the
                        evaluation [DEFAULT=Value defined by train_model.py]
  -i CHIPS_DIR, --chips-dir CHIPS_DIR
                        Input directory of chips that will be used by
                        evaluation process [DEFAULT=Value defined by
                        train_model.py]
classify_imgs.py
usage: classify_imgs.py [-h] -i IMAGES [IMAGES ...] -m MODEL_DIR -o OUTPUT_DIR
                        [-p MEMORY_PERCENTAGE]

STEP 06/06 - Classify a list of images using a trained model.

optional arguments:
  -h, --help            show this help message and exit
  -i IMAGES [IMAGES ...], --images IMAGES [IMAGES ...]
                        <Required> List of input images that will be
                        classified.
  -m MODEL_DIR, --model-dir MODEL_DIR
                        <Required> Input directory with the trained model and
                        the tensorboard logs.
  -o OUTPUT_DIR, --output-dir OUTPUT_DIR
                        <Required> The output directory that will that will
                        have the classification output.
  -p MEMORY_PERCENTAGE, --memory-percentage MEMORY_PERCENTAGE
                        Reading the input image until memory percentage reach
                        the value defined by this argument. After that, the
                        classification will execute for readed data.
                        [DEFAULT=40.0]