This pre-phase 1 series of videos is designed for people who have little or no experience in HTML, CSS and JavaScript. You will be using these three languages for your phase 1 and phase 2 projects, so it's helpful to learn about it now.
We will be going through the basics of HTML, CSS and JavaScript to develop a simple webpage.
As always, please do not hesitate to reach out if you are stuck or do not understand the content.
- Visual Studio Code
- Internet Browser (Google Chrome, Mozilla Firefox, Microsoft Edge)
To further your understanding and encourage self-learning, we have launched the XP Challenge. Prizes such as Xbox One S, Azure Exam Vouchers and Swag Kits will be given out to students who have shown their dedication and passion. Find out more about it here
In this project we will be making the following files.
-
index.htmlwhich is the main page of the webpage where our meme images will be placed. -
quotes.htmlwhich is the second page of webpage where all our quotes will be placed. -
styles.csswhich is placed in the css folder and it is where all of the webpage's styling will be defined and located
Various meme images will also be available located in ./assets/images/
We will need the basic HTML template to get started.
<!DOCTYPE html>                                      <!--Define the document and tells the system that the following document is HTML5-->
<html lang="en">                                     <!--Contains all other HTML elements. The lang attribute describes the language of the document-->
<head>                                               <!--Container for all of the metadata about the document.-->
    <meta charset="utf-8"/>                          <!--Defines the meta data of the document. The charset attribute specifies the character set that will be used.-->
    <title>Memes & Quotes</title>                    <!--Defines the title of the document.-->
    <link rel="stylesheet" href="./css/styles.css"/> <!--Specifies the location of the stylesheet.-->
</head>
<body>                                               <!--Contains all other HTML elements which will be visible in the webpage.-->
</body>
</html>
We will first make the header section of the web page where our navigation links and header title of our web apge will reside.
<header>
    <nav class="navbar">
        <a class="nav_link" href="index.html">Memes</a>
        <h1 class="center_text">MemesMetro</h1>
        <a class="nav_link" href="quotes.html">Quotes</a>
    </nav>
</header>- The
<header>tag contains all of the introductory material for the webpage which includes headings and navigation links. - The
<nav>tag defines defines a set of navigations links - The
<a>tag defines a hyperlink and when the content is selected on the webpage it will direct you to the link specified in the href attribute. In this case we want the "Memes" and "Quotes" label to direct to theindex.htmlandquotes.htmlpages respectively. - The
<h1>tag is used to define HTML headings, the number after the "h" signifies the importance of the heading and the hading will become progressively smaller the bigger the number is Thenavbar,nav_linkandcenter_textclass names are used to identify the HTML element so they can be referenced from the style sheet later on.
    <h1 class="center_text">Memes</h1>
    <h2 class="center_text">What is a meme?</h3>
    <p class="center_text meme_desription">A meme is an idea, behavior, or style that spreads by means of
        imitation from person to person within a culture and often carries
        symbolic meaning representing a particular phenomenon or theme.</p>
    <section class="memes_collection">
        <figure>
            <img class="meme" id="image1" src="./assets/images/pepe.jpg" alt="FeelsBadMan Meme"/>
        </figure>
        <figure>
            <img class="meme" id="image2" src="./assets/images/smart.jpg" alt="Smart thinking meme"/>
        </figure>
</section>- The
<p>tag defines a paragraph of text content. Every<p>that is defined will start on a new line. - The
<section>tag defines a section in a HTML document. In our case want to treat our two images as one group so that we can style them collectively later on. - The
<figure>defines a set of self-contained media like images. - The
<img>tag is an empty tag so it does not require an accompanying closing tag and it is used to embed images onto an HTML website. Thesrcattribute tells the webpage the directory of where the image in located. Thealtattrbute specifies the text that will be displayed in place of the image in the event the image cannot be loaded.
Much of the quotes.html page is similar to index.html with the exception of
    <section class="quote_card">
        <blockquote>When life gives you lemons you make lemonade</blockquote>
        <p class="person_name">- Jayson Tai</p>
</section>- The
<blockquote>tag specifies that the following content has been quoted from an external source.
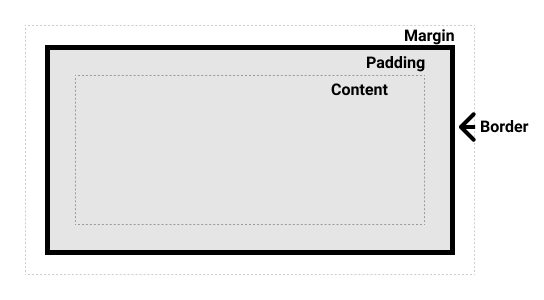
It is often useful to set
box-sizingtoborder-boxto layout elements. This makes dealing with the sizes of elements much easier, and generally eliminates several pitfalls you can stumble on while laying out your content. On the other hand, when usingposition: relativeorposition: absolute, use ofbox-sizing: content-boxallows the positioning values to be relative to the content, and independent of changes to border and padding sizes, which is sometimes desirable.

Flexbox and grid are the centrepieces that control the layout of the webpage. Flex and grid are the inner display style that we can set on the box. With flexbox, you can lay elements out horizontally or vertically which depends on the direction of the primary axis which defaults to row or horizontal. With grid, it’s like a table, where you divides the box up into cells and where each element can go. You may ask, should I use grid or flexbox? There isn’t a clear-cut answer, because what can be done by grid can also be achieved through flexbox. Though let's make a distinction, flexbox focuses on the control flow, that is the flex item can stretch or shrink. Grid focuses on content placement; for example, a grid is broken into several cells horizontally and vertically. Mozilla puts its opinion on the table:
If you want the space distribution row by row, use flexbox. If you don’t, use Grid.
Refer here for a more comprehensive discussion.
Positioning:
For a flexbox, we use justify-content or align-items to position flex items. The difference between the 2 attributes is that, justify-content controls the items on the primary axis, and align-items position the items along the cross axis. This CSS Tricks post gives a comprehensive flexbox cookbook.
Each box/element has the attribute of width and height. That is how we control the size of the element. However, how do we evaluate such size? If I ask how tall you, you may answer 5 Feet 11 Inches. In the CSS world, people use units like pixel (px), em and rem along with a numeric value to describe the size. For example, an element is 300px wide and 150px high. px is the basic unit size. rem is dependent on the root html element. Normally, the default font-size of html is 16px though it varies from browser to browser. That means 1 rem is 16px, 1.5 rem is 24px, etc. em depends on the size of the parent element. For example, consider the following code:
<div style="font-size: 20px;">
  <p style="font-size: 1.25em">Some em text</p>
</div>
The <p> tag is the child of the parent <div> tag. Therefore, the <p> tag will have a font-size of 1.25 * 20 = 25px. Here is the general formula for calculating the em size:
em = desired element pixel value / parent element font-size in pixels
Here is a more detailed description on font-size from Mozilla.
CSS is a langauage that styles the HTML page. In the presentation, we included CSS in index.html and quotes.html using the <link> tag to reference the styles.cssfile (linked css). Then we apply styles to our elements using class selectors like so:
<nav class="navbar">...</nav>
However, there are 2 other common ways to include CSS in the html page. Firstly, using inline style:
<p style="text-align: center; font-size: 36px">Big centered text</p>Normally, this is considered bad practice in HTML and CSS because it hinders readability. Secondly, we can use the <style> tag (embedded css), e.g.
<html>
  <head>
    <style>
      .big_center_text {
        text-align: center;
        font-size: 36px;
      }
    </style>
  <head>
  <body>
    <p class="big_centered_text">Big centered text</p>
  </body>
</html>
The above 2 examples produce the same result, that is, to center the paragraph, and change its font-size to 36px. This is better than inline styles, but writing CSS in a .css file offers the best readability. See more ways to include CSS in HTML here.
JavaScript is a high level programming and scripting language that allows you to implement complex features on web pages.
To make the MemesMetro webpage dynamic we need to add two buttons that will perform certain functions when pressed.
    <header>
        <nav class="navbar">
            <a class="nav_link" href="index.html">Memes</a>
            <h1 class="center_text">MemesMetro</h1>
            <a class="nav_link" href="quotes.html">Quotes</a>
        </nav>
        <p class="center_text"><button onclick="toggleDarkMode()">toggle theme</button></p>
    </header>
This places a HTML button element in the center of the header and it will execute the toggleDarkMode() function when pressed.
<p class="center_text"><button onclick="randomiseImage('image1', 'image2')">Randomise</button></p>This also placed an HTML button in the center of two images of the MemesMetro webpage and it will execute the randomiseImage('image1', 'image2') function when pressed. The image1 and image2 input parameters refers to the IDs of the two images tags in the webpage.
<script text="text/javascript">
    function toggleDarkMode() {
        // change to dark theme if not so already
        document.body.classList.toggle("dark_theme")
    }

    function randomiseImage(id, id2){
        var imagesArray = ["else.png", "oldRogers.jpg", "simpsons.png", "spiderman.png", "why.png", "pepe.jpg", "smart.jpg"]
        var randomIndex = Math.floor(Math.random() * 7)
        var randomIndex2 = Math.floor(Math.random() * 7)
        var image1 = document.getElementById(id)
        var image2 = document.getElementById(id2)
        image1.src = "./assets/images/" + imagesArray[randomIndex]
        image2.src = "./assets/images/" + imagesArray[randomIndex2]
    }
</script>
The JavaScript is placed within a <script> tag to tell the system that the following content is JavaScript code.
We define a function using the function keyword with the function's name afterwards. id and id2 in randomiseImage(id, id2) are the parameters of the function, they are essentially variables for the function which can take the form different values depending on the values that are placed as the input parameters during the function call.
The imagesArray variable is an array of all of the image names that are placed in the ./asset/images file directory and these are the images that we want the two of our MemesMetro page to alternate between. The content of the array is indexed from 0 to 6, where "else.png" is index 0, "oldRogers.jpg" is index 1 and so on and so fourth.
The randomIndex and randomIndex2 variables seek to generate two random integer numbers between 0 and 6 so they are able to be used to index the imageArray afterwards. It does this by using the Math.random() function which generates a random floating point number ranging from 0 to 1 and we times this random number by 7 so that the result will range from 0 to 6.93. Afterwards we wrap the arithmatic in the Math.floor() function to return the largest integer less than or equal to the input. This is to ensure that randomIndex and randomIndex2 does not exceed 6.
The image1 and image2 variables are set as the <img class="meme" id="image1" src="./assets/images/pepe.jpg" alt="FeelsBadMan Meme"/> and <img class="meme" id="image2" src="./assets/images/smart.jpg" alt="Smart thinking meme"/> HTML elements respectively. It does this by using document.getElementByID() JavaScript function, we pass in the parameters of randomiseImage(id, id2) as IDs for the function and the function is able return the respective HTML element that the ID belongs to.
Now that we have the two <img> elements of the MemesMetro page we are able to modify the src attribute of the element so that it display a different image. Since, all of our images are placed in the "./assets/images/" directory we will need to maintain this file path and all we need to do is change the actual image name so that it returns a different image into the src. We will obtain the image name strings using the random indexes generated in randomIndex and randomIndex2. Since, randomIndex and randomIndex2 generates a random number from 0 to 6 we can use this number to randomly access an element in the imagesArray to append to the "./assets/images/" file path and point the src of the image tags to a different image. For example, randomIndex generates 2 as its value, we will access the second index element of imagesArray using [] brackets which is "simpsons.png" and concatonate it with "./assets/images/" to produce "./assets/images/simpsons.png". We will then assign this new image file path to the src of the image using image1.src = . The result of all of this is the images of the MemesMetro page changing every time the "Randomise" button is pressed.