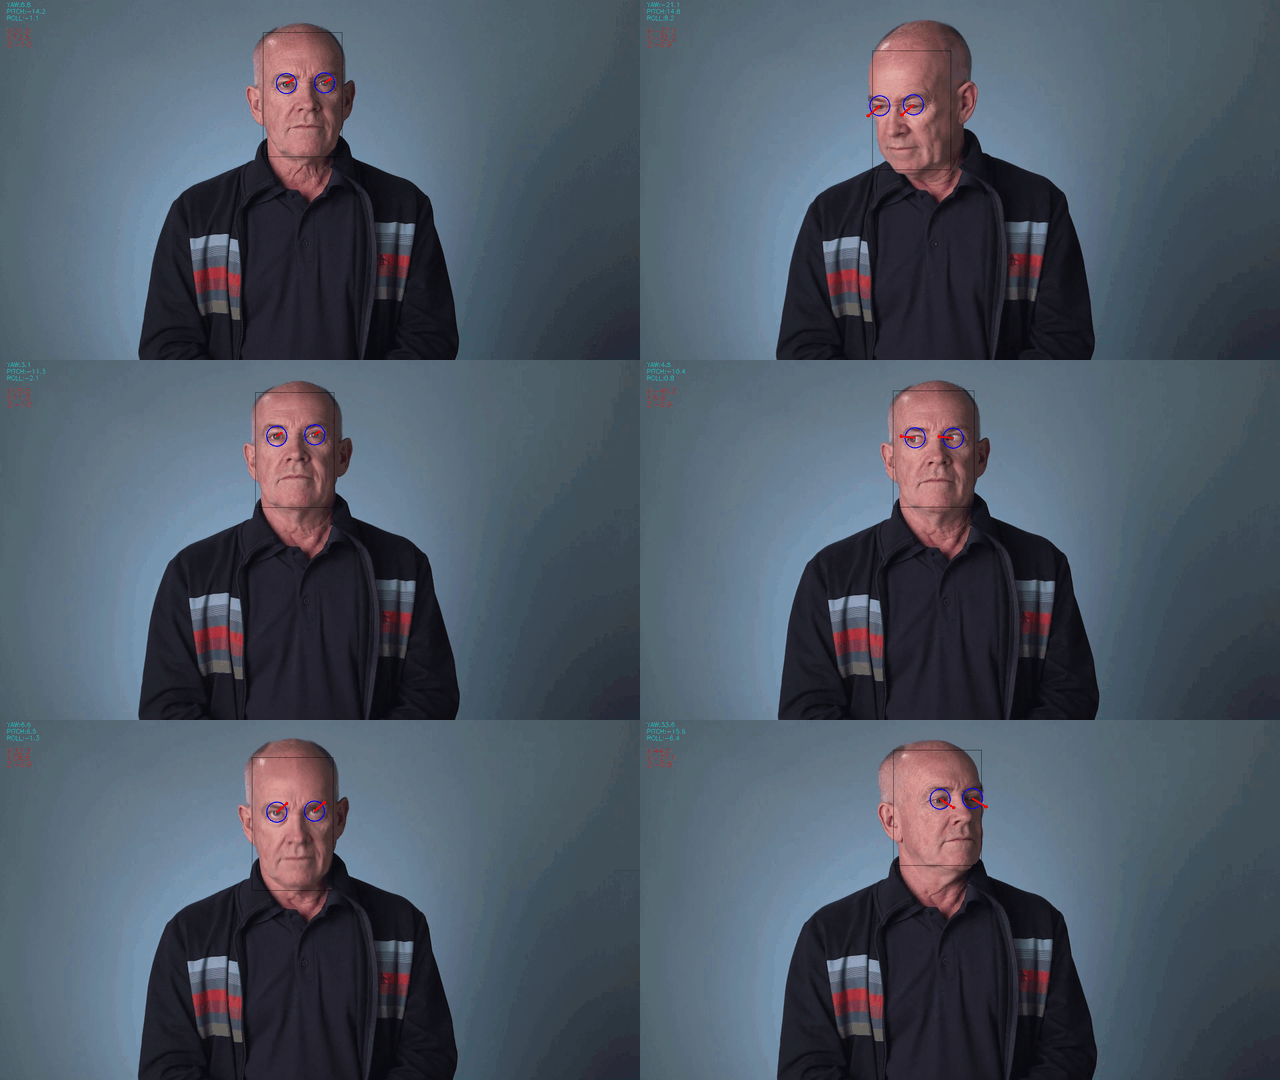
In this project, used a gaze detection model to control the mouse pointer of your computer. By using the Gaze Estimation model to estimate the gaze of the user's eyes and change the mouse pointer position accordingly. This project will demonstrate the ability to run multiple models in the same machine and coordinate the flow of data between those models.
By using the InferenceEngine API from Intel's OpenVino ToolKit to build the project. The gaze estimation model requires three inputs:
- The head pose
- The left eye image
- The right eye image.
To get these inputs, you will have to use three other OpenVino models:
You will have to coordinate the flow of data from the input, and then amongst the different models and finally to the mouse controller. The flow of data will look like this:
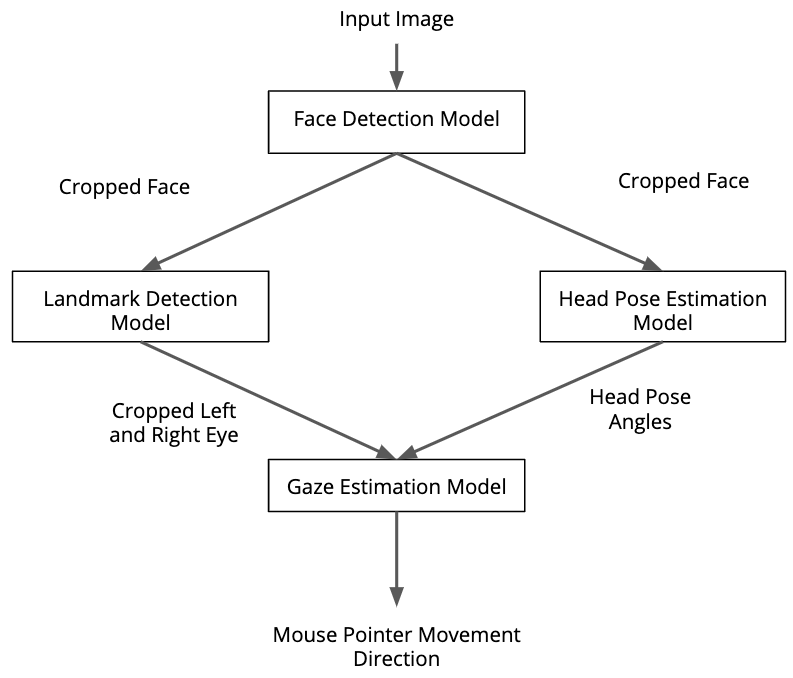
While building the flow, need to make sure that the input and output shapes of each model.
- 6th-10th Generation Intel® Core™ processors
- Intel® Xeon® v5 family
- Intel® Xeon® v6 family
- Intel® Movidius™ Neural Compute Stick
- Intel® Neural Compute Stick 2
- Intel® Vision Accelerator Design with Intel® Movidius™ VPUs
The model can be downloaded using the model downloader. The models you will need are:
Model Download Command
cd /opt/intel/openvino/deploymentools/open_model_zoo/tools/downloader/
./downloader.py --name face-detection-adas-binary-0001 -o ~/models
./downloader.py --name head-pose-estimation-adas-0001 -o ~/models
./downloader.py --name landmarks-regression-retail-0009 -o ~/models
./downloader.py --name gaze-estimation-adas-0002 -o ~/models- Download and install the OpenVINO Toolkit
- Clone this git repository into your local machine.
- Create a virtual nvironment for the project.
- Install all the dependency packages for the project.
- Run the
main.pyfile.
- Clone this git repository into your local machine.
git clone https://github.com/MrinmoiHossain/Computer-Pointer-Controller.git
cd Computer-Pointer-Controller- Create a virtual nvironment for the project.
python3 -m venv venv
source venv/bin/activate
source /opt/intel/openvino/bin/setupvars.sh- Install all the dependency packages for the project.
pip3 install -r requirements.txt- Run the
main.pyfile.
python3 src/main.py -mfd models/face-detection-adas-binary-0001/FP32-INT1/face-detection-adas-binary-0001.xml \
                    -mfl models/landmarks-regression-retail-0009/FP16-INT8/landmarks-regression-retail-0009.xml \
		            -mhp models/head-pose-estimation-adas-0001/FP16-INT8/head-pose-estimation-adas-0001.xml \
		            -mge models/gaze-estimation-adas-0002/FP16-INT8/gaze-estimation-adas-0002.xml \
-i bin/demo.mp4 -d "CPU" -o "result/" -flags fd fl hp ge.
├── bin
│ └── demo.mp4
├── GazeApp.log
├── img
│ ├── FPS.png
│ ├── Model_Loading_Time.png
│ ├── output_video.gif
│ ├── Project_Pipeline.png
│ └── Total_Inference_Time.png
├── models
│ ├── face-detection-adas-binary-0001
│ │ └── FP32-INT1
│ │ ├── face-detection-adas-binary-0001.bin
│ │ └── face-detection-adas-binary-0001.xml
│ ├── gaze-estimation-adas-0002
│ │ ├── FP16
│ │ │ ├── gaze-estimation-adas-0002.bin
│ │ │ └── gaze-estimation-adas-0002.xml
│ │ ├── FP16-INT8
│ │ │ ├── gaze-estimation-adas-0002.bin
│ │ │ └── gaze-estimation-adas-0002.xml
│ │ └── FP32
│ │ ├── gaze-estimation-adas-0002.bin
│ │ └── gaze-estimation-adas-0002.xml
│ ├── head-pose-estimation-adas-0001
│ │ ├── FP16
│ │ │ ├── head-pose-estimation-adas-0001.bin
│ │ │ └── head-pose-estimation-adas-0001.xml
│ │ ├── FP16-INT8
│ │ │ ├── head-pose-estimation-adas-0001.bin
│ │ │ └── head-pose-estimation-adas-0001.xml
│ │ └── FP32
│ │ ├── head-pose-estimation-adas-0001.bin
│ │ └── head-pose-estimation-adas-0001.xml
│ └── landmarks-regression-retail-0009
│ ├── FP16
│ │ ├── landmarks-regression-retail-0009.bin
│ │ └── landmarks-regression-retail-0009.xml
│ ├── FP16-INT8
│ │ ├── landmarks-regression-retail-0009.bin
│ │ └── landmarks-regression-retail-0009.xml
│ └── FP32
│ ├── landmarks-regression-retail-0009.bin
│ └── landmarks-regression-retail-0009.xml
├── README.md
├── requirements.txt
├── result
│ ├── FP16
│ │ └── stats.txt
│ ├── FP32
│ │ └── stats.txt
│ ├── INT8
│ │ └── stats.txt
│ ├── output_video.mp4
│ └── stats.txt
└── src
├── face_detection.py
├── facial_landmarks_detection.py
├── gaze_estimation.py
├── head_pose_estimation.py
├── input_feeder.py
├── main.py
├── model.py
├── mouse_controller.py
├── Project_Benchmarks.ipynb
└── queue_job.sh
Usage: main.py  [-h] -mfd FACEDETECTIONMODEL -mfl FACIALLANDMARKSMODEL
                -mhp HEADPOSEMODEL -mge GAZEESTIMATIONMODEL -i INPUT
                [-l CPU_EXTENSION] [-d DEVICE] [-pt PROB_THRESHOLD]
                [-o OUTPUT] [-flags FLAG_VALUE]

Arguments:
    -h, --help                      Show help message.
    -mfd, --faceDetectionModel      Path of xml file of face detection model.
    -mfl, --facialLandmarksModel    Path of xml file of facial landmarks detection model.
    -mhp, --headPoseModel           Path of xml file of head pose estimation model.
    -mge, --gazeModel               Path of xml file of gaze estimation model.
    -i, --input                     Path to image or video file.
    -l, --cpu_extension             MKLDNN (CPU)-targeted custom layers. Absolute path to a shared library with the kernels impl.
    -d, --device                    Specify the target device to infer on: "CPU, GPU, FPGA or MYRIAD is acceptable".
    -pt, --prob_threshold           Probability threshold for detections filtering (0.6 by default).
    -o, --output_path               Output video path.
    -flags, --preview_flag          Specify flag to show output like -flags ff fl(Space separated if multiple values).
                                    fd for Face Detection Model, fl for Facial Landmark Model,
                                    hp for Head Pose Estimation Model, ge for Gaze Estimation Model.
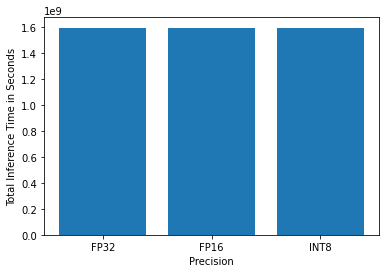
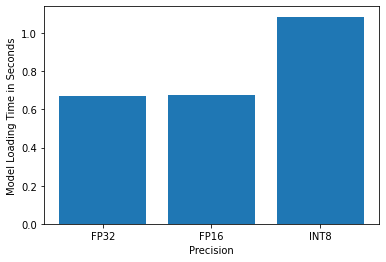
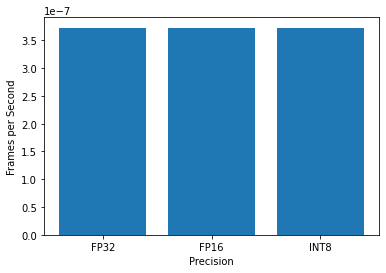
In this project, Inference Time, FPS and Model Loading Time is checked for INT8, FP16, FP32 (except - Face Detection Model). The output graphs of the test are given below -
| Precision | Inference Time | Model Loading Time | FPS |
|---|---|---|---|
| INT8 | 1595880096.3 | 1.086348295211792 | 3.728350277564647e-07 |
| FP16 | 1595880258.7 | 0.6771125793457031 | 3.728349898160188e-07 |
| FP32 | 1595880351.3 | 0.6721317768096924 | 3.7283496818249225e-07 |
- For, Inference time data see that there is not much difference for this three different precision models. Among this three precision, FP32 is higher because of higher precision value.
- And, for FPS, it is also similar to the inference time. That's mean smaller difference for this three different precision models.
- In, Model Loading time, INT8 precision model's time is much higher than any others because combination of precisions lead to higher weight of the model.
By using async inference will use the all cores of CPU improve performance with threading the ability to perform multiple inference at the same time. On the other side, at synchrounous inference, the inference request need to be waiting until the other inference request executed.
- Multiple People: If there found more than one person in the image, the detection and pointer control would only detect first person that the models detect first.
