This README has been written with Typora software.
[TOC]
Documentation and configuration of our Raspberry Pi.
Repository linked to @github/MikeLirio project called Raspberry Pi (is private for now).
We decided to install on a SSD an Ubuntu Server 20.04 LTS version and later use it as a OS on our Raspberry Pi.
We followed the next guide to make the installation:
- https://ubuntu.com/tutorials/how-to-install-ubuntu-on-your-raspberry-pi
- https://medium.com/@zsmahi/make-ubuntu-server-20-04-boot-from-an-ssd-on-raspberry-pi-4-33f15c66acd4
With Raspberry Pi Imager first we copy the SO on the MicroSD card. We choose Raspberry Pi OS Lite as a Operative System.
README! Before putting the MicroSD card on the Raspberry Pi, in our case as we want to configure it as headless, do not forget to add file called ssh on the boot folder. By default, SSH is not enabled and with the existence of this file, it will turning on this feature.
To log on the Raspberry Pi is as easy as execute the next command and use the credentials; user pi and password raspberry.
Default Raspberry Pi OS credentials user: pi password: raspberry
The IP I get it from the router, and I add it as a static, to avoid to check it each time we reboot the computer.
$ ssh pi@192.168.1.94Next step, update it ❤️
This is important because we need to upgrade the bootloader that will allow us to install the Ubuntu on the SSD and boot from there. Later the MicroSD will be useless...
$ sudo apt update && sudo apt full-upgrade -yThe first time this will take a few minutes. One time is completed, is time to get dirty with the bootloader. First we need to modify the file /etc/default/rpi-eeprom-update changing the value from default to stable.
Execute this command to exit the file on the terminal:
$ sudo nano /etc/default/rpi-eeprom-updateLet's change the value. The file must look like this:
FIRMWARE_RELEASE_STATUS="stable"Now, it's time to check if there is an update of the firmware available with the next command:
$ sudo rpi-eeprom-updateIf there is an update available, upgrade it and restart the Raspberry Pi:
$ sudo rpi-eeprom-update -a & sudo rebootAt this point, the initial setup is almost done.
Let's go. Execute the next command to enter on the Bootloader configuration:
$ sudo raspi-configIt will appear like a screen with menus. The steps to follow are describe on the following screenshots:


At this point, the Raspberry Pi is configured.
Now is when we have to install Ubuntu on the SSD.
The easiest way to do it is Raspberry Pi Imager. Before any configuration, connect the SSD on any computer and through the application, make the initial setup of any OS that you want.
One time done that. Plug the SSD and with the previous configuration done, Ubuntu should start the initial setup.
We setup the computer name with delirio, change the password and add another 2 admin users on the Raspberry Pi.
To do this setup, we run:
# for delirio is just follow the steps that Ubuntu ask for you.
$ adduser lirio
$ adduser ahortigu
Later, we remove (we know that we should not do it) the renewal of credentials with:
$ chage -M999 lirio
$ chage -M999 ahortigu
$ chage -M999 delirioThe folder ./scripts contains all Shell Scripts use along the Raspberry Pi. Inside the folder, it is defined two mail folders, scritps/src & scripts/test.
The testing on the bash scripts designed is pending to be studied and implemented.
The main scrips contained are:
-
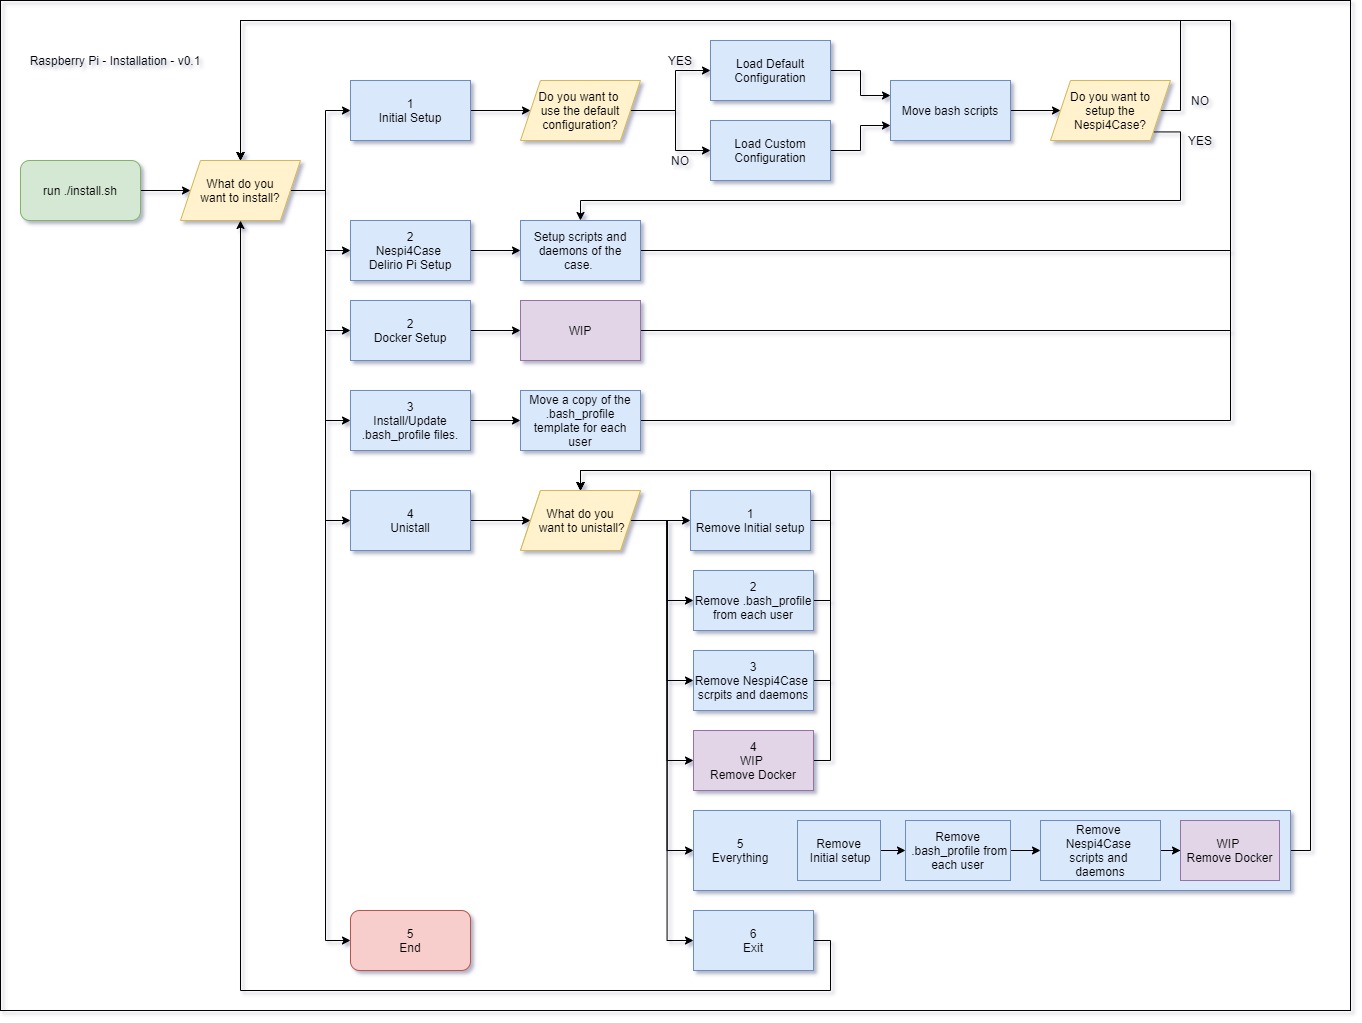
./scripts/src/install.sh: Main bash script to install the system. It provides a user iteration to help on the installation.Raspberry Pi - Installation - v0.1
-
./scripts/src/config/default.sh: Main environments variables used along all the bash scripts of the Delirio Pi system. -
./scripts/src/profiles/bash_profile_template: File with the functions used by all the users. Some help. -
./scripts/src/utils/colors.sh: Contains the declaration of constants than can be use on echo's to print the messages with colors. -
./scripts/src/utils/utils.sh: Contains the functions used along the installation and the bash_profile files.. -
./scripts/src/utils/progress_bar.sh: Shell script that print on terminal the percentage of progress of any script.- How to use it?
- progress_bar_start - Initialize and start the bar with a progress of Zero.
- progress_bar $var - Add the number give it as a parameter to the bar.
- progress_bar_end - Complete the bar with a value of 100.
- progress_bar_demo - Demo of a progress bar with 30 60 and 100 values.
- How to use it?
-
./scripts/src/case: Folder that contains all the scripts used for the case [Nespi 4 Case](#Nespi 4 Case). There will be explained on the case section.

Initially, we had the idea of using the own script that the company of the case share for free on this github repository. But they didn't work as expected, so we create our own scripts.
Those scrips are located on ./scripts/src/case :
-
Set Up:
./scripts/src/case/safe.close.sh: Script executed before any reboot or shutting down. It controls the correct shutdown of Docker or any behaviour that have to be perform a safety shutdown of the machine../scripts/src/case/setup.sh: Script that set the script & service files to control the buttons of the Raspberry Pi.- Flags:
- -r : reset; set the files for the reset button.
- -s : shutdown; set the files for the shutdown button.
- -c : safe-close; set the safe close script.
- -h : help; print in console this comments.
- none : set all the files.
- Flags:
-
Restart button:
./scripts/src/case/nespi4case.restart.gpio.py: Python script that controls the reset button. Each time you press the button, the light will start to blink. To achieve the reboot, you will have to hold it during 3 second. Before reboot, this script will executes the script./scripts/case/safe.close.sh../scripts/src/case/nespi4case.restart.service: Daemon controlled by systemctl. Makes that the previous script is executed on the background.
-
Shutdown button:
-
./scripts/src/case/nespi4case.shutdown.gpio.py: Python script that controls the shutdown button. Now it has an issue that when you turn off the Raspberry Pi, the fan is still working. Is an issue pending to fix.Before reboot, this script will executes the script
./scripts/case/safe.close.sh. -
./scripts/src/case/nespi4case.shutdown.service: Daemon controlled by systemctl. Makes that the previous script is executed on the background.
-
The scripts nespi4case.restart.gpio.py & will be placed on the path /opt/delirio, meanwhile the nespi4case.restart.service & nespi4case.shutdown.service service files have to be placed on /etc/systemd/system/.
To enable the new daemon manually:
# Reload systemd manager configuration. This will rerun all generators (see systemd.generator(7)), reload
# all unit files, and recreate the entire dependency tree. While the daemon is being reloaded, all sockets
# systemd listens on behalf of user configuration will stay accessible.
$ sudo systemctl daemon-reload
# Adding your service
$ sudo systemctl disable/enable nespi4case.service
$ sudo systemctl start nespi4case.service
# To check if is being added
$ systemctl list-unit-filesWe will be using this repository as a base of our environment. All the docker images used will be described below.
The system will be implemented in 4 different docker compose.

delirio-pi\docker\system\apps:delirio-pi\docker\system\devops:delirio-pi\docker\system\jenkins:- images on the docker-compose: Jenkins
- The problem founded is those images are not build on arch arm64, used by Raspberry Pi 4. As a future project, I will have to build them manually.
delirio-pi\docker\system\webserver:- images on the docker-compose: Nginx
We will build a docker image of Jenkins software as nowadays there is not one available for Raspberry Pi architecture.
The tags will be saved with the structure of docker\jenkins\{number version} for now.
The path to the Dockerfile is delirio-pi\docker\system\jenkins\Dockerfile.
The tags will be saved with the structure of docker\sonar\{number version} for now.
The path to the Dockerfile is delirio-pi\docker\system\devops\sonar\Dockerfile.
The tags will be saved with the structure of docker\nexus\{number version} for now.
The path to the Dockerfile is delirio-pi\docker\system\devops\nexus\Dockerfile.
The tags will be saved with the structure of docker\nginx\{number version} for now.
On the folderdelirio-pi\docker\system\webserver\nginx will contain the config file and all the HTML use by now.
Is configured as a reverse proxy by all the images.
To do the development more easier, we will develop docker images with all the need it configuration to make sure that the environment where you are developing is the most equal to production as possible.
The tags will be saved with the structure of docker\develop\{number version} for now.
The frontend will be developed in other repository, react-delirio-pi.
The backend is still on pending what to do.
Deluge
- DELIRIO_DELUGE_CONF
- DELIRIO_DELUGE_DOWNLOADS
Pi-Hole
- DELIRIO_PIHOLE
- DELIRIO_PIHOLE_DNSMASQD
Nexus 3
- Pending to analyse properly.
Sonarqube
- Pending to analyse properly.
- None to be created inside Docker.
Nginx
- Folders linked on the docker-compose:
- delirio-pi\docker\system\webserver\nginx\pages linked to /usr/share/nginx/html
- delirio-pi\docker\system\webserver\nginx\conf-d linked to /etc/nginx/conf.d
First, we will need to have it on the system. For that, we have to execute the next command lines:
$ sudo apt update
$ sudo apt install samba -y
We can check if it works getting the version of looking if the service is running:
$ smbd --version$ systemctl status smbdin case of being down, you can turning on with the next command
$ systemctl start smbdThe Share folders that we are going to share, will be located on /sharefolder path.
Next step, configure samba. To do this, we have to edit the file /etc/samba/smb.conf. This is our final configuration:
[...]

	# We add in this line the workgroud defined in our Windows computers
	workgroup = WORKGROUP

[...]

# And this block has been added at the end of the file
[delirio-pi]
    comment = Samba on Ubuntu 20.04 in Raspberry Pi 4
    path = /sharefolder
    read only = no
    browsable = yes
To apply the changes and update the firewall rules. To do that, follow the next commands:
$ sudo service smbd restart
$ sudo ufw allow samba
Finally, just add users on Samba;
$ sudo smbpasswd -a {username}We follow the next guide to configure the VPN on the Raspberry Pi 4 as now CyberGhost is not giving support to Ubuntu 20.10.
After configure the VPN with OpenVPN I started to have some issues with docker. Basically, I wasn't able to create networks on docker. To fix this issue, I follow this post on StackOverflow, and fixed it <3
Create /etc/openvpn/fix-routes.sh script with following contents:
#!/bin/sh

echo "Adding default route to $route_vpn_gateway with /0 mask..."
ip route add default via $route_vpn_gateway

echo "Removing /1 routes..."
ip route del 0.0.0.0/1 via $route_vpn_gateway
ip route del 128.0.0.0/1 via $route_vpn_gateway
Add executable bit to the file: chmod o+x /etc/openvpn/fix-routes.sh. Change owner of this file to root: chown root:root /etc/openvpn/fix-routes.sh.
Add to your config following two lines:
 script-security 2
 route-up  /etc/openvpn/fix-routes.sh
OpenVPN adds routes that for following networks: 0.0.0.0/1 and 128.0.0.0/1 (these routes cover entire IP range), and docker can't find range of IP addresses to create it's own private network.
You need to add a default route (to route everything through OpenVPN ) and disable these two specific routes. fix-routes script does that.
This script is called after OpenVPN adds its own routes. To execute scripts you'll need to set script-security to 2 which allows execution of bash scripts from OpenVPN context.
I'd like to thank author of this comment on GitHub, also thanks to OpenVPN support.