Making neural networks more interpretable, for research and art.
![]()
pip install torch-dreams
- Minimal example
- Not so minimal example
- Visualizing individual channels with
custom_func - Caricatures
- Visualize features from multiple models simultaneously
- Use custom transforms
- Feedback loops
- Custom images
- Working on models with different image normalizations
- Masked image parametrs
- Other conveniences
- Development
Make sure you also check out the quick start colab notebook
import matplotlib.pyplot as plt
import torchvision.models as models
from torch_dreams import Dreamer

model = models.inception_v3(pretrained=True)
dreamy_boi = Dreamer(model, device = 'cuda')

image_param = dreamy_boi.render(
    layers = [model.Mixed_5b],
)

plt.imshow(image_param)
plt.show()model = models.inception_v3(pretrained=True)
dreamy_boi = Dreamer(model, device = 'cuda', quiet = False)
image_param = dreamy_boi.render(
layers = [model.Mixed_5b],
width = 256,
height = 256,
iters = 150,
lr = 9e-3,
rotate_degrees = 15,
scale_max = 1.2,
scale_min = 0.5,
translate_x = 0.2,
translate_y = 0.2,
custom_func = None,
weight_decay = 1e-2,
grad_clip = 1.,
)
plt.imshow(image_param)
plt.show()model = models.inception_v3(pretrained=True)
dreamy_boi = Dreamer(model, device = 'cuda')
layers_to_use = [model.Mixed_6b.branch1x1.conv]
def make_custom_func(layer_number = 0, channel_number= 0):
def custom_func(layer_outputs):
loss = layer_outputs[layer_number][:, channel_number].mean()
return -loss
return custom_func
my_custom_func = make_custom_func(layer_number= 0, channel_number = 119)
image_param = dreamy_boi.render(
layers = layers_to_use,
custom_func = my_custom_func,
)
plt.imshow(image_param)
plt.show()The BatchedAutoImageParam paired with the BatchedObjective can be used to generate multiple feature visualizations in parallel. This takes up more memory based on the batch size, but is also faster than generating one visualization at a time.
from torch_dreams import Dreamer
import torchvision.models as models
from torch_dreams.batched_objective import BatchedObjective
from torch_dreams.batched_image_param import BatchedAutoImageParam

model = models.inception_v3(pretrained=True)
dreamy_boi = Dreamer(model, device="cuda")

## specify list of neuron indices to visualize
batch_neuron_indices = [i for i in range(10,20)]

## set up a batch of trainable image parameters
bap = BatchedAutoImageParam(
    batch_size=len(batch_neuron_indices),
    width=256,
    height=256,
    standard_deviation=0.01
)

## objective generator for each neuron
def make_custom_func(layer_number=0, channel_number=0):
    def custom_func(layer_outputs):
        loss = layer_outputs[layer_number][:, channel_number].norm()
        return -loss

    return custom_func

## prepare objective functions for each neuron index
batched_objective = BatchedObjective(
    objectives=[make_custom_func(channel_number=i) for i in batch_neuron_indices]
)

## render activation maximization signals
result_batch = dreamy_boi.render(
    layers=[model.Mixed_5b],
    image_parameter=bap,
    iters=120,
    custom_func=batched_objective,
)

## save results in a folder
for i in batch_neuron_indices:
    result_batch[batch_neuron_indices.index(i)].save(f"results/{i}.jpg")
Caricatures create a new image that has a similar but more extreme activation pattern to the input image at a given layer (or multiple layers at a time). It's inspired from this issue
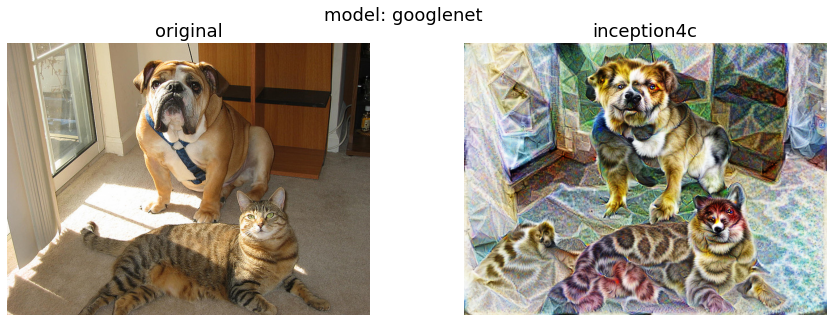
In this case, let's use googlenet
model = models.googlenet(pretrained = True)
dreamy_boi = Dreamer(model = model, quiet= False, device= 'cuda')

image_param = dreamy_boi.caricature(
    input_tensor = image_tensor,
    layers = [model.inception4c],   ## feel free to append more layers for more interesting caricatures
    power= 1.2,                     ## higher -> more "exaggerated" features
)

plt.imshow(image_param)
plt.show()First, let's pick 2 models and specify which layers we'd want to work with
from torch_dreams.model_bunch import ModelBunch

bunch = ModelBunch(
    model_dict = {
        'inception': models.inception_v3(pretrained=True).eval(),
        'resnet':    models.resnet18(pretrained= True).eval()
    }
)

layers_to_use = [
            bunch.model_dict['inception'].Mixed_6a,
            bunch.model_dict['resnet'].layer2[0].conv1
        ]

dreamy_boi = Dreamer(model = bunch, quiet= False, device= 'cuda')
Then define a custom_func which determines which exact activations of the models we have to optimize
def custom_func(layer_outputs):
    loss =   layer_outputs[0].mean()*2.0 + layer_outputs[1][:, 89].mean()
    return -loss
Run the optimization
image_param = dreamy_boi.render(
    layers = layers_to_use,
    custom_func= custom_func,
    iters= 100
)

plt.imshow(image_param)
plt.show()import torchvision.transforms as transforms
model = models.inception_v3(pretrained=True)
dreamy_boi = Dreamer(model, device = 'cuda', quiet = False)
my_transforms = transforms.Compose([
transforms.RandomAffine(degrees = 10, translate = (0.5,0.5)),
transforms.RandomHorizontalFlip(p = 0.3)
])
dreamy_boi.set_custom_transforms(transforms = my_transforms)
image_param = dreamy_boi.render(
layers = [model.Mixed_5b],
)
plt.imshow(image_param)
plt.show()import matplotlib.pyplot as plt
import torchvision.models as models
from torch_dreams import Dreamer
model = models.inception_v3(pretrained=True)
dreamy_boi = Dreamer(model, device = 'cuda', quiet = False)
image_param = dreamy_boi.render(
layers = [model.Mixed_6c],
)
image_param = dreamy_boi.render(
image_parameter= image_param,
layers = [model.Mixed_5b],
iters = 20
)
plt.imshow(image_param)
plt.show()Note that you might have to use smaller values for certain hyperparameters like lr and grad_clip.
from torch_dreams.custom_image_param import CustomImageParam
param = CustomImageParam(image = 'images/sample_small.jpg', device= 'cuda')  ## image could either be a filename or a torch.tensor of shape NCHW

image_param = dreamy_boi.render(
    image_parameter= param,
    layers = [model.Mixed_6c],
    lr = 2e-4,
    grad_clip = 0.1,
    weight_decay= 1e-1,
    iters = 120
)torch-dreams generally works with models trained on images normalized with imagenet mean and std, but that can be easily overriden to support any other normalization. For example, if you have a model with mean = [0.5, 0.5, 0.5] and std = [0.5, 0.5, 0.5]:
t = torchvision.transforms.Normalize(
                mean = [0.5, 0.5, 0.5],
                std =  [0.5, 0.5, 0.5]
            )

dreamy_boi.set_custom_normalization(normalization_transform = t) ## normalization_transform could be any instance of torch.nn.ModuleCan be used to optimize only certain parts of the image using a mask whose values are clipped between [0,1].
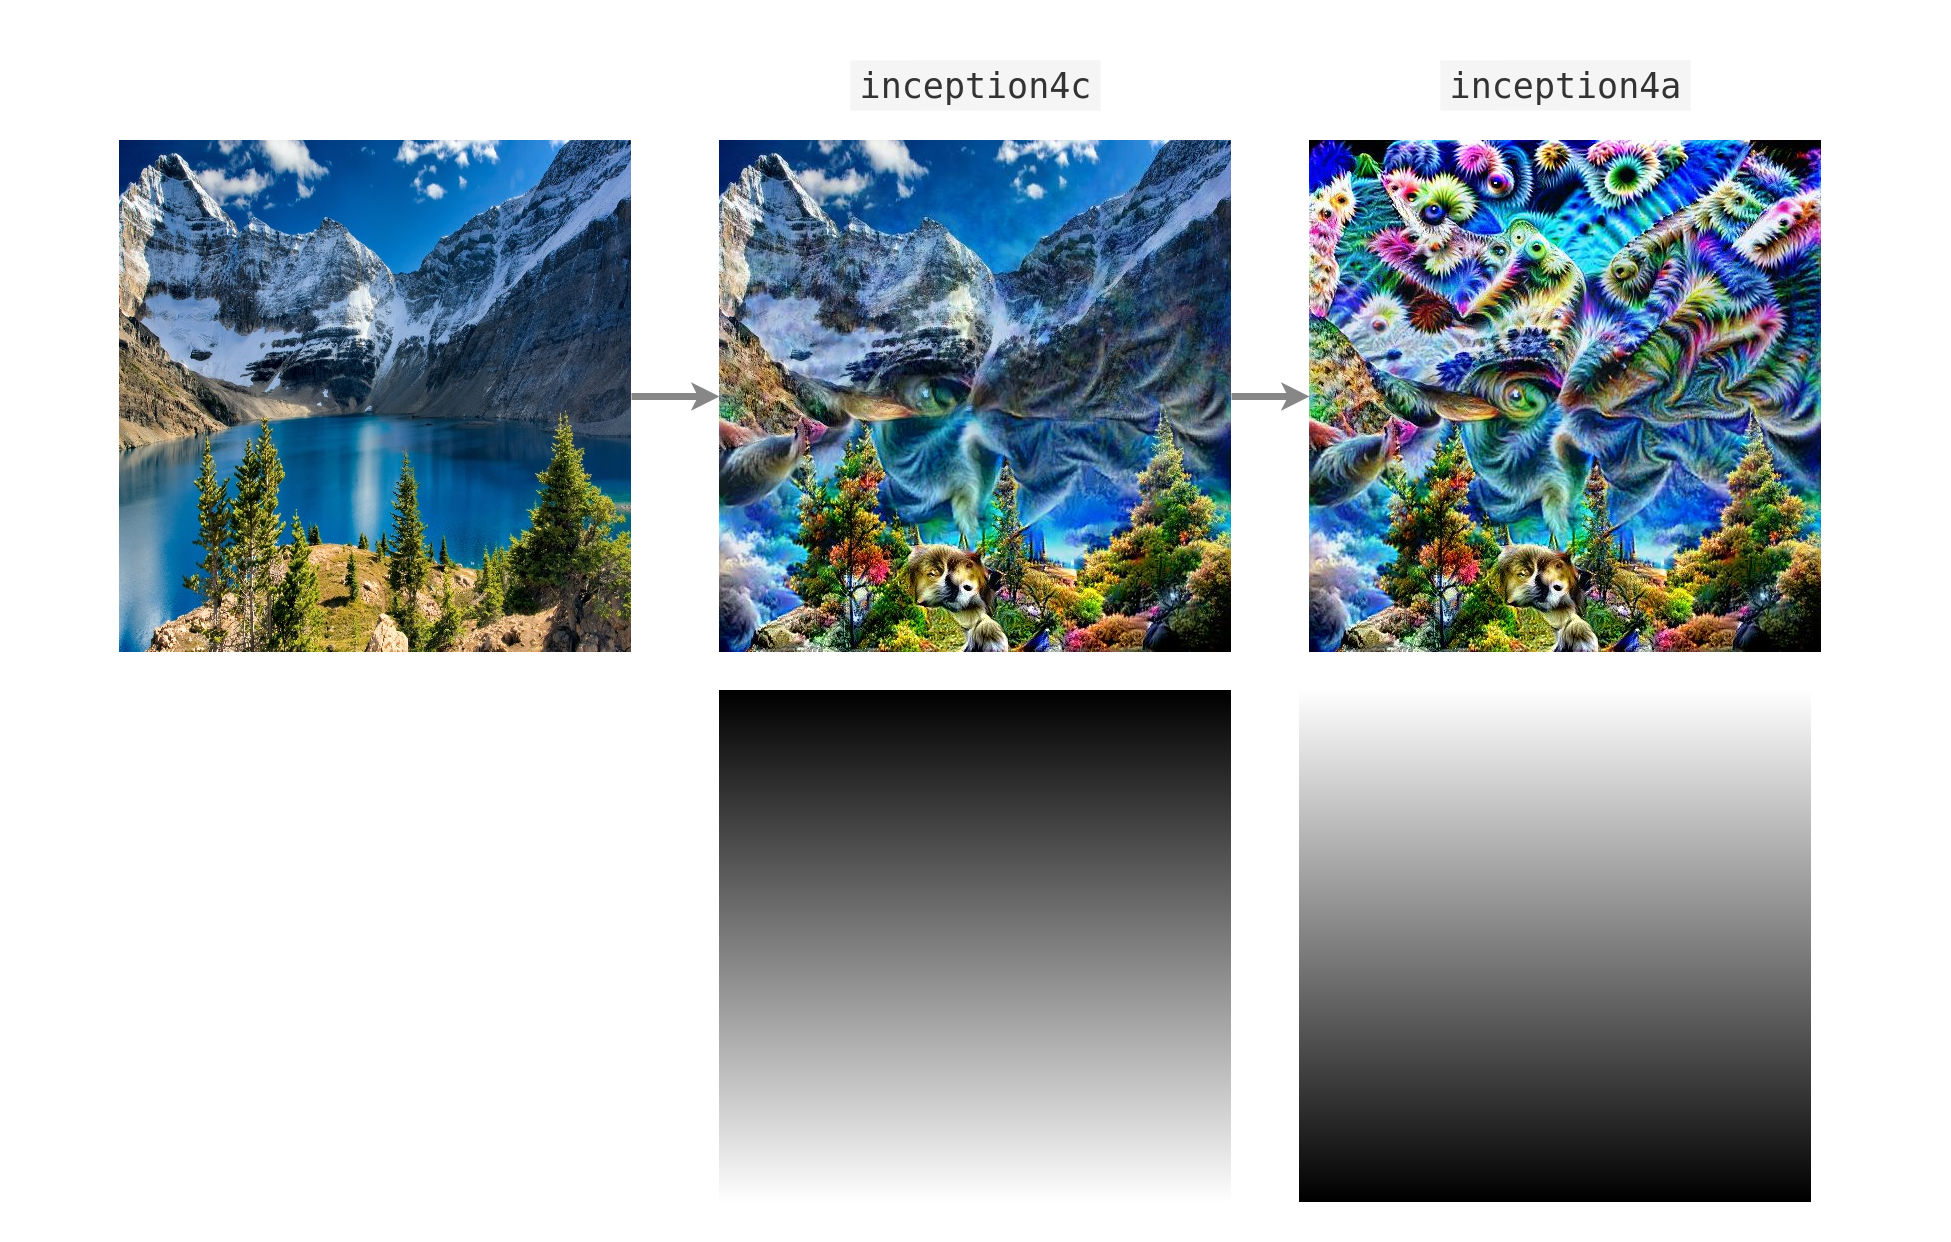
Here's an example with a vertical gradient
from torch_dreams.masked_image_param import MaskedImageParam

mask = torch.ones(1,1,512,512)

for i in range(0, 512, 1):  ## vertical gradient
    mask[:,:,i,:] = (i/512)

param = MaskedImageParam(
    image= 'images/sample_small.jpg',  ## optional
    mask_tensor = mask,
    device = 'cuda'
)

param = dreamy_boi.render(
    layers = [model.inception4c],
    image_parameter= param,
    lr = 1e-4,
    grad_clip= 0.1,
    weight_decay= 1e-1,
    iters= 200,
)

param.save('masked_param_output.jpg')
It's also possible to update the mask on the fly with param.update_mask(some_mask)
param.update_mask(mask = torch.flip(mask, dims = (2,)))

param = dreamy_boi.render(
    layers = [model.inception4a],
    image_parameter= param,
    lr = 1e-4,
    grad_clip= 0.1,
    weight_decay= 1e-1,
    iters= 200,
)

param.save('masked_param_output_2.jpg')The following methods are handy for an auto_image_param instance:
- Saving outputs as images:
image_param.save('output.jpg')- Torch Tensor of dimensions
(height, width, color_channels)
torch_image = image_param.to_hwc_tensor(device = 'cpu')- Torch Tensor of dimensions
(color_channels, height, width)
torch_image_chw = image_param.to_chw_tensor(device = 'cpu')- Displaying outputs on matplotlib.
plt.imshow(image_param)
plt.show()- For instances of
custom_image_param, you can set any NCHW tensor as the image parameter:
image_tensor = image_param.to_nchw_tensor()

## do some stuff with image_tensor
t = transforms.Compose([
    transforms.RandomRotation(5)
])
transformed_image_tensor = t(image_tensor)

image_param.set_param(tensor = transformed_image_tensor)-
layers(iterable): List of the layers of model(s)'s layers to work on.[model.layer1, model.layer2...] -
image_parameter(auto_image_param, optional): Instance oftorch_dreams.auto_image_param.auto_image_param -
width(int, optional): Width of image to be optimized -
height(int, optional): Height of image to be optimized -
iters(int, optional): Number of iterations, higher -> stronger visualization -
lr(float, optional): Learning rate -
rotate_degrees(int, optional): Max rotation in default transforms -
scale_max(float, optional): Max image size factor. Defaults to 1.1. -
scale_min(float, optional): Minimum image size factor. Defaults to 0.5. -
translate_x(float, optional): Maximum translation factor in x direction -
translate_y(float, optional): Maximum translation factor in y direction -
custom_func(function, optional): Can be used to define custom optimiziation conditions torender(). Defaults to None. -
weight_decay(float, optional): Weight decay for default optimizer. Helps prevent high frequency noise. Defaults to 0. -
grad_clip(float, optional): Maximum value of the norm of gradient. Defaults to 1.
model(nn.Moduleortorch_dreams.model_bunch.Modelbunch): Almost any PyTorch model which was trained on imagenetmeanandstd, and supports variable sized images as inputs. You can pass multiple models into this argument as atorch_dreams.model_bunch.Modelbunchinstance.quiet(bool): Set toTrueif you want to disable any progress barsdevice(str):cudaorcpudepending on your runtime
- Clone the repo and navigate into the folder
git clone git@github.com:Mayukhdeb/torch-dreams.git
cd torch-dreams/
- Install dependencies
pip install -r requirements.txt
- Install
torch-dreamsas an editable module
python3 setup.py develop
@misc{mayukhdebtorchdreams,
  title={Feature Visualization library for PyTorch},
  author={Mayukh Deb},
  year={2021},
  publisher={GitHub},
  howpublished={\url{https://github.com/Mayukhdeb/torch-dreams}},
}