参考:RHEL7 PerformanceTuningGuide
编译Qemu文档, 新方法参考zdoc
进入文档目录
cd /path/to/qemu/docs
mkdir _build
sphinx-build . _build
生成文件
_build/index.html
性能问题可以分如下两大类(虚拟化中也包含,还包含虚拟化部分)
- On-CPU 线程消耗CPU时间
- Off-CPU 等待IO,locks,timers,paging/swaping,etc.
FindingOriginsOfLatenciesUsingFtrace
延时的定义
一个事件实际执行的时间点和本应该要在哪个时间点执行的时间差
内核中导致延时的四个情景
- 禁止中断(导致任务无法处理)
- 禁止抢占(阻止激活的任务无法运行)
- 调度延时
- 中断倒转(中断优先级比其中断的任务优先级低)
使用trace来测量相应的延时
- 禁止中断(irqoff) 追踪关中断时间
- 禁止抢占(preemptoff) 追踪抢占/中断任一被关闭的最大延迟时间。
- 调度延时(wakeup, wakeup_rt) 追踪普通进程从被唤醒到真正得到执行之间的延迟
- 中断倒转
查看Qemu启动后都有那些线程
./scripts/find_thread_name.sh

pid(14912) qemu-system-x86
pid(14913) call_rcu
pid(14914) trace-thread
pid(14916) IO mon_iothread
pid(14917) CPU 0/KVM
pid(14918) CPU 1/KVM
pid(14921) SPICE Worker
pid(14922) vnc_worker
isolcpus
-
isolate one or more CPUs from the scheduler with the isolcpus boot parameter. This prevents the scheduler from scheduling any user-space threads on this CPU.
-
Once a CPU is isolated, you must manually assign processes to the isolated CPU, either with the CPU affinity system calls or the numactl command
tickless and dynamic tickless kernel(CONFIG_NO_HZ_FULL)
- tickless does not interrupt idle CPUs in order to reduce power usage and allow newer processors to take advantage of deep sleep states
- dynamic tickless is useful for very latency-sensitive workloads, such as high performance computing or realtime computing
开启内核配置选项(dynamic tickless config)
CONFIG_NO_HZ_FULL
通过在启动参数中设置isolcpus来配置cpu隔离和内核tick
在/etc/default/grub中设置
GRUB_CMDLINE_LINUX_DEFAULT="isolcpus=1,3 nohz_full=1,3"
重新生成grub.cfg
grub-mkconfig -o /boot/grub/grub.cfg
查看修改是否成功
cat /proc/cmdline
测试程序
# ./scripts/isol_cpu_test.sh
对测试结果解读
grep 'Local timer interrupts' /proc/interrupts
未配置隔离核和全时钟中断的的情况下每个核上的中断一般在1000ticks左右
配置后在隔离核上理论上只有1个ticks(实际测试平均都在10ticks以内)
通过查看内核代码得知cpuinfo来源是x86_model_id这个数组
static int show_cpuinfo(struct seq_file *m, void *v)
{
	seq_printf(m, "processor\t: %u\n"
		   "vendor_id\t: %s\n"
		   "cpu family\t: %d\n"
		   "model\t\t: %u\n"
		   "model name\t: %s\n",
		   cpu,
		   c->x86_vendor_id[0] ? c->x86_vendor_id : "unknown",
		   c->x86,
		   c->x86_model,
		   c->x86_model_id[0] ? c->x86_model_id : "unknown");
在内核代码arch/x86/kernel/cpu/common.c中通过cpuid获取
static void get_model_name(struct cpuinfo_x86 *c)
{
	v = (unsigned int *)c->x86_model_id;
	cpuid(0x80000002, &v[0], &v[1], &v[2], &v[3]);
	cpuid(0x80000003, &v[4], &v[5], &v[6], &v[7]);
	cpuid(0x80000004, &v[8], &v[9], &v[10], &v[11]);
	c->x86_model_id[48] = 0;
从The CPUID Explorer了解到:CPUID(0x80000002)..CPUID(0x80000004):就是Processor brand string(cpuinfo 中显示的model name)
可以通过工具来获取对应的寄存器
cpuid --one-cpu --raw --leaf=0x80000002
CPU:
   0x80000002 0x00: eax=0x65746e49 ebx=0x2952286c ecx=0x726f4320 edx=0x4d542865

cpuid --one-cpu --raw --leaf=0x80000003
CPU:
   0x80000003 0x00: eax=0x35692029 ebx=0x3035382d ecx=0x50432030 edx=0x20402055

cpuid --one-cpu --raw --leaf=0x80000004
CPU:
   0x80000004 0x00: eax=0x30302e33 ebx=0x007a4847 ecx=0x00000000 edx=0x00000000
x86是小端系统,所以对应的0x80000002的cpuid信息如下(在python中查看)
>>> hex='65746e49'
>>> bytearray.fromhex(hex)
bytearray(b'etnI')
>>> str=bytearray.fromhex(hex)
>>> str.reverse()
>>> print(str)
bytearray(b'Inte') // 把所有连起来就是cpuinfo中看到的model name
发现KVM提供了一个接口KVM_SET_CPUID2,通过这个接口,可以在用户空间设置需要模拟的CPUID的信息
kvm_arch_init_vcpu
kvm_vcpu_ioctl(cs, KVM_SET_CPUID2, &cpuid_data); /* 通过KVM接口设置CPUID */
虚拟机模拟的cpu在获取cpuinfo时调用的接口cpu_x86_cpuid
通过在这个接口里添加set_fake_cpuid_model来覆盖cpuid_model从而达到修改model name的信息
static void set_fake_cpuid_model(uint32_t fake_cpuid_model[12])
{
	/* fill any cpuinfo you want */
	const char *fake_model_id = "Intel(R) Xeon(R) A Really Fast CPU @ 10.0 GHz";
	memset(fake_cpuid_model, 0, 48);
	int c, len, i;
	len = strlen(fake_model_id);
	for (i = 0; i < 48; i++) {
		if (i >= len) {
			c = '\0';
		} else {
			c = (uint8_t)fake_model_id[i];
		}
		fake_cpuid_model[i >> 2] |= c << (8 * (i & 3));
	}
}

cpu_x86_cpuid
	case 0x80000002:
	case 0x80000003:
	case 0x80000004:
		set_fake_cpuid_model(env->cpuid_model); /* over ride the cpuid here */
		*eax = env->cpuid_model[(index - 0x80000002) * 4 + 0];
		*ebx = env->cpuid_model[(index - 0x80000002) * 4 + 1];
		*ecx = env->cpuid_model[(index - 0x80000002) * 4 + 2];
		*edx = env->cpuid_model[(index - 0x80000002) * 4 + 3];
x2apic优点
-
x2apic improves guest performance by reducing the overhead of APIC access, which is used to program timers and for issuing inter-processor interrupts. By exposing x2apic to guests, and by enabling the guest to utilize x2apic, we improve guest performance
-
improved guest performance and lower cpu utilization
x2APIC是硬件特性,内核提供一些参数来控制
默认开启,可以在/etc/default/grub中禁止该功能
GRUB_CMDLINE_LINUX_DEFAULT="nox2apic"
开机后查看是否由该功能
cat /proc/cpuinfo | ag x2apic
dmesg | ag x2apic
xAPIC模式
- APIC寄存器被映射到4KB大小的内存区,因此访问APIC是通过MMIO
x2APIC模式下
- 一部分MSR地址区间为APIC寄存器预留,访问APIC是通过MSR
测试方法
- measure the overhead of an IPI with and without x2apic
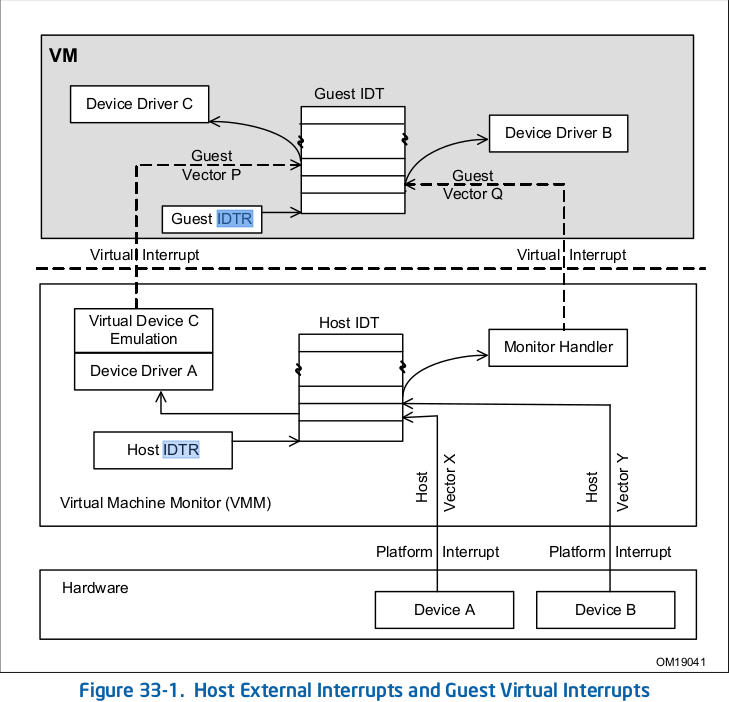
模拟中断和直接分配设备产生的中断示意图
Balancing Interrupts Manually
-
找出需要配置的中断
-
确认平台是否支持中断分发 check BIOS
-
确认APIC的工作模式 disable x2apic
设置smp_affinity
echo mask > /proc/irq/irq_number/smp_affinity
content of smp_affinity files can be obtained by
for i in $(seq 0 300); do grep . /proc/irq/$i/smp_affinity /dev/null 2>/dev/null; done
查看中断N绑定的cpu
cat /proc/irq/N/smp_affinity_list
irqbalance(v1.0.7)的主函数10s一个周期做以下事情
- 清除上次统计结果
- 分析中断情况
- 分析中断的负载情况
- 计算如何平衡中断
- 实施上面指定的方案
通过/proc/stat来计算中断负载(irq+softirq)
查询man手册获取详细信息
man 5 proc
cpu->last_load = (irq_load + softirq_load)
- 每个CORE的负载是附在上面的中断的负载的总和
- 每个DOMAIN是包含的CORE的总和
- 每个PACKAGE包含的DOMAIN的总和,就像树层次一样的计算
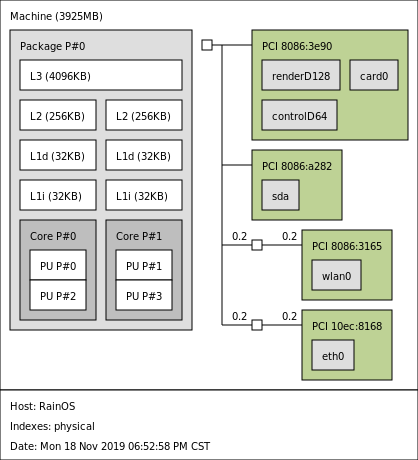
查看cpu各cache的信息(getconf -a)
tree -L 1 /sys/devices/system/cpu/cpu0/cache/
/sys/devices/system/cpu/cpu0/cache/
├── index0   -> L1 data缓存
├── index1   -> L1 Instruction缓存
├── index2   -> L2 缓存
└── index3   -> L3 缓存
RSS(ResidentSetSize)表示进程占用的物理内存大小, 但是将各进程的RSS值相加,通常会超出整个系统的内存消耗,这是因为RSS中包含了各进程间共享的内存
PSS(ProportionalSet size)所有使用某共享库的程序均分该共享库占用的内存时,每个进程占用的内存,显然所有进程的PSS之和就是系统的内存使用量.它会更准确一些,它将共享内存的大小进行平均后,再分摊到各进程上去.
USS(UniqueSetSize)进程独自占用的内存,它是PSS中自己的部分(PSS = USS + sharelib),它只计算了进程独自占用的内存大小,不包含任何共享的部分
- VSS(VirtualSetSize)虚拟耗用内存(包含共享库占用的内存)
- RSS(ResidentSetSize)实际使用物理内存(包含共享库占用的内存)
- PSS(ProportionalSetSize)实际使用的物理内存(比例分配共享库占用的内存)
- USS(UniqueSetSize)进程独自占用的物理内存(不包含共享库占用的内存)
根据rss查看内存使用情况饼图
smem --pie name -s rss
根据uss查看内存使用情况柱形图
smem --bar name -s uss
将主机A的信息采集后打包
smemcap > memorycapture.tar
在主机B上查看相应的结果
smem -S memorycapture.tar --bar name -s uss
发现使用同样的perf.data在不同机器上生成图片不一致
获取flame源码
git clone https://github.com/brendangregg/FlameGraph.git
采集qemu数据
perf record -a -g -p `pidof qemu-system-x86_64` sleep 30
用perf script工具对perf.data进行解析
perf script -i perf.data &> perf.unfold
将perf.unfold中的符号进行折叠
./stackcollapse-perf.pl perf.unfold &> perf.folded
生成svg图片
./flamegraph.pl perf.folded > perf.svg
或者将perf.data拷贝到FlameGraph目录中,执行脚本genfg.sh
编译Qemu的时候配置相关的选项
./configure --enable-trace-backends=simple
在gentoo中手动修改ebuild文件后通过localoverlay安装
手动创建一个需要trace的事件列表(可选)
echo bdrv_aio_readv   > /tmp/events
echo bdrv_aio_writev >> /tmp/events
启动Qemu时设定events,trace file, monitor
qemu -trace events=/tmp/events,file=trace.bin -monitor stdio ...
使用qemu源码中的脚本分析trace file(trace.bin)
cd qemu-source/
./simpletrace.py ../trace-events /path/to/trace.bin
./simpletrace.py ../trace-events-all /path/to/trace.bin
输出格式
eventname delta_ns/1000 pid args...
事件名字 耗时(us) 进程ID 函数参数
在Qemu monitor中设置event
(qemu) trace-event xxx-event <on | off>
开关trace file功能
(qemu) trace-file <on | off>
配置
./configure --enable-trace-backends=ftrace
启动的虚拟机需要有写ftrace的权限(比如用root用户启动虚拟机) 在monitor中动态开启(trace_ahci_start_transfer)
(QEMU) trace-event ahci_start_transfer on
实时查看打印日志
cat /sys/kernel/debug/tracing/trace_pipe
在Qemu源码中每个目录都有一个trace-events文件 在这个文件中定义了trace中如何打印参数(对应trace.bin中的输出)
qcow2镜像大小是on demand的 qcow2的组成单元是clusters(default 64KB)
手动修改cluster size大小为128KB
qemu-img create -f qcow2 -o cluster_size=128K hd.qcow2 4G
qcow2 image通过两级表来映射给guest
一个disk image对应一个L1,且L1一直存在内存中 L2的张数则和disk image的大小有关 Qemu中为了加速对L2表的访问在内存中提供了L2的cache
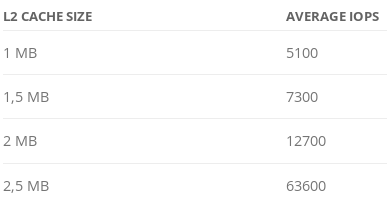
L2cache大小对性能的影响
可映射到guest的磁盘大小计算公式如下
disk_size = l2_cache_size * cluster_size / 8
如果cluster_size默认64KB的话
disk_size = l2_cache_size * 8192
如果要映射nGB磁盘大小的话l2 cache大小计算公式如下
l2_cache_size = disk_size_GB * 131072
Qemu默认的L2 cache大小是1MB,所以对应的8GB的默认磁盘大小
如何配置cache size
- l2-cache-size: maximum size of the L2 table cache
- refcount-cache-size: maximum size of the refcount block cache
- cache-size: maximum size of both caches combined
配置时需要注意的两点
- L2 cache和refcount block cache都要是cluster size的倍数
- 设之三面三个中的一个参数,qemu会自动调整其他两个参数保证(L2cache 大于4倍的refcount cache)
所以下面的三条设置是等效的
-drive file=hd.qcow2,l2-cache-size=2097152
-drive file=hd.qcow2,refcount-cache-size=524288
-drive file=hd.qcow2,cache-size=2621440
减少内存使用(多快照情况下)
-drive file=hd.qcow2,cache-clean-interval=900
多个快照的情况下,可以将不需要使用的cache定时释放,减少内存使用
Tracing
# trace-cmd record -b 20000 -e kvm
run your workload, then stop trace-cmd with ctrl-C. trace-cmd will write a trace.dat file
Analyzing
trace-cmd report
or using kernelshark
开始测试
iozone -a > result.txt
绘3D图
./Generate_Graphs result.txt
现象:虚拟机卡顿,延时大,拖动窗口有残影,主机端qemu进程的cpu占用率非常高
主机上收集qemu程序的信息
perf record -p `pidof qemu-system-x86_64`
分析相关信息
perf report -i perf.data

# Overhead  Command          Shared Object               Symbol
# ........  ...............  ..........................  ...................................................
#
	 8.41%  qemu-system-x86  [kernel.kallsyms]           [k] native_sched_clock
	 7.46%  qemu-system-x86  [kernel.kallsyms]           [k] trace_graph_entry
	 6.50%  qemu-system-x86  [kernel.kallsyms]           [k] trace_graph_return
	 5.20%  qemu-system-x86  [kernel.kallsyms]           [k] ring_buffer_lock_reserve
	 5.01%  qemu-system-x86  [kernel.kallsyms]           [k] __rb_reserve_next
	 4.38%  qemu-system-x86  [kernel.kallsyms]           [k] rb_commit
	 3.19%  qemu-system-x86  [kernel.kallsyms]           [k] tracing_generic_entry_update
	 2.94%  CPU 0/KVM        [kernel.kallsyms]           [k] trace_graph_entry
	 2.90%  CPU 0/KVM        [kernel.kallsyms]           [k] native_sched_clock
	 2.66%  CPU 0/KVM        [kernel.kallsyms]           [k] trace_graph_return
	 2.29%  qemu-system-x86  [kernel.kallsyms]           [k] ftrace_push_return_trace
	 2.10%  qemu-system-x86  [kernel.kallsyms]           [k] ring_buffer_event_data
	 1.90%  qemu-system-x86  [kernel.kallsyms]           [k] return_to_handler
	 1.89%  qemu-system-x86  [kernel.kallsyms]           [k] ftrace_return_to_handler
看到结果中调用trace相关的地方非常频繁
查看后发现是因为开机了trace
cat /sys/kernel/debug/tracing/tracing_on
1
关闭后qemu进程的cpu占用率降低,虚拟机不卡顿,但是perf.data里还是有相关trace调用
echo 0 > /sys/kernel/debug/tracing/tracing_on
设置trace为nop关闭所有trace(此时的perf.data里就看不到相关的trace内容了)
echo nop > /sys/kernel/debug/tracing/current_tracer
参考文章: 记一次虚拟化环境下Windows IO性能的解析
首先使用kvm_stat确认KVM中哪些事件频繁
linux/tools/kvm/kvm_stat/kvm_stat
分析vmx_handle_exit退出原因
- 访问IO Port(handle_pio)
- 访问MMIO(handle_apic_access)
- 其他
使用trace获取相应的事件信息(得到trace.dat也可以使用kernelshark查看)
trace-cmd record -e kvm_pio -e kvm_mmio
trace-cmd report
trace.dat中有如下信息
pio_read at 0x071 size 1 count 1 val 0xc0
pio_write at 0x70 size 1 count 1 val 0xc
获取mtree信息(这里vm是domain name)
virsh qemu-monitor-command vm --hmp info mtree > mtree.txt
在mtree.txt中查找相应的IOport(可以看到是rtc)
address-space: I/O
0000000000000070-0000000000000071 (prio 0, RW): rtc
实时查看虚拟机的事件
perf kvm --host stat live
如果IO_INSTRUCTION事件多,则查看具体那些ioport操作
perf kvm --host stat live --event=ioport

0x70:POUT        298    39.52%    46.68%      0.44us  45869.84us    405.72us ( +-  49.18% )
0x71:PIN        285    37.80%    16.04%      0.86us  13241.90us    145.73us ( +-  51.40% )
查看(qemu)info mtree
0000000000000070-0000000000000071 (prio 0, i/o): rtc
perf kvm stat live --event=msr

MSR Access    Samples  Samples%     Time%    Min Time    Max Time         Avg time
0x40000071:W        443    81.28%    97.84%      0.43us  32383.38us    348.47us ( +-  36.02% )
0x40000070:W        102    18.72%     2.16%      0.58us   3334.98us     33.45us ( +-  97.73% )
其中msr是如下寄存器
src/linux/arch/x86/include/asm/hyperv-tlfs.h
src/linux/arch/x86/hyperv/hv_apic.c

/* Define the virtual APIC registers */
#define HV_X64_MSR_EOI				0x40000070
#define HV_X64_MSR_ICR				0x40000071
使用trace获取相应的事件信息(得到trace.dat也可以使用kernelshark查看)
trace-cmd record -e kvm_entry -e kvm_exit
trace-cmd report
下面命令获取vmexit事件(其中有EXTERNAL_INTERRUPT)
perf kvm --host stat live [-p pid ]

VM-EXIT    Samples  Samples%     Time%    Min Time    Max Time         Avg time
EXTERNAL_INTERRUPT        590    30.01%     7.05%      0.61us  14827.23us     69.37us ( +-  54.68% )
统计kvm_exit事件中EXTERNAL_INTERRUPT由哪个中断向量(vector)触发
echo 1 > /sys/kernel/debug/tracing/events/kvm/kvm_exit/enable
cat /sys/kernel/debug/tracing/trace_pipe
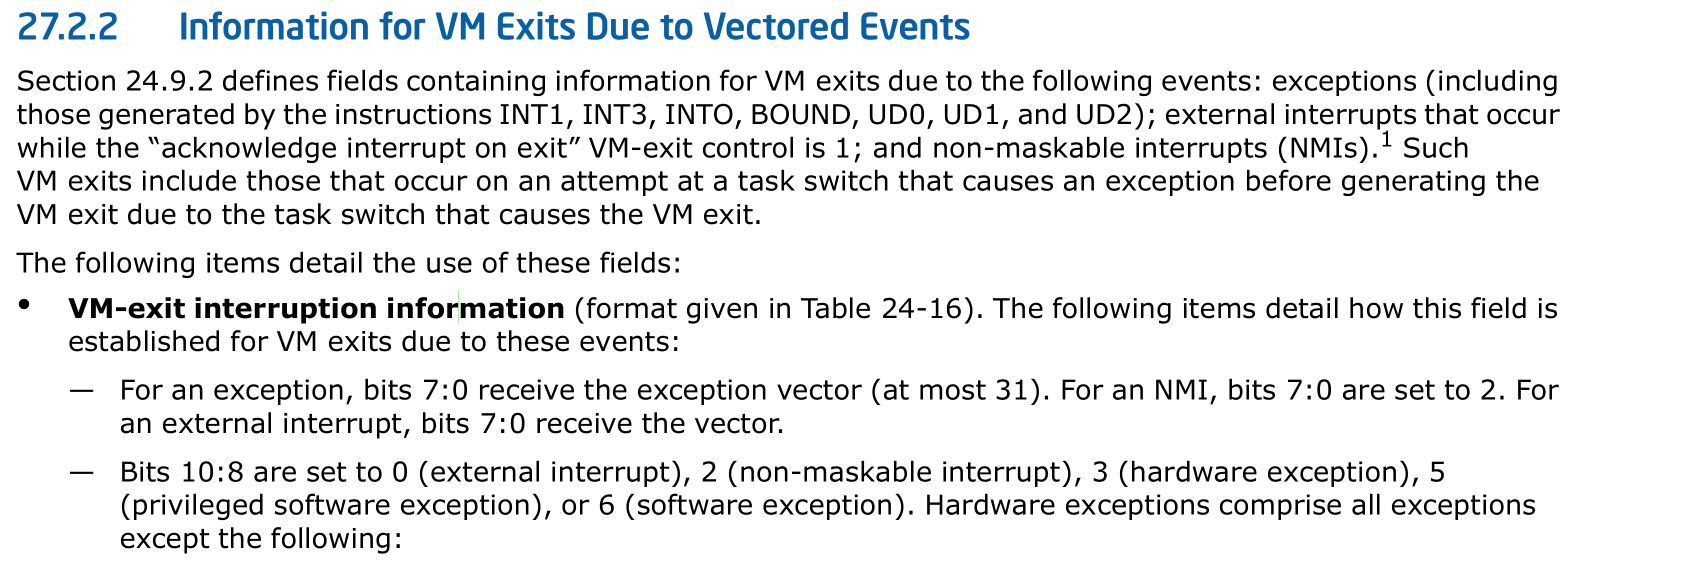
看到如下信息,其中intr_info的bit0-7(ec)表示的VM-exit interruption information
CPU 0/KVM-4432    [004] d... 416798.620167: kvm_exit: vcpu 0 reason EXTERNAL_INTERRUPT rip 0x771eeb94 info1 0x0000000000000000 info2 0x0000000000000000 intr_info 0x800000ec error_code 0x00000000

如下信息中intr_info中的bit7-0是0xfd
CPU 0/KVM-4432    [004] d... 416798.619838: kvm_exit: vcpu 0 reason EXTERNAL_INTERRUPT rip 0x767b17a0 info1 0x0000000000000000 info2 0x0000000000000000 intr_info 0x800000fd error_code 0x00000000

如下信息中intr_info中的bit7-0是0xf6
CPU 0/KVM-19232  [000] d..1. 2666636.979020: kvm_exit: vcpu 0 reason EXTERNAL_INTERRUPT rip 0xffffffff9be4398b info1 0x0000000000000000 info2 0x0000000000000000 intr_info 0x800000f6 error_code 0x00000000
查询主机上的vector号(arch/x86/include/asm/irq_vectors.h)
#define LOCAL_TIMER_VECTOR      0xec
#define RESCHEDULE_VECTOR       0xfd
#define IRQ_WORK_VECTOR         0xf6
所以虚拟机的退出原因是由于主机上的对应的中断向量产生的中断导致退出
trace打印的信息在内核代码入如下
内核5.10代码如下
kvm_x86_ops.get_exit_info(vcpu, &__entry->info1,         \
			  &__entry->info2,           \
			  &__entry->intr_info,           \
			  &__entry->error_code);         \
	*intr_info = vmx_get_intr_info(vcpu);
		vmx->exit_intr_info = vmcs_read32(VM_EXIT_INTR_INFO);

TP_printk("vcpu %u reason %s%s%s rip 0x%lx info1 0x%016llx "         \
      "info2 0x%016llx intr_info 0x%08x error_code 0x%08x",      \
      __entry->vcpu_id,                      \
      kvm_print_exit_reason(__entry->exit_reason, __entry->isa), \
      __entry->guest_rip, __entry->info1, __entry->info2,        \
      __entry->intr_info, __entry->error_code)           \

内核5.9代码如下
kvm_x86_ops.get_exit_info(vcpu, &__entry->info1,         \
			  &__entry->info2,           \
			  &__entry->intr_info,           \
			  &__entry->error_code);         \

*info1 = vmx_get_exit_qual(vcpu);
*info2 = vmx_get_intr_info(vcpu);
{
	//VM_EXIT_INTR_INFO  = 0x00004404,
	vmx->exit_intr_info = vmcs_read32(VM_EXIT_INTR_INFO);
}

TP_printk("vcpu %u reason %s%s%s rip 0x%lx info %llx %llx",
      __entry->vcpu_id,
      kvm_print_exit_reason(__entry->exit_reason, __entry->isa),
      __entry->guest_rip, __entry->info1, __entry->info2)
查询intel SDM volume 3c解释interruption information
使用qemu源码中的工具
cd qemu/scripts/
gdb --args qemu-system-x86_64 -enable-kvm -cpu host -smp $(nproc) -m 2048 -boot d -hda /path/to/vm.img
(gdb) source qemu-gdb.py
(gdb) help qemu
准备ramdisk(linux-0.2.img)
下载linux源码使用下面的配置编译内核
make kvmtool_defconfig
make
下载lkvm
git clone git://git.kernel.org/pub/scm/linux/kernel/git/will/kvmtool.git
make
启动虚拟机
$ ./lkvm run --disk /path/to/linux-0.2.img --kernel /path/to/arch/x86/boot/bzImage
带网络启动虚拟机
# ./lkvm run --disk /path/to/linux-0.2.img --kernel /path/to/arch/x86/boot/bzImage --network virtio
参考文章 https://lwn.net/Articles/658511
使用下面命令将md转换为pdf
pandoc --latex-engine=xelatex -V geometry:paperwidth=12in -V geometry:paperheight=20in -V geometry:margin=.5in -o output.pdf input.md -V mainfont="SourceHanSansCN-Normal"


