Smartplug (esp8266) turn automatically a cheap and superefficient DIY PM filter based on the Lufdaten sensor data
With this Tasmota, a smart plug will read the value from your Lufdaten sensor and will turn your filter on/off accroding to the threshold you set.
You can force your filter to be ON even if the PM values are low by pressing the button on your plug or the button "Force" in the UI.
A huge thanks to @gemu2015 for the time spent for extracting the values from the json and creating the "force mode".
-
a smart plug with tasmota already installed (you can find a list of plug with plug preinstalled with tasmota here) or any smart plug with an esp8266 or esp8285* (if you managed to "brick" the plug, go to the section "how to unbrick it?') I bought mine on Aliexpress at 16€: ATHOM preflashed TASMOTA Smart Plug 16A
*) EPS8285 is equivalent to an ESP8266 embedded with 1MB Flash memory, therefore, ESP8285 uses the same set of SDK as ESP8266's, namely ESP8266 SDK)
-
Build your luftadaten sensor (20$): https://sensor.community/en/
-
Build your air filter It's just a hepa filter on a fan! Yes it works, even if there is air from the fan passing around the filter! https://smartairfilters.com/en/blog/how-to-make-diy-air-purifier/
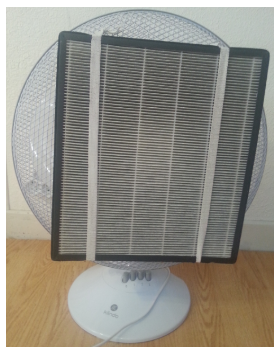
This design has been tested by Thomas Talhelm "a non-expert nerd who has dedicated years to understanding how to live under Beijing’s particulate cloud":
https://smartairfilters.com/en/blog/what-is-the-best-air-purifier-on-the-market-today/
https://smartairfilters.com/en/blog/diy-air-outlet-tests/
https://smartairfilters.com/en/blog/comparison-diy-filter-effectiveness-iq-air/
With tasmota you can directly send a command and save/edit a script from a web interface (you don't need to build + upload the bin file to change your code). It takes ≈7seconds for the plug to save the script and restart.
To do that just use need to open the IP of you tasmota device in your browser, to save a script on the Consoles>Edit script, and to go to Consoles>Console and write in the text input : script 1 (and then press Enter)
- If you have a tasmota plug already configured: connect your smartplug and go to Configuration> Backup Configuration (it will backup the most important pin configuration and probably the wifi)
You can use the tasmota_custom.bin.gz (based on 9.5.0.8) that is provided in this repository or you can build the same custom tasmota by following these step:
- Install VSCode Visual Studio Code and the extension PlatformIO via the extension menu inside VScode.
- Go to https://github.com/arendst/Tasmota , click on
CodethenDownload ZIPand extract the zip (mine was extracted in the folder in the "Tasmota-development") - In VSCode, open the command palette and select
PlatformIO : Home - On the PlatformIO home page, click on
Open project, select your folder (eg: Tasmota-development). If VSCode aks if you trust the authors, clickYes - Copy the
user_config_override.hprovided here inTasmota-development\tasmota - In VSCode, make sure the the tasmota path is set to "env:tasmota (Tasmota-development)" (you can see it at the bottom of the windows, otherwise click on it and select the correct env: https://imgur.com/ISQzFdp )
- Open the command palette and select PlatformIO Built
In your browser open the IP of your smartplug and go to Firmware Upgrade then click on upload a file and select Tasmota-development\build_output\firmware\tasmota.bin.gz (advice: always use the bin.gz from the build_output, not the .bin from the .pio) (Don't install the wrong bin/scrip, otherwise you will "brick the plug": you will have then to break it open and do some soldering to fix it!)
● If you get a "Upload buffer miscompare" error
- This means that the smartplug doesn't have enough free memory to install the custom firmware. So you need to first install a "tasmota minimal firmware" before uploading your custom firmware.
- go to https://github.com/arendst/Tasmota/releases and download the latest tasmota-minimal.bin.gz (you need to scroll down pass the migration info about older version and the Changelog to finally get to the list of all tasmota.bin)
- open your tasmota plug IP and go to Firmware Upgrade> and upload the tasmota-minimal.bin.gz
- once it is done, upload your custom firmware (Tasmota-development\build_output\firmware\tasmota.bin.gz)
- in your browser open the IP of your smartplug
- click on consoles> edit script
- check the checkbox to enable script
- paste the content of
script_for_webUI.script: you need to modify the IP (cf http) with the one from your luftdaten senso. You cam also modify the PM thresholds - Now fo to consoles>console and write :
script 1(and then press Enter) - Everything should be working now!
Don't forget to plug your PM filter on the smartplug!
- If you have any problem (ex: during the build or a function that doesn't work properly), update tasmota : they regularly fix the bugs (two times in a week, I solved errors by simply updating the tasmota to the latest)
- Always upload the .bin.gz not the .bin
If your wifi credentials have changed (ex: new password, new modem...), you need to shortly press the button on your plug 4 (or 6) times quickly. This will activate the "wifi configuration mode". Then on your computer, open the Network settings (where all the wifi devices are listed) and select your tasmota smartplug. A new tab on your browser will be automatically opened and you can enter your new credentials. more info : https://tasmota.github.io/docs/FAQ/#wi-fi
How to fix a bricked smart plug (by erasing it and reinstalling tasmota) or installing tasmota on a esp8266 plug
■ How to open the plug:
- best technique: https://www.youtube.com/watch?v=MjG07LQmJjQ
- interesting comments: https://www.youtube.com/watch?v=mG4bAAHluMU
■ How to erase/reinstall tasmota
- solder the wires (cf the picture below from https://codesandbolts.com/bsd29-smart-socket-esp8285)
- install esptool via python
python -m pip install esptool - download tasmota.bin on http://ota.tasmota.com/tasmota/release/
- put esp8266 in programming mode (connect gpio0 to ground, plug the usb-serial connector- wait 10sec, disconnect gpio to ground)
- when you are in pogramming mode the red light turn ON
- when it uploads the orange light (in the middle) turns ON and the white light flash quickly (near the crystal clock of the board).
- verify that esp8266 is in programming mode (to get COM port : device manager > Ports (COM & LPT) . )
esptool.py -p COM3 read_mac(should return several line of info incl mac address)
esptool.py -p COM3 flash_id(should return several line similar above) - erase flash an install tasmota
esptool.py --port COM3 erase_flash
esptool.py --port COM3 write_flash -fs 1MB -fm dout 0x0 firmware.bin
 others tuto:
https://community.octoprint.org/t/make-your-own-sonoff-smart-plug/13230
https://www.instructables.com/USB-to-Serial-Convertor-for-ESP8266/
■ Configurate the plug
- connect the plug and enter wifi
- re-enter the config specs for the plug : cf configuration> Restore config