RPC框架,使用netty作为网络连接,使用zookeeper作为注册服务器。本项目主要分为三个部分,其一动态代理,其二netty网络通信,其三zookeeper客户端的使用。参考项目 黄勇老师教程
本项目中的zookeeper环境是基于docker安装的,使用的脚本命令如下:
1.下载镜像
docker pull zookeeper
2.启动容器并添加映射
docker run --privileged=true -d --name zookeeper --publish 2181:2181  -d zookeeper:latest
3.添加防火墙端口
firewall-cmd --zone=public --add-port=2181/tcp --permanentzookeeper启动后无需其他的操作便可以直接使用,可以使用idea的插件连接zookeeper进行测试,Docker安装Zookeeper并进行操作
主要的测试是在test包下,src/main下为主要的逻辑代码,进行测试时需要首先打开zookeeper服务器,然后配置zookeeper服务器地址,因为我的是虚拟机中,所以需要更改为自己的服务ip地址,目录为src/test/resources/rpc.properties
# rpc server
rpc.service_address=127.0.0.1:8000
# zookeeper server
rpc.registry_address=192.168.60.130:2181
服务的测试主要是包含两步,第一开启服务器,test/server/RpcBootStarp.java 为启动服务器。第二开启测试,test/RpcTest.java
package com.dwj.rpc.test;

@RunWith(SpringJUnit4ClassRunner.class)
@ContextConfiguration(locations = "classpath:client-spring.xml")
public class RPCTest {
    @Autowired
    RpcProxy rpcProxy;

    /**
     * 测试返回string参数的代理
     */
    @Test
    public void HelloServiceTest(){
        HelloService helloService = rpcProxy.create(HelloService.class);
        String result = helloService.sayHello("World");
        System.out.println(result);
    }

    /**
     * 测试对个返回参数的代理
     */
    @Test
    public void PersonServiceTest(){
        PersonService personService = rpcProxy.create(PersonService.class);
        List<Person> result2 = personService.GetTestPerson("小明",3);
        for (Person p : result2){
            System.out.println(p);
        }
    }
}主要的实现类就是一个RpcProxy这个类,通过这个类使用netty进行网络连接调用远端的方法,因为用到了zookeeper所以在发送数据之前需要调用服务的发现,即获取到服务器的ip和监听端口。主要的关系就是客户端实现动态代理,服务器端实现反射调用函数。
其中调用的对应关系如下,首先是客户端:主要有两个待实现的接口。
package com.dwj.rpc.test.client;
public interface HelloService {
    String sayHello(String name);
}

public interface PersonService {
    List<Person> GetTestPerson(String name, int num);
}
然后是服务器端,对应两个具体的继承接口并且实现的类。
package com.dwj.rpc.test.server;
@RpcService(value = HelloService.class,version = "1.0")
public class HelloServiceImpl implements HelloService {
    @Override
    public String sayHello(String name) {
        return "Hello " + name;
    }
}

@RpcService(PersonService.class)
public class PersonServiceImpl implements PersonService {
    @Override
    public List<Person> GetTestPerson(String name, int num) {
        List<Person> persons = new ArrayList<>(num);
        for (int i = 0; i < num; ++i) {
            persons.add(new Person(Integer.toString(i), name));
        }
        return persons;
    }
}
然后服务器通过使用RpcService注解,将这两个类扫描到HashMap容器中作为服务等待客户端调用,如下所示。
{com.dwj.rpc.test.client.HelloService=com.dwj.rpc.test.server.HelloServiceImpl@51fadaff,
 com.dwj.rpc.test.client.PersonService=com.dwj.rpc.test.server.PersonServiceImpl@401f7633}
以上为server中hashMap中的保存的键值对,即反射调用的映射关系只需要发送客户端的包名,便能够获取到对应的实例化对象。
注解的定义为:其中可以加上版本号进行实现。
//带有RpcService表示为直接的注解。
@Target({ElementType.TYPE})
@Retention(RetentionPolicy.RUNTIME)
@Component
public @interface RpcService {

    /**
     * 服务接口类
     */
    Class<?> value();

    /**
     * 服务版本号
     */
    String version() default "";
}
客户端的动态代理实现:
@SuppressWarnings("unchecked")
public <T> T create(final Class<?> interfaceClass, final String serviceVersion) {
    // 创建动态代理对象
    return (T) Proxy.newProxyInstance(
        interfaceClass.getClassLoader(),
        new Class<?>[]{interfaceClass},
        new InvocationHandler() {
            @Override
            public Object invoke(Object proxy, Method method, Object[] args) throws Throwable {
                // 创建 RPC 请求对象并设置请求属性
                RpcRequest request = new RpcRequest();
                request.setRequestId(UUID.randomUUID().toString());

                //获取到的接口名称 com.dwj.rpc.test.client.HelloService
                request.setInterfaceName(method.getDeclaringClass().getName());

                request.setServiceVersion(serviceVersion);
                request.setMethodName(method.getName());
                request.setParameterTypes(method.getParameterTypes());
                request.setParameters(args);
               	// 获取 RPC 服务地址
                // 使用HashMap作为缓存
                // 通过interface的全限定类名进行回去服务器的名称, 需要加上这个version字段。。 明天在搞吧。
                if (serviceDiscovery != null) {
                    String interFaceName = method.getDeclaringClass().getName();
                    // 需要判断 serviceVersion 是否为空。
                    if (StringUtil.isNotEmpty(serviceVersion)) {
                        interFaceName += "-" + serviceVersion;
                    }
                    serviceAddress = serviceDiscovery.discover(interFaceName);
                }
                //如果不使用zookeeper则需要将这个不进行注解。
                //serviceAddress = "127.0.0.1:8000";
                if (StringUtil.isEmpty(serviceAddress)) {
                    throw new RuntimeException("server address is empty");
                }
                // 从 RPC 服务地址中解析主机名与端口号
                String[] array = StringUtil.split(serviceAddress, ":");
                String host = array[0];
                int port = Integer.parseInt(array[1]);
                // 创建 RPC 客户端对象并发送 RPC 请求
                // 使用地址和端口进行数据连接,
                RpcClient client = new RpcClient(host, port);

                long time = System.currentTimeMillis();
                //但是这个获取到的response总是为空
                RpcResponse response = client.send(request);
                LOGGER.debug("time: {}ms", System.currentTimeMillis() - time);
                if (response == null) {
                    throw new RuntimeException("response is null");
                }
                // 返回RPC响应结果
                if (response.hasException()) {
                    throw response.getException();
                } else {
                    return response.getResult();
                }
            }
        }
    );
}
服务器端使用反射进行调用方法,主要就是进行解析request请求。
private Object handle(RpcRequest request) throws Exception {
    // 获取服务对象
    String serviceName = request.getInterfaceName();
    String serviceVersion = request.getServiceVersion();
    if (StringUtil.isNotEmpty(serviceVersion)) {
        serviceName += "-" + serviceVersion;
    }
    //获取 hashMap中的保存的键值对
    Object serviceBean = handlerMap.get(serviceName);

    if (serviceBean == null) {
        throw new RuntimeException(String.format("can not find service bean by key: %s", serviceName));
    }
    // 获取反射调用所需的参数
    Class<?> serviceClass = serviceBean.getClass();
    String methodName = request.getMethodName();
    Class<?>[] parameterTypes = request.getParameterTypes();
    Object[] parameters = request.getParameters();
    // 执行反射调用
    Method method = serviceClass.getMethod(methodName, parameterTypes);
    method.setAccessible(true);
    return method.invoke(serviceBean, parameters);
}上一个项目使用的是http协议进行的连接,现在打算使用netty作为网络连接。其实对于netty是不够了解的。
在此也涉及到序列化与反序列化。使用的是第三方工具类Protostuff。
<!-- Protostuff -->
<!--序列化工具-->
<dependency>
    <groupId>com.dyuproject.protostuff</groupId>
    <artifactId>protostuff-core</artifactId>
    <version>1.0.8</version>
</dependency>
<dependency>
    <groupId>com.dyuproject.protostuff</groupId>
    <artifactId>protostuff-runtime</artifactId>
    <version>1.0.8</version>
</dependency>
其中实现的方式为:
package com.dwj.rpc.common.util;

/**
 * 序列化工具类(基于 Protostuff 实现)
 *
 */
public class SerializationUtil {

    private static Map<Class<?>, Schema<?>> cachedSchema = new ConcurrentHashMap<>();

    private static Objenesis objenesis = new ObjenesisStd(true);

    private SerializationUtil() {
    }

    /**
     * 序列化(对象 -> 字节数组)
     */
    @SuppressWarnings("unchecked")
    public static <T> byte[] serialize(T obj) {
        Class<T> cls = (Class<T>) obj.getClass();
        LinkedBuffer buffer = LinkedBuffer.allocate(LinkedBuffer.DEFAULT_BUFFER_SIZE);
        try {
            Schema<T> schema = getSchema(cls);
            return ProtostuffIOUtil.toByteArray(obj, schema, buffer);
        } catch (Exception e) {
            throw new IllegalStateException(e.getMessage(), e);
        } finally {
            buffer.clear();
        }
    }

    /**
     * 反序列化(字节数组 -> 对象)
     */
    public static <T> T deserialize(byte[] data, Class<T> cls) {
        try {
            T message = objenesis.newInstance(cls);
            Schema<T> schema = getSchema(cls);
            ProtostuffIOUtil.mergeFrom(data, message, schema);
            return message;
        } catch (Exception e) {
            throw new IllegalStateException(e.getMessage(), e);
        }
    }

    @SuppressWarnings("unchecked")
    private static <T> Schema<T> getSchema(Class<T> cls) {
        Schema<T> schema = (Schema<T>) cachedSchema.get(cls);
        if (schema == null) {
            schema = RuntimeSchema.createFrom(cls);
            cachedSchema.put(cls, schema);
        }
        return schema;
    }
}
具体的使用:
/**
 * RPC 解码器
 */
public class RpcDecoder extends ByteToMessageDecoder {

    private Class<?> genericClass;

    public RpcDecoder(Class<?> genericClass) {
        this.genericClass = genericClass;
    }

    @Override
    public void decode(ChannelHandlerContext ctx, ByteBuf in, List<Object> out) throws Exception {
        if (in.readableBytes() < 4) {
            return;
        }
        in.markReaderIndex();
        int dataLength = in.readInt();
        if (in.readableBytes() < dataLength) {
            in.resetReaderIndex();
            return;
        }
        byte[] data = new byte[dataLength];
        in.readBytes(data);
        out.add(SerializationUtil.deserialize(data, genericClass));
    }
}
package com.dwj.rpc.common.codec;
/**
* RPC 编码器
*/
public class RpcEncoder extends MessageToByteEncoder {
private Class<?> genericClass;
public RpcEncoder(Class<?> genericClass) {
this.genericClass = genericClass;
}
@Override
public void encode(ChannelHandlerContext ctx, Object in, ByteBuf out) throws Exception {
if (genericClass.isInstance(in)) {
byte[] data = SerializationUtil.serialize(in);
out.writeInt(data.length);
out.writeBytes(data);
}
}
}使用封装体的方式使得关系更加的方便
package com.dwj.rpc.common.bean;

/**
 * 封装 RPC 请求
 */
public class RpcRequest {

    private String requestId; //请求id
    private String interfaceName; //请求接口名称
    private String serviceVersion; //请求版本
    private String methodName; //请求方法名
    private Class<?>[] parameterTypes; //请求参数类型
    private Object[] parameters; //请求参数。
	//get set
}
package com.dwj.rpc.common.bean;
/**
* 封装 RPC 响应
*/
public class RpcResponse {
private String requestId;
private Exception exception;
private Object result;
//get set
}客户端进行与服务器交互
package com.dwj.rpc.client;

public class RpcClient extends SimpleChannelInboundHandler<RpcResponse> {

    // send 以后就是使用这个东西进行获取。
    @Override
    protected void channelRead0(ChannelHandlerContext channelHandlerContext, RpcResponse rpcResponse) throws Exception {
        this.response = rpcResponse;
    }

    @Override
    public void exceptionCaught(ChannelHandlerContext ctx, Throwable cause) throws Exception {
        LOGGER.error("api caught exception", cause);
        ctx.close();
    }

    /**
     *  发送数据到服务器。
     * @param request 发送请求
     * @return 返回响应数据
     * @throws Exception
     */
    public RpcResponse send(RpcRequest request) throws Exception {
        EventLoopGroup group = new NioEventLoopGroup();
        try {
            // 创建并初始化 Netty 客户端 Bootstrap 对象
            Bootstrap bootstrap = new Bootstrap();
            bootstrap.group(group);
            bootstrap.channel(NioSocketChannel.class);
            bootstrap.handler(new ChannelInitializer<SocketChannel>() {
                @Override
                public void initChannel(SocketChannel channel) throws Exception {
                    ChannelPipeline pipeline = channel.pipeline();
                    pipeline.addLast(new RpcEncoder(RpcRequest.class)); // 编码 RPC 请求
                    pipeline.addLast(new RpcDecoder(RpcResponse.class)); // 解码 RPC 响应
                    pipeline.addLast(RpcClient.this); // 处理 RPC 响应
                }
            });
            bootstrap.option(ChannelOption.TCP_NODELAY, true);
            // 连接 RPC 服务器
            ChannelFuture future = bootstrap.connect(host, port).sync();
            // 写入 RPC 请求数据并关闭连接
            Channel channel = future.channel();
            channel.writeAndFlush(request).sync();
            channel.closeFuture().sync();
            // 返回 RPC 响应对象
            return response;
        } finally {
            group.shutdownGracefully();
        }
    }
}
服务器端:
package com.dwj.rpc.server;

public class RpcServer implements ApplicationContextAware, InitializingBean {

    //在进行设置好参数以后,进行开启服务器
    @Override
    public void afterPropertiesSet() throws Exception {
        EventLoopGroup bossGroup = new NioEventLoopGroup();
        EventLoopGroup workerGroup = new NioEventLoopGroup();
        try {
            // 创建并初始化 Netty 服务端 Bootstrap 对象
            ServerBootstrap bootstrap = new ServerBootstrap();
            bootstrap.group(bossGroup, workerGroup);
            bootstrap.channel(NioServerSocketChannel.class);
            bootstrap.childHandler(new ChannelInitializer<SocketChannel>() {
                @Override
                public void initChannel(SocketChannel channel) throws Exception {
                    ChannelPipeline pipeline = channel.pipeline();
                    pipeline.addLast(new RpcDecoder(RpcRequest.class)); // 解码 RPC 请求
                    pipeline.addLast(new RpcEncoder(RpcResponse.class)); // 编码 RPC 响应
                    pipeline.addLast(new RpcServerHandler(handlerMap)); // 处理 RPC 请求
                }
            });
            bootstrap.option(ChannelOption.SO_BACKLOG, 1024);
            bootstrap.childOption(ChannelOption.SO_KEEPALIVE, true);

            // 获取 RPC 服务器的 IP 地址与端口号
            String[] addressArray = StringUtil.split(serviceAddress, ":");
            String ip = addressArray[0];
            int port = Integer.parseInt(addressArray[1]);
            // 启动 RPC 服务器
            ChannelFuture future = bootstrap.bind(ip, port).sync();

            // 注册服务到zookeeper服务器
            if (serviceRegistry != null) {
                // 获取本地扫描到的所有 注解的接口,放入数组。
                List<String> interfaceNames = new ArrayList<>(handlerMap.keySet());

                serviceRegistry.register(serviceAddress, interfaceNames);
                LOGGER.debug("register service: {} => {}", interfaceNames.toString(), serviceAddress);
            }
            LOGGER.debug("server started on port {}", port);
            System.out.println("server started on port" + port);
            // 关闭 RPC 服务器
            future.channel().closeFuture().sync();
        } finally {
            workerGroup.shutdownGracefully();
            bossGroup.shutdownGracefully();
        }
    }
}
服务器获取客户端的数据。
package com.dwj.rpc.server;

public class RpcServerHandler extends SimpleChannelInboundHandler<RpcRequest> {

    @Override
    public void channelRead0(final ChannelHandlerContext ctx, RpcRequest request) throws Exception {
        // 创建并初始化 RPC 响应对象
        RpcResponse response = new RpcResponse();
        response.setRequestId(request.getRequestId());
        try {
            Object result = handle(request); //处理请求体,反射执行。
            response.setResult(result);
        } catch (Exception e) {
            LOGGER.error("handle result failure", e);
            response.setException(e);
        }
        // 写入 RPC 响应对象并自动关闭连接
        ctx.writeAndFlush(response).addListener(ChannelFutureListener.CLOSE);
    }

    @Override
    public void exceptionCaught(ChannelHandlerContext ctx, Throwable cause) {
        LOGGER.error("server caught exception", cause);
        ctx.close();
    }
}使用zookeeper客户端进行服务的创建节点的时候,使用"/"表示一个目录,如
parent = "/servcice";
child =  parent + "/interface"
这样就表示创建了两个目录, 如果不加 “/” ,则直接表示根节点,会被覆盖,所以在创建的时候,需要做好拼接。
注册服务主要是在服务器启动的时候进行使用,查看服务器的spring配置文件可以看出,在初始化服务器的时候,需要将服务器发现对象注入进去,并且使用也是,直接调用注册函数即可,其中注册需要传递两个参数,服务器ip地址,系统扫描到的接口全限定类名。
rpcServer.java

    // 注册服务到zookeeper服务器
    if (serviceRegistry != null) {
        // 获取本地扫描到的所有 注解的接口,放入数组。
        List<String> interfaceNames = new ArrayList<>(handlerMap.keySet());

        serviceRegistry.register(serviceAddress, interfaceNames);
        LOGGER.debug("register service: {} => {}", interfaceNames.toString(), serviceAddress);
    }
    LOGGER.debug("server started on port {}", port);
注册则是与之对应,主要就是在进行代理的时候进行发现服务器的ip地址,然后进行服务器的连接,需要将接口的全新定类名传递过去,从缓存中找到对应的服务器地址。
RpcProxy.java
    // 获取 RPC 服务地址
    if (serviceDiscovery != null) {
        String interFaceName = method.getDeclaringClass().getName();
        // 需要判断 serviceVersion 是否为空。
        if (StringUtil.isNotEmpty(serviceVersion)) {
            interFaceName += "-" + serviceVersion;
        }
        serviceAddress = serviceDiscovery.discover(interFaceName);
    }

    //如果不使用zookeeper则需要将这个不进行注解。
    //serviceAddress = "127.0.0.1:8000";
    if (StringUtil.isEmpty(serviceAddress)) {
        throw new RuntimeException("server address is empty");
    }
    // 从 RPC 服务地址中解析主机名与端口号
    String[] array = StringUtil.split(serviceAddress, ":");
    String host = array[0];
    int port = Integer.parseInt(array[1]);
从缓存中找到对应的地址。
ZooKeeperServiceDiscovery.class
	@Override
    public String discover(String interfaceName) throws IOException {
        // 直接从数据中进行获取。
        return serviceMap.get(interfaceName);
}所有的与zookeeper服务器交互都是基于zookeeper客户端这个类进行,其中新建一个zookeeper客户端如下,需要注意的是,在进行创建zookeeper客户端时候需要使用CountDownLatch线程同步进行连接服务器。
private CountDownLatch latch = new CountDownLatch(1);
private final ZooKeeper zooKeeper;
// 需要在构造器中进行初始化、
public ZooKeeperServiceRegistry(String zkAddress) throws IOException {

    // 初始化的时候就进行连接到zookeeper服务器。
    this.zooKeeper = new ZooKeeper(zkAddress, Constant.ZK_CONNECTION_TIMEOUT, this);
    try {
        latch.await();
    } catch (InterruptedException e) {
        e.printStackTrace();
    }
}其中zookeeper的监听器为:需要此类继承Watcher接口。
// 创建zookeeper同步所需要的同步锁。
@Override
public void process(WatchedEvent watchedEvent) {
    if (watchedEvent.getState() == Event.KeeperState.SyncConnected){
        latch.countDown();
    }
}现阶段的注册都是只是单纯的把服务器的ip注册到zookeeper服务器中,并没有指定每一个service对应的服务器ip。具体的实现代码:
//  注册持久性registry节点 其中只需要serviceAddress 就行,而 service 无序注册。
// 还需要传递 interfaceName。
@Override
public void register(String serviceAddress, List<String> interfaceName) throws KeeperException, InterruptedException {

    // 创建 registry 节点(持久)
    String registryPath = Constant.ZK_REGISTRY_PATH;
    LOGGER.debug("create registry node: {}", registryPath);
    // 当没有注册的时候才会进行注册。
    if (null == zooKeeper.exists(registryPath, false)) {
        //  new byte[0] 表示该节点只是一个父节点,没有值。
        zooKeeper.create(registryPath, new byte[0], ZooDefs.Ids.OPEN_ACL_UNSAFE, CreateMode.PERSISTENT);
    }
    // 注册服务节点。
    for (String name:interfaceName) {
        // 需要将所有的接口服务发布出去。
        String InterfacePath = registryPath + "/" + name ;
        // InterfacePath = registry/com.dwj.rpc.test.client.HelloService-1.0
        if (null == zooKeeper.exists(InterfacePath,false)){ // 如果没有该节点就进行注册。
            zooKeeper.create(InterfacePath, new byte[0], ZooDefs.Ids.OPEN_ACL_UNSAFE, CreateMode.PERSISTENT); //创建持久节点。
        }
        // 建立Provider节点,
        String providerPath = InterfacePath + Constant.ZK_PROViDE_PATH;
        // providerPath = registry/com.dwj.rpc.test.client.HelloService-1.0/provider
        if (null == zooKeeper.exists(providerPath,false)){
            zooKeeper.create(providerPath, new byte[0], ZooDefs.Ids.OPEN_ACL_UNSAFE, CreateMode.PERSISTENT); //创建持久节点。
        }

        // 此时在进行注册服务器地址,这时候如果有新的服务器提供者运行,那么也会直接的增加新的数据。
        String addressPath = providerPath + "/" + serviceAddress;
        // addressPath = registry/com.dwj.rpc.test.client.HelloService-1.0/provider/127.0.0.1:8000;
        if (null == zooKeeper.exists(addressPath,false)){
            zooKeeper.create(addressPath, new byte[0], ZooDefs.Ids.OPEN_ACL_UNSAFE, CreateMode.EPHEMERAL); //创建临时节点。
        }
        LOGGER.debug("create zookeeper node ({} => {})", addressPath, serviceAddress);
    }

}
需要说明的是,路径的规划为:
public interface Constant {
    int ZK_SESSION_TIMEOUT = 5000;
    int ZK_CONNECTION_TIMEOUT = 1000;

    String ZK_REGISTRY_PATH = "/registry";
    String ZK_PROViDE_PATH = "/provider";
}
其中注册的结果如下所示:
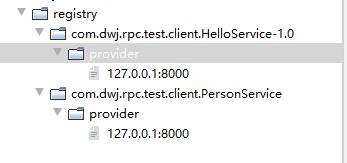
可以看出,其中registry、服务全限定性类名和provider为持久性节点,provider下会保存所有提供同类服务的服务器节点的ip,采用的是CreateMode.EPHEMERAL临时节点模式,提供了地址和端口。
服务发现与注册是相辅相成的,也是先要创建一个zookeeper客户端,然后进行连接并进行查询,在本项目中采用的是使用一个watcher进行检测服务器,
public class ZooKeeperServiceDiscovery implements ServiceDiscovery, Watcher {

    // 记录缓存,同步HashMap进行存储数据。
    private final Map<String, List<String>> serviceMap = new ConcurrentHashMap<>();

    public ZooKeeperServiceDiscovery(String zkAddress) throws IOException {
        // 创建 ZooKeeper 客户端
        zooKeeper = new ZooKeeper(zkAddress, Constant.ZK_CONNECTION_TIMEOUT, this);

        try {
            latch.await();
        } catch (InterruptedException e) {
            e.printStackTrace();
        }
        //看着结点。
        watchNode(zooKeeper);
    }

    // 根据接口的名称发现对应服务器的ip地址和端口。 每次获取都是从HashMap中获取,避免多次连接。
    @Override
    public String discover(String interfaceName) throws IOException {
         // 这是一个List,然后重新从中间获取到对应列表进行负载均衡。
        List<String> result = serviceMap.get(interfaceName);
        // 使用负载均衡算法进行实现。 获取单例负载均衡对象。
        ClusterStrategy clusterStrategy = ClusterStrategyImpl.getUniqueInstance(); //
        return clusterStrategy.select(result);
    }

  	// 每次开始的时候会直接的进行连接。获取到所有的数据。
    // 实现监听ZK_REGISTRY_PATH的child节点,当节点进行变化的时候便会回调这个方法,然后进行重新更新HashMap。
    private void watchNode(final ZooKeeper zk) {
        serviceMap.clear(); //每次在进行检测子节点的变化的时候,需要先将Map 更新,然后在进行重新赋值。 所以要使用 ConcurrentHashMap
        // 进行数据的同步
        try {
            // 将register下所有的节点进行遍历。 当触发event以后 这个便失效,所以需要反复的注册event监视器。
            List<String> nodeList = zk.getChildren(Constant.ZK_REGISTRY_PATH, event -> {

                if (event.getType() == Event.EventType.NodeChildrenChanged) {
                    watchNode(zk); // 这时候会重新的调用方法,然后进行更新状态。
                    LOGGER.debug("Watcher:", "子节点的值发生了变化");
                }
            });

            // 然后遍历registry节点下所有的节点。 并且使用HashMap缓存。
            for (String node : nodeList) {
                // 在获取节点的时候需要使用监听器。
                List<String> serverList = zk.getChildren(Constant.ZK_REGISTRY_PATH + "/" + node +
                                                         Constant.ZK_PROViDE_PATH, true, null);

                // 存到HashMap中。
                serviceMap.put(node,serverList);
            }
            LOGGER.debug("serviceMap data: {}", serviceMap);
            LOGGER.debug("Service discovery triggered updating connected server node.");

        } catch (KeeperException | InterruptedException e) {
            LOGGER.error("", e);
        }
    }

    @Override
    public void process(WatchedEvent watchedEvent) {
        if (watchedEvent.getState() == Event.KeeperState.SyncConnected){
            latch.countDown();
        }
    }
}
服务发现采取的逻辑是,在刚开始的时候会从zookeeper中获取到所有的节点的列表,然后保存在ConcurrentHashMap中,并且一直监听这个节点的变化,当节点有变化的时候,便会更新ConcurrentHashMap,始终保存最新的服务缓存。
public class ClusterStrategyImpl implements ClusterStrategy {

    // 使用volatile
    private volatile static ClusterStrategyImpl uniqueInstance;
    private ClusterStrategyImpl() {
    }
    public static ClusterStrategy getUniqueInstance() {
        if (uniqueInstance == null) {
            synchronized (ClusterStrategyImpl.class) {
                if (uniqueInstance == null) {
                    uniqueInstance = new ClusterStrategyImpl();
                }
            }
        }
        return uniqueInstance;
    }


    @Override
    public synchronized String  select(List<String> providerIp) {
        if (providerIp.size() == 1){
            return providerIp.get(0);
        }else {
            int MAX_LEN = providerIp.size();
            int index = RandomUtils.nextInt(0, MAX_LEN - 1); // 随机选择一个数据进行。
            return providerIp.get(index);
        }

    }
}
使用随机算法从服务器列表中选择一个服务器进行连接,达到负载均衡的目的,另外考虑并发问题,使用单例池加锁进行负载均衡。
以上便完成了整个的监听逻辑的设定。