进入 tty 模式,ctrl+alt+f12
设置镜像
sudo vim /etc/pacman.conf
开机 archlinuxcn
- manjaro:
[archlinuxcn]
# The Chinese Arch Linux communities packages.
#SigLevel = Optional TrustedOnly
SigLevel = Optional TrustAll
#清华大学
Server = https://mirrors.tuna.tsinghua.edu.cn/archlinuxcn/$arch
- mirrorlist
## Country : China
# 清华大学
Server = https://mirrors.tuna.tsinghua.edu.cn/archlinux/$repo/os/$arch
## 163
Server = http://mirrors.163.com/archlinux/$repo/os/$arch
## aliyun
Server = http://mirrors.aliyun.com/archlinux/$repo/os/$arch
# 上海交通大学
Server = https://mirrors.sjtug.sjtu.edu.cn/manjaro/stable/$repo/$arch
1. 配置 git
1.1. 配置 git 用户名,邮箱
git config --global user.name "username"
git config --global user.email "email.@qq.com"
配置完查看是否配置成功 git config --global --list
如果没有错误,我们就可以进行下一步了。
1.2. 安装 openssh
sudo pacman -S openssh1.3. 生成 ssh 密钥
1.查看是否已经有了 ssh 密钥:cd ~/.ssh 如果没有密钥则不会有此文件夹,有则备份删除 2.生存密钥:
ssh-keygen -t rsa -C "Your SSH key comment"后面一直回车
然后将 ~/.ssh/id_rsa.pub内容复制到剪贴版,进入 github 创造一个新的 ssh,将上面复制的内容粘贴进去然后保存。
1.3. 验证安装
选择一个自己的仓库,选择 ssh 克隆,然后输入 yes,如果成功克隆,那么恭喜你已经成功配置好 ssh 了。
2. 配置 ohmyzsh
zsh 是一个非常好用的 shell,相比于原生的 zsh 更加强大。
但是,自己配置 zsh 是一个非常麻烦的事情,而且不一定能够配置好的,所以,我们就直接用ohmyzsh 。
2.1. 安装 zsh
一条命令轻松安装
sudo pacman -S zsh2.2. 设置 zsh 为默认 shell
先查看 zsh 的路径
which zsh
chsh -s /usr/bin/zsh
记得重新启动下 archlinux
查看自己是否设置成功
输出当前SHELL:
echo $SHELL
查看系统中的SHELL:
cat /etc/shells
2.2. 安装 ohmyzsh
Oh My Zsh is installed by running one of the following commands in your terminal. You can install this via the command-line with either curl, wget or another similar tool.
| Method | Command |
|---|---|
| curl | sh -c "$(curl -fsSL https://raw.githubusercontent.com/ohmyzsh/ohmyzsh/master/tools/install.sh)" |
| wget | sh -c "$(wget -O- https://raw.githubusercontent.com/ohmyzsh/ohmyzsh/master/tools/install.sh)" |
| fetch | sh -c "$(fetch -o - https://raw.githubusercontent.com/ohmyzsh/ohmyzsh/master/tools/install.sh)" |
国内源加速:
sh -c "$(curl -fsSL https://gitee.com/lxyoucan/tools/raw/master/common/ohmyzshinstall.sh)"2.3. 安装好用的 zsh 插件
-
zsh-syntax-highlighting
git clone https://github.com/zsh-users/zsh-syntax-highlighting.git ${ZSH_CUSTOM:-~/.oh-my-zsh/custom}/plugins/zsh-syntax-highlighting -
zsh-autosuggestions
git clone https://github.com/zsh-users/zsh-autosuggestions ${ZSH_CUSTOM:-~/.oh-my-zsh/custom}/plugins/zsh-autosuggestions -
zsh-completions
git clone https://github.com/zsh-users/zsh-completions ${ZSH_CUSTOM:-${ZSH:-~/.oh-my-zsh}/custom}/plugins/zsh-completions -
fzf-tab
git clone https://github.com/Aloxaf/fzf-tab ${ZSH_CUSTOM:-~/.oh-my-zsh/custom}/plugins/fzf-tab
开启插件,在 .zshrc 中找到 plugins
plugins=(
	# ohmyzsh builtin plugins
	git
	z
	# user plugins
	zsh-syntax-highlighting
	zsh-autosuggestions
	zsh-completions
	fzf-tab
)
2.4. 安装好看的主题 powerlevel10k
- Clone this repository:
git clone --depth=1 https://github.com/romkatv/powerlevel10k.git ${ZSH_CUSTOM:-$HOME/.oh-my-zsh/custom}/themes/powerlevel10k**镜像:
git clone --depth=1 https://gitee.com/romkatv/powerlevel10k.git ${ZSH_CUSTOM:-$HOME/.oh-my-zsh/custom}/themes/powerlevel10k-
Set ZSH_THEME="powerlevel10k/powerlevel10k"in~/.zshrc. -
配置 powerlevel10k: 输入命令
p10k configure就能根据提示来进行配置 powerlevel10k
修改 powerlevel10k 图标:
vim .p10k.zsh
例如: 例如修改图标为 arch:
typeset -g POWERLEVEL9K_OS_ICON_CONTENT_EXPANSION=''想要了解更加具体可以看这个链接 romkatv/powerlevel10k#515
3. 配置 neovim
3.1. 安装最新的 neovim 版本
安装需要的依赖:
sudo pacman -S base-devel cmake unzip ninja tree-sitter curlbuild 来进行安装最新的 neovim
- Install build prerequisites on your system
sudo pacman -S cmakegit clone https://github.com/neovim/neovim如果克隆速度很慢可以换成 ssh 来进行克隆,速度飞起。sudo pacman -S unzipcd neovim && make CMAKE_BUILD_TYPE=Release- If you want the stable release, also run
git checkout stable. - If you want to install to a custom location, set
CMAKE_INSTALL_PREFIX. See also Installing Neovim. - On BSD, use
gmakeinstead ofmake. - To build on Windows, see the Building on Windows section.
- If you want the stable release, also run
sudo make install- Default install location is
/usr/local
- Default install location is
如果我们想要查看我 build 的是什么版本:
./build/bin/nvim --version | grep ^Build如果想要了解更多请看这个视频
安装完 neovim 我们安装一些需要的 neovim 插件依赖:
sudo pacman -S npm
sudo pacman -S fd
# write markdown use this to show file structure
sudo pacman -S tree
# to find text in telescope
sudo pacman -S ripgrep
3.2. neovim null-ls 依赖
sudo pacman -S prettier stylua3.3. neovim 使用系统剪贴版
我们只需要安装一个东西就可以使用了
sudo pacman -S xclip然后我们把东西复制到 + 剪贴版就能使用快速复制粘贴。
3.4. 安装后启动速度过慢
这个原因是你 neovim build 的版本是 debug 版本 neovim-issue
解决方案:
- 删除 build 目录
make CMAKE_BUILD_TYPE=Release- 查看 build 类型:
./build/bin/nvim --version | grep ^Build - 如果是不是 debug 类型,
sudo make install,就解决了。
4. screenkey
平时,如果我需要做视频教程的话,那么我就需要使用一个显示自己按键的软件
4.1. 安装
sudo pacman -S screenkey
# 修改screenkey 位置需要的软件
sudo pacman -S slop
4.2. 配置
我用的是 i3 可以在左上角看到 screenkey 图标然后能够进行修改。 可以调节:
- 透明度
- 显示区域
- 字体
- 字体大小,颜色
5. 配置字体
一个好的字体能够让你生活变得更加舒服。 那么就让我们开始安装一个好的字体吧。
5.1.了解下字体。
- 未单个用户安装
字体一般都被安装到这个位置
~/.local/share/fonts - 为系统用户安装(所有用户)
5.2. 安装字体
通过pacman字体安装位置是 /usr/share/fonts/
我一般是直接使用pacman进行安装
sudo pacman -S nerd-fonts-complete
yay -S otf-operator-mono-lig
当然单独有 nerd-font 是不够,有时候,我们需要一些其他的字体,那么我们要学会如何安装其他字体。
字体来源当然是从对应的字体网站下载获得。
比如我现在已经下载好了Operator Mono。
sudo cp -r OperatorMono /usr/share/fonts/
cd /usr/share/fonts
# 加载字体
fc-cache -fv
查看是否安装成功:
fc-list | grep OperatorMono
如果出现结果,那么我们就安装成功了。
5.3. vscode 使用 Operator mono lig 字体
下载仓库
将下载好的字体移动到~/.local/share/fonts下面,然后 fc-cache-fv就能安装好这个字体
我用的是 archlinux 系统 在 setting.json 加上这么一句:
"editor.fontFamily": "Operator Mono SSm Lig,微软雅黑",就能使用这个字体了。
5.4. kitty 上使用 Operator mono lig 字体
git clone https://github.com/CarlCaraan/Font-Operator-Mono-Lig.git将下载好的字体移动到~/.local/share/fonts下面,然后 fc-cache-fv就能安装好这个字体
我用的是 archlinux 系统 在 kitty.conf 加上这么一句: 因为 Operator Mono Lig 粗体显示效果并不是特别优秀,所以还是用 Operator Mono 来显示粗体
font_family      Operator Mono Lig
bold_font        Operator Mono
italic_font      Operator Mono Lig
bold_italic_font Operator Mono
5.5. 安装中文字体
# 安装 adobe 无衬线字体
sudo pacman -S adobe-source-han-sans-otc-fonts


 #安装 adobe 衬线字体
sudo pacman -S adobe-source-han-serif-otc-fonts


# 安装 noto 中文字体
sudo pacman -S noto-fonts noto-fonts-cjk


# 安装 noto emoji 表情包
sudo pacman -S noto-fonts-emoji
5.6. ide 使用霞鹜文楷中文字体
我使用这个字体的原因是这个字体比较好看,哈哈。没错,我就是颜值党。
首先我们先去下载这个
git clone https://github.com/lxgw/LxgwWenKai.git将这个仓库下的 ttf 文件夹里面的字体移动到 /usr/share/fonts
然后我们执行 fc-cache-fv,这个时候我们就安装成功了。
当然,我们要使用一个字体的话,我们需要知道这个字体叫什么名字。
使用 fc-list | grep -i lxgw

这个就是我们喜欢的名字,然后我们就可以在自己喜欢的编辑器设置这个字体。
-
vscode
-
idea


6. Stow 管理 dotfile
6.1 安装
sudo pacman -S stowstow --help 获得帮助文档:
# 我这里就说明最经常使用的几个命令。

# 删除一个stow链接
stow -D

# 重新同步一个stow链接
stow -R
6.2 使用
我就拿 alacritty 来进行举例,我在$HOME目录下建立一个 .dotfile 文件夹[这样 stow 管理的默认位置就是$HOME],来进行管理这些 stow 好的文件夹。
alacrrity的配置在 ~/.config/alacrrity/ 这个文件夹下面。
我们首先在 dotfile 里面建立一个alacritty文件夹,文件夹里面的结构是这个样子的:
alacritty
└── .config
    └── alacritty
        ├── alacritty.yml
        ├── alacritty.yml.bak
        ├── default-arcolinux.yml
        └── default-github.yml
注意:
- 如果原来在
~/.config/alacritty的文件没有被删除的话,那么就会出现问题。
然后我们回到.dotflie 文件夹,然后stow alacritty,然后就能在~/.config/alacritty/ 生成对应的文件和文件夹。
7. 配置 fzf
7.1. 安装
sudo pacman -S fzf7.2. 配置
通过 pacman 安装的 fzf 是和 github 上面安装是不一样的。
安装好的脚本都在 /usr/share/fzf/key-bindings.zsh
在 .zshrc 最下面添加这么两句话:
# fzf configuration
# fzf 判断是否存在,然后引用。
[ -f /usr/share/fzf/key-bindings.zsh ] && source /usr/share/fzf/key-bindings.zsh
# enable completion
[ -f /usr/share/fzf/completion.zsh ] && source /usr/share/fzf/completion.zsh
然后这个时候,我们就能够使用 fzf 的快捷键:
Ctrl+tlist files+folders in current directory (e.g., typegit add, pressCtrl+t, select a few files usingTab, finallyEnter)Ctrl+rsearch history of shell commandsAlt+cfuzzy change directory
7.3. pacman 结合 fzf
Try this to fuzzy-search through all available packages, with package info shown in a preview window, and then install selected packages:
pacman -Slq | fzf --multi --preview 'pacman -Si {1}' | xargs -ro sudo pacman -SList all your installed packages, and then remove selected packages:
pacman -Qq | fzf --multi --preview 'pacman -Qi {1}' | xargs -ro sudo pacman -RnsIf you want to add package file list in preview – may be a bit slower updating preview window (make sure you run pacman -Fy with root privileges at least once before invocation to sync the pacman file database):
pacman -Slq | fzf --multi --preview 'cat <(pacman -Si {1}) <(pacman -Fl {1} | awk "{print \$2}")' | xargs -ro sudo pacman -S8. lazygit
8.1. 安装
sudo pacman -S lazygit8.2 配置
默认配置为 ~/.config/layzgit/config.yml
使用 git-delta 来进行预览
安装 git-delta
sudo pacman -S git-delta配置
git:
  paging:
    pager: delta
9. rofi
rofi-github 是 i3wm 一个很好的窗口启动器,默认的 rofi 有点丑。
9.1. 安装
sudo pacman -S rofi9.2. 配置
rofi 默认配置文件在 ~/.config/rofi/config.rasi
生成默认配置:
mkdir -p ~/.config/rofi
rofi -dump-config > ~/.config/rofi/config.rasi9.3. 主题
默认的 rofi 主题其实很一般,所以我们就需要换一个好看的主题,毕竟颜值才是第一生产力。
9.3.1. 快速更换主题
我使用的是 i3 自带的 dmenu 来进行命令
rofi-theme-selector然后就可以快乐的选择自己喜欢的主题,他会把主题配置写入到配置文件内。
pacman安装的主题配置文件在 /usr/share/rofi/themes/ 内
我现在使用的是 gruvbox-common,简单舒服。
10. i3 窗口管理器
10.1. 安装
sudo pacman -S i310.2. i3 浮动窗口
10.2.1. 获取窗口 WM_CLASS
首先我们需要了解哪些窗口是我们要浮动的。 i3wm 识别一个浮动窗口是识别它的 WM_CLASS
你只需要在同一个 workspace 中打开您的应用和终端,在终端中输入xprop这里你的鼠标会变成十字线,点击你的应用程序即可获取到窗口的信息。
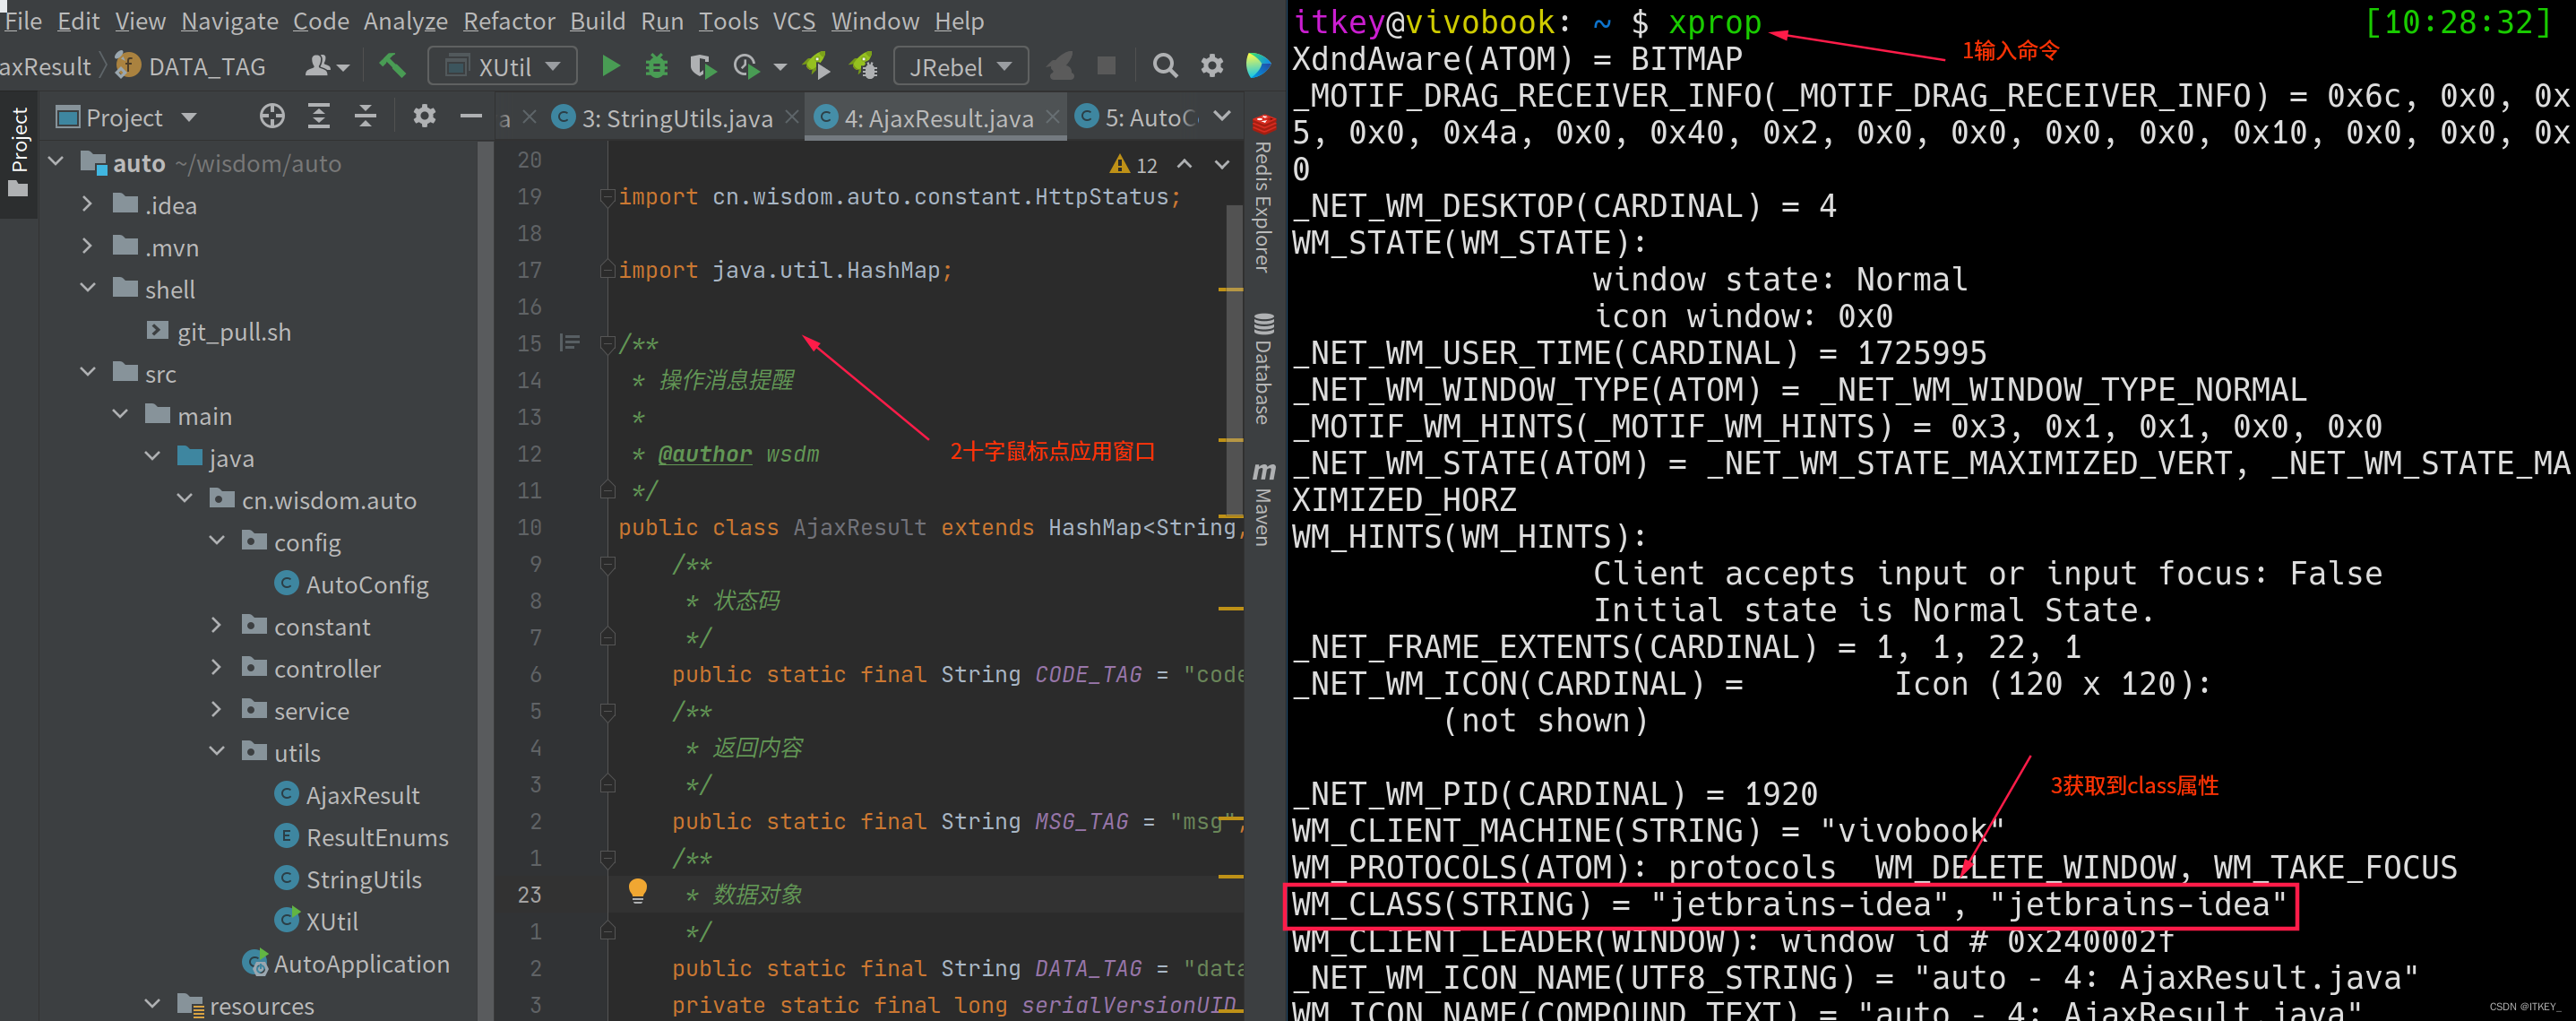
更方便的方法查询 WM_CLASS
xprop | grep WM_CLASSWM_CLASS 的第一部分是实例(本例中为“jetbrains-idea”),第二部分是类(本例中为“jetbrains-idea”)。 记得选第二个名字
i3wm 启动窗口指定浮动窗口的大小和位置
示例:
for_window [class="窗口"] floating enable resize set 640 480,move right 330px,move down 70px11. polybar
默认的 i3-status 有点简陋,这个是用来替代的。 polybar-github
11.1. 安装
sudo pacman -S polybar11.2. 配置
polybar 的默认配置在 /etc/polybar/config.ini,也可以自定义在 ~/.config/ploybar/config.ini
复制默认配置:
mkdir ~/.config/polybar
cp /etc/polybar/config.ini ~/.config/polybar/config.ini
12. 音量、亮度调节
12.1. 亮度调节
安装依赖:
yay -S light-git写入 i3 配置文件:
bindsym XF86MonBrightnessUp exec light -A 10 # increase screen brightness
bindsym XF86MonBrightnessDown exec light -U 10 # decrease screen brightness
12.2. 音量调节
安装
sudo pacman -S alsa-utils使用 alsamixer 来启动
通过方向键或者 jk 来调节音量。
esc 退出。
13.ranger 文件管理器
13.1. 安装
sudo pacman -S ranger13.2. 配置
13.2.1. 使用图标
git clone https://github.com/alexanderjeurissen/ranger_devicons ~/.config/ranger/plugins/ranger_devicons
echo "default_linemode devicons" >> $HOME/.config/ranger/rc.conf
13.2.2. 整合 git
在 ~/.config/ranger/rc.conf
set vcs_aware true更多信息请看 VCS integration
13.3. 使用 kitty 终端预览图片
安装 pip
sudo pacman -S python-pip安装 pillow (为了能够使用 ranger 来预览图片)
pip3 install -i https://mirrors.aliyun.com/pypi/simple pillow修改 rc.conf :
set preview_images true
set preview_images_method kitty
然后,我们就能愉快的使用 ranger 来进行图片预览了。
13.3. 参考文章
14. 常用简单软件下载
more information please see https://arch.icekylin.online/apps/daily.html
14.1. 开发工具
- alacritty
sudo pacman -S alacritty- kitty
sudo pacman -S kitty- vscode
yay -S visual-studio-code-bin- vscode-rofi
yay -S rofi-code-git- dunst (通知)
sudo pacman -S dunst- ide
sudo pacman -S intellij-idea-ultimate-edition
sudo pacman -S intellij-idea-ultimate-edition-jre

sudo pacman -S webstorm
sudo pacman -S webstorm-jre
14.2. 浏览器
- Chrome
yay -S google-chrome- Firefox
sudo pacman -S firefox- Microsoft Edge
yay -S microsoft-edge-stable-bin14.3. 休闲
14.3.1. qq 微信
- qq and wechat
记得在/etc/pacom.conf 中开启 multib 这个镜像库下载需要里面的依赖 要不然会一直安装不成功
yay -S deepin-wine-wechat icalingua++
# 垃圾 linux qq 建议使用上面那个
# yay -S deepin-wine-qq
14.3.2. wine 放大字体
默认的字体很小,让我很难受,看久了人都要瞎了。 所以,我们需要调字体。
/opt/apps/com.qq.weixin.deepin/files/run.sh winecfg
解决出现阴影在微信屏幕上
每次重新启动,都会重新出现。
下载依赖
sudo pacman -S winctrl xwininfo更多详细信息请看这 https://zhuanlan.zhihu.com/p/106926984
14.4. 解决 wechat 中文字体乱码
14.4.1. 下载字体
到github 下载字体,点击"下载" ,字体文件默认存储到 Downloads 文件夹内。
14.4.2. 將字体复制到指定的位置
cp ~/Downloads/MSYH.TTC ~/.deepinwine/Deepin-WeChat/drive_c/windows/Fonts
14.4.3. 將字体注册到 Wine
vim ~/.deepinwine/Deepin-WeChat/font.reg
键入以下内容,然后保存。
REGEDIT4
[HKEY_LOCAL_MACHINE\Software\Microsoft\Windows NT\CurrentVersion\FontSubstitutes]
"MS Shell Dlg"="msyh"
"MS Shell Dlg 2"="msyh"

[HKEY_LOCAL_MACHINE\Software\Microsoft\Windows NT\CurrentVersion\FontLink\SystemLink]
"Lucida Sans Unicode"="msyh.ttc"
"Microsoft Sans Serif"="msyh.ttc"
"MS Sans Serif"="msyh.ttc"
"Tahoma"="msyh.ttc"
"Tahoma Bold"="msyhbd.ttc"
"msyh"="msyh.ttc"
"Arial"="msyh.ttc"
"Arial Black"="msyh.ttc"
14.3.2. telegram
- telegram
sudo pacman -S telegram-desktop14.3.3. YesPlayMusic(推荐 支持网易云)
- YesPlayMusic(推荐 支持网易云)
yay -S yesplaymusic14.3.4. 网易云音乐
- 网易云音乐
yay -S netease-cloud-music14.4. 办公
14.4.1 坚果云
yay -S nutstore14.4.2. 百度网盘
yay -S baidunetdisk-bin14.4.3. obsidian
sudo pacman -S obsidian14.4.4. office
# 安装国内版 office,安装字体
yay -S wps-office-cn ttf-wps-fonts
# 中文语言包(建议安装)
yay -S wps-office-mui-zh-cn
14.4.5. 滴答清单
yay -S dida-bin14.4.6. utools
yay -S utools14.4.7. SMplayer (视频播放器)
sudo pacman -S SMplayer14.4.8. (钉钉)
yay -S dingtalk-bin
yay -S dingtalk-electron
14.4.9. 腾讯会议
yay -S wemeet-binpdf 阅读
yay -S foxitreader14.5. 炫技
14.5.1. cmatrix
sudo pacman -S cmatrix14.6. 图片查看器
- ristretto
sudo pacman -S ristretto14.7. colorpicker
git clone https://aur.archlinux.org/colorpicker.git
cd colorpicker
makepkg -si
然后我们就能愉快的使用 colorpicker 获得颜色了。在终端
如果你想用 gui 的页面,那么你就使用这个Gcolor2
14.8. 思维导图
- minder
sudo pacman -S minder14.9. 直播平台
- obs-sudio
sudo pacman -S obs-studio- screenkey
sudo pacman -S screenkey dbus-python slop15. 丝滑动画 picom
如果使用的是 yay 里面自带的 pciom 是缺少很多特性的。
那么我们用一个 fork 版本。 我还使用的是我关注的 b 站 up 主 fork fork 版本
15.1 安装
git clone git@github.com:yaocccc/picom.git
cd picom
git checkout implement-window-animations
15.2. 安装依赖
sudo pacman -S meson ninja libev uthash libconfig15.3. 安装
git submodule update --init --recursive
meson --buildtype=release . build
sudo ninja -C build install
15.2. 参考教程
16. networkmanger
16.1. 安装
在 archlinux 中我们需要连接 WiFi 我们需要安装下面这些东西
pacman -S networkmanager nm-connection-editor  network-manager-applet rp-pppoe
systemctl enable NetworkManager
然后我们就拥有了一个 gui 的 wifi 连接器。
17. z.lua
17.1. 安装
安装 z.lua
git clone https://github.com/skywind3000/z.lua ~/script/然后在 ~/.zshrc 里面添加
# 默认普通模式
eval "$(lua ~/tmp/z.lua/z.lua  --init zsh)"
# 开启增强模式
eval "$(lua ~/tmp/z.lua/z.lua  --init zsh once enhanced)"
17.2. 使用
数据文件都放在 ~/.zlua里面
在不带参数的时候按 z 会显示出所有路径和频率。
更多详细信息请看这里:
eval "$(lua ~/tmp/z.lua/z.lua --init zsh once enhanced)"
18. pacman 和 yay 常用命令
18.1. pacman
- S:安装
- Ss: 从 pacman 搜索安装包
- Syyu:每日更新
- Ql : 从已经安装好的包进行搜索
18.2. yay
- S : 安装
- Sy:从远程镜像获取软件包更新信息
- Syy:强制获取更新信息
- Syyu:更新软件包
- Sc:删除以下载的过时安装包
- Syyw:下载较新的软件包,但不安装
- Ss:从远程仓库中搜索软件包
- R:删除软件
- Rs:删除软件及其依赖文件
- Rns:删除软件和依赖文件及其配置文件
- Qe:显示用户安装的软件包
- Qq:不输出软件的版本信息
- Qn:显示从官方镜像中下载的软件
- Qm:显示从 AUR 中下载的软件
- Qdt:显示孤包
- Qs:显示本地库的包
19. 常见问题
19.1. Connecting to raw.githubusercontent.com :443... failed: Connection refused.
我们先去这个网站查询 raw.githubusercontent.com
然后就把查找到的 host 然后 sudo vim /etc/hosts
然后在尾部添加这个数据:
185.199.108.133 raw.githubusercontent.com类似上面形式,这个问题就解决了。
19.2. archlinux 电量不更新
自从升级入了 archlinux 5.19 的内核就发现电池电量不更新
那么我就用了我的 google 大法,终于搜索到我想要的内容了。
在这个文件 /etc/modprobe.d/asus_ec_sensors.conf
加人这么一句话:
blacklist asus_ec_sensors
然后重启,我们这个时候就能更新电量了。
20. 使用技巧
20.1 查找文件并删除
例如,我现在文件中有这么一群文件,如下图所示:
.
├── 1.aaa.txt
├── 1.bbb.txt
├── 2.aaa.txt
└── 2.bbb.txt然后我们要实现的目标是删除文件名包含1.的文件。
那么,我们就写一个 shell 脚本
# 查找文件放入到一个数组内
file_list=`fd '1.'`
# 循环删除
for file in ${file_list}
do
  rm ${file}
done
然后我们执行命令,就能看到删除成功了。
.
├── 2.aaa.txt
└── 2.bbb.txt
20.2. grep 遍历一个文件夹里面的内容
grep -r "要查找的内容" ./

20.3. 删除文件——排除指定文件
20.3.1. 情形
当前状态:
.
├── 1.txt
├── 2.txt
├── 3.txt
├── 4.txt
└── 5.txt
然后我想删除只保留 1.txt。
20.3.2. 使用!()
rm !(1.txt)
正常情况下是全部文件被删除了,只留下了 1.txt,但是有时候我们的系统没配置好,可能会报错,例如下面这种:
-bash: !: event not found上面这种情况是因为我们的系统没有开启通配符功能,我们执行下面的命令开启通配符功能先:
shopt -s extglob
查看通配符功能是否开启,on 表示已经开启
shopt -s

查看删除后的文件
.
└── 1.txt
20.3.3. 使用 grep -v 排除然后删除
推荐使用这个方法,因为可以直接用 zsh 来进行操作
find *.txt | grep -v 1.txt | xargs rm
20.3.4. 参考文件
21. advanced fzf
21.1. 安装依赖
sudo pacman -S the_silver_searcher bat22. 配置 npm 镜像
首先我们查看我们的镜像地址
npm get registry正常来说,我们没有更改镜像地址。
默认是 https://registry.npmjs.org/
切换淘宝镜像
npm config set registry http://registry.npm.taobao.org/设置好我们再查看下:
npm get registry 然后我们就能看到 npm config set registry http://registry.npm.taobao.org/说明我们设置成功。
23. vscode 输入法问题
在 linux 下我们实现的输入法基本上都是 fcitx 其他输入法,我也不了解在 linux。
在setting.json
添加这句
  "vim.autoSwitchInputMethod.enable": true,
  "vim.autoSwitchInputMethod.defaultIM": "1", // 1033
  "vim.autoSwitchInputMethod.obtainIMCmd": "/usr/bin/fcitx5-remote",
  "vim.autoSwitchInputMethod.switchIMCmd": "/usr/bin/fcitx5-remote -t {im}",
24. 改变 manjaro 主题
下载依赖
sudo pacman -S gnome-themes-extra gnome-icon-theme-extras使用命令 lxappearance
改变 qt 主题
使用命令 qt5ct