- Introduction
- Typography
- List, Link, Media
- Table & Form
- HTML5 Sematic Elements
- Web Accessibility
- HTML Graphics
- Projects
- HTML stands for Hyper Text Markup Language
- It is not a programming language
- HTML helps us to create the main structure of a webpage
- With the help of markup tag we can display text, image, video etc. on the webpage
- Tim Berners-Lee created HTML in 1991
- Tag is the heart of html; HTML document is mainly built with tag.
- Tag Syntax:
<keyword>; Inside the angular brackets we need to write predefined keywords to use html tag. - Small / capital letters both can be used when writing html tag; however small letter is prefered.
- Example:
<p> This is a paragraph </p> - In the example,
<p>is an opening tag,</p>is a closing tag andThis is a paragraphis called content - In between the starting tag to end tag we have content
- Everything from starting tag to end tag is called Element
-
There are 2 types of html tag: Pair/container tag and empty tag
-
Pair tag has starting and ending; However, empty tag has no closing tag.
-
Some of the example of pair tag and empty tags are given below:
<!-- Some examples of Pair/Container Tag -->
<html>
  ...
</html>
<head>
  ...
</head>
<body>
  ...
</body>
<p>...</p>
<h1>...</h1>
....

<!-- Some examples of Empty Tag -->
<br />
<hr />
<img />
<input />
...
- Attribute helps tag to extend its capabilities
- In the following example,
<img/>is tag; src, height, width are the attributes<img src="anis.jpg" height="200" width="200" />
- Attribute Syntax:
attributeName="attributeValue"
-
HTML document has 2 important part: head, body
-
In the following example a basic structure of a HTML document
<!DOCTYPE html>
<html>
  <head>
    TITLE, META TAG ETC.
  </head>
  <body>
    CONTENT OF THE WEBPAGE
  </body>
</html>
-
Always use
<!DOCTYPE html>to tell the browser what type of document to expect; remember it is not a tag, just a declaration -
Every HTML document must have
<html>pair tag and Inside<html>tag we use<head>and<body>as the example shows above. -
Inside head tag we use meta tag, set title etc.
-
Inside body tag we write everything that we want to display on web page.
- Editor: VScode / Notepad++ / Sublime
- Browser: Google Chrome / Firefox
- Version Control: GitHub
<!DOCTYPE html>
<html lang="en">
  <head>
    <title>Document</title>
  </head>
  <body>
    This is my first webpage <br />
    I am Anisul Islam <br />
    A full stack web developer & passionate computer science teacher<br />
  </body>
</html>- Here, lang attribute refers to the language; attribute value en refers to english
- Inside
<head>tag we have set title of the webpage using<title>tag - Inside
<body>tag we are displaying some text. here<br/>tag creates a line break
<head>
  <meta charset="UTF-8" />
  <meta http-equiv="X-UA-Compatible" content="IE=edge" />
  <meta name="viewport" content="width=device-width, initial-scale=1.0" />
  <meta name="description" content="Free complete html tutorials 2021" />
  <meta name="keywords" content="HTML, html, html5" />
  <meta name="author" content="Anisul Islam" />
  <link rel="stylesheet" href="style.css" />
  <style>
    body {
      background-color: aquamarine;
    }
  </style>
  <script src="index.js"></script>
  <title>Document</title>
</head>- Inside
<head>tag we can define metadata(document title, character set, links, scripts, styles), other information that will not be visible to the users - meta tag provides information to the browsers and search engines about the webpage
<meta charset="UTF-8" />defines the character encoding for the HTML document.<meta http-equiv="X-UA-Compatible" content="IE=edge" />for supporting older version of IE.<meta name="viewport" content="width=device-width, initial-scale=1.0" />defines that webpage width is related to devices width and initial zoom level is 1.<link rel="stylesheet" href="style.css">generally connects css file to html. Inside of href attribute we give the css file name.<style> ... </style>we can use<style> ... </style>tag directly inside the head tag for designing html elements.<script src="index.js"></script>generally connects js file to html. we can also use<script> ... </script>tag directly inside the body tag.
- After writing your html code you can check the validity on this website https://validator.w3.org/
<body>
  <!--6 heading tags-->
  <h1>This is a h1</h1>
  <h2>This is a h2</h2>
  <h3>This is a h3</h3>
  <h4>This is a h4</h4>
  <h5>This is a h5</h5>
  <h6>This is a h6</h6>

  <!--to create a paragrap use p tag-->
  <p>This is a paragraph. I am writing a paragraph here.</p>

  <!--to create a horizontal rule use hr tag-->
  <hr size="2" />
</body>
output of the text-formatting tags is below:

- There are 6 HTML heading levels.
<h1>is the largest level and<h6>is the smallest level. - by default, heading tags and paragraph tag create new line (block level element)
<hr size="2"/>here<hr/>is an empty tag responsible for creating horizontal rule and size attribute set the heights of the horizontal rule in pixel
<!DOCTYPE html>
<html lang="en">
  <head>
    <meta charset="UTF-8" />
    <meta http-equiv="X-UA-Compatible" content="IE=edge" />
    <meta name="viewport" content="width=device-width, initial-scale=1.0" />

    <style>
      body {
        background-color: #222;
      }
      h1 {
        /* color: white; */
        /* color: #fff; */
        color: rgb(255, 255, 255);
        text-align: center;
      }
    </style>

    <title>Document</title>
  </head>
  <body>
    <h1>Bangladesh is my motherland. I miss Bangladesh a lot.</h1>
    <p style="color: green;">I also miss my family</p>
  </body>
</html>- From the example, you can see that for styling html elements inside the html documents we can use style tag or style attribute
- style attribute in HTML: style="property: value; property: value..." (from the example you can see that
<p>tag has style attribute where paragraph color is set as green) - style tag in HTML:
<style> ... </style>tag must be used inside the head tag as shown in this example. In this example you can see that<h1>and<body>tag has styling property like color, text-align, background-color. - To set color of an html element we can use color name / hexadecimal color code / rgb color / hsl code as a value of color property as shown in this example for h1 tag.
- some tools for selecting color
<body>
  <!-- b(bold) and strong tag are quite similar -->
  <b>This is a bold text</b> <br />
  <strong>This is a strong text</strong> <br />

  <!-- i(italic) and em(emphasize) tag are quite similar -->
  <i>This is a italic text</i> <br />
  <em>This is a emphasize text</em> <br />

  <!-- u(underline) -->
  <u>This is a italic text</u> <br />

  <!--tags can be used inside one another-->
  <b>bold. <i> italic and bold</i></b> <br />

  <mark>Important task should be highlighted</mark> <br />
  <!-- del (deleted) -->
  <del>This is a deleted text</del> <br />

  <!-- sup (superscript), sub(subscript) -->
  H<sub>2</sub>O <br />
  (a+b)<sup>2</sup> <br />

  <!-- pre tag helps to show text as you want to formatted -->
  <pre>
      This is a
        life changing documentation
      Read,learn, enjoy
        ofcourse share with others
  </pre>
</body>
output of the text-formatting tags is below:

Comment syntax example
<!-- This is a comment -->Entity syntax example
© < > > ♥- First example shows the example of a html comment
- second example shows an example of entity
- To create an entity first write & then give a keyword and then give a semicolon
©will create copyright symbol<will create less than symbol>will create greater than symbol♥will create hearts symbol
Unicode character website: https://unicode-table.com/en/
W3School emoji link: https://www.w3schools.com/charsets/ref_emoji.asp
iconfinder icon link: https://www.iconfinder.com/
-
Some common style property such as font-size, font-family, color, background-color, font-weight, font-style for styling text
-
In the following example, we are setting the h1's background color as green, font color as white, font size 5rem or 80px and font family is fantasy
<body>
  <h1
    style="
      background-color: green;
      color: white;
      font-size: 5rem;
      font-family: fantasy;
    "
  >
    Bangladesh
  </h1>
</body>
output of the heading style code


-
Mainly there are 2 types of list available in html: ordered list, unordered list
-
ol(ordered list) tag is used for creating ordered list -
ul(unordered list) tag is used for creating unordered list -
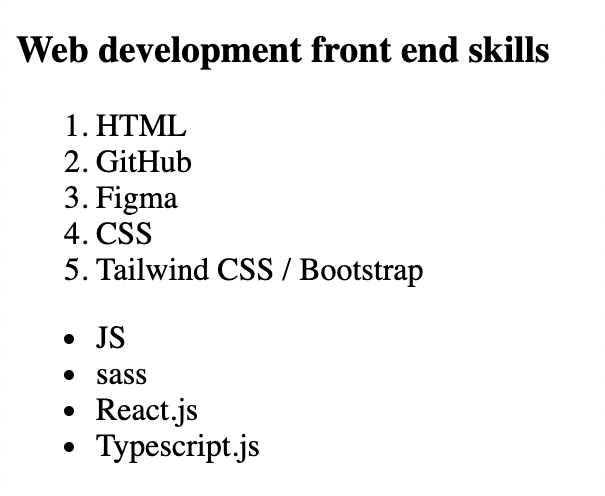
li(list) tag is a common tag for both ordered and unordered list example<body> <h3>Web development front end skills</h3> <ol> <li>HTML</li> <li>GitHub</li> <li>Figma</li> <li>CSS</li> <li>Tailwind CSS / Bootstrap</li> </ol> <ul> <li>JS</li> <li>sass</li> <li>React.js</li> <li>Typescript.js</li> </ul> </body>
output of the list code

-
link tag
<a> ... </a>is used for visiting other pages or websites. -
Inside
<a>linkhref="url"attribute is used where we give the address where we want to visit based on click -
Inside
<a>linktarget="_blank"attribute is used to open a new tab for the visited page/site -
As shown in the following example we can send email by clicking the link for that we have to use
href="mailto:EMAIL_ADDRESS_HERE" -
As shown in the following example we can call somone by clicking the link for that we have to use
href="tel:PHONE_NUMBER_HERE"Example
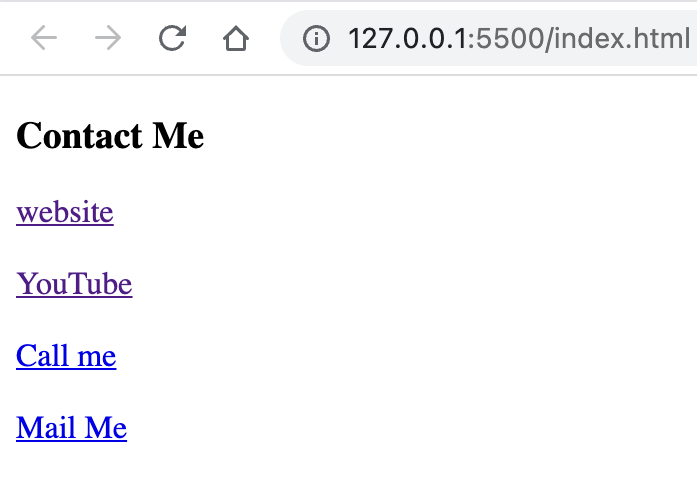
<body>
  <h3>Contact Me</h3>
  <a href="http://www.studywithanis.com" target="_blank">website</a> <br />
  <br />
  <a href="https://www.youtube.com/c/anisulislamrubel" target="_blank"
    >YouTube</a
  >
  <br />
  <br />
  <a href="tel:0017444044000" target="_blank">Call me</a> <br />
  <br />
  <a href="mailto:anisul2010s@yahoo.co.uk" target="_blank">Mail Me</a>
</body>
output of the html link code

- For adding image on webpage we use
<img />tag as shown in the following example. - some common attribute for
<img />tag:src, alt, height, width, title - syntax for adding image:
<img src="imagename" alt="alternative" title="profile image"> srcattribute needs the image addressaltattribute shows some text about image if image is not foundtitleattribute shows some tooltip text when we hover over the imageheightandwidthattribute helps us to set the height and width of image- we can use
<img>tag inside of<a>tag so that when we click an image it will take us to a link.<a href="" target="_blank"> <img src="" alt="" /> </a>
-
iframe helps us to display any website, youtube video or map inside our own webpage
iframe Example<iframe width="560" height="315" src="https://www.youtube.com/embed/oN8aS_HW4k8" title="YouTube video player" allowfullscreen > </iframe>
-
<audio> ... </audio>tag helps us to add audio in our webpage -
<audio> ... </audio>tag has some attributes such ascontrols autoplay muted height width -
audio example shows how to add aduio source by using
<source />tag -
Inside
<source />tag we must define thesrc=""src address/name and also thetype=""of audio -
as the example shows there are 2
<source />tag is used if the first format is not supported by the browser then second one will work. if first and second both is not supported by the browser thenYour browser does not support the audio element.will work.audio Example
<audio controls autoplay muted height="300" width="300">
  <source src="anis.mp3" type="audio/mp3">
  <source src="anis.wav" type="audio/wav">
  Your browser does not support the audio element.
</audio
<video> ... </video>tag helps us to add video in our webpage<video> ... </video>tag has some attributes such ascontrols autoplay muted height width
video Example
<video controls autoplay muted height="300" width="300">
  <source src="anis.mp4" type="video/mp4">
  <source src="anis.ogg" type="audio/ogg">
  Your browser does not support the video element.
</video-
<table>tag is used to create table. -
<thead>tag is used to create table head. -
<tbody>tag is used to create table body. -
<tfoot>tag is used to create table footer. -
<tr>tag is used to create table row. -
<td>tag is used to create table data cell. -
<th>tag is used to create table header cell. -
<caption>tag is used to create table caption. -
Follow the image to understand td, tr,
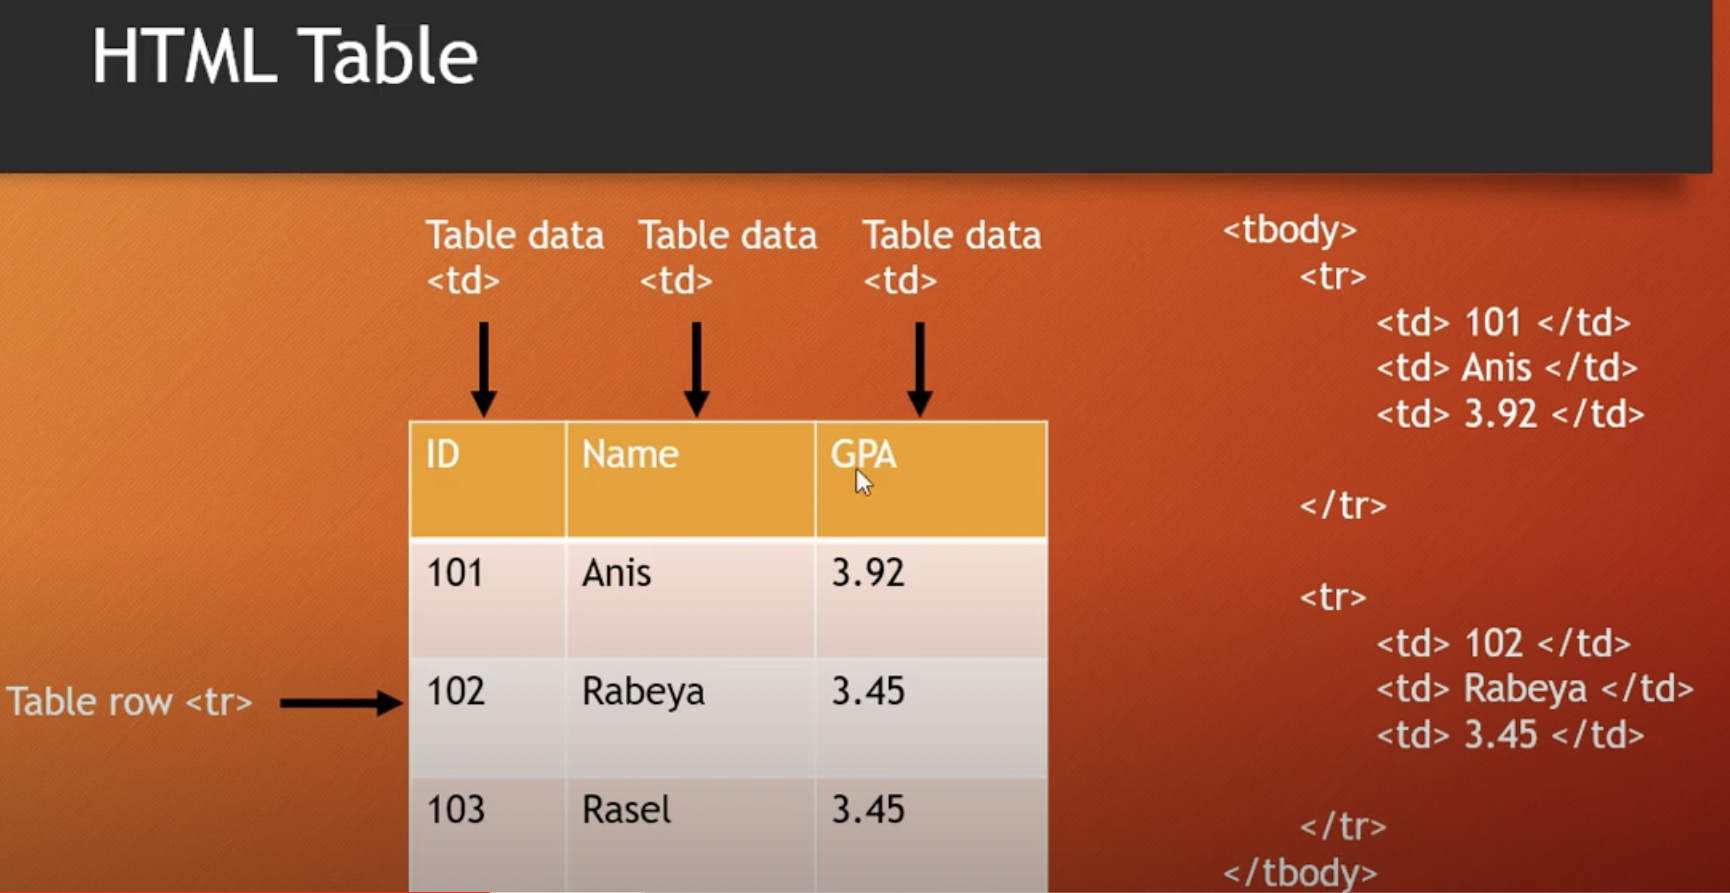
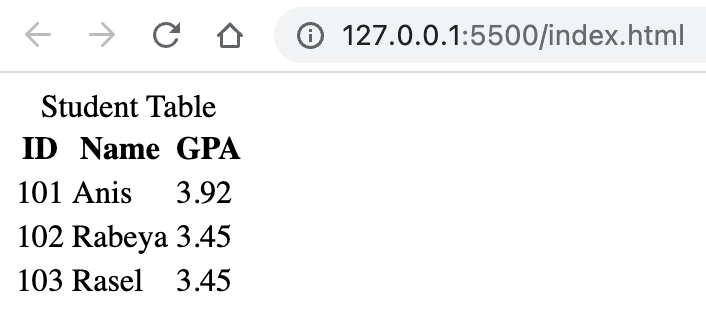
<body>
  <table>
    <caption>
      Student Table
    </caption>
    <thead>
      <tr>
        <th>ID</th>
        <th>Name</th>
        <th>GPA</th>
      </tr>
    </thead>
    <tbody>
      <tr>
        <td>101</td>
        <td>Anis</td>
        <td>3.92</td>
      </tr>
      <tr>
        <td>102</td>
        <td>Rabeya</td>
        <td>3.45</td>
      </tr>
      <tr>
        <td>103</td>
        <td>Rasel</td>
        <td>3.45</td>
      </tr>
    </tbody>
  </table>
</body>
output of the above html code


-
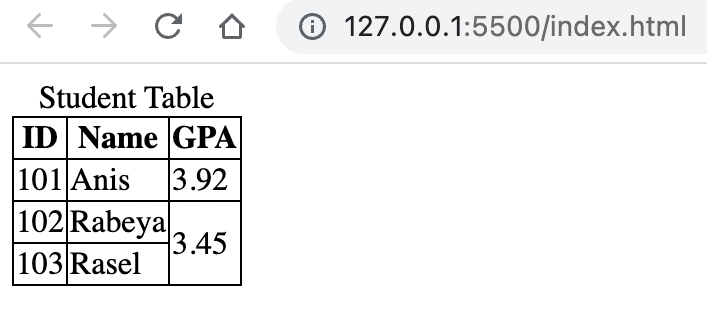
rowspan="N"attribute is used to tell that a cell will expand N number of rows. -
colspan="N"attribute is used to tell that a cell will expand N number of columns.
An example of rowspan is given below:<!DOCTYPE html> <html lang="en"> <head> <title>Document</title> <style> table, th, td { border: 1px solid; border-collapse: collapse; } </style> </head> <body> <table> <caption> Student Table </caption> <thead> <tr> <th>ID</th> <th>Name</th> <th>GPA</th> </tr> </thead> <tbody> <tr> <td>101</td> <td>Anis</td> <td>3.92</td> </tr> <tr> <td>102</td> <td>Rabeya</td> <td rowspan="2">3.45</td> </tr> <tr> <td>103</td> <td>Rasel</td> </tr> </tbody> </table> </body> </html>
output of the above html code
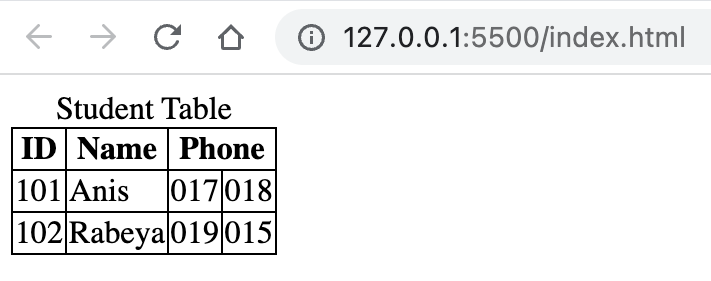
<br/>An example of rowspan is given below:
<!DOCTYPE html>
<html lang="en">
  <head>
    <title>Document</title>

    <style>
      table,
      th,
      td {
        border: 1px solid;
        border-collapse: collapse;
      }
    </style>
  </head>
  <body>
    <table>
      <caption>
        Student Table
      </caption>
      <thead>
        <tr>
          <th>ID</th>
          <th>Name</th>
          <th colspan="2">Phone</th>
        </tr>
      </thead>
      <tbody>
        <tr>
          <td>101</td>
          <td>Anis</td>
          <td>017</td>
          <td>018</td>
        </tr>
        <tr>
          <td>102</td>
          <td>Rabeya</td>
          <td>019</td>
          <td>015</td>
        </tr>
      </tbody>
    </table>
  </body>
</html>
output of the above html code
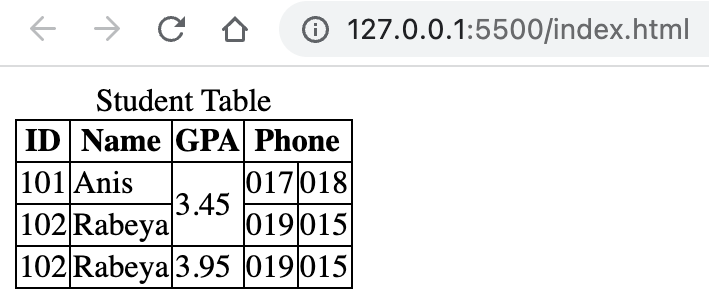
<br />An example of colspan and rowspan is given below:
<!DOCTYPE html>
<html lang="en">
  <head>
    <title>Document</title>

    <style>
      table,
      th,
      td {
        border: 1px solid;
        border-collapse: collapse;
      }
    </style>
  </head>
  <body>
    <table>
      <caption>
        Student Table
      </caption>
      <thead>
        <tr>
          <th>ID</th>
          <th>Name</th>
          <th>GPA</th>
          <th colspan="2">Phone</th>
        </tr>
      </thead>
      <tbody>
        <tr>
          <td>101</td>
          <td>Anis</td>
          <td rowspan="2">3.45</td>
          <td>017</td>
          <td>018</td>
        </tr>
        <tr>
          <td>102</td>
          <td>Rabeya</td>
          <td>019</td>
          <td>015</td>
        </tr>
        <tr>
          <td>102</td>
          <td>Rabeya</td>
          <td>3.95</td>
          <td>019</td>
          <td>015</td>
        </tr>
      </tbody>
    </table>
  </body>
</html>
output of the above html code


-
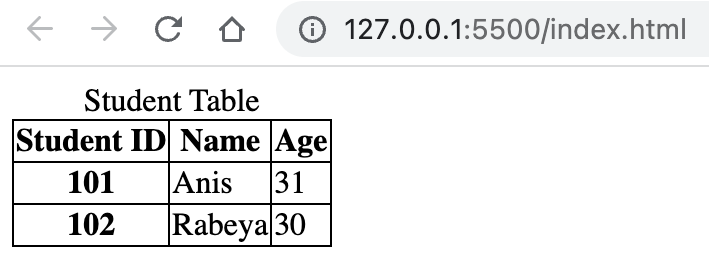
<th scope="col/row"> -
An example of accessible table using scope is given below:
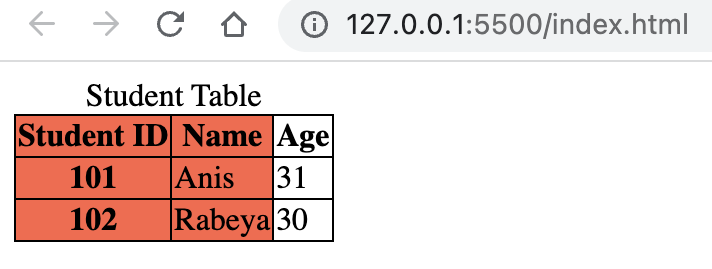
<!DOCTYPE html>
<html lang="en">
  <head>
    <title>Document</title>

    <style>
      table,
      th,
      td {
        border: 1px solid;
        border-collapse: collapse;
      }
    </style>
  </head>
  <body>
    <table>
      <caption>
        Student Table
      </caption>
      <thead>
        <tr>
          <th scope="col">Student ID</th>
          <th scope="col">Name</th>
          <th scope="col">Age</th>
        </tr>
      </thead>
      <tbody>
        <tr>
          <th scope="row">101</th>
          <td>Anis</td>
          <td>31</td>
        </tr>
        <tr>
          <th scope="row">102</th>
          <td>Rabeya</td>
          <td>30</td>
        </tr>
      </tbody>
    </table>
  </body>
</html>
output of the above html code
An example of table using
<colgroup> & <col>tags is given below:<!DOCTYPE html> <html lang="en"> <head> <title>Document</title> <style> table, th, td { border: 1px solid; border-collapse: collapse; } </style> </head> <body> <table> <caption> Student Table </caption> <colgroup> <col span="2" style="background-color: tomato" /> </colgroup> <thead> <tr> <th scope="col">Student ID</th> <th scope="col">Name</th> <th scope="col">Age</th> </tr> </thead> <tbody> <tr> <th scope="row">101</th> <td>Anis</td> <td>31</td> </tr> <tr> <th scope="row">102</th> <td>Rabeya</td> <td>30</td> </tr> </tbody> </table> </body> </html>
output of the above html code


HTML <form> Elements:
-
<form>element is used to create a html form. form help us to collect user data. -
<input />element is the most used form element. -
<label>element is used for labelling form elements. It helps the form elements accessible byguiding the screen reader.<label for="name">element hasfor=""attribute which value should be equal to<input id="name"/>element's id value. -
<select>- helps to create dropdown menu. -
<option>- helps to create options for dropdown menu. -
<textarea>- helps to create multiple lines text input field. -
<button>- helps to create button. -
<fieldset> -
<legend> -
<output> -
<datalist>&list=""attributes
form attributes:
-
<form action="/home" method="post" autocomplete="on">-> enable the autocomplete option. -
<form action="/home" method="post" autocomplete="on" enctype="text/plain">-> sends data without encoding. -
name=""attribute is used to set the name of any element which is essential for getting data in server side especially.
<input /> element types
-
type=""attribute can change the visualization of<input />element. -
<input type="text"/>creates a single line text input field. -
<input type="email"/>creates a single line email input field. -
<input type="password"/>creates a single line password input field. -
<input type="number"/>creates a single line number input field. -
<input type="checkbox"/>creates a checkbox input field. -
<input type="radio"/>creates a radio button input field. -
<input type="button"/>creates a clikable button. -
<input type="submit"/>creates a submit button for form. -
<input type="color"/>creates a color picker input field. -
<input type="date"/>creates a date picker. -
<input type="month"/>creates a month picker. -
<input type="time"/>creates a time picker. -
<input type="week"/>creates a week picker. -
<input type="image"/>creates a image selector. -
<input type="file"/>creates a file selector. -
<input type="url"/>creates a url selector. -
<input type="tel"/>creates a input field for telephone number. -
<input type="search"/>is used for searching. -
<input type="hidden"/>creates a input field which is not visible to user. -
<input type="range" min="" max=""/>creates a range by setting min and max value, default range is 0 to 100.
Input attributes:
-
value=""attribute is used to set initial value for input field. -
readonlyattribute is used to set an input field as readonly. -
checkedattribute is used to set an input field already checked. -
disabledattribute is used to make a input field disable. -
size=""attribute is used to set the number of characters for an input field. -
maxlength=""attribute is used to set the maximum number of characters for an input field. -
max=""attribute is used to set the maximum input value for an input field. -
min=""attribute is used to set the minimum input value for an input field. -
pattern=""attribute is used to set a regular expression for validating an input field. -
placeholder=""attribute is used to give a hint to the users. -
requiredattribute specifies that an input element must be filled before submitting the form. -
step=""attribute specifies steps for input field. -
autofocusattribute makes an input field automatically focus when the page is loaded. -
height="" width=""attribute is used to set input elements height and width. -
list="id_of_datalist"attribute is used to set input elements height and width.
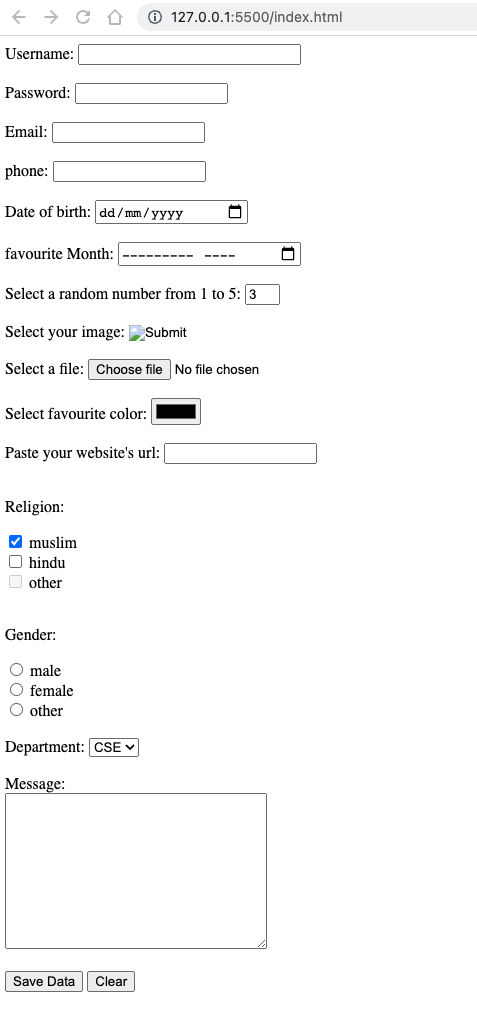
A form example is given below:
<form action="/" method="post">
  <div>
    <datalist id="usernames">
      <option value="anis"></option>
      <option value="linkon"></option>
      <option value="ridoy"></option>
    </datalist>

    <label for="username">Username: </label>
    <input
      type="text"
      id="username"
      name="username"
      size="30"
      autofocus
      required
      list="usernames"
    />
  </div>
  <br />
  <div>
    <label for="password">Password: </label>
    <input type="password" id="password" name="password" required />
  </div>
  <br />
  <div>
    <label for="email">Email: </label>
    <input type="email" id="email" name="email" autocomplete />
  </div>
  <br />
  <div>
    <label for="phone">phone: </label>
    <input type="tel" id="phone" name="phone" />
  </div>
  <br />
  <div>
    <label for="dob">Date of birth: </label>
    <input type="date" id="dob" name="dob" />
  </div>
  <br />
  <div>
    <label for="month">favourite Month: </label>
    <input type="month" id="month" name="month" />
  </div>
  <br />
  <div>
    <label for="random">Select a random number from 1 to 5: </label>
    <input
      type="number"
      id="random"
      name="random"
      min="1"
      max="5"
      value="3"
    />
  </div>
  <br />
  <div>
    <label for="profile">Select your image: </label>
    <input type="image" id="profile" name="profile" />
  </div>
  <br />
  <div>
    <label for="file">Select a file: </label>
    <input type="file" id="file" name="file" />
  </div>
  <br />
  <div>
    <label for="color">Select favourite color: </label>
    <input type="color" id="color" name="color" />
  </div>
  <br />
  <div>
    <label for="website">Paste your website's url: </label>
    <input type="url" id="website" name="website" />
  </div>

  <!-- checkbox disable-->
  <br />
  <div>
    <p>Religion:</p>
    <div>
      <input type="checkbox" id="muslim" checked />
      <label for="muslim">muslim</label>
    </div>
    <div>
      <input type="checkbox" id="hindu" />
      <label for="hindu">hindu</label>
    </div>
    <div>
      <input type="checkbox" id="other" disabled />
      <label for="other">other</label>
    </div>
  </div>
  <!-- radiobutton -->
  <br />
  <div>
    <p>Gender:</p>
    <div>
      <input type="radio" id="male" name="gender" />
      <label for="male">male</label>
    </div>
    <div>
      <input type="radio" id="female" name="gender" />
      <label for="female">female</label>
    </div>
    <div>
      <input type="radio" id="other" name="gender" />
      <label for="other">other</label>
    </div>
  </div>
  <!-- dropdown menu -->
  <br />
  <div>
    <label for="department">Department: </label>
    <select name="department" id="department">
      <option value="cse">CSE</option>
      <option value="eee">EEE</option>
      <option value="llb">LLB</option>
    </select>
  </div>
  <!-- textarea -->
  <br />
  <div>
    <label for="message">Message: </label> <br />
    <textarea name="" id="message" cols="30" rows="10"></textarea>
  </div>
  <!-- button -->
  <br />
  <div>
    <button type="submit">Save Data</button>
    <button type="reset">Clear</button>
  </div>
</form>
output of the above html code

- div can help to divide screen
-
HTML5 developed in 2014
-
HTML5'S Objectives
- adding more semantic tags
- more form types
- improve accessibility
- improved storage facilities
- improved graphics & media
- remove few things
-
HTML5 Semantic elements:
<header> <nav> <main> <article> <aside> <section> <footer> <figure> <figcaption> <details> <summary> <mark> <time> -
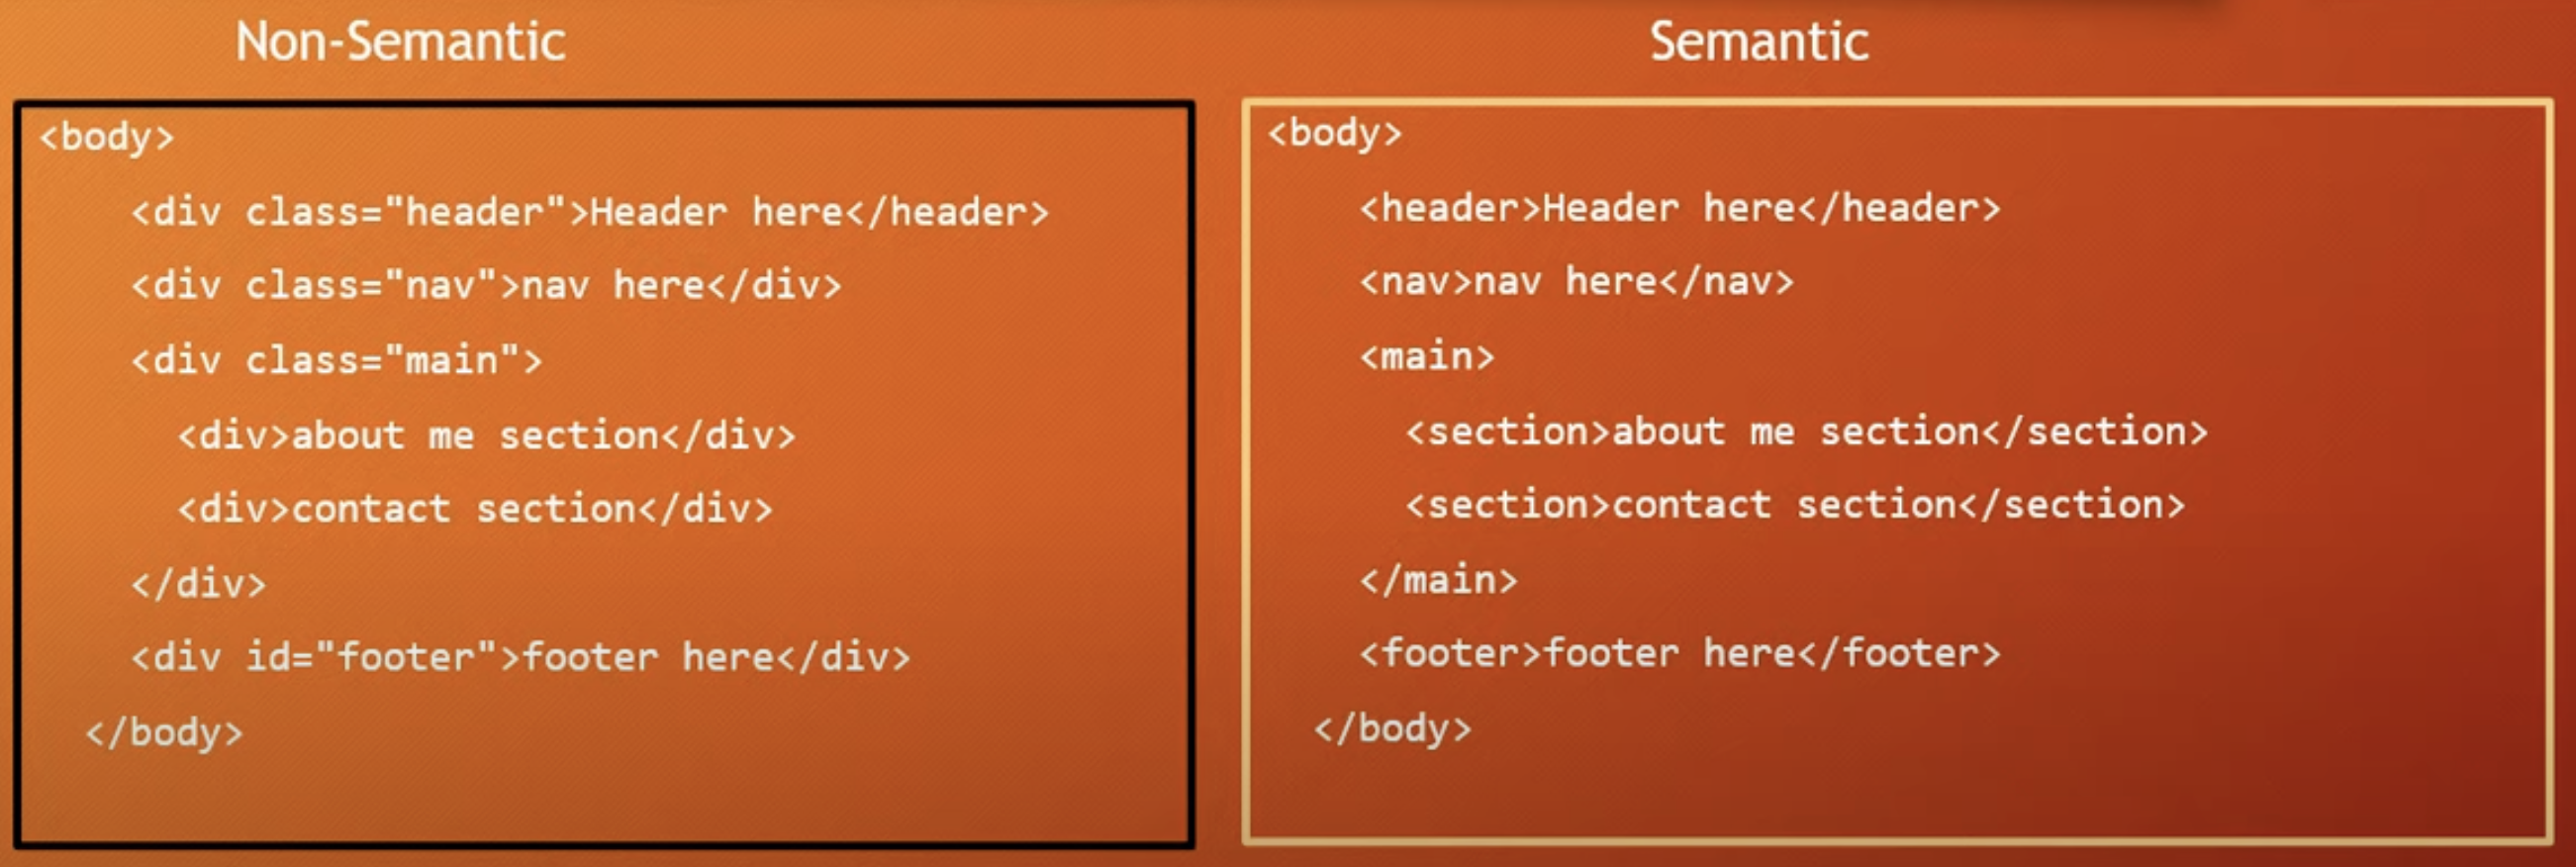
sematic tags vs non semantic tags
- semantic tags are meaningful tags for human, search engine. example:
<form> <table> <p> <h1> etc. - non-semantic tags are not meaningful tags for human, search engine. example:
<span> <div> etc. - sematic tags vs non semantic tags example is given below:
-
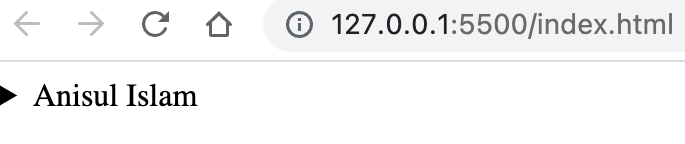
<details>elements have tewo states: closed, open -
<summary>a short summary of details is provided by summary element -
<figure>can have diagram, photos inside of it. -
<figcaption>can set the figure caption.An example of details, summary elements are given below:
<!DOCTYPE html>
<html lang="en">
  <head>
    <title>Document</title>
    <style>
      details[open] > summary {
        background-color: aqua;
      }
    </style>
  </head>
  <body>
    <details>
      <summary>Anisul Islam</summary>
      My Name is Anisul Islam. I am 31 years old. I have done my masters in
      Software, Web & cloud at Tampere University, Finland.
    </details>

    <!-- no need to understand this part cause I just tested using javascript here -->
    <!-- <script>
      const details = document.querySelector("details");
      details.addEventListener("toggle", () => {
        if (details.open) {
          console.log("open");
        } else {
          console.log("close");
        }
      });
    </script> -->
    <figure>
      <img src="./images/list.png" alt="list" />
      <figcaption>fig1: list image</figcaption>
    </figure>
  </body>
</html>
output of the heading style code

- semantic tags are meaningful tags for human, search engine. example:


-
what is web accessibility?
- making website supportive for disable people and search engine
-
how to check web accessibility?
- we can use some tools like axe DevTools - Web Accessibility Testing
-
Tips for making website accessible:
-
Use Semantic elements over non semantic elements. In the following example button is more accessible than div for making a button. Semantic elements help the screen readers.
<div>Click me</div>
<button>Click me</button>
-
Use Heading tags in order
- use one h1 element in a webpage
- keep sequence when using: h1 -> h2 -> h3 ... (follow top-down order)
-
Use alt attribute
- use alt attribute for
<img />element - alt attribute provides more info to the blind people
- low bandwidth might not render the image so the alt will help here
- alt attributes helps technologies like search engines
- title attribute can be used when we hover over image to get extra information
- use alt attribute for
-
Contrast ratio checker
- use contrast ratio checker for foreground and background color: https://webaim.org/resources/contrastchecker/
-
Declare the languages
<html lang="en">
-
Meaningful Link txt
- make link text descriptive, understandable and clear
<a href="http://studywithanis.com" target="_blank"> Visit Anisul Islam's website </a>
- make link text descriptive, understandable and clear
-
Form related matters
- use label and bind input elements with label by using id and for value same. example is given below:
<label for="email">Email: </label> <input type="email" id="email" />
- use label and bind input elements with label by using id and for value same. example is given below:
-
-
References:
- https://www.w3.org/WAI/fundamentals/accessibility-intro/
- https://www.w3schools.com/html/html_accessibility.asp
<img src="imageName.svg"><progress min="0" max="100" value="70"> </progress>
- you will learn more about svg and canvas in CSS and Javascript playlist