How to intercept network trafic on Android
| Version | 2023.03.31 |
|---|---|
 |
This work is licensed under a Creative Commons Attribution-NonCommercial-ShareAlike 4.0 International License |
In order to implement this tutorial you need to use one of these Android devices:
- Android Virtual Device (AVD) -- see one of these tutorials: Android Studio Emulator - GUI, or Android Studio Emulator - command line to learn how to set up an AVD;
- Android 11 (API version 30) was used for this tutorial
- or a physical smartphone with Android rooted. Rooting an Android device is beyond the scope of this tutorial, but you can read this webpage to learn more about it.
- Python 3.x
- Linux: already installed in most Linux distributions
- Windows: download from python.org
NOTE
The Android emulator uses the
x86, orx86_64CPU instruction set. However, some APPs are compiled only forarm, orarm64CPU architectures. If the APP you are analysing does not provide a version forx86, orx86_64, you need to use Android 9, or Android 11 on the emulator, because these versions include a translation mechanism fromarminstructions tox86.
To intercept the network traffic of an Android device we need a proxy. The proxy will act as Man-in-the-middle between the Android device and the servers it connects to. There are several ways to accomplish network traffic interception:
- using a proxy on a computer, like mitmproxy, or PolarProxy;
- using a fake VPN on Android to act like a proxy, like Packet Capture, or HTTP Toolkit.
Using a proxy on a computer -- this method is a bit more complex to setup, but is the one that generally guarantees more flexibility to analyse the captured traffic. The main disadvantage is that all Android traffic is routed through the proxy and it's more difficult to find the packects related to the app we want to study.
Using a fake VPN on Android -- this is the simplest way to intercept traffic, and it allows choosing just one app to be redirected and captured. On one hand, no root permission is required, on the other hand it might require extra steps to download the captured packets to a computer.
For this tutorial we are going to use HTTP Toolkit that sets up a fake VPN service. Download HTTP Toolkit (it's available for Linux, MacOS and Windows) and then install it on your computer.
Start Android Vistual Device (AVD) and open the HTTP Toolkit software. On the main window you'll see several options, select Android Device via ADB:

When the option Android Device via ADB is selected, several things happen behind the scenes:
-
the app
tech.httptoolkit.android.v1is installed on the AVD -
the
HTTP Toolkit CAdigital certificate is added to theTrusted credentials: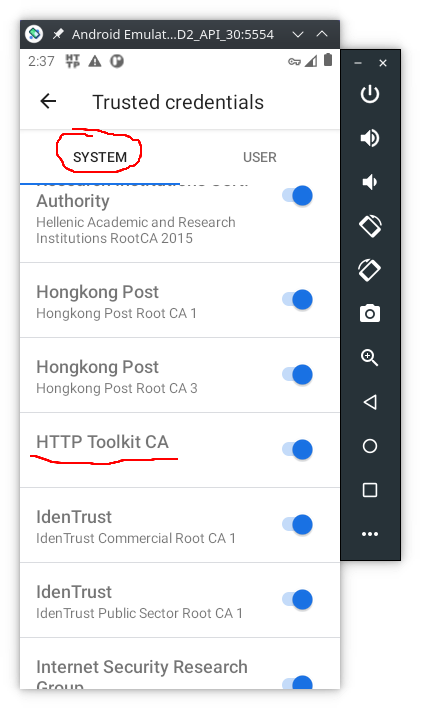
-
a fake VPN service is started on the AVD:
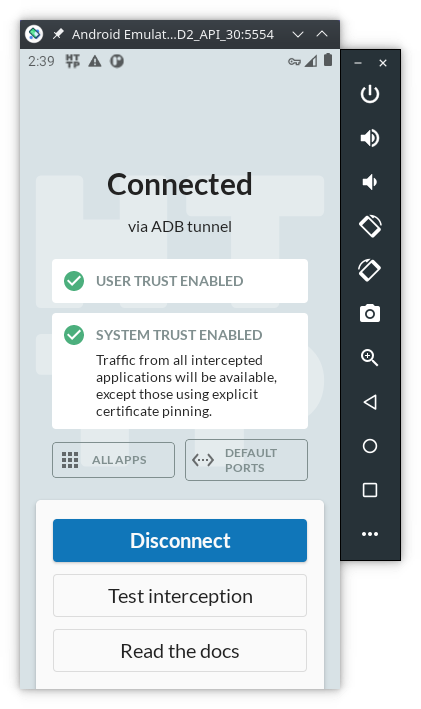


By default, HTTP Toolkit will intercept the network traffic from ALL apps and services installed on the AVD. However, we are going to analyse just one app, so let's change HTTP Toolkit configurations on the AVD:
- click the button
All APPS - on the 3 vertical dots menu choose
Disable all apps - again on the 3 vertical dots menu, choose
Show system - now, on the search bar type
chromeand enable the capture:

To generate some traffic, open the Chrome browser on the AVD and type AFD2 (or something else) on the address bar and press enter. This will make a query to google search, and the HTTP Toolkit on the computer will show the captured network packets:

However, you might not be able to access any website due to the Certificate Pinning protection. Keep reading to learn how to bypass it.
NOTE
The HTTP Toolkit is an open source project hosted on https://github.com/httptoolkit/httptoolkit. However, there are some features that are reserved for the paying costumers, namely the ability to save the captures into a file. This can be overcome by copy/paste the packets contents. Alernativelly, you can use
mitmproxy, but the setup process is more complex.
After the proxy is enabled and the digital certificates are properly configured, some APPS might still not work. That happens because they are able to detect that the digital certificate we are using is not the one they expect. This technique is called certificate pinning. Certificate pinning is an extra step to protect SSL/TLS network traffic from Man-in-the-middle attacks, which we are trying to do.
In order to bypass certificate pinning we need to dynammicly change the network traffic. We can use Frida, an open source tool for dynamic interception and alteration of network traffic to bypass some certificate pinning security mechanisms.
To install Frida we need to have the latest Python 3.x.
Let's install the latest frida version, which is presently 16.0.11.
NOTE
In case you whish to have more than one version of
frida-toolson the same computer create first a Python virtual environment:> pip install virtualenv > virtualenv frida14 > source frida14/bin/activate
Install frida-tools (the binaries are in the Frida’s GitHub releases)
> pip install frida-tools
> frida --version
16.0.11
It is useful to add the frida-tools to the path on the system environment variables:
- on Windows go to:
Control Panel > System > Advanced System Settings > Environment Variables. Then add the parent folder in which Frida is installed:C:\Users\<username>\AppData\Local\Packages\PythonSoftwareFoundation.Python.3.9_qbz5n2kfra8p0\LocalCache\local-packages\Python39\Scripts\(adapt accordingly to your Python version) - on Linux do:
user@linux:~$ export $PATH:$HOME/.local/bin
To install Frida on Android, the device must be rooted first. For this tutorial we are going to use an Android Virtual Device (AVD) running Android 11 (API version 30).
NOTE
Make sure
fridaalready supports the Android version you're using.
Download the frida-server from Frida’s GitHub releases page that matches both:
- The CPU architectutre of your Android device. If you are not sure check it by doing
adb shellfollowed byuname -m; - and the
frida(client) version running on the desktop. If you are not sure check it by doingfrida --version.
Then uncompress it with 7zip, or on the Linux command line:
user@linux:~$ unxz frida-server-16.0.11-android-x86_64.xzNOTE
Be aware that your emulator might be
x86(32 bits) instead of thex86_64(64 bits) that is used in this tutorial.If your are using a physical Android device, the CPU architecture could be
armv8l, in that case you should download thearm64version of thefrida-server.
Now, make sure your Android device is connected, copy frida-server to your device and run it as root, as shown here:
> adb devices
List of devices attached
emulator-5554   device
> adb push ./frida-server-16.0.11-android-x86_64 /sdcard/Download/
./frida-server-16.0.11-android-x86_64/: 1 file pushed. 99.8 MB/s (41358640 bytes in 0.395s)
> adb shell
generic_x86_64_arm64:/ $ su
generic_x86_64_arm64:/ # cd /data/local/tmp
generic_x86_64_arm64:/data/local/tmp # cp /sdcard/Download/frida-server-16.0.11-android-x86_64 .
generic_x86_64_arm64:/data/local/tmp # chmod +x frida-server-16.0.11-android-x86_64
generic_x86_64_arm64:/data/local/tmp # ./frida-server-16.0.11-android-x86_64 &
[1] 6268
Open a new terminal and test if Frida is running:
> frida-ps -Uai
 PID  Name                     Identifier
4  -----------------------  ---------------------------------------
1614  Google                   com.google.android.googlequicksearchbox
5405  HTTP Toolkit             tech.httptoolkit.android.v1
2605  Messages                 com.google.android.apps.messaging
4230  Phone                    com.android.dialer
3037  Photos                   com.google.android.apps.photos
4493  Settings                 com.android.settings
4698  YouTube                  com.google.android.youtube
...
NOTE
If you need to terminate
frida-serverdo (replace8888to the actual PID):> adb shell generic_x86_64_arm64:/ $ su generic_x86_64_arm64:/ # ps -e | grep frida-server root 8888 5811 10874320 119644 do_sys_poll 0 S frida-server-16.0.11-android-x86_64 generic_x86_64_arm64:/ # kill -9 8888
Download the latest version of pinning-demo.apk, presently v1.3.0. This app has several buttons, each with a different implementation of certificate pinning mechanism. Install it on Android emulator:
> adb install pinning-demo.apk
Performing Streamed Install
Success
With the HTTP Tollkit still running, open the SSL Pinning Demo app and press all the buttons:

You'll see 5 of 6 buttons in red, because the app was able to detect a different digital certificate from the one it was expecting. Now, lets use frida bypass SSL Pinning Demo certificate pinning.
- The first step is to identify the package name:
user@linux:~$ frida-ps -aiU | grep pinning
6491 SSL Pinning Demo tech.httptoolkit.pinning_demo- Then apply the
javascriptthat enables to bypass certificate pinning with Frida. In the computer run:
> frida -U --codeshare akabe1/frida-multiple-unpinning -f <mobile-app-name>For the SSL Pinning Demo app:
> frida -U --codeshare akabe1/frida-multiple-unpinning -f tech.httptoolkit.pinning_demo
     ____
    / _  |   Frida 16.0.11 - A world-class dynamic instrumentation toolkit
   | (_| |
    > _  |   Commands:
   /_/ |_|       help      -> Displays the help system
   . . . .       object?   -> Display information about 'object'
   . . . .       exit/quit -> Exit
   . . . .
   . . . .   More info at https://frida.re/docs/home/
   . . . .
   . . . .   Connected to Android Emulator 5554 (id=emulator-5554)
Spawned `tech.httptoolkit.pinning_demo`. Resuming main thread!
[Android Emulator 5554::tech.httptoolkit.pinning_demo ]->
======
[#] Android Bypass for various Certificate Pinning methods [#]
======
[-] OkHTTPv3 {2} pinner not found
...- Now press all the buttons again. If everything is working as expected, you should now be able to get 5 (of 6) green buttons:

NOTE
Frida is able to avoid certificate pinning from many Android apps, but not all of them. For example, Tiktok is known to have implemented some technics against Frida and other similar tools.
If the certificate pinning bypass is not working for your mobile app, try:
- with an older version of the app itself,
- or, use an older version of Android,
- or both an older version of the app and older version of Android.
At this point, the "Manually Pinned Request" is still red because the app developer hard-coded the hash value of the server digital certificate. However, we can create and inject our code into the app to change its behaviour. However, we can create and inject our code into the app to change its behaviour. To this end, we need to know its source code, which is available where.
On line 32 we have the hash value of Let's Encrypt digital certificate. Let's Encrypt is the CA that signed the website digital certificate to which the app connects:
const val LETS_ENCRYPT_ROOT_SHA256 = "NgJeUutmfGsIONh0XaovCA5VJ05uv2gCb27pUOpTPxU="On line 221 we have the function responsible for the manual certificate pinning:
fun sendManuallyCustomPinned(view: View) {Then, on line 242we have a call to compare the hash values of the digital certificates:
if (!certs.any { cert -> doesCertMatchPin(LETS_ENCRYPT_ROOT_SHA256, cert) }) {The code of the doesCertMatchPin() function is:
private fun doesCertMatchPin(pin: String, cert: Certificate): Boolean {
    val certHash = cert.publicKey.encoded.toByteString().sha256()
    return certHash == pin.decodeBase64()
}
We aim to change the function doesCertMatchPin() to ensure it will always return true. This way, we can get the last button green while still being able to intercept the network connection.
First create the file manual.js then copy/paste the following javascript code:
Java.perform(function() {
  Java.use("tech.httptoolkit.pinning_demo.MainActivity").doesCertMatchPin.implementation = function(s,t) {
    console.log("Manual pinning surpassed " + s + t);
    return true;
  }
});
Explanation of the code:
tech.httptoolkit.pinning_demois the name of the appMainActivityis the name of the activity where our function is executeddoesCertMatchPin.implementationreplace the code of functiondoesCertMatchPinby this code:
  function(s,t) {
      console.log("Manual pinning surpassed " + s + t);
      return true;
}s,tare input variables, in this caseLETS_ENCRYPT_ROOT_SHA256, certconsole.log(...)print to Frida consolereturn true;always return true
Now, let's inject our code into the app by adding -l manual.js to the frida command:
frida -U --codeshare akabe1/frida-multiple-unpinning -l manual.js -f tech.httptoolkit.pinning_demoThis should be the result:

- apply the
fridascript to the Google Chrome browser - access to
https://ead.ipleiria.pt- then, on the login page type:
- for the username:
Asdrubal - for the password:
loves AFD2!!
- for the username:
- then, on the login page type:
- go to the HTTP Toolkit interface on your computer and find the packet that contains the username and password.
Execute the following tutorials:
- Solving OWASP UnCrackable Android App Level 1 with Runtime Mobile Security (RMS)
- Solving OWASP MSTG UnCrackable App for Android Level 1
- Solving OWASP MSTG UnCrackable App for Android Level 2
- Solving OWASP MSTG UnCrackable App for Android Level 3
- Intercepting Android Emulator TLS traffic with magisk
- this tutorial teachs how to root an Android emulator in order to install any CA digital certificate as
system trusted, required for Android 11
- this tutorial teachs how to root an Android emulator in order to install any CA digital certificate as
- Introduction to the Mobile Security Testing Guide