ECS Docker Demo
Terminologies
- Task Definition: A task definition is required to run Docker containers in Amazon ECS, it describes how your container should run in ECS.
- Service: Amazon ECS allows you to run and maintain a specified number of instances of a task definition simultaneously in an Amazon ECS cluster. This is called a service.
- ECR: AWS registry service to store docker images.
- ECS: AWS Elastic Container Service.
Build docker image
You may also clone this repository to get all source code in /src directly, then you should go to step 5 directly to start building container image.
1. Install docker
[ec2-user@ip-10-0-0-204 ~]$ sudo yum install docker -y
[ec2-user@ip-10-0-0-204 ~]$ mkdir demo-docker
[ec2-user@ip-10-0-0-204 ~]$ cd demo-docker/
[ec2-user@ip-10-0-0-204 demo-docker]$
2. Create a file called app.py in your project directory and paste this in:
import time
from flask import Flask

app = Flask(__name__)

@app.route('/')
def hello():
    return '<!DOCTYPE html> \
<html lang="en"> \
<head> \
<title>Page Title</title> \
<meta charset="UTF-8"> \
<meta name="viewport" content="width=device-width, initial-scale=1"> \
<style> \
 \
 \
/* Header/logo Title */ \
.header { \
  padding: 80px; \
  text-align: center; \
  background: #1abc9c; \
  color: white; \
} \
 \
/* Increase the font size of the heading */ \
.header h1 { \
  font-size: 40px; \
} \
 \
 \
</style> \
</head> \
<body> \
<div class="header"> \
  <h1>ECS Fargate demo website</h1> \
  <p>A <b>simple hello</b> from ECS Fargate</p> \
</div> \
</body> \
</html>  '
3. Create another file called requirements.txt in your project directory and paste this in:
[ec2-user@ip-10-0-0-204 demo-docker]$ cat requirements.txt
flask
4. Create a Dockerfile
In this step, you write a Dockerfile that builds a Docker image. The image contains all the dependencies the Python application requires, including Python itself.
In your project directory, create a file named Dockerfile and paste the following:
FROM python:3.7-alpine
WORKDIR /code
ENV FLASK_APP app.py
ENV FLASK_RUN_PORT 80
ENV FLASK_RUN_HOST 0.0.0.0
RUN apk add --no-cache gcc musl-dev linux-headers
COPY requirements.txt requirements.txt
RUN pip install -r requirements.txt
COPY . .
CMD ["flask", "run"]
EXPOSE 80
5. Build docker image
[ec2-user@ip-10-0-0-204 demo-docker]$ docker build -t ecs-demo-app .6. Check docker image
[ec2-user@ip-10-0-0-204 demo-docker]$ docker images
REPOSITORY          TAG                 IMAGE ID            CREATED             SIZE
ecs-demo-app        latest              54f8232440d3        14 minutes ago      213MB
python              3.7-alpine          39fb80313465        2 days ago          98.7MB
7. Test the docker image
[ec2-user@ip-10-0-0-204 demo-docker]$ docker run -p 8080:80 <IMAGE-ID>
 * Serving Flask app "app.py"
 * Environment: production
   WARNING: This is a development server. Do not use it in a production deployment.
   Use a production WSGI server instead.
 * Debug mode: off
 * Running on http://0.0.0.0:80/ (Press CTRL+C to quit)
172.17.0.1 - - [29/Aug/2019 13:01:22] "GET / HTTP/1.1" 200 -

[ec2-user@ip-10-0-0-204 ~]$ curl localhost:8080
Push image to ECR
1. Create ECR repository in AWS
[ec2-user@ip-10-0-0-204 ~]$ aws ecr create-repository --repository-name ecs-demo-repository --region eu-west-1
{
    "repository": {
        "registryId": "xxxxxx",
        "repositoryName": "ecs-demo-repository",
        "repositoryArn": "arn:aws:ecr:eu-west-1:xxxxxxxx:repository/ecs-demo-repository",
        "createdAt": 1567083784.0,
        "repositoryUri": "xxxxxxxx.dkr.ecr.eu-west-1.amazonaws.com/ecs-demo-repository"
    }
}
2. Tag image to repo
[ec2-user@ip-10-0-0-204 ~]$ docker tag ecs-demo-app <ReposistoryUri>:v13. Get docker login credentials
Run the following command and copy the output, then paste it in your terminal and hit enter to login.
[ec2-user@ip-10-0-0-204 ~]$ aws ecr get-login-password --region eu-west-1 | docker login --username AWS --password-stdin xxxxxxxx.dkr.ecr.region.amazonaws.com
WARNING! Using --password via the CLI is insecure. Use --password-stdin.
WARNING! Your password will be stored unencrypted in /home/ec2-user/.docker/config.json.
Configure a credential helper to remove this warning. See
https://docs.docker.com/engine/reference/commandline/login/#credentials-store

Login Succeeded
4. Push image to ECR
[ec2-user@ip-10-0-0-204 ~]$ docker push xxxxxxxx.dkr.ecr.eu-west-1.amazonaws.com/ecs-demo-repository5. Check image in ECR
Go to your AWS Console and go to the ECR service page, you should be able to see the “ecs-demo-app” in the list of repositories, click on it and you will see the image details as below:
 Copie the image URI and keep it, we will use it to create the task definition.
6. Create Task Definition in ECS
- Go the ECS page in your AWS console, click ‘Task definitions“ in the left side of the page.
- Click ”Create new Task Definition“, then choose ”Fargate“ then hit ”Next“, you will see a new page popped out.
- Enter a name in “Task Definition Name” field, for this example we will use “ecs-fargate-demo”.
- Choose ‘None“ in Task Role, leave the rest by default then go to ”Task size“ section.
- Select “1 GB” in “Task memory” and “0.5 vCPU” in “Task CPU” then hit “Add container” in this section.
- Enter a name in “Container name” field, for this example we will use “ecs-demo-container”, paste the image URI you have copied previous, then scroll down to “Port mappings” and enter “80” leave the protocol to “tcp” as below.
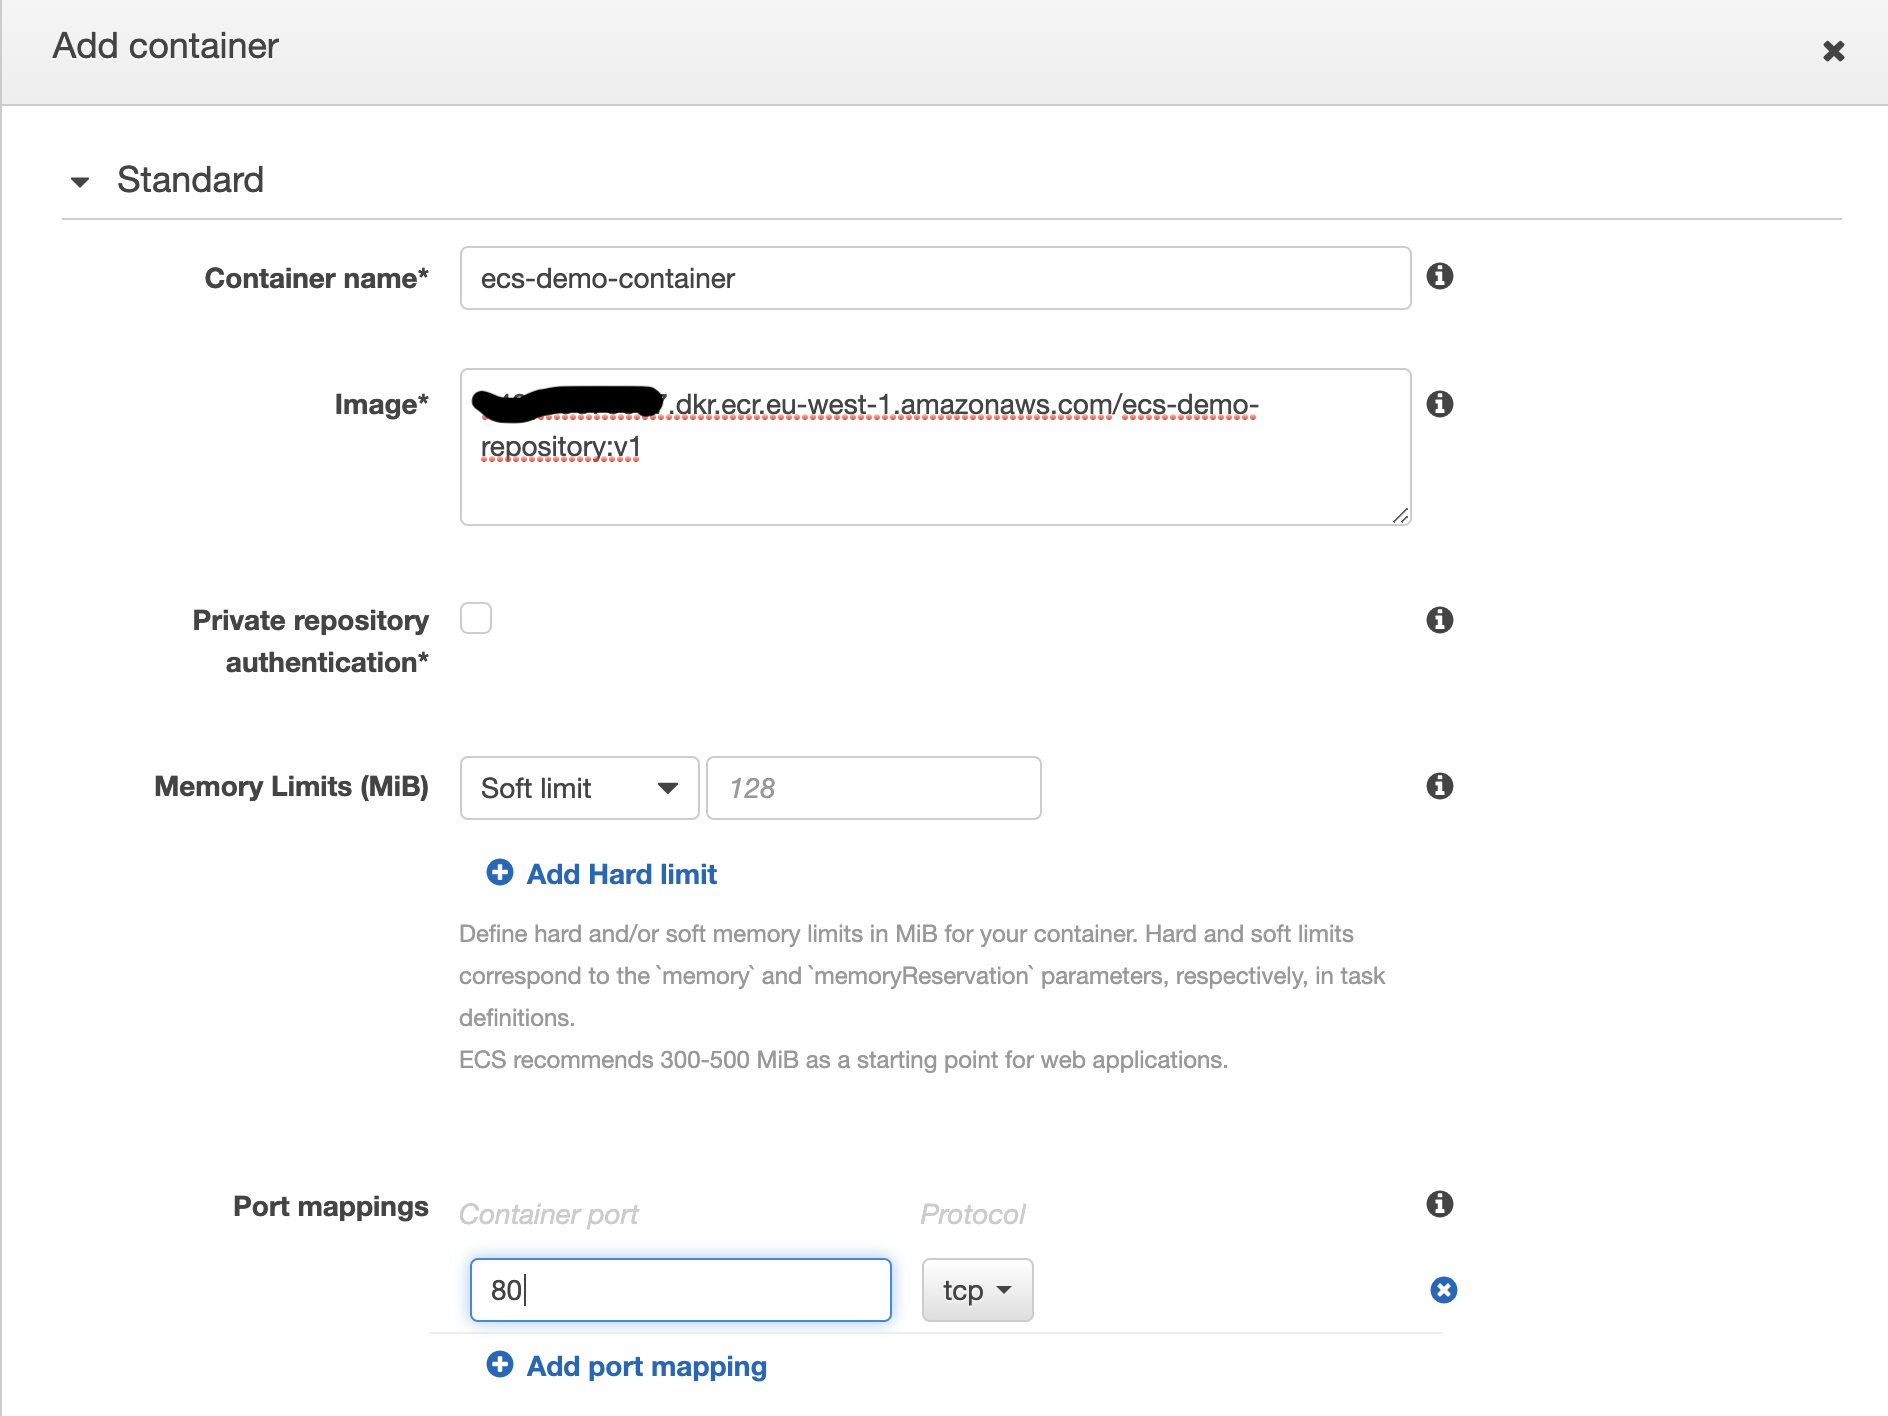
- Scroll down and hit “Add”.
- Leave the rest sections with default setting and click “Create”

Now we have created a Task Definition and we will use it to create a Service later.
7. Create Fargate cluster in ECS
- Go to “Cluster” in ECS service page in your AWS console
- Click “Create Cluster”, the leave the default selection of “Networking only” panel and click '“Next”,
- Enter a name in “Cluster name” field
- Check the “Create VPC” and leave all as default and click “Create”
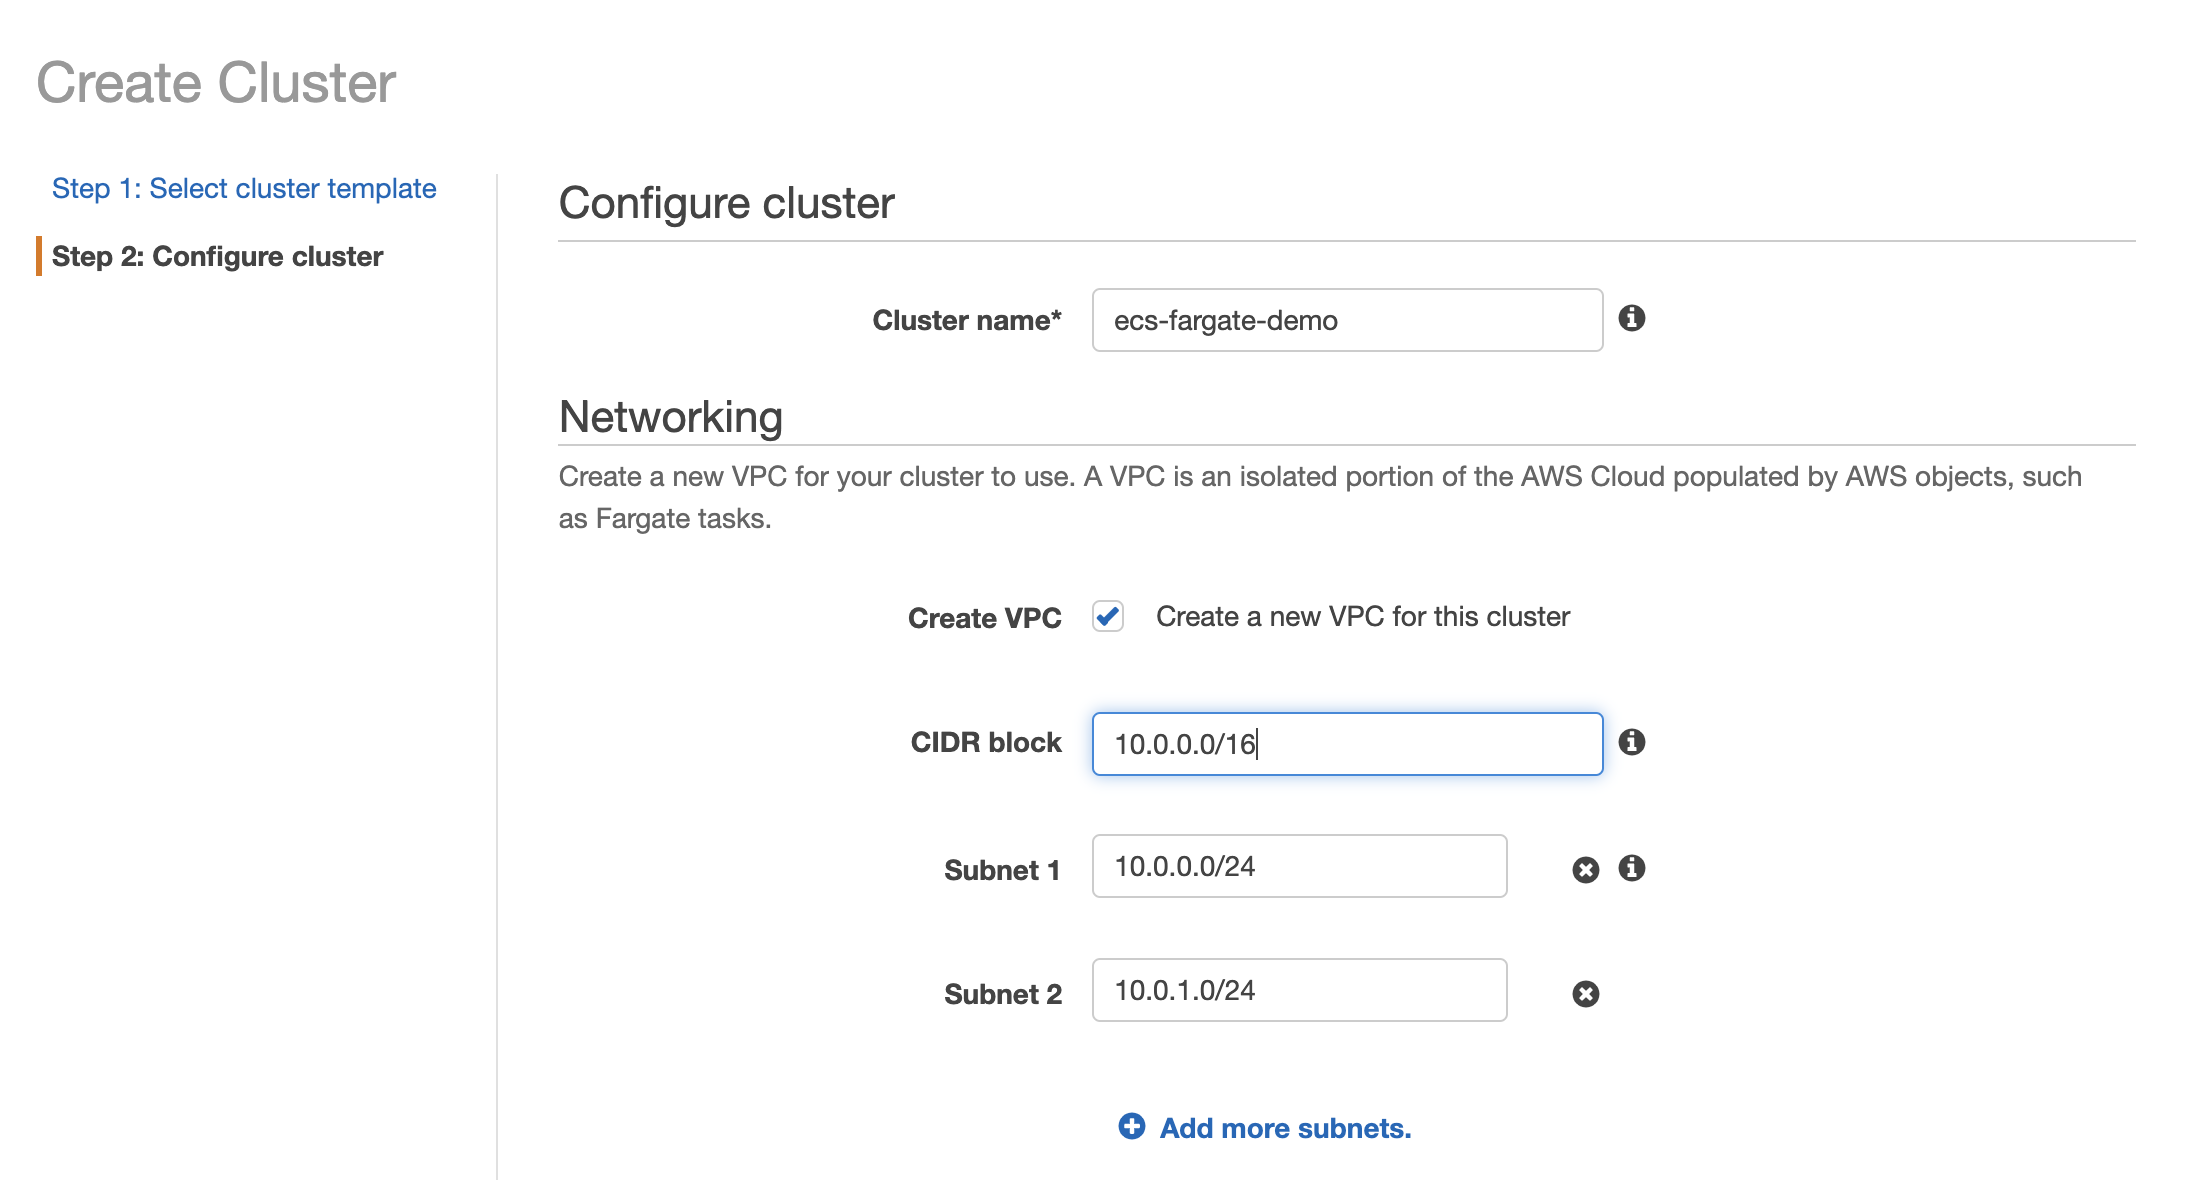
- Note the newly created VPC id and we will use it in “Create Service in ECS” section.

Now we have a Fargate cluster and we are going to launch a Service.
8. Create Service in ECS
- Go to the cluster details page and choose the “Services” tab, click “Create” button, you will see a new page popped out.
- Choose “FARGATE” as launch type and “esc-fargate-demo” as Task Definition.
- Leave the rest as default and enter a name in “Service Name” field, for this example we will use “ecs-demo-svc”
- Enter “3” in “Number of tasks” then hit “Next”
- Choose the VPC you have noted in previous step and add the two subnets in this VPC
- In “Load Balancing” section, choose “Network Load Balancer”, you will see an alert saying “No load balancer is found”
- Click the link “EC2 Console” to create a Network Load balancer“ by following this guide (https://docs.aws.amazon.com/elasticloadbalancing/latest/network/network-load-balancer-getting-started.html), please make sure to delete all target groups attached to this load balancer and note the Network Load Balancer DNS name.
- Once you have created a Network Load Balancer, click refresh button and you should be able to see the load balancer you’ve created. Choose that Network Load Balancer and then click the button "Add to load balancer" button
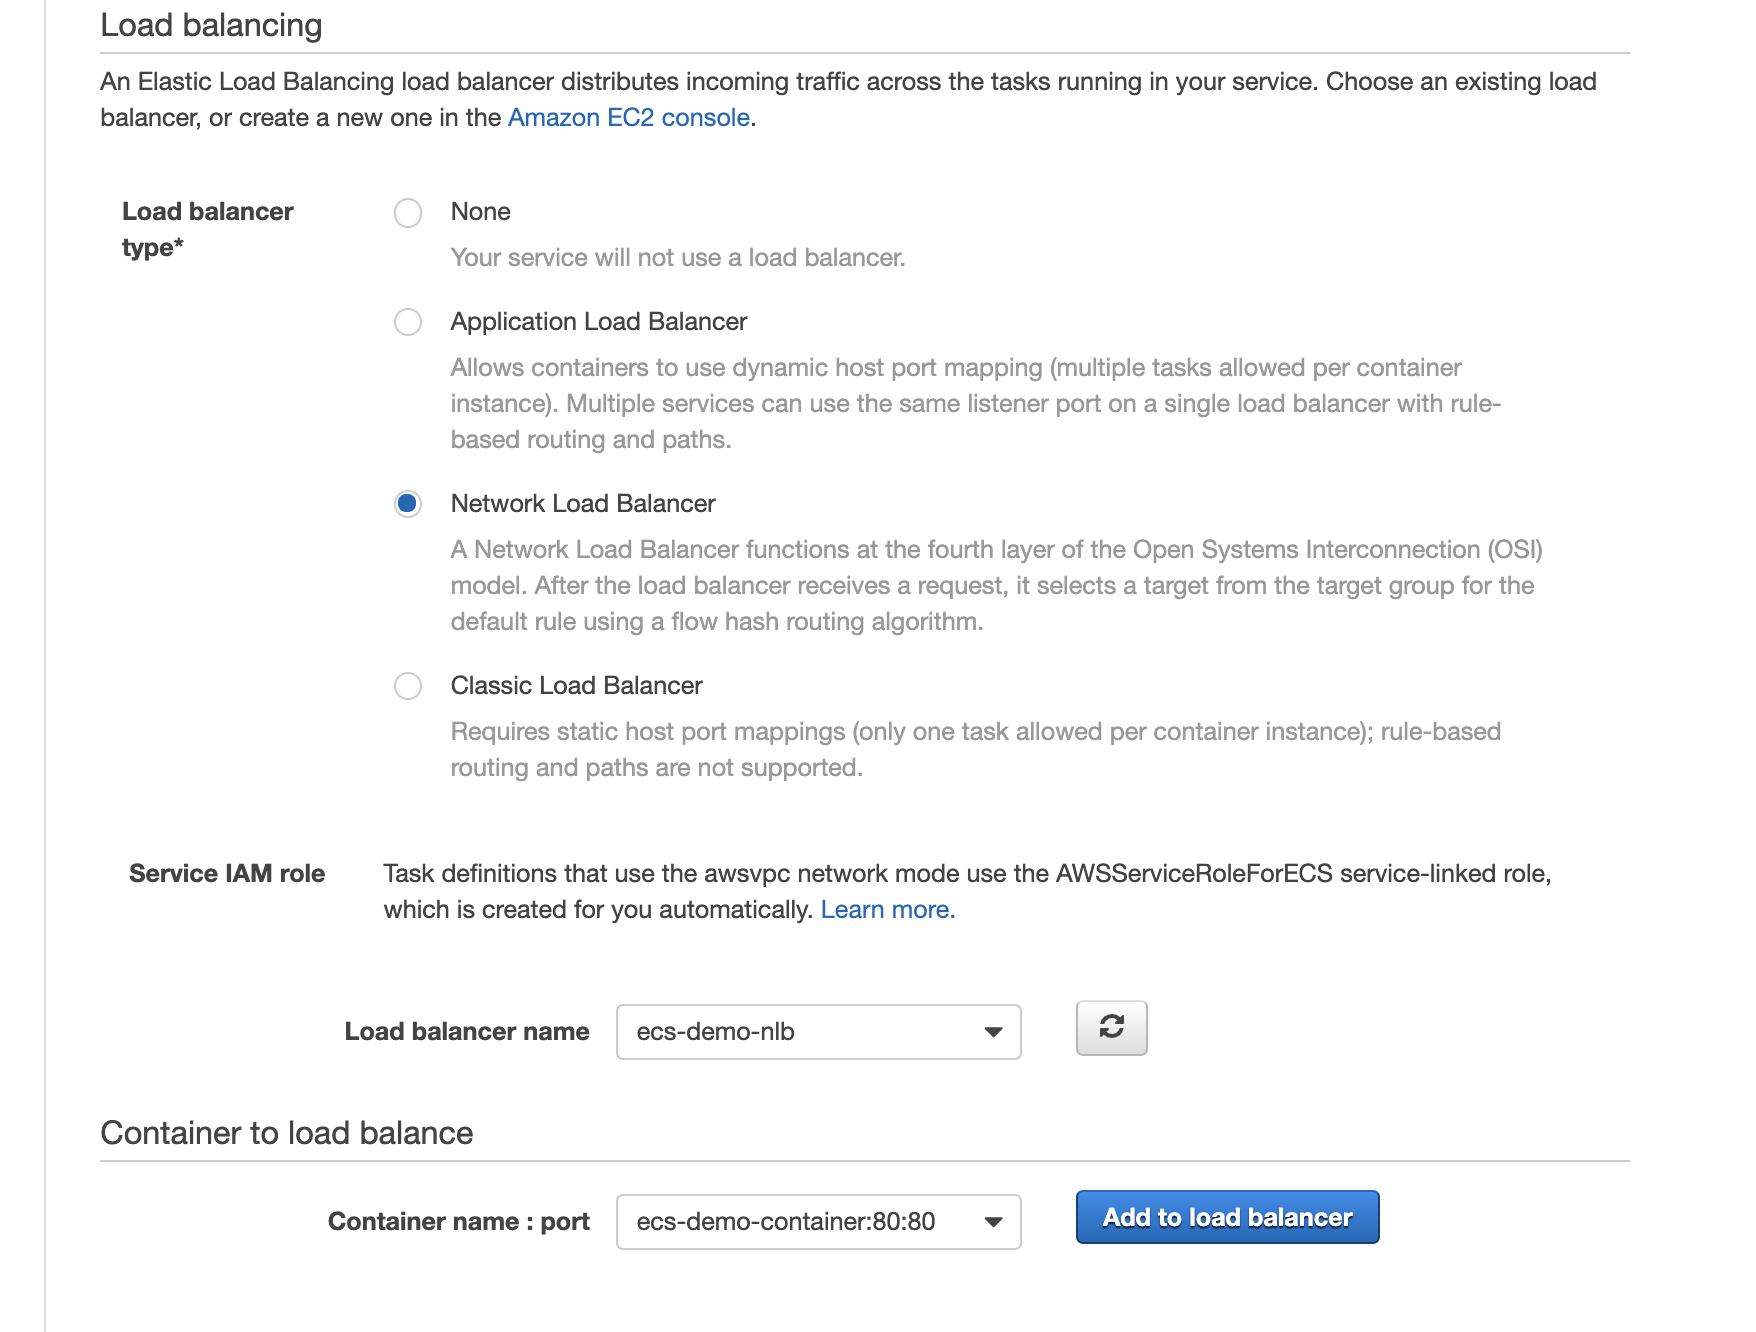
- Enter “80” in the second field of “Production listener port”
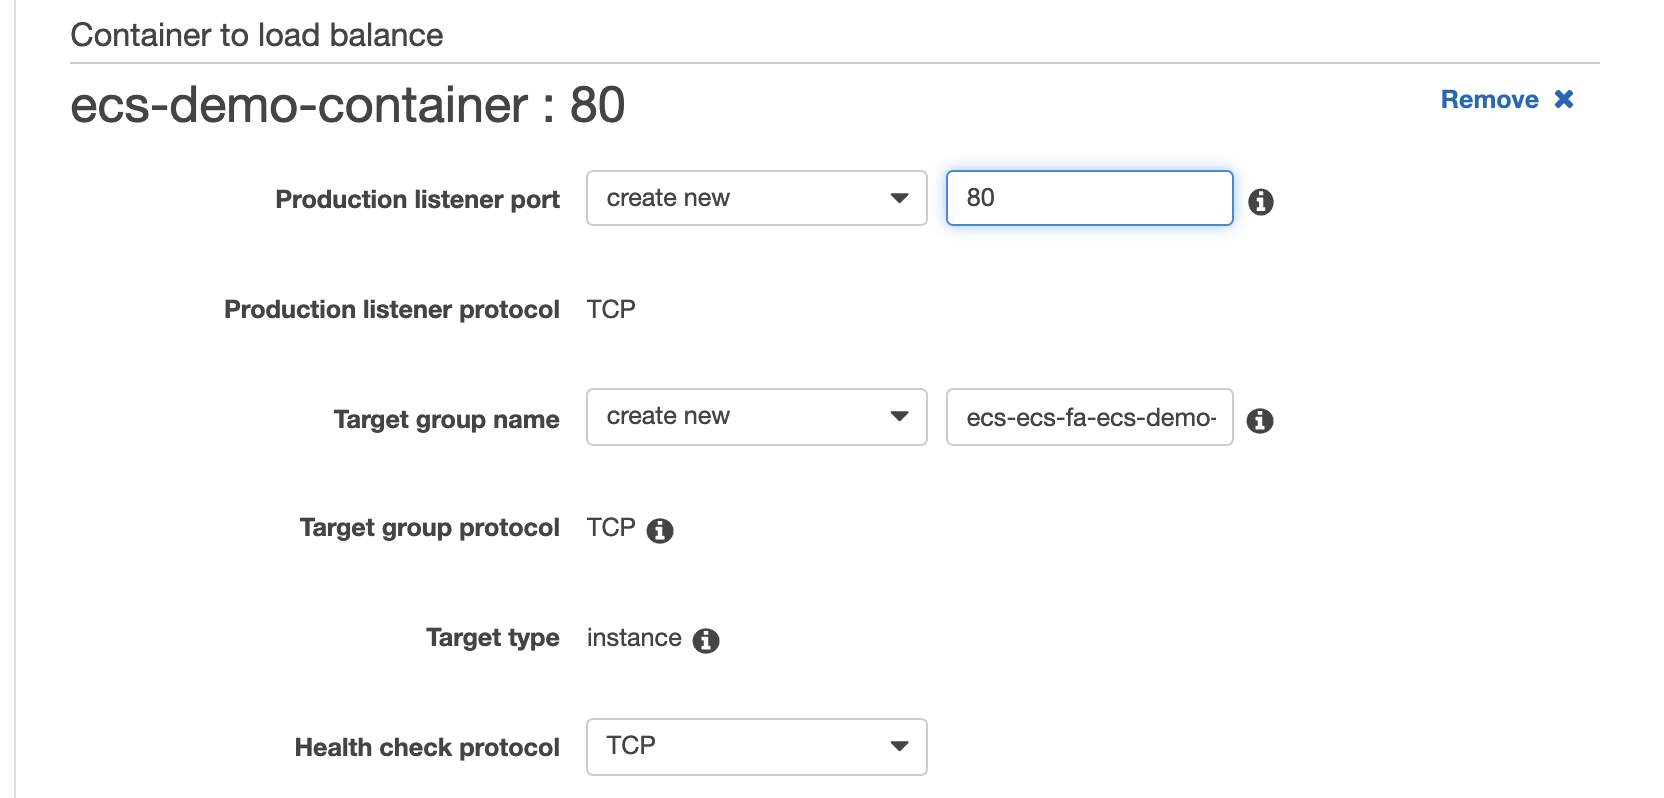
- The click “next”
- Leave the default option and hit “Next”
- Review the options you have choose and click “Create”
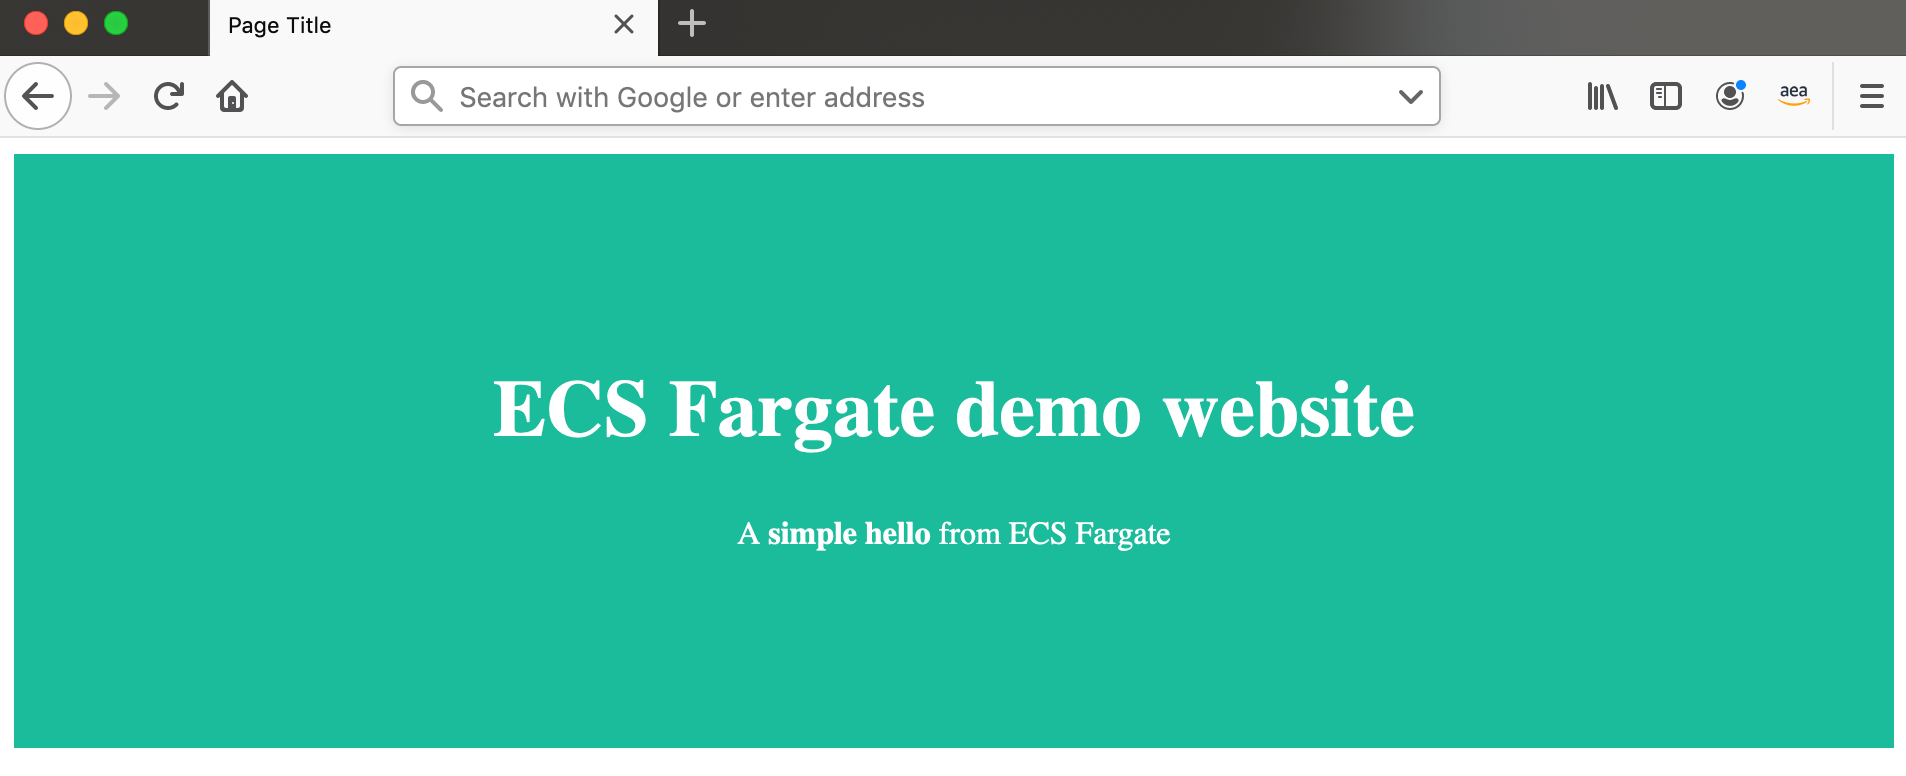
- Wait until all the Tasks to be deployed and enter the Network Load Balancer DNS name in your browser, you should see something similar to this: