TinyGo for Arduino
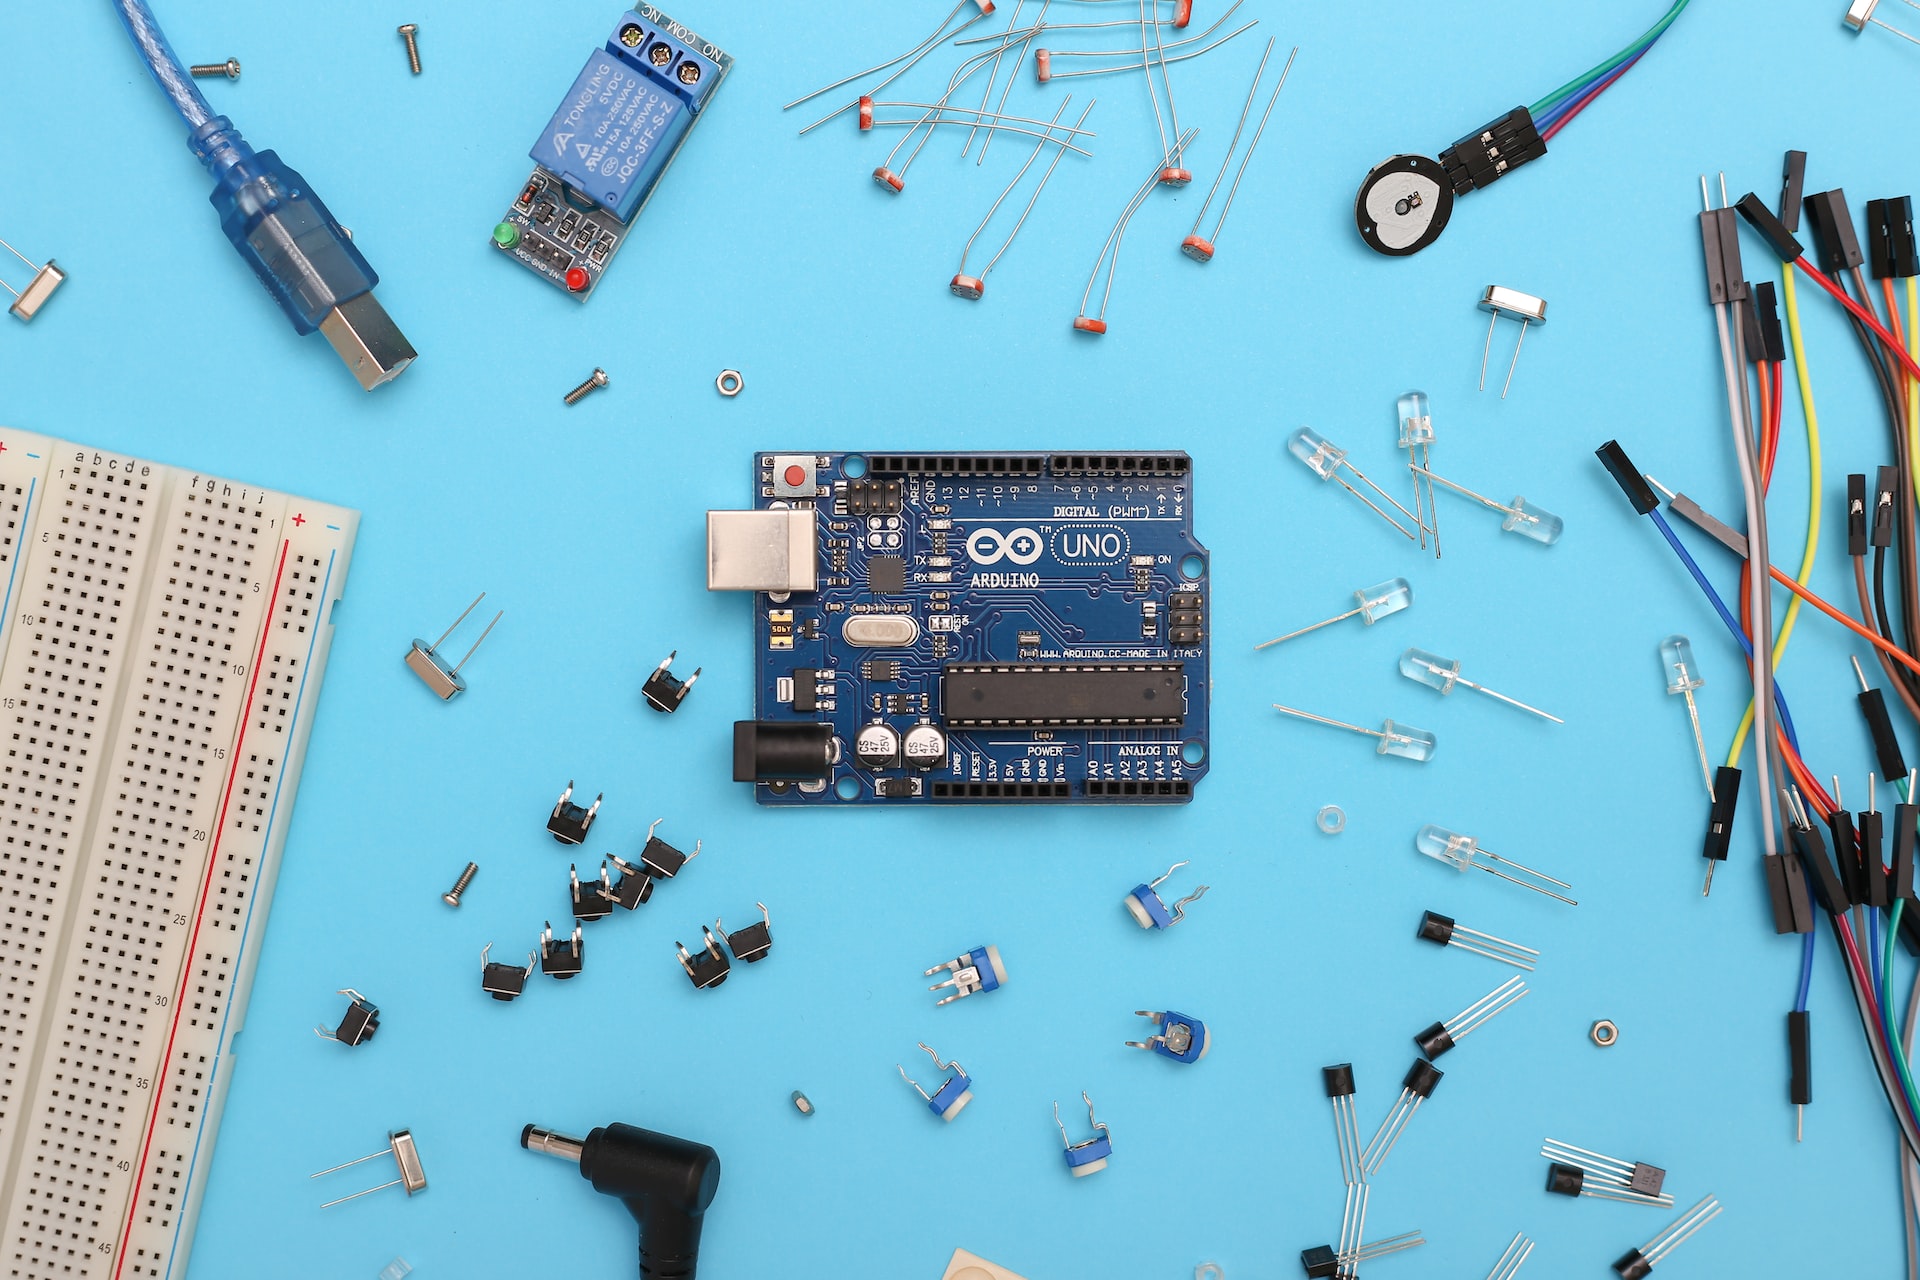
🧭 Introduction
📖 Documentation
-
📖 Arduino Projects Book, license CC-BY-NC-SA by Arduino LLC.
🧰 Do It Yourself (DIY)
💻 Hello world! (PC/Go version)
package main

func main() {
    println("Hello! 👋")
}
Run from source:
$ go run app.go
Hello! 👋
Compile:
$ go build app.go
$ ls
app  app.go
Execute:
$ ./app
Hello! 👋
File size:
$ du -h app
1,2M	app
Cross-compile (Windows):
$ GOOS=windows go build app.go
 ls
app  app.exe  app.go
$ du -h app.exe
1,2M	app.exe
Cross-compile (Apple Silicon):
$ rm app app.exe
$ ls
app.go
$ GOOS=darwin GOARCH=arm64 go build app.go
$ ls
app  app.go
$ du -h app
1,1M	app
ℹ️ If you use Visual Studio Code, you may install the Go extension to get code completion, signature help, etc.
💻 Hello world! (PC/TinyGo version)
package main

func main() {
    println("Hello! 👋")
}
Run from source:
$ tinygo run app.go
Hello! 👋
Build:
$ tinygo build app.go
(base) boisgera@oddball:~/tmp/sandbox$ ls
app  app.go
(base) boisgera@oddball:~/tmp/sandbox$ du -h app
68K	app
Execute:
$ ./app
Hello! 👋
📟 Hello world! (Arduino/TinyGo version)
package main

func main() {
    println("Hello from Arduino! 👋")
}
tinygo flash -target=arduino app.goavrdude: AVR device initialized and ready to accept instructions
Reading | ################################################## | 100% 0.00s
avrdude: Device signature = 0x1e950f (probably m328p)
avrdude: NOTE: "flash" memory has been specified, an erase cycle will be performed
To disable this feature, specify the -D option.
avrdude: erasing chip
avrdude: reading input file "/tmp/tinygo287452646/main.hex"
avrdude: writing flash (1174 bytes):
Writing | ################################################## | 100% 0.20s
avrdude: 1174 bytes of flash written
avrdude: verifying flash memory against /tmp/tinygo287452646/main.hex:
avrdude: load data flash data from input file /tmp/tinygo287452646/main.hex:
avrdude: input file /tmp/tinygo287452646/main.hex contains 1174 bytes
avrdude: reading on-chip flash data:
Reading | ################################################## | 100% 0.16s
avrdude: verifying ...
avrdude: 1174 bytes of flash verified
avrdude done. Thank you.
If you are familiar with Python, you can read this message with:
pip install pyserialimport serial
# ⚙️ Configuration
BAUD_RATE = 9600
SERIAL_PORT = "/dev/ttyACM0"
# ⏳ Loop
with serial.Serial(SERIAL_PORT, BAUD_RATE) as file:
while True:
bytes = file.readline().strip()
print(bytes.decode("utf-8"))$ python read.py
Hello from Arduino! 👋
⏳But there is a simpler alternative with TinyGo:
$ tinygo flash -monitor -baudrate=9600 -target arduino app.go
...
Connected to /dev/ttyACM0. Press Ctrl-C to exit.
Hello from Arduino! 👋
⏳
⏱️ Time
package main

import "time"

func main() {
    for i := 0; i < 3; i++ {
        println("Hello from Arduino! 👋")
        time.Sleep(500 * time.Millisecond)
    }
}
$ tinygo flash -monitor -baudrate=9600 -target arduino app.go
...
Connected to /dev/ttyACM0. Press Ctrl-C to exit.
Hello from Arduino! 👋
Hello from Arduino! 👋
Hello from Arduino! 👋
⏳package main
import "time"
func main() {
for {
println("Hello from Arduino! 👋")
time.Sleep(500 * time.Millisecond)
}
}$ tinygo flash -monitor -baudrate=9600 -target arduino app.go
...
Connected to /dev/ttyACM0. Press Ctrl-C to exit.
Hello from Arduino! 👋
Hello from Arduino! 👋
Hello from Arduino! 👋
⏳Timer & Ticker standard API would be super
nice to have, but they are buggy at the moment.
🚥 Blinky
package main

import (
    "machine"
    "time"
)

var Output = machine.PinConfig{Mode: machine.PinOutput}

func main() {
    led := machine.LED // i.e. machine.D13 (a Pin)
    led.Configure(Output)
    for {
        led.Low()
        time.Sleep(1000 * time.Millisecond)
        led.High()
        time.Sleep(3000 * time.Millisecond)
    }
}
tinygo flash -target=arduino app.goℹ️ If you use Visual Studio Code,
you may install the TinyGo extension and select the arduino target to get code completion and signature
help for the machine package.
For more details, refer to the TinyGo documentation.
📄 Intel HEX
Intel hexadecimal object file format, Intel hex format or Intellec Hex is a file format that conveys binary information in ASCII text form. It is commonly used for programming microcontrollers, EPROMs, and other types of programmable logic devices and hardware emulators. In a typical application, a compiler or assembler converts a program's source code (such as in C or assembly language) to machine code and outputs it into a HEX file. [...] The HEX file is then read by a programmer to write the machine code into a PROM or is transferred to the target system for loading and execution.
tinygo build -o app.hex -target=arduino app.go$ cat app.hex
:100000000C9434000C9472020C9472020C947202E0
:100010000C9472020C9472020C9464020C9472029E
:100020000C9472020C9472020C9472020C94720280
...
:10007000BEBF0F92A0E0B3E0C4E6D3E0EEE1F5E04E
:1005700066726F6D2041726475696E6F2120F09F05
:02058000918B5D
:00000001FF
pip install intelhex$ hexinfo.py app.hex
- file: 'app.hex'
data:
- { first: 0x00000000, last: 0x00000581, length: 0x00000582 }>>> 0x00000582
1410(1410 bytes, well below the 32 kb limit for Arduino Uno).
Then instead of tinygo flash, do:
avrdude -C /etc/avrdude.conf -p atmega328p -c arduino -P /dev/ttyACM0 -D -U flash:w:app.hex:i$ man avrdude
AVRDUDE(1) BSD General Commands Manual AVRDUDE(1)
NAME
avrdude — driver program for ``simple'' Atmel AVR MCU programmer
SYNOPSIS
avrdude -p partno [-b baudrate] [-B bitclock] [-c programmer-id]
[-C config-file] [-D] [-e] [-E exitspec[,exitspec]] [-F]
[-i delay] [-n -logfile] [-n] [-O] [-P port] [-q] [-s] [-t] [-u]
[-U memtype:op:filename:filefmt] [-v] [-x extended_param] [-V]
...
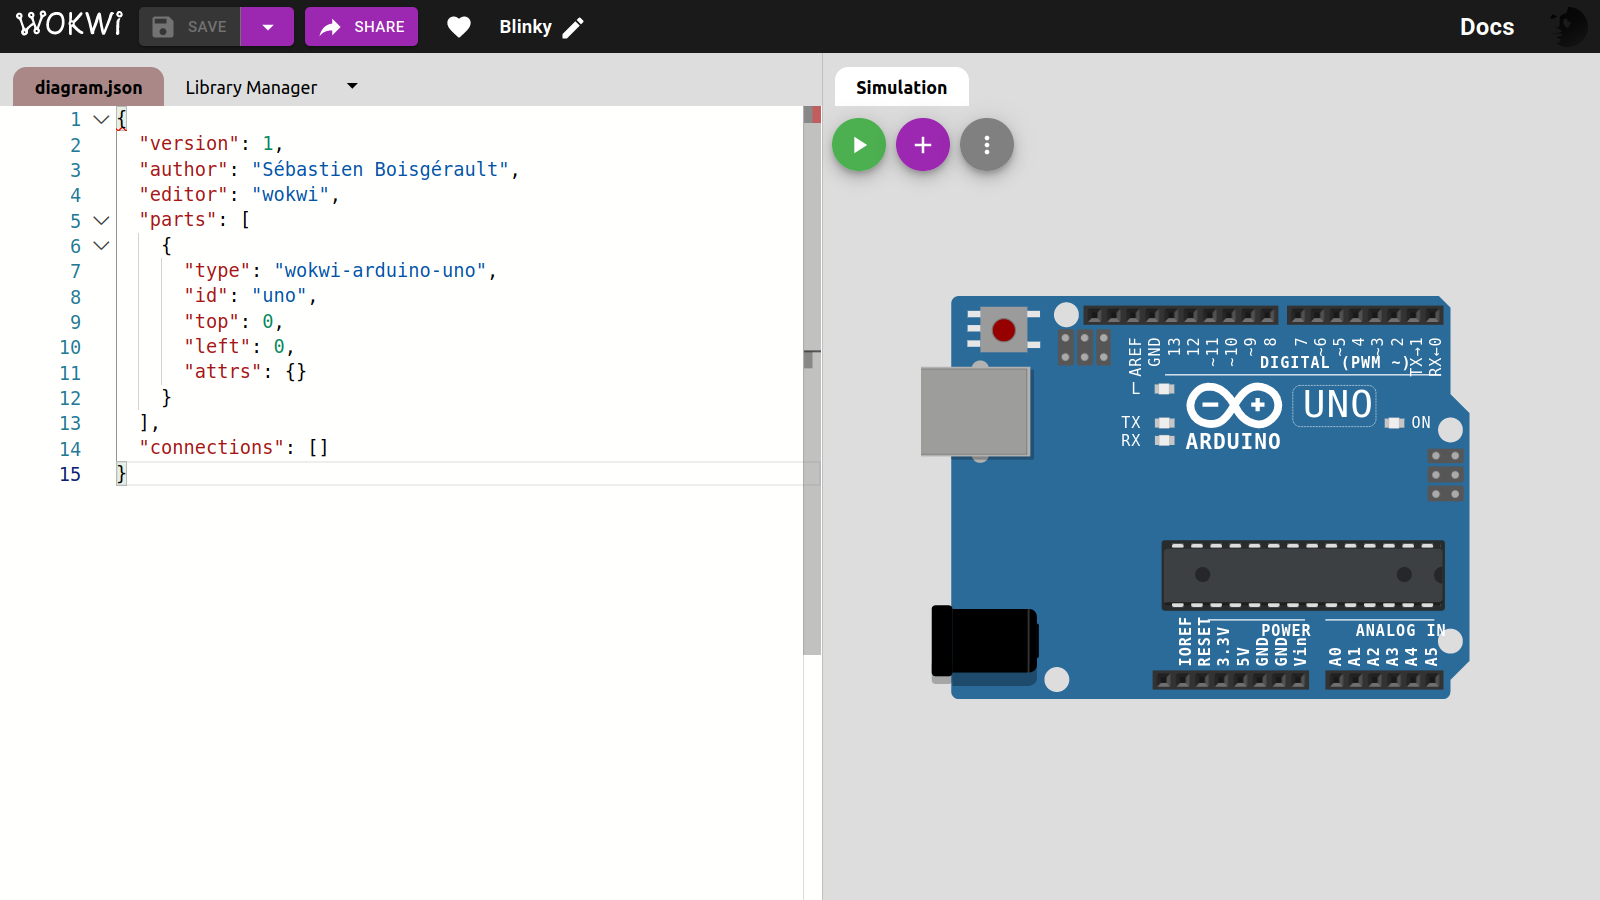
💻 WokWi Simulator
-
Sign into https://wokwi.com/.
-
Start from Scratch with Arduino Uno. You may rename the project "Blinky" instead of "sketch.ino" and delete the
sketch.inofile ; we won't need it. -
In the editor, right-click and open the command palette (or press F1).
-
Select "Load HEX File and Start Simulation ..." and upload your
app.hexfile. -
Profit! 🎉
🚥 LED
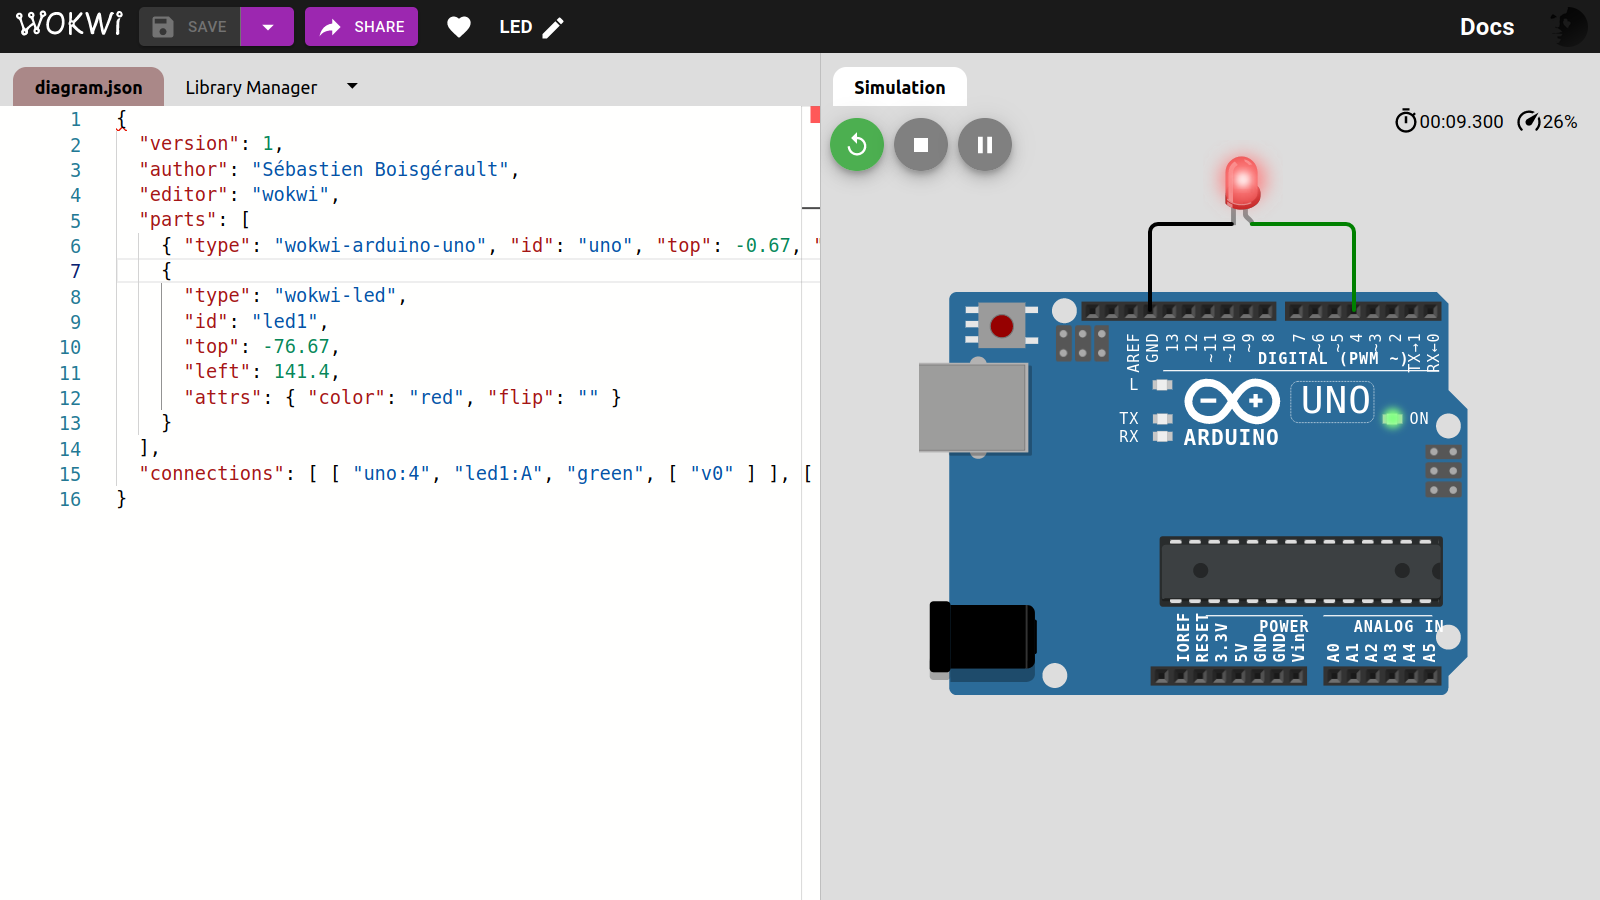
To replicate the Blinky project, but with an external LED instead of the
onboard one, we need little change in the app.go program; if we intend
to connect the LED D4, we have:
package main

import (
    "machine"
    "time"
)

var Output = machine.PinConfig{Mode: machine.PinOutput}

func main() {
    led := machine.D4
    led.Configure(Output)
    for {
        led.Low()
        time.Sleep(1000 * time.Millisecond)
        led.High()
        time.Sleep(3000 * time.Millisecond)
    }
}
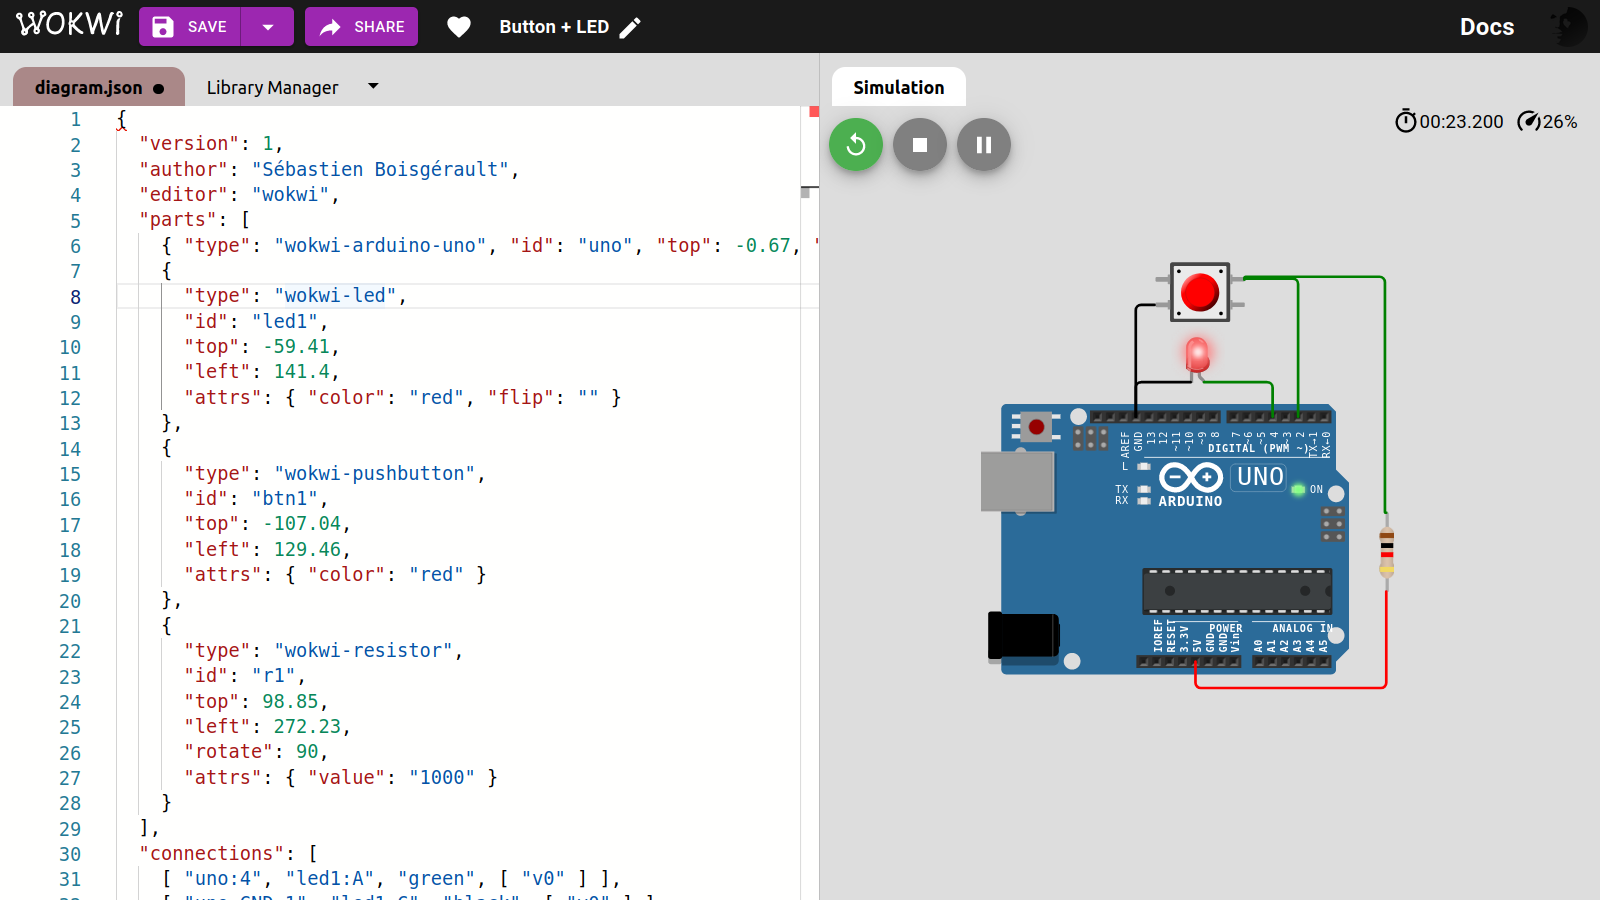
🔲 Toggle Button + LED
To switch the LED state, press the button during at least 0.1 seconds, then release it.
package main

import (
    "machine"
    "time"
)

var Input = machine.PinConfig{Mode: machine.PinInput}
var Output = machine.PinConfig{Mode: machine.PinOutput}

var ButtonPin = machine.D2
var ButtonWasPressed = false

var LightPin = machine.D4
var LightOn = false

func setup() {
    LightPin.Configure(Output)
    ButtonPin.Configure(Input)
}

func ButtonHandler() {
    ButtonPressed := !ButtonPin.Get()
    ButtonRelease := !ButtonPressed && ButtonWasPressed
    if ButtonRelease {
        LightOn = !LightOn
    }
    ButtonWasPressed = ButtonPressed
}

func LightHandler() {
    if LightOn {
        LightPin.High()
    } else {
        LightPin.Low()
    }
}

func main() {
    setup()
    for {
        ButtonHandler()
        LightHandler()
        time.Sleep(100 * time.Millisecond)
    }
}
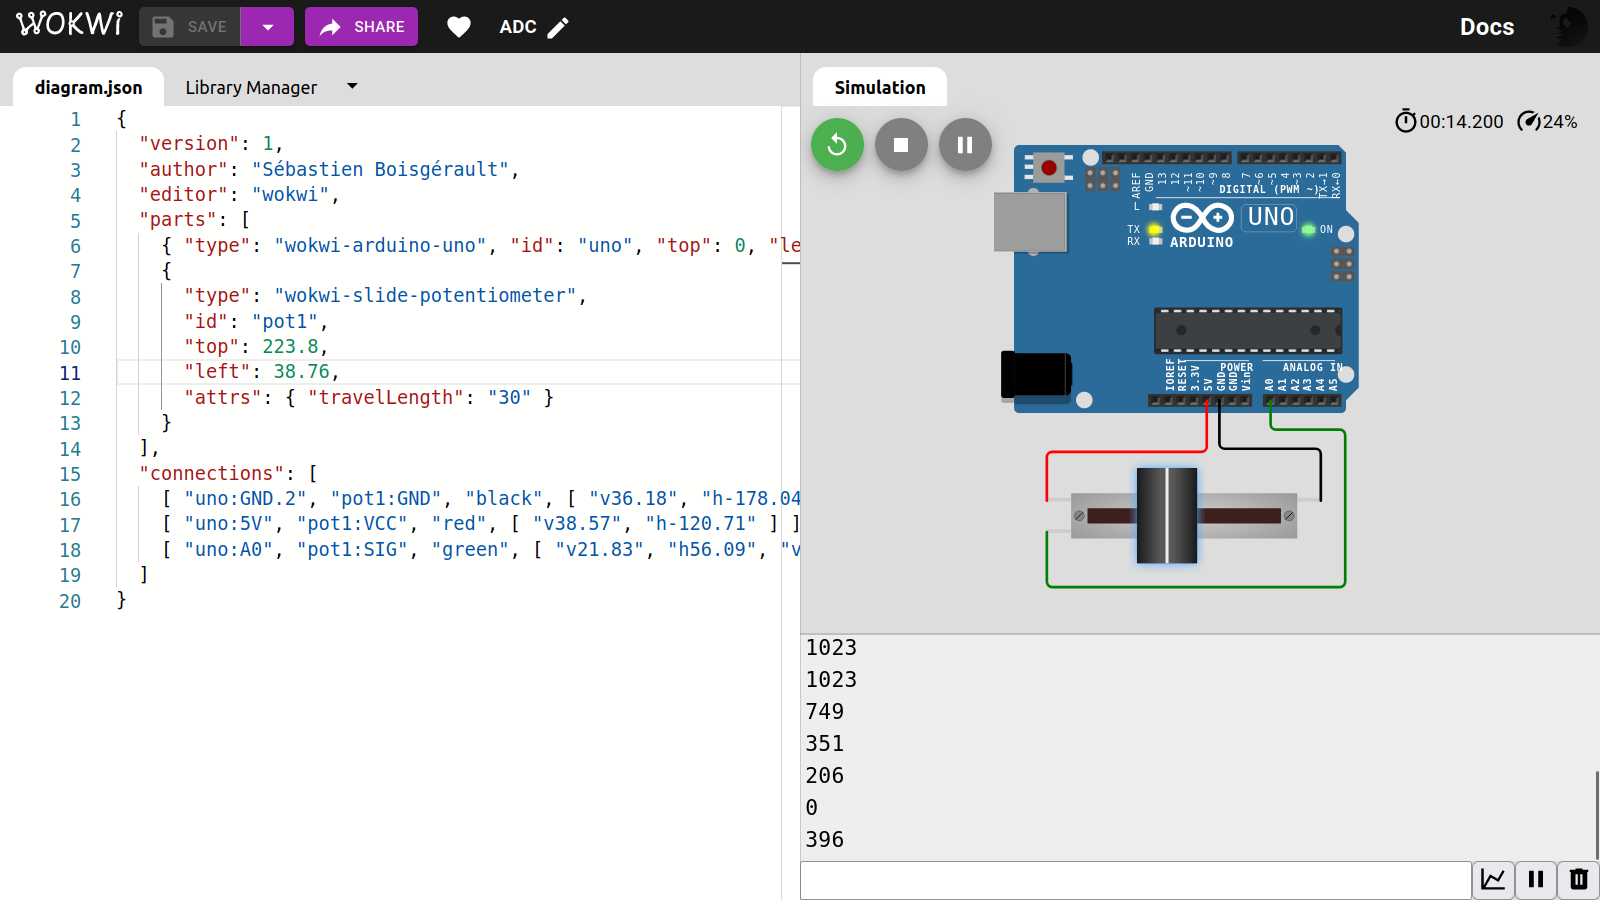
📉 ADC
package main

import (
    "machine"
    "time"
)

var adc = machine.ADC{Pin: machine.ADC0}

func setup() {
    machine.InitADC()
}

func main() {
    setup()
    for {
        println(adc.Get() >> 6)
        time.Sleep(1 * time.Second)
    }
}diagram.json:
{
  "version": 1,
  "author": "Sébastien Boisgérault",
  "editor": "wokwi",
  "parts": [
    { "type": "wokwi-arduino-uno", "id": "uno", "top": 0, "left": 0, "attrs": {} },
    {
      "type": "wokwi-slide-potentiometer",
      "id": "pot1",
      "top": 223.8,
      "left": 38.76,
      "attrs": { "travelLength": "30" }
    }
  ],
  "connections": [
    [ "uno:GND.2", "pot1:GND", "black", [ "v36.18", "h-178.04" ] ],
    [ "uno:5V", "pot1:VCC", "red", [ "v38.57", "h-120.71" ] ],
    [ "uno:A0", "pot1:SIG", "green", [ "v21.83", "h56.09", "v118.38", "h-229.59" ] ]
  ]
}
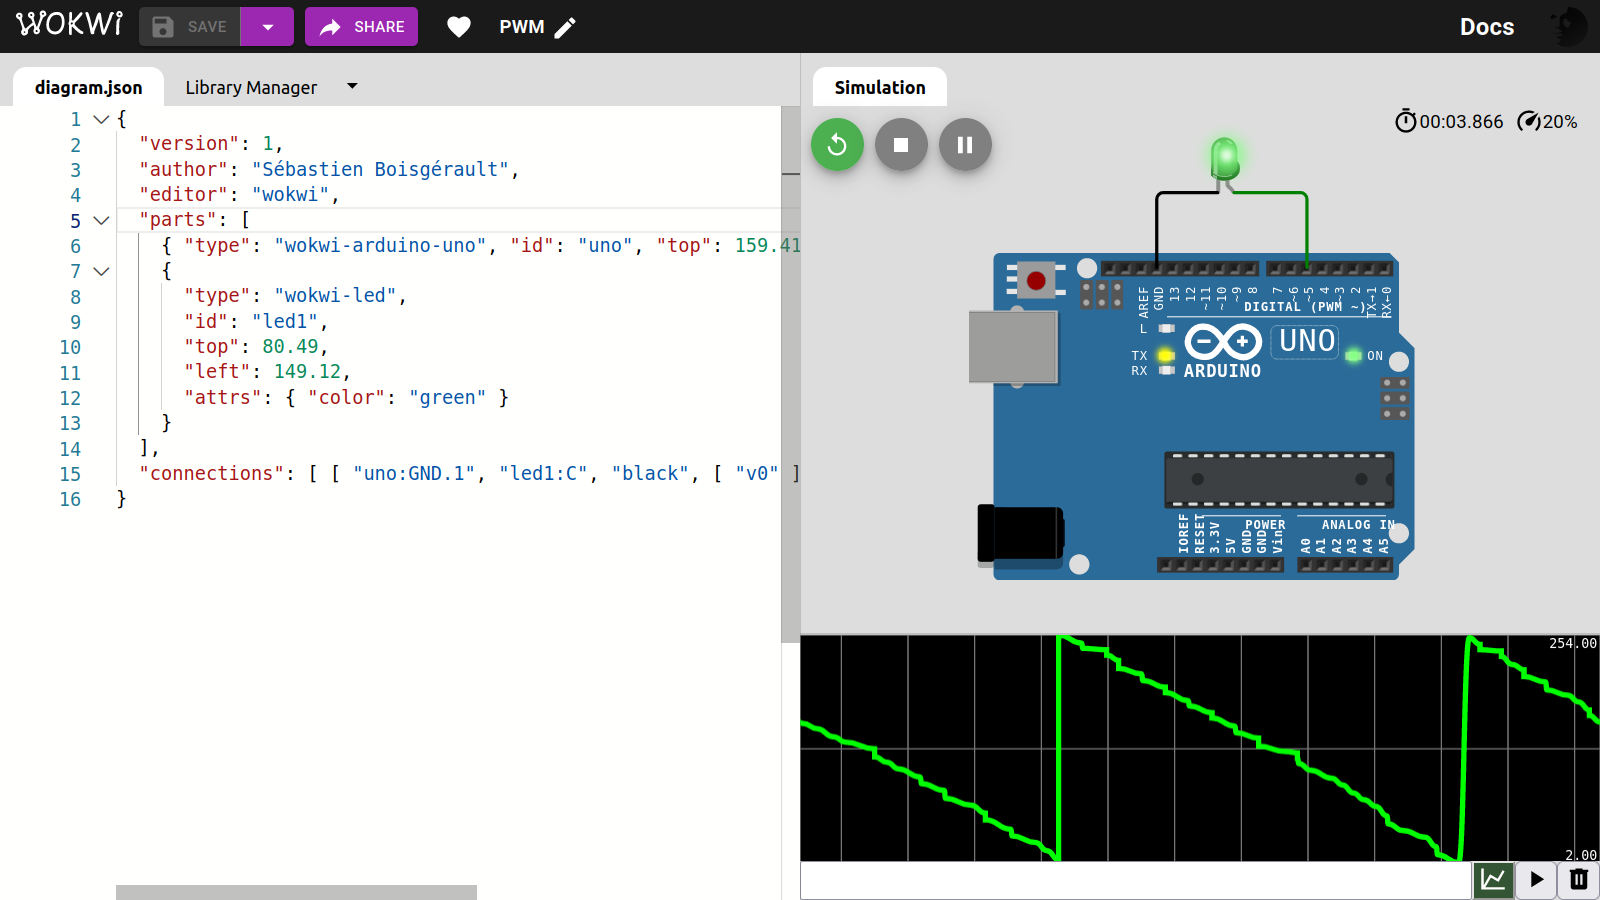
📈 PWM
See Using PWM.
package main

import (
    "machine"
    "time"
)

var pwm machine.PWM
var pwmPin = machine.D5
var period uint64
var ch uint8

func setup() {
    pwm.Configure(machine.PWMConfig{})
    period = pwm.Period() // 16_000 ns
    var err error
    ch, err = pwm.Channel(pwmPin)
    if err != nil {
        panic(err)
    }
}

func main() {
    setup()
    top := pwm.Top()
    x := top
    for {
        println(x)
        pwm.Set(ch, x)
        x = x - top/100
        if x == 0 {
            x = top
        }
        time.Sleep(10 * time.Duration(period))
    }
}diagram.json:
{
  "version": 1,
  "author": "Sébastien Boisgérault",
  "editor": "wokwi",
  "parts": [
    { "type": "wokwi-arduino-uno", "id": "uno", "top": 159.41, "left": 11.03, "attrs": {} },
    {
      "type": "wokwi-led",
      "id": "led1",
      "top": 80.49,
      "left": 149.12,
      "attrs": { "color": "green" }
    }
  ],
  "connections": [ [ "uno:GND.1", "led1:C", "black", [ "v0" ] ], [ "uno:5", "led1:A", "green", [ "v0" ] ] ]
}