ImGui Handler is a library which tries to make it easy to get started with Dear ImGui in a C# application. It does this by providing an MVVM style way to quickly create new custom GUI controls and a manager to take care of their lifetime.
Table of Contents
- ImGuiHandler -
- ImGuiHandler.Monogame -


Below is a sample of how you would use this library to set up a a basic editor for an entity, with full support for PropertyChanged events so other parts of your code can immediately react to changes.
public class EntityDataEditor : ImGuiElement
{
    private readonly EntityDataDisplay _displayWindow;

    public int EntityId { get; }

    [HasTextBuffer(100)]
    public string DisplayName
    {
        get => Get<string>();
        set => Set(value);
    }

    public int Health
    {
        get => Get<int>();
        set => Set(value);
    }

    public int GoldCost
    {
        get => Get<int>();
        set => Set(value);
    }

    public float MovementSpeed
    {
        get => Get<float>();
        set => Set(value);
    }

    public EntityDataEditor(EntityData entity)
    {
        using (DisablePropertyChangedNotifications())
        {
            EntityId = entity.Id;
            DisplayName = entity.DisplayName;
            Health = entity.Health;
            GoldCost = entity.GoldCost;
            MovementSpeed = entity.MovementSpeed;
        }

        _displayWindow = new EntityDataDisplay(entity);
    }

    protected override void CustomRender()
    {
        InputText(nameof(DisplayName), "Display Name");
        InputInt(nameof(Health), "Health");
        InputInt(nameof(GoldCost), "Gold Cost");
        InputFloat(nameof(MovementSpeed), "Movement Speed");

        if (ImGui.Button("Show Data Window"))
        {
            _displayWindow.IsVisible = !_displayWindow.IsVisible;
        }

        _displayWindow.Render();
    }
}
In order for Dear ImGUi controls to be displayed you need a way to pass the geometric data from Dear ImGui to the rendering system that your application uses. This is done by creating an implementation of the ImGuiRenderer base class.
If your application is using MonoGame for rendering, than the ImGuiHandler.MonoGame project can be used for a pre-written renderer. See the MonoGameImGuiRenderer.cs code for reference.
IF your application is not using MonoGame, it should be relatively easy to create your own renderer as long as you know how to pass ImGui geometry data to your rendering pipeline. If you have example code for that, you should be able to plug that code into an implementation of the ImGuiRenderer and be on your way.
With an ImGuiRenderer available we then need to create an ImGuiManager instance. The manager is used to hold a list of all root level custom elements and render them each frame. The ImGuiManager also has useful properties to to note, such as AcceptingMouseInput and AcceptingKeyboardInput. These can be used to prevent keyboard and mouse input meant for Dear ImGui elements from being consumed by non-ImGui elements of your application.
When your application then draws to the screen, your ImGui elements are then rendered by calling ImGuiManager.RenderElements(timeSinceLastFrame).
As an example, a minimal MonoGame Game class would look like:
    public class App : Game
    {
        private ImGuiManager _imGuiManager;

        public App()
        {
            new GraphicsDeviceManager(this);
            IsMouseVisible = true;
        }

        protected override void Initialize()
        {
            // Must be instantiated *after* the graphics device has been initialized
            var imGuiRenderer = new MonoGameImGuiRenderer(this);
            imGuiRenderer.Initialize();

            _imGuiManager = new ImGuiManager(imGuiRenderer);
            base.Initialize();
        }

        protected override void Draw(GameTime gameTime)
        {
            GraphicsDevice.Clear(Color.CornflowerBlue);

            _imGuiManager.RenderElements(gameTime.ElapsedGameTime);

            base.Draw(gameTime);
        }
One of the core benefits of the ImGui Handler library is it makes it easy to create sets of UI controls. This is done by creating a class that implements the ImGuiElement base class.
One example of a bare bones window is the main Dear ImGui demo window. This can be rendered by defining the following class:
public class DemoWindowElement : ImGuiElement
{
    protected override void CustomRender()
    {
        ImGui.ShowDemoWindow();
    }
}
This can then be togged with code such as:
protected override void Initialize()
{
    _demoWindowElement = new DemoWindowElement();
    _imGuiManager.AddElement(_demoWindowElement);
}

protected override void Update(GameTime gameTime)
{
    if (HasBeenPressed(Keys.F12))
    {
        _demoWindowElement.IsVisible = !_demoWindowElement.IsVisible;
    }
}
When you run the application pressing F12 should then open and close the Dear ImGui demo window.
The ImGuiElement base class has been designed to act in a MVVM style (albeit with the view model and the rendering code contained in the same class). An example of this is:
public class MyCustomWindow : ImGuiElement
{
    // Dear ImGui relies on byte buffers for text input, so the `HasTextbuffer` attribute
    // simplifies conversion between `byte[]` and `string` when going between C# and Dear ImGui
    [HasTextBuffer(200)]
    public string SomeTextValue
    {
        // Built-in helper to prevent having to create a backing variable
        Get => Get<string>();

        // Built-in helper that takes care of setting the value to the backing variable
        // as well as handling property changed notification event propagation
        Set => Set();
    }

    public MyCustomWindw(string initialString)
    {
        // DisablePropertyChangedNotifications allows updating data without propagating
        // change notifications.  Can help performance with bulk updates.
        using (DisablePropertyChangedNotifications())
        {
            SomeTextValue = initialString;
        }
    }

    protected override void CustomRender()
    {
        ImGui.Begin("My Window");
        InputText(nameof(SomeTextValue), "Text Input Example");
        ImGui.End();
    }
}
Outside code can then hook into the name change notification via
var window = new MyCustomWindow("test");
window.PropertyChanged += (sender, args) =>
{
    switch (args.PropertyName)
    {
        case nameof(MyCustomWindow.SomeTextValue):
            ShowMessageBox(window.SomeTextValue);
            break;
    }
}
The one downside in using properties with Dear ImGui is that you cannot pass them to inputs, as you must pass in the value by reference. Thus in order to create an input you have to do something like:
var health = Health; // Health defined as public int Health { get; set; }
ImGui.InputInt("Current Health", ref health);
Health = health;
This adds a lot of boilerplate code that makes it tedious to write out more complicated sets of inputs. To alleviate this several helper methods exist in the ImGuiElement base class. For example, the above lines can instead be written as:
InputInt(nameof(Health), "Current Health");
Several of these are built-in, such as:
InputText()InputInt()InputDouble()InputFloat()Checkbox()
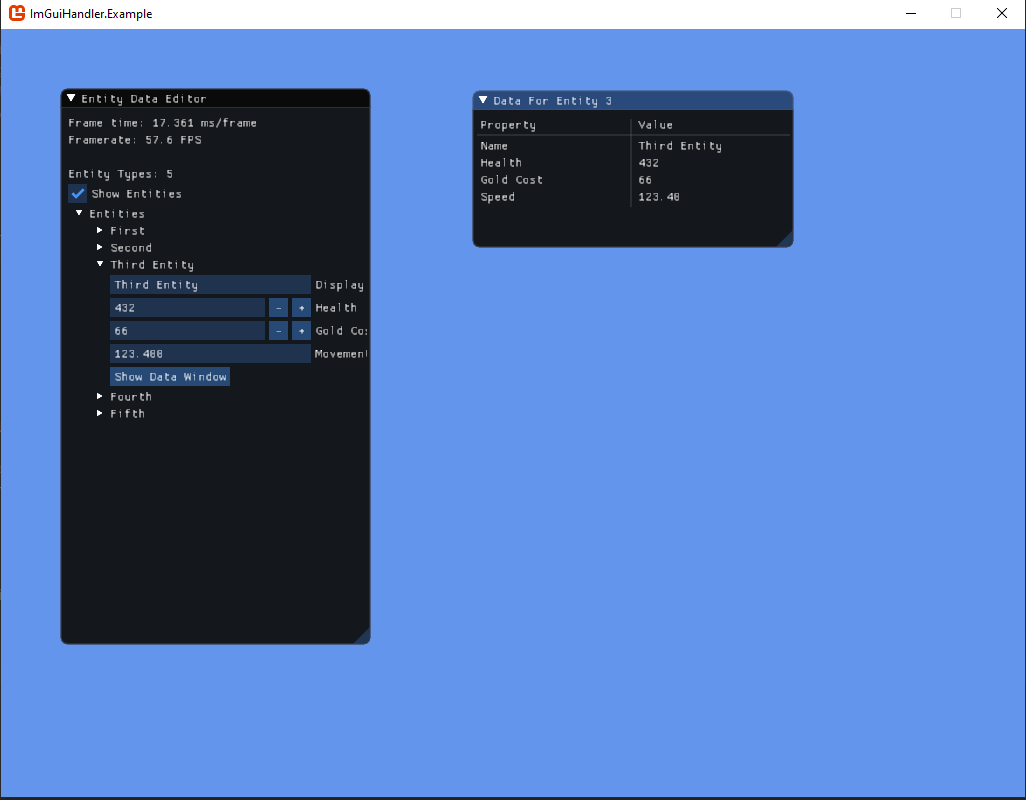
To take advantage of the the features in the ImGui Handler library, we will create the elements in the following screen
For this demonstration, we will assume we have the following data structure for holding entity specific data:
public class EntityData
{
    public int Id { get; set; }
    public string DisplayName { get; set; }
    public int Health { get; set; }
    public int GoldCost { get; set; }
    public float MovementSpeed { get; set; }
}
The first window we want to demonstrate is the top right window, which displays data about a single entity. We want to make sure that it always shows the latest contents of the EntityData instance that's backing it. Thus we can write:
public class EntityDataDisplay : ImGuiElement
{
    private readonly EntityData _entity;

    public EntityDataDisplay(EntityData entity)
    {
        _entity = entity;
    }

    protected override void CustomRender()
    {
        if (ImGui.Begin($"Data For Entity {_entity.Id}"))
        {
            ImGui.Columns(2);
            ImGui.Text("Property"); ImGui.NextColumn();
            ImGui.Text("Value"); ImGui.NextColumn();
            ImGui.Separator();

            ImGui.Text("Name"); ImGui.NextColumn();
            ImGui.Text(_entity.DisplayName); ImGui.NextColumn();
            ImGui.Text("Health"); ImGui.NextColumn();
            ImGui.Text(_entity.Health.ToString()); ImGui.NextColumn();
            ImGui.Text("Gold Cost"); ImGui.NextColumn();
            ImGui.Text(_entity.GoldCost.ToString()); ImGui.NextColumn();
            ImGui.Text("Speed"); ImGui.NextColumn();
            ImGui.Text(_entity.MovementSpeed.ToString("N"));
            ImGui.Columns(1);
        }

        ImGui.End();
    }
}
Next we want to create the UI elements for editing a single entity. In the screenshot above this is shows as the UI elements within the tree view. Since data is being modified in this UI element we want to follow an MVVM style approach.
public class EntityDataEditor : ImGuiElement
{
    // Keep track of the entity display window so we can toggle it on and off
    private readonly EntityDataDisplay _displayWindow;

    public int EntityId { get; }

    [HasTextBuffer(100)]
    public string DisplayName
    {
        get => Get<string>();
        set => Set(value);
    }

    public int Health
    {
        get => Get<int>();
        set => Set(value);
    }

    public int GoldCost
    {
        get => Get<int>();
        set => Set(value);
    }

    public float MovementSpeed
    {
        get => Get<float>();
        set => Set(value);
    }

    public EntityDataEditor(EntityData entity)
    {
        using (DisablePropertyChangedNotifications())
        {
            EntityId = entity.Id;
            DisplayName = entity.DisplayName;
            Health = entity.Health;
            GoldCost = entity.GoldCost;
            MovementSpeed = entity.MovementSpeed;
        }

        _displayWindow = new EntityDataDisplay(entity);
    }

    protected override void CustomRender()
    {
        InputText(nameof(DisplayName), "Display Name");
        InputInt(nameof(Health), "Health");
        InputInt(nameof(GoldCost), "Gold Cost");
        InputFloat(nameof(MovementSpeed), "Movement Speed");

        if (ImGui.Button("Show Data Window"))
        {
            _displayWindow.IsVisible = !_displayWindow.IsVisible;
        }

        // The `Render()` method will only draw if `IsVisible` is true, and thus `Render()`
        // is safe to call even if we leave `IsVisible` off.
        _displayWindow.Render();
    }
}
We need to create the previous editor elements up for each EntityData defined in our application. Not only that we also want to make sure we hook into the property changed notifications, so when the ImGui inputs are modified it updates the appropriate EntityData instance as well. This can be achieved via:
var entities = GetEntities();
var entityEditors = new List<EntityDataEditor>();
foreach (var entity in entities)
{
    var editor = new EntityDataEditor(entity);
    editor.PropertyChanged += (sender, args) =>
    {
        switch (args.PropertyName)
        {
            case nameof(EntityDataEditor.DisplayName):
                entity.DisplayName = editor.DisplayName;
                break;

            case nameof(EntityDataEditor.Health):
                entity.Health = editor.Health;
                break;

            case nameof(EntityDataEditor.GoldCost):
                entity.GoldCost = editor.GoldCost;
                break;

            case nameof(EntityDataEditor.MovementSpeed):
                entity.MovementSpeed = editor.MovementSpeed;
                break;
        }
    };

    entityEditors.Add(editor);
}
Now, when the inputs on that specific entity editor are changed, not only will the correct EntityData instance's properties change but the entity's data display window (defined above) will also automatically show the latest values.
The previous UI elements were contained within a larger UI element that contains multiple entity editors in it. The code that handles that is:
public class EntityDataWindow : ImGuiElement
{
    private readonly List<EntityDataEditor> _entityEditors;

    public bool ShowEntities
    {
        get => Get<bool>();
        set => Set(value);
    }

    public EntityDataWindow(IEnumerable<EntityDataEditor> entities)
    {
        _entityEditors = new List<EntityDataEditor>(entities);
    }

    protected override void CustomRender()
    {
        if (ImGui.Begin("Entity Data Editor"))
        {
            var framerate = ImGui.GetIO().Framerate;
            ImGui.Text($"Frame time: {(1000f / framerate):F3} ms/frame");
            ImGui.Text($"Framerate: {framerate:F1} FPS");

            ImGui.NewLine();

            ImGui.Text($"Entity Types: {_entityEditors.Count}");
            Checkbox(nameof(ShowEntities), "Show Entities");

            if (ShowEntities)
            {
                if (ImGui.TreeNode("Entities"))
                {
                    foreach (var editor in _entityEditors)
                    {
                        if (ImGui.TreeNode(editor.EntityId.ToString(), editor.DisplayName))
                        {
                            editor.IsVisible = true;
                            editor.Render();

                            ImGui.TreePop();
                        }
                    }

                    ImGui.TreePop();
                }
            }
        }

        ImGui.End();
    }
}
Finally we need to hook everything up to the main game. This assumes the application is using MonoGame for rendering.
public class App : Game
{
    private static readonly EntityData[] Entities = FormTestEntities();
    private readonly EntityDataWindow _entityDataWindow;
    private ImGuiManager _imGuiManager;

    public App()
    {
        new GraphicsDeviceManager(this);
        IsMouseVisible = true;

        var entityEditors = CreateEntityDataEditors();
        _entityDataWindow = new EntityDataWindow(entityEditors);
    }

    protected override void Initialize()
    {
        var imGuiRenderer = new MonoGameImGuiRenderer(this);
        imGuiRenderer.Initialize();

        _imGuiManager = new ImGuiManager(imGuiRenderer);
        _imGuiManager.AddElement(_entityDataWindow);

        _entityDataWindow.IsVisible = true;

        base.Initialize();
    }

    protected override void Draw(GameTime gameTime)
    {
        GraphicsDevice.Clear(Color.CornflowerBlue);

        _imGuiManager.RenderElements(gameTime.ElapsedGameTime);

        base.Draw(gameTime);
    }
}