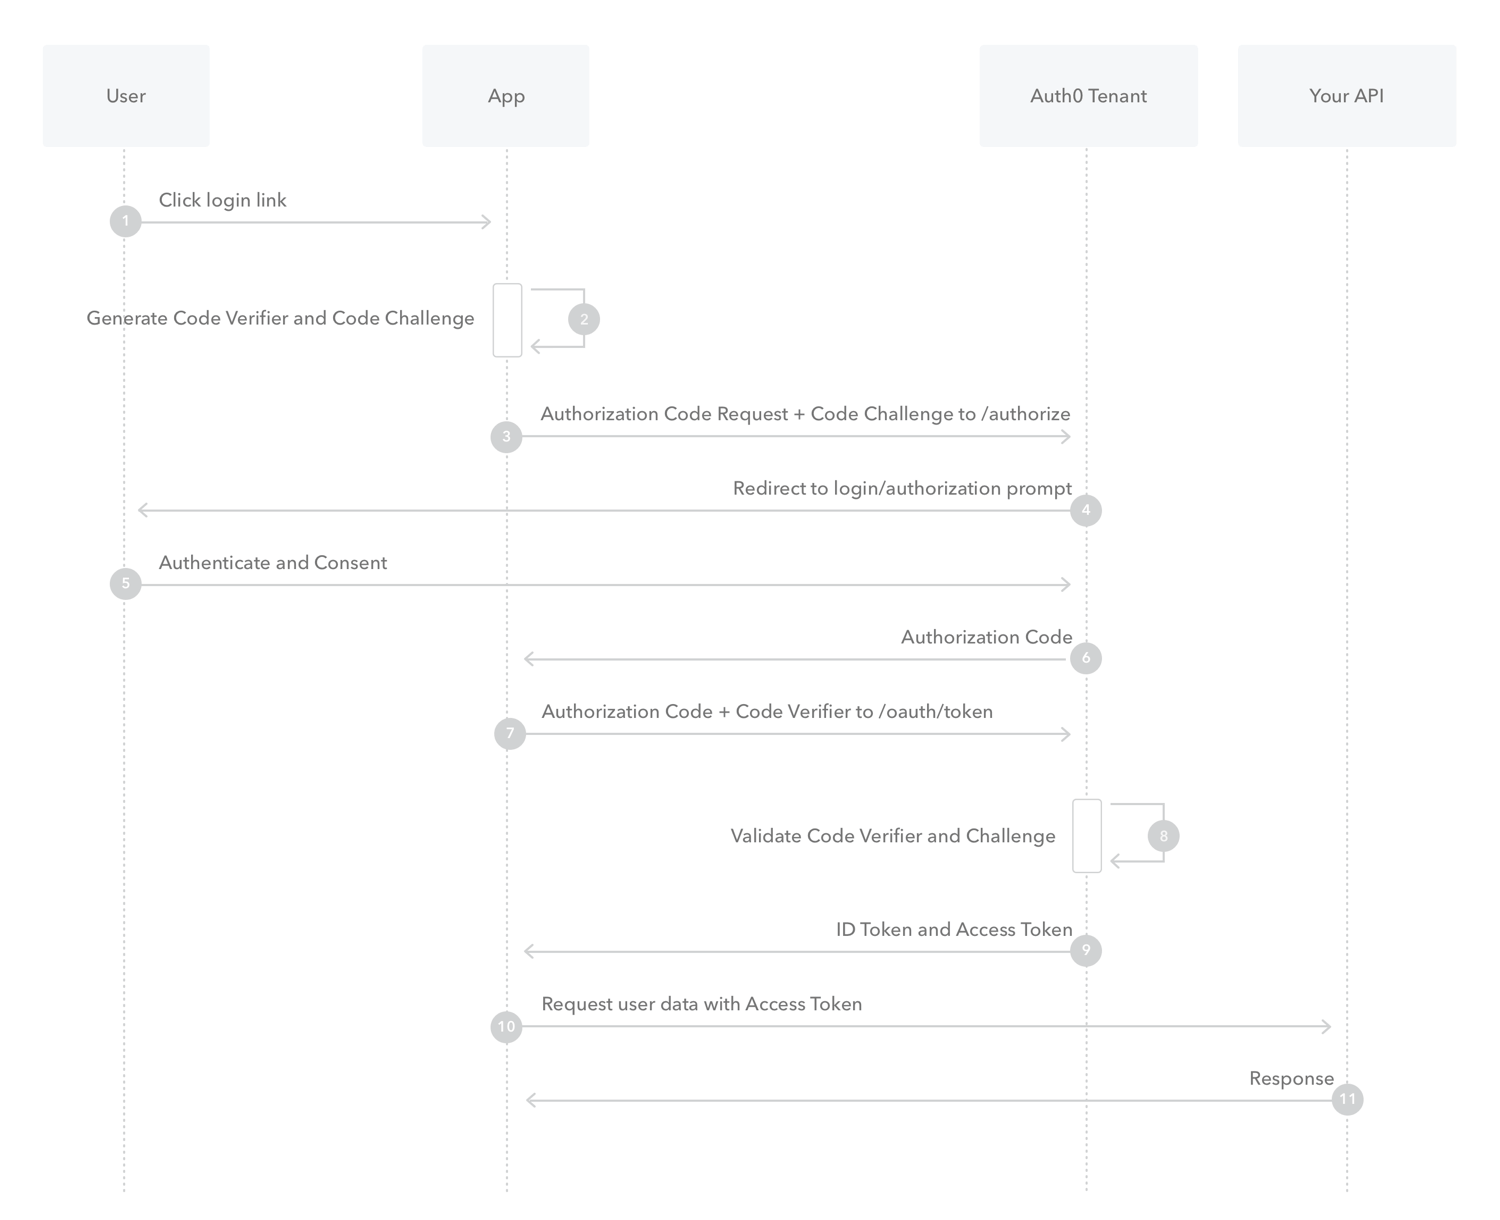
The Proof Key for Code Exchange, know as PKCE (RFC 7636), is a enhancement to the Authorization Code Flow. Originally designed to protect the Authorization Code Flow in mobile apps, but its ability to prevent authorization code injection makes useful for every type of OAuth client, even web apps that use client authentication.
PKCE introduces a secret created by the calling application that can be verified by the authorization server; this secret is called the Code Verifier. Additionally, the calling app creates a transform value of the Code Verifier called the Code Challenge and sends this value over HTTPS to retrieve an Authorization Code. This way, a malicious attacker can only intercept the Authorization Code, and they cannot exchange it for a token without the Code Verifier.
This repo provides a quick demo of the PKCE flow, with a Spring Boot backend and a Single Page App developed in Angular, bellow you will find the steps and set up to implement the PKCE flow.
Provided by: Auth0 by Okta
I'm using Keycloak as authorization server, it will be handling the auth between the front and the backend.
-
Once you download Keycloak you can start it with this command
bin\kc.bat start-dev --http-port 8180(I'm changing the port because it's already used by the backend). -
You need to create an admin user before you can start using the console.
-
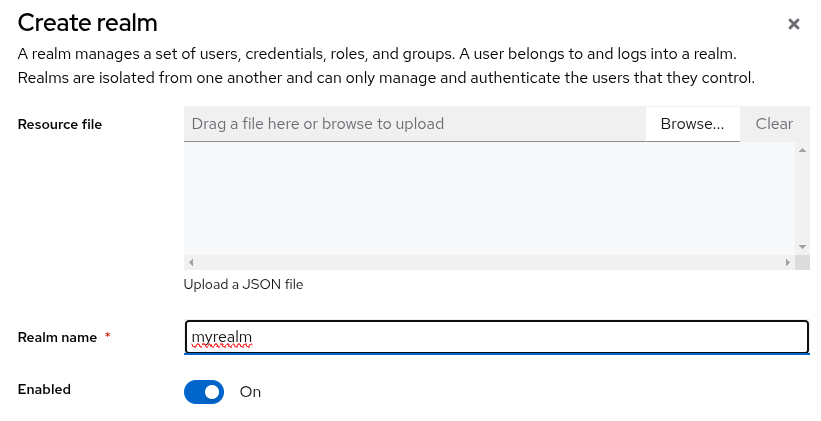
A realm in Keycloak is equivalent to a tenant, on the top left you should create a new realm for each application
-
Click in the client tab and then create new client as follows, keep in mind the client ID and the realm for later

 Check the URIs according to your own application, in addition, for educational purposes I permitted all origins.

-
After create the client, go to the Advanced tab and set the PKCE method to S256.

The client it's ready, now you need to create a end user to use in the login
-
In the left menu click in the Users tab and then Add user
-
Fill the mandatory fields and the ones that you may need

-
Once created go to the Credentials tab and set a password to the user (turn off the Temporary button if you don't want to force the user to change the password after the first login)
If you want to implement roles, you can do it in this way
- In the left menu click in the Realm roles tab and then Create role
- Then go to the Users tab and click in the user you want to assign role(s)
- Look for the Role mapping tab and then click Assign role
- Check the roles that you want to assign and then save the changes
The backend works as Resource server and all the set-up for the security is in the config package: The KeycloakRoleConverter is used to extract the roles from the claims inside the token and the SecurityConfig implements the securityFilterChain. This is a lightweight demo, so it doesn't use a database, instead of that, some dummy data is loaded in memory in the controller.
To install the library that I'm using you can use this command npm install keycloak-angular keycloak-js
Did you remember the client ID and the realm from Keycloak? Well in the app.module file you need to insert this function
function initializeKeycloak(keycloak: KeycloakService) {
  return () =>
    keycloak.init({
      config: {
        url: 'http://localhost:8180',
        realm: 'pkce',
        clientId: 'spa-pkce'
      },
      initOptions: {
        pkceMethod: 'S256',
        redirectUri: 'http://localhost:4200/dashboard'
      }, loadUserProfileAtStartUp: false
    });
}
The url must match the one that is using Keycloak as endpoint, fill the realm and clientId accordingly, and finally check that the redirectUri match with the one provided inside Keycloak. There are more configurations that you can check in the commits of this repo
To run correctly this demo, Keycloak must be configured, up and running as well as the backend and the frontend. To check if its working first you will be allowed to log in successfully, while you are login you can check the code challenge generated by the Angular application

and once we get authenticated we can check the code verifier (used to verify the code challenge) along the access token
