The Mad King is a text based adventure game where you explore a castle to find items and in the end defeat the bosses that are inside the castle.
Venture further if you dare.

-
Free user inputs with a direction system
-
The user can freely input what direction the user wants to go by writing "Go" (North, West, East, South).

-
-
Inventory system
-
A simple inventory system that tracks what and how many items you have in your inventory.

-
-
Zones
-
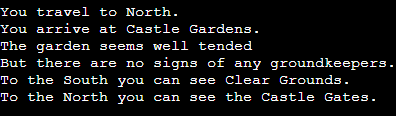
Individual zones/areas that have each their own description
-
-
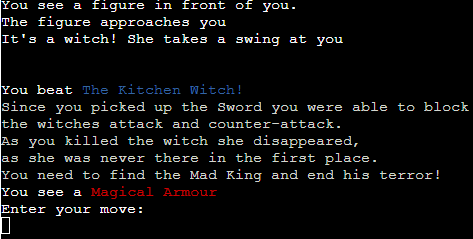
Bosses
-
There are two bosses that you can encounter during the game, if the item cap is not fulfilled you will lose.
-
-
Input validation


| Screenshot | Notes |
|---|---|
 |
You cannot enter anything other than directions (North, West, East or South) or Get (item). |
 |
You cannot break anything by writing any special characters (!*"#%). |
 |
If you write "Go" somewhere that is not the directions you will get a "You cannot go that way" message. |
|
You cannot break anything by writing the wrong words. |
 |
If you write "Get" on a non existent item you will get a "Cannot get (item)" message. |
|
If you write something else that is not a command you will get an "Invalid command" message. |
- Multi choice routes
- If you go into an area I would like to add multi choice routes you can take for your character which would include multiple endings.
- More complex inventory system
- Inventory system where you can actually use the items in your inventory in your choices.
- More interactive zones.
- Add NPC's that you can have a simple conversation with and more complex bosses.
- Random generated zones.
- Add a system that changes the places of the zones so that it is random generated with random generated NPC's.
- Python used as the back-end programming language.
- Git used for version control. (
git add,git commit,git push) - GitHub used for secure online code storage.
- Gitpod used as a cloud-based IDE for development.
- Markdown Builder by Tim Nelson used to help generate the Markdown files.
- Heroku used for hosting the deployed back-end site.
To follow best practice, a flowchart was created for the app's logic, and mapped out before coding began using a free version of Lucidchart
Below I made a map for directions in the game and was used as a flowchart to know which areas and directions I needed to add.

The program uses classes as a blueprint for the project's objects (OOP). This allows for the object to be reusable.
class Person:
    """ Insert docstring comments here """
    def __init__(self, name, age, health, inventory):
        self.name = name
        self.age = age
        self.health = health
        self.inventory = inventory
The primary functions used on this application are:
clear()- Clears console.
prompt()- Display starting message
restart_game()- Restarts the application.
I've used the following Python packages and/or external imported packages.
sys: used for adding the restart game function.os: used for adding aclear()function.colorama: used for including color in the terminal.
For all testing, please refer to the TESTING.md file.
Code Institute has provided a template to display the terminal view of this backend application in a modern web browser. This is to improve the accessibility of the project to others.
The live deployed application can be found deployed on Heroku.
This project uses Heroku, a platform as a service (PaaS) that enables developers to build, run, and operate applications entirely in the cloud.
Deployment steps are as follows, after account setup:
- Select New in the top-right corner of your Heroku Dashboard, and select Create new app from the dropdown menu.
- Your app name must be unique, and then choose a region closest to you (EU or USA), and finally, select Create App.
- From the new app Settings, click Reveal Config Vars, and set the value of KEY to
PORT, and the value to8000then select add. - If using any confidential credentials, such as CREDS.JSON, then these should be pasted in the Config Variables as well.
- Further down, to support dependencies, select Add Buildpack.
- The order of the buildpacks is important, select
Pythonfirst, thenNode.jssecond. (if they are not in this order, you can drag them to rearrange them)
Heroku needs two additional files in order to deploy properly.
- requirements.txt
- Procfile
You can install this project's requirements (where applicable) using:
pip3 install -r requirements.txt
If you have your own packages that have been installed, then the requirements file needs updated using:
pip3 freeze --local > requirements.txt
The Procfile can be created with the following command:
echo web: node index.js > Procfile
For Heroku deployment, follow these steps to connect your own GitHub repository to the newly created app:
Either:
- Select Automatic Deployment from the Heroku app.
Or:
- In the Terminal/CLI, connect to Heroku using this command:
heroku login -i - Set the remote for Heroku:
heroku git:remote -a app_name(replace app_name with your app name) - After performing the standard Git
add,commit, andpushto GitHub, you can now type:git push heroku main
The frontend terminal should now be connected and deployed to Heroku!
This project can be cloned or forked in order to make a local copy on your own system.
For either method, you will need to install any applicable packages found within the requirements.txt file.
pip3 install -r requirements.txt.
If using any confidential credentials, such as CREDS.json or env.py data, these will need to be manually added to your own newly created project as well.
You can clone the repository by following these steps:
- Go to the GitHub repository
- Locate the Code button above the list of files and click it
- Select if you prefer to clone using HTTPS, SSH, or GitHub CLI and click the copy button to copy the URL to your clipboard
- Open Git Bash or Terminal
- Change the current working directory to the one where you want the cloned directory
- In your IDE Terminal, type the following command to clone my repository:
git clone https://github.com/Jonathan97-web/Mad-King.git
- Press Enter to create your local clone.
Alternatively, if using Gitpod, you can click below to create your own workspace using this repository.

Please note that in order to directly open the project in Gitpod, you need to have the browser extension installed. A tutorial on how to do that can be found here.
By forking the GitHub Repository, we make a copy of the original repository on our GitHub account to view and/or make changes without affecting the original owner's repository. You can fork this repository by using the following steps:
- Log in to GitHub and locate the GitHub Repository
- At the top of the Repository (not top of page) just above the "Settings" Button on the menu, locate the "Fork" Button.
- Once clicked, you should now have a copy of the original repository in your own GitHub account!
As of writing this there will be no difference between the local and the deployed version on Heroku.
| Source | Location | Notes |
|---|---|---|
| Markdown Builder by Tim Nelson | README and TESTING | tool to help generate the Markdown files |
| Chris Beams | version control | "How to Write a Git Commit Message" |
| YouTube | Python Tutorial | For creating the game |
| YouTube | PP3 terminal | tutorial for adding color to the Python terminal |
| Github | PP3 terminal | Code for restarting the game |
For this project no external media was used for creation of this project.
Use this space to provide attribution to any supports that helped, encouraged, or supported you throughout the development stages of this project. A few examples have been provided below to give you some ideas.
- I would like to thank my Code Institute mentor, Tim Nelson For his support through this project.
- I would like to thank the Code Institute tutor team for their assistance with troubleshooting and debugging some project issues.
- I would like to thank the Code Institute Slack community for the moral support; it kept me going during periods of self doubt and imposter syndrome.
- I would like to thank my spouse/partner Merle, for believing in me, and allowing me to make this transition into software development.