CiviCRM Extension which integrates CiviCRM with QuickBooks Online. CiviCRM Contacts and Contributions are pushed to your QuickBooks Online account, QuickBooks Invoices are pulled into CiviCRM, updating the Contribution status. Synchronise all things!
Integration of the two systems saves you time by not having to do repetitive data entry in your accounting system and CiviCRM. This extension does the work for you!
QuickBooks Online provides different Tax APIs for US and non-US countries. This extension has been developed and tested with:
- QuickBooks Online, Australia (AU)
- QuickBooks Online, United States (USA)
- QuickBooks Online, United Kingdom (UK)
- QuickBooks Online, Canada (CA)
CiviQuickBooks will only synchronise contacts to Quickbooks Online from your CiviCRM when a Contribution is added to them, either through online payments or administrator action.
CiviQuickBooks version 2 implements the OAuth 2.0 protocol for QuickBooks Online - if you are upgrading from a previous version you will need to generate new keys. See the Configuration section below.
- Ensure the CiviContribute component is enabled
- Download the latest version of this extension
- Unzip in the CiviCRM extension directory, as defined in
System Settings / Directories. - Download the CiviCRM extension, Account Sync.
- In CiviCRM, go to
System Settings / Extensionsand enable both extensions, Account Sync and QuickBooks Online Integration. QuickBookswill now be available in theAdministermenu.- Click on the
QuickBooksmenu to display theQuickBooks Online Settingspage. - Update the CiviQuickBooks Online configuration as detailed below.
- You will need an Intuit Developer Account, sign up at
(https://developer.intuit.com/). This account must be added as a user of
Adminuser type to the QuickBooks Online company being integrated. - Once your developer account is created and linked, Go to the
My Appssection and selectCreate new app. - Use the
Select APIsbutton in theJust start codingcard, then select the Accounting API. - From the App dashboard, select the
OAuth 2.0 keys - In the
Production Keyssection, copy theClient IDandClient Secretkeys. - Paste these values into the CiviQuickBooks Online Settings page and submit.
- Copy the Redirect URI that is present into the
Production Keyssection of your App in the Intuit Developer site.
CiviQuickBooks Online Settings page is shown below.

- Click the
Authorizelink as shown below theAccess Token Expiry Datefield. - The QuickBooks Online Authentication page will now be displayed.
- Follow the instructions and to complete the authentication process.
- After authentication, you will be redirected back to CiviCRM.
- Open the
QuickBooks Online Settingspage. - To confirm QuickBooks Online authentication a date will be shown in the
Access Token Expiry Datefield. If no date is shown then authentication has failed. Repeat the process.
Each QuickBooks Product/Service has a unique name. This is used in the CiviCRM Financial Account codes to correctly code each Invoice in QuickBooks Online.
- Open the QuickBooks Company, go to product/service settings page (https://sandbox.qbo.intuit.com/app/items).
- Identify each QuickBooks Product/Service that you want to sync with CiviCRM.
- Open the CiviCRM Financial Account setting page
(civicrm/admin/financial/financialAccount) and update the
Acctg Codeof corresponding Financial account to be the same as each QuickBooks Product/Service name: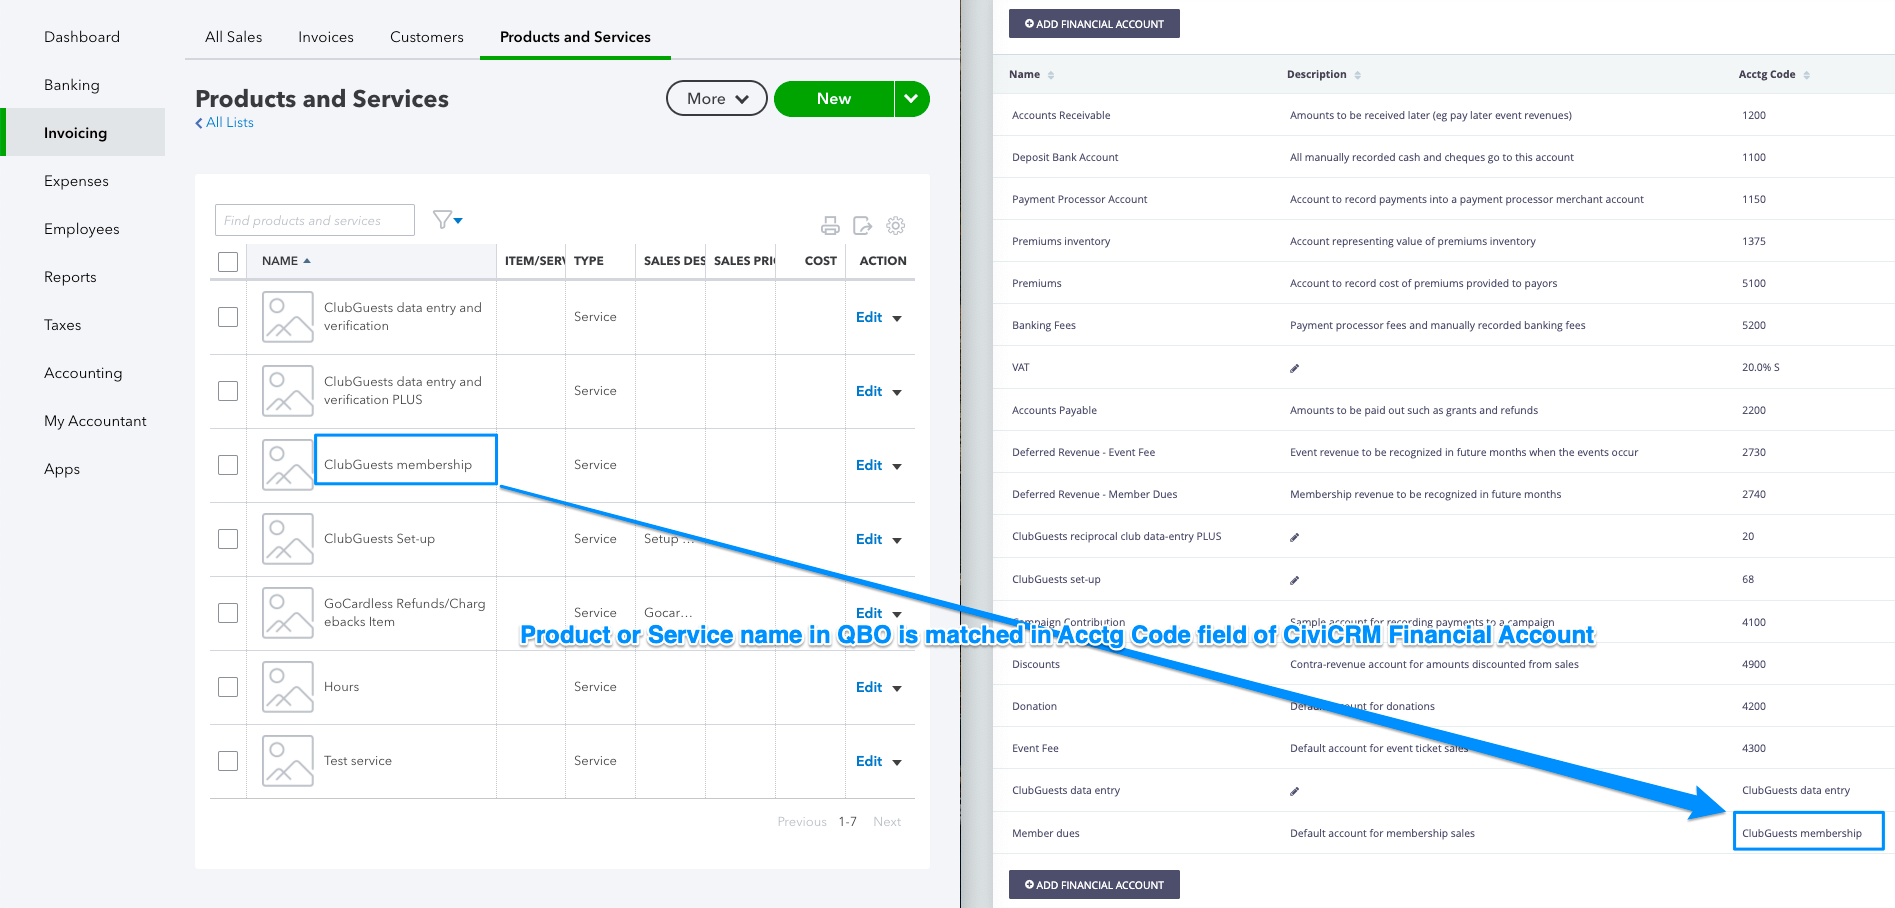
- When setting up Contributions in CiviCRM, ensure that the Financial Type for the Contribution is set to use the correct Financial Account as the Income Account.
- During sync, the Contribution line item will be set to the corresponding QuickBooks Product/Service.
- When a CiviCRM
Acctg Codedoes not match any QuickBooks Product/Service name, which means that no product/service in QuickBooks has the same name, that particular line item will NOT be pushed through the invoice.

Map your QuickBooks tax account name to corresponding CiviCRM financial types Sales Tax Accounts acctg code.
When the extension pushes an invoice to QuickBooks Online, it requires every item to have a specified Tax account.
- Go to
GST>Rates&Settings. There are many tax accounts listed there, with names in columnTax name, copy the tax name you want and paste it into theAcctg codefield of corresponding Tax financial account. - Open the CiviCRM Financial Account setting page
(civicrm/admin/financial/financialAccount) and update the
Acctg Codeof corresponding Financial account to be the same as each QuickBooks tax account name. - If a financial type does not contain any GST, a financial account also needs
to be created with the corresponding Tax account name in QuickBooks filled
out. For example, create a new financial account called
NO GSTwith GST rate as0,acctg codeasGST free(a tax account name which has GST rate as0also). And assign that financial account as corresponding line itemsSales Tax account`. - When setting up Contributions in CiviCRM, ensure that the Financial Type for
the Contribution/line item is set to use the correct Financial Account as the
Sales Tax Account. - During sync, the Contribution line item will be assigned with corresponding Tax account.
- When a CiviCRM
Acctg Codedoes not match any QuickBooks Tax account name, which means that the there is no tax account in QuickBooks has the same name, that particular line item will NOT be pushed through the invoice.
- For US companies, each line item or product/service in an invoice can only be
marked with
NON(for non-taxable) orTAX(taxable), and the entire invoice will have a single tax rate selected as a state tax or a combination tax rate. - Users need to make sure that:
- In CiviCRM:
- The financial type of each line item in the contribution is associated
with a
sales tax financial account- All those associated financial accounts need to have
TAXorNONas theacctg codefield. - All those associated financial accounts need to have
Tax Rate Nameof desired tax rate account in QuickBooks as theaccount type codefield in CiviCRM. e.g.Californiaas thefinancial type code. - Make sure that all the financial types of line items have the same value
of
account type codein thesales tax financial account. The extension will pick the first line item that is taxable and with aaccount type code. And use that name to get the ID oftax accountfrom QuickBooks Online.
- All those associated financial accounts need to have
- The financial type of each line item in the contribution is associated
with a
- In QuickBooks Online:
- Make sure there are matched products/services that have the name that is
same with the values of the
acctg codeof allIncome financial accountof allfinancial typesused in the contributions. - Make sure all used
tax accountshave been created and have names recored in theaccount type codeof thesales tax financial accountof matchedfinancial type.
- Make sure there are matched products/services that have the name that is
same with the values of the
This extension currently assumes that it will be connected to a QuickBooks Online, Production account.
If instead, you wish to connect this to a QuickBooks Online Development account then open the QuickBooks Online Settings page and change the Environment option from Production to Development.
When you have finished testing in the Development account, then change the Environment option back to Production.
For more details on the QuickBooks Online environments, see:
- https://developer.intuit.com/app/developer/qbo/docs/develop/sandboxes
- https://developer.intuit.com/app/developer/qbo/docs/develop/sdks-and-samples-collections/php/configuration
- As line items that have no matched QuickBooks product/service name filled out or no matched QuickBooks tax account name filled out will not be pushed in the invoice, an invoice could have less items pushed. If an invoice does not have even one item in it after the filtering, the invoice will not be pushed successfully.
- As long as an invoice has at least one item in it after filtering, the
information about those non-pushed items will be noted down as
customer memofield. Theidof the problematic financial type and itsacctg codewill be listed. In that case, you need to fix the invoice manually.
Development and support for this Extension is funded solely by Agileware and CiviCRM community contributions. Agileware does not receive any funding at all for this Extension from the CiviCRM Partner program or CiviCRM LLC. Agileware welcome any funding to help continue paying Agileware staff to continue contributing to the CiviCRM community and Extensions.
❤️ Donate to Agileware to tell us how much you appreciate Agileware's CiviCRM open source work and community contributions.
This CiviCRM extension was developed by the team at Agileware.
Agileware provide a range of CiviCRM services including:
- CiviCRM migration
- CiviCRM integration
- CiviCRM extension development
- CiviCRM support
- CiviCRM hosting
- CiviCRM remote training services
Support your Australian CiviCRM developers, contact Agileware today!
![]()