Round Table design pattern is named for King Arthur and the Knights of the Round Table to signify the equality of the module components and their common purpose.
- Part #1: Installation and usage
- Part #2: Components and their responsibilities
- Part #3: Communication between components
- Part #4: Communication between modules
- Part #5: Memory management
- Part #6: Briefly howto
Download the XcodeTemplates.zip file, and extract his contents into Tempates directory:
~/Library/Developer/Xcode/Templates/File Templates
Now, after templates are ready, create the generic module from template.
There are templates fot UIKit projects, and also for SwiftUI ones. If your use both frameworks in your project, you can use both templates with no problems.
For UIKit projects, create the group for generic module (like "RLEModule" or "UIKitModule", or whatever you want). Then click "New File..." from a context menu of this group, scroll down to a section "File Templates" and pick "RTModule UIKit Generic". You'll be asked for a couple of settings; the primary one is your Trunk object where you keep all your dependencies (if you don't have such for any reasons, you can specify just "NSObject"). Finally, you'll get the generic module files, each starting with "RLE" (letter E here stands for "Enums").
For SwiftUI projects, create the group for generic module (like "RLBModule" or "SwiftUIModule", or whatever you want). Then click "New File..." from a context menu of this group, scroll down to a section "File Templates" and pick "RTModule SwiftUI Generic". You'll be asked for your Trunk object where you keep all your dependencies (if you don't have such for any reasons, you can specify just "NSObject"). Finally, you'll get the generic module files, each starting with "RLB" (letter B here stands for "Binding").
Now, having the generic module configured, you're ready to create your own modules.
For UIKit modules, you can use RTModule UIKit Standalone.xctemplate for a ViewController and RTModule UIKit Navigatable.xctemplate for a NavigationController. Technically they have a minimal code difference, so you always can transform any of them to each other in a couple of seconds by changing the typealias for View.
For SwiftUI modules, you can use RTModule SwiftUI View.xctemplate without any difference between standalone and navigatable views.
Feel free to download this entire repo and explore some built-in examples.
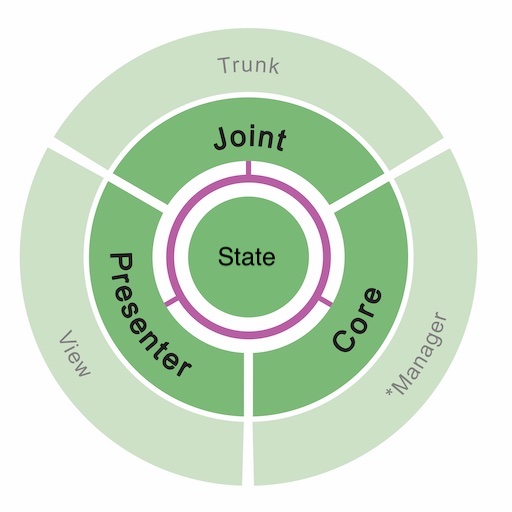
Presenter is responsible for preparing the data model before flushing it into View, and Presenter also can perform some extra transformations (like appending the currency symbol in front of the good's price, or retrieving some localized strings from resources, etc).
Core has access to some system dependencies (like managers, services, adapters, etc) and implements the business logic using them.
Joint is responsible for building different modules into hierarchy. This purpose includes navigators and tabs, pushing and popping, presenting and dismissing.
State is responsible for keeping some state data the module needs for performing its job. For example, State can keep an error description that sometimes gets delivered from Core and should be then presented into View. Another example, State can keep the entered text from input field that will be processed later, after user taps the proceed button. All primary components has access to the State (like, Core can write something to, and Presenter can read something from).
The helping assembly function that's responsible for creating all the module components and linking them between each other into single module. It might look like this example below (the additional generic function RTEModuleAssembly() acts like singleton and helps linking the components in the correct way):
func LoginModuleAssembly(trunk: Trunk) -> LoginModule {
    return RTEModuleAssembly(
        pipeline: LoginModulePipeline(),
        state: LoginModuleState(),
        coreBuilder: { pipeline, state in
            LoginModuleCore(
                pipeline: pipeline,
                state: state,
                authManager: trunk.authManager
            )
        },
        presenterBuilder: { pipeline, state in
            LoginModulePresenter(
                pipeline: pipeline,
                state: state
            )
        },
        viewBuilder: { pipeline in
            LoginModuleView(
                pipeline: pipeline
            )
        },
        jointBuilder: { pipeline, state, view in
            LoginModuleJoint(
                pipeline: pipeline,
                state: state,
                view: view,
                trunk: trunk
            )
        })
}Components themselves don't know anything about others, they are isolated. They use Pipeline for communication. Pipeline does distribute commands from any component to all others.
Core can feed some command to other components using Pipeline in case of any event (like if any update happens within the database):
// Core -> Pipeline [dataUpdate]

enum CoreEvent {
    case .dataUpdate
}

private func handleDataUpdated() {
    self.pipeline?.notify(event: .dataUpdate)
}

// Pipeline -> Presenter [dataUpdate]

override func handleCore(event: CoreEvent) {
    switch event {
        case .dataUpdate:
            self.updateView()
    }
}

// Pipeline -> Joint [dataUpdate]

override func handleCore(event: CoreEvent) {
    // ...
}
As you can see, feeding the commands uses enum instead of method calls. Here is s great advantage that we just need to add some extra cases to support new functionality).
So, instead of the call like this:
func didTapButton(button: UIButton) {
    self.viewModel?.showGreeting()
}
Round Table uses this call:
func didTapButton(button: UIButton) {
    self.pipeline.notify(intent: .buttonTap)
}
And Round Table handles this command like this way:
// View -> Pipeline [buttonTap]

enum ViewIntent {
    case buttonTap
}

func didTapButton(button: UIButton) {
    self.pipeline.notify(intent: .buttonTap)
}

// Pipeline -> Core [buttonTap]

override func handleView(intent: ViewIntent) {
    switch intent {
        case .buttonTap:
            self.performCloudSync()
    }
}
And there's one more important note. The Pipeline performs communication in specific way: all the commands go a strict path Core -> Presenter -> Joint. It means, depending on sender, the command will go through:
- from Core, to Presenter and Joint
- from Presenter, to Core and Joint
- from Joint, to Core and Presenter
This special rule has a special meaning: in most cases, every action causes the module state change. It's why Core is the first receiver, to be possible to modify the module State. Then, the second receiver is Presenter, to render the View using the updated module State. And the third is Joint, in case we should feed a command outside, to parent.
This distribution order is why we finally got rid of numerous boilerplate-like proxy calls you might have seen within other architectures.
Please note, each component has its specific commands naming:
- Core can share his Events for Presenter and Joint, to notify about some internal updates
- Presenter can share his Updates for View, to notify about some data for rendering
- Joint can share his Inputs for Core and Presenter, to notify about some input data from the outside (typically, from parent module); and also it can share his Outputs to outside (typically, to parent module)
- View can share his Intents for Core, Presenter, and Joint, to notify a user has interacted with UI
As soon Joint is responsible for building modules hierarchy, he also creates the children modules. Let's see an example below, here we want to present the modal screen for user could type his comment and then close that screen:
// View sends [commentButtonTap] to Pipeline

enum ViewIntent {
    case commentButtonTap
}

@objc private func didTapCommentButton() {
    self.pipeline.notify(intent: .commentButtonTap)
}

// Joint receives [commentButtonTap] from Pipeline

override func handleView(intent: ViewIntent) {
    switch intent {
        case .commentButtonTap:
            self.presentCommentModule()
    }
}

// Joint grabs the input and sends [comment(text:)] to Pipeline

enum JointInput {
    case comment(text: String)
}

private func presentCommentModule() {
    let module = CommentModuleAssembly(trunk: self.trunk)
    //note// "module" contains {view, joint}

    module.joint.attach { [weak self] output in
        switch output {
            case .comment(let text):
                self?.pipeline?.notify(input: .comment(text: text)) // <--
                self?.view?.dismiss(animated: true)
        }
    }

    self.view?.present(module.view, animated: true)
}

// Core receives [comment(text:)] from Pipeline:

override func handleJoint(input: JointInput) {
    switch input {
        case .comment(let text):
            self.state.comment = text
    }
}

// Presenter receives [comment(text:)] from Pipeline
// and then Presenter sends [review(comment:)] to Pipeline

enum PresenterUpdate {
    case review(comment: String)
}

override func handleJoint(input: JointInput) {
    switch input {
        case .comment:
            self.pipeline?.notify(update: .review(comment: state.comment))
    }
}

// View receives [review(comment:)] from Pipeline

override func handlePresenter(update: PresenterUpdate) {
    switch update {
        case .review(let comment):
            self.reviewLabel.text = comment
    }
}Memory management is based on automatic UIViewController existence during a navigation:
- View strongly holds the Pipeline
- Pipeline strongly holds the Core, Presenter, and Joint
- Core, Presenter, and Joint strongly hold the State
- All other references are weak
There are six places you should learn about: Assembly, State, Core, Presenter, View, and Joint.
The primary goal of Assembly function is creating the module's components and passing the Trunk object through the hierarchy.
Also feel free to use the extra arguments in case you need passing them into any component depending on your own business logic.
Having the previous example of LoginModuleAssembly(), we can add the extra argument LoginModuleKind that'll stand for what kind of Login Form we do want: by phone, or by email.
So we keep the passed Kind argument, and retrieve the AuthManager from Trunk. Please pay your attention to lines #6, #9, and #14:
enum LoginModuleKind {
    case email
    case phone
}

func LoginModuleAssembly(trunk: Trunk, kind: LoginModuleKind) -> LoginModule { // <--
    return RTEModuleAssembly(
        pipeline: LoginModulePipeline(),
        state: LoginModuleState(kind: kind), // <--
        coreBuilder: { pipeline, state in
            LoginModuleCore(
                pipeline: pipeline,
                state: state,
                authManager: trunk.authManager // <--
            )
        },
        presenterBuilder: { pipeline, state in
            LoginModulePresenter(
                pipeline: pipeline,
                state: state
            )
        },
        viewBuilder: { pipeline in
            LoginModuleView(
                pipeline: pipeline
            )
        },
        jointBuilder: { pipeline, state, view in
            LoginModuleJoint(
                pipeline: pipeline,
                state: state,
                view: view,
                trunk: trunk
            )
        })
}
Having the built module, you may use it any way you want:
// From a start point, for window root
class AppDelegate: UIResponder, UIApplicationDelegate {
    var window: UIWindow?

    func application(/*...*/) -> Bool {
        let trunk = Trunk(/*...*/)
        let module = LoginModuleAssembly(trunk: trunk, kind: .email)

        let window = UIWindow()
        self.window = window

        window.rootViewController = module.view
        window.makeKeyAndVisible()

        return true
    }
}

// From any Joint (using a Joint's Trunk)
func presentLoginForm() {
    let module = LoginModuleAssembly(trunk: self.trunk, kind: .email)
    self.view?.present(module.view, animated: true)
}

// From any ViewController of other design pattern (need global Trunk)
func presentLoginForm() {
    let module = LoginModuleAssembly(trunk: GlobalTrunk, kind: .email)
    self.present(module.view, animated: true)
}Initially it's just an empty object like that one:
final class LoginModuleState {
}
But you can fill it by constants or variables you need:
final class LoginModuleState {
    let kind: LoginModuleKind
    var inputLogin = String()
    var inputPassword = String()

    init(kind: LoginModuleKind) {
        self.kind = kind
    }
}This is the primary place where you implement the business logic of your module. Core has three entrypoints. All of them are basically do nothing, so feel free not to implement them instead of having empty methods:
/*
  *CoreEvent are the notifications about any changes
  the Core sends to other components via Pipeline
*/
enum LoginModuleCoreEvent {
    enum Failure { case wrongPair, reachedLimit }
    case started
    case success
    case failure(Failure)
}

/*
  The run() method gets called automatically
  after the module has been successfully created
  and his components are linked with the Pipeline

  Best place to perform any startup commands and calls,
  like subscribing to any observables, or extracting any initial data
*/
override func run() {
    let (login, password) = self.authManager.credentials
    self.state.inputLogin = login
    self.state.inputPassword = password

    self.authManager.attach { [weak self] status in
        switch status {
            case .login:
                self?.pipeline?.notify(event: .success)
            case .wrong:
                self?.pipeline?.notify(event: .failure(.wrongPair))
            case .limit:
                self?.pipeline?.notify(event: .failure(.reachedLimit))
        }
    }
}

/*
  The handleView(intent:) method gets called by the Pipeline
  if the View has passed some *ViewIntent into it
*/
override func handleView(intent: LoginModuleViewIntent) {
    switch intent {
        case .loginChange(let value):
            self.state.inputLogin = value
        case .passwordChange(let value):
            self.state.inputPassword = value
        case .loginButtonTap:
            let login = self.state.inputLogin
            let password = self.state.inputPassword
            self.authManager.signIn(login: login, password: password)
            self.pipeline?.notify(event: .started)
    }
}

/*
  The handleJoint(input:) method gets called by the Pipeline
  if the Joint has passed some *JointInput into it
*/
override func handleJoint(input: LoginModuleJointInput) {
}This is the UI coordinator where you manage what updates will be passed to your View. Presenter has four entrypoints. All of them are basically do nothing, so feel free not to implement them instead of having empty methods:
/*
  *PresenterUpdate are the values for updating UI
  the Presenter sends to View via Pipeline
*/
enum LoginModulePresenterUpdate {
    case prefill(login: String, password: String)
    case failure(reason: String?)
    case toggleWaitingIndicator(visible: Bool)
}

/*
  The update(firstAppear:) method gets called automatically
  after the module has been successfully created
  and his components are linked with the Pipeline,
  having agrument 'firstAppear' to be true

  Best place to send render updates to View
  so to represent the entire screen contents

  Feel free to call this method manually,
  having the 'firstAppear' argument value as you wish
*/
func update(firstAppear: Bool) {
    if firstAppear {
        let login = self.state.inputLogin
        let password = self.state.inputPassword
        self.pipeline?.notify(update: .prefill(login: login, password: password))
    }
}

/*
  The handleView(intent:) method gets called by the Pipeline
  if the View has passed some *ViewIntent into it
*/
override func handleView(intent: LoginModuleViewIntent) {
}

/*
  The handleCore(event:) method gets called by the Pipeline
  if the Core has passed some *CoreEvent into it
*/
override func handleCore(event: LoginModuleCoreEvent) {
    switch event {
        case .started:
            self.pipeline?.notify(update: .toggleWaitingIndicator(visible: true))
        case .success:
            // the screen will be dismissed, no need to update
            break
        case .failure:
            self.pipeline?.notify(update: .toggleWaitingIndicator(visible: false))
    }

    switch event {
        case .started:
            self.pipeline?.notify(update: .failure(reason: nil))
        case .success:
            // the screen will be dismissed, no need to update
            break
        case .failure(.wrongPair):
            self.pipeline?.notify(update: .failure(reason: "Check your credentials"))
        case .failure(.reachedLimit):
            self.pipeline?.notify(update: .failure(reason: "Please try again later"))
    }
}

/*
  The handleJoint(input:) method gets called by the Pipeline
  if the Joint has passed some *JointInput into it
*/
override func handleJoint(input: LoginModuleJointInput) {
}This is the hierarchy coordinator, it communicates with children and parent.
Here you can find the reference to View (via self.view property), and the outlet to notify its parent (via notifyOut(output:) method). You can pass something in from outside using take(input:) method.
Also, joint has two entrypoints. All of them are basically do nothing, so feel free not to implement them instead of having empty methods:
/*
  *JointInput are the values the Joint gets from outside
  and sends to other components via Pipeline
*/
enum LoginModuleJointInput {
}

/*
  *JointOutput are the values the Joint sends to his parent
*/
enum LoginModuleJointOutput {
    case dismiss
}

/*
  The handleCore(event:) method gets called by the Pipeline
  if the Core has passed some *CoreEvent into it
*/
override func handleCore(event: LoginModuleCoreEvent) {
    switch event {
        case .success:
            self.notifyOut(output: .dismiss)
    }
}

/*
  The handleView(intent:) method gets called by the Pipeline
  if the View has passed some *ViewIntent into it
*/
override func handleView(intent: LoginModuleViewIntent) {
    switch intent {
        case .cancelButtonTap:
            self.notifyOut(output: .dismiss)
        case .recoveryButtonTap:
            let module = RecoveryModuleAssembly(trunk: self.trunk, login: self.state.login)

            // There is also an option to pass any extra input some later
            // module.joint.take(input: ...)

            module.joint.attach { output in
                // ...
            }

            self.view?.present(module.view, animated: true)
    }
}This is the UI part the user interacts with. It can pass some user actions into module using ViewIntents. View has just one entrypoint. It basically do nothing, so feel free not to implement it instead of having empty method:
/*
  *ViewIntent are user actions in UI
  the View sends to other components via Pipeline
*/
enum LoginFormViewIntent {
    case loginChange(String)
    case passwordChange(String)
    case loginButtonTap
}

override func handlePresenter(update: LoginFormModulePresenterUpdate) {
    switch update {
        case .prefill(let login, let password):
            self.loginTextField.text = login
            self.passwordTextField.text = password
        case .failure(let reason):
            // ...
        case .toggleWaitingIndicator(let visible):
            // ...
    }
}

@objc private func handleLoginButton() {
    self.pipeline.notify(intent: .loginButtonTap)
}

internal func textField(_ textField: UITextField, shouldChangeCharactersIn range: NSRange, replacementString string: String) -> Bool {
    if textField === self.loginTextField {
        self.pipeline.notify(intent: .loginChange(...))
    }
    else if textField === self.passwordTextField {
        self.pipeline.notify(intent: .passwordChange(...))
    }

    return true
}