Handy and Customizable!
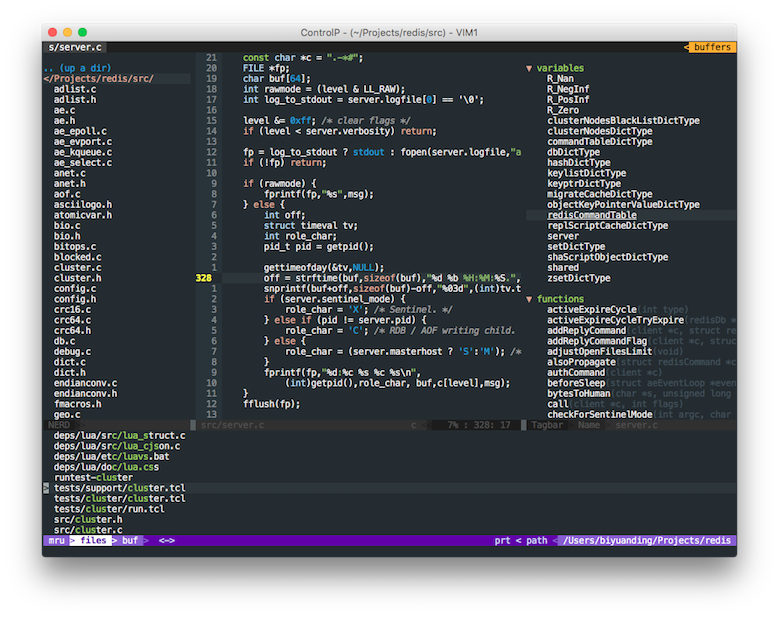
Utilize NERDTree, Fugitive, Ctrl-P, and many excellent plugins now.
In OS X and Linux where curl is installed, td-vimrc can be installed with one command in the terminal:
$ curl https://raw.githubusercontent.com/thomasding/td-vimrc/master/install.sh | sh -It will clone td-vimrc into ~/.td-vimrc, clone Vundle (the package manager that
this vimrc uses, which need cloning manually) into ~/.vim/bundle/Vundle.vim, and
create local customizable vimrc files ~/.vimrc.before.local, ~/.vimrc.after.local
and ~/.vimrc.plugin.local, which are well self-documented.
Then, it installs all the plugins and set up tmux related plugins if the installation is run in a tmux session.
For Tmux
Run the installation in a tmux session so that it sets up the tmux related plugins for you. Otherwise, you are able to set them up manually.
In Windows or OS X and Linux where curl is not available, td-vimrc has to be installed manually by following these steps:
-
Clone td-vimrc into your home directory:
$ git clone https://github.com/thomasding/td-vimrc.git ~/.td-vimrc -
Link the vimrc to ~/.vimrc:
-
In OS X or Linux, run the command in terminal:
$ ln -s ~/.td-vimrc/vimrc ~/.vimrc
-
In Windows, start CMD as administrator, change to home directory, and run:
C:\Users\{Your Home}> mklink .vimrc .td-vimrc\vimrc
-
-
Clone Vundle to your vim plugin directory:
$ git clone https://github.com/VundleVim/Vundle.vim.git ~/.vim/bundle/Vundle.vim -
Create local customizable vimrc files:
Create
~/.vimrc.before.local,~/.vimrc.after.localand~/.vimrc.plugin.localin your home directory. See [Customization] for the descriptions of these files. -
Enable extra features (optional):
Edit
~/.vimrc.before.localand setg:tdvimrc_featuresto enable extra features you need." The following statement enables all the extra features td-vimrc supports. " Remove unwanted features from the list. Set it to [] to disable all extra " features. See [Features] for the descriptions of each extra feature. let g:tdvimrc_features = ["golang", "web", "tmux"]
-
Install all the plugins:
Run
:PluginInstallin VIM or$ vim +PluginInstall +qain terminal to install all the plugins td-vimrc requires for all enabled features.
-
Enhance editing experience:
-
Map
jjto<Esc>in Insert mode. -
Set leader key to
\. -
Show relative line number.
Relative line number makes it faster to jump to a farther line. Jump to the tenth line above the cursor, for example, with
10krather thankkkkkkkkkk. -
Set default tab width and indentation to 4 spaces and use spaces in place of tabs.
-
Enable incremental search and smart case. Highlight matched texts.
In smart case matching,
whatmatchwhat,WhatandWHAT, butWhatmatchesWhatonly.To disable the matching highlight after searching, type
:nohin Normal mode. -
Use
<Ctrl-h>,<Ctrl-l>,<Ctrl-j>and<Ctrl-k>to switch between window splits more quickly. -
Trim trailing whitespaces automatically on save.
-
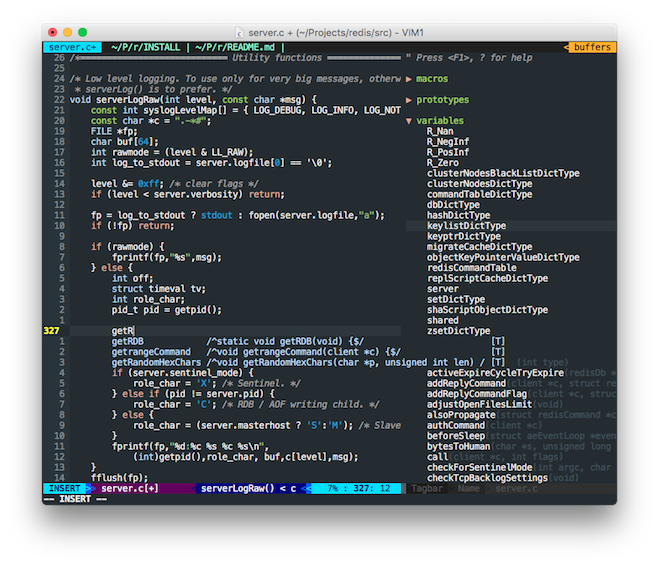
Automatically complete code with neocomplete.
Neocomplete depends on Lua support of vim. Run
:echo has('lua')in your vim to see if it supports Lua.1indicates your vim supports Lua and0indicates not.To install a macvim with lua support in OS X, run in terminal:
$ brew install macvim --with-lua --with-override-system-vim
$ brew linkapps macvim
--with-override-system-viminstructs macvim to replace system default vim.Neocomplete shows a popup with candidates while you are typing. Press
<Tab>to switch between the candidates in the popup. Just ignore the popup if the completion does not satisfy the expectation. -
Undo to any previous state with undotree.
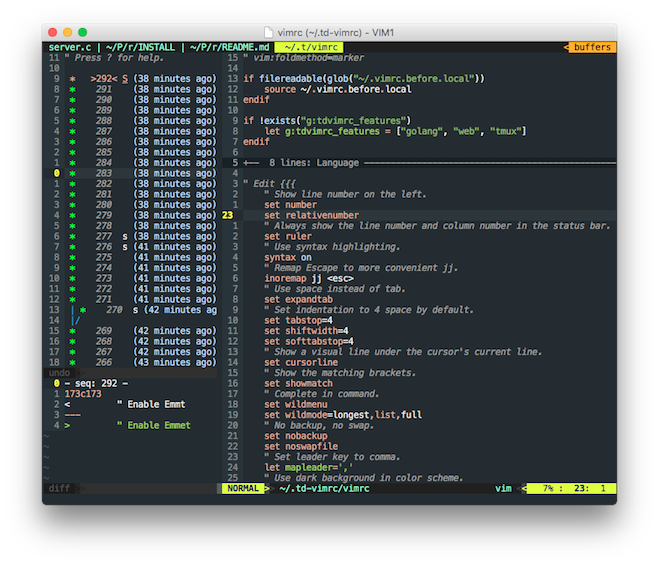
Undo history used to be a linear structure. You cannot return to the original state after undoing to a previous state and then doing more editing. Using undotree, the undo history forms a tree so that undoing and editing creates a new branch in the history tree, and you are able to reach any state in the tree.
To toggle the undo tree window, press
,uin Normal mode. Move the cursor to the preferred state in the tree and press<Enter>to revert to a previous state.>{Number}<indicates the current state.Sandsindicate the save point. The small window below the history demonstrates the difference between the two adjacent state. While switching between history states, the changing lines in the buffer is highlighted. -
Add, substitute and remove brackets with vim-surround.
Press
cs"'inside"Hello World!" to change it to'Hello World!'`.Press
cs'<q>to change it to<q>Hello World!</q>.Press
ds"to remove the delimiters and change it toHello World!.Press
ysiw](iwis a text object indicating a word) onHelloofHello World!to change it to[Hello] World!.See more usage from the documentation of vim-surround.
-
Enable Github Flavored Markdown syntax with vim-flavored-markdown.
-
Demonstrates variable, function and class definitions in the current file with tagbar.
Press
\tin Normal mode to toggle the tagbar.Tagbar uses exuberant ctags to process the editing file in memory. It does not refer to any real tags file.
To install exuberant ctags in OS X, run
brew install ctagsin terminal. -
Quickly align many lines with one command by tabular.
See Aligning text with tabular.vim for an introduction to tabular.
-
Toggle indent hint with key
\igby vim-indent-guide.
-
-
Beautify the appearance of VIM:
-
Powerful and beautiful status line with vim-airline working along with many other plugins.
-
A full pack of hundreds of colorschemes with vim-colorschemes.
By default, td-vimrc applies
codeschoolif vim is running in GUI andgruvboxif in terminal.Press
:colorscheme(there is a whitespace aftercolorscheme) and<Tab>to list all the colorschemes. -
Hide menubar, toolbar and scrollbars by default.
-
Use good-looking monospace fonts according to the operating system.
Td-vimrc chooses Monaco in OS X, Monospace in Linux and Consolas in Windows by default.
-
-
Improve finding file experience:
-
Use ctrlp to quickly find files with fuzzy search.
Press
<Ctrl-p>in Normal mode to bring the ctrlp panel in appearance.Here are some most frequent key bindings used in ctrlp panel:
Key Description Ctrl-j Move down the cursor to the next line Ctrl-k Move up the cursor to the previous line Ctrl-f Iterate forward between file, buffer and MRU list Ctrl-b Iterate backward between file, buffer and MRU list Enter Open the selected file(s) Ctrl-x Open the file in a new horizontal split Ctrl-v Open the file in a new vertical split Ctrl-y Create the file and its parent directories F5 Refresh the list See the full list of supported actions in ctrlp.
-
Show your project directory in tree structure with NERDTree.
Press
\nin Normal mode to jump to the NERDTree window, opening it if hidden.Press
\Nin Normal mode to toggle the NERDTree window.Here are some most frequent key bindings used in NEDTree window:
Key Description ? Toggle help j Move down the cursor to the next line k Move up the cursor to the previous line o Open the selected file or toggle the selected directory i Open in a new horizontal split v Open in a new vertical split r Refresh the list
-
-
Integrate with git:
-
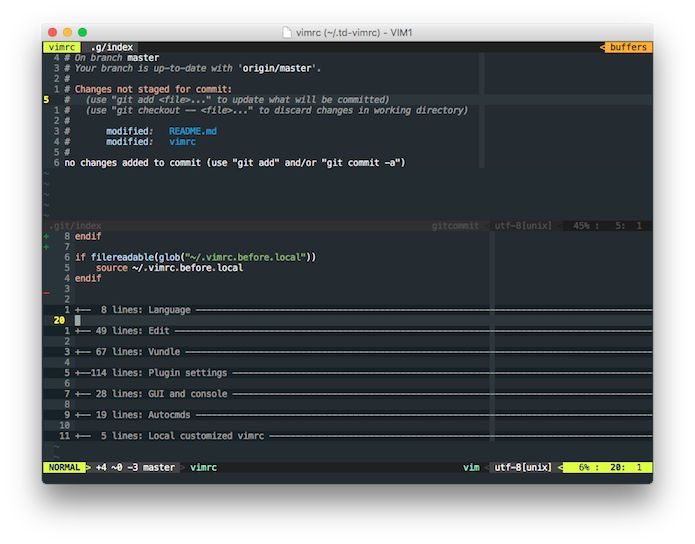
Seamlessly manage your code in your git repo with fugitive.
Td-vimrc comes with a few key bindings in Normal mode for frequent git action:
Shortcut Command Description \gs :Gstatus Show the status of the repo. Press -on a file to toggle between staged and unstaged state.\gw :Gwrite Save the buffer and stage it in the repo \gc :Gcommit Bring up a commit window. Press :wqin it to apply the commit or:q!to abandon the commit\gd :Gdiff Diff the file with the one in HEAD \gb :Gblame Blame the file See fugitive for more documentation.
-
Indicates modification besides the buffer with plus, minus and tilde signs with vim-gitgutter.
-
Show git status in NERDTree by nerdtree-git-plugin.
-
-
Powerful plugin management with Vundle.
-
Great python experience:
-
Intelligent completion with jedi (working with neocomplete).
-
Use
\pin python file to call flake8 to check the syntax and style:Using flake8 requires flake8 to be installed in your computer.
-
- Full golang development environment with vim-go.
-
Expand HTML and CSS abbreviations with Emmet-vim.
-
Enhanced javascript syntax highlighting.
-
HTML5 syntax highlighting support.
-
Unite tmux with vim-airline by tmuxline.vim.
To support tmuxline on the startup of tmux, run
:TmuxlineSnapshot [file]to create a snapshot which can be sourced by ~/.tmux.conf on startup.To source the created snapshot, add the following lines in your ~/.tmux.conf:
# in ~/.tmux.conf source-file [file] -
Switching tmux panes and vim window splits seamlessly with
<Ctrl-h>,<Ctrl-l>,<Ctrl-j>and<Ctrl-k>by vim-tmux-navigator.To support switching panes in tmux, append the following code in your ~/.tmux.conf:
# Smart pane switching with awareness of vim splits
# See: https://github.com/christoomey/vim-tmux-navigator
is_vim='echo "#{pane_current_command}" | grep -iqE "(^|\/)g?(view|n?vim?x?)(diff)?$"'
bind -n C-h if-shell "$is_vim" "send-keys C-h" "select-pane -L"
bind -n C-j if-shell "$is_vim" "send-keys C-j" "select-pane -D"
bind -n C-k if-shell "$is_vim" "send-keys C-k" "select-pane -U"
bind -n C-l if-shell "$is_vim" "send-keys C-l" "select-pane -R"
bind -n C-\ if-shell "$is_vim" "send-keys C-\\" "select-pane -l"
DO NOT edit .vimrc. Your changes will be lost after updating your vimrc configuration.
To customize your vim, edit ~/.vimrc.before.local, ~/.vimrc.after.local and ~/.vimrc.plugin.local, respectively.
-
~/.vimrc.before.local: loaded at the very beginning of~/.vimrc.Enable extra features by setting
g:tdvimrc_featuresin this file. An example is:" The following statement enables all the extra features td-vimrc supports. " Remove unwanted features from the list. Set it to [] to disable all extra " features. See [Features] for the descriptions of each extra feature. let g:tdvimrc_features = ["golang", "web", "tmux"]
Every time the features are changed, run
:PluginCleanand:PluginInstallin vim to apply the changes. -
~/.vimrc.plugin.local: loaded while loading Vundle plugins.Add your plugins to this file. An example is:
" Ctrl-P helps finding files faster.
Plugin 'kien/ctrlp.vim'
Every time plugins are added or removed, run
:PluginCleanand:PluginInstallin vim to apply the changes. -
~/.vimrc.after.local: loaded at the very end of~/.vimrc.Override tdvimrc's default configuration and add your own commands in this file.
-
Open terminal and change to directory
~/.td-vimrc. Run the command to pull the latest td-vimrc:$ git pull
-
Run
:PluginClean,:PluginUpdateand:PluginInstallin vim to update the plugins.
Git integration with fugitive:
Explore definitions with tagbar and complete code with neocomplete:
Undo to any previous state with undotree:


