The ArduinoButton library simplifies interfacing with buttons on Arduino.
- Download the latest zip file from the releases page.
- Install the zip file via Sketch -> #include -> Add library from .ZIP file.
#include <ArduinoButton.h>

#define BUTTON_PIN 7

ArduinoButton button(BUTTON_PIN, false); // Set to true for active-low, false for active-high

void setup() {
  Serial.begin(9600);

  // Callback for button release event
  button.onKeyUp([]() {
    Serial.println("Button click callback");
  });

  // Callback for button press event
  button.onKeyDown([]() {
    Serial.println("Button down callback");
  });

  // Callback for double click event
  button.onDoubleClick([]() {
    Serial.println("Double click callback");
  });

  // Callback for double click with a custom delay between two clicks (e.g., 1000ms)
  button.onDoubleClick([]() {
    Serial.println("Double click callback with custom delay");
  }, 1000);
}

void loop() {
  button.loop();
}Note: The second parameter in ArduinoButton button(BUTTON_PIN, false); indicates whether the button is active-low (true) or active-high (false).
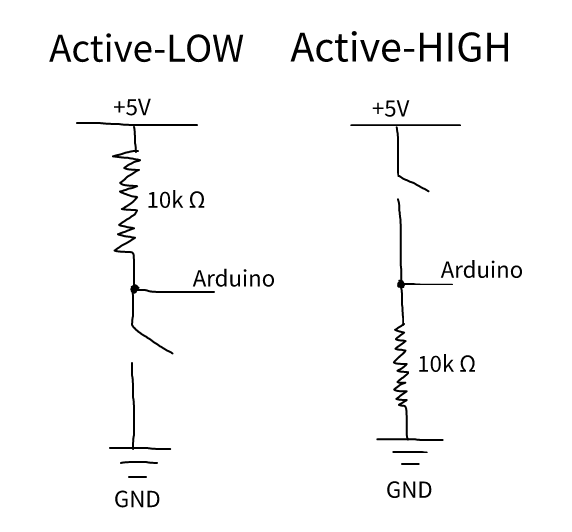
Buttons can be configured in two ways: active-low or active-high. Understanding the difference is important.
- In an active-low configuration, the button is considered "pressed" or "active" when its input is pulled low, typically to GND (Ground).
- When the button is not pressed, its input is held high (typically at VCC or the power supply voltage).
- Active-low buttons are commonly used because they are often more straightforward to wire and interface.
- In an active-high configuration, the button is considered "pressed" or "active" when its input is connected to the power supply voltage (VCC).
- When the button is not pressed, its input is pulled low, typically to GND (Ground).
- Active-high buttons can be useful in certain scenarios.
Ensure that you connect the button and the library accordingly based on your chosen configuration (active-low or active-high). The library handles the specifics of button state detection, regardless of the configuration chosen.
For an interactive experience and to see the ArduinoButton library in action, you can try out the Tinkercad simulation here. This simulation will help you understand how the library works and how to integrate it into your projects.
Feel free to explore and experiment with the library in the Tinkercad environment to get a hands-on experience before implementing it in your hardware projects.
