Software for collecting the position of CS:GO player's bounding boxes and exporting them as csv in realtime.
Free open-source data-collection software for Counter-Strike: Global Offensive game. Designed as an internal application - Dynamic-link library (DLL) loadable into game process. Compatible with the Steam version of the game.
Although the original software is designed for cheating, this version was developed with the intention of only being used in private matches, causing no harm to other player's experiences.
-
Microsoft Visual Studio 2019 (preferably the latest version), platform toolset v142 and Windows SDK 10.0.x.x are required in order to run Osiris. If you don't have ones, you can download VS here (Windows SDK is installed during Visual Studio Setup).
-
Python 8.x with the following additional libraries:
- mss
- numpy
- opencv-python
- pandas
After installing python, you can install all the necessary libraries with the following command:
pip3 install mss numpy opencv-python pandas
Open this if you want to compile from source and modify the code
With git
Open git command prompt and enter following command:
git clone https://github.com/IgaoGuru/csgo-data.git
csgo-data folder should have been succesfully created, containing all the source files.
When you have equiped a copy of source code, next step is opening Osiris.sln in Microsoft Visual Studio 2019.
Then change build configuration to Release | x86 and simply press Build solution.
If everything went right you should receive Osiris.dll binary file.
When injected, menu is openable under INSERT key.
You can download the already compiled dll, and inject it into the game either with Extreme injector (recommended), or Xenos Injector.
Remember to configurate steam to start CS:GO in insecure mode (with the "-insecure") flag), and run the game. This flag will ensure that Valve's anticheat isn't activated when you inject the dll (eliminating the risk of banning you steam account from cs:go's servers).
In csgo's video setting, remember to change the in-game resolution to your current img_rez (default=[1280x720]).
place the csgo window on the top-left corner of you primary monitor
For data-collection results, it's best to run "deathmatch" private matches, that is because there are no interruptions (like round intervals or timeouts) during the game, and you can switch freely between teams.
Recommended CS:GO deathmatch settings:
After starting the private match, make sure your Developer Console is activated in CS:GO's settings. After that, I recommend setting the following commands:
sv_cheats 1
bind t noclip
bind y god
mp_dm_bonus_length_max 0
mp_dm_time_between_bonus_max 9999
cl_teamid_overhead_mode 0
mp_roundtime 60
mp_restartgame 1 60
god
with these commands, you can use t to fly through te map, making it easier to spot other players, and use y to make the LocalPlayer(you) immortal.
note: because of a minor difference between the capturing of the screen and the bounding box output, moving the mouse too fast may cause inaccuracies in the data collection. Try to move the mouse at a steady rate, with no fast or abrupt movements.
Inside Extreme Injector's configuration menu, change the Injection Method from "Standard Injection" to "Manual Map".
Before injecting, create a folder named named "csgolog" inside "C:\", so that it's path is C:\csgolog\.
Select the game's process in the injector, and select the dll in "ADD DLL" option. You can now inject the dll by clicking Inject.
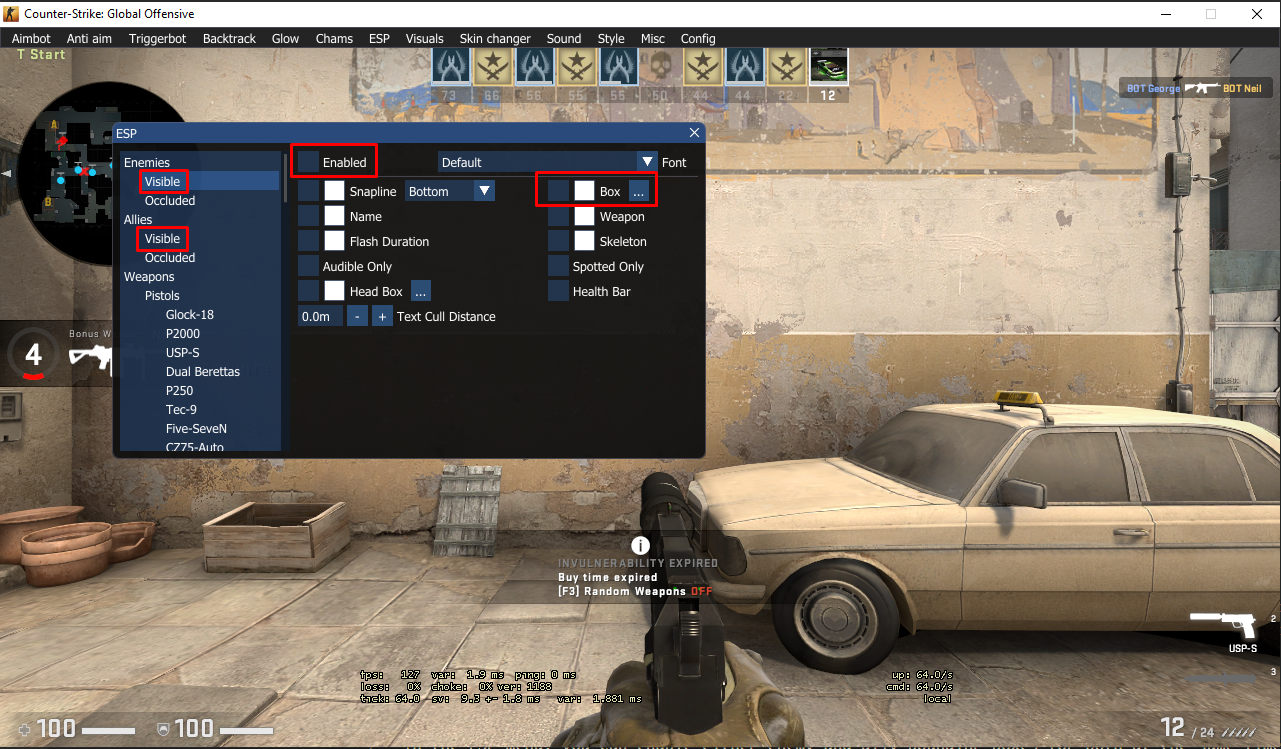
After starting a private match with bots, open the menu with INSERT, and click on the ESP option.
In the ESP menu, you can enable either enemy and ally bounding boxes (or both at the same time) with the "Box" checkbox.
By default, the bounding boxes are not rendered into the game (so you won't be able to see them while playing). Later on, an option for toggling bbox rendering will be added.
Enabling the "Box" option will automatically start outputing bboxes for the specific target. (in this case "Visible Enemies");
After enabling the preffered bounding boxes, a text file will be created in the stardard path (C:/csgolog/csgo_log.txt). You don't need to edit or open the file. This file will be read and processed by the main_cycle.py script.
note: in order to modify the standard csv path (not recommended), you will need to edit/compile the dll's code from source
If you want to modify the standard csv path:
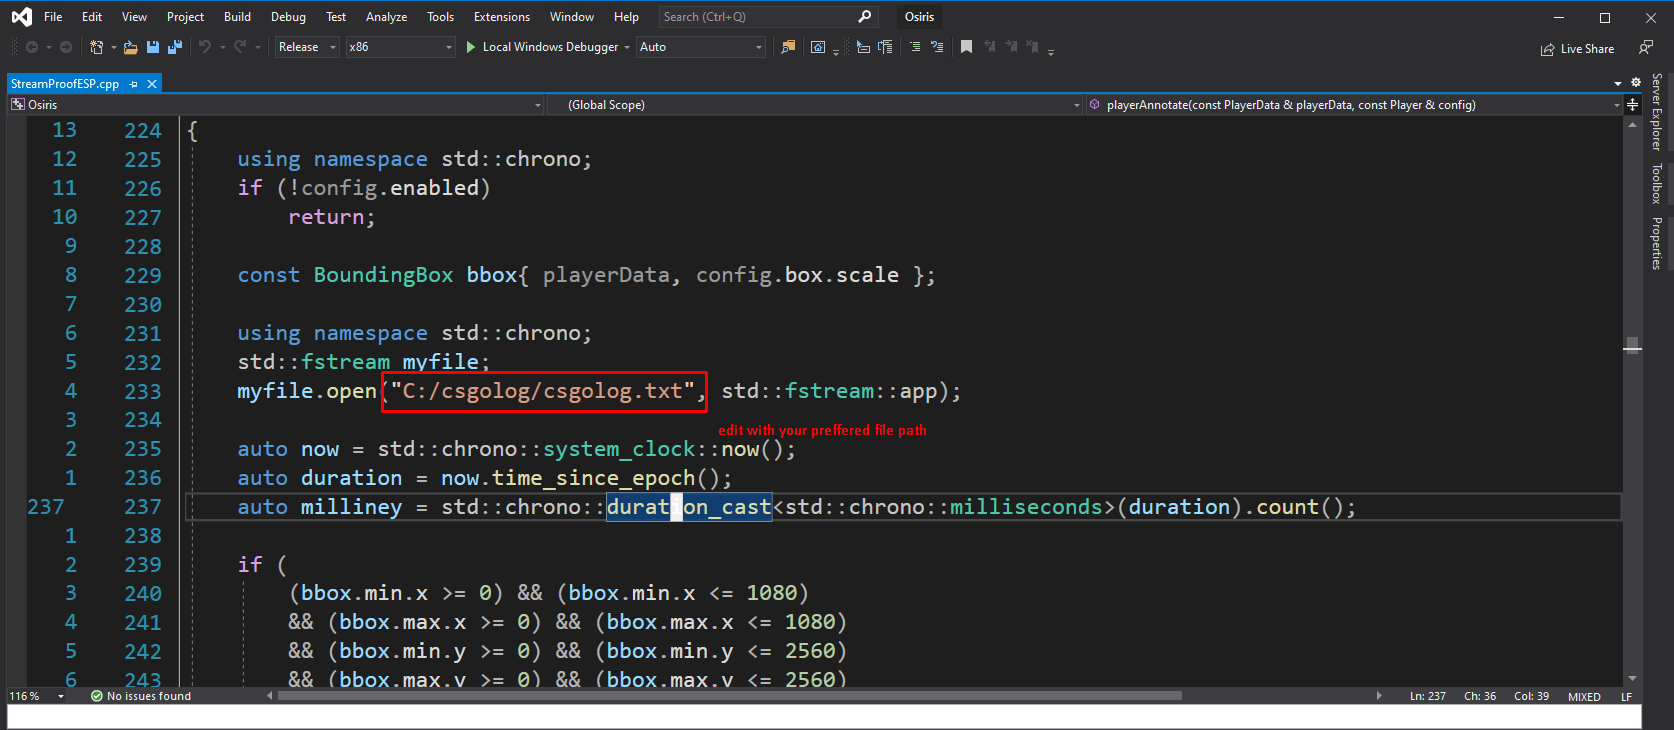
After opening the dll's code in VisualStudio, head over to the StreamProofEsp.cpp file under the Hacks folder. In there, you should find a PlayerAnnotate function, and there you can modify the "myfile.open('your_path_here')" path.

Now that the preferred bboxes are being outputed, its time to collect the actual images that correspond to the outputed bboxes. For collecting the images and pairing them with the dll's output, we will use the main_cycle.py script.
Open the main_cycle.py script with you editor of choice, and change the "output_path" variable to your directory of choice. This path will contain the outputs from the data-collector.
With the dll running, run the main_cycle.py script. A folder will be created every time the script is ran. Inside, there will be the annotation from the screencaptures inside the "imgs" folder. This annotation file is the final output of the data-collector.
This file manages the screencapturing, saving, merging and outputing of the data-collector. All functions used by this file come from the csgodata module (inside the utils folder).
Every run of this file generates a new session folder
A session is a complete run of the main_cycle.py script. This folder contains the outputs from main_cycle.py. The folder contains:
- imgs folder (contains the screenshots)
- annotation file (contains the formatted bbox annotations)
The annotation file contains the following format:
- corresponding image's name
- LocalPlayer's team (2 = Terrorist, 3 = CounterTerrorist)
- bboxes's enemy state (if bbox is from the opposite team from LocalPlayer = 1; else = 0)
- x0, y0, x1, y1
- Daniel Krupiński for developing and maintaining the open-source original software.
- ocornut and contributors for creating and maintaining an amazing GUI library - Dear imgui.
- Zer0Mem0ry - for great tutorials on reverse engineering and game hacking
Copyright (c) 2020-2020 Igor Rocha
This project is licensed under the MIT License - see the LICENSE file for details.


