Use Supply Chain Insights to predict, assess, and mitigate disruptions and ultimately optimize supply chain performance
When everything is going all and well, details such as which route your carrier took to deliver your package to your customer seem completely immaterial. But what happens when a massive storm hits, and you realize that all of your carriers are stuck in the storm, and none of your packages will be delivered on time? You've just broken your promise to your customers, and more likely than not, you'll have to deal with angry customers demanding refunds, all because you didn't have the visibility into your end-to-end supply chain. This is where Supply Chain Insights comes in.
IBM's Supply Chain Insights provides your organization with end-to-end visibility throughout all stages of the supply chain lifecycle - starting from planning and sourcing, all the way to delivery and service, and everything in-between. Not only that but Supply Chain Insights is a collaboration platform; it enables businesses to set up resolution rooms to discuss and take action on problems that inevitably arise during the supply chain process. Now, Supply Chain Insights, like any other artificial intelligence application, is only as good as the data that you give it. To make things simple, Supply Chain Insights allows for two ways to upload data into the platform - one via Excel sheet upload, and the other via REST APIs. This pattern will show you how to you to get your account, upload data, and integrate with external data sources such as UPS, and ultimately make better supply chain decisions.
Audience level : Intermediate Developers
🚨 Note: Supply Chain Insights will be abbreviated to SCI for short. 🚨
When you have completed this code pattern, you will understand how to:
- Upload orders, shipments from an Excel spreadsheet
- Use APIs to automate and upload large batches of orders and shipments
- Automate updating external shipment data (from UPS or Fedex) to increase response time of supply chain events.
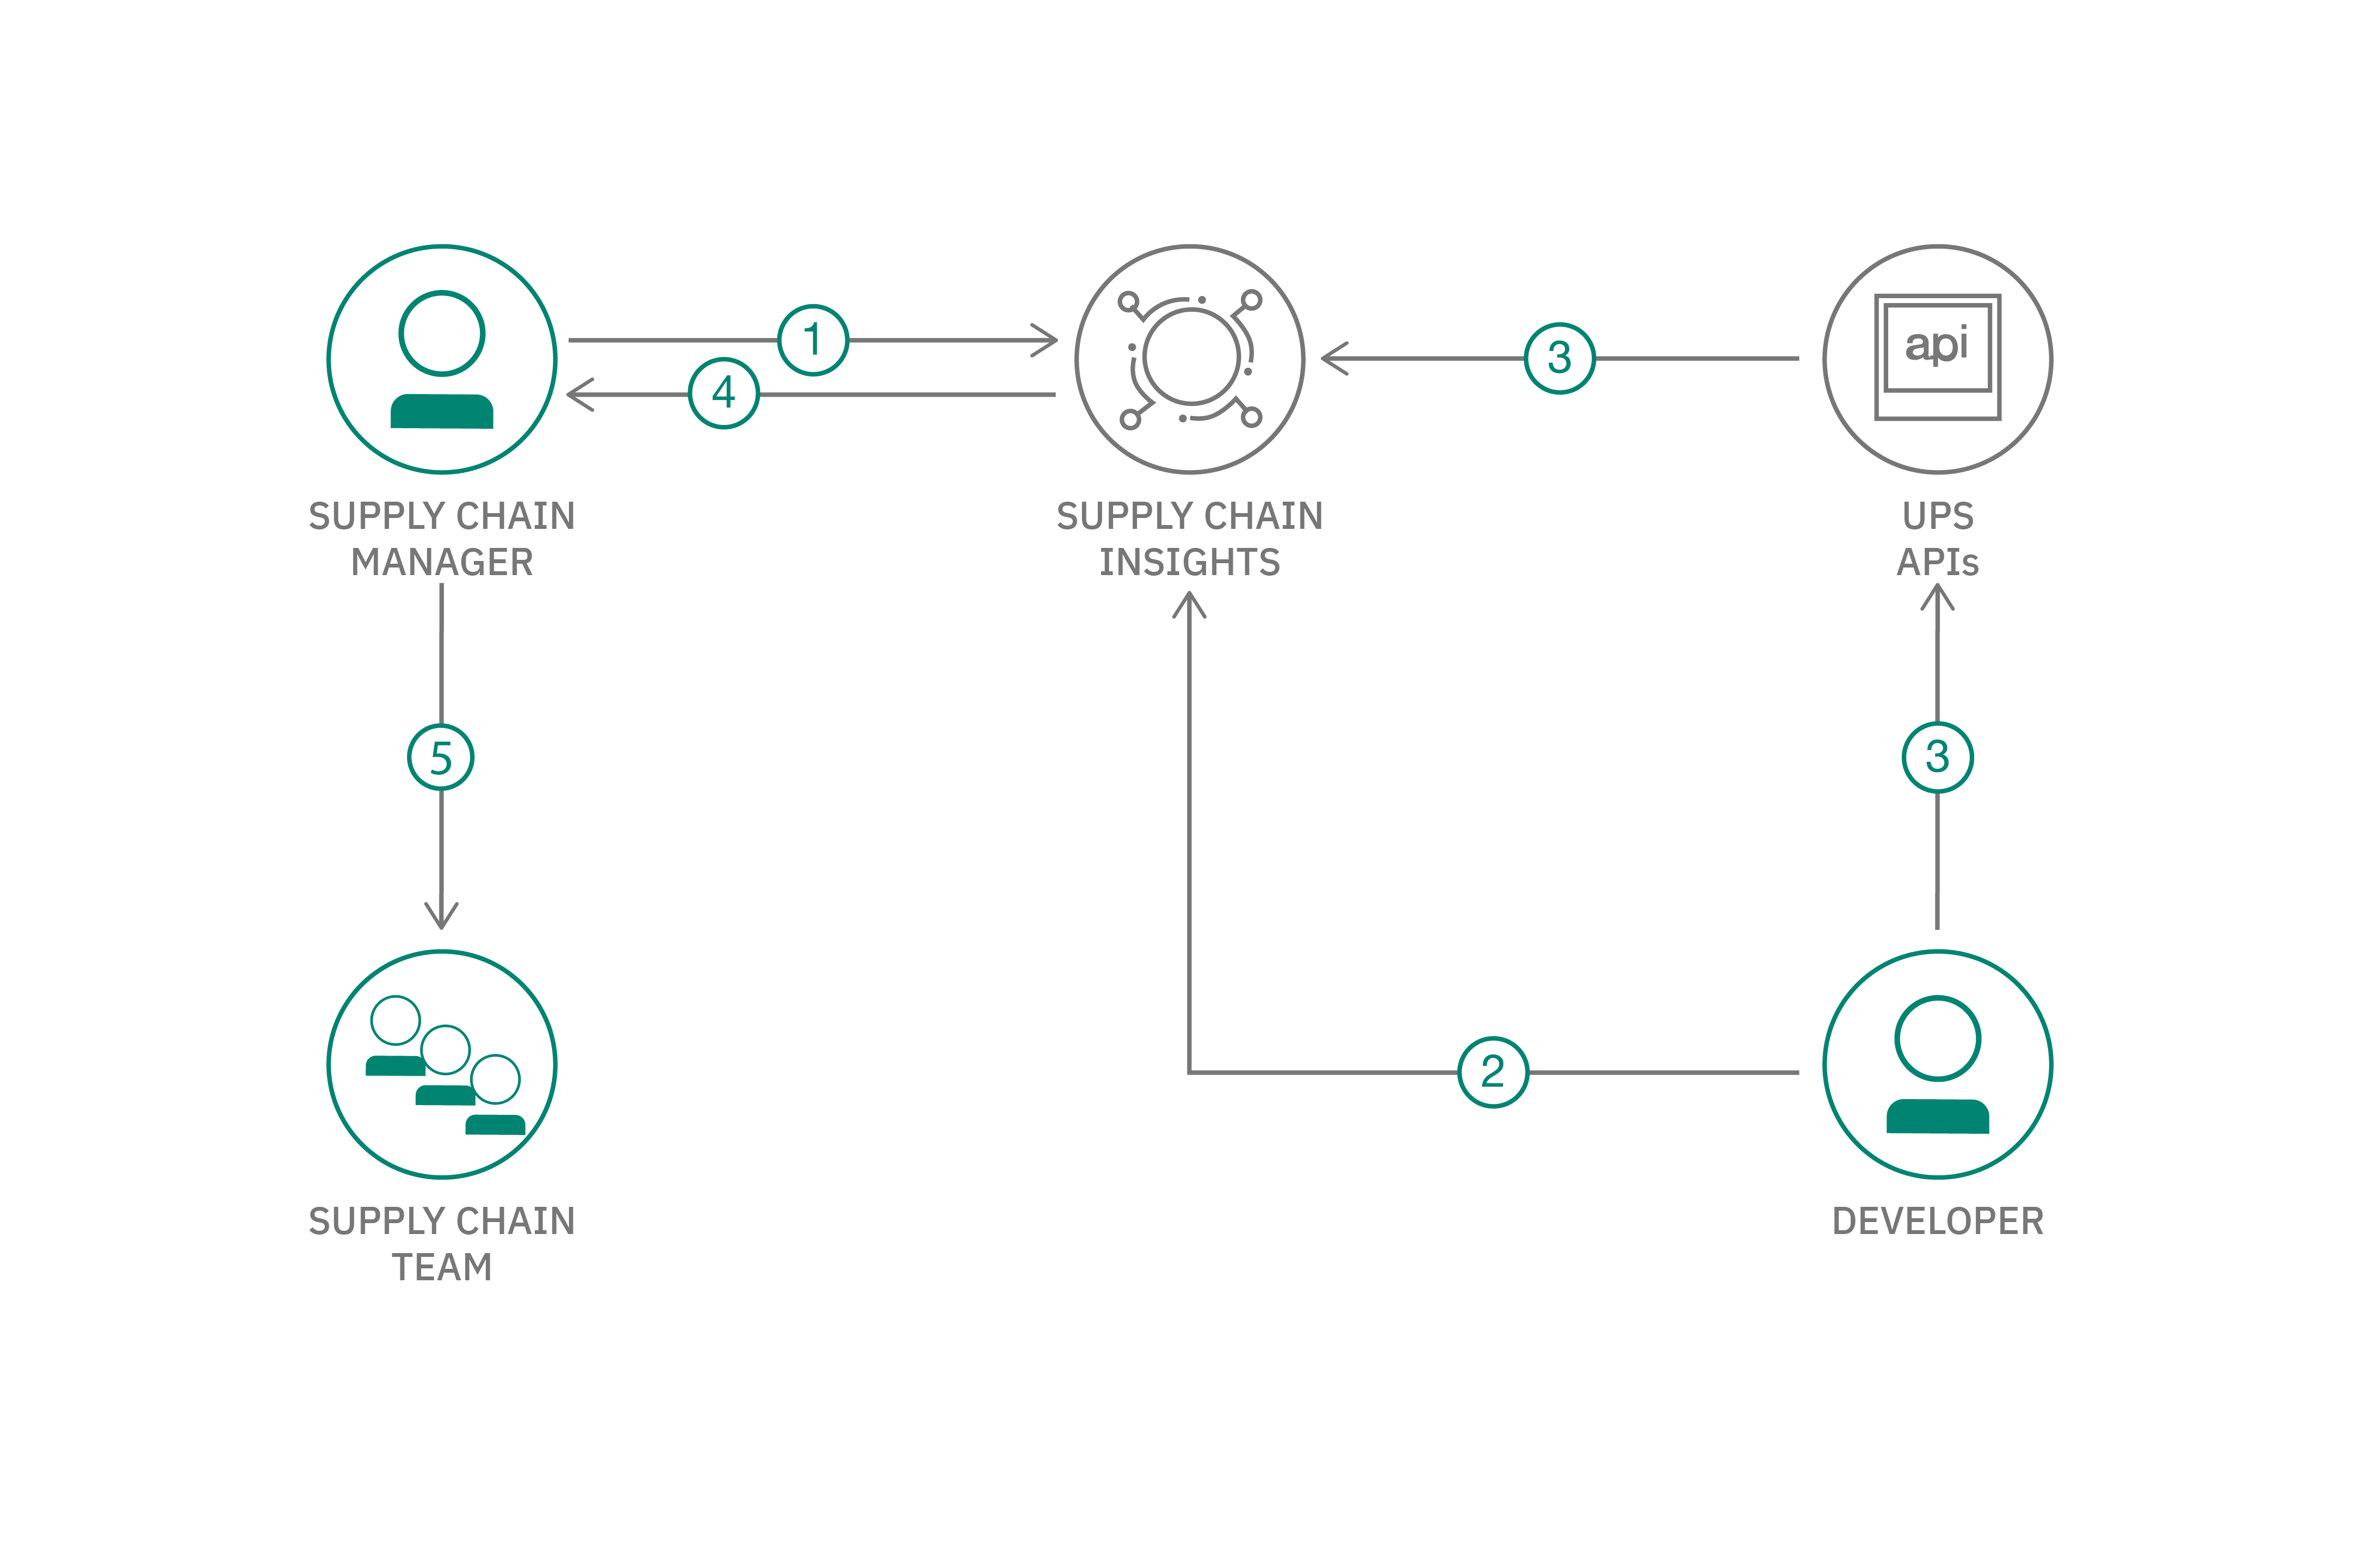
- The developer uploads existing shipment information using Excel.
- The developer uses APIs to automate uploading of large batches of orders and shipments.
- The developer uses UPS API's to gain real-time information about the current location and estimated time of delivery for shipments.
- Supply Chain Insights offers valuable advisories depending on the UPS information about the current location and estimated delivery.
- The supply chain team goes into resolution rooms to plan how best to mitigate disruptions predicted by advisories.
- Supply Chain Insights Capitalize on AI to break free from supply chain visibility challenges and act with confidence.
- Get an IBM ID
- Get a Supply Chain Insights trial account
- Upload existing orders and shipments from spreadsheet
- Get API Credentials
- Use Supply Chain Insights API to gain visibility into your customers
- Use Supply Chain Insights APIs to add product data
- Use UPS APIs to add location and delivery estimate data
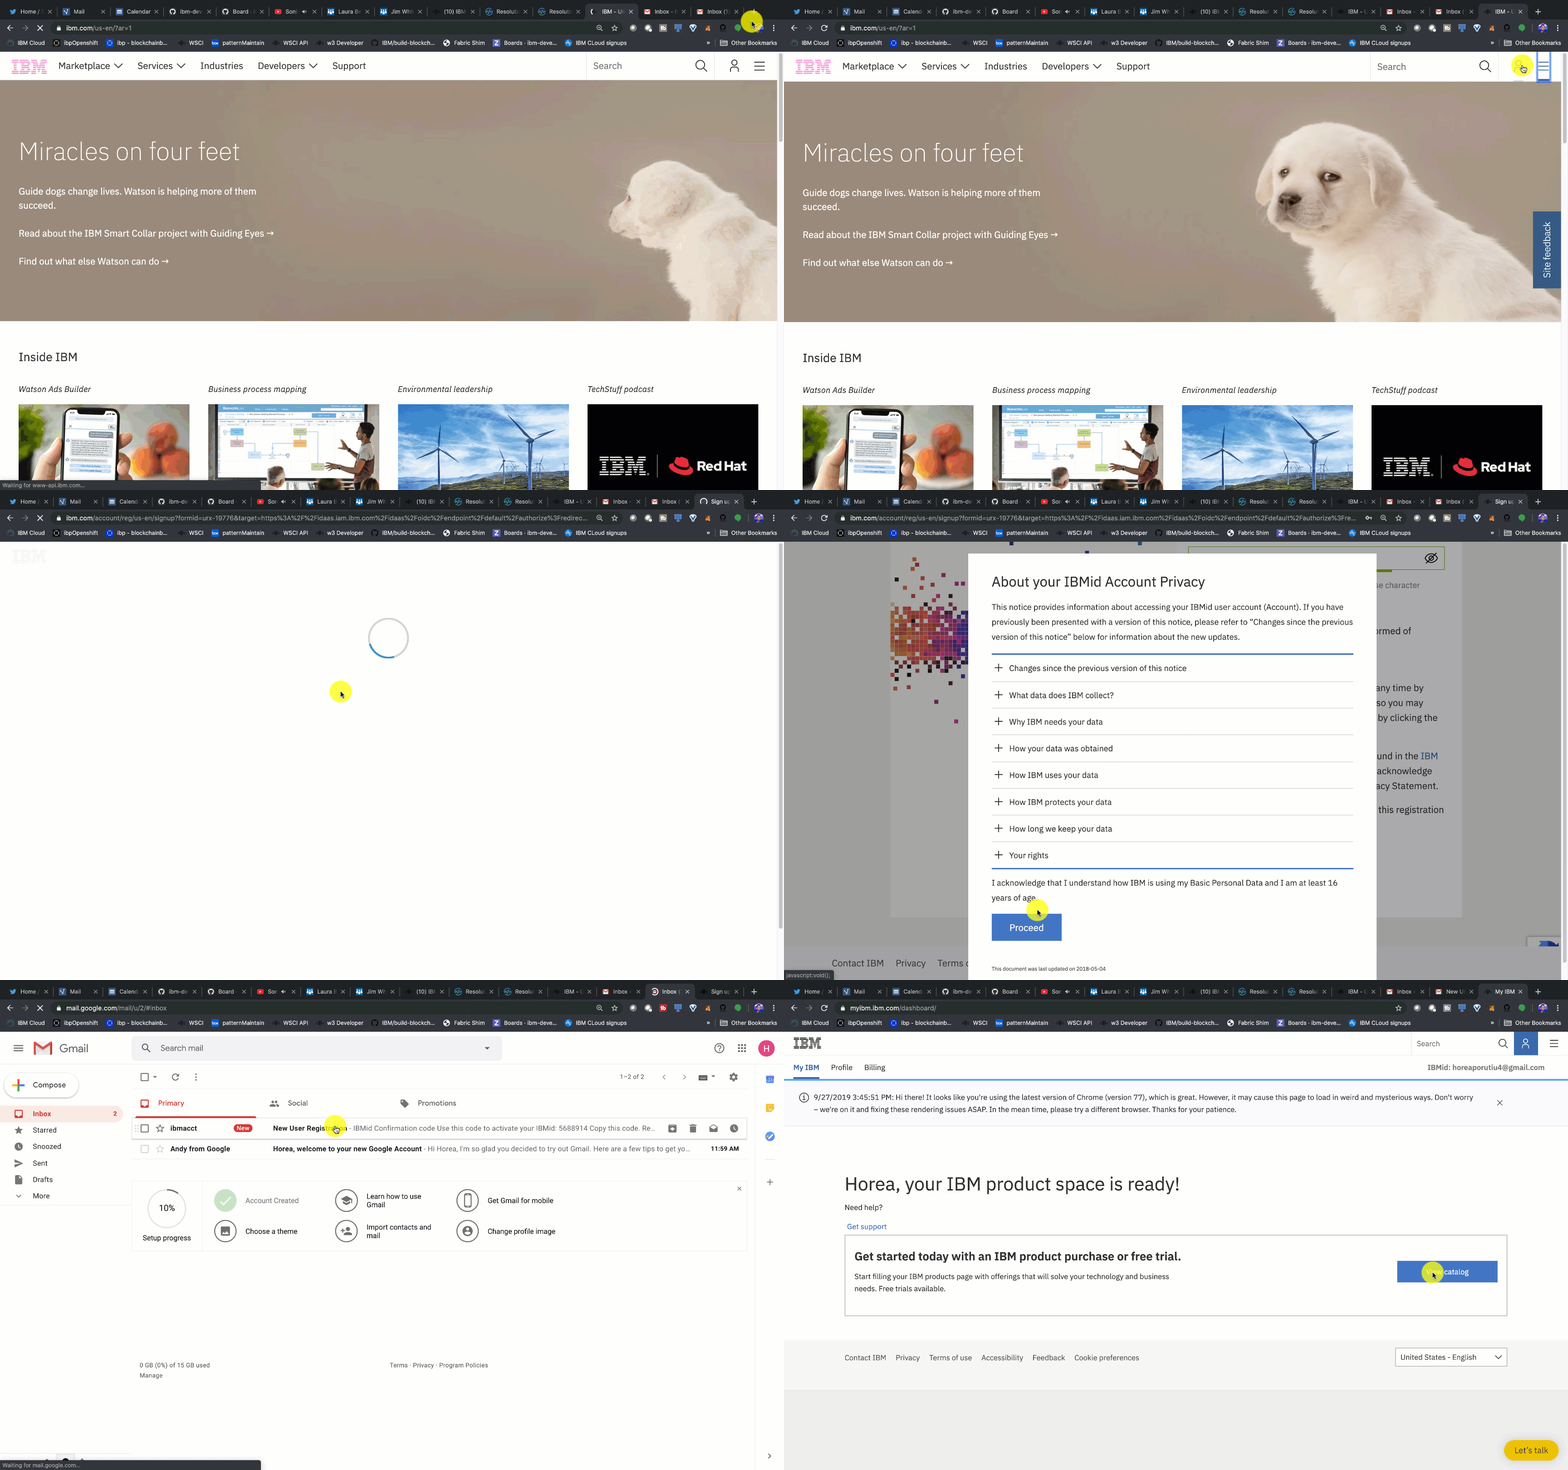
The first step to getting your free trial of Supply Chain Insights (SCI for short) is to get an IBM ID. First go to ibm.com and in the top-right corner, click on the icon of a person. From there, click on My IBM. From there, click on Create an IBM ID and fill out the form. Note that the email you use here will need to be valid, since you will be emailed your trail account for SCI to the email you use to create your IBM ID. Now that you have created your IBM ID, let's request your SCI trial.
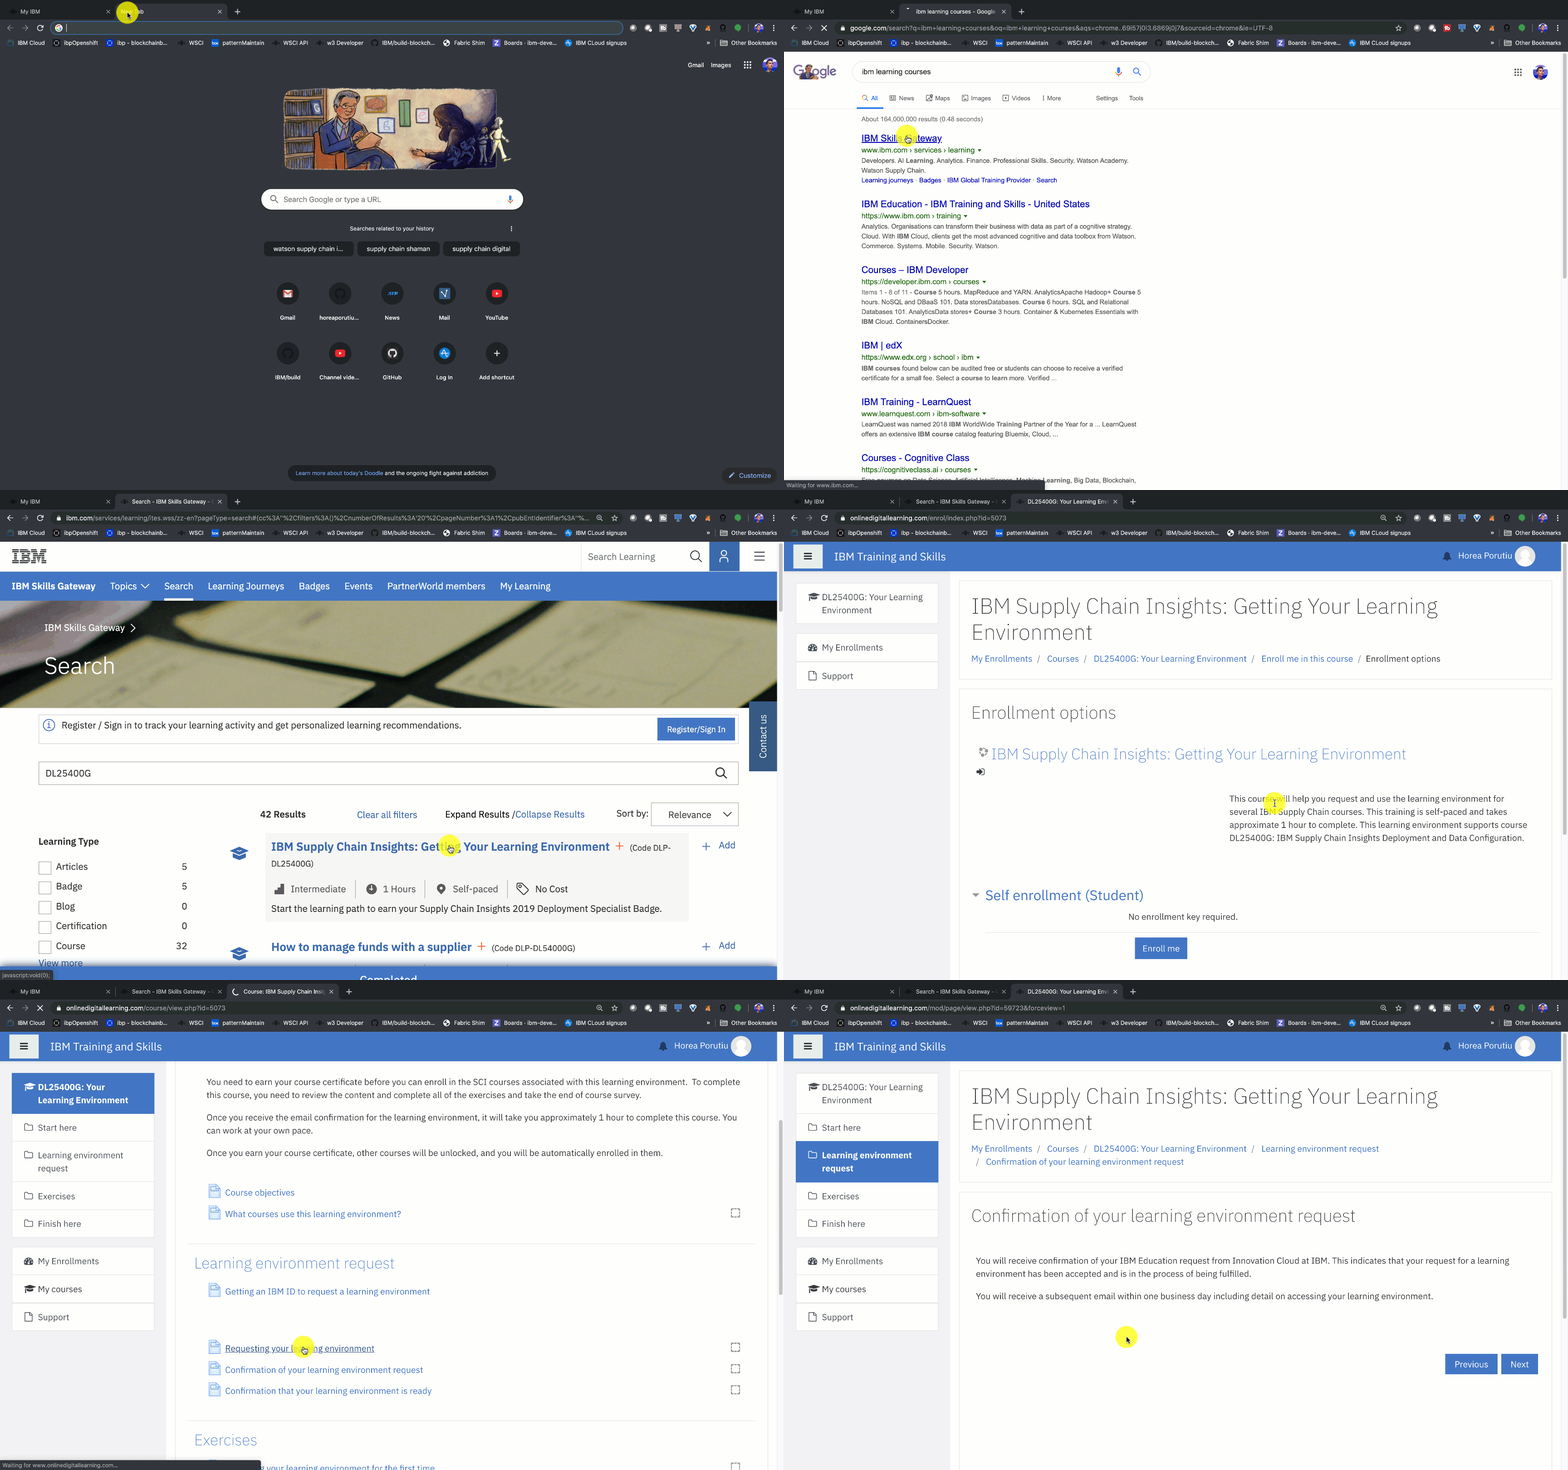
To get a Supply Chain Insights trail account, we must first register for a course that gives us access to this account. Let's go to IBM Training and Skills site. You will likely be asked to login with your IBM ID. Once there, search for DL25400G. You will see a couple results, click on IBM Supply Chain Insights: Getting Your Learning Environment. Inside the course, you will see a few links, click on Requesting your learning environment. From there, fill in the form with your IBM ID email, and then click on Create Request. The request must be processed by IBM, and can take up to one business day to complete. I.e. if you request it on Friday, you may only get access to your account on Monday.
Go ahead and check your email that is associated with your IBMid. Once you get your email granting your access to your SCI trial, we are ready to get started!
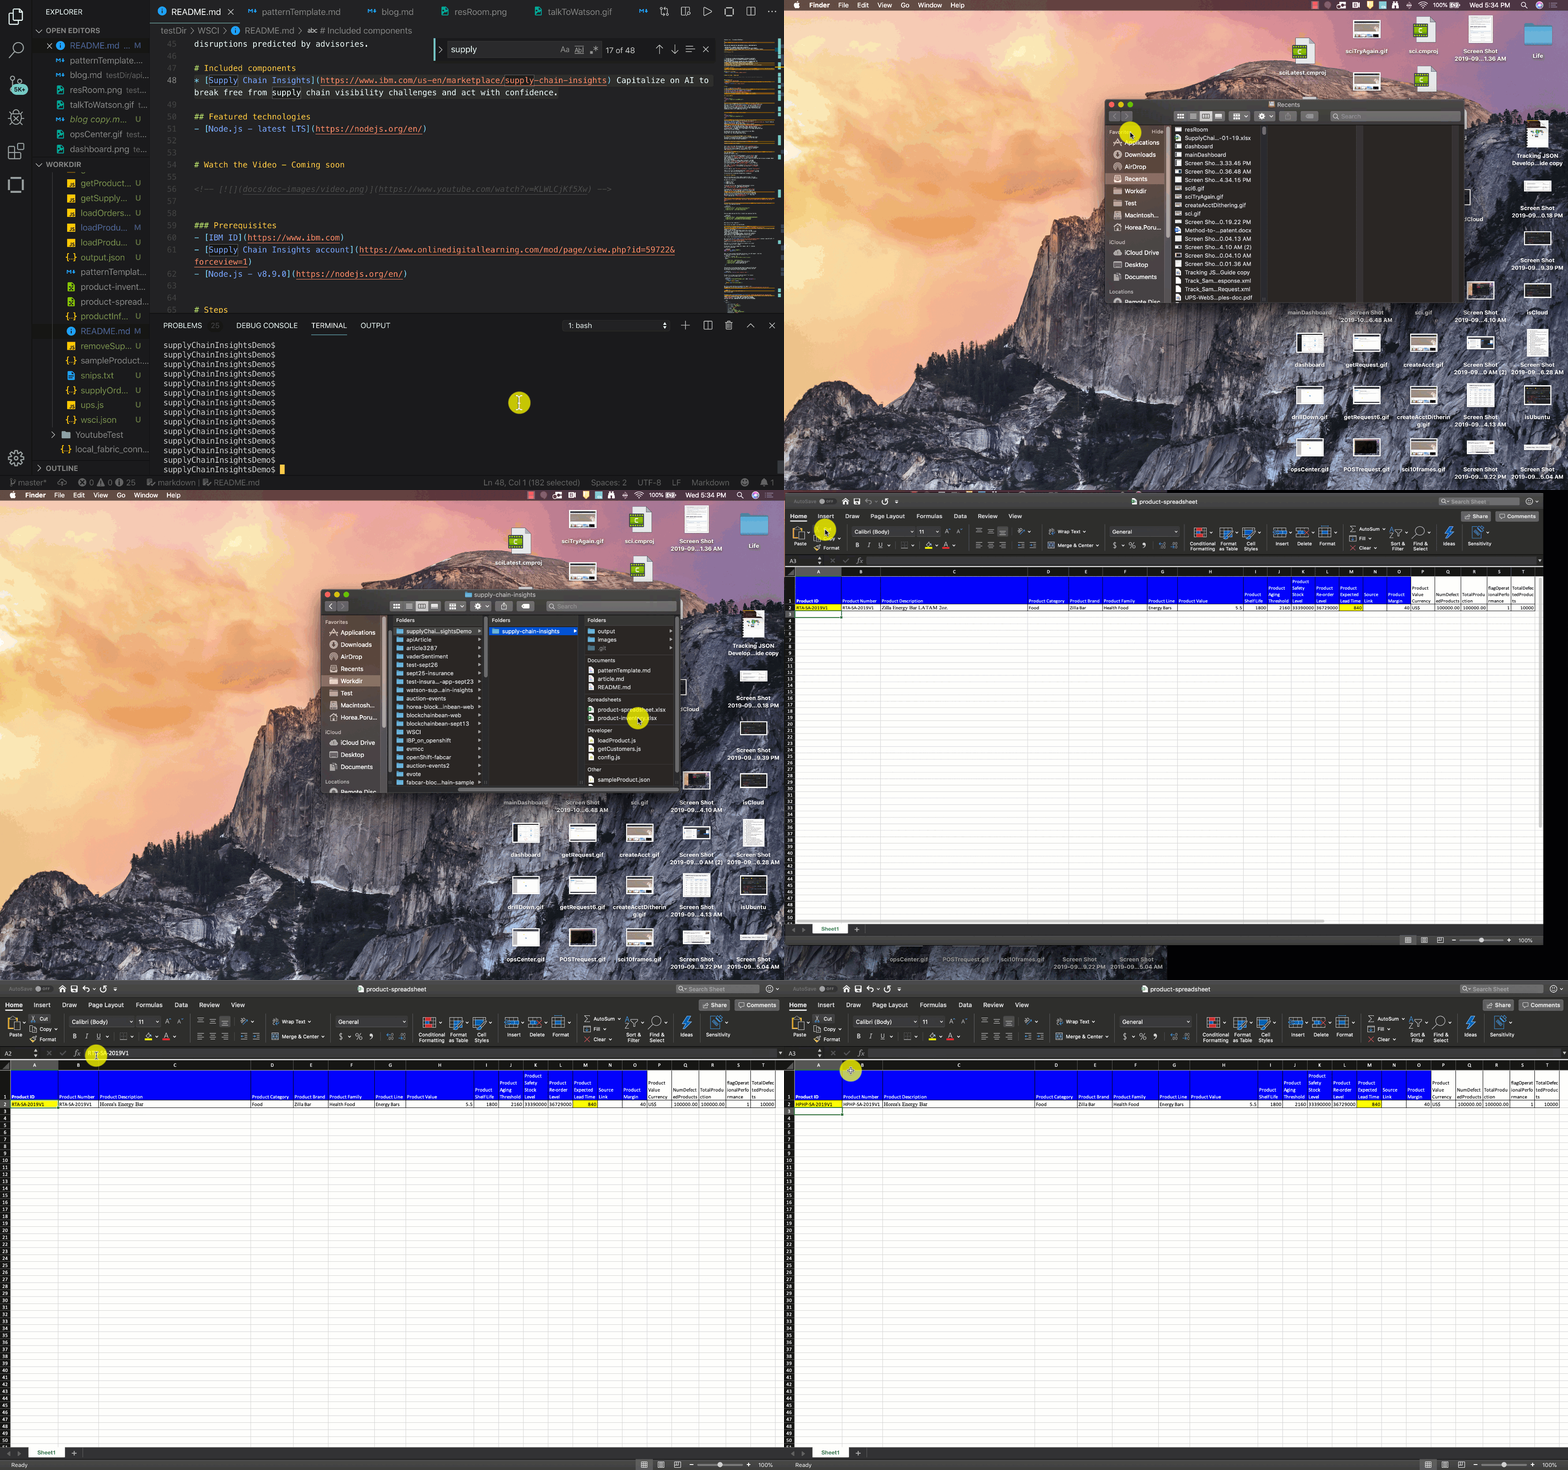
Our first exercise upon getting our SCI account is uploading data from a spreadsheet. Go ahead do a git clone to download all of the files from the repo, which includes the Excel spreadsheets.
testDir$ git clone https://github.com/horeaporutiu/supply-chain-insights

testDir$ cd supply-chain-insights/
You'll see in this repo, that we have the product-spreadsheet.xlsx and product-inventory.xlsx files. First, let's update the spreadsheets to use our own initials instead of RTA. Update the files, and save them. Since my initials are HP, my spreadsheet will show HP-SA-2019-V1.
Now, log into IBM Supply Chain Insights with your IBM ID and password you created in step 1.
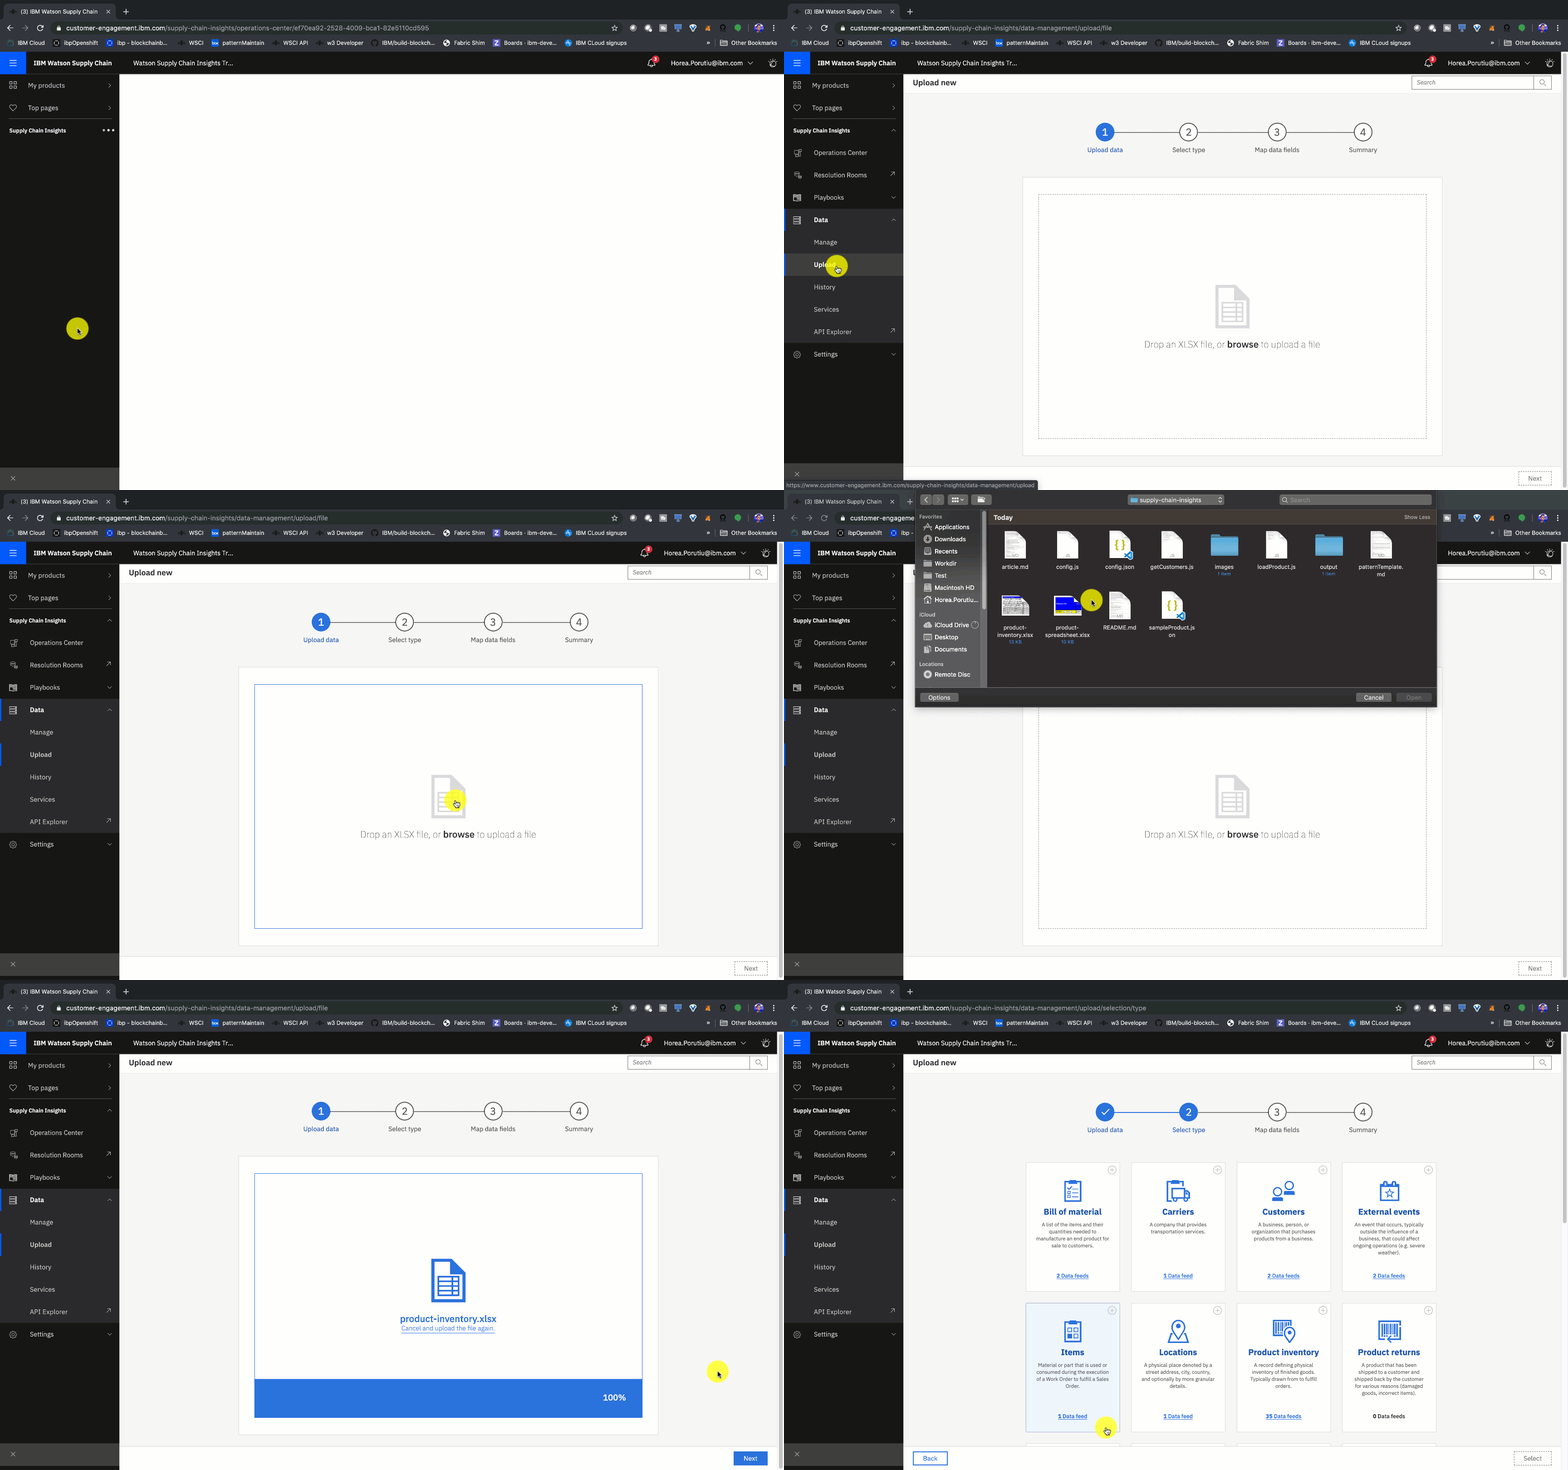
From the left-hand panel of the SCI dashboard, click on Data, which
is right above the Settings. From there, click on Upload. From
there, navigate to product-inventory.xlsx from within your cloned
repo. You should see something like This upload is similar to files that were previously uploaded. Select one of these mappings? You can edit the mapping or make a copy if necessary. Go ahead
and click on Select a type under the main panel which shows
11/12 fields matched.
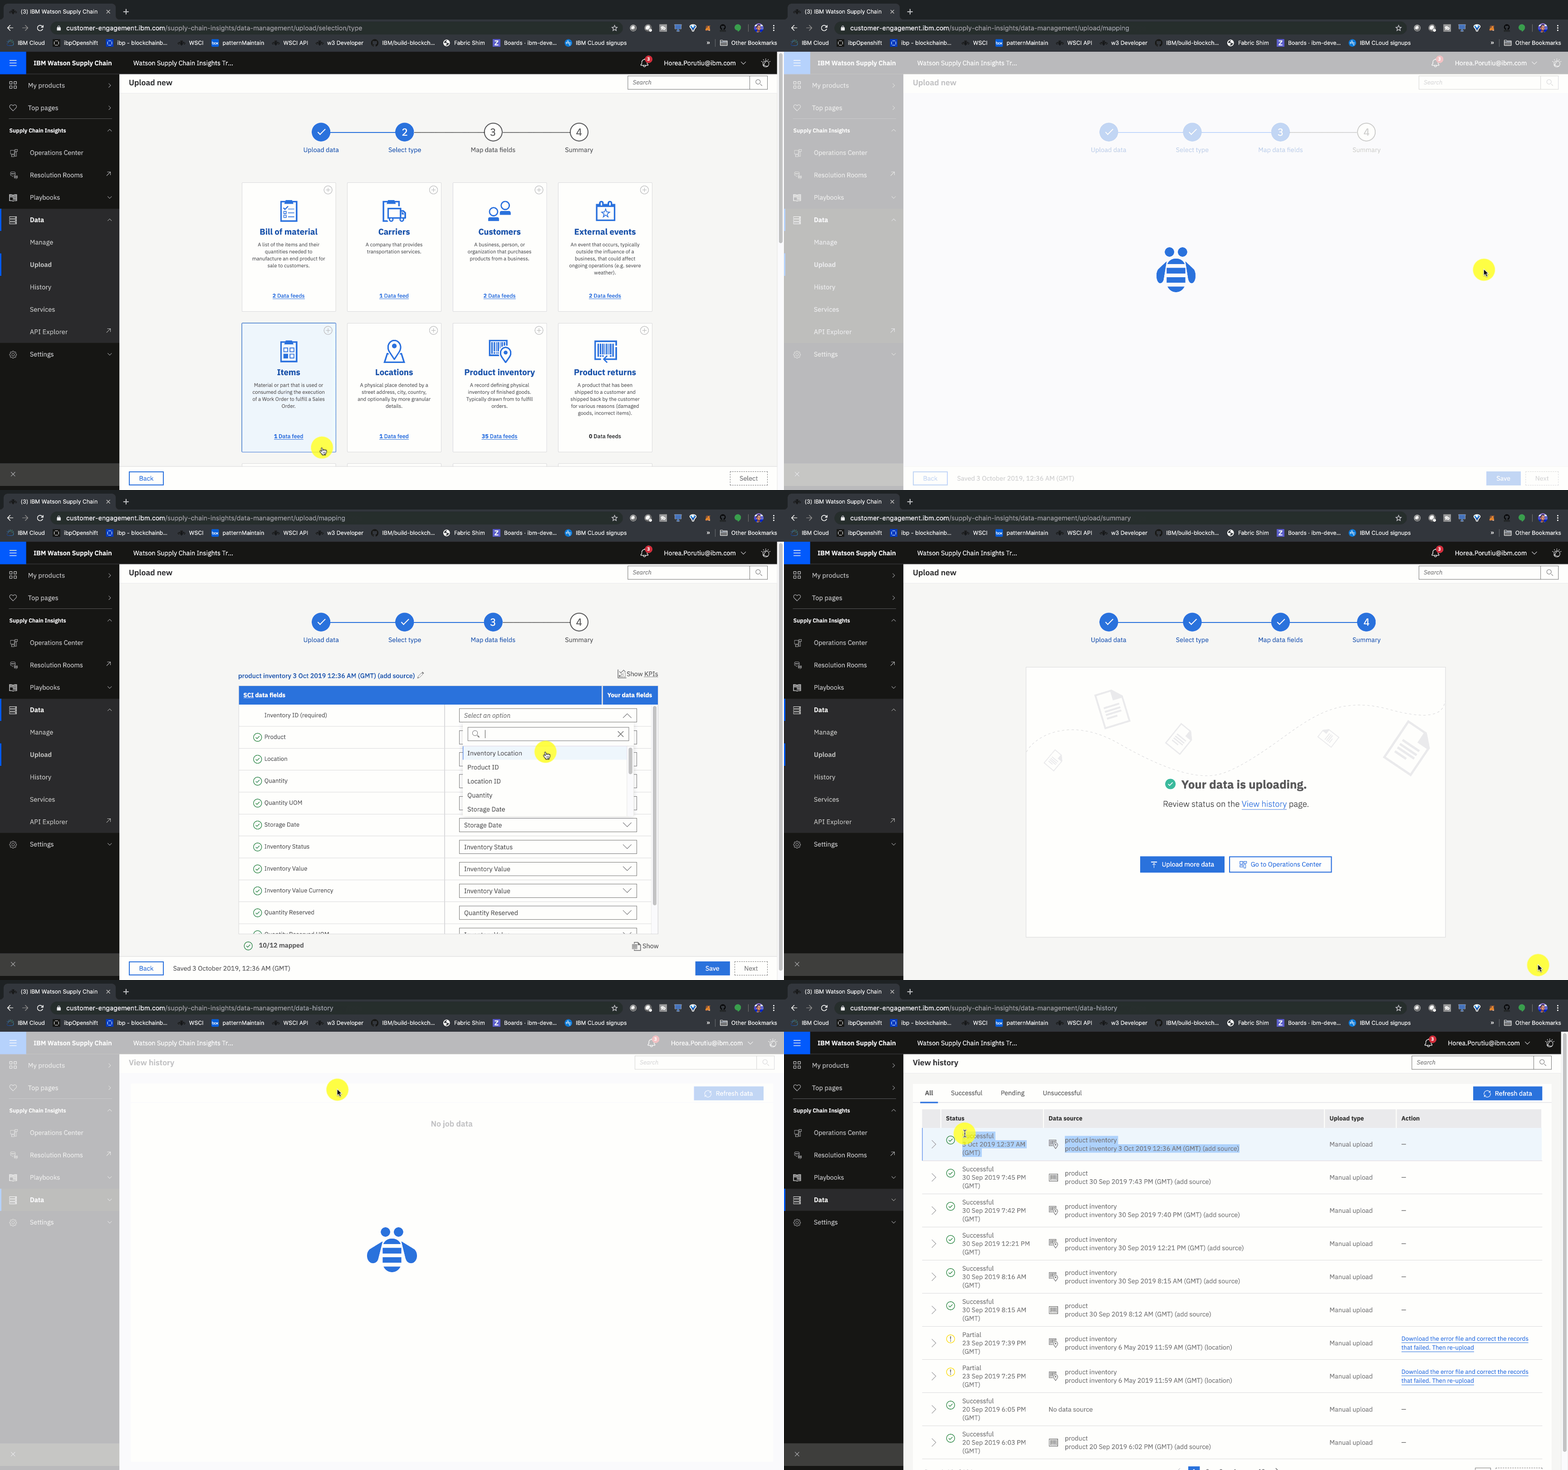
On the next screen you should see a lot of panels. Go ahead and select Product Inventory. You should
see a pop-up which says Time to map your upload! Click on Continue.
Then, under Your data fields click on Select an option and click on Inventory Location. On the bottom, you should see 11/12 mapped. Click on Next.
The next page will say Your data is uploading. Click on View History. Next, click on Refresh data. You should now see that your data has been uploaded with a timestamp from the current date!
There, at the top of the page you should see product-inventory. If you click on the right-arrow, you should see 8 records processed. Nice job!
You now know how to upload data through Excel spreadsheets!
APIs for SCI enable you to load, update, and delete data. The first thing we need to do before we can use the API is to get our credentials.
We need three credentials:
- X-IBM-User-Secret
- X-IBM-Client-Id
- X-IBM-Client-Secret
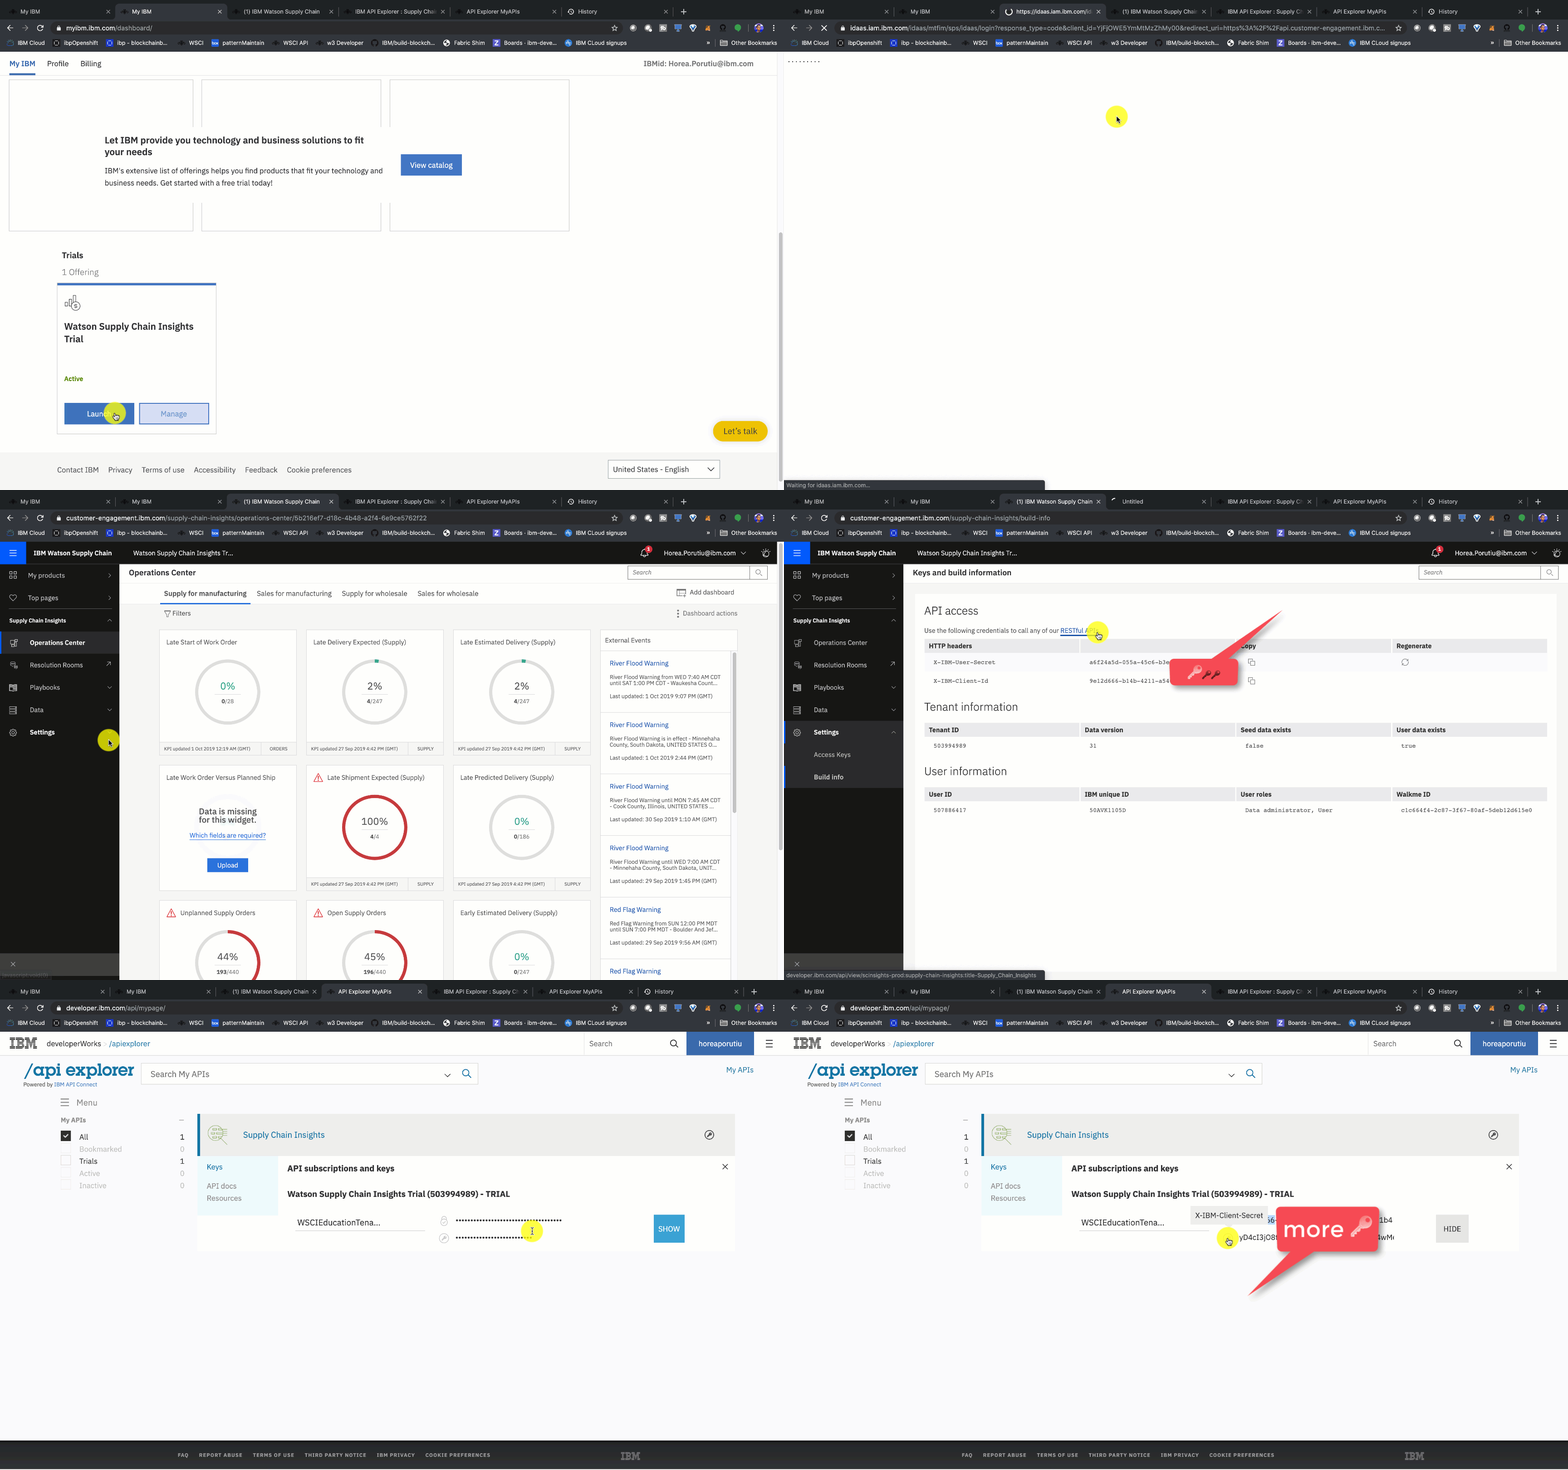
To retrieve the first two, from the SCI home dashboard, click on Settings -> Build info. From there you should see your X-IBM-User-Secret and X-IBM-Client-Id
To retrieve the X-IBM-Client-Secret, click on RESTful APIs under API access. This will take you to the SCI API explorer page. Click on My APIs in the top-right corner. To the right of Supply Chain Insights you'll see a key icon, go ahead and click on that. Once you click the icon, you'll see two sets of credentials one with a lock icon, and one with a key icon. If you hover over the key icon you can see it says X-IBM-Client-Secret - then click SHOW and save your X-IBM-Client-Secret.
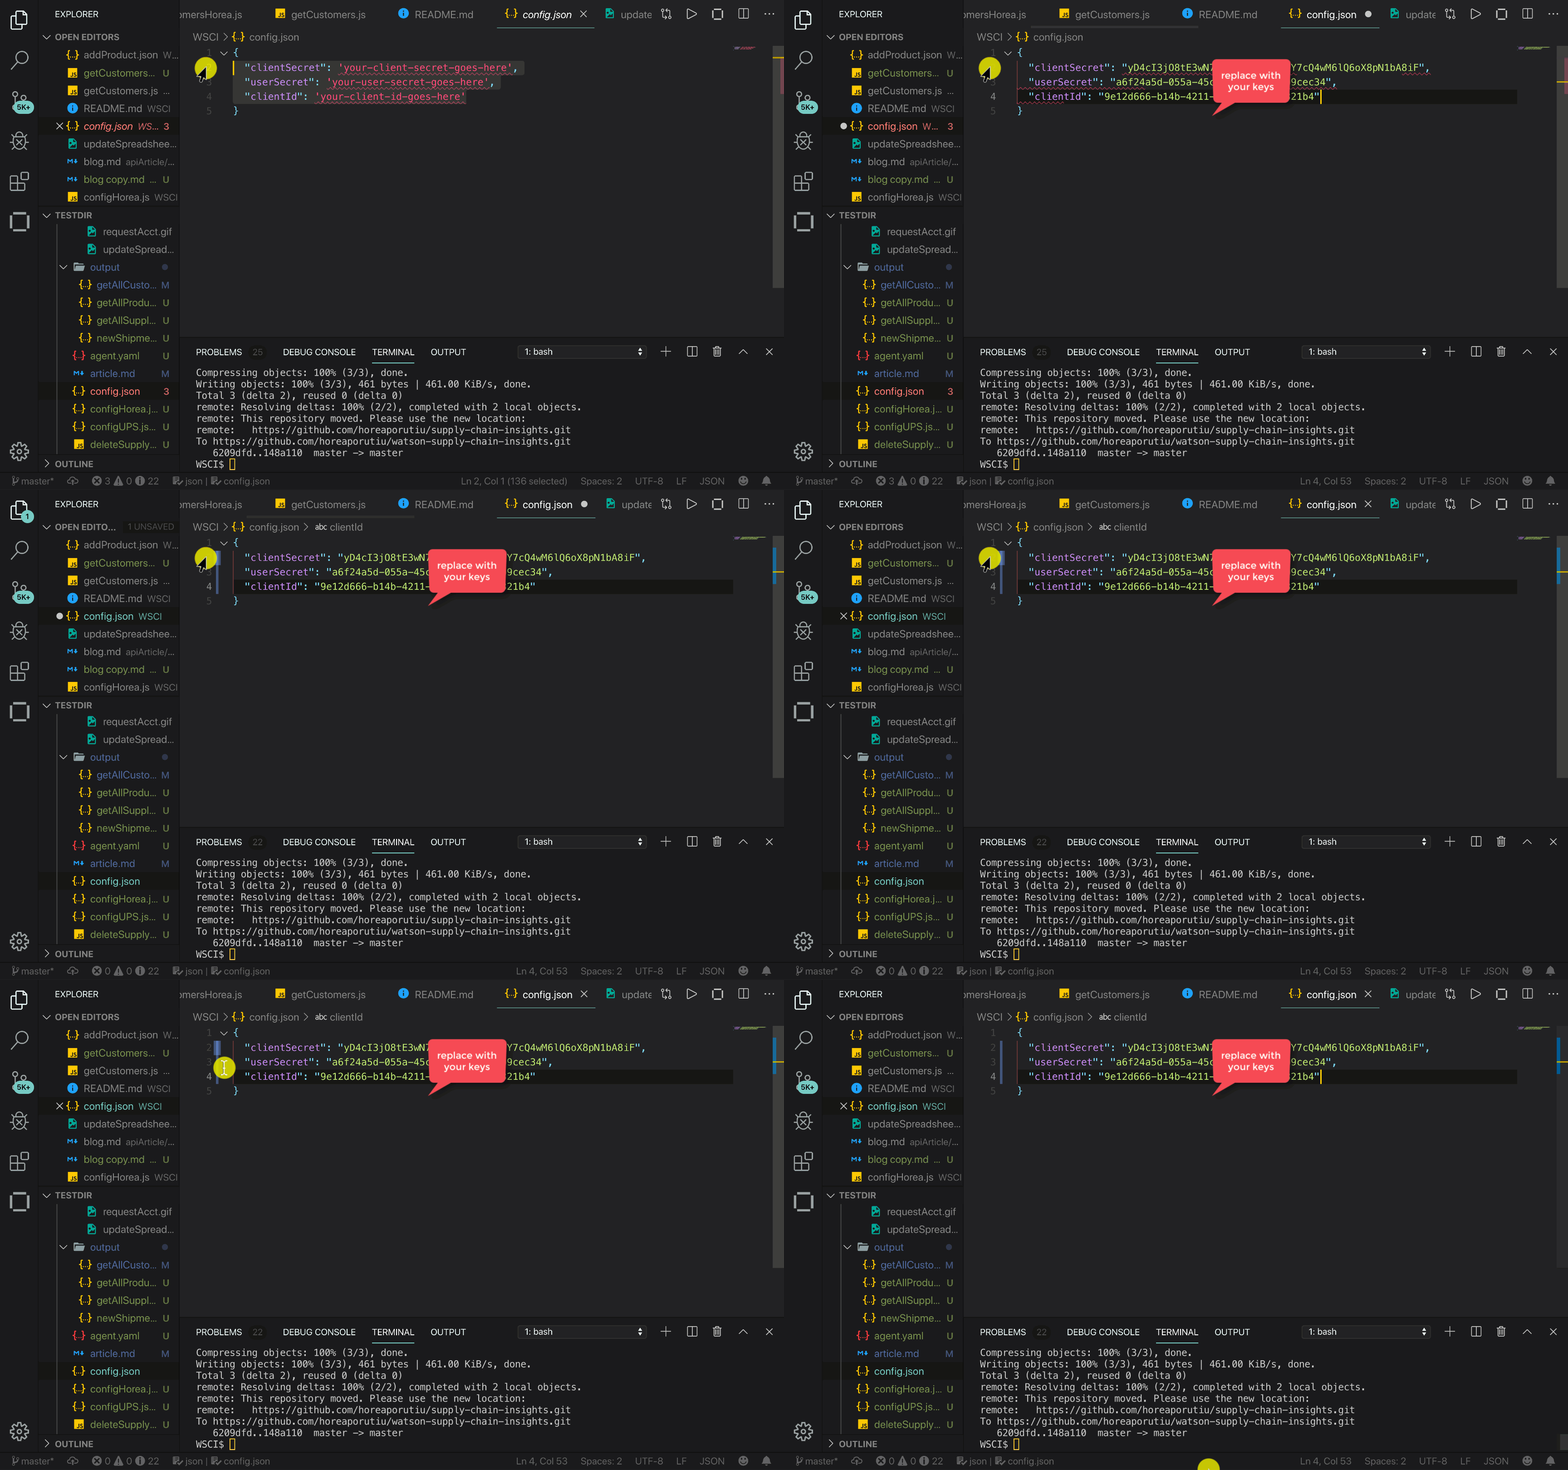
🚨 Note: You will have to update your config.js file client secret, user secret, and user id fields with the credentials you just got above. 🚨
At first the config.js file will look something like this:
module.exports = {
  "x-ibm-client-secret": 'your-client-secret-goes-here',
  "x-ibm-user-secret": 'your-user-secret-goes-here',
  "x-ibm-client-id": 'your-client-id-goes-here'
}
Once you update and save the file, it should look something like this:
module.exports = {
  "x-ibm-client-secret": 'yD4cI3jO8tE3wN7hO123fsdfacQ4wM6lQ6oX8pN1bA8iF',
  "x-ibm-user-secret": 'a6f24a5dafsdfsdfb3e6-952c909cec34',
  "x-ibm-client-id": '9e1fafafb14b-4211-a540-2627bc0321b4'
}
Note these are fake credentials ^^.
Nice, you are now ready to use the SCI APIs!
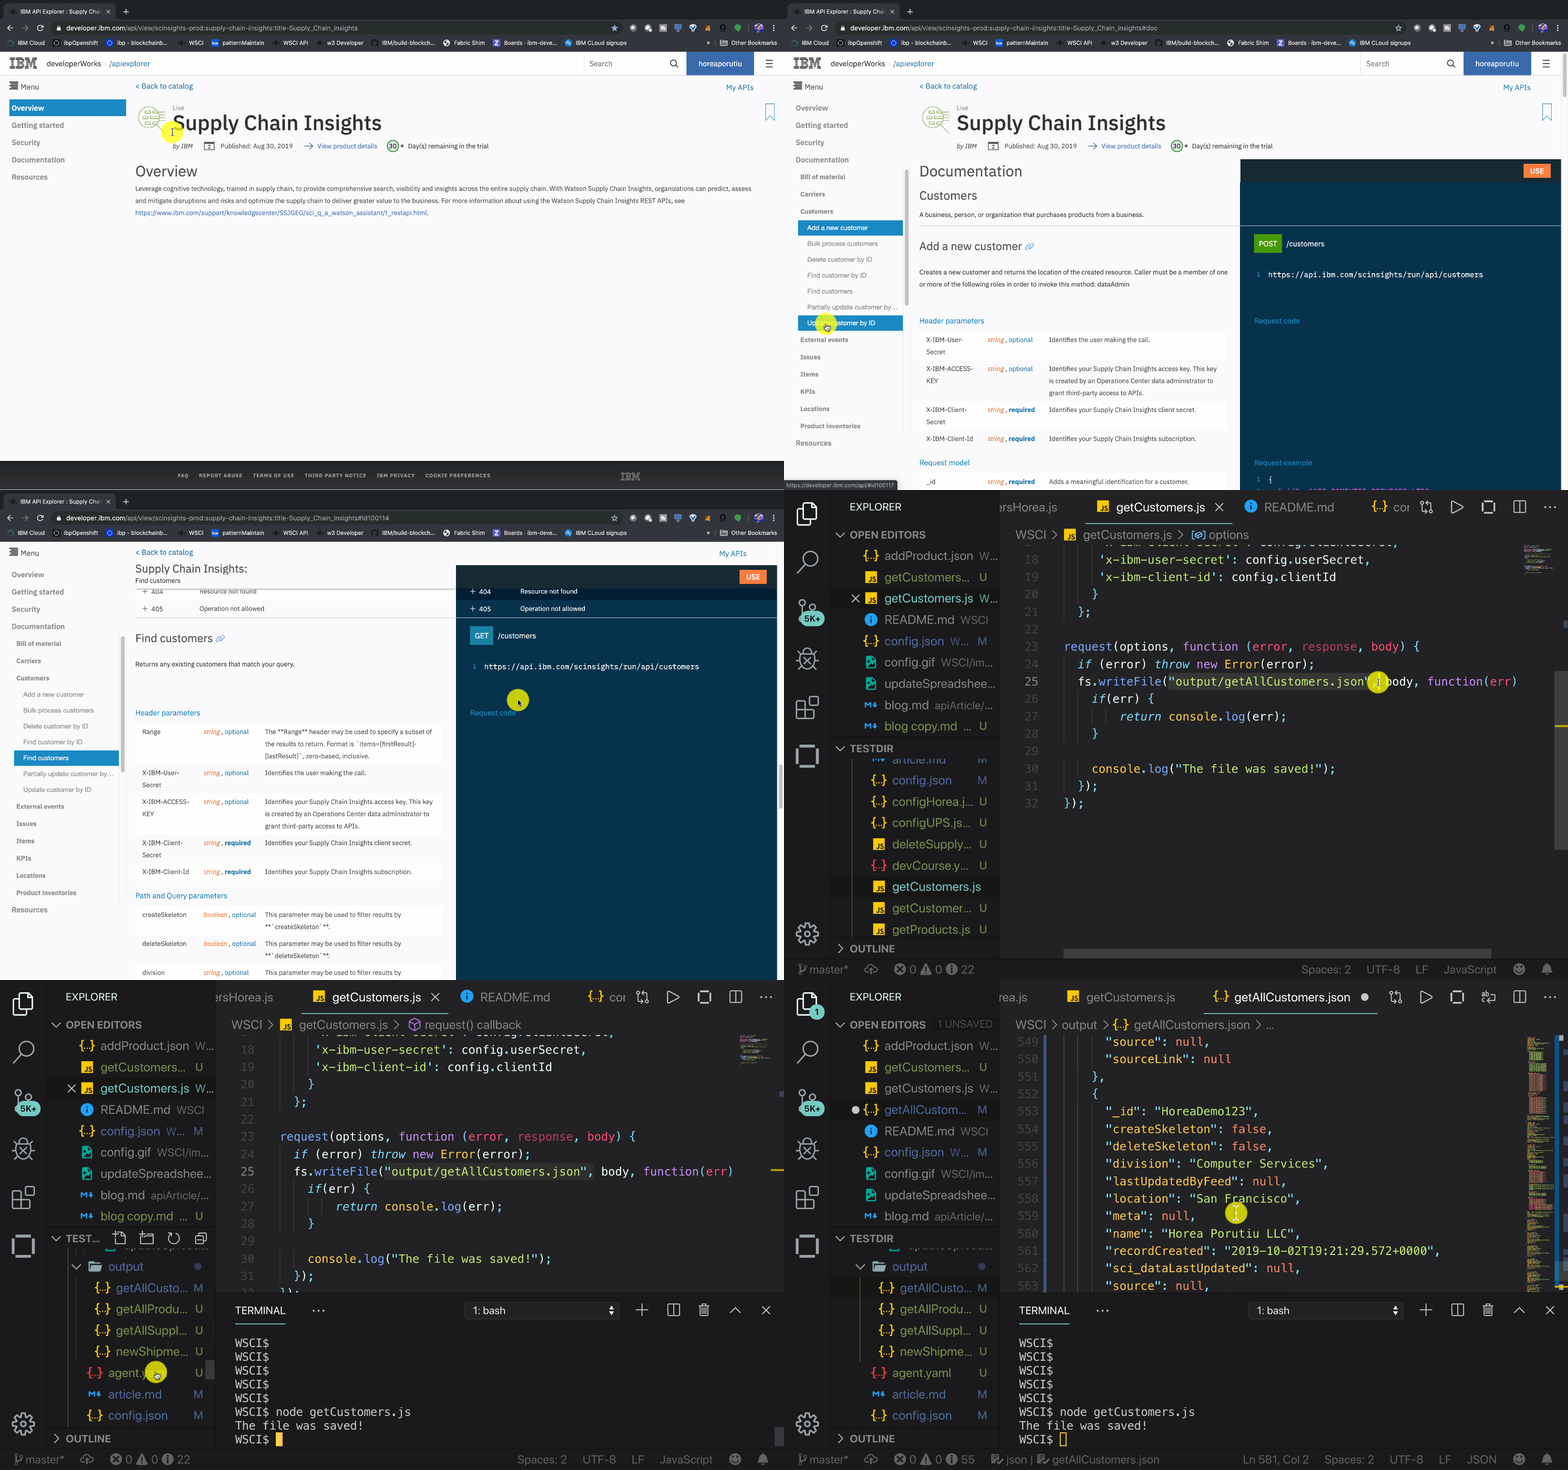
Let's first go to the SCI API documentation page From there, let's try out first API request to find customers.
In your cloned repo, you should see a script that is called
getCustomers.js. This script, along with a lot of the other scripts
we will run, use the base api
https://api.ibm.com/scinsights/run/api/, but this one in specific
looks to get all of the customers we have stored in SCI. This is
why the URL we will make a API request to is the following:
url: 'https://api.ibm.com/scinsights/run/api/customers'
Our script uses the HTTP request client package to make API calls. It also uses the fs module to write the output from the API request to a file.
Note that all of the output files will be created in the output
directory, which at first, is empty.
At the top of the file, we import the request and fs libraries
with the following code:
const request = require("request");
const fs = require('fs');
Next, we create an object which holds the options to our API request - note that
we are using the API keys from our config.js file:
var options = { method: 'GET',
  url: 'https://api.ibm.com/scinsights/run/api/customers',
  headers:
   {
     'content-type': 'application/json',
     'x-ibm-client-secret': config.x-ibm-client-secret,
     'x-ibm-user-secret': config.x-ibm-user-secret,
     'x-ibm-client-id': config.x-ibm-client-id
    }
  };
The last part of the script uses the library to make an HTTP API call to the SCI API and then once we get the data back from our API call the callback function will fire, as shown below:
request(options, function (error, response, body) {Inside of the callback, we write back the body of the response
to the output/getAllCustomer.json file:
  fs.writeFile("output/getAllCustomers.json", body, function(err) {
    if(err) {
        return console.log(err);
    }
    console.log("The file was saved!");
  });
Now that we understand how we are making the request, let's go ahead and run the script getCustomer.js
supply-chain-insights$ npm install
supply-chain-insights$ node getCustomers.js
The file was saved!
If we go to the output/getAllCustomer.json file, we will see it's all on one line. Let's format it by selecting the line, right-clicking and selecting format document. If all went well, you should see a document with over 300 lines, something that looks a bit like the following:
{
  "results": [
    {
      "_carrierDivision": null,
      "_carrierID": "TransOceanic",
      "_carrierName": "TransOceanic",
      "_carrierType": null,
      "_custom1": 123.0,
      "_custom2": "ABC",
      "_id": "TransOceanic",
      "_locationID": "Phoenix, USA",
      "_sourceLink": "https://www.ibm.com/",
      "createSkeleton": false,
      "deleteSkeleton": false,
      "division": null,
      "lastUpdatedByFeed": "8b2790af-aeab-49b8-98dc-7d7ef3d58e5c",
      "location": "Phoenix, USA",
      "meta": null,
      "name": "TransOceanic",
      "recordCreated": "2019-05-06T11:38:38.569+0000",
      "sci_dataLastUpdated": "2019-09-12T01:21:40.530+0000",
      "source": "8b2790af-aeab-49b8-98dc-7d7ef3d58e5c",
      "sourceLink": "https://www.ibm.com/",
      "type": null
    },
    {
      "_carrierDivision": null,
      "_carrierID": "UXS",
      "_carrierName": "UXS",
      "_carrierType": null,
      "_custom1": 123.0,
      "_custom2": "ABC",
      "_id": "UXS",
      "_locationID": "Nashua, USA",
      "_sourceLink": "https://www.ibm.com/",
      "createSkeleton": false,
      "deleteSkeleton": false,
      "division": null,
      "lastUpdatedByFeed": "8b2790af-aeab-49b8-98dc-7d7ef3d58e5c",
      "location": "Nashua, USA",
      "meta": {
        "activeEventRules": [
          "CARRIER_LOCATION_ADVISORY:22",
          "CARRIER_LOCATION_ADVISORY:23",
          "CARRIER_LOCATION_ADVISORY:20"
        ],
        "activeIssueCount": 3,
        "activeIssues": [
          "010bc1f2-8b41-498d-8289-5becffe1d215",
          "0e069071-5a7d-4f5c-b360-bad34c16fec4",
          "08e85518-5f0b-4def-8fe4-1ee635849be2"
        ],
        "activeKpis": null,
        "embeddedRecordLastUpdated": {
          "010bc1f2-8b41-498d-8289-5becffe1d215": "2019-09-12T01:22:00.920+0000",
          "08e85518-5f0b-4def-8fe4-1ee635849be2": "2019-09-12T01:22:00.920+0000",
          "0e069071-5a7d-4f5c-b360-bad34c16fec4": "2019-09-12T01:22:00.920+0000"
        },
        "inactiveEventRules": null,
        "inactiveIssueCount": 0,
        "inactiveIssues": null,
        "inactiveKpis": null,
        "issues": {
          "CARRIER_LOCATION_ADVISORY:20": "08e85518-5f0b-4def-8fe4-1ee635849be2",
          "CARRIER_LOCATION_ADVISORY:22": "010bc1f2-8b41-498d-8289-5becffe1d215",
          "CARRIER_LOCATION_ADVISORY:23": "0e069071-5a7d-4f5c-b360-bad34c16fec4"
        }
      },
      "name": "UXS",
      "recordCreated": "2019-09-12T01:19:28.838+0000",
      "sci_dataLastUpdated": "2019-09-12T01:21:40.513+0000",
      "source": "8b2790af-aeab-49b8-98dc-7d7ef3d58e5c",
      "sourceLink": "https://www.ibm.com/",
      "type": null
    },
Note that this is all dummy data, but SCI comes with some dummy data out of the box to show you what it can do. Let's now go ahead and put some of our own data into SCI.
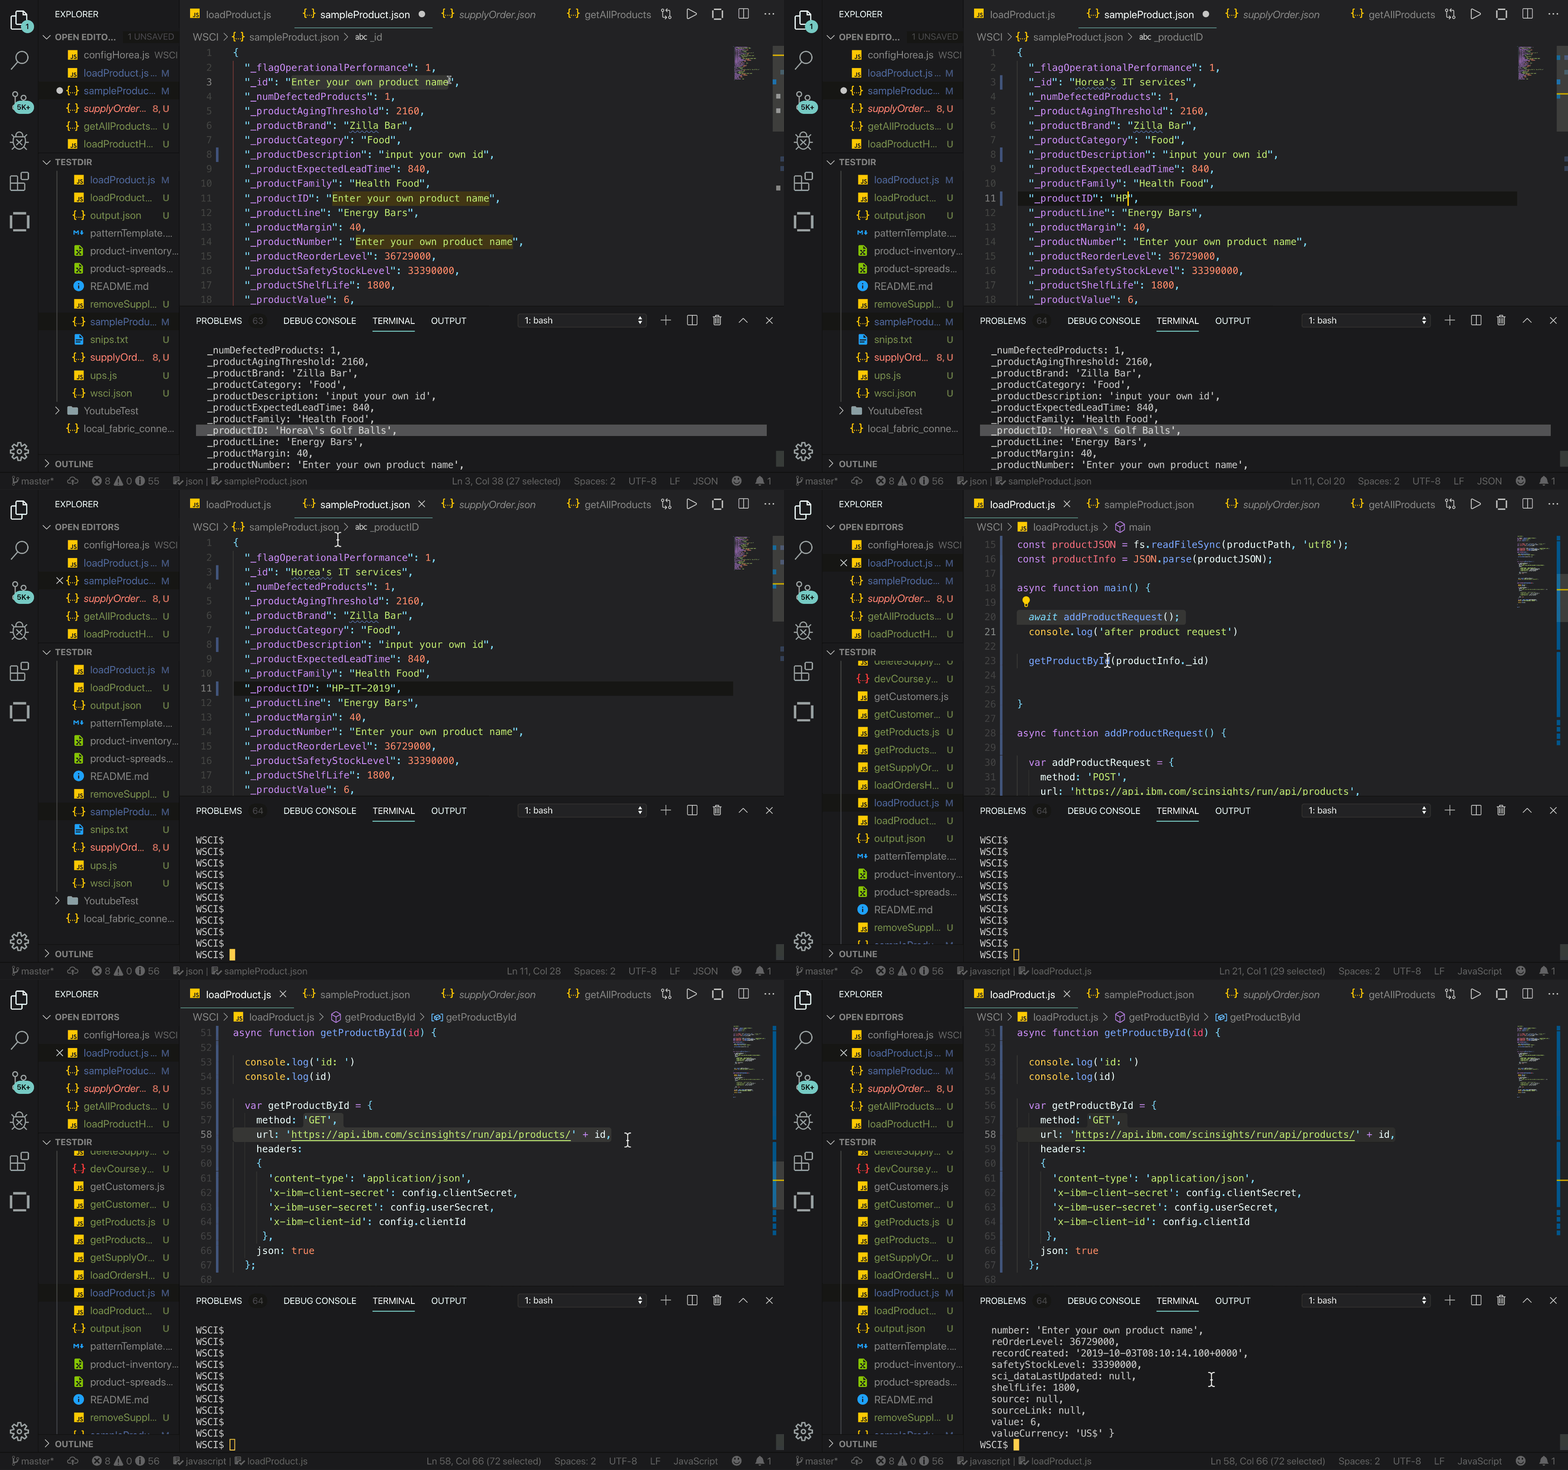
Go ahead and check out the sampleProduct.json file
It should look something like this:
{
  "_flagOperationalPerformance": 1,
  "_id": "Enter your own product name",
  "_numDefectedProducts": 1,
  "_productAgingThreshold": 2160,
  "_productBrand": "Zilla Bar",
  "_productCategory": "Food",
  "_productDescription": "Zilla Energy Bar 2oz. Special Edition",
  "_productExpectedLeadTime": 840,
  "_productFamily": "Health Food",
  "_productID": "Enter your own product name",
  "_productLine": "Energy Bars"
}
Go ahead and change the _id and _productID values to whatever you wish. I will
change them to something with my name.
Once you modify and save the file, it should look something like this:
{
  "_flagOperationalPerformance": 1,
  "_id": "Horea's IT services",
  "_numDefectedProducts": 1,
  "_productAgingThreshold": 2160,
  "_productBrand": "Zilla Bar",
  "_productCategory": "Food",
  "_productDescription": "Zilla Energy Bar 2oz. Special Edition",
  "_productExpectedLeadTime": 840,
  "_productFamily": "Health Food",
  "_productID": "HP-IT-2019"
}
Save the file, and then run the script loadProduct.js. The script has a main function which calls two other functions.
- It calls a function which creates a product in Supply Chain Insights
by using the
sampleProduct.jsonfile. - Next, it calls a function to lookup the product that was just created
by Id. The
_idvalue fromsampleProduct.jsonis used to query by ID.
If all went well, you should see output like the following:
WSCI$ node loadProduct
 addProductRequest successful
 after product request
 id:
 Horea's IT services
 getProductById response:
 { _flagOperationalPerformance: 1,
   _id: 'Horea\'s IT services',
   _numDefectedProducts: 1,
   _productAgingThreshold: 2160,
   _productBrand: 'Zilla Bar',
   _productCategory: 'Food',
   _productDescription: 'input your own id',
   _productExpectedLeadTime: 840,
   _productFamily: 'Health Food',
   _productID: 'HP-IT-2019',
_productLine: 'Energy Bars'Next, it's time to integrate with external systems to upload data into Supply Chain Insights. For this step, we're going to use UPS APIs. First, you must get a UPS account.
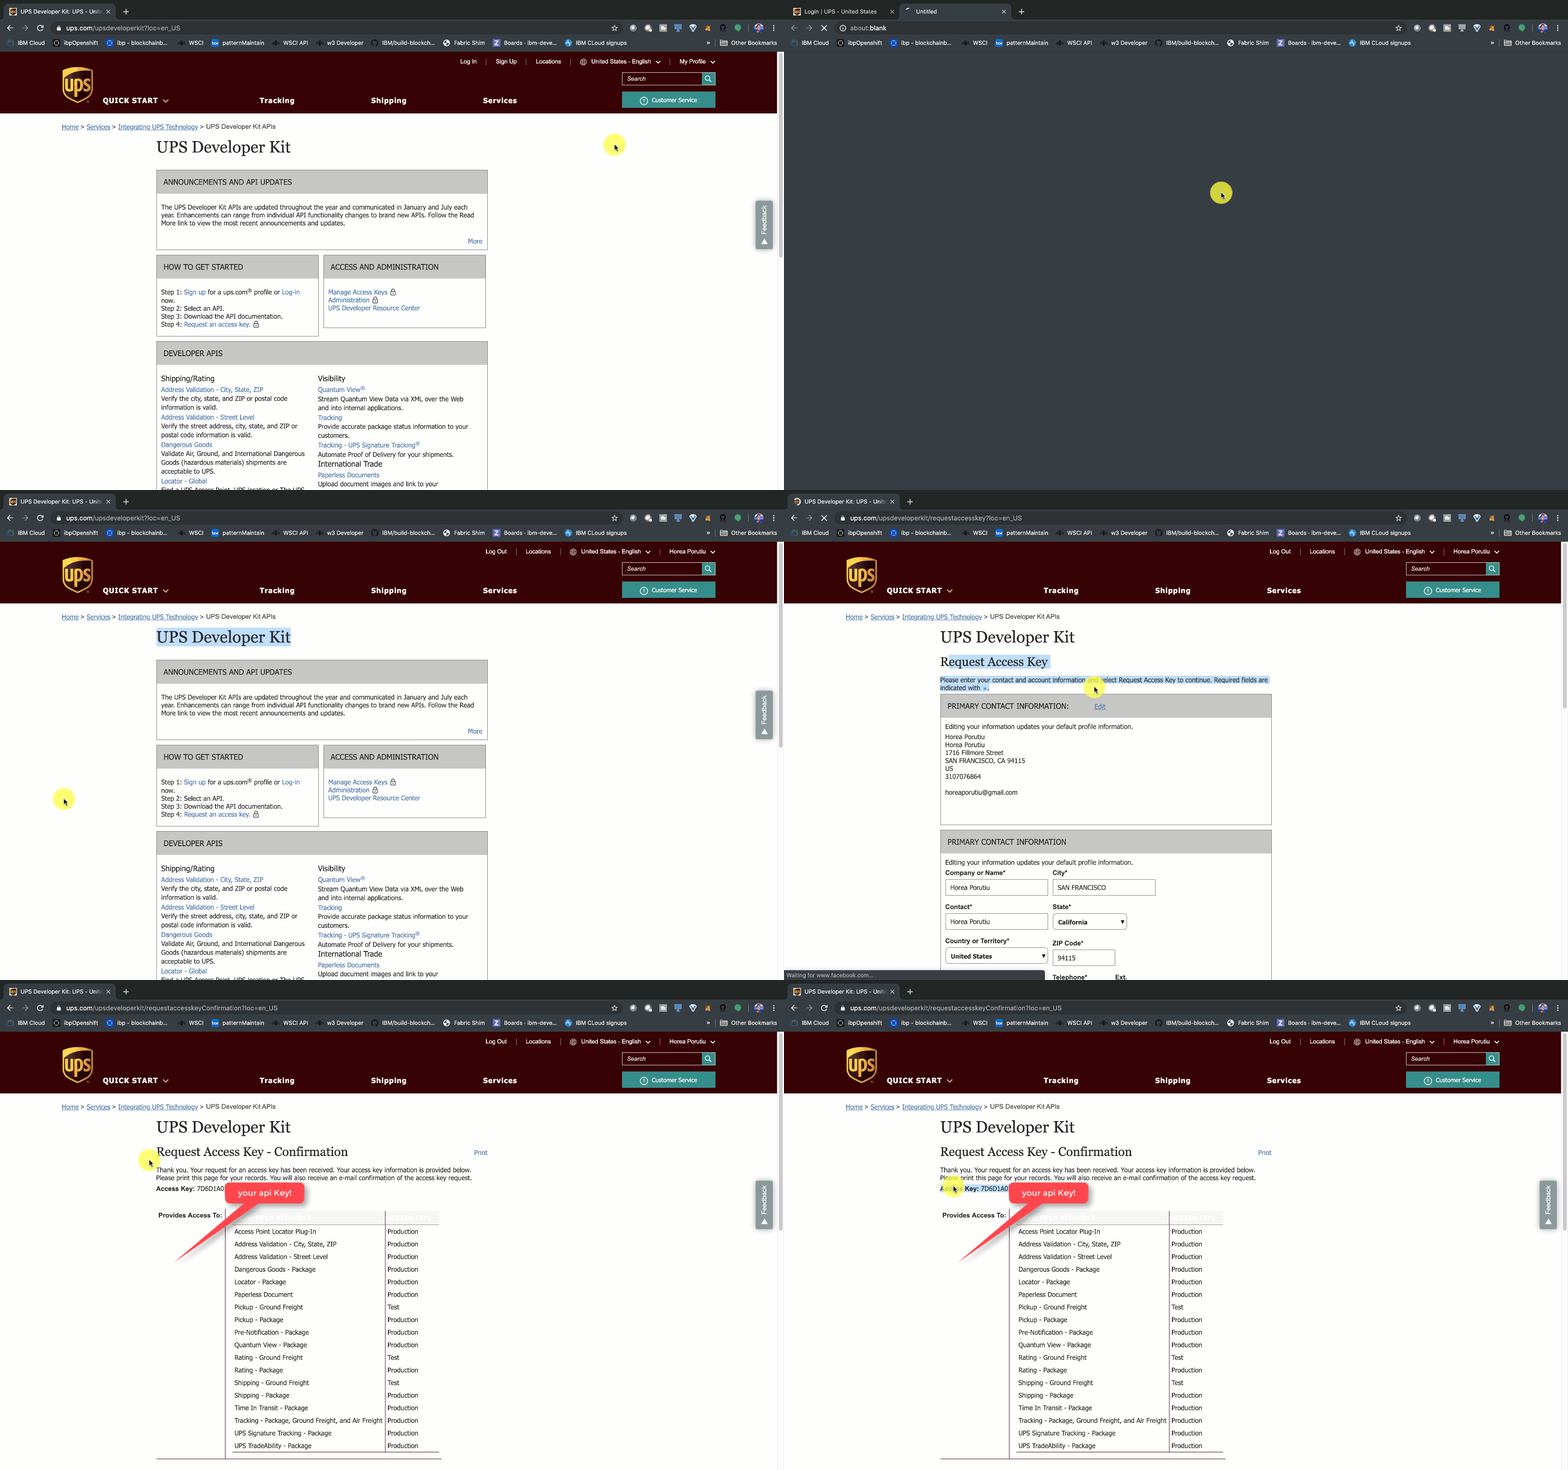
Once you've signed into your UPS account, let's go to the UPS Developer Kit page. For now, we will use the Tracking API to check in on our packages. But first, we must request an access (API) key.
After you fill in the info, you can go ahead and click on Request Access Key. Within a few seconds you should have your access key. Nice!
Now, let's do something with that API key. First, let's update config.json with
your API key. It should look something like this when all is said and done:
{
  "clientSecret": "your-client-secret-goes-here",
  "userSecret": "your-user-secret-goes-here",
  "clientId": "your-client-id-goes-here",
  "upsAccessKey": "DD6C9D67asdfbadsg5"
}
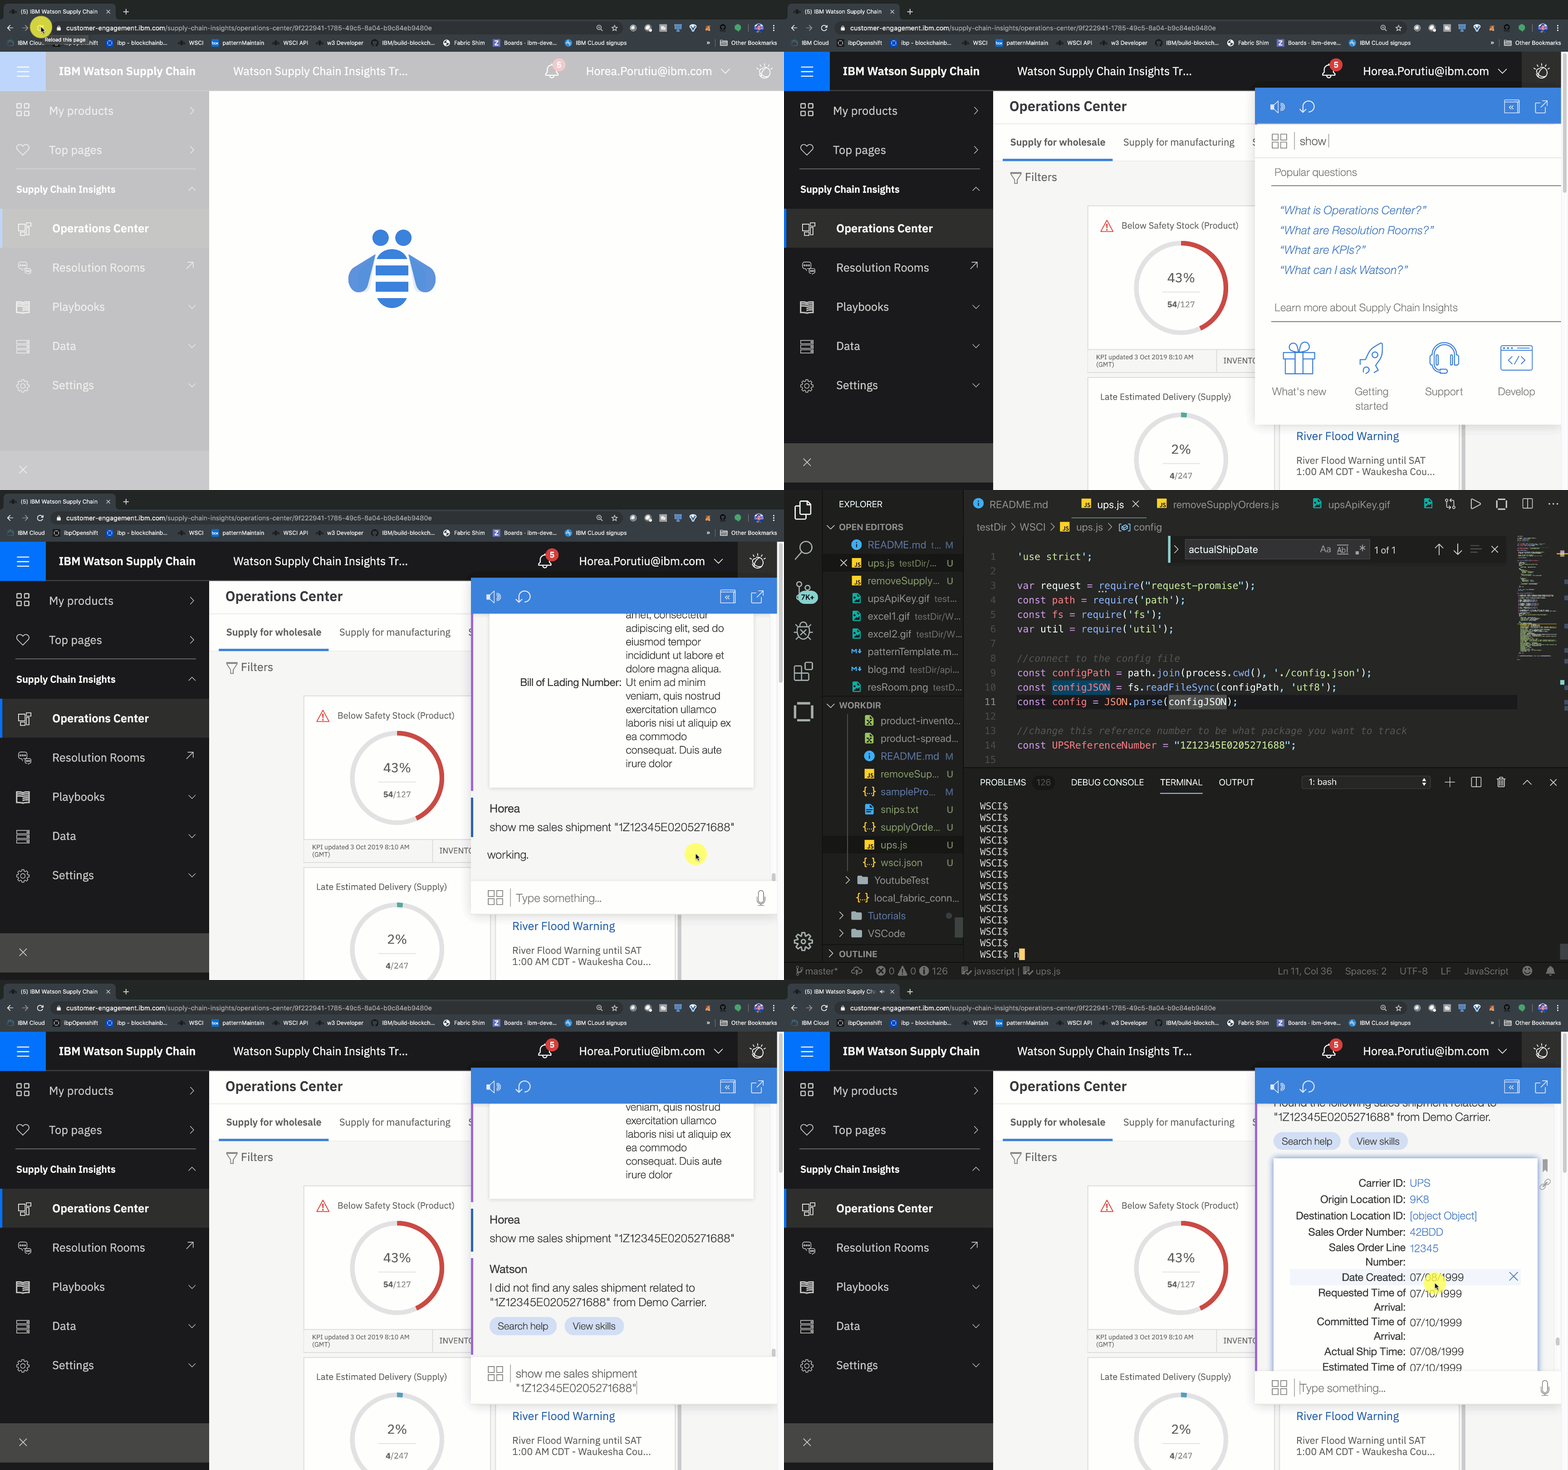
In your SCI account dashboard, click on the Watson icon in the top right corner of your screen. Type in the following command, to see if we have this sales shipment in our platform:
show me sales shipment "1Z12345E0205271688"
Watson should say I did not find any sales shipment related to "1Z12345E0205271688" from Demo Carrier.
Before we run the ups.js script, go ahead and add in your UPS username
and password in the following lines of the ups.js script.
Next, let's run the ups.js script by using the following command in terminal:
WSCI$ node ups.js This should add the sales shipment 1Z12345E0205271688 to our platform.
If you look at the ups.js file, you'll see that first we get UPSInfo on a dummy shipment, and then we parse that shipment, get the date delivered and the pickup date, and create a new sales shipment with those details in our platform.
Go ahead and ask Watson the same question:
show me sales shipment "1Z12345E0205271688"
And this time Watson should show you all of the shipment details, like the date delivered and the date created which we parsed from the UPS object.
Good job! You've just integrated with external APIs to add data to the platform. Integrating your whole supply chain system into the SCI platform enables you to integrate with news and have a full end-to-end picture of any disruptions (advisories) that may impact your supply chain. You now have all the information you need to make the optimal decision to ensure all of your back-end processes are running as efficiently as possible.
This application can be expanded in a couple of ways:
- Automatically check for any shipment detail changes by invoking the UPS API every hour and update the SCI platform accordingly.
- Create custom skills for Watson to more easily query your data.
This code pattern is licensed under the Apache Software License, Version 2. Separate third-party code objects invoked within this code pattern are licensed by their respective providers pursuant to their own separate licenses. Contributions are subject to the Developer Certificate of Origin, Version 1.1 (DCO) and the Apache Software License, Version 2.
