This is a repository which step by step teaches you how to use the "Ultralytics Hub" to train your own yolov8n model and deploy it to FVP.
- The first part is Yolov8n object detection part.
- At this part will step by step teach you how to use the Ultralytics Hub to train your own yolov8n object detection model, pass the model using vela compiler with HIMAX WE2 setting.
- The second part is Yolov8n pose part.
- At this part will use the pre-trained model yolov8n-pose and use DeGirum/ultralytics_yolov8 to convert the pre-trained weight to int8 tflite, pass the model using vela compiler with HIMAX WE2 setting.
- Second, you can also retrain the yolov8n pose model.
- Finally, deploy YOLOv8n to FVP.
- The example including
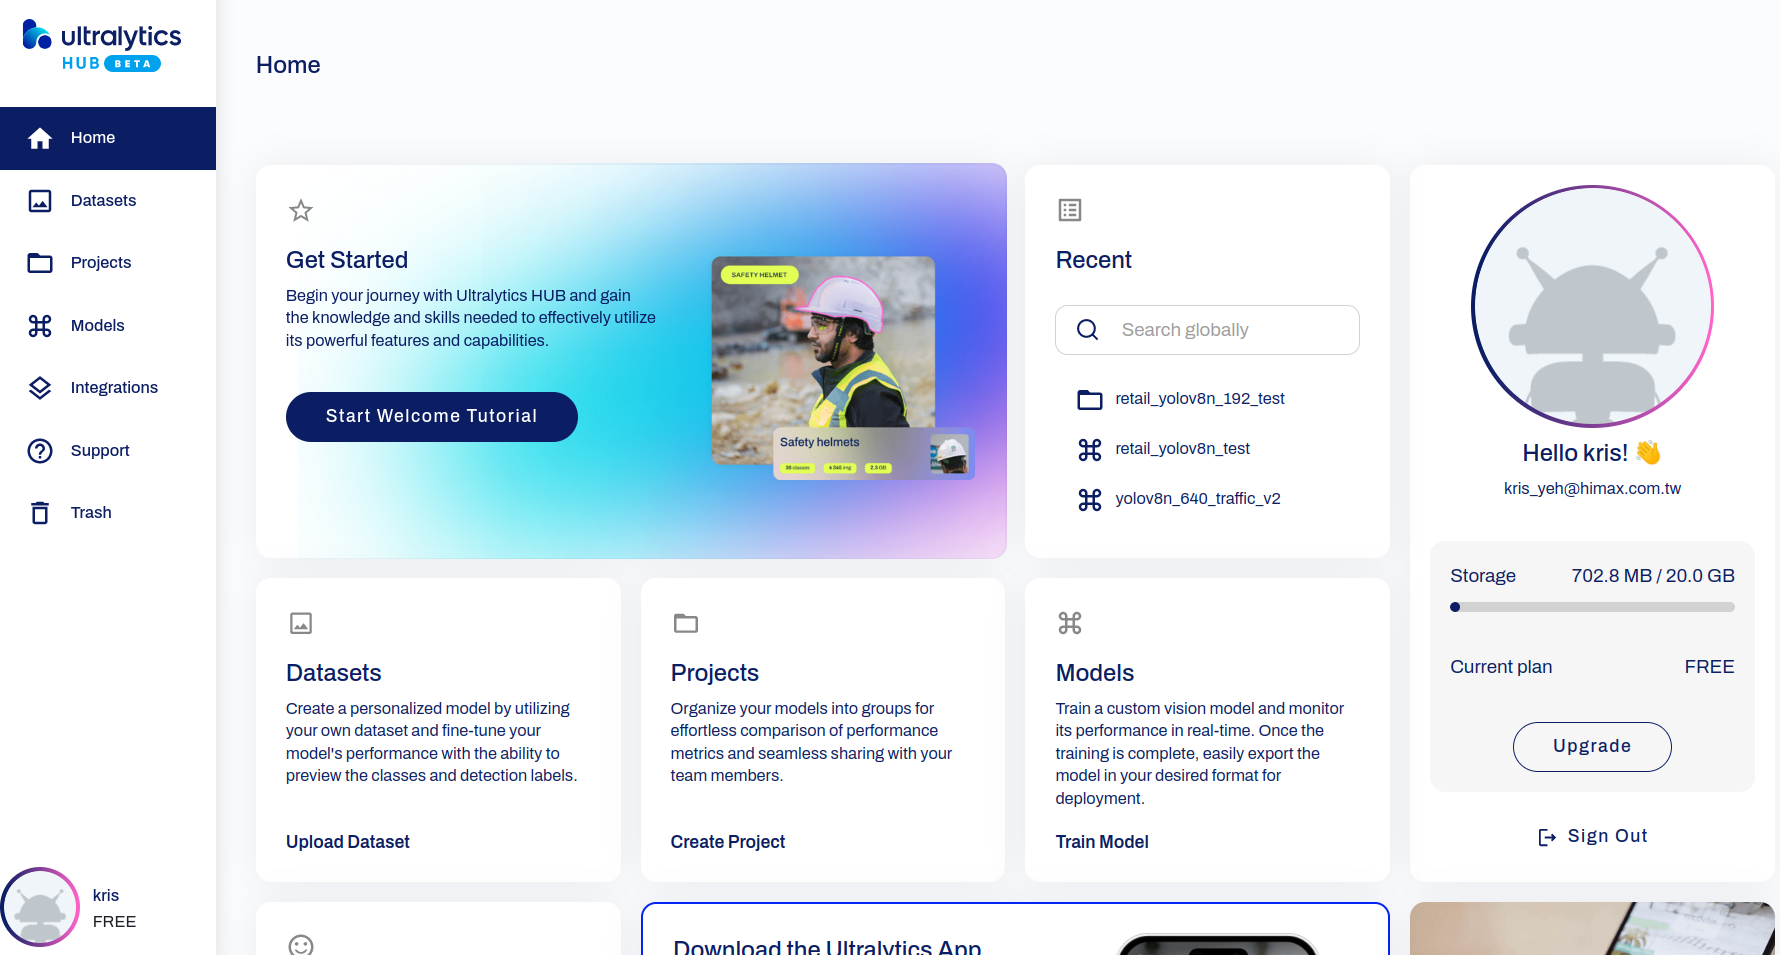
- Web GUI Overview
- Home page
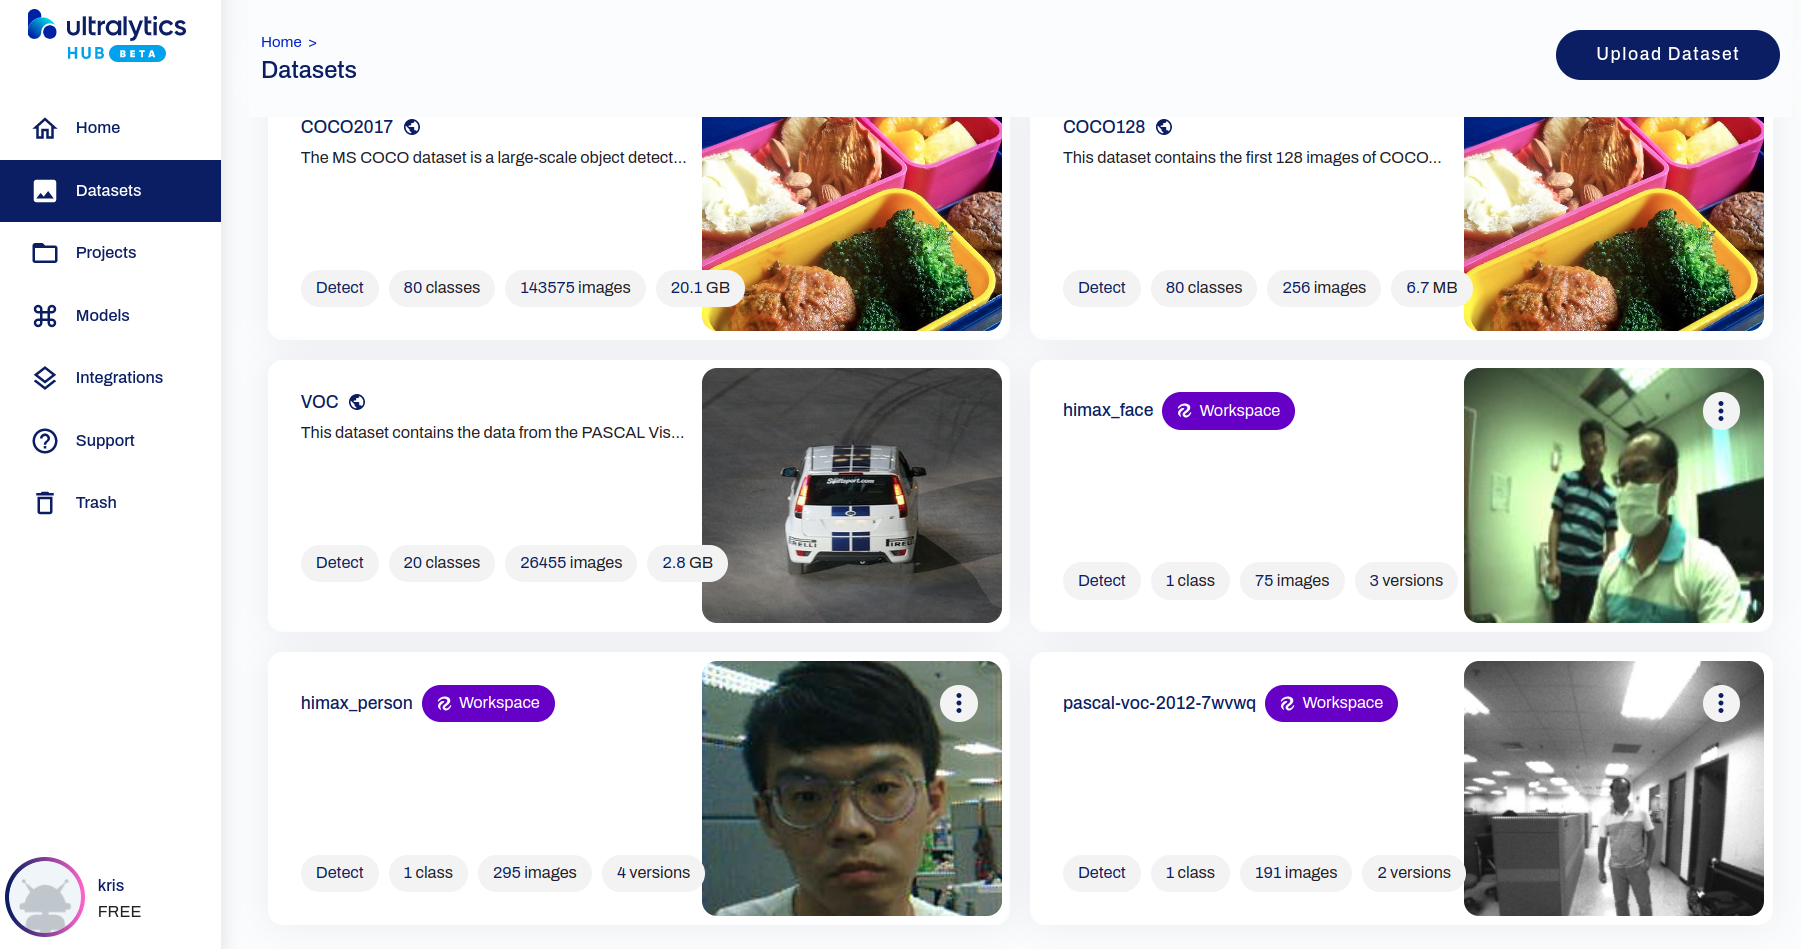
- Provided public dataset (only detection dataset)
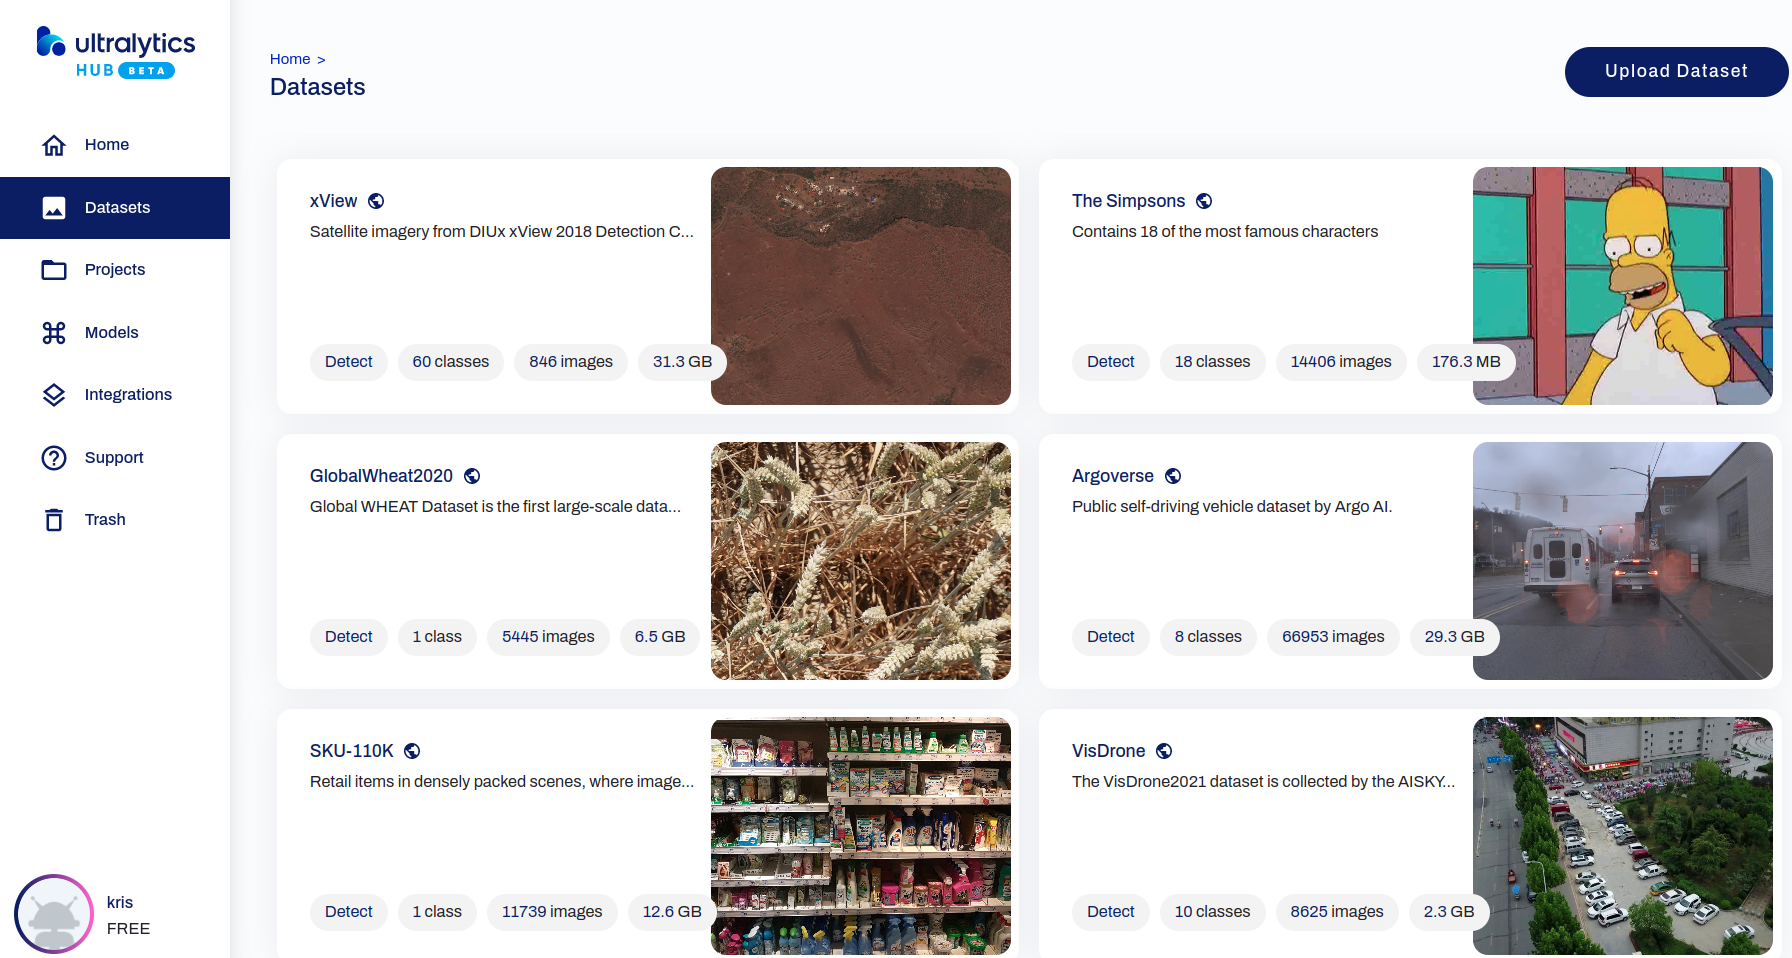
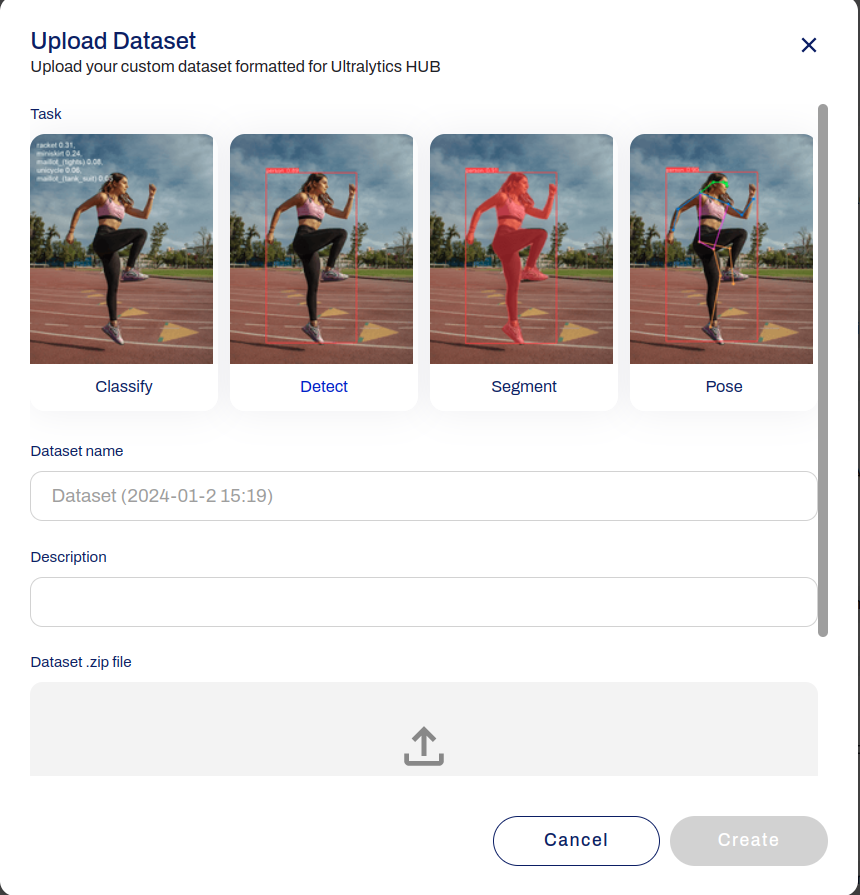
- You can also upload your own dataset
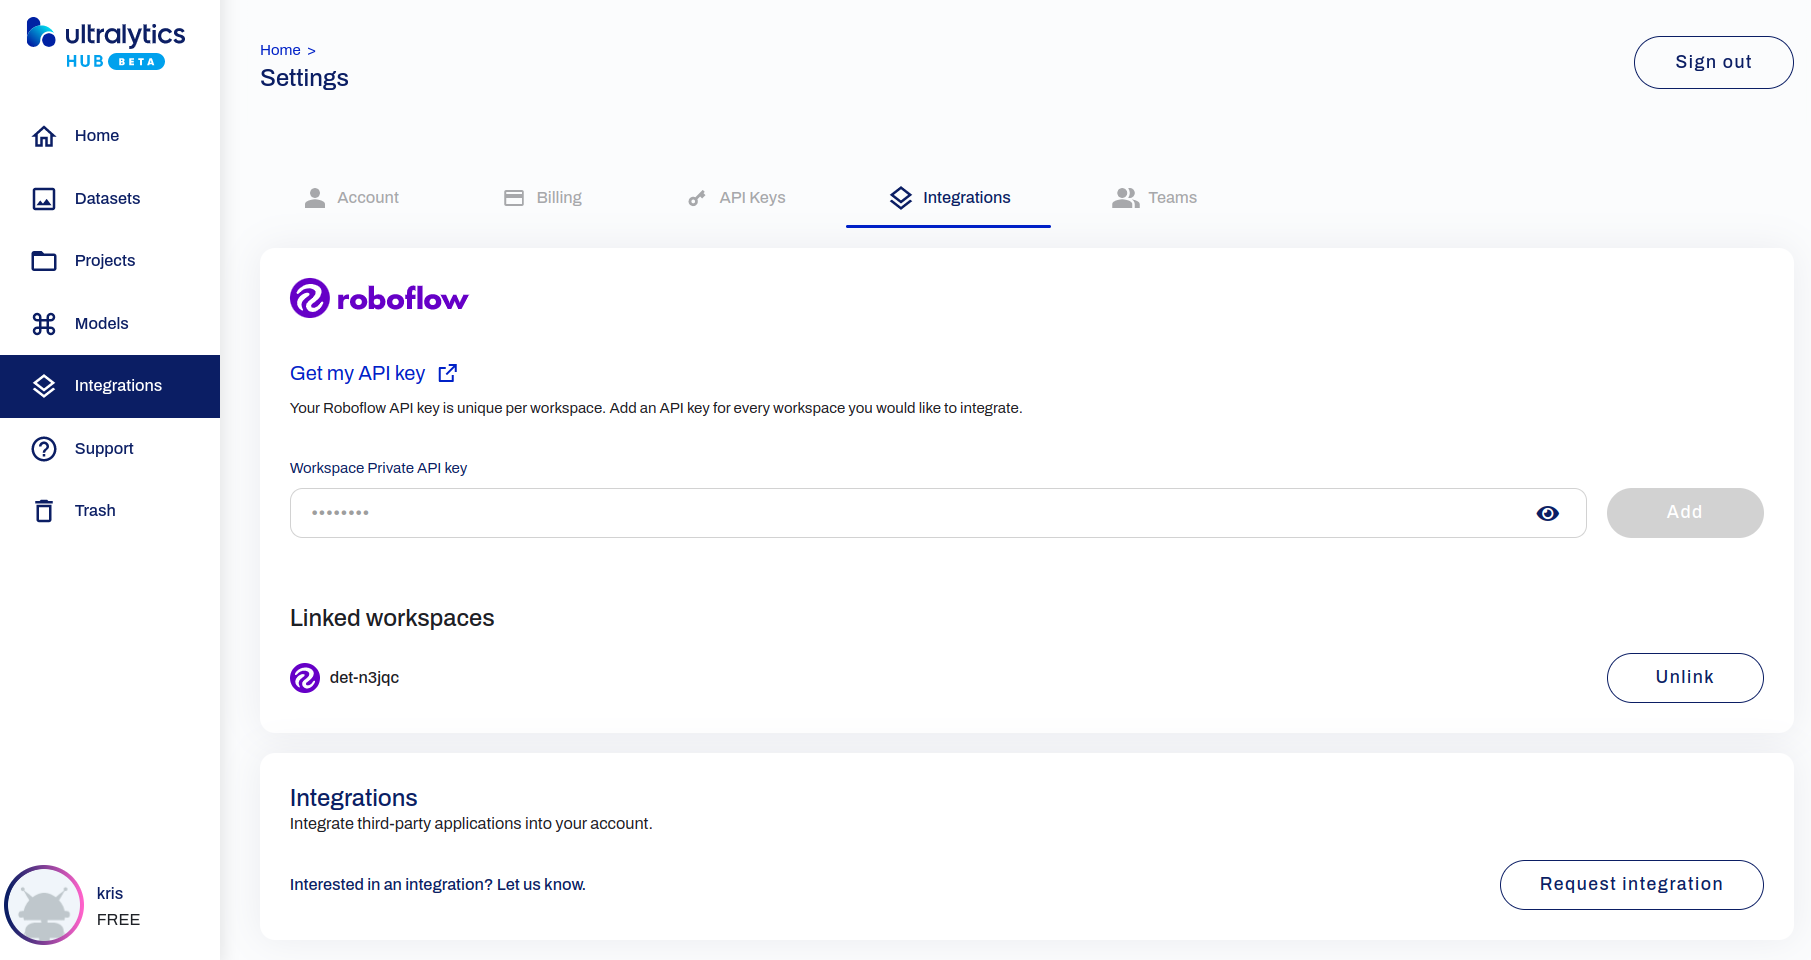
- Integrations with the Roboflow which can upload your own data and output yolov8 data format
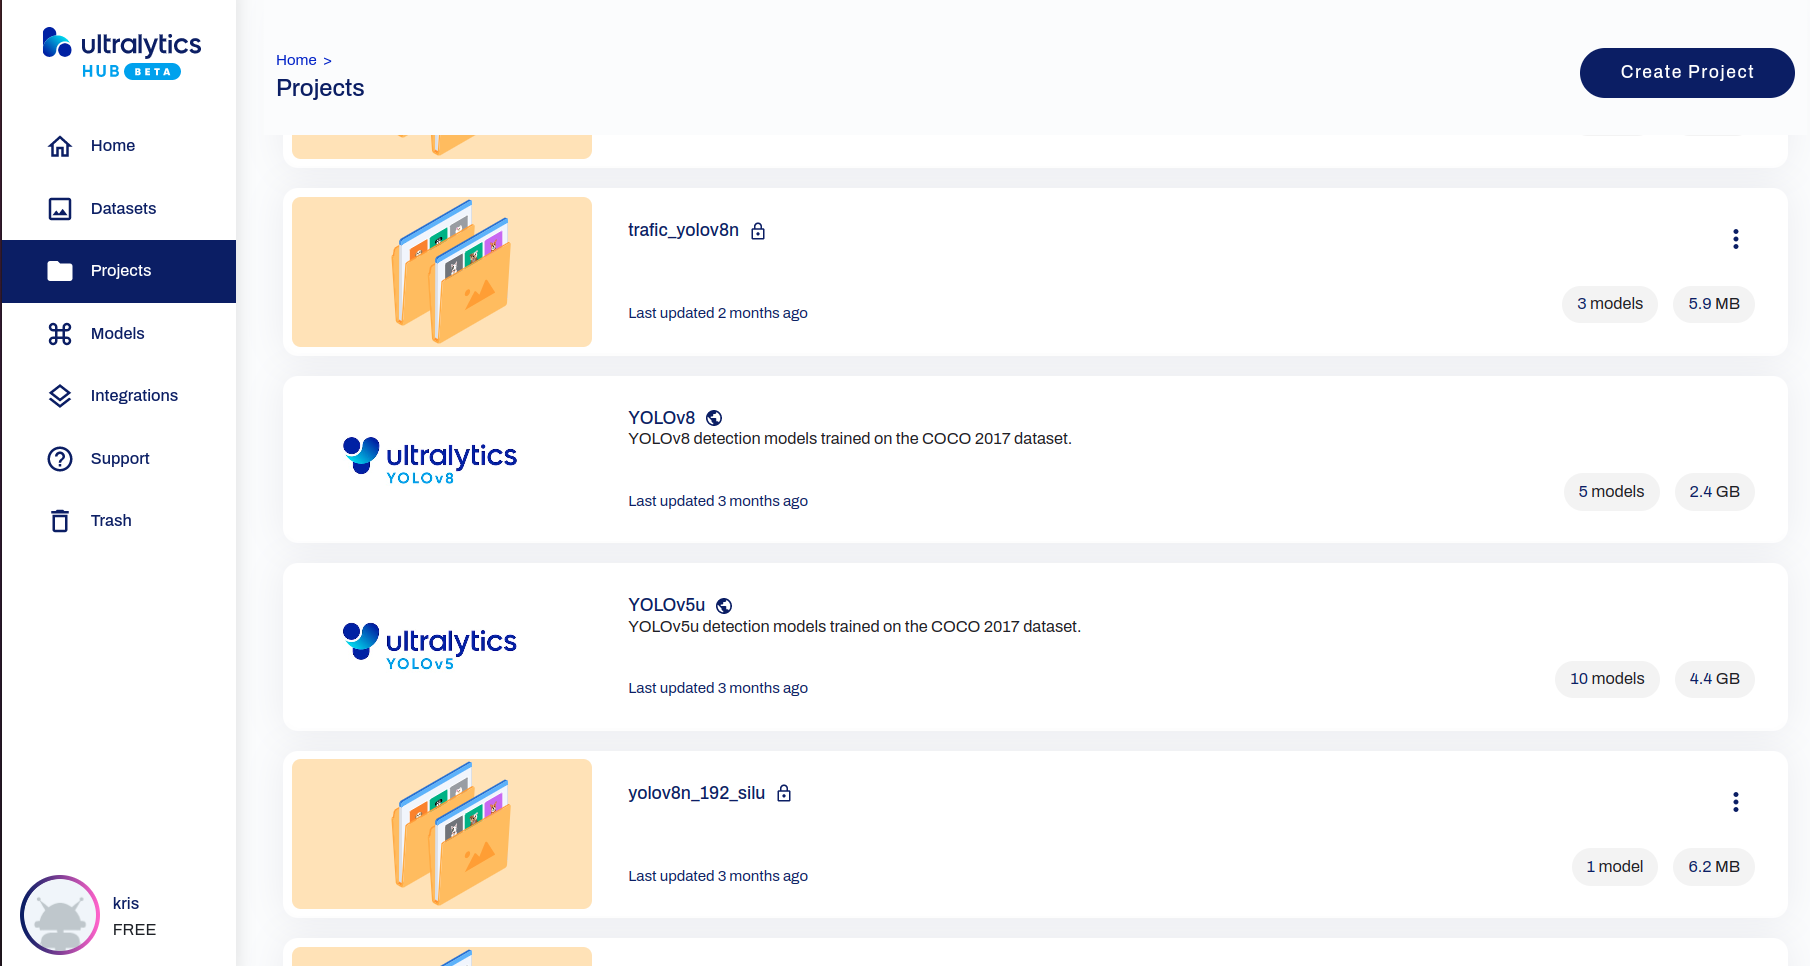
- Create project page
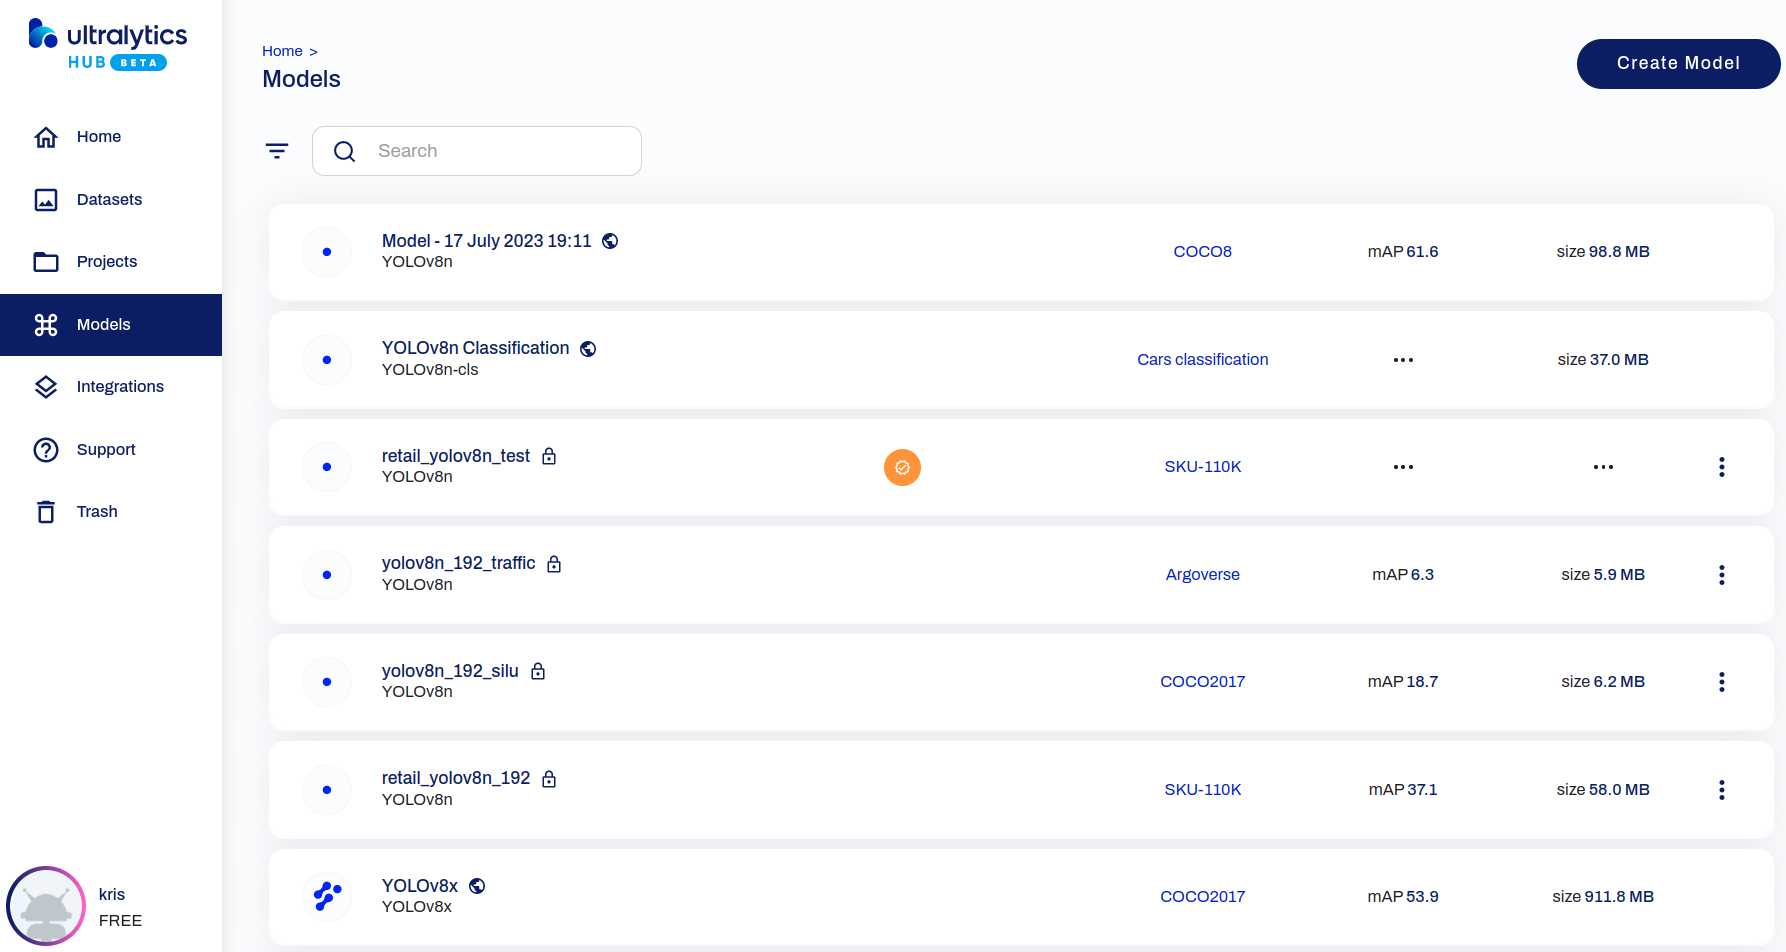
- Models which you trained or pre-trained
- GUI training on your own
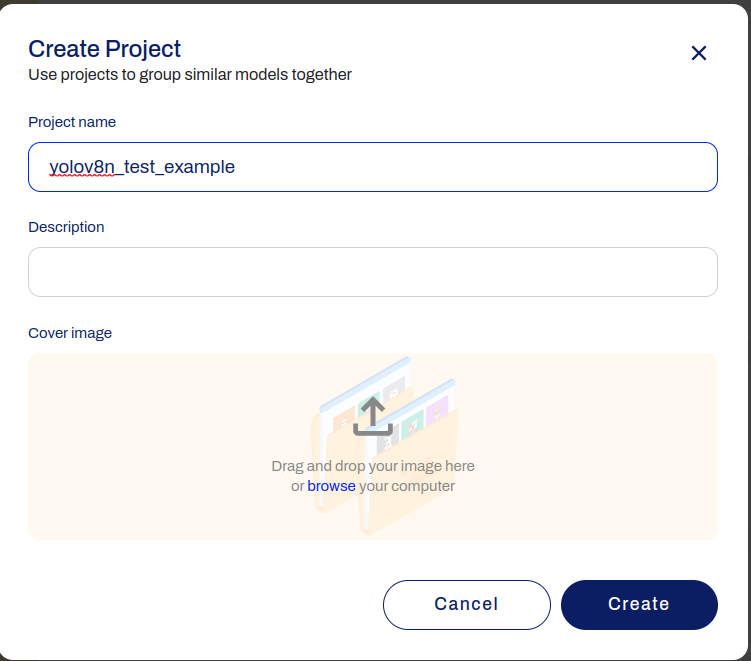
- Create your own project
- Create model

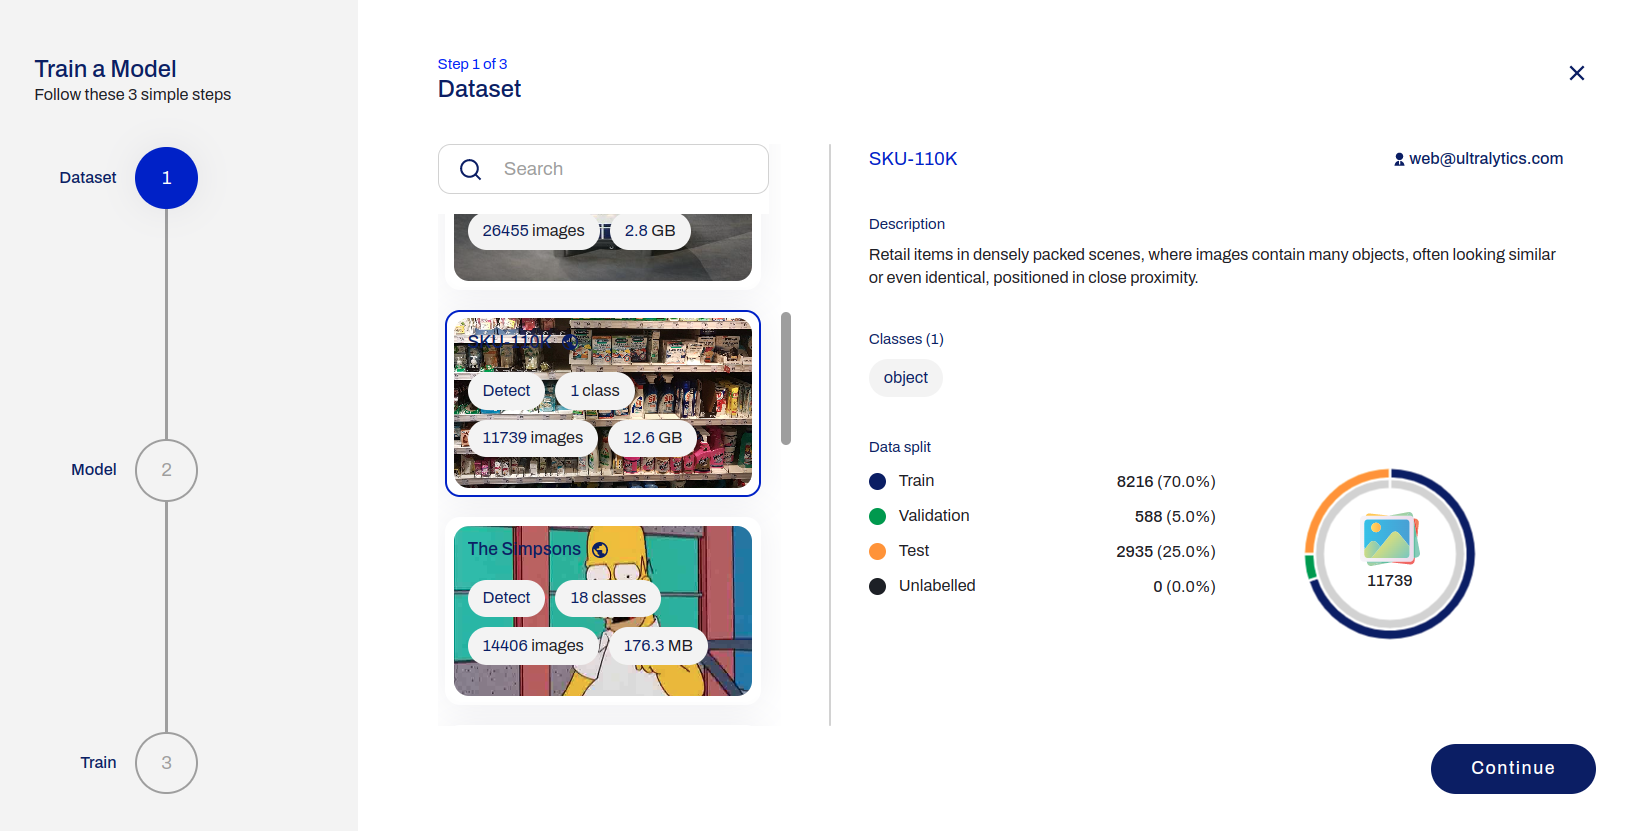
- Select provided dataset
- Set model setting
- Please choose Yolov8n (n: nano is the smallest model at Yolov8 series) and use pre-trained model
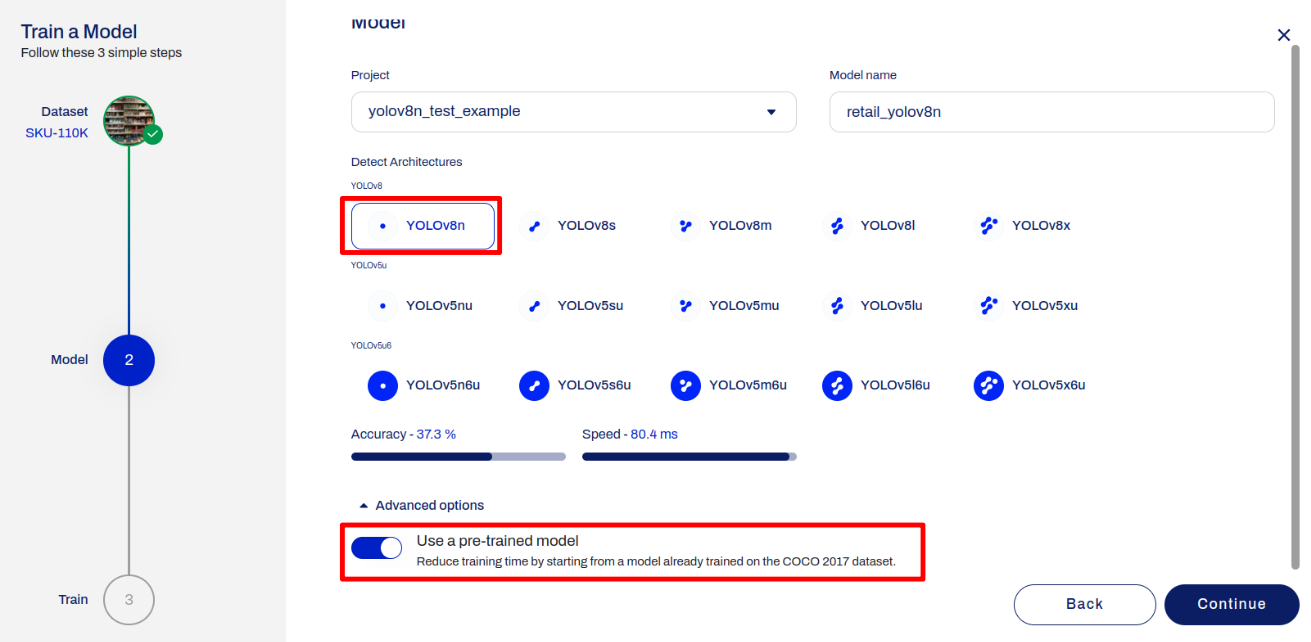
- Please choose Yolov8n (n: nano is the smallest model at Yolov8 series) and use pre-trained model
- Set training setting
- Scroll down to set the advance setting
- Please set input size to 192, which can fulfill the HIMAX WE2 setting
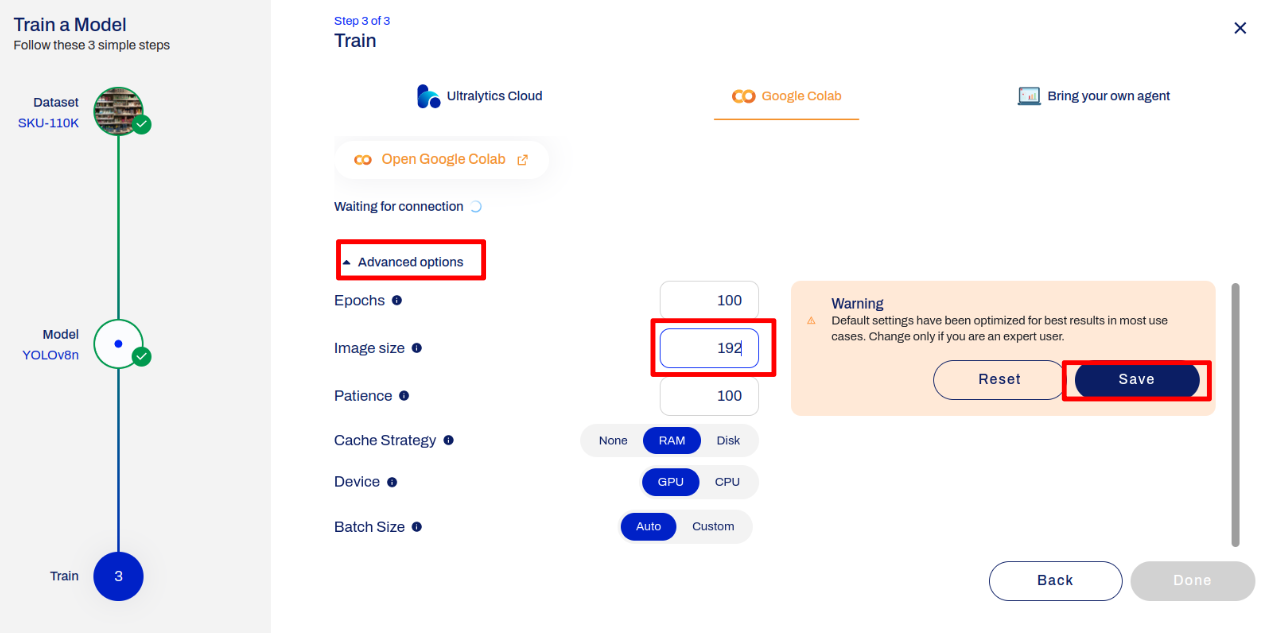
- Please set input size to 192, which can fulfill the HIMAX WE2 setting
- Connect to your own training resource
- Google Colab
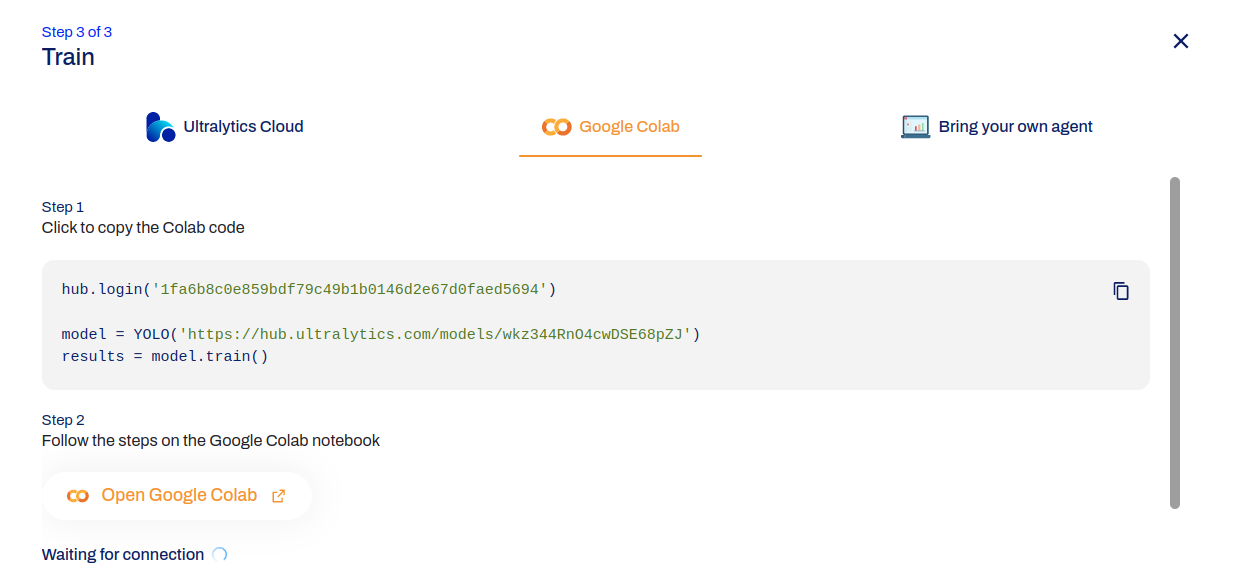
- please copy the Colab code
- open Google Colab and paste on Google Colab
- Bring to your own agent
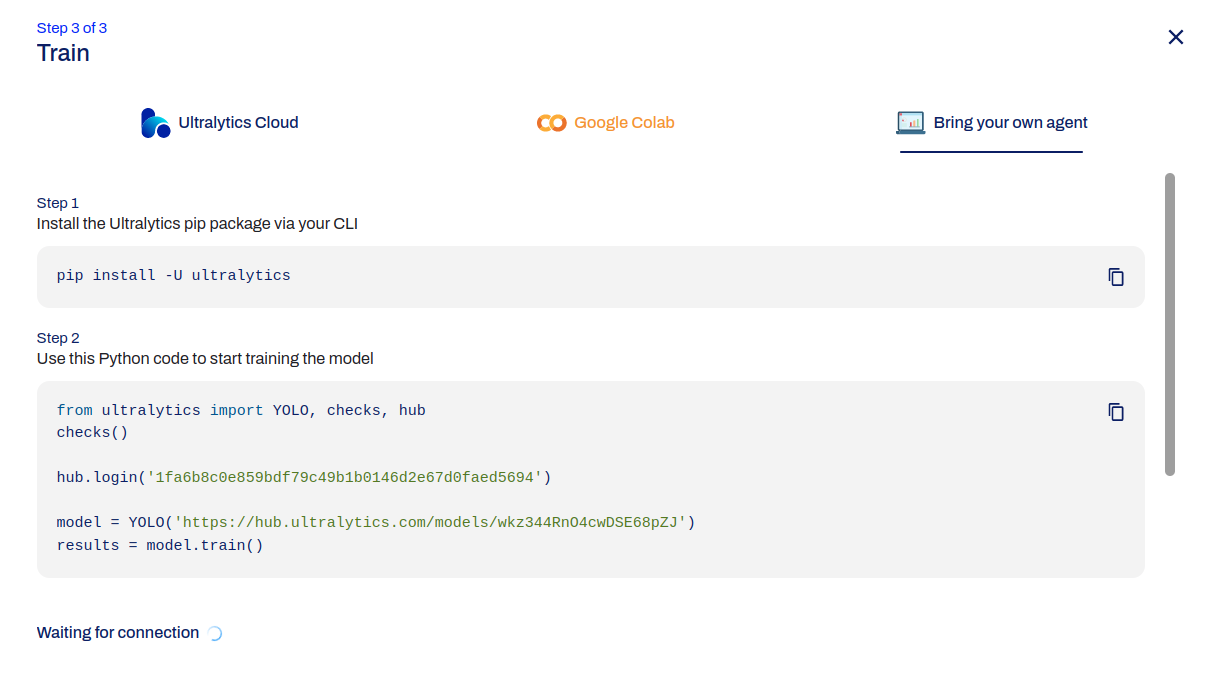
- Please pip install the
Ultralyticspackage - Create the python file and paste the python code
- Execute python file
- Please pip install the
- Google Colab
- Scroll down to set the advance setting
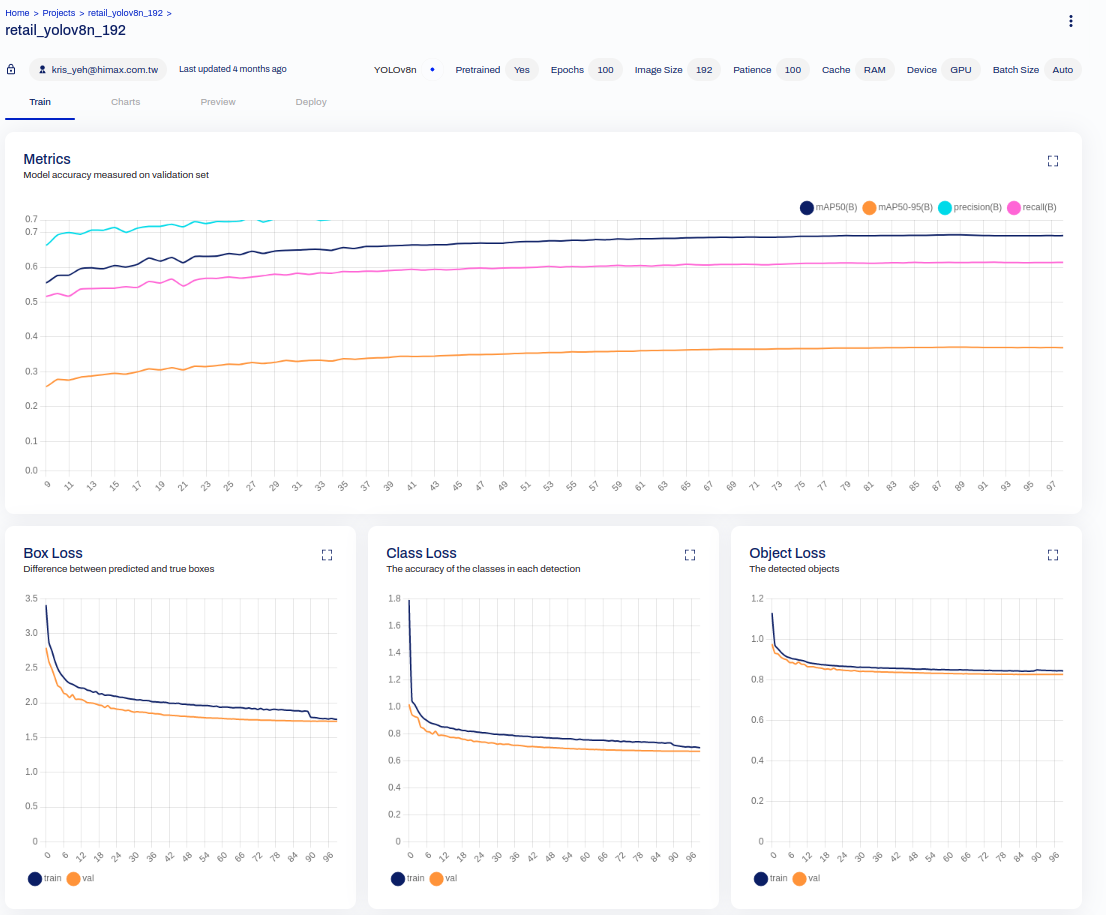
- See the training progress on the Web


- After training process is done, then you will get the
best.ptwhich is the pytorch model. - Use python code to export it to int8 tflite (full interger quant) by Ultralytics export API
- If your training dataset is another, you should change the data yaml file.
from ultralytics import YOLO # # Load a model image_size = 192 model = YOLO("best.pt") model.export(format="tflite", imgsz = image_size, int8 = True, data="SKU-110K.yaml") - We use provided dataset
SKU-110Kfor retail detect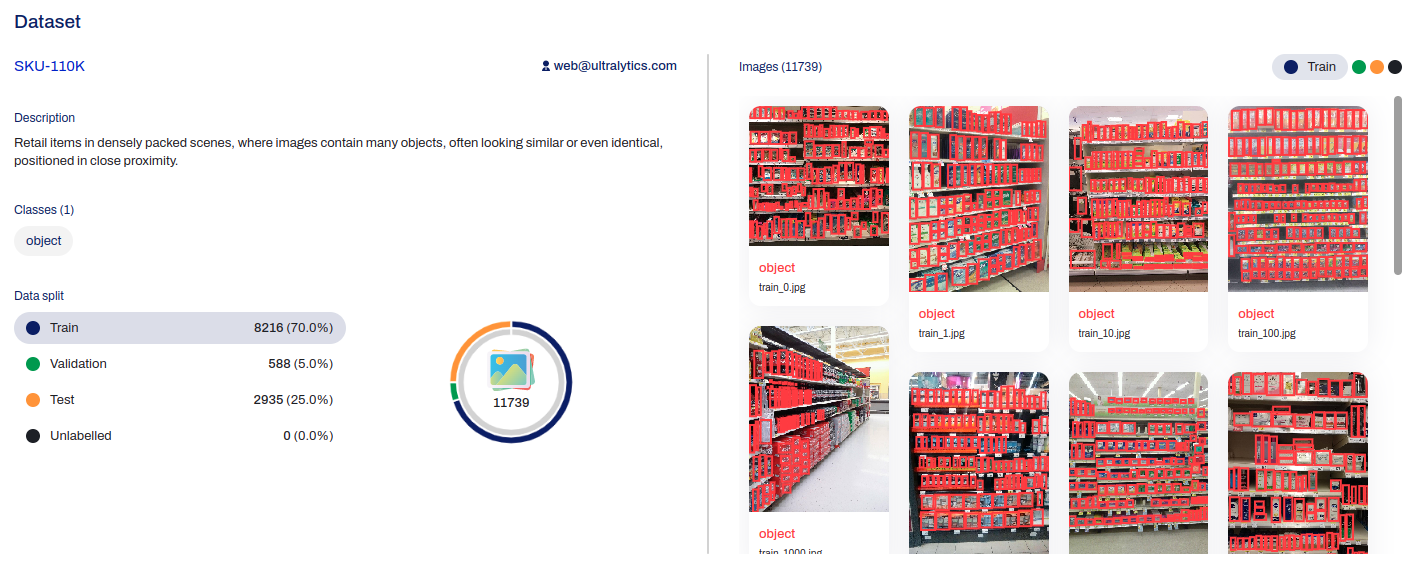
- The output int8 tflite model will be called
*_full_integer_quant.tflite - You can also use yolov8n object detection pre-trained weight, which is output COCO 80 class.
from ultralytics import YOLO

# # Load a model
image_size = 192

model = YOLO("yolov8n.pt")

model.export(format="tflite", imgsz = image_size, int8 = True, data="coco128.yaml")
- If your training dataset is another, you should change the data yaml file.

- You can reference here.
- Go under vela folder
cd vela - Install necessary package:
pip install ethos-u-vela - Run vela with himax config ini file with mac=64 and the yolov8n object detect example tflite model
vela --accelerator-config ethos-u55-64 --config himax_vela.ini --system-config My_Sys_Cfg --memory-mode My_Mem_Mode_Parent --output-dir ./img_yolov8_192 ./img_yolov8_192/yolov8n_full_integer_quant_size_192.tflite - You will see the vela report on the terminal: : (Notes:
Total SRAM usedless than1MBwill be better)- There are 5 transpose ops leak out the vela compiler, and it will be fall back to run on Cortex-M55 CPU.
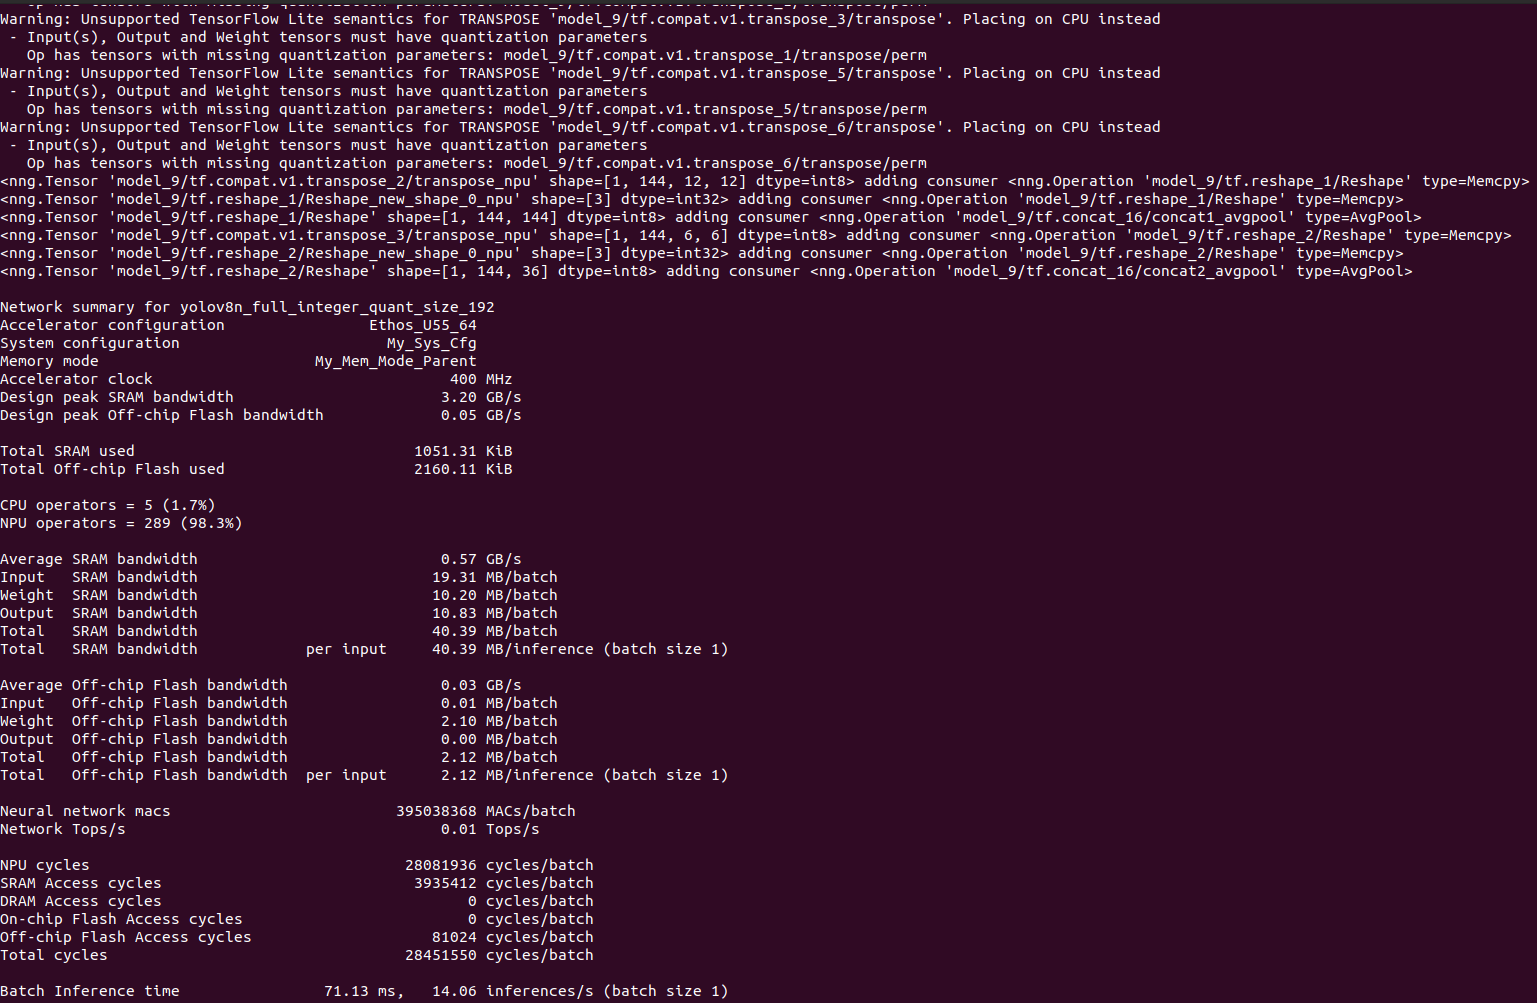
- There are 5 transpose ops leak out the vela compiler, and it will be fall back to run on Cortex-M55 CPU.

- If there are many transpose OP run on CPU, it will be slow.
- At the Ultralytics repositroy, it use PINTO0309's onnx2tf tool to convert the onnx model to int8 tflite.
- First, we can convert pytroch to onnx model.
- Second, add the following command at the
ultralytics repositoryhttps://github.com/ultralytics/ultralytics/blob/main/ultralytics/engine/exporter.py#L709C2-L709C76 . (please reference the tutorial here)-prf {param_replacement.json} -rtpo- We give the example here,
replace_192_80cls_transpose_op.json, but there are something should be changed under following condition.- Be careful, the
op_nameandparam_nameshould be changed if needed, depending on theop_nameandparam_nameof your convertedonnx file. - If your output class is not 80, you should modify
replace_192_80cls_transpose_op.jsonto replace144value to64+{class_num}. For example, class_num is1, you should modifyreplace_192_80cls_transpose_op.jsonto replace144value to65, and then it could be correct.
- Be careful, the
- We give the example here,
- Finally, you can delete 4
transpose op, at final int8 tflite.- original tflite which pass vela
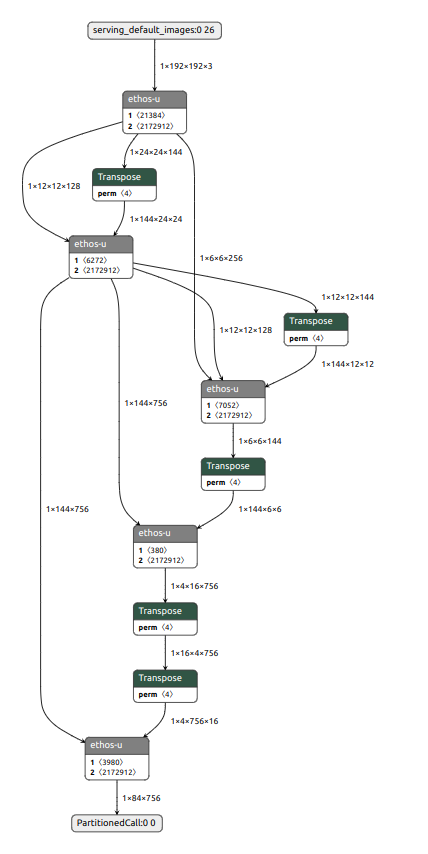
- delete 4 transpose tflite which pass vela
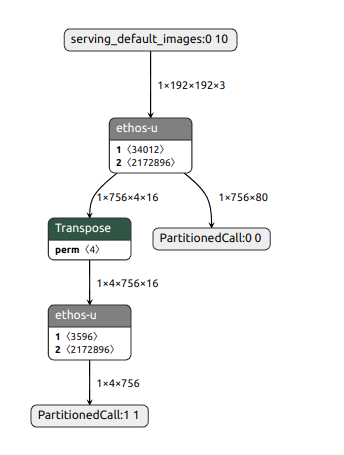
- original tflite which pass vela


- We use DeGirum/ultralytics_yolov8 to convert the yolov8n pose pre-trained weight to int8 tflite.
- Prerequisites
#create python virtual environment python3 -m venv ultralytics_yolov8_venv #activate ultralytics_yolov8_venv source ultralytics_yolov8_venv/bin/activate pip install tensorflow==2.13.1 pip install onnx2tf==1.15.4 pip install -U onnx==1.15.0 \ && pip install -U nvidia-pyindex \ && pip install -U onnx-graphsurgeon \ && pip install -U onnxruntime==1.16.3 \ && pip install -U onnxsim==0.4.33 \ && pip install -U simple_onnx_processing_tools \ && pip install -U onnx2tf \ && pip install -U h5py==3.7.0 \ && pip install -U psutil==5.9.5 \ && pip install -U ml_dtypes==0.2.0 git clone https://github.com/DeGirum/ultralytics_yolov8 cd ultralytics_yolov8 #install ultralytics_yolov8 package pip install -e . cd ..- Export command
python dg_export_int8_output.py --weights="yolov8n-pose.pt" --img=192 #or python dg_export_int8_output.py --weights="yolov8n-pose.pt" --img=256 - The DeGirum/ultralytics_yolov8 repository exporting a YOLOv8n pose model with 7 separate outputs improved performance in quantized model.
- You can train the yolov8n pose model on your own PC.
python dg_train_pose.py --weights="yolov8n-pose.pt" --img=256 - After training process is done, then you will get the
best.ptwhich is the pytorch model. Next, it will automatically generate thebest_save_model/best_full_integer_quant.tflite. Just generate the vela model by passing thebest_save_model/best_full_integer_quant.tfliteto vela compiler, and you can run the model which you retrain on WE2.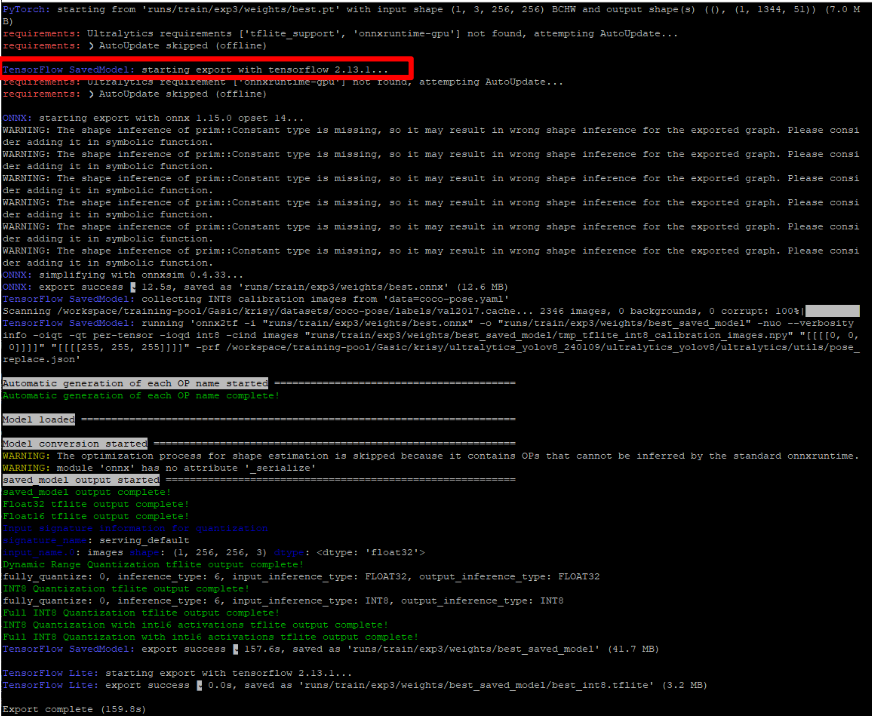

- You can reference here.
- Go under vela folder
cd vela
- Install necessary package:
pip install ethos-u-vela
- Run vela with himax config ini file with mac=64 and the yolov8n pose example tflite model
vela --accelerator-config ethos-u55-64 --config himax_vela.ini --system-config My_Sys_Cfg --memory-mode My_Mem_Mode_Parent --output-dir ./img_yolov8_pose_192 ./img_yolov8_pose_192/yolov8n-pose_full_integer_quant.tflite
- You will see the vela report on the terminal: (Notes:
Total SRAM usedless than1MBwill be better)- There are 4 transpose ops leak out the vela compiler, and it will be fall back to run on Cortex-M55 CPU.
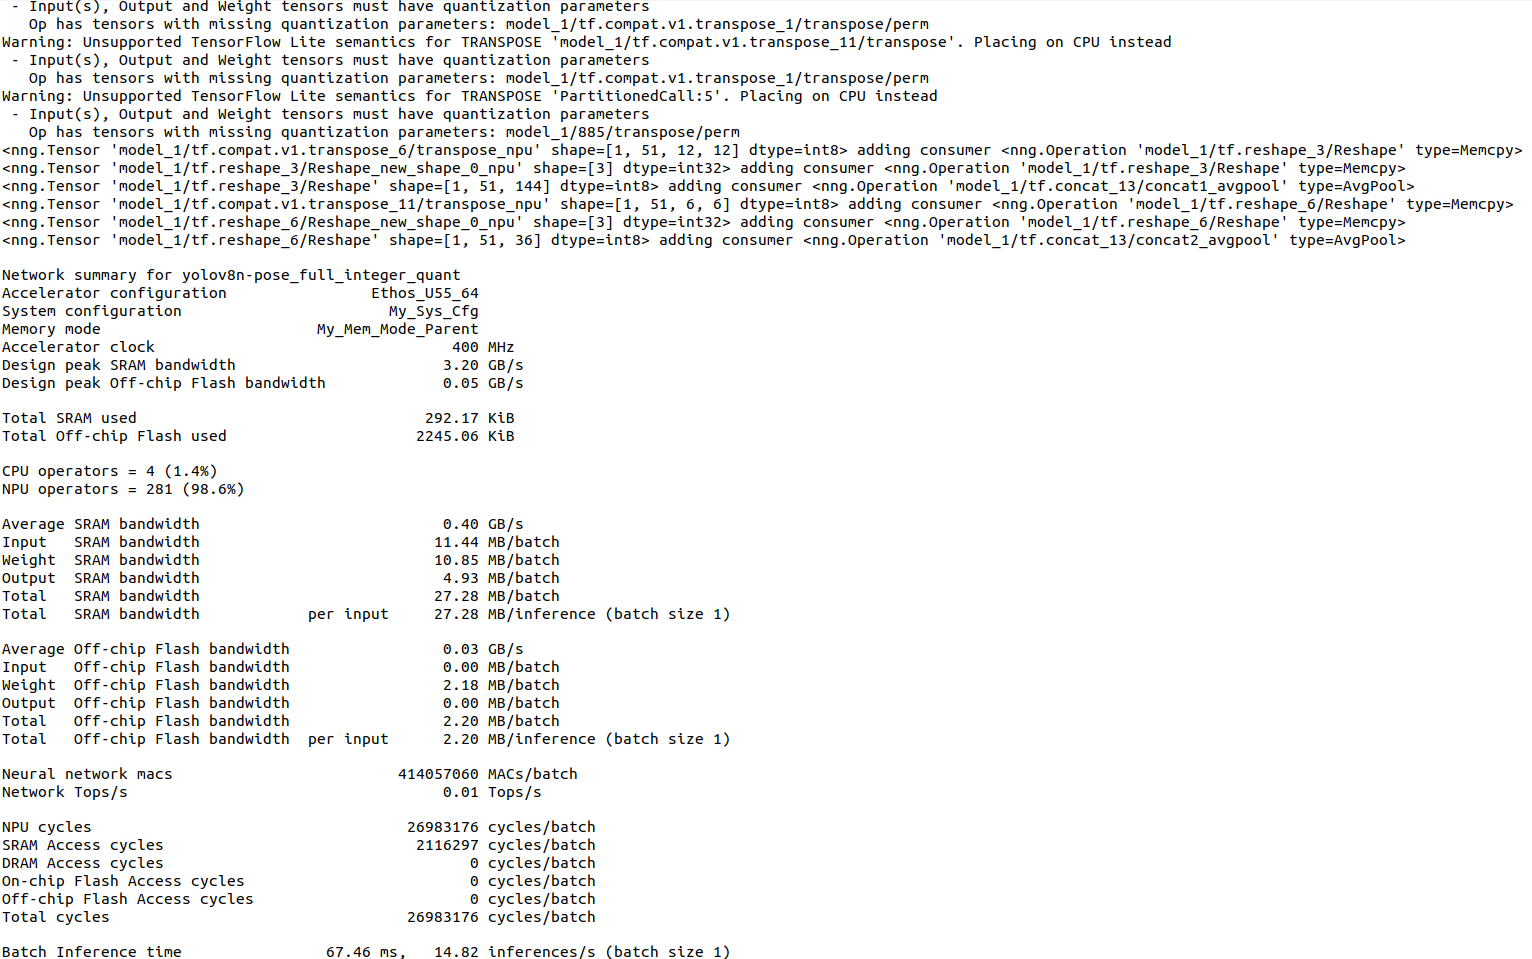
- There are 4 transpose ops leak out the vela compiler, and it will be fall back to run on Cortex-M55 CPU.

- To run evaluations using this software, we suggest using Ubuntu 20.04 LTS environment.
- Install the toolkits listed below:
-
Install necessary packages:
sudo apt-get update sudo apt-get install cmake sudo apt-get install curl sudo apt install xterm sudo apt install python3 sudo apt install python3.8-venv sudo apt-get install libpython3.8-dev -
Corstone SSE-300 FVP: aligned with the Arm MPS3 development platform and includes both the Cortex-M55 and the Ethos-U55 processors.
# Fetch Corstone SSE-300 FVP
wget https://developer.arm.com/-/media/Arm%20Developer%20Community/Downloads/OSS/FVP/Corstone-300/MPS3/FVP_Corstone_SSE-300_Ethos-U55_11.14_24.tgz
# Create folder to be extracted
mkdir temp
# Extract the archive
tar -C temp -xvzf FVP_Corstone_SSE-300_Ethos-U55_11.14_24.tgz
# Execute the self-install script
temp/FVP_Corstone_SSE-300_Ethos-U55.sh --i-agree-to-the-contained-eula --no-interactive -d CS300FVP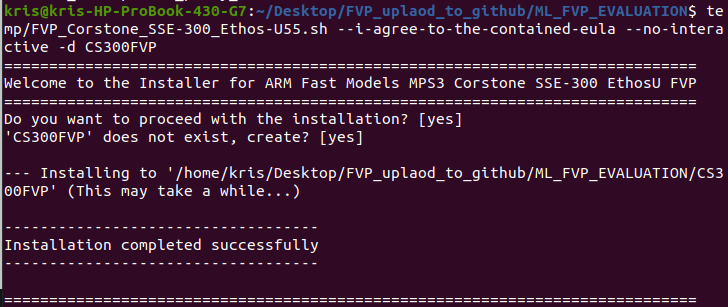
-
GNU Arm Embedded Toolchain 10-2020-q4-major is the only version supports Cortex-M55.
# fetch the arm gcc toolchain. wget https://developer.arm.com/-/media/Files/downloads/gnu-rm/10-2020q4/gcc-arm-none-eabi-10-2020-q4-major-x86_64-linux.tar.bz2 # Extract the archive tar -xjf gcc-arm-none-eabi-10-2020-q4-major-x86_64-linux.tar.bz2 # Add gcc-arm-none-eabi/bin into PATH environment variable. export PATH="${PATH}:/[location of your GCC_ARM_NONE_EABI_TOOLCHAIN_ROOT]/gcc-arm-none-eabi/bin" -
Arm ML embedded evaluation kit Machine Learning (ML) applications targeted for Arm Cortex-M55 and Arm Ethos-U55 NPU.
- We use Arm ML embedded evaluation kit to run the Yolov8n FVP example.
# Fetch Arm ML embedded evaluation kit
wget https://review.mlplatform.org/plugins/gitiles/ml/ethos-u/ml-embedded-evaluation-kit/+archive/refs/tags/22.02.tar.gz

mkdir ml-embedded-evaluation-kit
tar -C ml-embedded-evaluation-kit  -xvzf 22.02.tar.gz
cp -r ./source/application/main/include ./ml-embedded-evaluation-kit/source/application/main
cp -r ./source/application/tensorflow-lite-micro/include ./ml-embedded-evaluation-kit/source/application/tensorflow-lite-micro
cp -r ./source/profiler/include ./ml-embedded-evaluation-kit/source/profiler
cp -r ./source/use_case/ad/include ./ml-embedded-evaluation-kit/source/use_case/ad
cp -r ./source/use_case/asr/include ./ml-embedded-evaluation-kit/source/use_case/asr
cp -r ./source/use_case/img_class/include ./ml-embedded-evaluation-kit/source/use_case/img_class
cp -r ./source/use_case/inference_runner/include ./ml-embedded-evaluation-kit/source/use_case/inference_runner
cp -r ./source/use_case/kws/include ./ml-embedded-evaluation-kit/source/use_case/kws
cp -r ./source/use_case/kws_asr/include ./ml-embedded-evaluation-kit/source/use_case/kws_asr
cp -r ./source/use_case/noise_reduction/include ./ml-embedded-evaluation-kit/source/use_case/noise_reduction
cp -r ./source/use_case/object_detection/include ./ml-embedded-evaluation-kit/source/use_case/object_detection
cp -r ./source/use_case/vww/include ./ml-embedded-evaluation-kit/source/use_case/vww
cp -r download_dependencies.py ./ml-embedded-evaluation-kit/
cp -r set_up_default_resources.py ./ml-embedded-evaluation-kit/
cp -r gen_rgb_cpp.py ./ml-embedded-evaluation-kit/scripts/py/
cp -r requirements.txt ./ml-embedded-evaluation-kit/scripts/py/
cd ml-embedded-evaluation-kit/
rm -rf ./dependencies
python3 ./download_dependencies.py
./build_default.py --npu-config-name ethos-u55-64
#go out ml-embedded-evaluation-kit folder and copy the example resources to ML embedded evaluation kit
cd ..
cp -r ./resources/img_yolov8_192 ./ml-embedded-evaluation-kit/resources
cp -r ./source/use_case/img_yolov8_192 ./ml-embedded-evaluation-kit/source/use_case
cp -r ./vela/img_yolov8_192 ./ml-embedded-evaluation-kit/resources_downloaded/

cp -r ./resources/img_yolov8_192_delete_transpose ./ml-embedded-evaluation-kit/resources
cp -r ./source/use_case/img_yolov8_192_delete_transpose ./ml-embedded-evaluation-kit/source/use_case
cp -r ./vela/img_yolov8_192_delete_transpose ./ml-embedded-evaluation-kit/resources_downloaded/

cp -r ./resources/img_yolov8_pose_192 ./ml-embedded-evaluation-kit/resources
cp -r ./source/use_case/img_yolov8_pose_192 ./ml-embedded-evaluation-kit/source/use_case
cp -r ./vela/img_yolov8_pose_192 ./ml-embedded-evaluation-kit/resources_downloaded/

cp -r ./resources/img_yolov8_pose_256 ./ml-embedded-evaluation-kit/resources
cp -r ./source/use_case/img_yolov8_pose_256 ./ml-embedded-evaluation-kit/source/use_case
cp -r ./vela/img_yolov8_pose_256 ./ml-embedded-evaluation-kit/resources_downloaded/
- We use Arm ML embedded evaluation kit to run the Yolov8n FVP example.
-


-
Go under folder of ml-embedded-evaluation-kit
cd ml-embedded-evaluation-kit -
First, Create the output file and go under the folder
mkdir build_img_yolov8_192 && cd build_img_yolov8_192 -
Second, Configure the Yolov8n Object detection example and set ETHOS_U_NPU_ENABLED to be ON.And you can run with Ethos-U55 NPU.
cmake ../ -DUSE_CASE_BUILD=img_yolov8_192 \-DETHOS_U_NPU_ENABLED=ON -
Compile the Yolov8n Object detection example
make -j8
- Go out and under the folder of YOLOv8_on_WE2
cd ../../ - Run with the commad about
Be careful of the
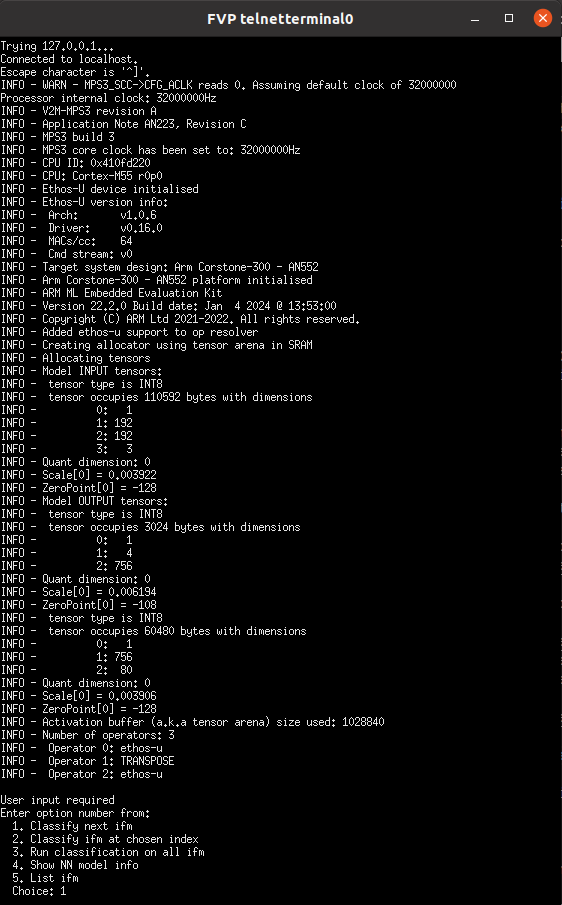
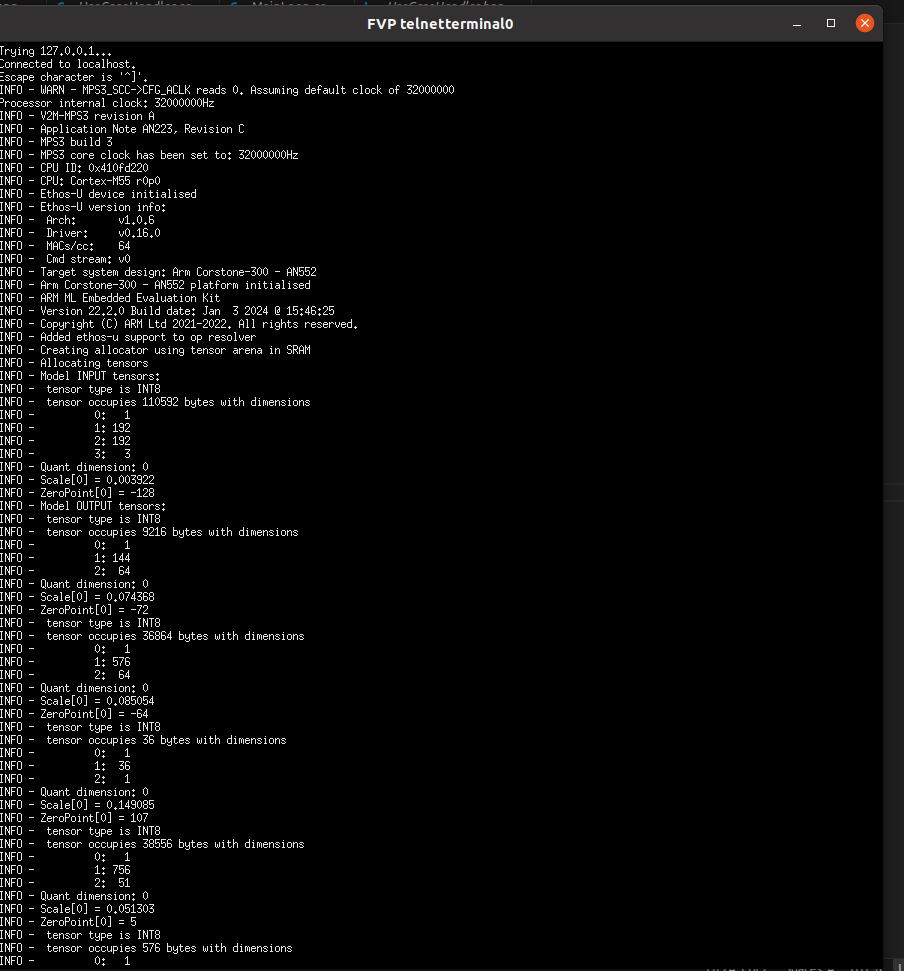
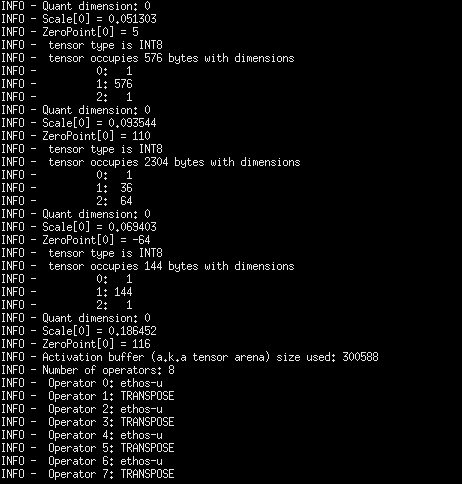
CS300FVP/models/Linux64_GCC-6.4/FVP_Corstone_SSE-300_Ethos-U55 -C ethosu.num_macs=64 ml-embedded-evaluation-kit/build_img_yolov8_192/bin/ethos-u-img_yolov8_192.axfethosu.num_macsnumber of the MACS at the command. If you use missmatch MACS number with vela model, it will be invoke fail. - You with see the FVP telnetterminal result below:
- Start inference:
- You will see the input size, output tensor size and MACS size on telnetterminal.
- The tflite op has run with the ethos-u op.
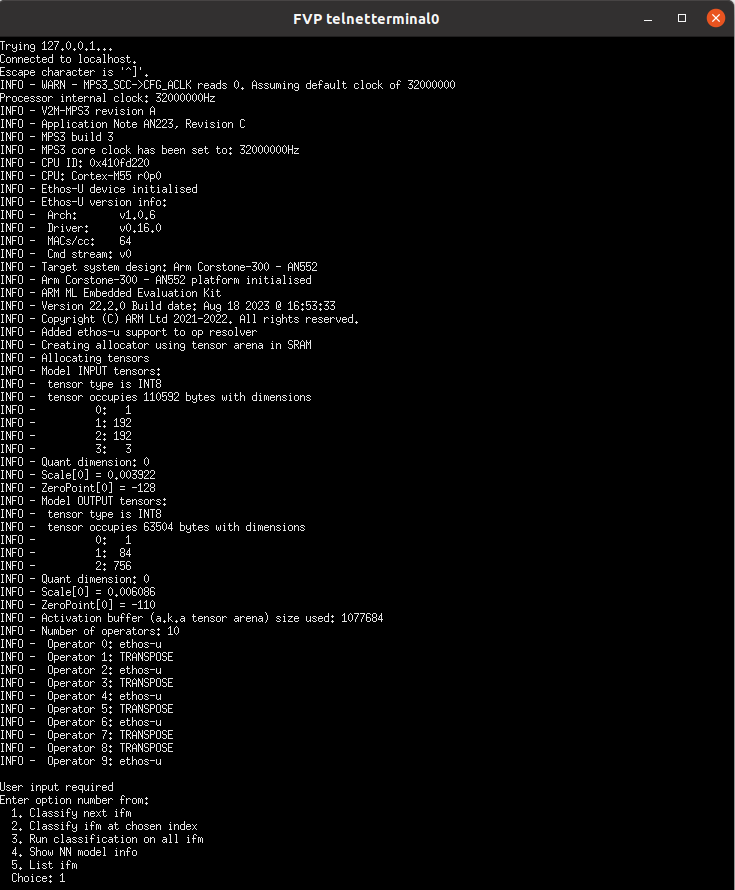
- Run inference:
- key-in
1on telnetterminal and you will start to inference first image with Ethos-U55 NPU and Cortex-M55.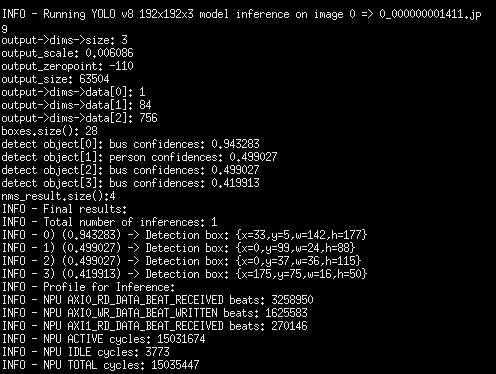
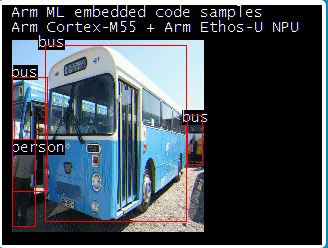
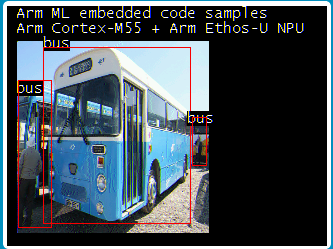
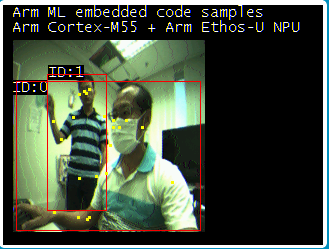
- First, you will see the input image on the screen.
- Then, you will see the detection result with bbox and class on the screen.
- key-in


-
Go under folder of ml-embedded-evaluation-kit
cd ml-embedded-evaluation-kit -
First, Create the output file and go under the folder
mkdir build_img_yolov8_192_delete_transpose && cd build_img_yolov8_192_delete_transpose -
Second, Configure the Yolov8n Object detection delete transpose example and set ETHOS_U_NPU_ENABLED to be ON.And you can run with Ethos-U55 NPU.
cmake ../ -DUSE_CASE_BUILD=img_yolov8_192_delete_transpose \-DETHOS_U_NPU_ENABLED=ON -
Compile the Yolov8n Object detection delete transpose example
make -j8
Run with Yolov8n Object detection delete transpose tflite model and inference using Ethos-U55 NPU and m55
- Go out and under the folder of YOLOv8_on_WE2
cd ../../ - Run with the commad about
Be careful of the
CS300FVP/models/Linux64_GCC-6.4/FVP_Corstone_SSE-300_Ethos-U55 -C ethosu.num_macs=64 ml-embedded-evaluation-kit/build_img_yolov8_192_delete_transpose/bin/ethos-u-img_yolov8_192_delete_transpose.axfethosu.num_macsnumber of the MACS at the command. If you use missmatch MACS number with vela model, it will be invoke fail. - You with see the FVP telnetterminal result below:
- Start inference:
- You will see the input size, output tensor size and MACS size on telnetterminal.
- The tflite op has run with the ethos-u op.
- Run inference:
- key-in
1on telnetterminal and you will start to inference first image with Ethos-U55 NPU and Cortex-M55.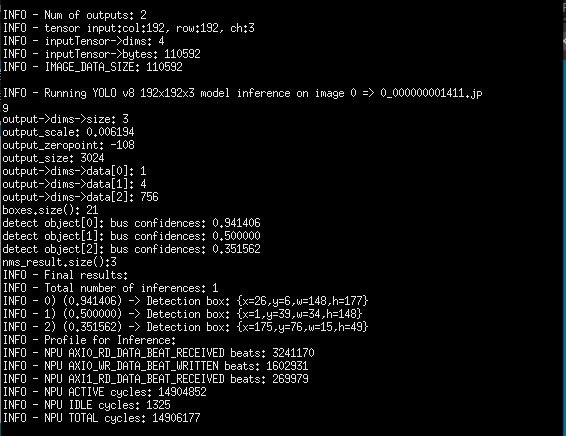
- First, you will see the input image on the screen.
- Then, you will see the detection result with bbox and class on the screen.
- key-in


-
Go under folder of ml-embedded-evaluation-kit
cd ml-embedded-evaluation-kit -
First, Create the output file and go under the folder
mkdir build_img_yolov8_pose_192 && cd build_img_yolov8_pose_192 -
Second, Configure the Yolov8n pose example and set ETHOS_U_NPU_ENABLED to be ON.And you can run with Ethos-U55 NPU.
cmake ../ -DUSE_CASE_BUILD=img_yolov8_pose_192 \-DETHOS_U_NPU_ENABLED=ON -
Compile the Yolov8n pose example
make -j8
- Go out and under the folder of YOLOv8_on_WE2
cd ../../ - Run with the commad about
Be careful of the
CS300FVP/models/Linux64_GCC-6.4/FVP_Corstone_SSE-300_Ethos-U55 -C ethosu.num_macs=64 ml-embedded-evaluation-kit/build_img_yolov8_pose_192/bin/ethos-u-img_yolov8_pose_192.axfethosu.num_macsnumber of the MACS at the command. If you use missmatch MACS number with vela model, it will be invoke fail. - You with see the FVP telnetterminal result below:
- Start inference:
- You will see the input size, output tensor size and MACS size on telnetterminal.
- The tflite op has run with the ethos-u op.
- Run inference:
- key-in
1on telnetterminal and you will start to inference first image with Ethos-U55 NPU and Cortex-M55.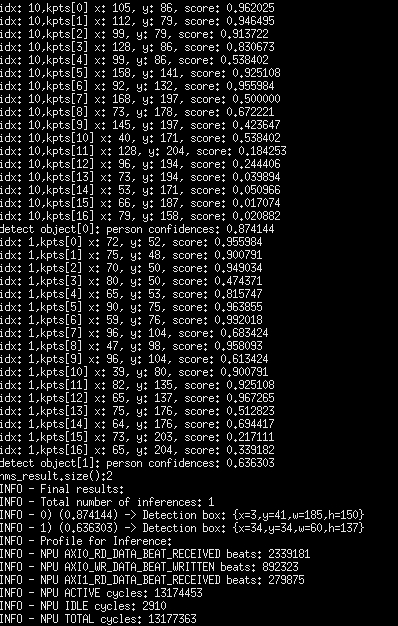
- First, you will see the input image on the screen.
- Then, you will see the detection result with bbox and pose key-points on the screen.
- key-in


-
Go under folder of ml-embedded-evaluation-kit
cd ml-embedded-evaluation-kit -
First, Create the output file and go under the folder
mkdir build_img_yolov8_pose_256 && cd build_img_yolov8_pose_256 -
Second, Configure the Yolov8n pose example and set ETHOS_U_NPU_ENABLED to be ON.And you can run with Ethos-U55 NPU.
cmake ../ -DUSE_CASE_BUILD=img_yolov8_pose_256 \-DETHOS_U_NPU_ENABLED=ON -
Compile the Yolov8n pose example
make -j8
- Go out and under the folder of YOLOv8_on_WE2
cd ../../ - Run with the commad about
Be careful of the
CS300FVP/models/Linux64_GCC-6.4/FVP_Corstone_SSE-300_Ethos-U55 -C ethosu.num_macs=64 ml-embedded-evaluation-kit/build_img_yolov8_pose_256/bin/ethos-u-img_yolov8_pose_256.axfethosu.num_macsnumber of the MACS at the command. If you use missmatch MACS number with vela model, it will be invoke fail.