TAMV is under active development!
- TAMV Walkthrough Video
- TAMV = Tool Alignment (using) Machine Vision
- Why should I use this version/fork of TAMV?
- What's included in this package?
- What do I need to run TAMV?
- What do I need to run ZTATP?
- How do I install OpenCV on my Raspberry Pi?
- How do I run these packages?
- TAMV Community Videos
You can find me (H2B) on the Jubilee Discord Server and I'll be more than glad to help you get things up and running.
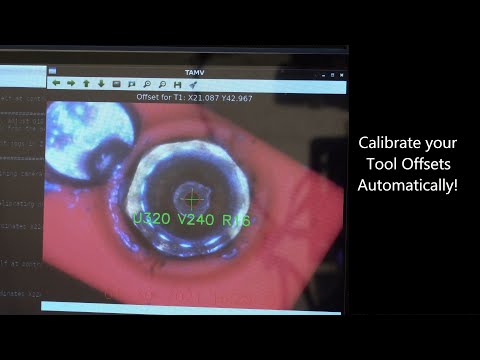
We've got a short walkthrough of TAMV in operation up on YouTube, and there you can see a real-time setup and alignment for a 3 tool printer. Click on the image to head over there!
Ever needed to simplify nozzle and tool alignment on a toolchanging 3D printer/machine?
Well, welcome to the wonderful experience of automated nozzle alignment and Z offset setting using machine vision (for X&Y offset alignment) and electrical touch plates (for Z offset alignment).
This program significantly improves how tool-changing machines using Duet RRF v2/3 on Duet2 / Duet3 controlers by leveraging open-source computer vision algorithms from the OpenCV project to eliminate the guesswork from tool alignment and (nearly) completely automate the process. Let the machines do the work!
TAMV in its current release is a graphical program that allows you to connect to your printer and automatically calculate tool offsets in XY space using a generic USB microscope and a Raspberry Pi (preferably a Pi4 or better with 4GB of RAM). You may also use any Windows or Linux desktop/laptop, as long as you can connect that machine to the microscope situated on the printer build plate.
Please avoid using any webcams for alignment, because this approach (while viable) will need significantly more work to overcome issues related to insufficient/inappropriate lighting and limited depth-of-field of webcam optics (not to mention more sensor noise artifacts), all of which can throw off the computer vision algorithms and cause headaches.
- Its got a bundled installation script for getting OpenCV 4.5.1 running on a Raspberry Pi.
- It takes about 5 minutes to install.
- TAMV is fully multi-processing and multi-threading for faster run times.
- Automatically calibrates itself for optical distortions, making alignment smoother and faster.
- Switches automatically between 4 different detection modes to lock on to the nozzle quickly.
- Fails over to manual alignment capture when the nozzle can't be detected.
- Supports manual or semi-assisted alignments so you can use it with any tools in your toolchanger
- Its built to be extensible, and we do have a few klipper beta testers working on a driver for klipper toolchangers!
- You can save multiple printer profiles and re-use your connections every time you align your tools.
- Its completely open-source and community driven.
- TAMV.py: the main interface for automated X/Y offset tool alignment using computer vision
- ZTATP.py: a second program that uses electrical touch plates to physically measure tool Z offsets using your Duet controller's endstop inputs
-
A fully functional tool changer platform running RepRapFirmware 2.0.5 or 3.2+
It has only been tested on machines using either Duet2 (+Duex2 or Duex5) or Duet 3 boards.
All your toolchanging macros (tpre, tpost, tfree) have to be up and running - you can run tool changes cleanly.
All of your tools are assumed to have reached a "safe working area" once the tool is active (after tpost has completed), and your selected "Controlled Point" (the XY position where your microscope is located) can be reached using a large X move followed by a large Y move (be mindful of collisions here!)
You will need to modify your tool change macros to exclude any extrusion moves temporarily to make sure the nozzles are clear of any filament and can be detected reliably. This is still a manual modification and we're working on automating this in the near future.
All of your tools must have clean nozzles with no excessive filament deposits surrounding the nozzle.
-
A Raspberry Pi (3 or better with at least 2GB of RAM)
We prefer a Raspberry Pi 4 with 4GB of RAM for a smoother experience, but it will also work on a Model 3 Raspberry Pi.
OpenCV requires at least 2GB of RAM to be installed, keep this in mind before jumping into installing openCV. It also takes over an hour to compile OpenCV on a Raspberry Pi 4
-
A generic USB microscope with the light controls built-in to the USB cable
This is a generic mass-manufactured part commonly found at your favorite ecommerce outlet of choice. Make sure you are using the variant that has a lighting control wheel built-in to the USB cable, as there are alternative versions that look very similar which lack lighting control and have been found to be incompatible with Raspbian and will not work.
You may choose to use a webcam you already have at home, but be mindful that computer vision requires a specific type of lighting (mainly soft diffuse light directed perpendicular from the camera to the object/nozzle) to work consistently. Webcams also tend to have wide-angle lens optics and offer a very coarse depth of focus, further complicating things when you need to focus on a 0.4mm nozzle from a 25mm focal distance. Add to that webcam sensors typically exhibit a lot of noise artifacts when forced to zoom in so closely to the nozzles. Overall, it will work, but you'll need to fiddle with it until its just right. We all started using TAMV with Logitech C270 webcams, and then moved to microscopes for the vastly superior experience.
-
A little dose of patience (since you're reading this and already own a toolchanger, then we're sure you've got this bit covered..)
You'll find a great community and ton of help and answers to your questions on the Jubilee Discord Server
-
Any tool changer machine, just like #1 above for TAMV, running RRF
-
A Raspberry Pi, just like #2 above for TAMV
You may also choose to use any computer that can run a Python3 script and communicate with your Duet over the local network.
-
Some sort of electrically conductive touch plate which you're going to connect to an endstop input (ground) on your Duet board.
This can be as simple as a block of aluminum with an electrical wire screwed into it. As long as its electrically conductive and relatively small (under 3 inches on its longest side), you should be OK (size plays a large part in signal noise, so avoid using your printer's build plate..)
-
A second electrical wire that you can hook up to your tools (one at a time, ZTATP pauses and prompts you to connect/disconnect everything for each tool).
We can recommend some electrical wire and an alligator clip that you can connect to your nozzle for each alignment sequence.
-
A multimeter (REQUIRED!) to test for electrical continuity between your tool nozzle and touch plate before each alignement sequence.
We are talking about moving your tool down into a block of metal on your printer bed with ZTATP, so any collisions will definitely lead to machine/tool damage that will cause frustration and expensive repair.
-
Patience, more so than TAMV, since you want to make sure each tool is ready to be slowly lowered into a block of solid metal, and you definitely don't want to mess this up.
Don't worry. If you do your checks before each probe move, you won't have any crashes (hopefully).
But you are taking full responsibilty and accountability for using ZTATP and we will not be liable for any damages that you may incur.
-
Clone this repository into your home folder
Open a terminal window on your Raspberry pi
type
cd, and hit entertype
git clone https://github.com/HaythamB/TAMVand hit enter -
type
cd TAMVand press enter -
Run
./install_opencv.sh -
Wait 5 to 15 minutes for everything to be installed
Note for Raspberry Pi 3 users: you will probably have to increase the default SWAP size to at least 2GB for the install to run successfully. Here's the commands to run before installing openCV to set up a 2GB swap file. Run a Google search on "how to increase raspberry pi 3 swap size" for more info.
sudo sed -i 's/CONF_SWAPSIZE=100/CONF_SWAPSIZE=2048/g' /etc/dphys-swapfile
sudo /etc/init.d/dphys-swapfile stop
sudo /etc/init.d/dphys-swapfile start
-
Connect your microscope/webcam to a USB port (preferably only connect 1 when starting it for the first time)
-
Open a terminal window from the Raspbian desktop and NOT AN SSH SESSION and run
cd TAMVand then./TAMV.pyorpython3 ./TAMV.py -
Follow the buttons and prompts on-screen. There are tooltips everywhere to guide you!
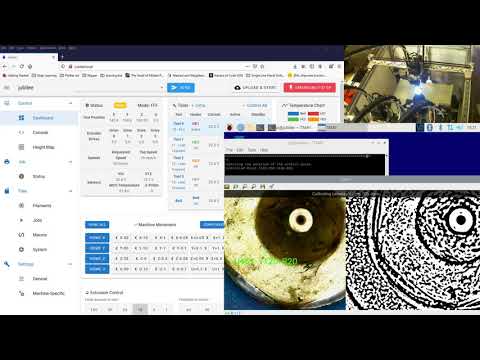
You can always also watch this video here to see how a calibration is run for an older release of TAMV.
TAMV.py = Tool Align Machine Vision - for Duet based tool changing 3D printers.
- Runs on the Pi that has the USB or Pi camera
- Requires network connection to DUET RepRap V2 or V3 based printer.
- This MAY be, but is not required to be, the Pi in a Duet3+Pi configuration
- Requires OpenCV installed on the Pi.
- MUST run on the graphic console, not SSH. This can be physical, VNC, or any combination of the two.
- Always use soft diffused lighting when running TAMV (a diffused LED ring works great). This is the most important factor to get it to detect nozzles consistently and reliably without any fuss.
P.S. Reminder: Never NEVER run a graphic app with 'sudo'. It can break your XWindows (graphic) setup. Badly.
ZTATP.py = Z Tool Align Touch Plate - for Duet based tool changing 3D printers.
- Requires network connection to DUET RepRap V2 or V3 based printer.
- This MAY be, but is not required to be, the Pi in a Duet3+Pi configuration
- Warning: RRF 2&3 have a hardcoded offset of 0.7mm applied to Z-probes which you must over-ride in your config.g file. If you don't fix this issue, your offsets will be calculated 0.7mm too close to your print surface and this will result in damage to your printer! A simple G31 Z0 at the end of your config.g file (or whatever Z offset applies to your probe) is sufficient to fix this issue. A later release of ZTATP will automatically handle this issue, but for now, it is a manual fix.
See instructions above for TAMV. It will be in the same directory.
show help message and exit
Name or IP address of Duet printer. You can use -duet=localhost if you are on the embedded Pi on a Duet3.
x y of center of a 15x15mm touch plate (these can be decimal values)
input pin to which wires from nozzles are attached (only in RRF3)
set a run for an individual tool number
cd TAMV
./ZTATP.py -touchplate X Y
NOTE: Requires Wiring! Each nozzle must be wired to the GPIO specified (default is io5.in, can be overriden on command line). The touchplate must be grounded. Recommend about running with finger on power switch, in case a given touch does not stop.
You can find the original release of TAMV in Danal Estes' repository.
Be sure to check out Luke's latest releases on his website.