| services | platforms | author | level | client | service | endpoint |
|---|---|---|---|---|---|---|
active-directory |
dotnet |
jmprieur |
400 |
.NET Framework 4.5 Console, JavaScript SPA |
ASP.NET Web API |
AAD V1 |
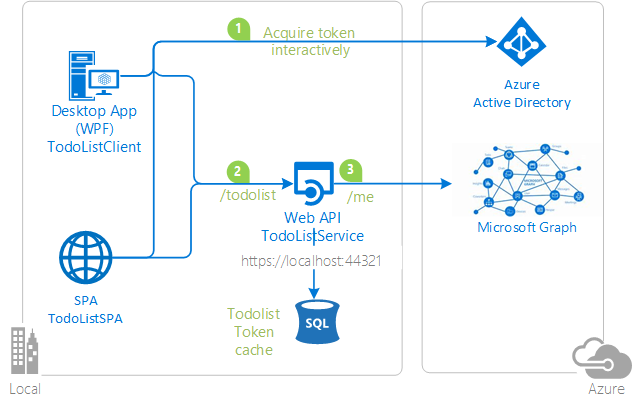
In this sample, the native client and a simple JavaScript single page application:
- Acquire a token to act On Behalf Of the user.
- Call a web API (
TodoListService) - Which itself calls another downstream Web API (The Microsoft Graph)
The TodoListService uses a database to:
-
Store the todo list
-
Illustrate token cache serialization in a service

-
TodoListClientuses Active Directory Authentication Library for .NET (ADAL.NET) to acquire a token for the user in order to call the first web API. For more information about how to acquire tokens interactively, see Acquiring tokens interactively Public client application flows. -
TodoListSPA, the single page application, uses ADAL.js. When the user enters a todo item,TodoListClientandTodoListSPAcallTodoListServiceon the/todolistendpoint. -
Then
TodoListServicealso uses ADAL.NET to get a token to act on behalf of the user to call the Microsoft Graph. For details, see Service to service calls on behalf of the user. It then decorates the todolist item entered by the user, with the First name and the Last name of the user. Below is a screen copy of what happens when the user named automation service account entered "item1" in the textbox.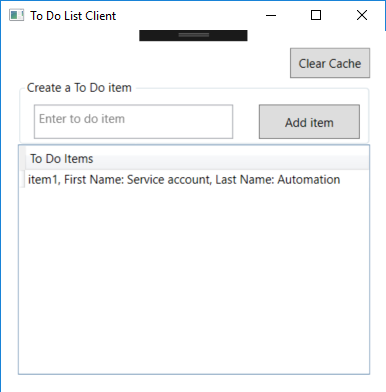

Both flows use the OAuth 2.0 protocol to obtain the tokens. For more information about how the protocols work in this scenario and other scenarios, see Authentication Scenarios for Azure AD.
Looking for previous versions of this code sample? Check out the tags on the releases GitHub page.
To run this sample, you'll need:
- Visual Studio 2017
- An Internet connection
- An Azure Active Directory (Azure AD) tenant. For more information on how to get an Azure AD tenant, see How to get an Azure AD tenant
- A user account in your Azure AD tenant. This sample will not work with a Microsoft account (formerly Windows Live account). Therefore, if you signed in to the Azure portal with a Microsoft account and have never created a user account in your directory before, you need to do that now.
From your shell or command line:
git clone https://github.com/Azure-Samples/active-directory-dotnet-webapi-onbehalfof.git
Given that the name of the sample is pretty long, and so are the name of the referenced NuGet pacakges, you might want to clone it in a folder close to the root of your hard drive, to avoid file size limitations on Windows.
There are three projects in this sample. Each needs to be separately registered in your Azure AD tenant. To register these projects, you can:
- either follow the steps in the paragraphs below (Step 2 and Step 3)
- or use PowerShell scripts that:
- automatically create for you the Azure AD applications and related objects (passwords, permissions, dependencies)
- modify the Visual Studio projects' configuration files.
If you want to use this automation, read the instructions in App Creation Scripts
As a first step you'll need to:
- Sign in to the Azure portal.
- On the top bar, click on your account, and then on Switch Directory.
- Once the Directory + subscription pane opens, choose the Active Directory tenant where you wish to register your application, from the Favorites or All Directories list.
- Click on All services in the left-hand nav, and choose Azure Active Directory.
In the next steps, you might need the tenant name (or directory name) or the tenant ID (or directory ID). These are presented in the Properties of the Azure Active Directory window respectively as Name and Directory ID
-
In the Azure Active Directory pane, click on App registrations and choose New application registration.
-
Enter a friendly name for the application, for example 'TodoListService-OBO' and select 'Web app / API' as the Application Type.
-
For the sign-on URL, enter the base URL for the sample, which is by default
https://localhost:44321/. -
Click on Create to create the application.
-
In the succeeding page, Find the Application ID value and copy it to the clipboard. You'll need it to configure the Visual Studio configuration file for this project.
-
Then click on Settings, and choose Properties.
-
For the App ID URI, replace the guid in the generated URI 'https://<your_tenant_name>/<guid>', with the name of your service, for example, 'https://<your_tenant_name>/TodoListService-OBO' (replacing
<your_tenant_name>with the name of your Azure AD tenant) -
From the Settings menu, choose Keys and add a new entry in the Password section:
- Type a key description (of instance
app secret), - Select a key duration of either In 1 year, In 2 years, or Never Expires.
- When you save this page, the key value will be displayed, copy, and save the value in a safe location.
- You'll need this key later to configure the project in Visual Studio. This key value will not be displayed again, nor retrievable by any other means, so record it as soon as it is visible from the Azure portal.
- Type a key description (of instance
-
Configure Permissions for your application. To that extent, in the Settings menu, choose the 'Required permissions' section and then, click on Add, then Select an API, and type
Microsoft Graphin the textbox. Then, click on Select Permissions and select User.Read.
- In the Azure Active Directory pane, click on App registrations and choose New application registration.
- Enter a friendly name for the application, for example 'TodoListClient-OBO' and select 'Native' as the Application Type.
- For the Redirect URI, enter
https://<your_tenant_name>/TodoListClient-OBO, replacing<your_tenant_name>with the name of your Azure AD tenant. - Click on Create to create the application.
- In the succeeding page, Find the Application ID value and copy it to the clipboard. You'll need it to configure the Visual Studio configuration file for this project.
- Then click on Settings, and choose Properties.
- Configure Permissions for your application. To that extent, in the Settings menu, choose the 'Required permissions' section and then,
click on Add, then Select an API, and type
TodoListService-OBOin the textbox. Then, click on Select Permissions and select Access 'TodoListService-OBO'.
- In the Azure Active Directory pane, click on App registrations and choose New application registration.
- Enter a friendly name for the application, for example 'TodoListSPA-OBO' and select 'Web app / API' as the Application Type.
- For the sign-on URL, enter the base URL for the sample, which is by default
http://localhost:16969/. - Click on Create to create the application.
- In the succeeding page, Find the Application ID value and copy it to the clipboard. You'll need it to configure the Visual Studio configuration file for this project.
- Enable the OAuth 2 implicit grant for your application by choosing Manifest at the top of the application's page. Open the inline manifest editor.
Search for the
oauth2AllowImplicitFlowproperty. You will find that it is set tofalse; change it totrueand click on Save to save the manifest. - Then click on Settings, and choose Properties.
- For the App ID URI, replace the guid in the generated URI 'https://<your_tenant_name>/<guid>', with the name of your service, for example, 'https://<your_tenant_name>/TodoListSPA-OBO' (replacing
<your_tenant_name>with the name of your Azure AD tenant) - Configure Permissions for your application. To that extent, in the Settings menu, choose the 'Required permissions' section and then,
click on Add, then Select an API, and type
TodoListService-OBOin the textbox. Then, click on Select Permissions and select Access 'TodoListService-OBO'.
For the middle tier web API (TodoListService-OBO) to be able to call the downstream web APIs, the user must grant the middle tier permission to do so in the form of consent.
However, since the middle tier has no interactive UI of its own, you need to explicitly bind the client app registration in Azure AD, with the registration for the web API.
This binding merges the consent required by both the client & middle tier into a single dialog, which will be presented to the user by the client.
You can do so by adding the "Client ID" of the client app, to the manifest of the web API in the knownClientApplications property. Here's how:
-
In the Azure portal, navigate to your
TodoListService-OBOapp registration, and open the manifest editor by clicking on Manifest. -
In the manifest, locate the
knownClientApplicationsarray property, and add the Client ID of the client application (TodoListClient-OBO) as an element. After you're done, your code should look like the following snippet with as many GUIDs as you have clients:"knownClientApplications": ["94da0930-763f-45c7-8d26-04d5938baab2"] -
Save the TodoListService manifest by clicking the Save button.
-
[Optionally] do the same with the ClientID of your single page JavaScript application's registration if you created it.
In the steps below, ClientID is the same as Application ID or AppId.
Open the solution in Visual Studio to configure the projects
- Open the
TodoListService\Web.Configfile - Find the app key
ida:Tenantand replace the existing value with your AAD tenant name. - Find the app key
ida:Audienceand replace the existing value with the App ID URI you registered earlier for the TodoListService-OBO app. For instance usehttps://<your_tenant_name>/TodoListService-OBO, where<your_tenant_name>is the name of your Azure AD tenant. - Find the app key
ida:AppKeyand replace the existing value with the key you saved during the creation of theTodoListService-OBOapp, in the Azure portal. - Find the app key
ida:ClientIDand replace the existing value with the application ID (clientId) of theTodoListService-OBOapplication copied from the Azure portal.
- Open the
TodoListClient\App.Configfile - Find the app key
ida:Tenantand replace the existing value with your AAD tenant name. - Find the app key
ida:ClientIdand replace the existing value with the application ID (clientId) of theTodoListClient-OBOapplication copied from the Azure portal. - Find the app key
ida:RedirectUriand replace the existing value with the Redirect URI for TodoListClient-OBO app. For instance usehttps://<your_tenant_name>/TodoListClient-OBO, where<your_tenant_name>is the name of your Azure AD tenant. - Find the app key
todo:TodoListResourceIdand replace the existing value with the App ID URI you registered earlier for the TodoListService-OBO app. For instance usehttps://<your_tenant_name>/TodoListService-OBO, where<your_tenant_name>is the name of your Azure AD tenant. - Find the app key
todo:TodoListBaseAddressand replace the existing value with the base address of the TodoListService-OBO project (by defaulthttps://localhost:44321/).
If you have configured the TodoListSPA application in Azure AD, you want to update the JavaScript project:
- Open the
TodoListSPA\appconfig.jsfile - In the
configvariable (which is about the Azure AD TodoListSPA configuration):
- find the member named
tenantand replace the value with your AAD tenant name. - find the member named
clientIdand replace the value with the Client ID for the TodoListSPA application from the Azure portal. - find the member named
redirectUriand replace the value with the redirect URI you provided for the TodoListSPA application from the Azure portal, for example,https://localhost:44377/.
-
In the
WebApiConfigvariable (which is about configuration of the resource, that is the TodoListService):- find the member named
resourceIdand replace the value with the App ID URI of the TodoListService, for examplehttps://<your_tenant_name>/TodoListService.
- find the member named
-
While running the SPA app in the browser, take care to allow popups from this app.
Clean the solution, rebuild the solution, and run it. You might want to go into the solution properties and set both projects, or the three projects, as startup projects, with the service project starting first.
Explore the sample by signing in, adding items to the To Do list, Clearing the cache (which removes the user account), and starting again. The To Do list service will take the user's access token, received from the client, and use it to get another access token so it can act On Behalf Of the user in the Microsoft Graph API. This sample caches the user's access token at the To Do list service, so it does not request a new access token on every request. This cache is a database cache.
[Optionally], when you have added a few items with the TodoList Client, login to the todoListSPA with the same credentials as the todoListClient, and observe the id-Token, and the content of the Todo List as stored on the service, but as Json. This will help you understand the information circulating on the network.
The code using ADAL.NET is in the TodoListClient/MainWindow.xaml.cs file in the SignIn() method. See [More information][#More-information] below for details on how this work. The call to the TodoListService is done in the AddTodoItem() method.
The code for the Token cache serialization on the client side (in a file) is in TodoListClient/FileCache.cs
The code acquiring a token on behalf of the user from the service side is in TodoListService/Controllers/TodoListController.cs
The code for the Service side serialization (in a database) is in TodoListService/DAL/DbTokenCache.cs. you can see how it's referenced by the Controller in the CallGraphAPIOnBehalfOfUser() method.
This project has two WebApp / Web API projects. To deploy them to Azure Web Sites, you'll need, for each one, to:
- create an Azure Web Site
- publish the Web App / Web APIs to the web site, and
- update its client(s) to call the web site instead of IIS Express.
- Sign in to the Azure portal.
- Click Create a resource in the top left-hand corner, select Web + Mobile --> Web App, select the hosting plan and region, and give your web site a name, for example,
TodoListService-OBO-contoso.azurewebsites.net. Click Create Web Site. - Once the web site is created, click on it to manage it. For this set of steps, download the publish profile by clicking Get publish profile and save it. Other deployment mechanisms, such as from source control, can also be used.
- Switch to Visual Studio and go to the TodoListService project. Right click on the project in the Solution Explorer and select Publish. Click Import Profile on the bottom bar, and import the publish profile that you downloaded earlier.
- Click on Settings and in the
Connection tab, update the Destination URL so that it is https, for example https://TodoListService-OBO-contoso.azurewebsites.net. Click Next. - On the Settings tab, make sure
Enable Organizational Authenticationis NOT selected. Click Save. Click on Publish on the main screen. - Visual Studio will publish the project and automatically open a browser to the URL of the project. If you see the default web page of the project, the publication was successful.
- Navigate to the Azure portal.
- On the top bar, click on your account and under the Directory list, choose the Active Directory tenant containing the
TodoListService-OBOapplication. - On the applications tab, select the
TodoListService-OBOapplication. - From the Settings -> Reply URLs menu, update the Sign-On URL, and Reply URL fields to the address of your service, for example https://TodoListService-OBO-contoso.azurewebsites.net. Save the configuration.
- In Visual Studio, go to the
TodoListClient-OBOproject. - Open
TodoListClient\App.Config. Only one change is needed - update thetodo:TodoListBaseAddresskey value to be the address of the website you published, for example, https://TodoListService-OBO-contoso.azurewebsites.net. - Run the client! If you are trying multiple different client types (for example, .Net, Windows Store, Android, iOS) you can have them all call this one published web API.
- In Visual Studio, go to the
TodoListSPA-OBOproject. - Open
TodoListSPA\appconfig.js. Only one change is needed - update thetodo:TodoListBaseAddresskey value to be the address of the website you published, for example, https://TodoListService-OBO-contoso.azurewebsites.net. - Run the client! If you are trying multiple different client types (for example, .Net, Windows Store, Android, iOS) you can have them all call this one published web API.
- Sign in to the Azure portal.
- Click Create a resource in the top left-hand corner, select Web + Mobile --> Web App, select the hosting plan and region, and give your web site a name, for example,
TodoListSPA-OBO-contoso.azurewebsites.net. Click Create Web Site. - Once the web site is created, click on it to manage it. For this set of steps, download the publish profile by clicking Get publish profile and save it. Other deployment mechanisms, such as from source control, can also be used.
- Switch to Visual Studio and go to the TodoListService project. Right click on the project in the Solution Explorer and select Publish. Click Import Profile on the bottom bar, and import the publish profile that you downloaded earlier.
- Click on Settings and in the
Connection tab, update the Destination URL so that it is https, for example https://TodoListSPA-OBO-contoso.azurewebsites.net. Click Next. - On the Settings tab, make sure
Enable Organizational Authenticationis NOT selected. Click Save. Click on Publish on the main screen. - Visual Studio will publish the project and automatically open a browser to the URL of the project. If you see the default web page of the project, the publication was successful.
- Navigate to the Azure portal.
- On the top bar, click on your account and under the Directory list, choose the Active Directory tenant containing the
TodoListSPA-OBOapplication. - On the applications tab, select the
TodoListSPA-OBOapplication. - From the Settings -> Reply URLs menu, update the Sign-On URL, and Reply URL fields to the address of your service, for example https://TodoListSPA-OBO-contoso.azurewebsites.net. Save the configuration.
First, in Visual Studio 2017 create an empty solution to host the projects. Then, follow these steps to create each project.
- In Visual Studio 2017, create a new
Visual C#ASP.NET Web Application (.NET Framework)project. In the next screen, choose theWeb APIproject template. And while on this screen, click the Change Authentication button, select 'Work or School Accounts', 'Cloud - Single Organization', enter the name of your Azure AD tenant. You will be prompted to sign in to your Azure AD tenant. NOTE: You must sign in with a user that is in the tenant; you cannot, during this step, sign in with a Microsoft account. - Add the Active Directory Authentication Library (ADAL) NuGet, Microsoft.IdentityModel.Clients.ActiveDirectory, EntityFramework, and Microsoft.AspNet.WebApi.Cors to the project.
- Add reference of the
System.IdentityModelassembly in the project. - In the
Modelsfolder, add a new class calledTodoItem.cs. Copy the implementation of TodoItem from this sample into the class. - In the
Modelsfolder, add a new class calledUserProfile.cs. Copy the implementation of UserProfile from this sample into the class. - Create a new folder named
DAL.In theDALfolder, add a new class calledDbTokenCache.cs. Copy the implementation of DbTokenCache from this sample into the class. - In the
DALfolder, add a new class calledTodoListServiceContext.cs. Copy the implementation of TodoListServiceContext from this sample into the class. - Add a new class named
Extensionsin the project. Replace the implementation with the contents of the file of the same name from the sample. - Add a new, empty, Web API 2 Controller called
TodoListController. - Copy the implementation of the TodoListController from this sample into the controller. Don't forget to add the
[Authorize]attribute to the class. - In
web.configmake sure that the keyida:AADInstance,ida:Tenant,ida:ClientID, andida:AppKeyexist, and are populated. For the global Azure cloud, the value ofida:AADInstanceishttps://login.onmicrosoft.com/{0}. - In
web.config, in<appSettings>, create keys forida:GraphResourceIdandida:GraphUserUrland set the values accordingly. For the global Azure AD, the value ofida:GraphResourceIdishttps://graph.microsoft.com, and the value ofida:GraphUserUrlishttps://graph.microsoft.com/v1.0/me/.
- In the solution, create a new Windows --> Windows Classic Desktop -> WPF App(.NET Framework) called TodoListClient.
- Add the Active Directory Authentication Library (ADAL) NuGet, Microsoft.IdentityModel.Clients.ActiveDirectory to the project.
- Add assembly references to
System.Net.Http,System.Web.Extensions, andSystem.Configuration. - Add a new class to the project called
TodoItem.cs. Copy the code from the sample project file of the same name into this class, completely replacing the code in the file in the new project. - Add a new class to the project called
FileCache.cs. Copy the code from the sample project file of the same name into this class, completely replacing the code in the file in the new project. - Copy the markup from `MainWindow.xaml' in the sample project into the file of the same name in the new project, completely replacing the markup in the file in the new project.
- Copy the code from
MainWindow.xaml.csin the sample project into the file of the same name in the new project, completely replacing the code in the file in the new project. - In
app.configcreate keys forida:AADInstance,ida:Tenant,ida:ClientId,ida:RedirectUri,todo:TodoListResourceId, andtodo:TodoListBaseAddressand set them accordingly. For the global Azure cloud, the value ofida:AADInstanceishttps://login.onmicrosoft.com/{0}.
Finally, in the properties of the solution itself, set both projects as startup projects.
Use Stack Overflow to get support from the community.
Ask your questions on Stack Overflow first and browse existing issues to see if someone has asked your question before.
Make sure that your questions or comments are tagged with [adal dotnet].
If you find a bug in the sample, please raise the issue on GitHub Issues.
To provide a recommendation, visit the following User Voice page.
If you'd like to contribute to this sample, see CONTRIBUTING.MD.
This project has adopted the Microsoft Open Source Code of Conduct. For more information, see the Code of Conduct FAQ or contact opencode@microsoft.com with any additional questions or comments.
For more information, see ADAL.NET's conceptual documentation:
- Recommended pattern to acquire a token
- Acquiring tokens interactively in public client applications
- Service to service calls on behalf of the user.
- Customizing Token cache serialization
For more information about how OAuth 2.0 protocols work in this scenario and other scenarios, see Authentication Scenarios for Azure AD.