假设:diffusion是一个去噪器+生成器。每一个unet是一个去噪器,如果输入的是$ax_0 + b\varepsilon$,那么输出的$x_0$是非常好的。但是如果输入的是一个随机噪声,那么输出的x0不一定很好,需要多个unet进行不同步的拟合。
现在end2end无法实现去噪的原因是:
- 参数量太大了,不好训练。
- Unet训练的时候是用噪声进行监督,end2end是用x0进行监督
- 中间使用了ddim的采样
设计实验:
- 输入加噪图片,用Unet最后一层输出的x0应该是好的
- 减小参数量到30M,应该可以训练出去噪器
说明不能用训练去噪器的方式训练生成器??
Jiaming Song, Chenlin Meng and Stefano Ermon, Stanford
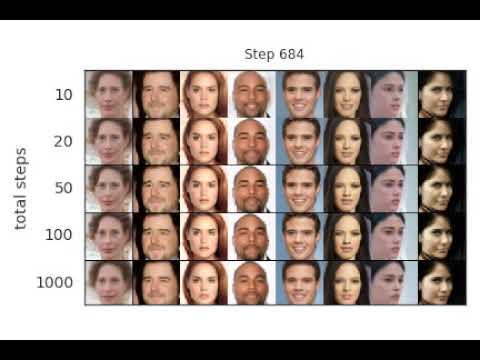
Implements sampling from an implicit model that is trained with the same procedure as Denoising Diffusion Probabilistic Model, but costs much less time and compute if you want to sample from it (click image below for a video demo):
DDIM is now also available in 🧨 Diffusers and accesible via the DDIMPipeline. Diffusers allows you to test DDIM in PyTorch in just a couple lines of code.
You can install diffusers as follows:
pip install diffusers torch accelerate
And then try out the model with just a couple lines of code:
from diffusers import DDIMPipeline

model_id = "google/ddpm-cifar10-32"

# load model and scheduler
ddim = DDIMPipeline.from_pretrained(model_id)

# run pipeline in inference (sample random noise and denoise)
image = ddim(num_inference_steps=50).images[0]

# save image
image.save("ddim_generated_image.png")
More DDPM/DDIM models compatible with hte DDIM pipeline can be found directly on the Hub
To better understand the DDIM scheduler, you can check out this introductionary google colab
The DDIM scheduler can also be used with more powerful diffusion models such as Stable Diffusion
You simply need to accept the license on the Hub, login with huggingface-cli login and install transformers:
pip install transformers
Then you can run:
from diffusers import StableDiffusionPipeline, DDIMScheduler

ddim = DDIMScheduler.from_config("runwayml/stable-diffusion-v1-5", subfolder="scheduler")
pipeline = StableDiffusionPipeline.from_pretrained("runwayml/stable-diffusion-v1-5", scheduler=ddim)

image = pipeline("An astronaut riding a horse.").images[0]

image.save("astronaut_riding_a_horse.png")The code has been tested on PyTorch 1.6.
Training is exactly the same as DDPM with the following:
python main.py --config {DATASET}.yml --exp {PROJECT_PATH} --doc {MODEL_NAME} --ni
python main.py --config {DATASET}.yml --exp {PROJECT_PATH} --doc {MODEL_NAME} --sample --fid --timesteps {STEPS} --eta {ETA} --ni
where
ETAcontrols the scale of the variance (0 is DDIM, and 1 is one type of DDPM).STEPScontrols how many timesteps used in the process.MODEL_NAMEfinds the pre-trained checkpoint according to its inferred path.
If you want to use the DDPM pretrained model:
python main.py --config {DATASET}.yml --exp {PROJECT_PATH} --use_pretrained --sample --fid --timesteps {STEPS} --eta {ETA} --ni
the --use_pretrained option will automatically load the model according to the dataset.
We provide a CelebA 64x64 model here, and use the DDPM version for CIFAR10 and LSUN.
If you want to use the version with the larger variance in DDPM: use the --sample_type ddpm_noisy option.
Use --interpolation option instead of --fid.
Use --sequence option instead.
The above two cases contain some hard-coded lines specific to producing the image, so modify them according to your needs.
@article{song2020denoising,
  title={Denoising Diffusion Implicit Models},
  author={Song, Jiaming and Meng, Chenlin and Ermon, Stefano},
  journal={arXiv:2010.02502},
  year={2020},
  month={October},
  abbr={Preprint},
  url={https://arxiv.org/abs/2010.02502}
}
This implementation is based on / inspired by:
- https://github.com/hojonathanho/diffusion (the DDPM TensorFlow repo),
- https://github.com/pesser/pytorch_diffusion (PyTorch helper that loads the DDPM model), and
- https://github.com/ermongroup/ncsnv2 (code structure).