Table of Contents
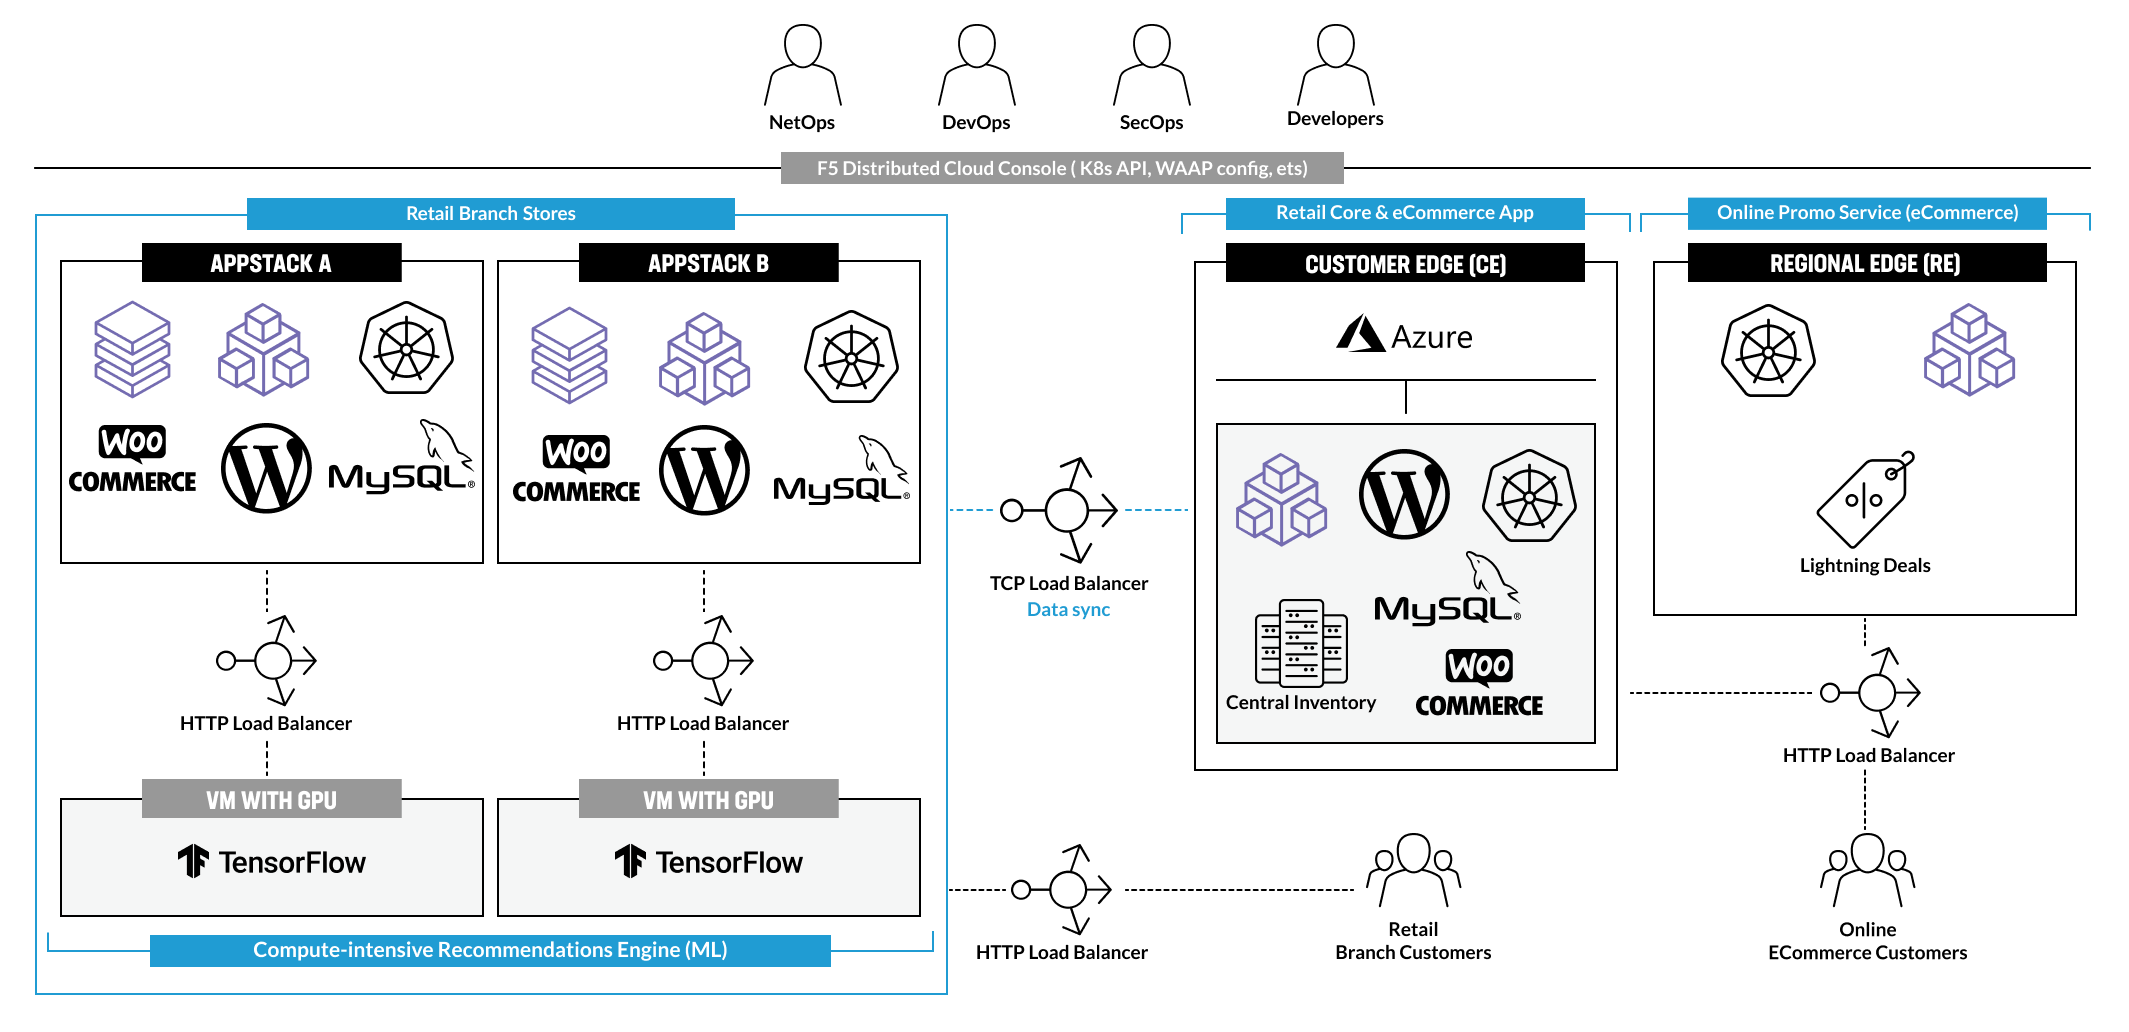
This guide, along with the provided scripts and sample app & services, is designed to help explore and demonstrate the use-cases of the F5 Distributed Cloud platform (xC), including F5 Distributed Cloud AppStack, Multi-Cloud Networking (MCN) and Edge Compute configured using Azure VNET site.
You can use the included scripts to deploy the WooCommerce sample app, which represents a traditional 3-tier app architecture (backend + database + frontend). With F5 Distributed Cloud Services, you can easily deploy and securely network these app services to create a distributed app model that spans across:
- Customer Edge (CE) public cloud
- Retail Branch (AppStack on a private cloud)
- Regional Edge (RE)
The guide walks through the key use-cases for this distributed app architecture via several modules, all based on the following scenario.
The BuyTime Online & Retail scenario is a representative example of a shared Retail Branch + Online eCommerce architecture, where a traditional 3-tier app built on WooCommerce (powered by WordPress + MySQL) is used in both deployment models:
- The Retail Branch Kiosk provides recommendations and processes orders for in-store shoppers. The key requirements for this scenario are ease of deployment and configuration of the Retail Branch Kiosks, as well as the ability to quickly and securely connect to other services, including the recommendation engine service that runs in each branch and the central inventory database that runs in the public cloud.
- The Online .com site provides typical eCommerce capabilities and is augmented with modern online promotion features. The key requirements are a quick response time for time- and latency-sensitive online promotions, similar to Amazon’s Lighting Deals, as well as high security for both in-branch and online eCommerce operations.
For simplicity, this scenario re-uses the standard WooCommerce datasets for a clothes shop. The modules below lay out a framework for connecting and managing the distributed app services for this scenario, with a focus on the three core use-cases.
F5 Distributed Cloud Services (xC) enable a consistent deployment, management, and security model for applications, regardless of where they are run. In this scenario, a fictitious retailer named BuyTime will use xC AppStack to create a consistent deployment topology for an in-store Kiosk shopping experience by utilizing a traditional 3-tier app stack: WooCommerce frontend + backend & MariaDB. This topology can run in multiple Retail Branches with identical configuration, management, and security policies applied.
The following three use-cases are the key components of this guide and are represented in each of the modules:
MODULE 1
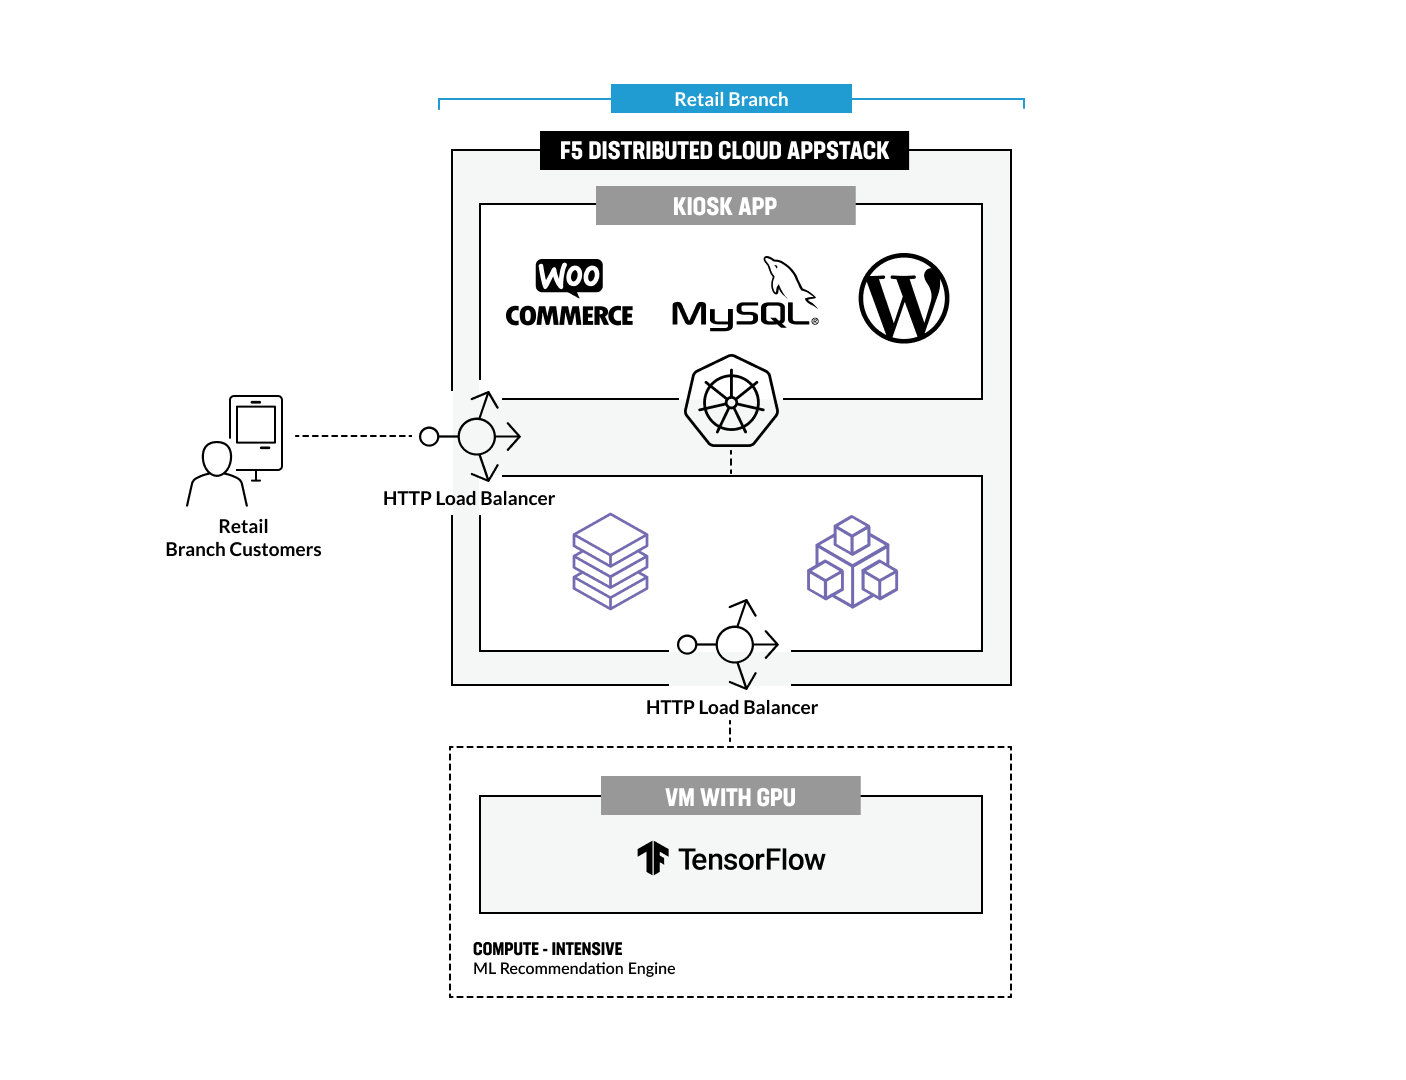
The HTTP Load Balancer can be utilized to securely connect Retail Branches running in-store Kiosks on AppStack (Compute @ Edge) to a VM hosting the shopping recommendation service. Each of these Kiosks can leverage the App Mesh and Multi-Cloud Networking features built into the xC App Stack to securely connect to internal and external services. The BuyTime Retail Kiosk uses an external recommendation engine, which simulates a common use-case for a Machine Learning (ML) service that can be deployed on a VM with a GPU (Recommendation ML Service for compute-intensive tasks on VM w/ GPU). This engine processes images of clothes or accessories uploaded from the Kiosk and makes recommendations for other matching clothes/accessories. To simplify the scenario for this demo, the sample app uses a mock service that returns an image based on specified criteria instead of using TensorFlow or a similar platform. We also provide a link to the recommendation service deployed in our cloud, so there is no need to run a VM in your network. However, we have included the scripts to run the Docker on your VM if you would like to deploy and use your own.
MODULE 2
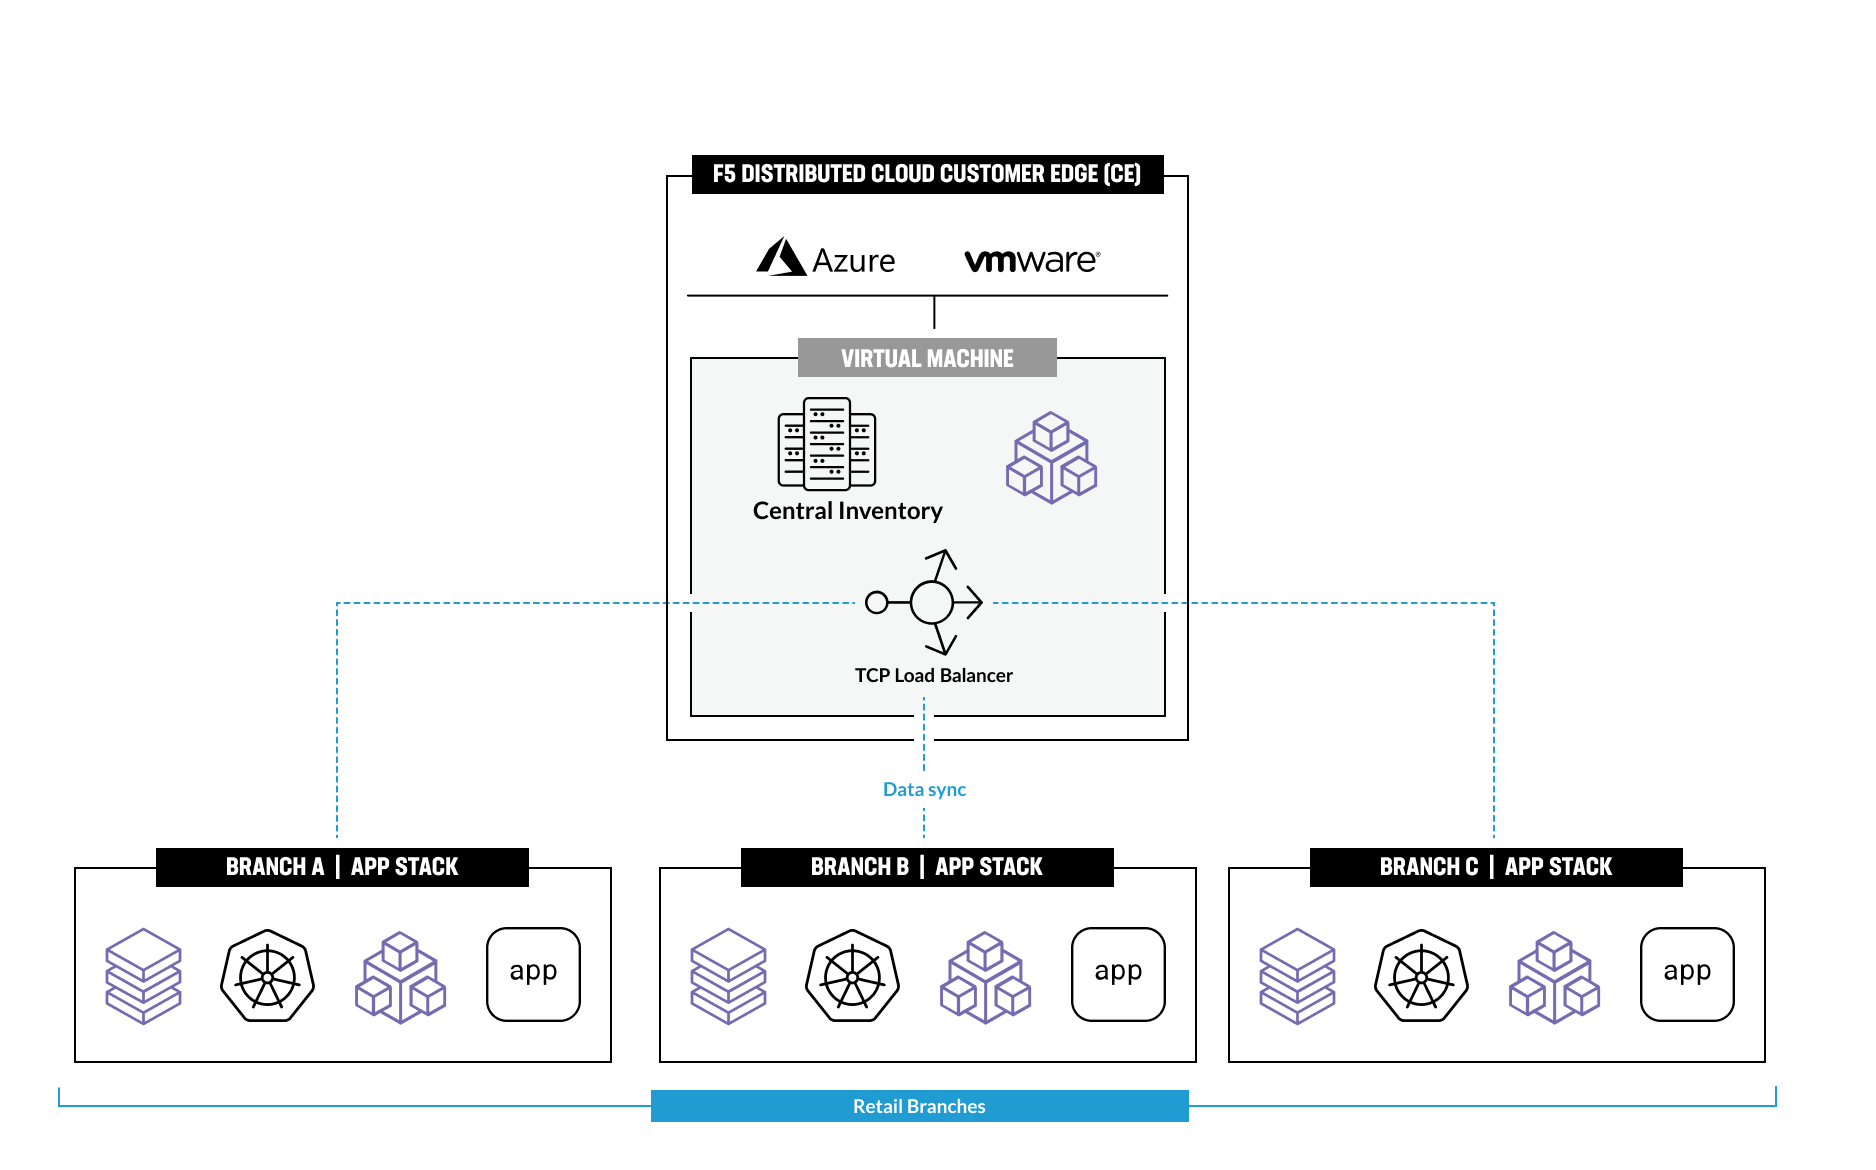
In module two, we focus on configuring Multi-Cloud Networking for the BuyTime App. The TCP Load Balancer is utilized to securely connect and synchronize branch databases with the central inventory and order databases deployed in the public cloud on the Customer Edge (CE).
It's worth noting that the TCP Load Balancer operates on Layer 4 of the OSI model, which is the Transport Layer. It forwards traffic to backend servers based on the source IP address and port and destination IP address and port, making it an ideal choice for load balancing TCP traffic.
By using the TCP Load Balancer, you can ensure that the inventory and order data is always up-to-date and accurate while providing secure networking between the central database in the CE and the Retail branch.
MODULE 3
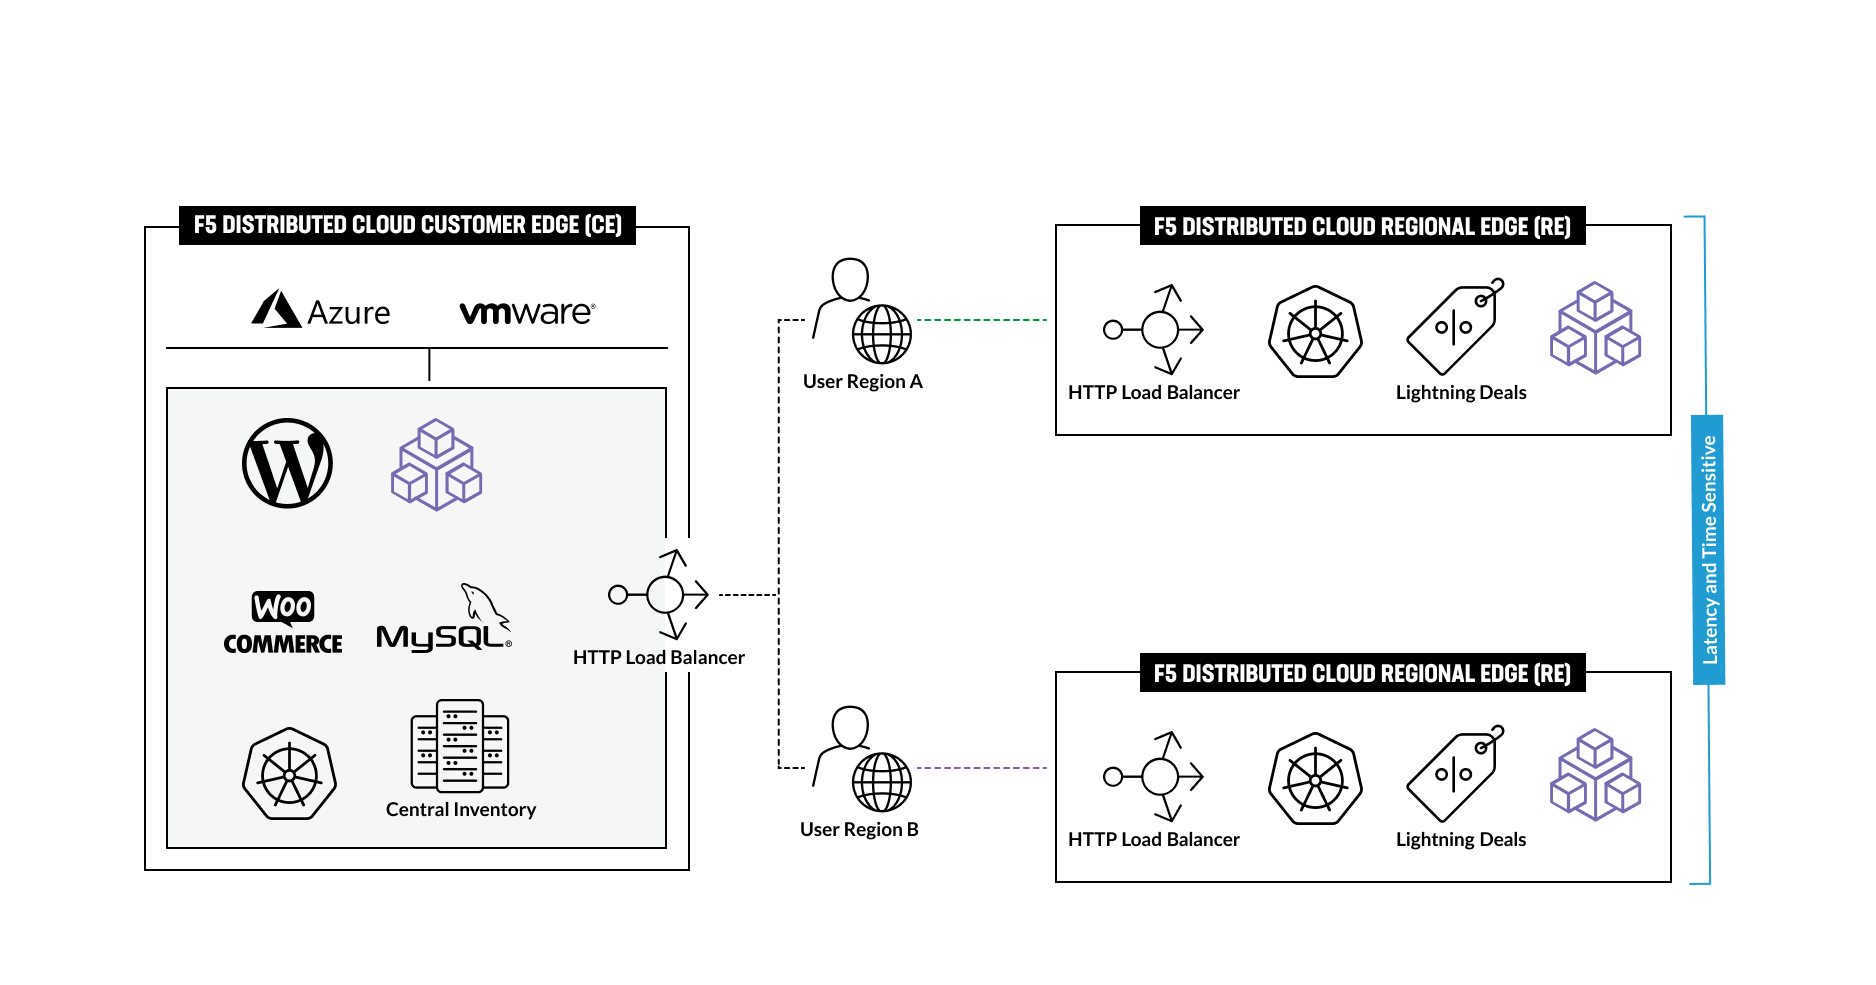
In this scenario, the Regional Edge is used with an HTTP Load Balancer to enhance eCommerce capabilities with time- and latency-sensitive promotional capabilities. This can be achieved by deploying a slightly modified version of the WooCommerce app with a different theme and modules.
Similarly, the same WooCommerce app can also be deployed, connected, and secured on the Customer Edge (CE) in a public or private cloud. By making some minor changes to the theme and modules, the app can be used to drive an eCommerce site with a set of time-limited, low-latency online promotional services similar to Amazon's Lightning Deals.
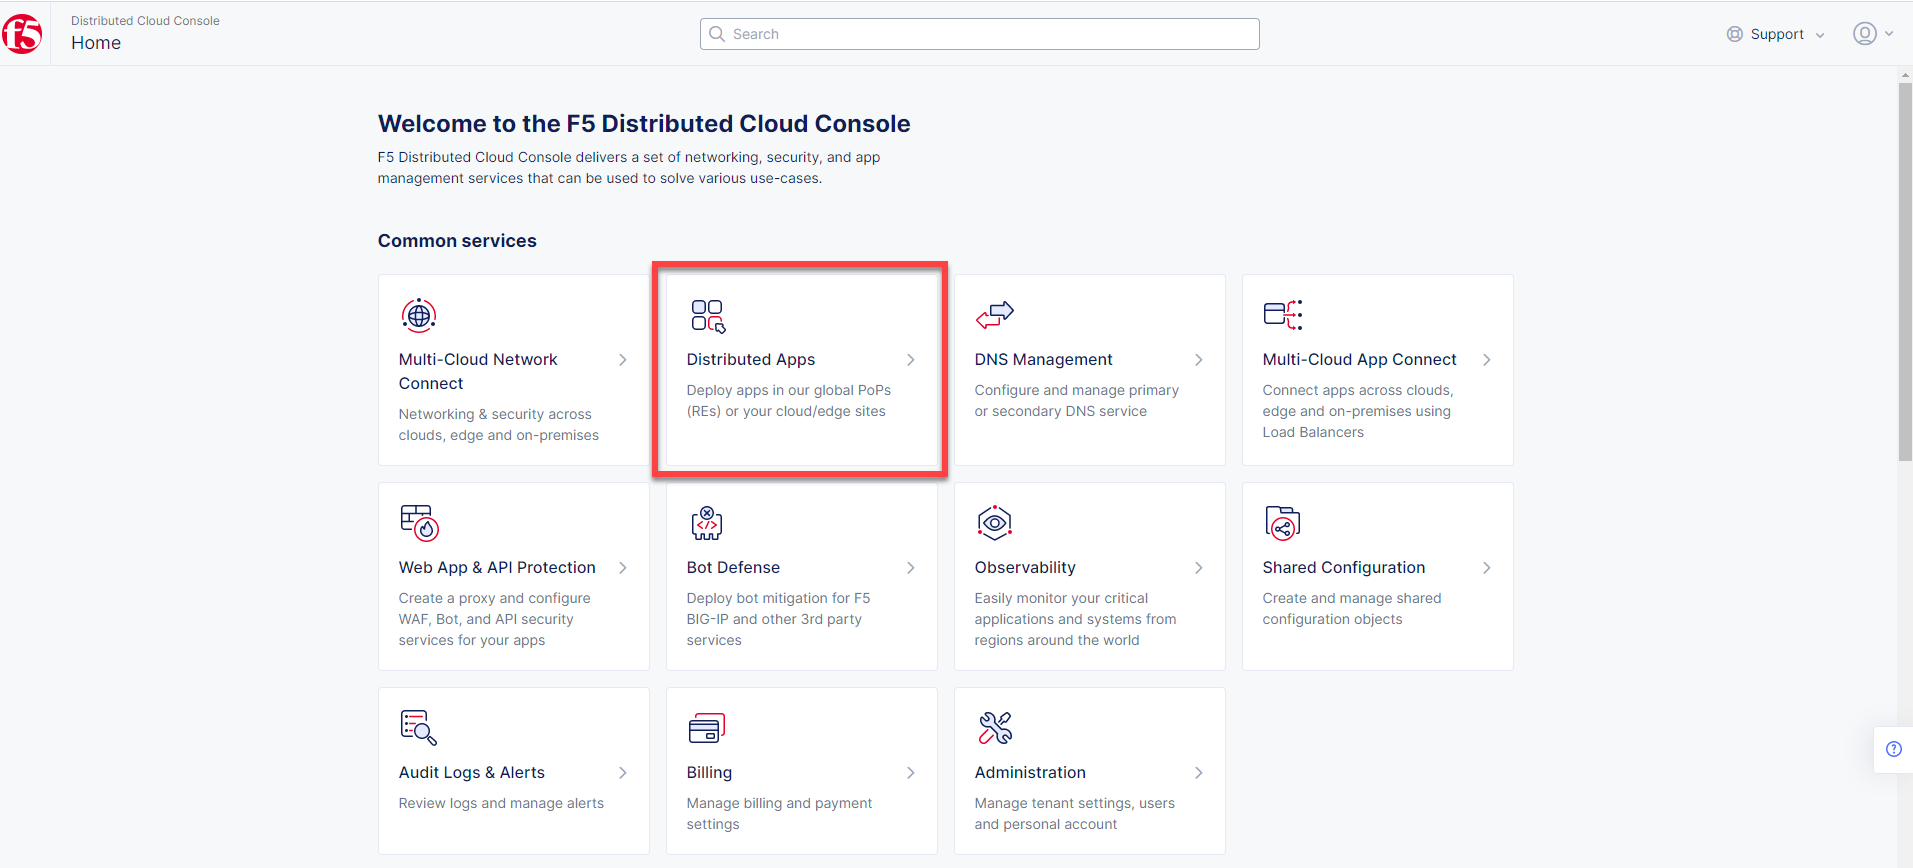
First of all, we will need to create a managed Kubernetes (mK8s) cluster. To do that, log into the Console and navigate to the Distributed Apps service.
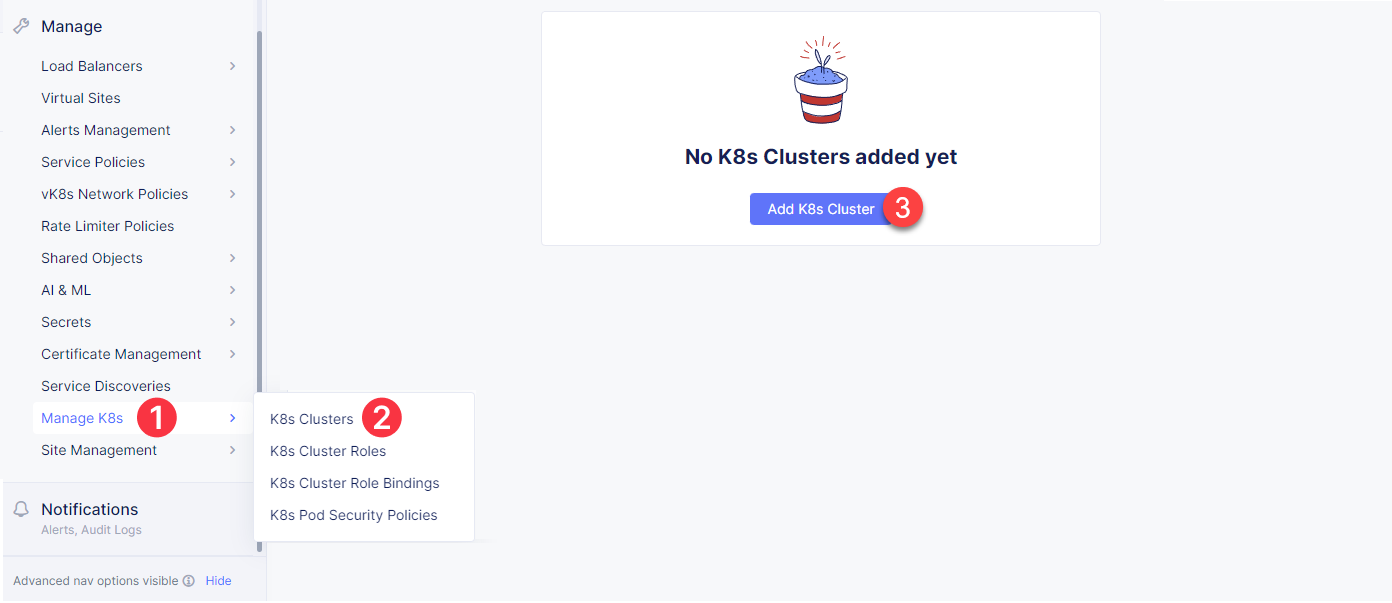
In the left-side navigation panel proceed to the Manage section, click Manage K8s and select K8s Clusters. When the page opens, click the Add K8s Cluster button.
In the opened creation form, enter a name for the K8s cluster.
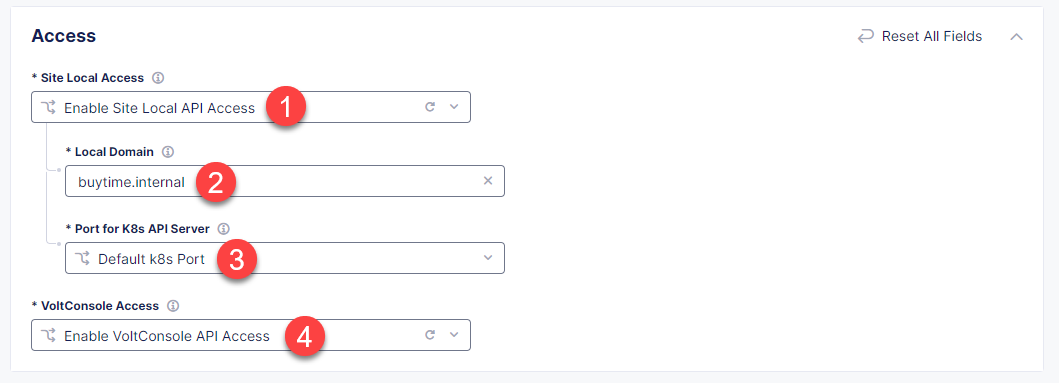
In the Access section, select the Enable Site Local API Access option from the Site Local Access menu. This enables local access to K8s cluster. Then in the Local Domain field, enter a local domain name for the K8s cluster in the <sitename>.<localdomain> format. We will use the buytime.internal for this demo. The local K8s API server will become accessible via this domain name. Next, from the Port for K8s API Server menu, select Default k8s Port which uses default port 65443. From the VoltConsole Access menu, select the Enable VoltConsole API Access option which will let us download the global kubeconfig for the managed K8s cluster.
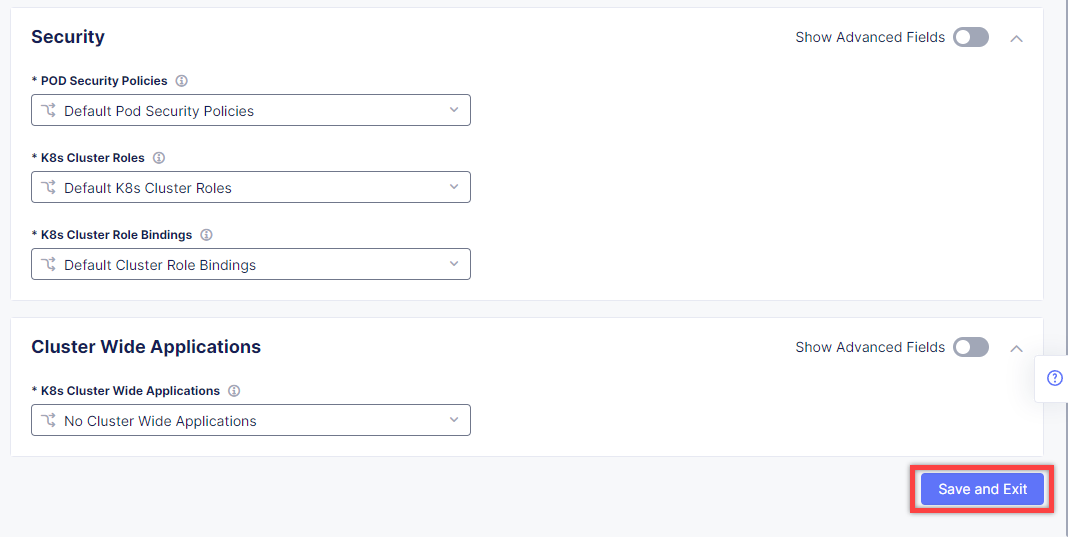
Finally, complete creating the K8s cluster by clicking Save and Exit.
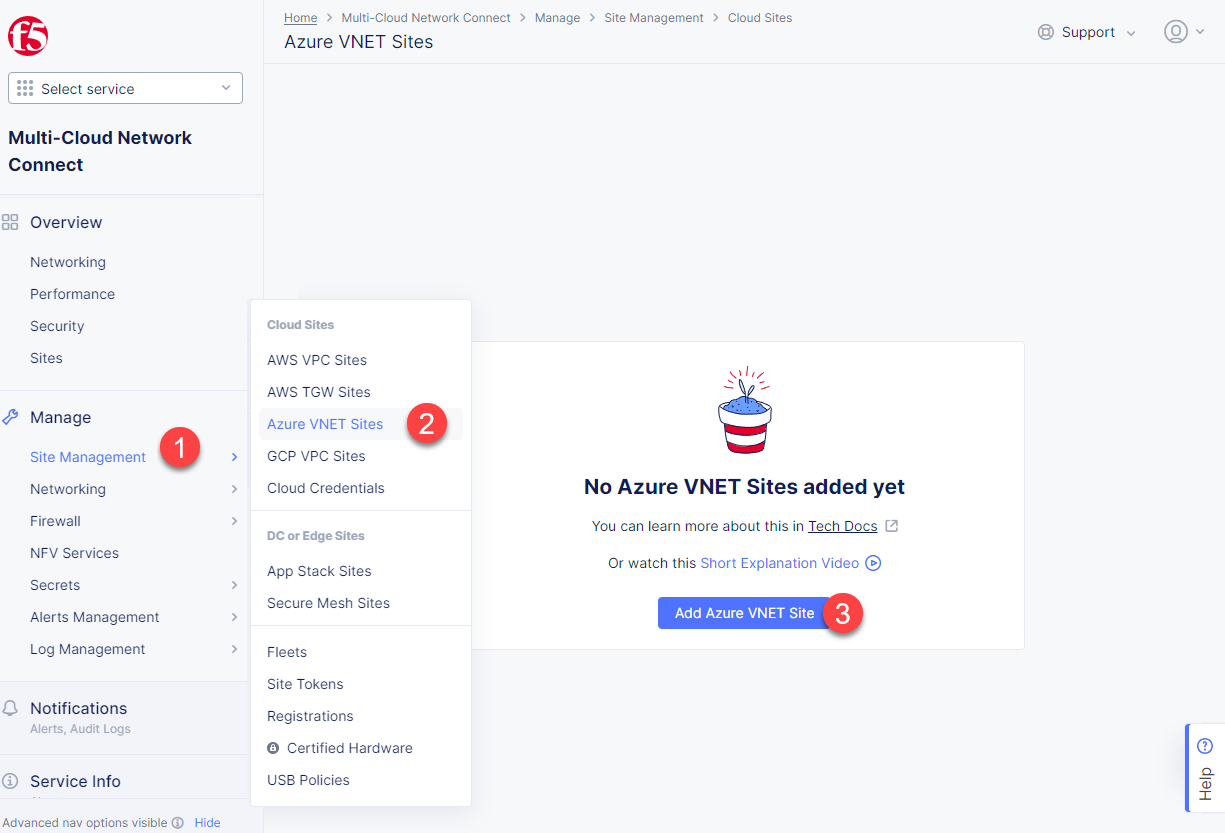
Let's start with creating an Azure VNet Site and then move on to creating an app stack. Proceed to the Multi-Cloud Network Connect service, then navigate to the Site Management section and select Azure VNET Sites. Click the Add Azure VNET Site button.
In the Metadata section, give the site a name and specify a label. Type in location for the custom key and buytime-app-stack for its value.
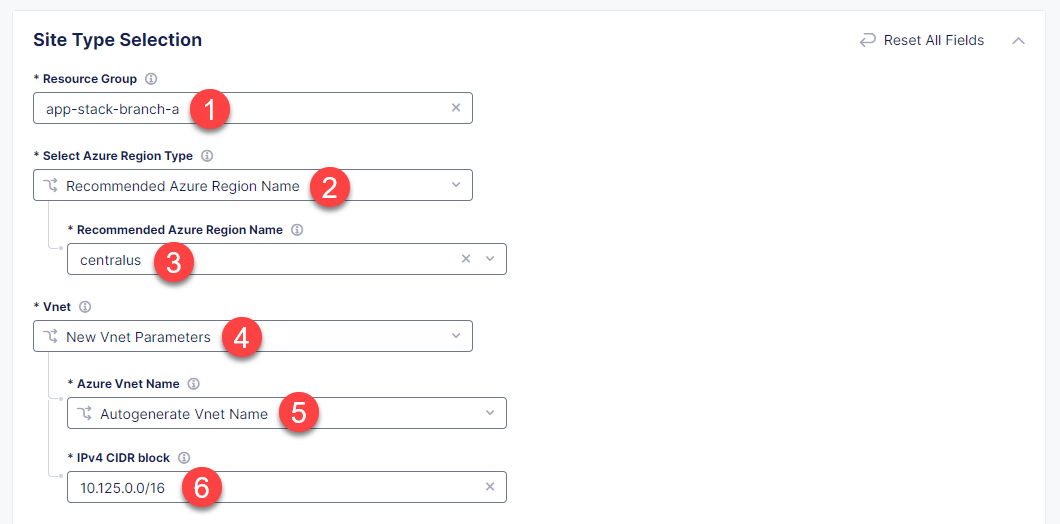
Next, we will configure site type. First, enter your Azure resource group app-stack-branch-a for resources that will be created. Ensure that you enter a name for a non-existent resource group. With the Recommended Azure Region Name option selected by default, go on and select centralus for this demo. From the Vnet menu, select New Vnet Parameters and then Autogenerate Vnet Name. After that, enter the 10.125.0.0/16 CIDR in the IPv4 CIDR block field.
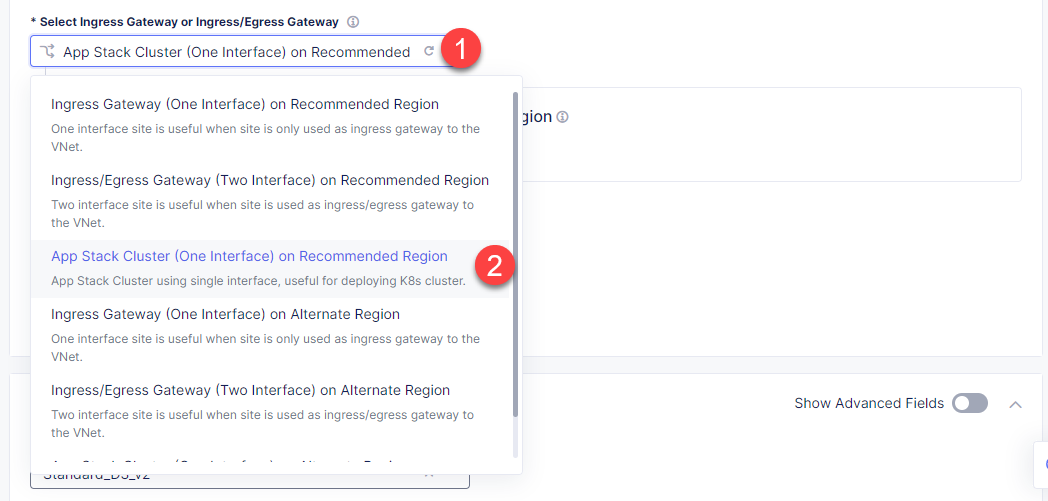
In this step, we will create an app stack cluster. Open the Select Ingress Gateway or Ingress/Egress Gateway menu, and select App Stack Cluster (One Interface) on Recommended Region. It will use single interface and be used for deploying K8s cluster.
Click Configure to move on to the configuration.
Then click Add Item to configure an app stack cluster (one interface) node.
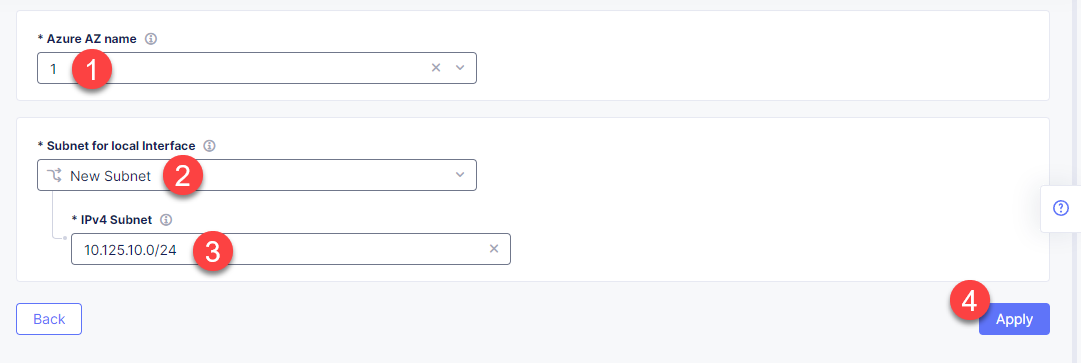
From the Azure AZ name menu, select 1 to set the number of availability zones. After that, open the Subnet for local interface menu to select New Subnet and add parameters for creating a new subnet. Enter the subnet address 10.125.10.0/24 in the IPv4 Subnet field for the new subnet. Finally, click the Apply button.
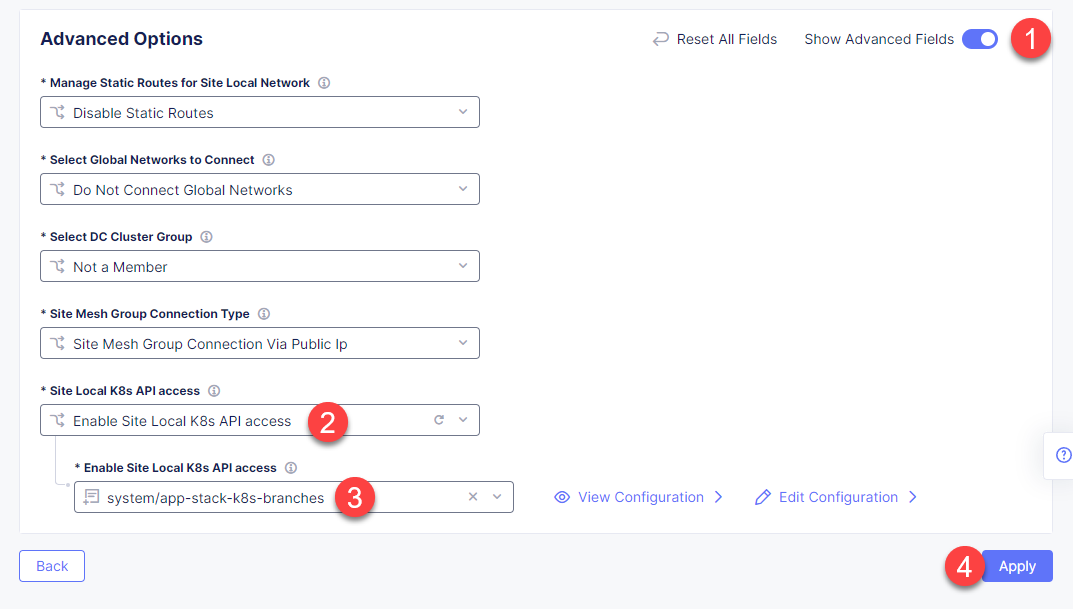
In the Advanced Options section, enable Site Local K8s API access and select the system/app-stack-k8s-branches K8s cluster object we created earlier. Then click the Apply button.
Back on the Azure VNET Site configuration page, navigate to the Cloud Credentials and select the system/azure-creds for automatic deployment.
Proceed to the Site Node Parameters section and make sure the Standard_D3_v2 Azure machine type is set. Then go down to the Public SSH key and paste the key to access the site. Note that if you don't have a key, you can generate one using the "ssh-keygen" command and then display it with the command "cat ~/.ssh/id_rsa.pub".
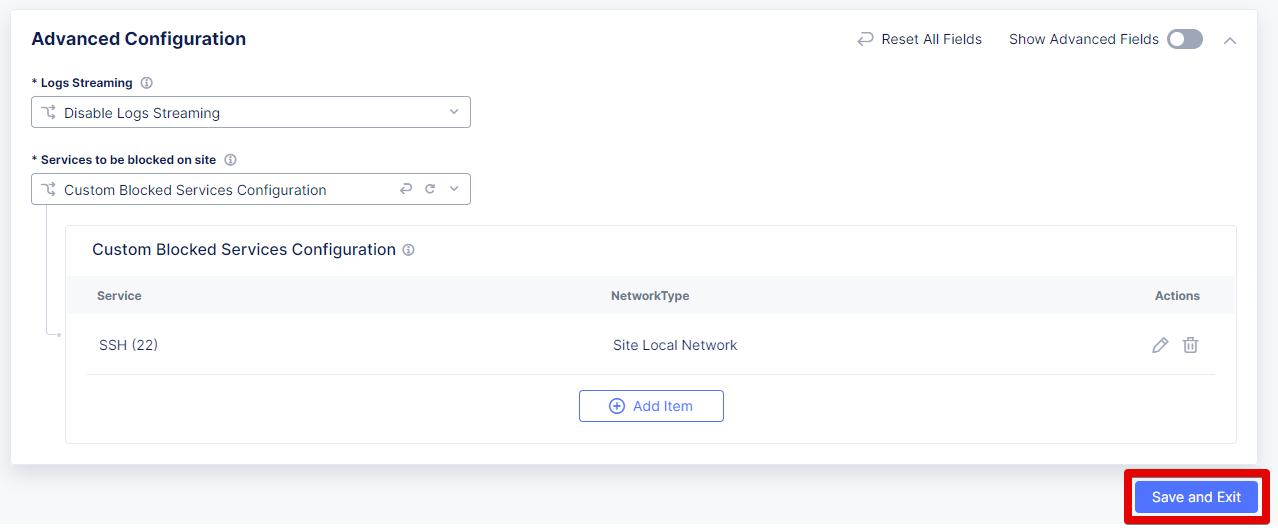
Then scroll down to the Advanced Configuration section to configure services to be blocked on site. Select the Custom Blocked Services Configuration in the drop-down menu and then click Add Item.
First, make sure that Blocked Services Value Type is SSH port, then select Site Local Network as Network Type. Finally, click Apply.
After that, take one more look at the configuration and complete it by clicking the Save and Exit button.
The Status box for the VNet object will display Generated. Click Apply in the Actions column. The Status field for your Azure VNET object changes to Applying.
Wait for the apply process to complete and the status to change to Applied.
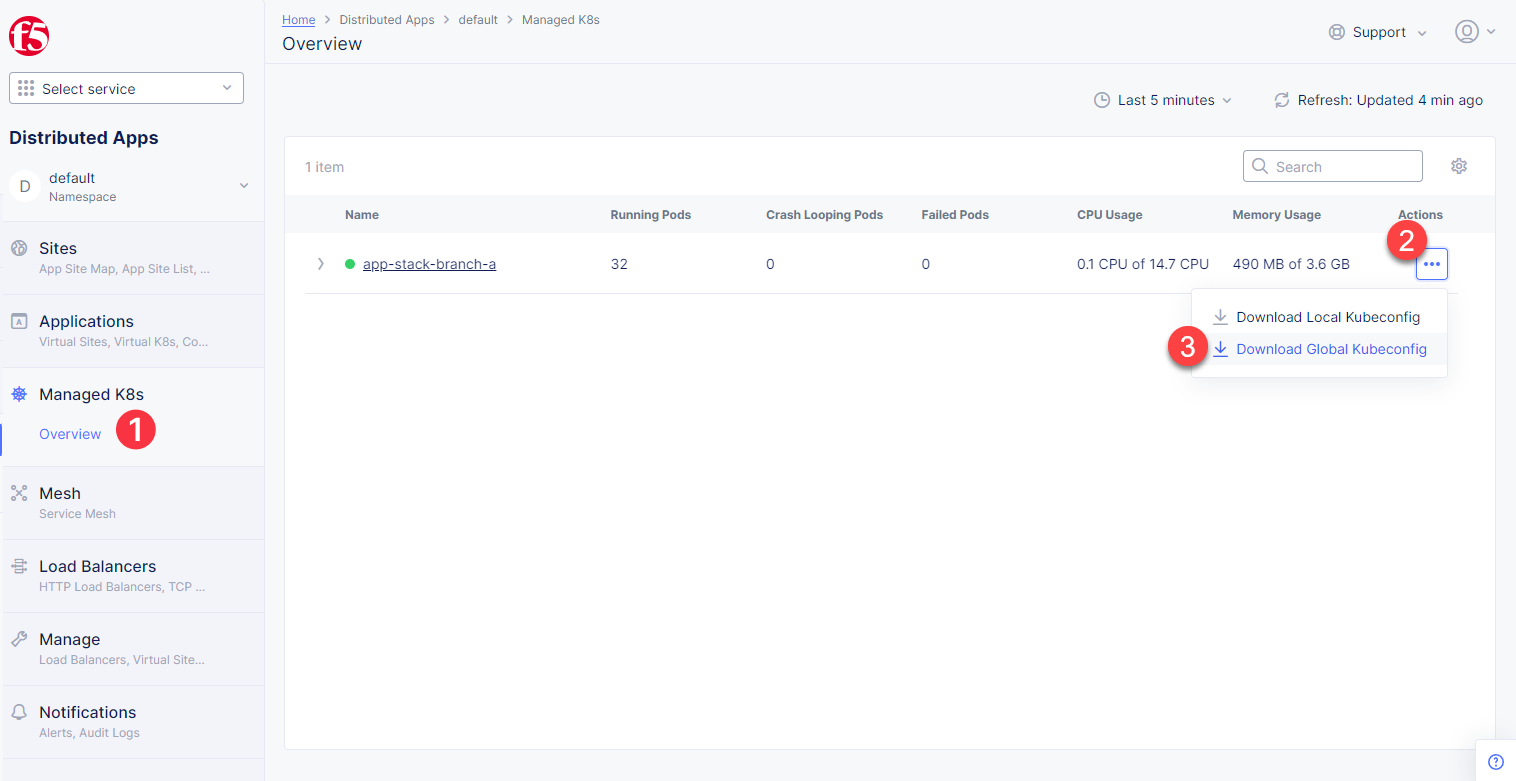
Next, we will get the mK8s Kubeconfig. Navigate to the Managed K8s section in the left-side panel and proceed to Overview. The page will show the created managed K8s. Open its menu and select Download Global Kubeconfig.
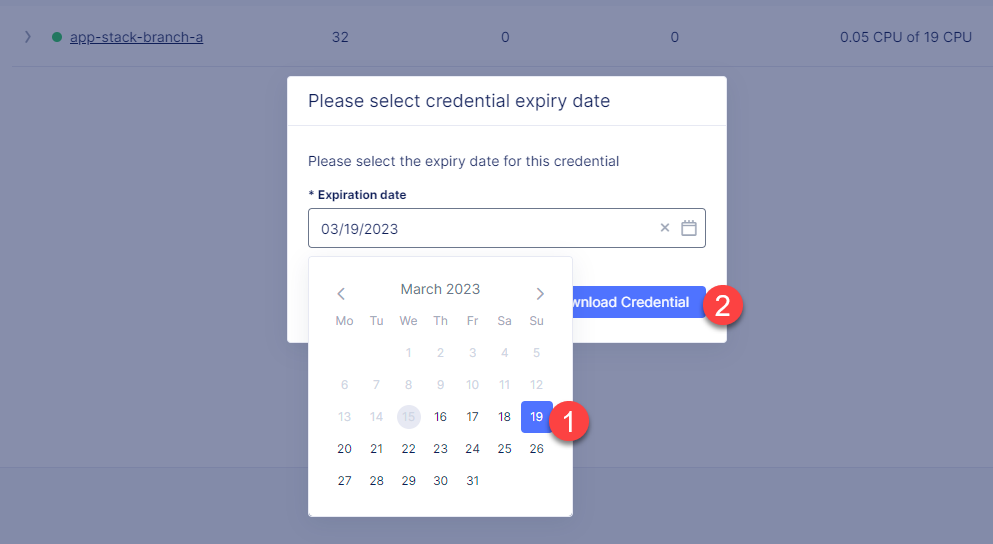
Open the calendar, select the expiry date and click the Download Credential button.
Let's now run the command to see the number of Kubernetes pods deployed to run the application. Proceed to your local CLI and run the command:
> kubectl --kubeconfig ./your_mk8s_kubeconfig_global.yaml get nodes

nodes
NAME            STATUS   ROLES        AGE   VERSION
master-node-1   Ready    ves-master   20m   v1.23.14-ves
As we can see from the output, there's a master-node-1 node in our Kubernetes having the 'Ready' status.
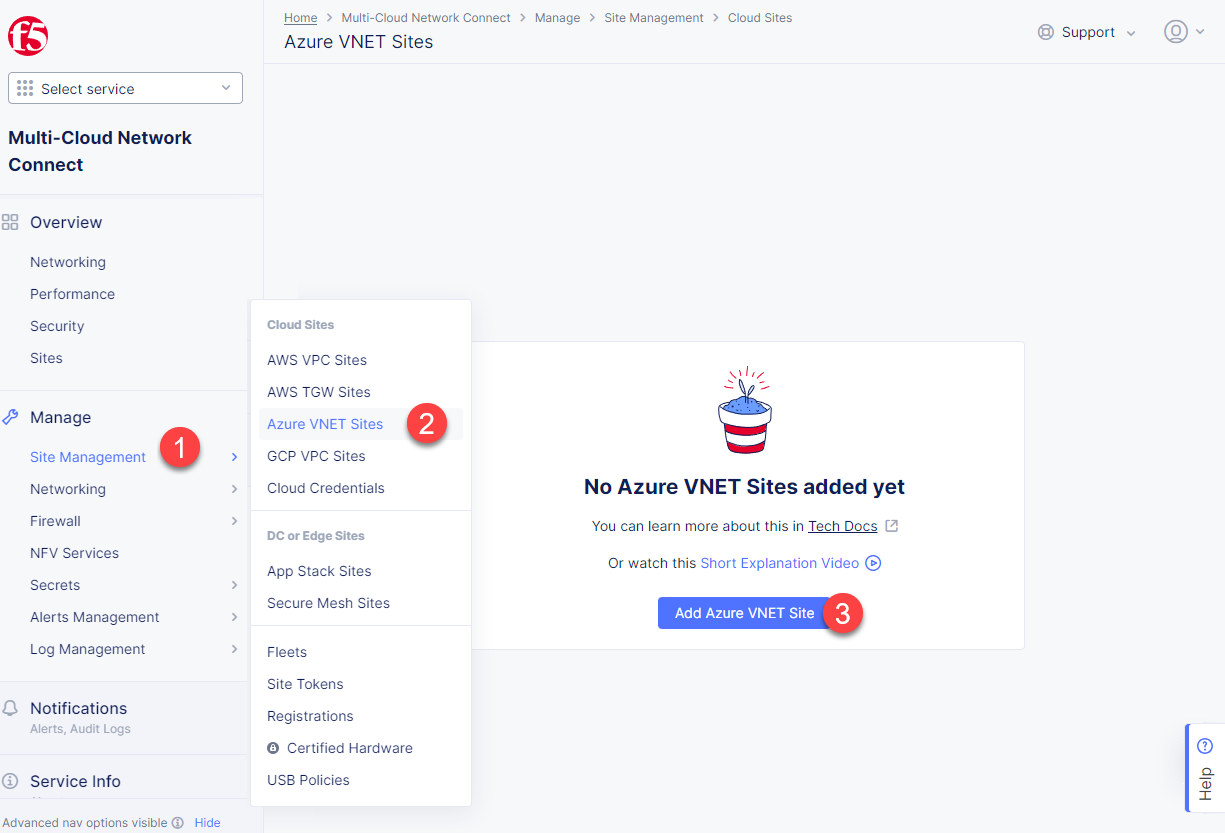
Let's now take the last pre-requisite step - creating an Azure CE Site. Navigate to the Site Management section and select Azure VNET Sites. Click the Add Azure VNET Site button.
Enter a name and proceed to the labels. Type in location for the custom key and buytime-ce-site for its value.
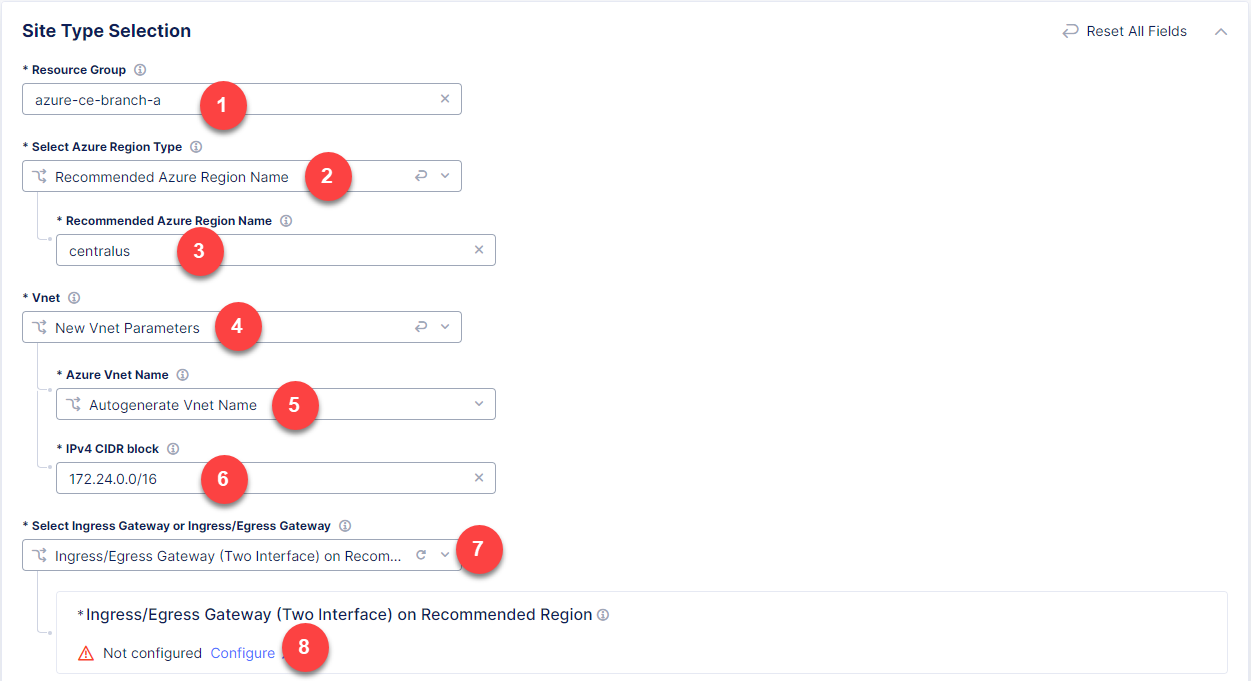
Next, we will configure site type. First, enter your Azure resource group azure-ce-branch-a for resources that will be created. Ensure that you enter a name for a non-existent resource group. With the Recommended Azure Region Name option selected by default, go on and select centralus for this demo. From the Vnet menu, select New Vnet Parameters and then Autogenerate Vnet Name. After that, enter the 172.24.0.0/16 CIDR in the IPv4 CIDR block field. From the Select Ingress Gateway or Ingress/Egress Gateway menu, select the Ingress Gateway (One Interface) on Recommended Region option which is useful when the site is used as ingress/egress gateway to the VPC. Click Configure to open the two-interface node configuration.
Click Add Item to add a node.
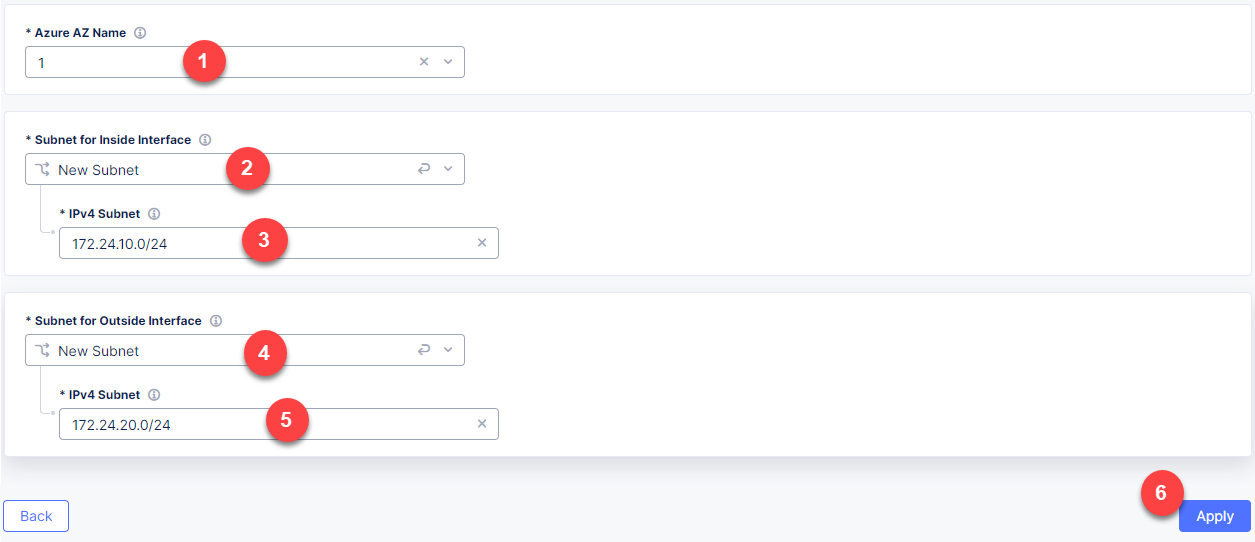
From the Azure AZ name menu, select 1 to set the number of availability zones. Then go on to configure Subnet for Inside Interface by entering the 172.24.10.0/24 subnet in the IPv4 Subnet field. And finally, in the Subnet for Outside Interface menu fill in the 172.24.20.0/24 subnet in the IPv4 Subnet field. Complete configuring the node by clicking the Apply button.
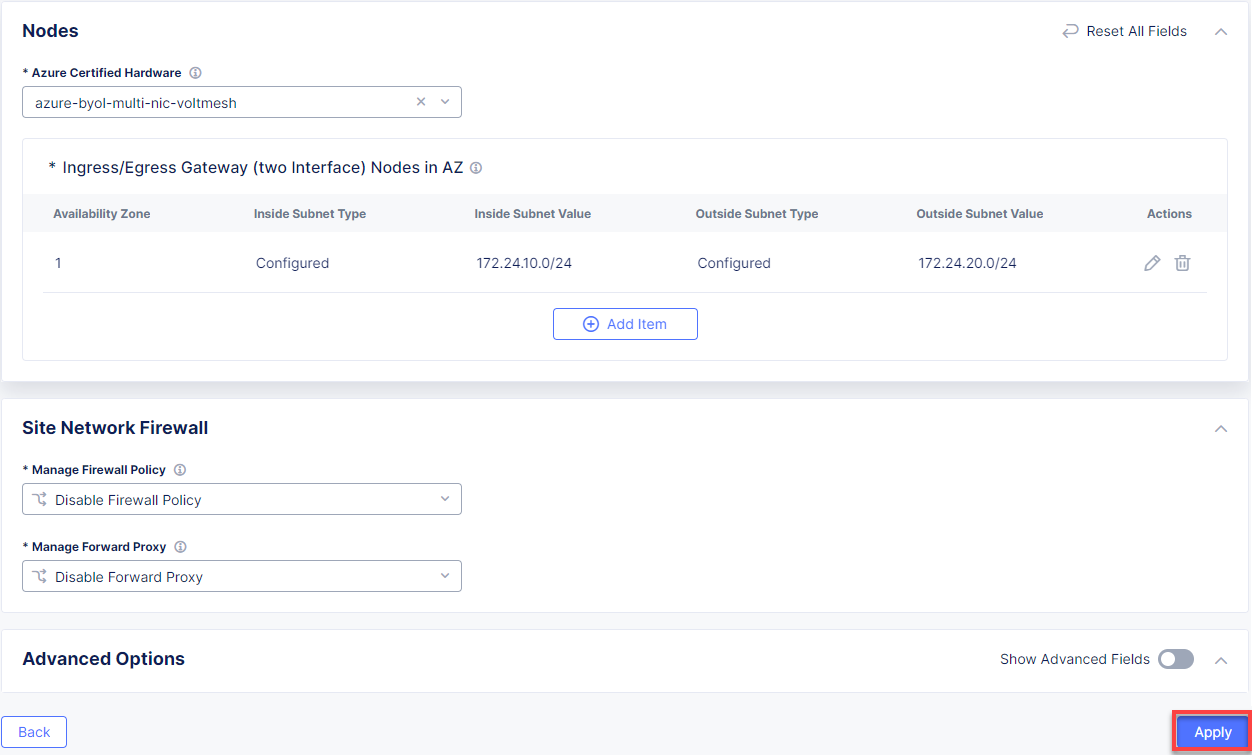
Take a look at the node configuration and click the Apply button to proceed.
Back on the Azure VNET Site configuration page, navigate to the Cloud Credentials and select the system/azure-creds for automatic deployment.
Next, we will paste the Public SSH key to access the site. Note that if you don't have a key, you can generate one using the "ssh-keygen" command and then display it with the command "cat ~/.ssh/id_rsa.pub".
Finally, take one more look at the configuration and complete it by clicking the Save and Exit button.
The Status box for the VPC site object will display Generated. Click Apply. The Status field for the Azure VNET object changes to Apply Planning. Wait for the apply process to complete and the status to change to Applied.
In this Module we are going to deploy BuyTime Retail Kiosk using AppStack created within the Pre-requisites section, create an HTTP LB for the Kiosk, and connect the Retail Branches running in-store Kiosk on AppStack to the Recommendation Service using the created HTTP LB.
In order to deploy the kiosk by running the following command, we will need the Kubeconfig which we downloaded in the Get mK8s Kubeconfig section in Pre-requisites. After getting the Kubeconfig, proceed to the CLI and run the following command to deploy the Kiosk:
> kubectl --kubeconfig ./your_mk8s_kubeconfig_global.yaml apply -f ./deployments/appstack-mk8s-kiosk.yaml

namespace/branch-a created
deployment.apps/mysql-deployment created
service/mysql-service created
deployment.apps/wordpress-deployment created
service/wordpress-service created
deployment.apps/kiosk-deployment created
service/kiosk-service created
After the command is executed, we can verify the deployment by executing the following command:
> kubectl --kubeconfig ./your_mk8s_kubeconfig_global.yaml get deployments -n branch-a

NAME                   READY   UP-TO-DATE   AVAILABLE   AGE
kiosk-deployment       1/1     1            1           10m
mysql-deployment       1/1     1            1           10m
wordpress-deployment   1/1     1            1           10m
If the kiosk is deployed and running correctly, the 1/1 value will appear in the READY column.
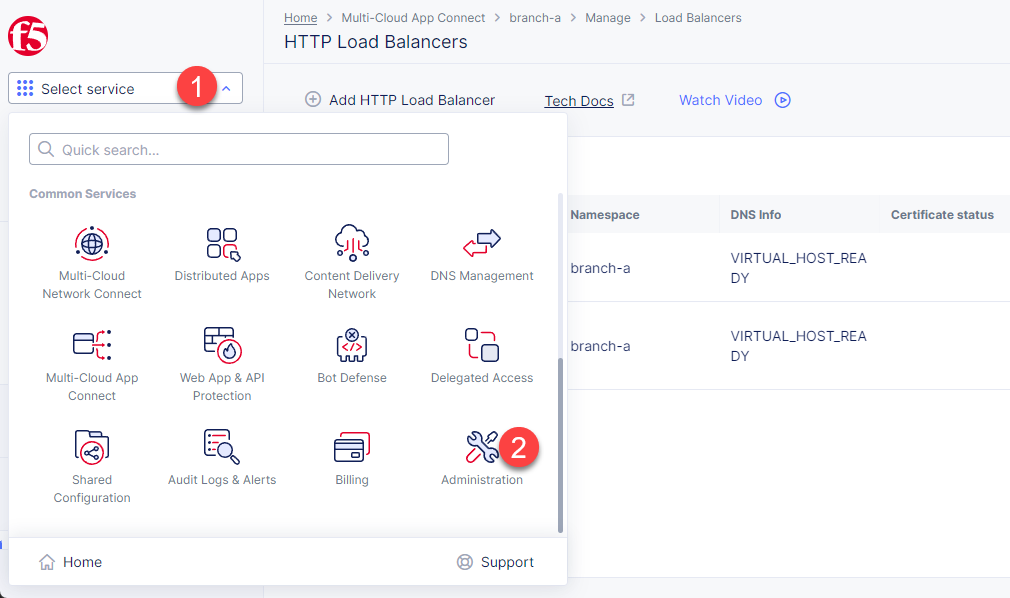
In order to connect the Retail Branches running in-store Kiosk on AppStack to the Recommendation Service using the HTTP LB, we first need to create a namespace for the HTTP LB. To do that, open the Service menu and navigate to the Administration service.
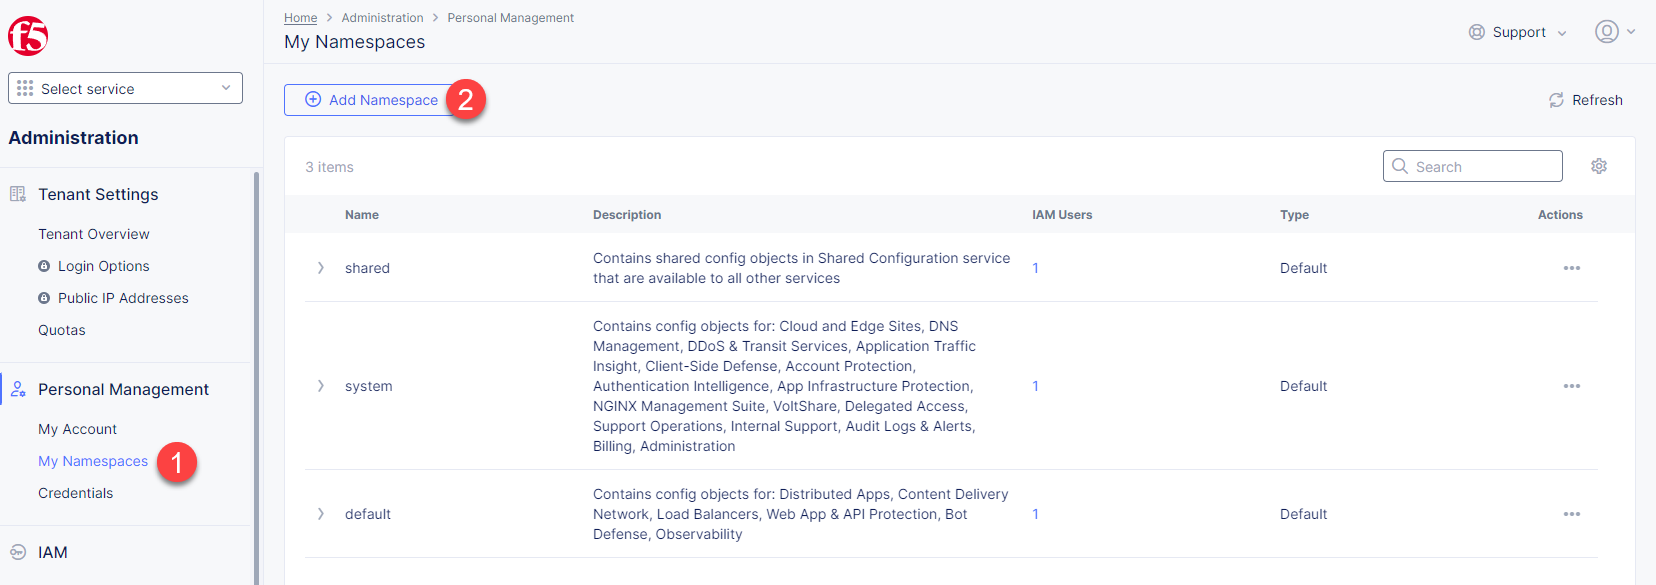
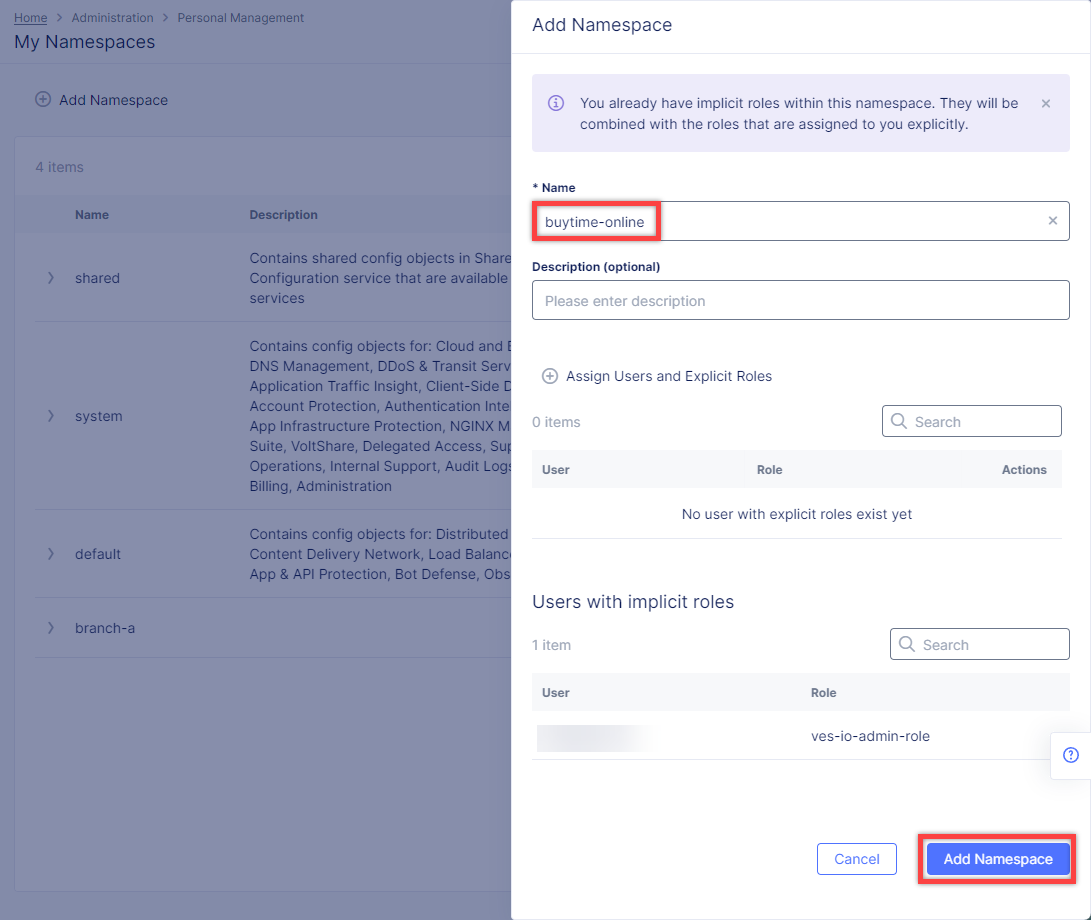
In the Personal Management section of the left Administration panel, select My Namespaces. Click the Add Namespace button. The Add Namespace menu displays.
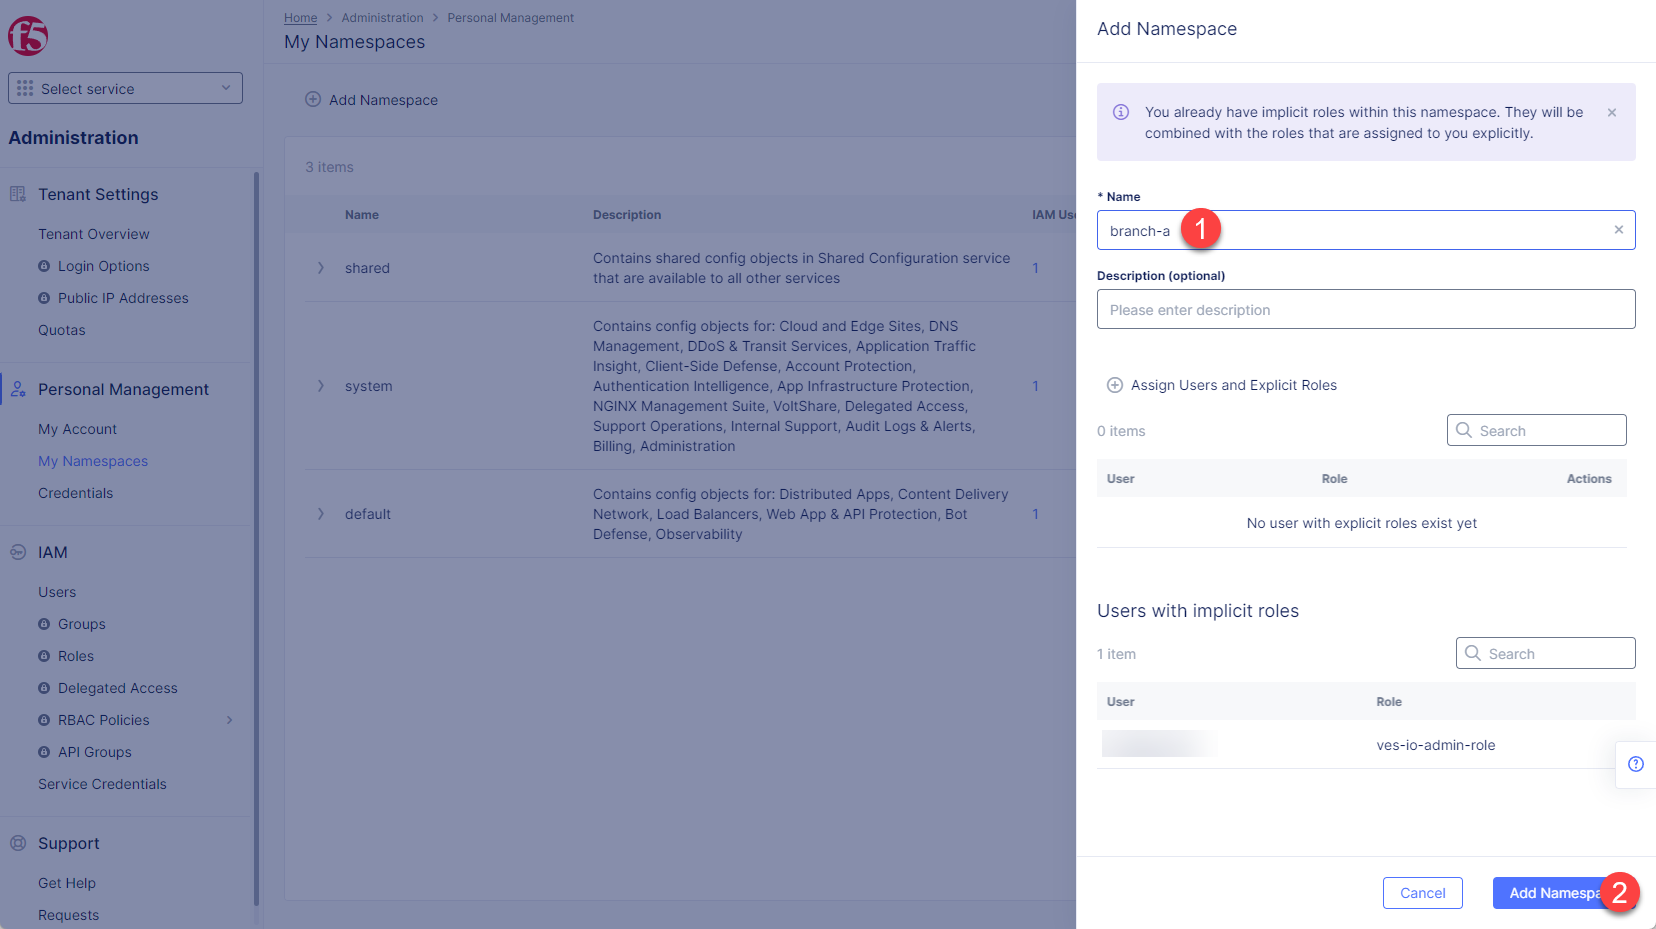
Give namespace a name. Note that each namespace must have a unique name. Click the Add Namespace button. The new namespace displays in the list on your My Namespaces page.
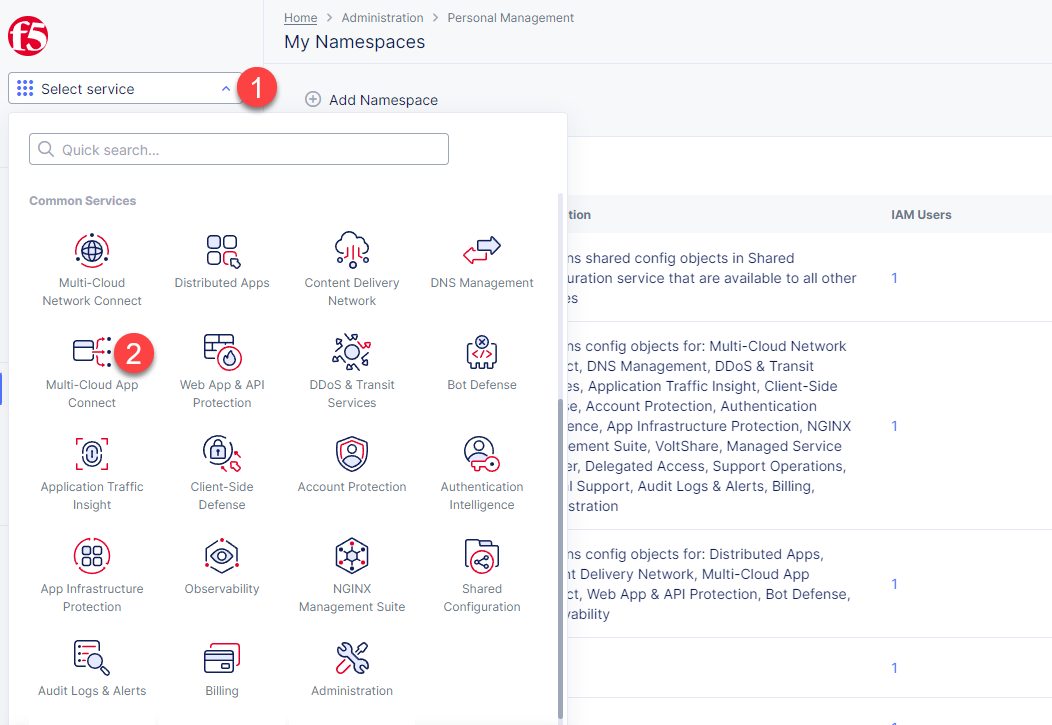
After creating a namespace, we can go on to creating an HTTP LB for the Kiosk in order to connect the Retail Branches running in-store Kiosk on AppStack to the Recommendation Service. Open the Service menu and navigate to the Multi-Cloud App Connect service.
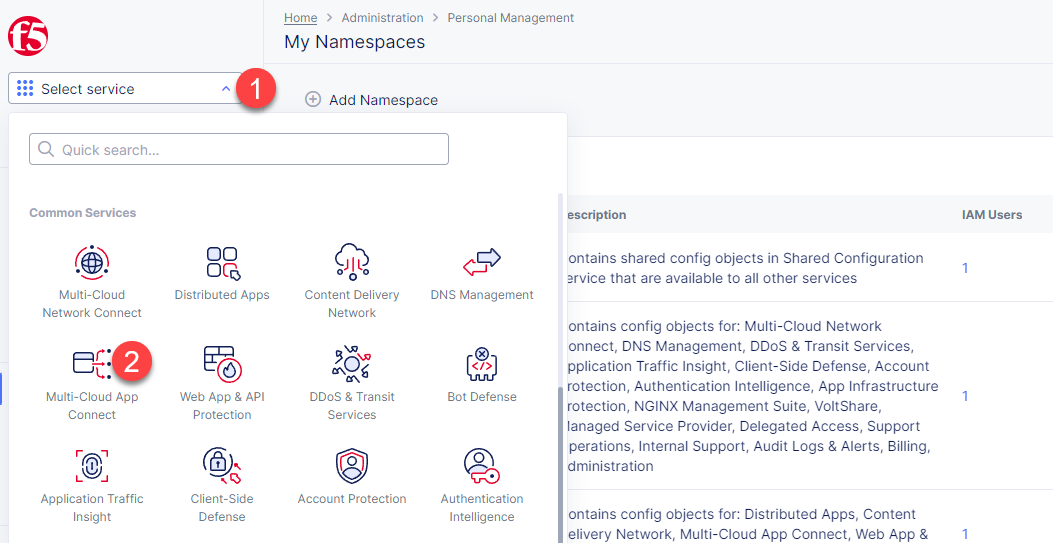
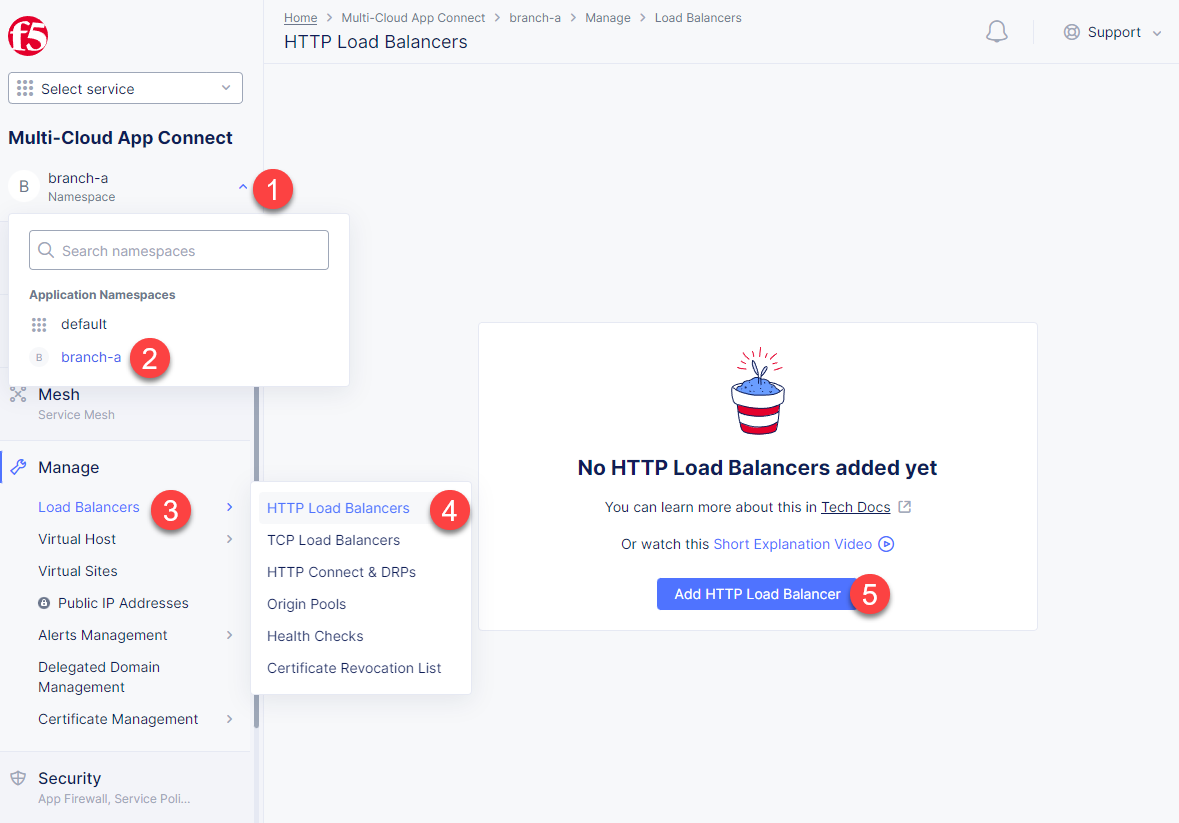
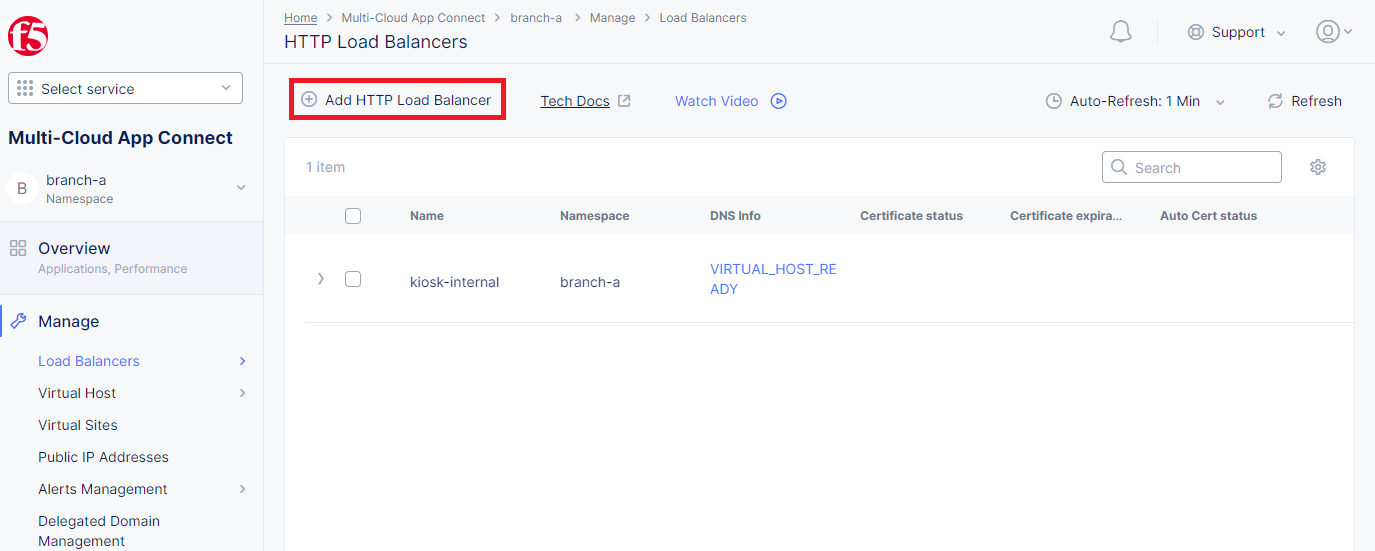
In the Application Namespaces menu select the namespace we created in the previous step for the kiosk. Then navigate to the Load Balancers section in the left-side panel and select the HTTP Load Balancers option. Then click the Add HTTP Load Balancer button to open the creation form.
In the Name field, enter a name for the new load balancer.
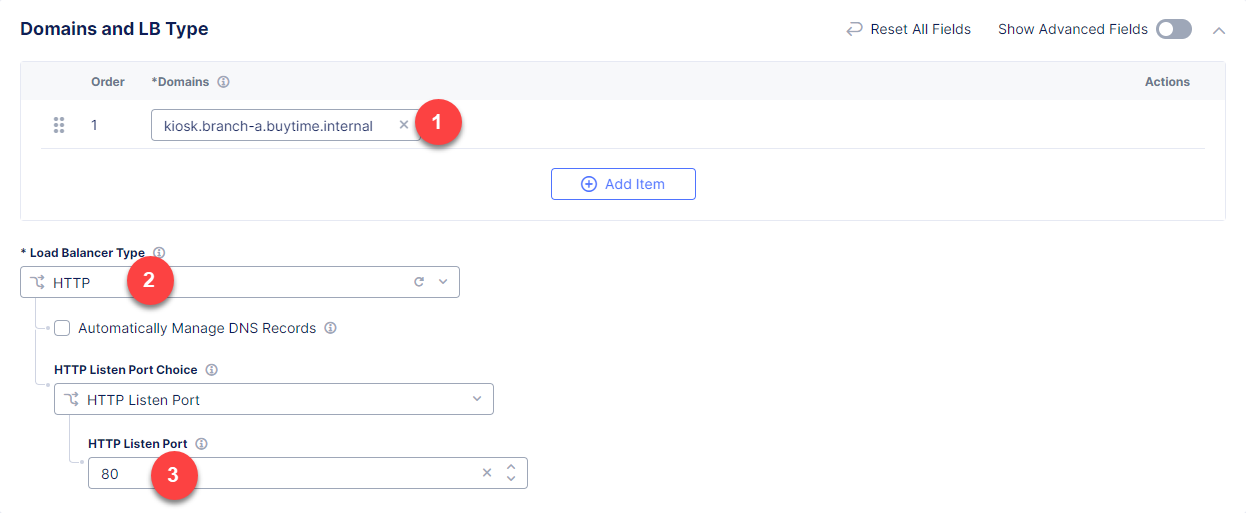
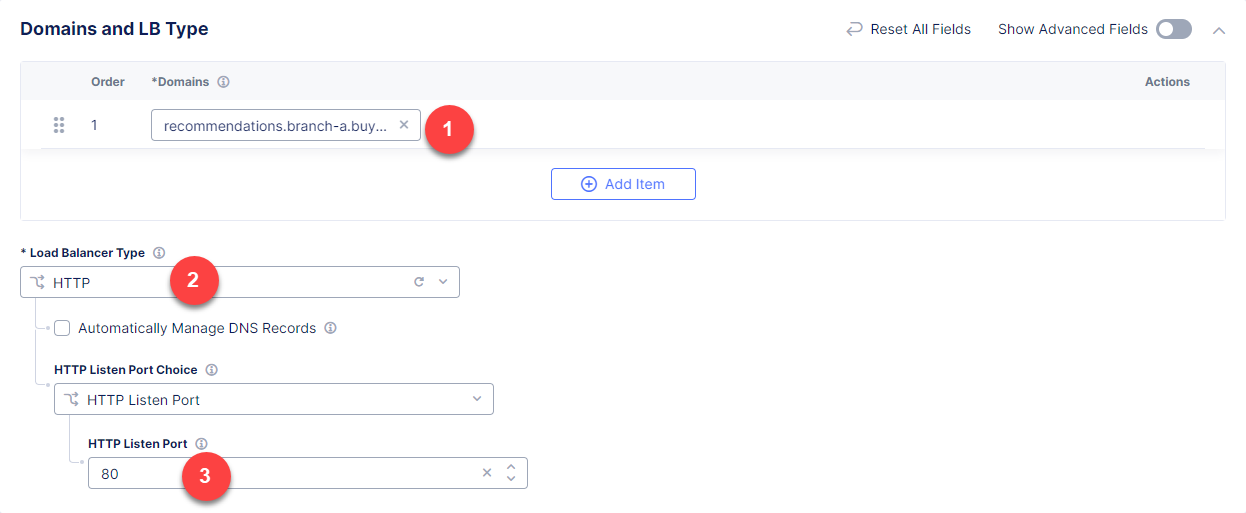
Then proceed to the Domains and LB Type section and fill in the kiosk.branch-a.buytime.internal domain. Next, from the Load Balancer Type drop-down menu, select HTTP to create the HTTP type of load balancer. Specify the 80 port.
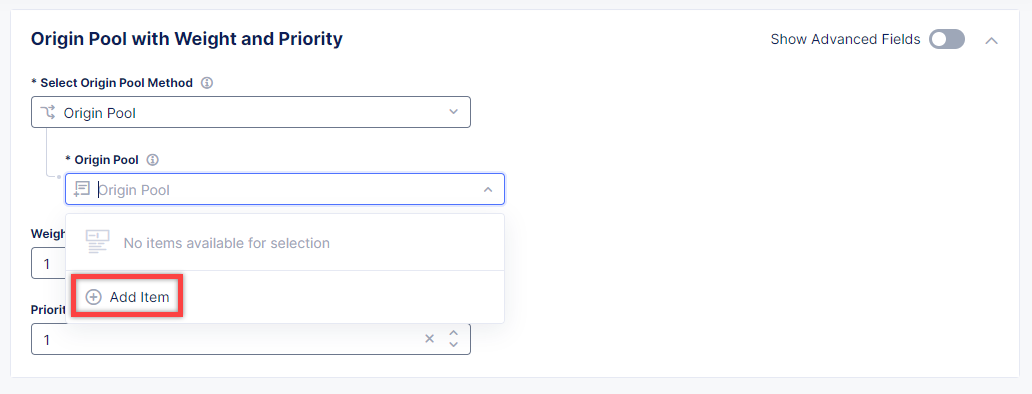
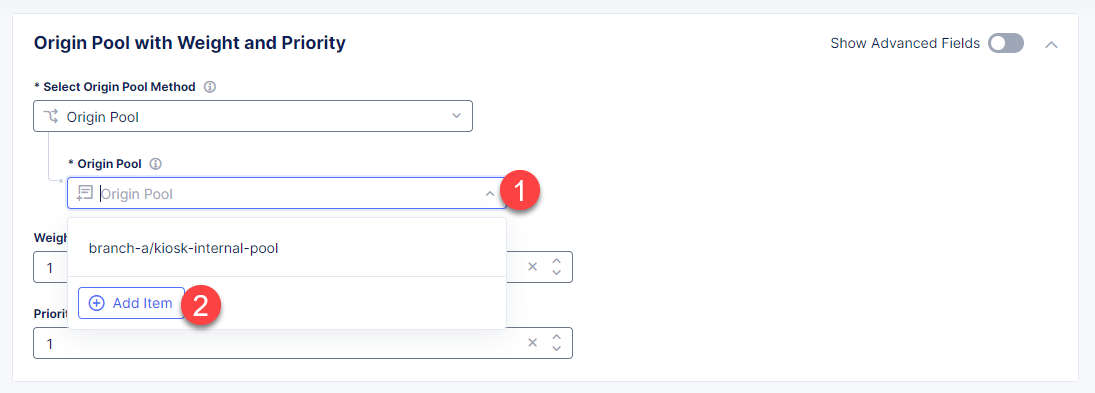
After that move on to the Origins section and click Add Item to add an origin pool for the HTTP Load Balancer.
To create a new origin pool, click Add Item.
Give origin pool a name.
To create a new origin server, click Add Item.
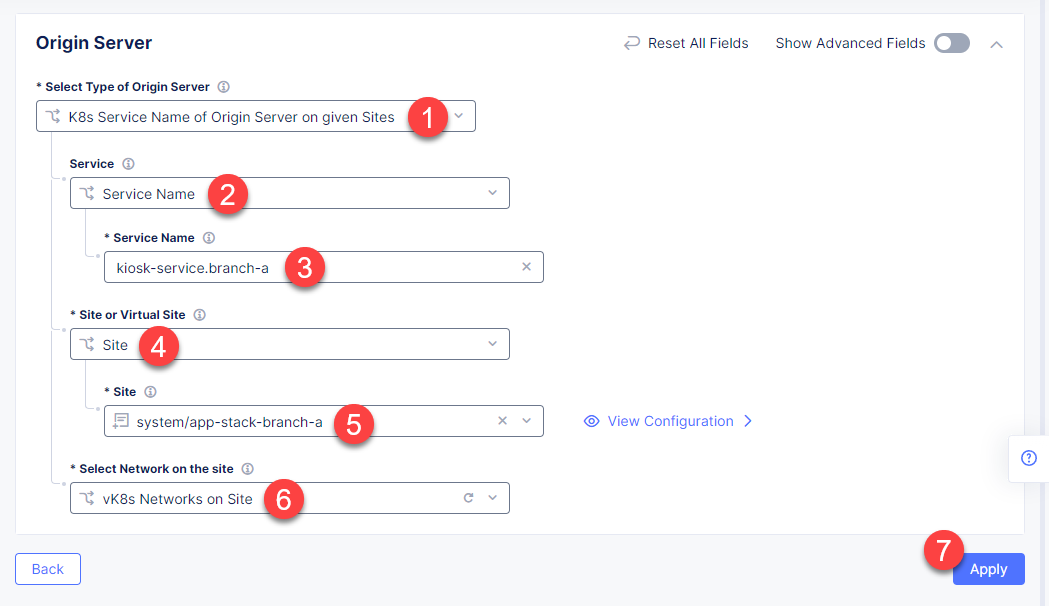
First, from the Select Type of Origin Server menu, select K8s Service Name of Origin Server on given Sites to specify the origin server with its K8s service name. Then enter the kiosk-service.branch-a service name in the Service Name field. Next, select the system/app-stack-branch-a site created earlier. After that open the Select Network on the site menu and select vK8s Networks on Site which means that the origin server is on vK8s network on the site and, finally, click Apply.
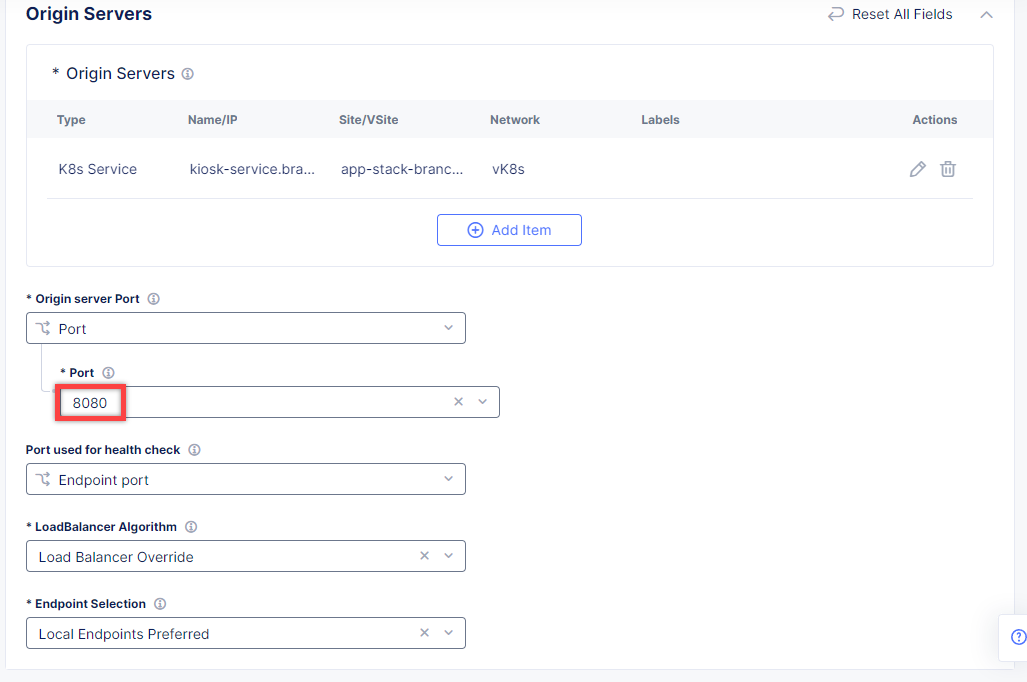
Back on the Origin Pool page, type in the 8080 Origin server Port.
Scroll down and click Continue to move on to apply the origin pool configuration.
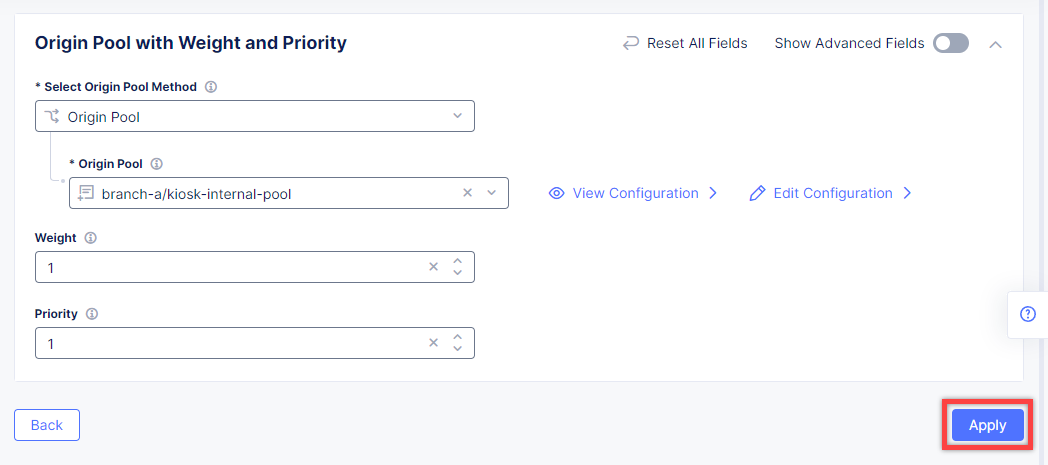
Click the Apply button to apply the origin pool configuration to the HTTP Load Balancer.
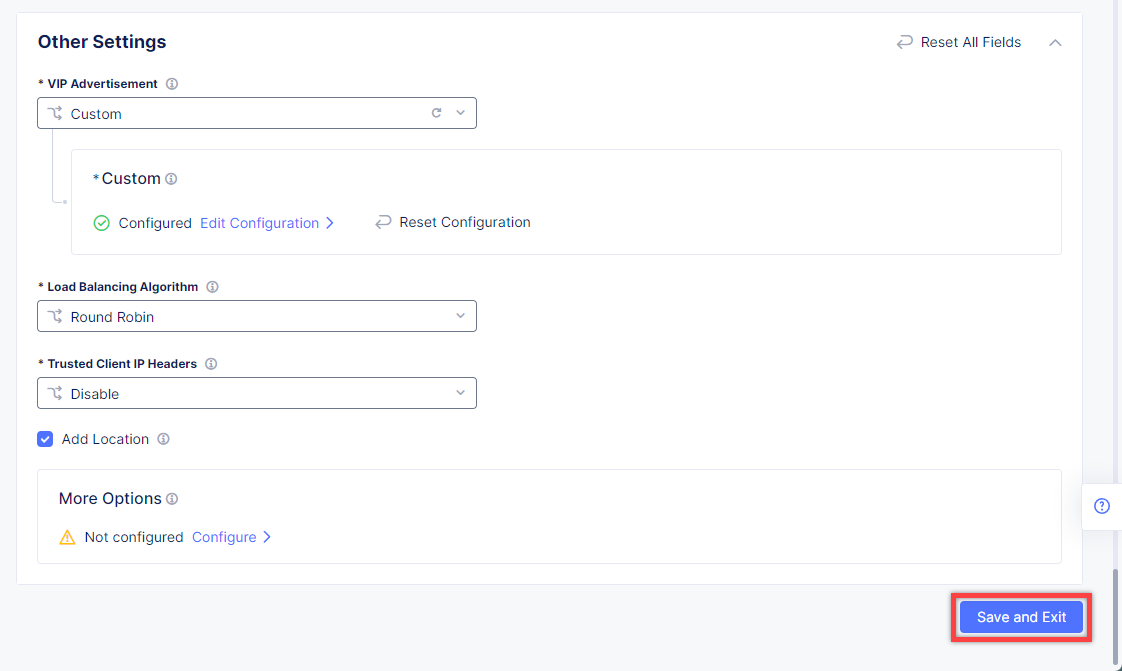
Finally, configure the HTTP Load Balancer to Advertise the VIP to the created site. Select Custom for VIP Advertisement, which configures the specific sites where the VIP is advertised. And then click Configure.
Click Add Item to add the configuration.
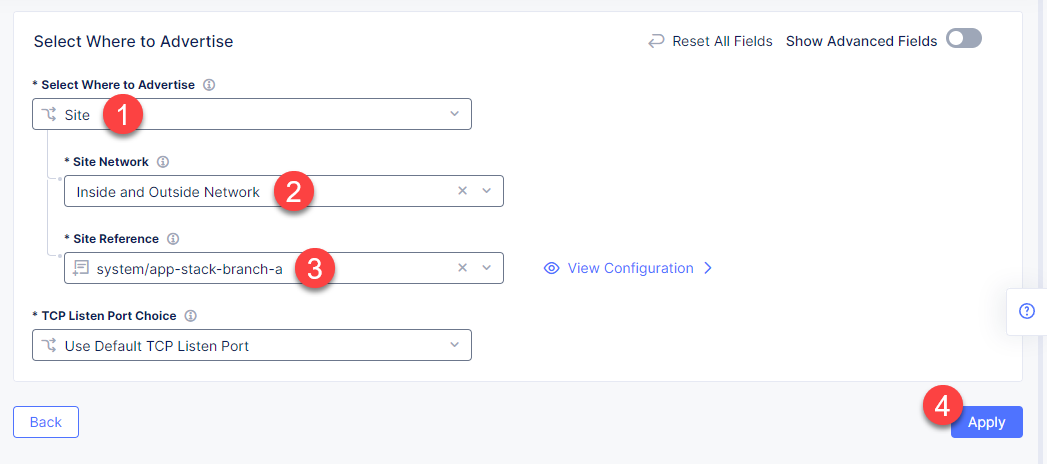
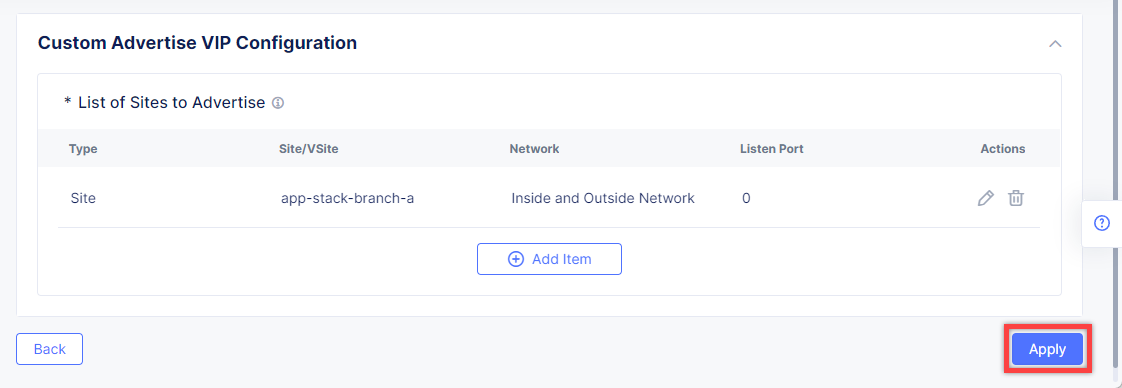
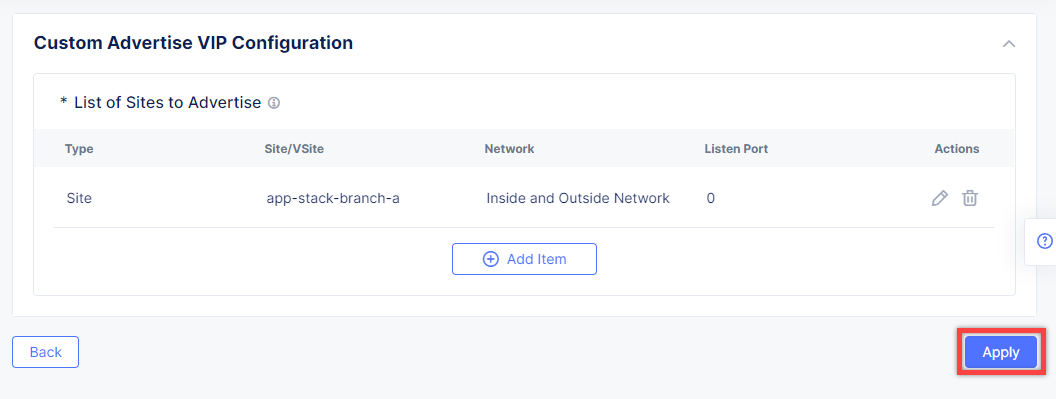
In the drop-down menu select Site as a place to advertise. Then select Inside and Outside Network for the site. And finally, select the created site as site reference. Click Apply to add the specified configuration.
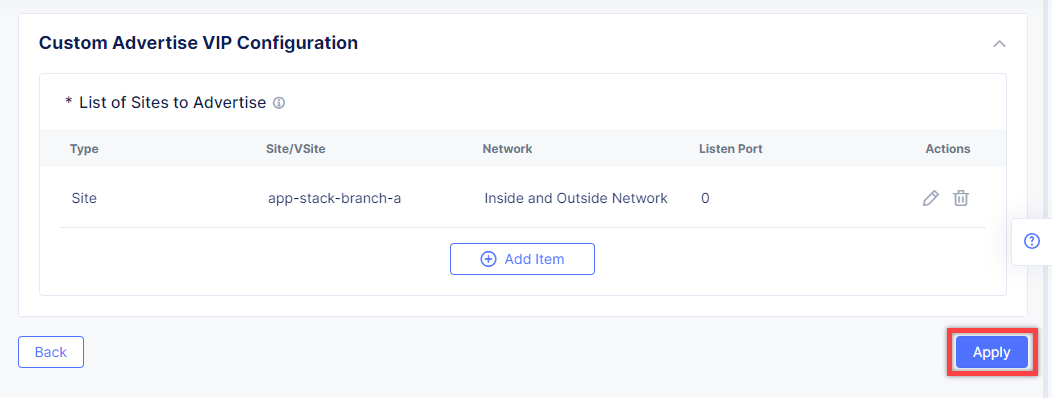
Proceed by clicking Apply. This will apply the VIP Advertisement configuration to the HTTP Load Balancer.
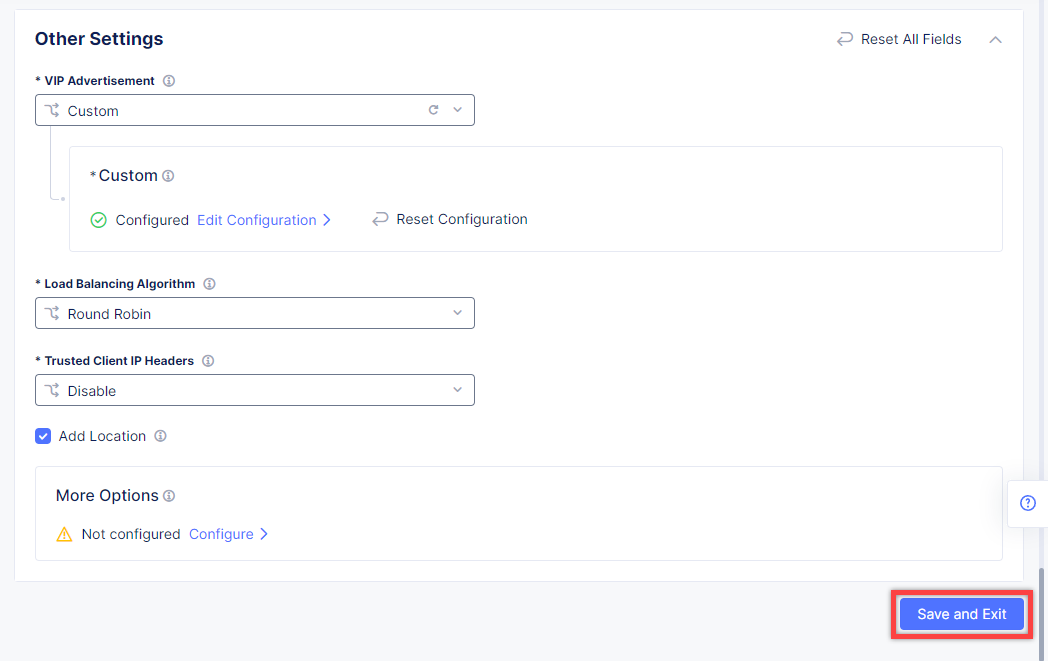
Complete creating the load balancer by clicking the Save and Exit button.
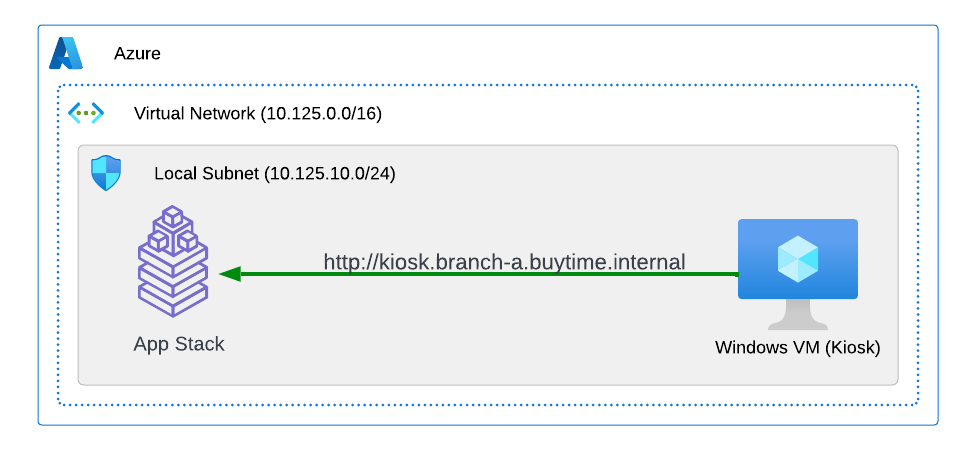
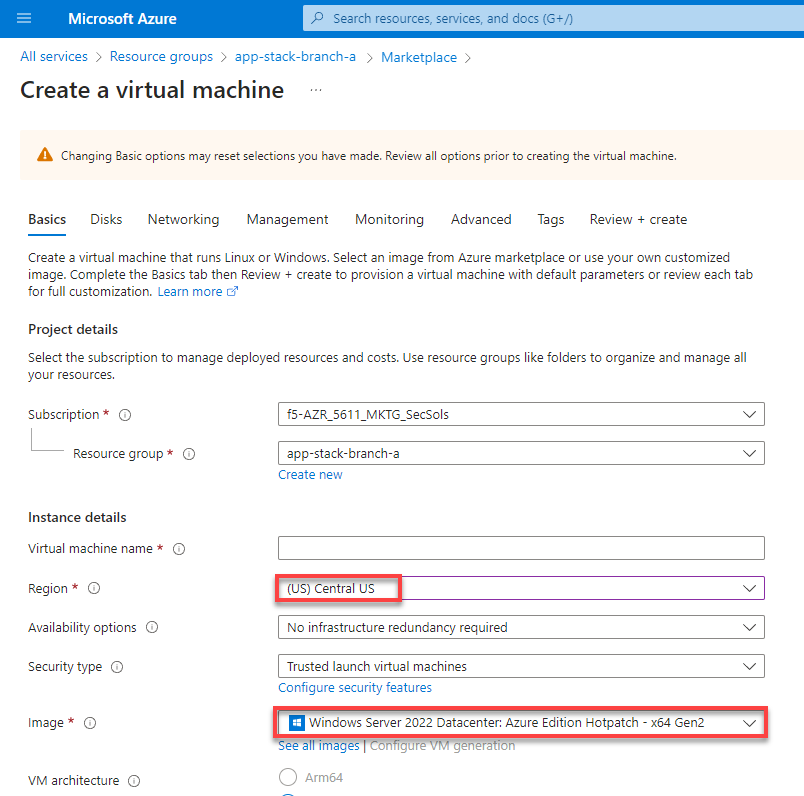
Let's now test the kiosk we deployed. To do that create a VM next to your App Stack Deployment like in the image below. This VM will be your kiosk simulation. In the real scenario we assume that kiosk will be a standalone machine which is located or has access to the same network as App Stack.
Here is an example of the networking section that you would encounter when creating a new VM. Select instance region. In this demo we will use (US) Central US. And then select the base operating system. We use Windows Server 2022 Datacenter: Azure Edition Hotpatch - x64 Gen2 for this demo.
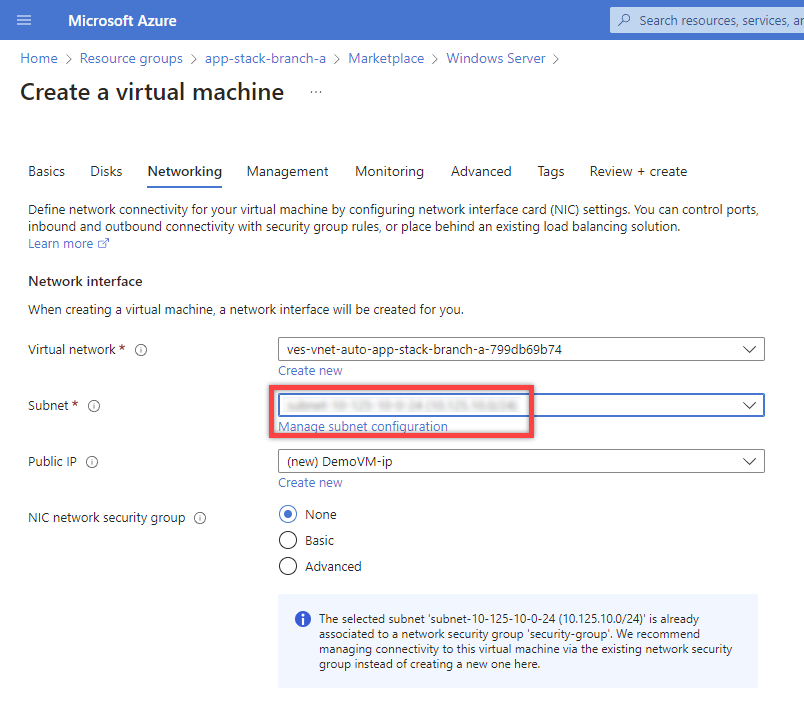
Select the subnet.
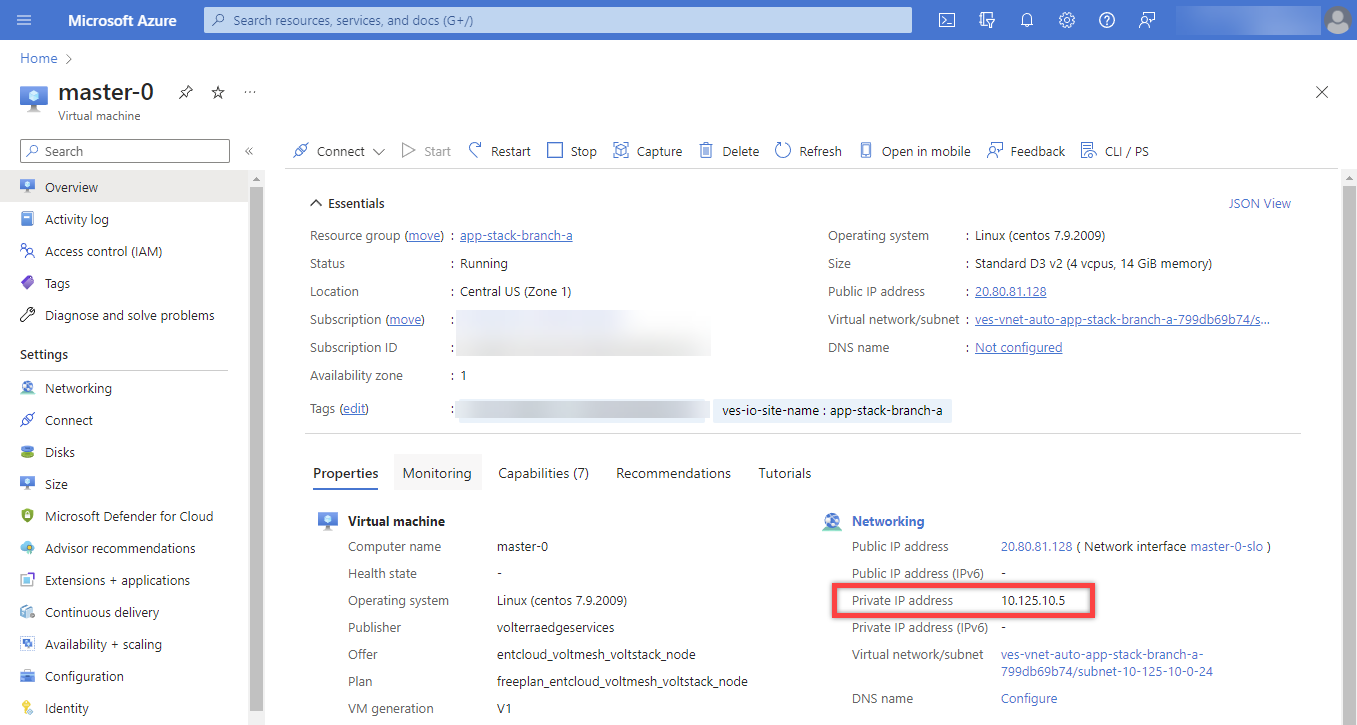
Find the Private IP of your AppStack VM in Azure. Usually it's 10.125.10.5
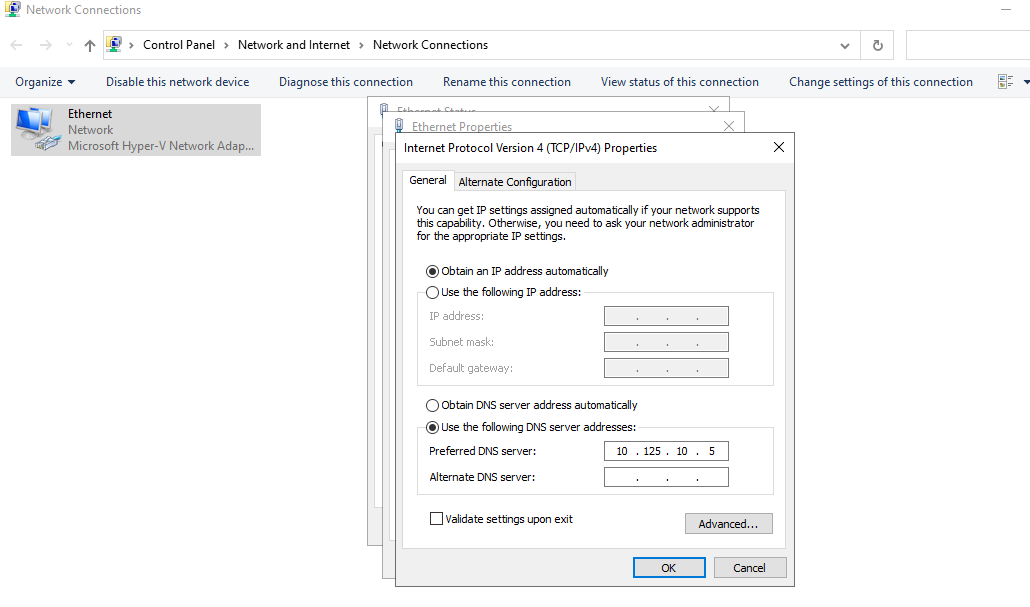
Update the DNS server on your Kiosk VM, use the AppStack IP address. In a real scenario, you can use the DNS server on AppStack during network outages when working in offline mode
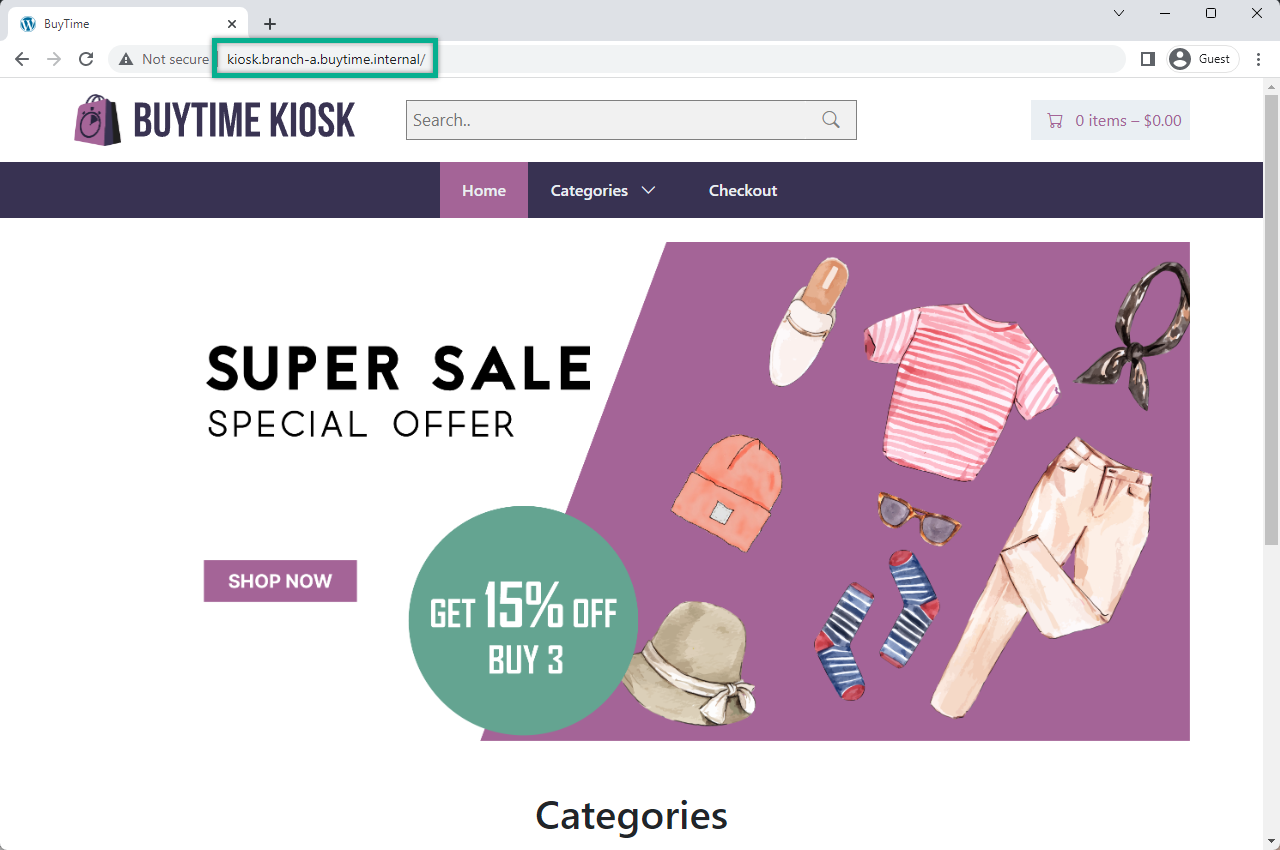
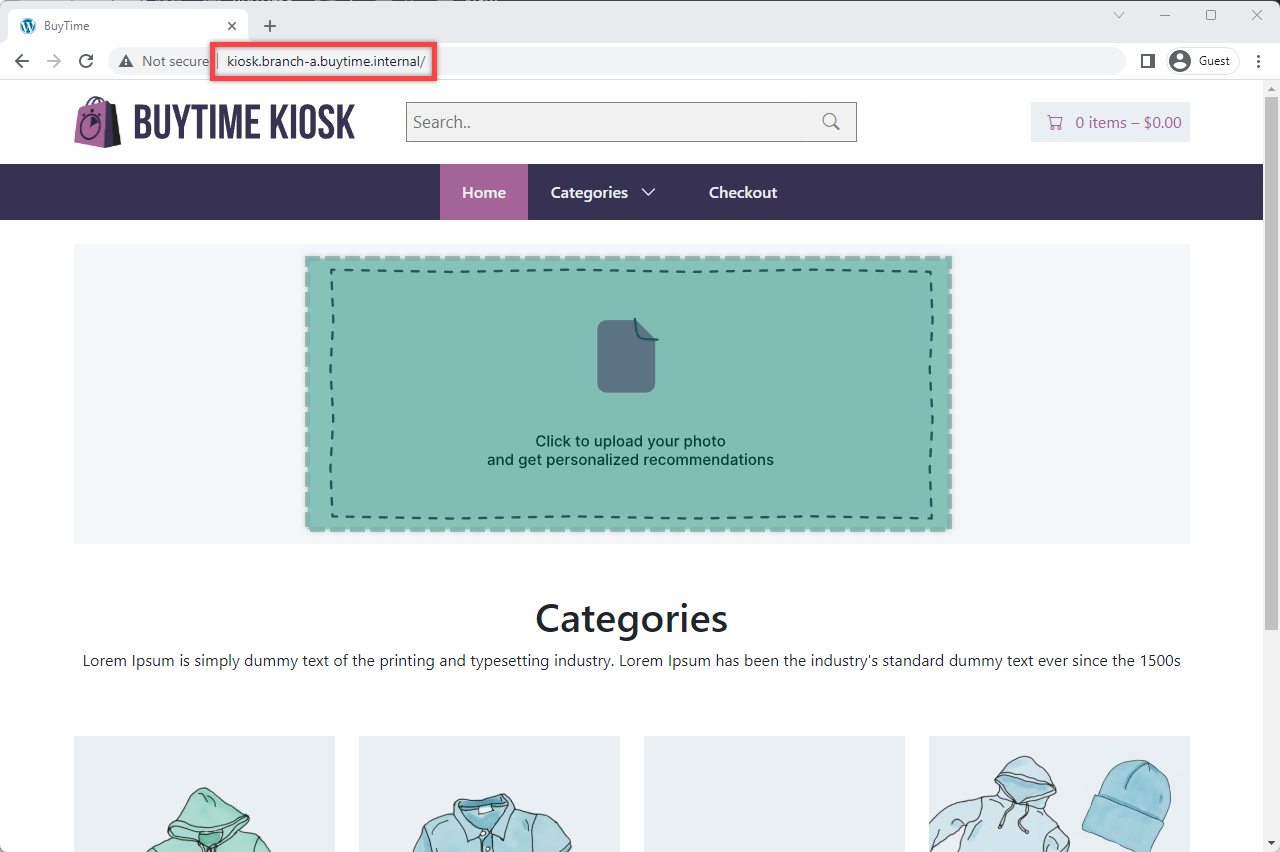
Open a browser window on your kiosk VM and proceed to the http://kiosk.branch-a.buytime.internal/ indicated as a domain for kiosk HTTP LB. You can see the kiosk up and running.
In this part of Module 1 we are going to create an HTTP LB for the recommendation module of our app and then test it. To do that, go back to the F5 Console and click the Add HTTP Load Balancer button to open the creation form.
In the Name field, enter a name for the new load balancer expressing its purpose - recommendation.
Then proceed to the Domains and LB Type section and fill in the recommendations.branch-a.buytime.internal domain. Next, from the Load Balancer Type drop-down menu, select HTTP to create the HTTP type of load balancer. Specify the 80 port.
After that move on to the Origins section and click Add Item to add an origin pool for the HTTP Load Balancer.
To create a new origin pool, open the Origin Pool menu and click Add Item.
Give origin pool a name.
To create a new origin server, click Add Item.
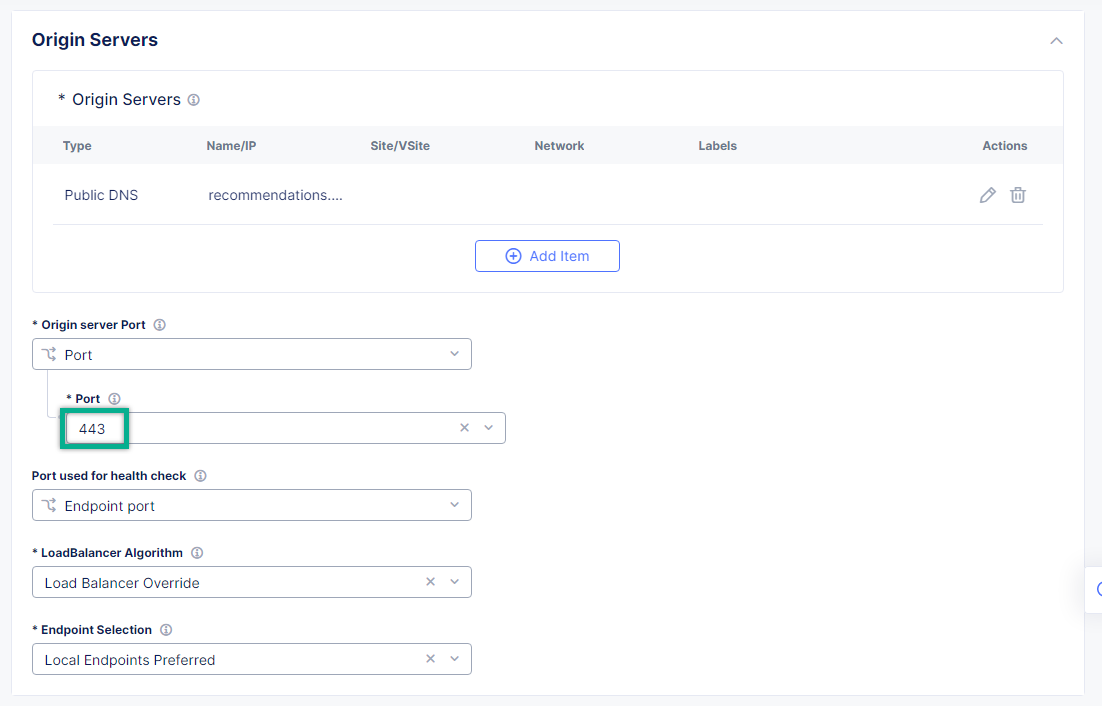
First, from the Select Type of Origin Server menu, select Public DNS Name of Origin Server to specify the origin server with DNS Name. To simplify the guide we provide you with demo server hosted on our cloud. Enter the recommendations.buytime.sr.f5-cloud-demo.com public IP and click Apply. If you want to use your own, there is k8s manifest or docker compose filed in the deployments folder.
Back on the Origin Pool page, leave the 443 Origin server Port. Make sure to update the port value in case you use own Recommendations VM deployment.
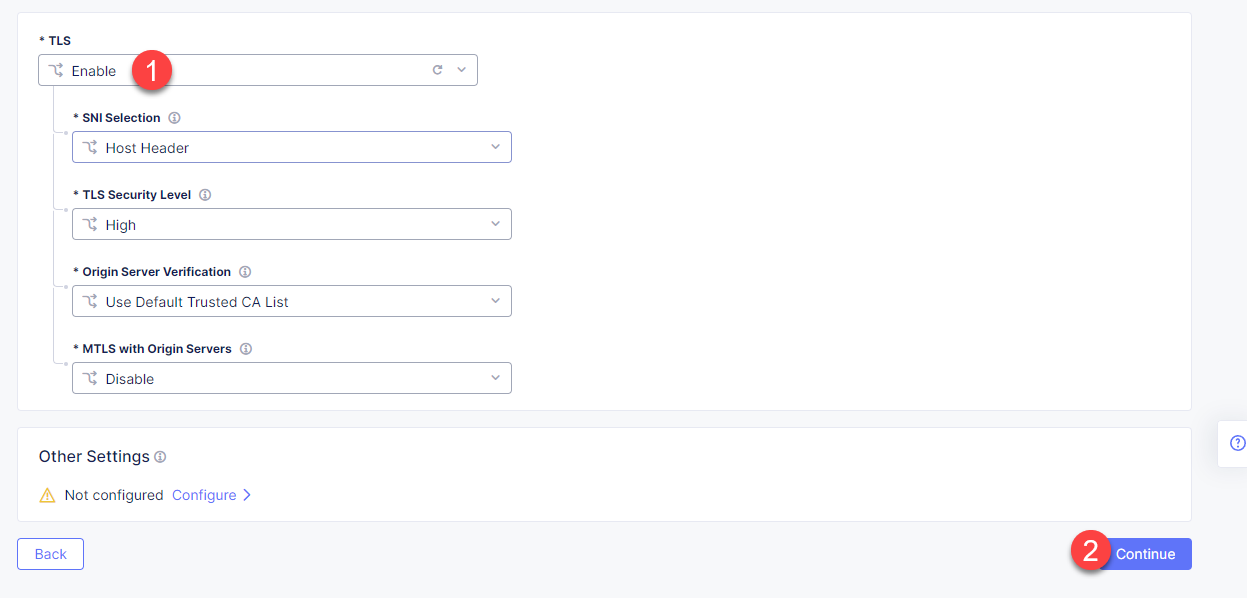
Scroll down, enable TLS and click Continue to move on to apply the origin pool configuration.
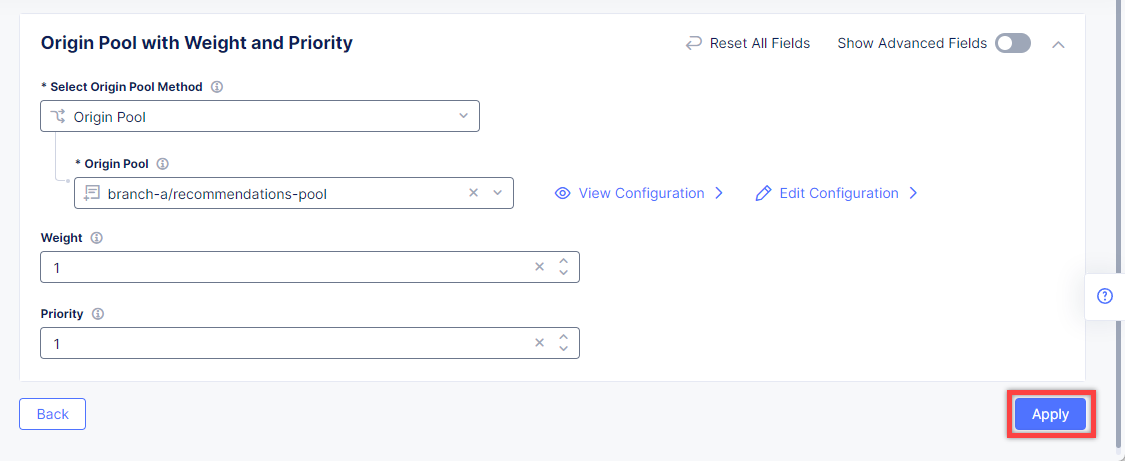
Click the Apply button to apply the origin pool configuration to the HTTP Load Balancer.
Finally, configure the HTTP Load Balancer to Advertise the VIP to the created site. Select Custom for VIP Advertisement, which configures the specific sites where the VIP is advertised. And then click Configure.
Click Add Item to add the configuration.
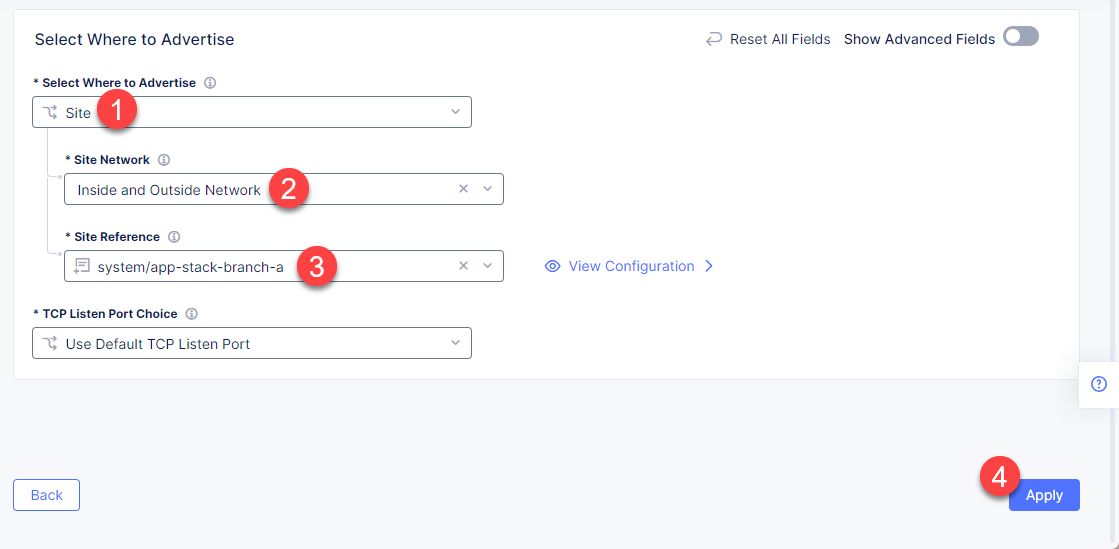
In the drop-down menu select Site as a place to advertise. Then select Inside and Outside Network for the site. And finally, select the created site as site reference. Click Apply to add the specified configuration.
Proceed by clicking Apply. This will apply the VIP Advertisement configuration to the HTTP Load Balancer.
Complete creating the load balancer by clicking the Save and Exit button.
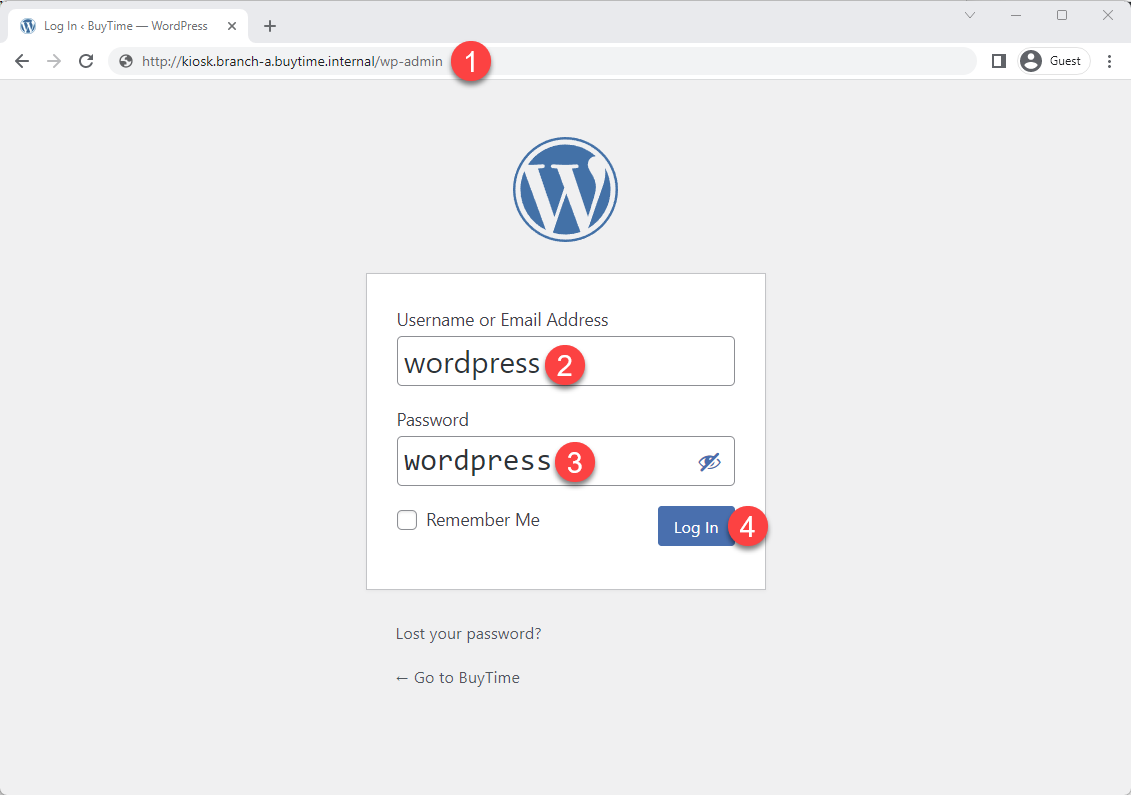
HTTP LB for the recommendation module is created. Now we can test how it works. First, sign in the Kiosk VM created before. Then in the created VM open a browser window and go to the http://kiosk.branch-a.buytime.internal/wp-admin. Log in.
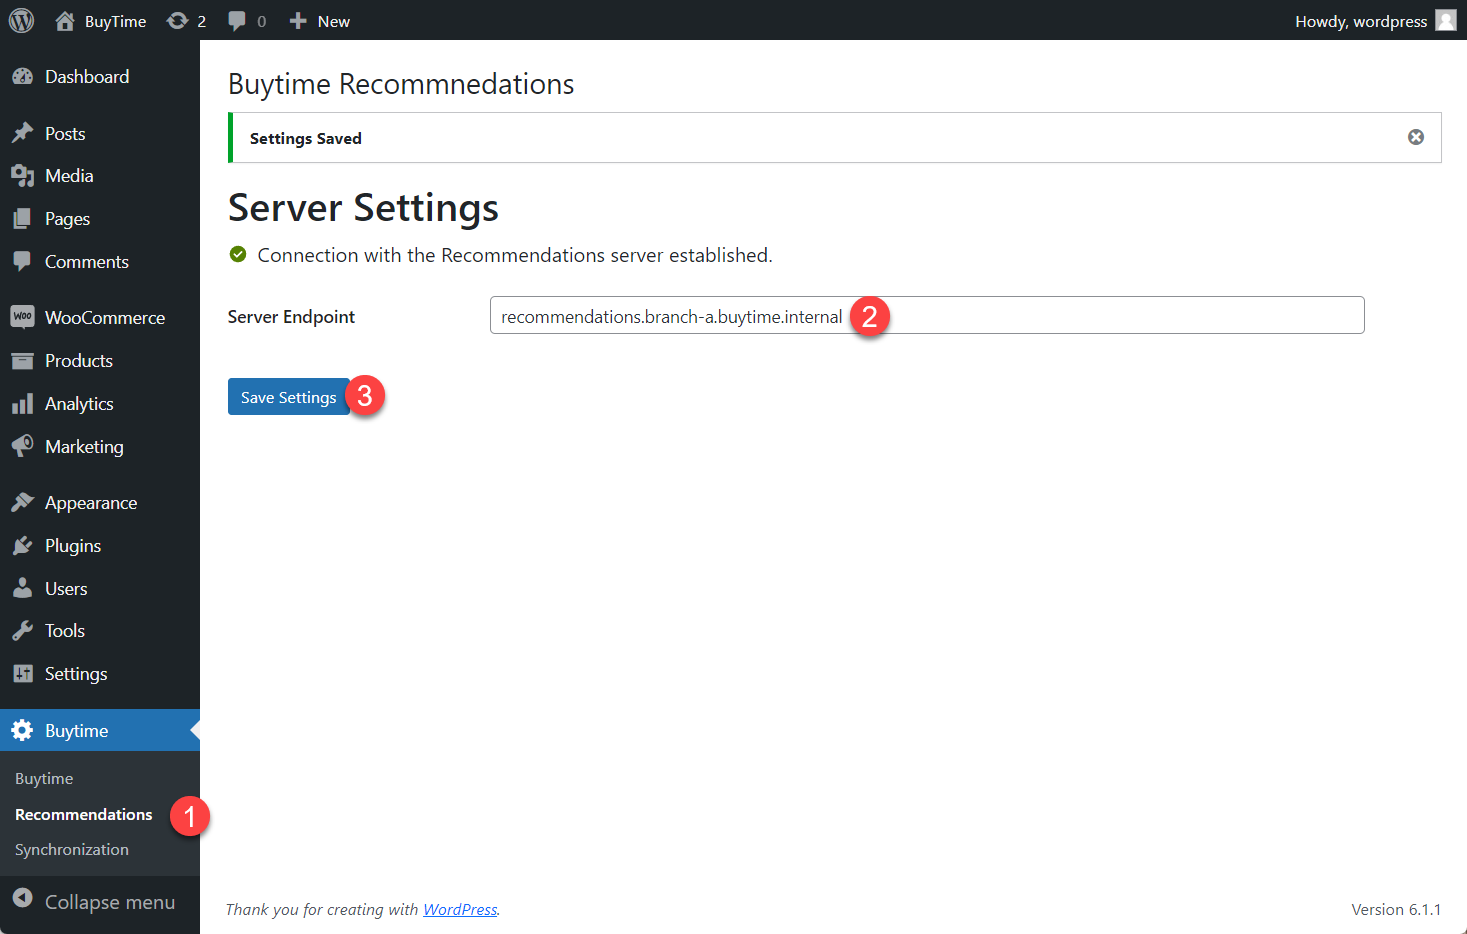
In the Wordpress Admin Dashboard we need to configure the Buytime plugin where we add the link to the recommendations service. Navigate to the Recommendations section in the left panel, paste the recommendations.branch-a.buytime.internal link and click the Save Settings button. If the configuration is successful, you will see the Connection with the Recommendations server established. message.
Finally, go to the kiosk http://kiosk.branch-a.buytime.internal to see that the recommendations module is up and running there.
In this Module we are going to use CE to deploy central DB (central inventory) & online App, as well as create and use TCP LB to securely connect to Retail Branch to enable order & inventory sync.
First of all, we will need to create a namespace for our online store to add our instances to. To do that, open the Service menu and navigate to the Administration service.
In the Personal Management section of the left Administration panel, select My Namespaces. Click the Add Namespace button. The Add Namespace menu displays.
Give namespace a name. Note that each namespace must have a unique name. Click the Add Namespace button. The new namespace displays in the list on your My Namespaces page.
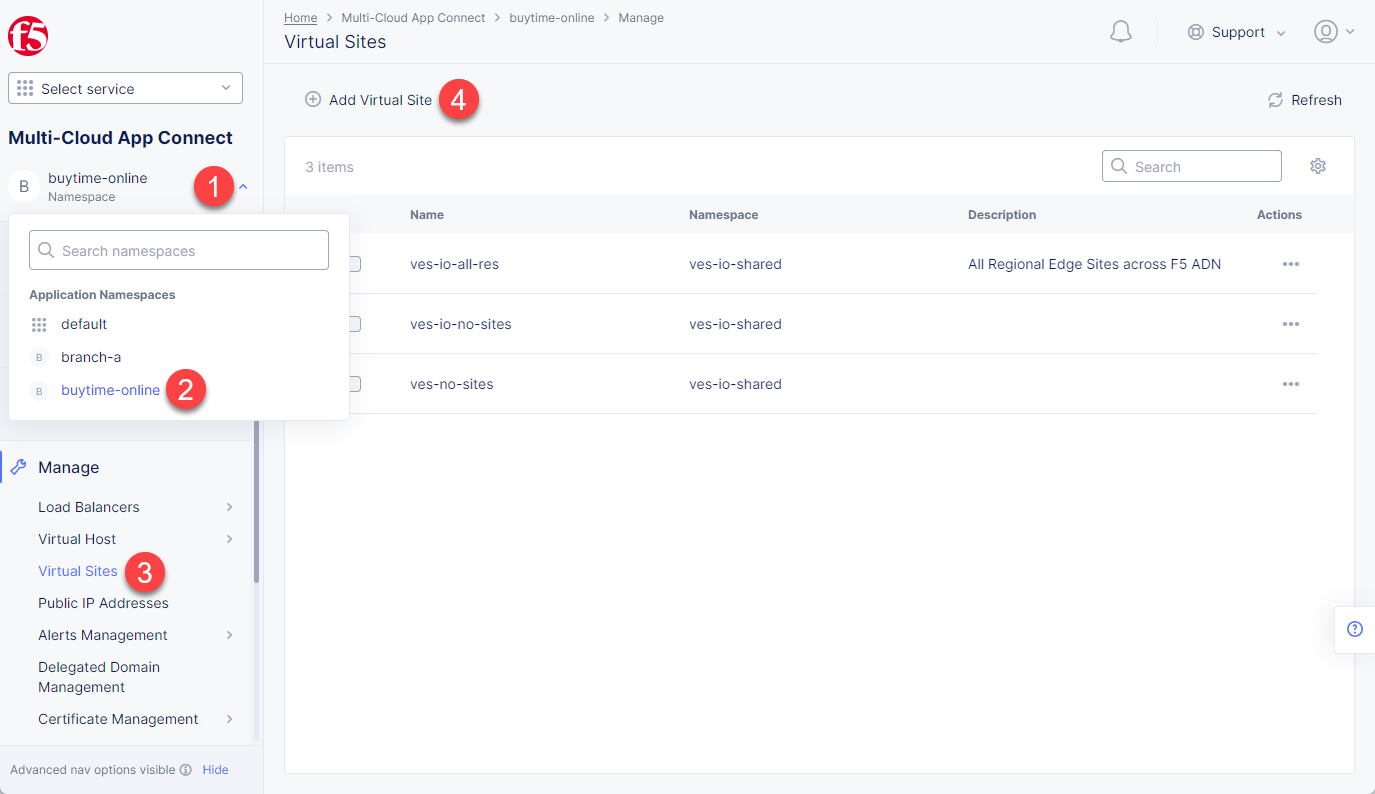
Now that the namespace is ready, we can go on to creating a virtual site for our Virtual K8s. Open the Service menu and navigate to the Multi-Cloud App Connect section.
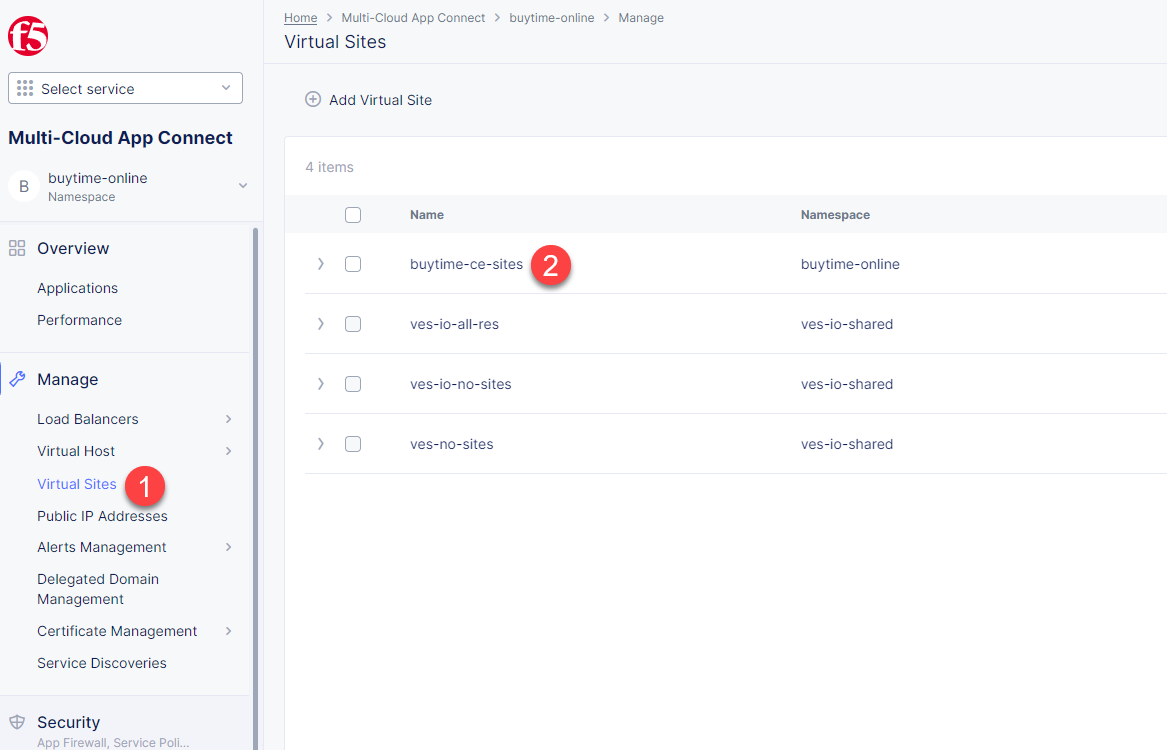
In the Application Namespaces menu select the namespace we created in the previous step and navigate to Virtual Sites in the Manage section. After that click Add Virtual Site to load the creation form.
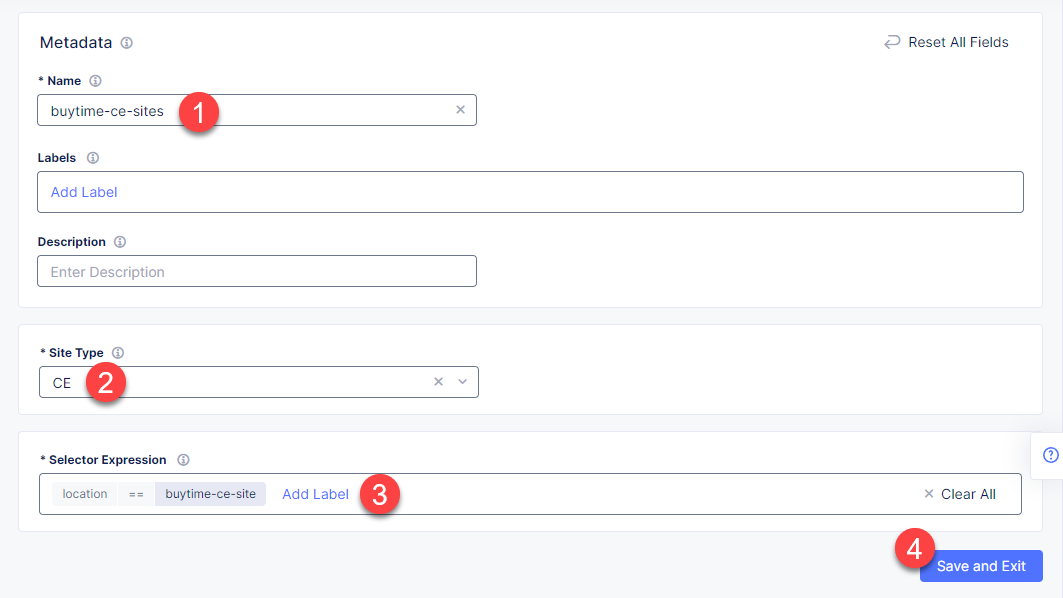
In the Metadata section Name field, enter a virtual site name. In the Site Type section, select the CE site type from the drop-down menu, and then move on to adding label. Type in location as a key, select the == operator and fill in buytime-ce-site value for the key. Complete the process by clicking the Save and Exit button.
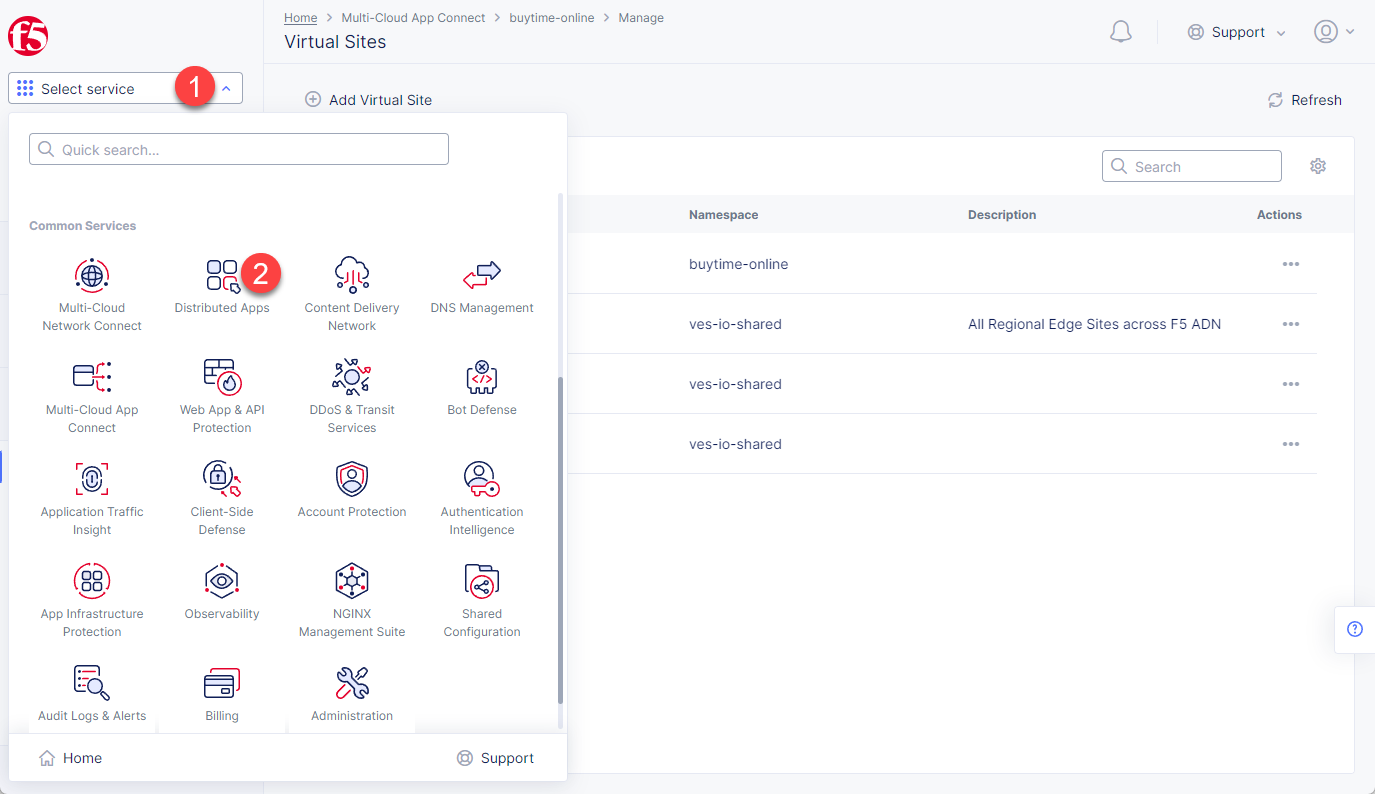
Now that the virtual site is created, we can add a virtual K8s. Open the Service menu and navigate to the Distributed Apps service.
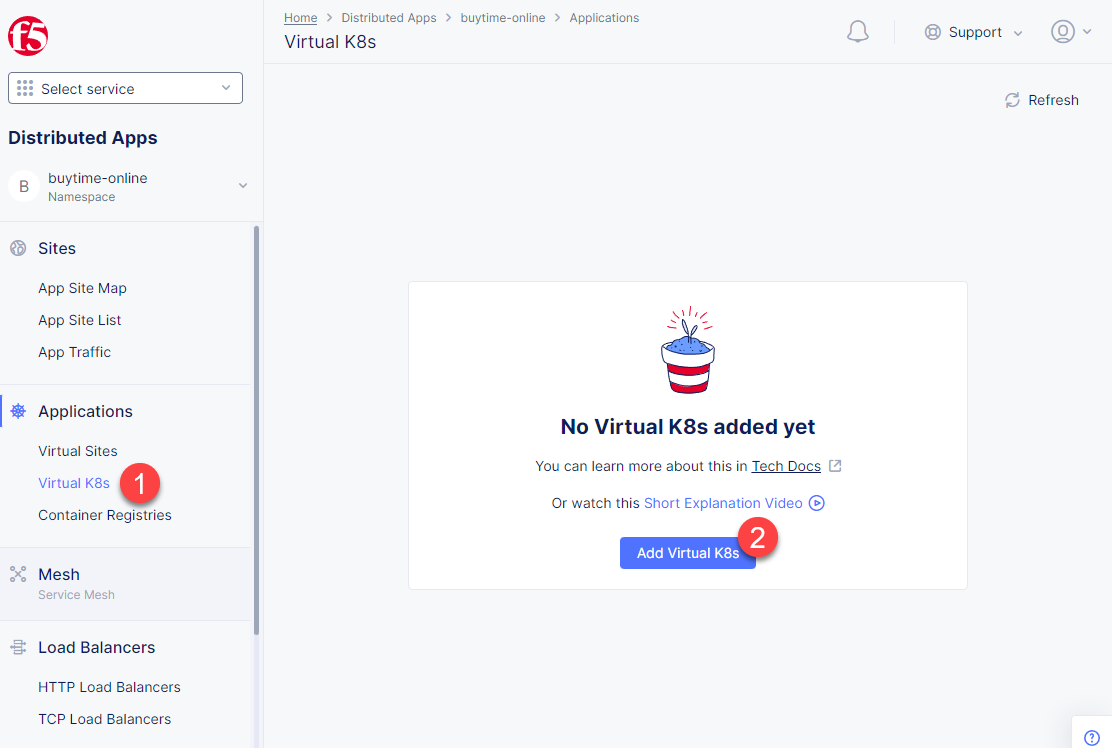
Proceed to Virtual K8s and click the Add Virtual K8s button to create a vK8s object.
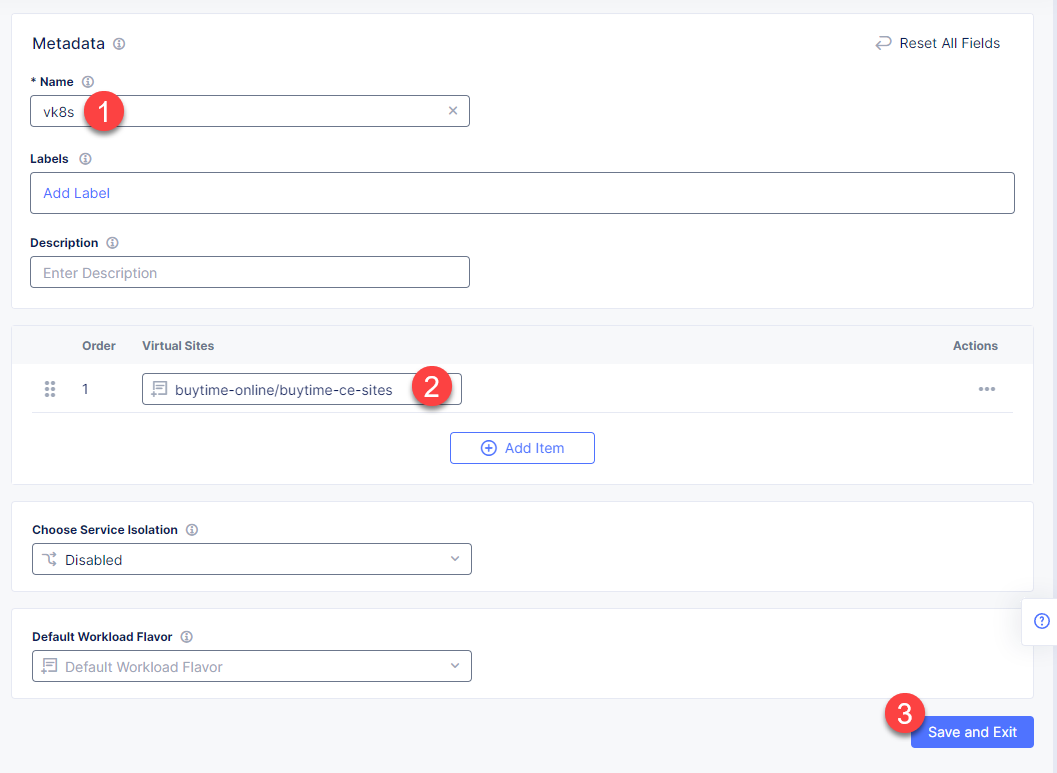
In the Name field, enter a name. Then open the menu and select the virtual site we created earlier. Complete creating the vK8s object by clicking Save and Exit. Wait for the vK8s object to get created and displayed.
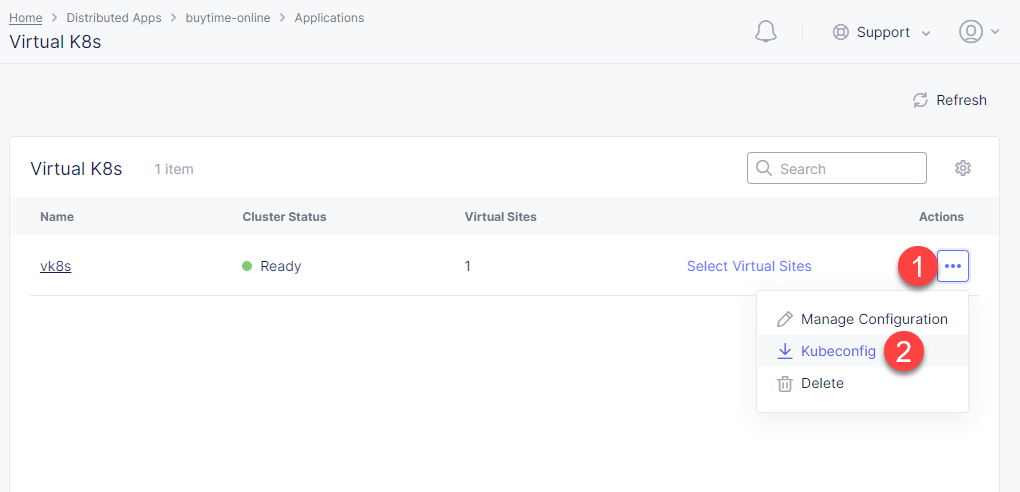
In order to deploy synchronization module to vk8s, we will get Kubeconfig. Open the menu of the created virtual K8s and click Kubeconfig.
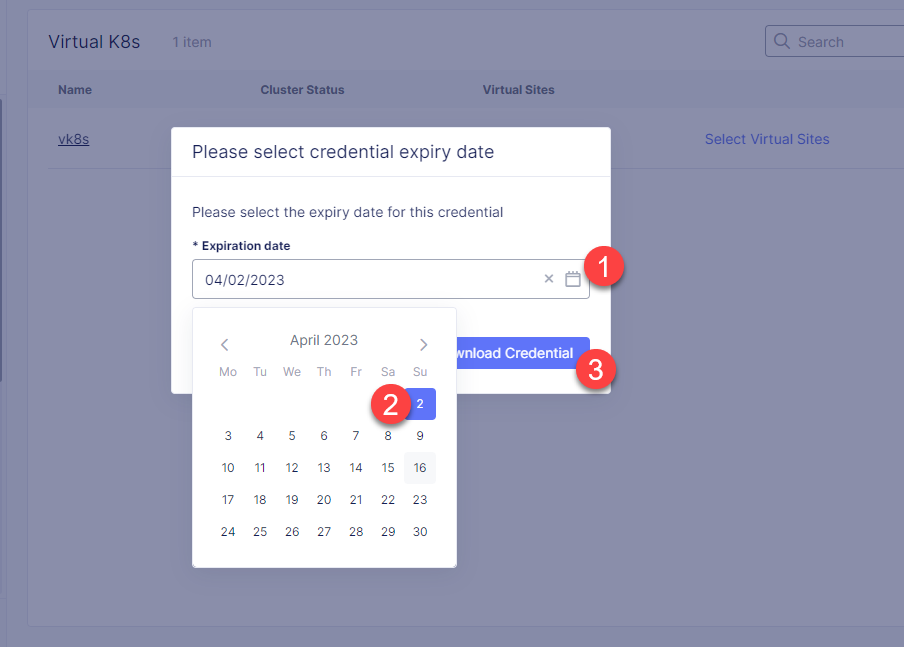
Open the calendar and select the expiry date. Then click the Download Credential button. The download will start automatically.
After downloading the Kubeconfig for the created virtual K8s, we can deploy the synchronization module to vK8s. To do that, run the following command:
> kubectl --kubeconfig ./your_vk8s_kubeconfig.yaml apply -f ./deployments/ce-vk8s-inventory-server.yaml

deployment.apps/inventory-server-deployment created
service/inventory-server-service created
To verify the deployment we can execute the following command:
> kubectl --kubeconfig ./your_vk8s_kubeconfig.yaml get deployments

NAME                              READY   UP-TO-DATE   AVAILABLE   AGE
inventory-server-deployment       1/1     1            1           5m
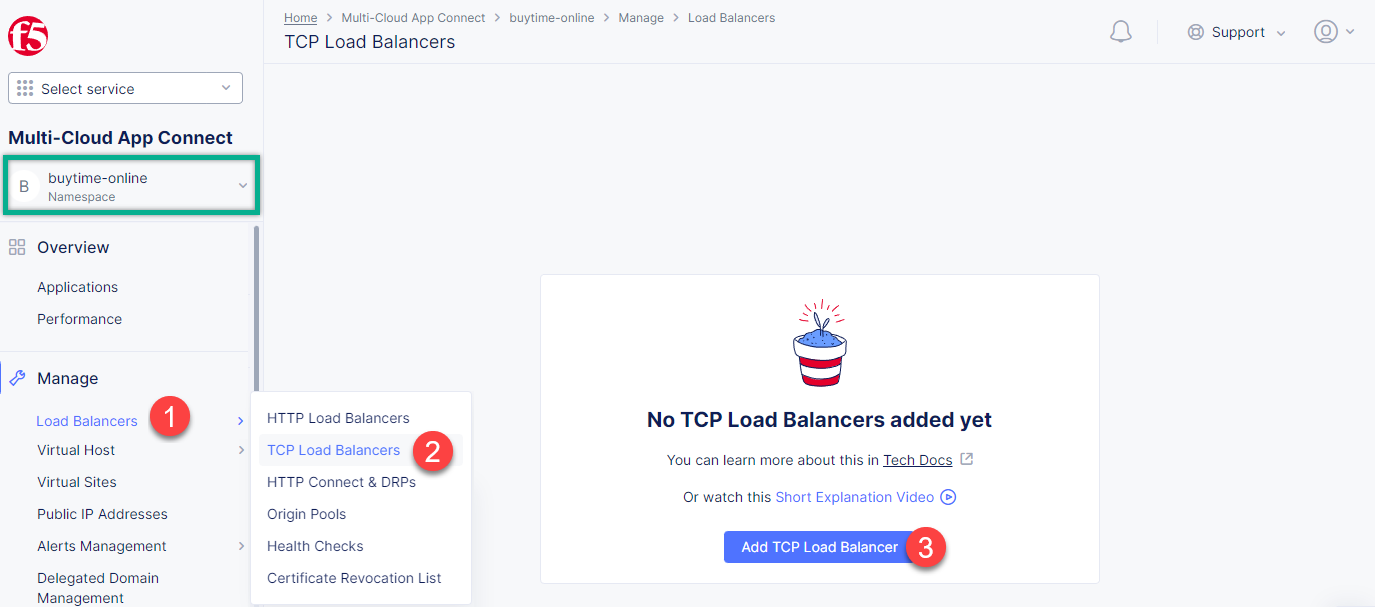
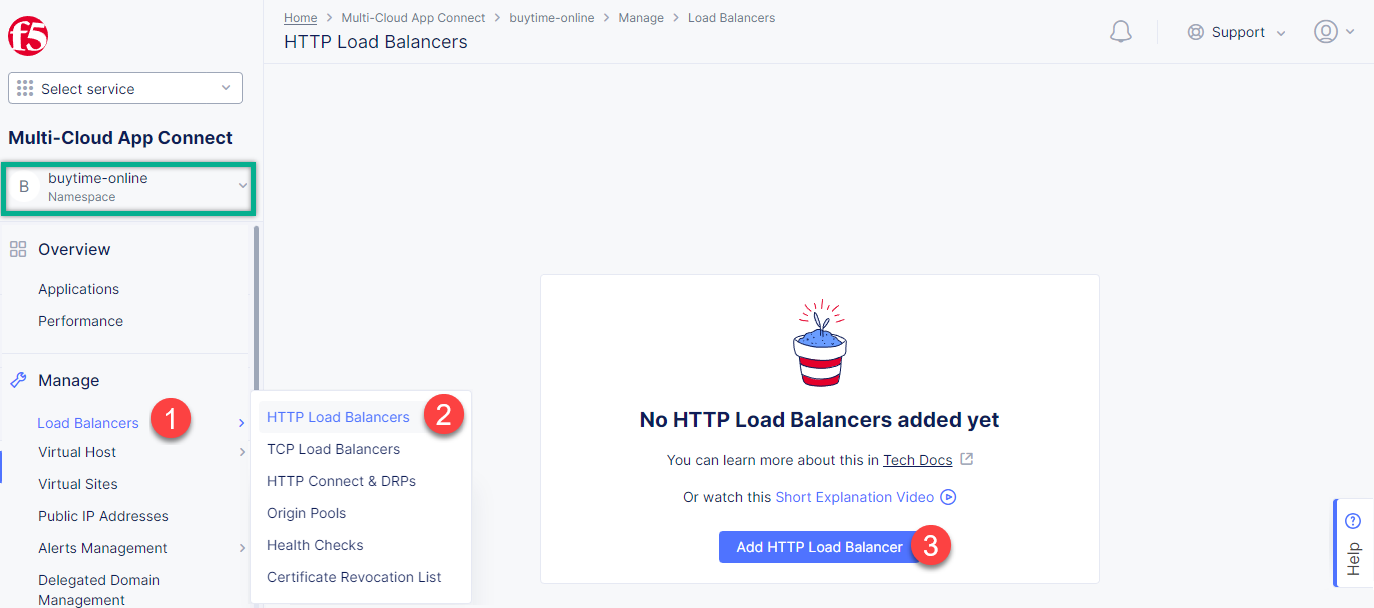
First of all, make sure you are in the namespace created for the online store - buytime-online. Then navigate to the Load Balancers section in the left-side panel and select the TCP Load Balancers option. Then click the Add TCP Load Balancer button to open the creation form.
In the Name field, enter a name for the new load balancer.
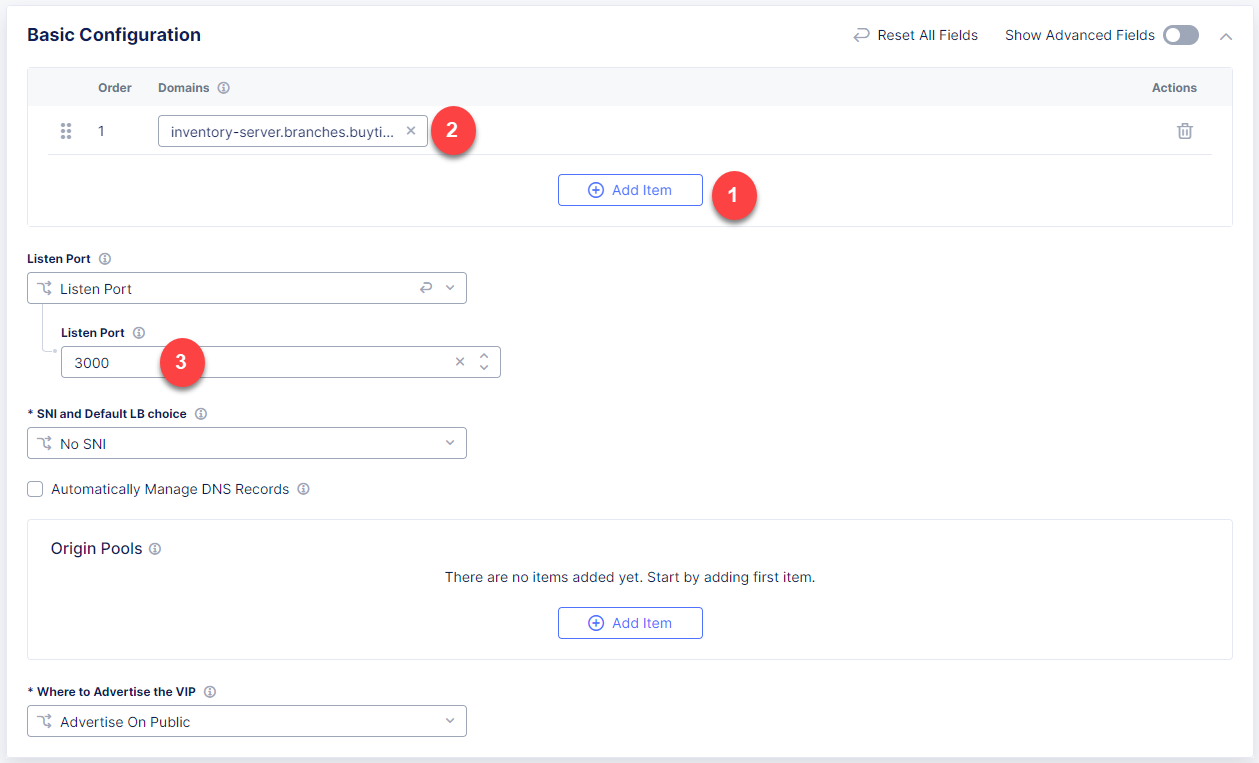
Then proceed to the Basic Configuration section and fill in the inventory-server.branches.buytime.internal domain. Next, specify the 3000 port. Then move on to the Origin Pools section and click Add Item to open the configuration form.
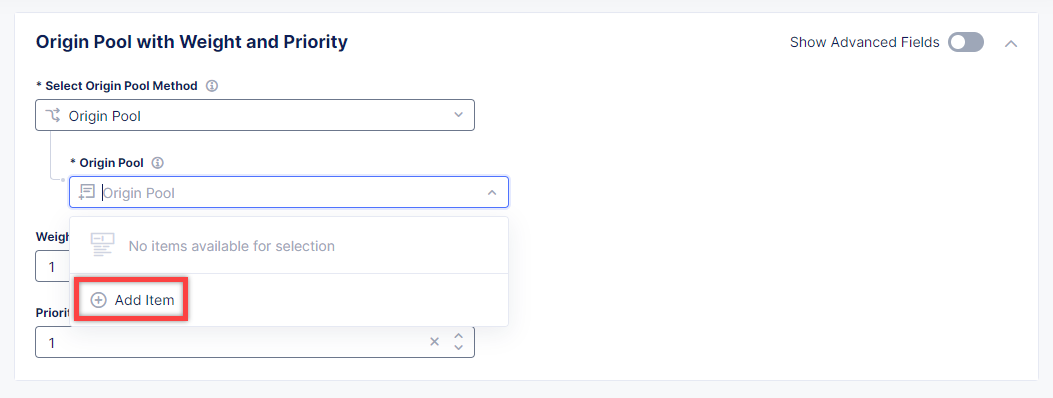
In the Origin Pool drop-down menu, click Add Item to start adding the pool.
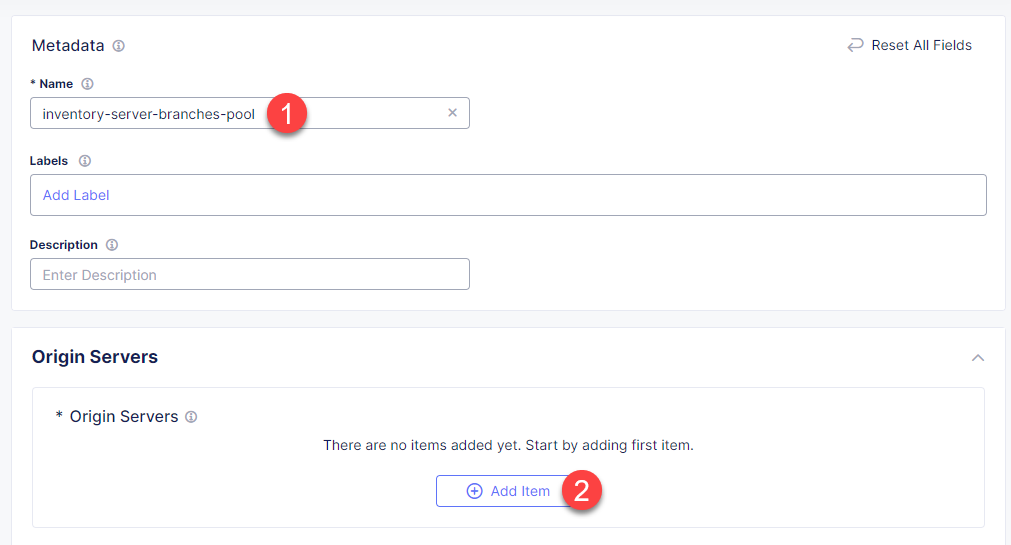
Give origin pool a name, say, inventory-server-branches-pool. Then move on to configuring an origin server.
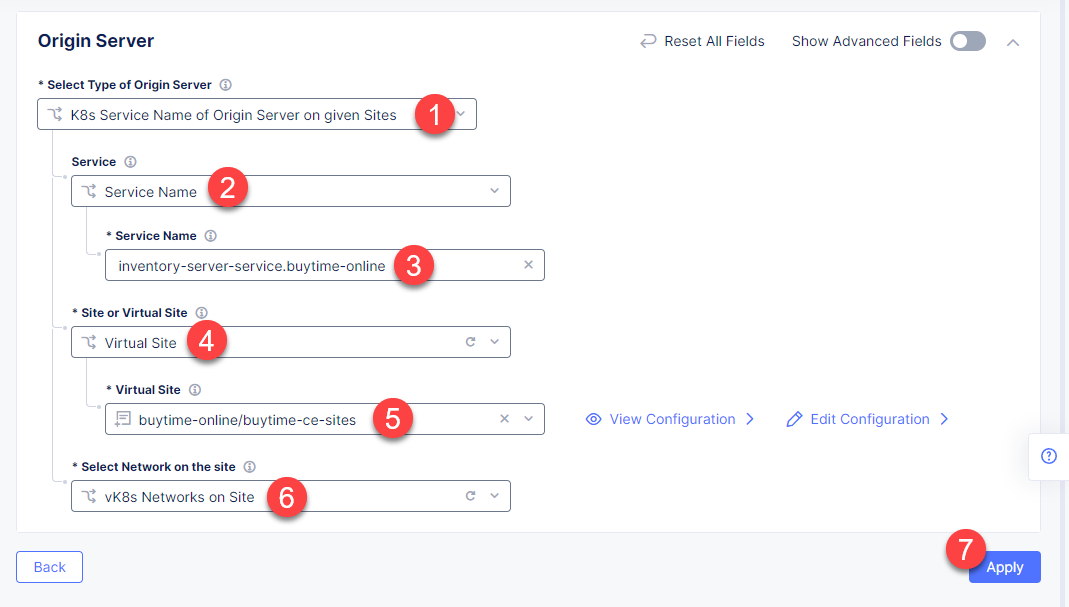
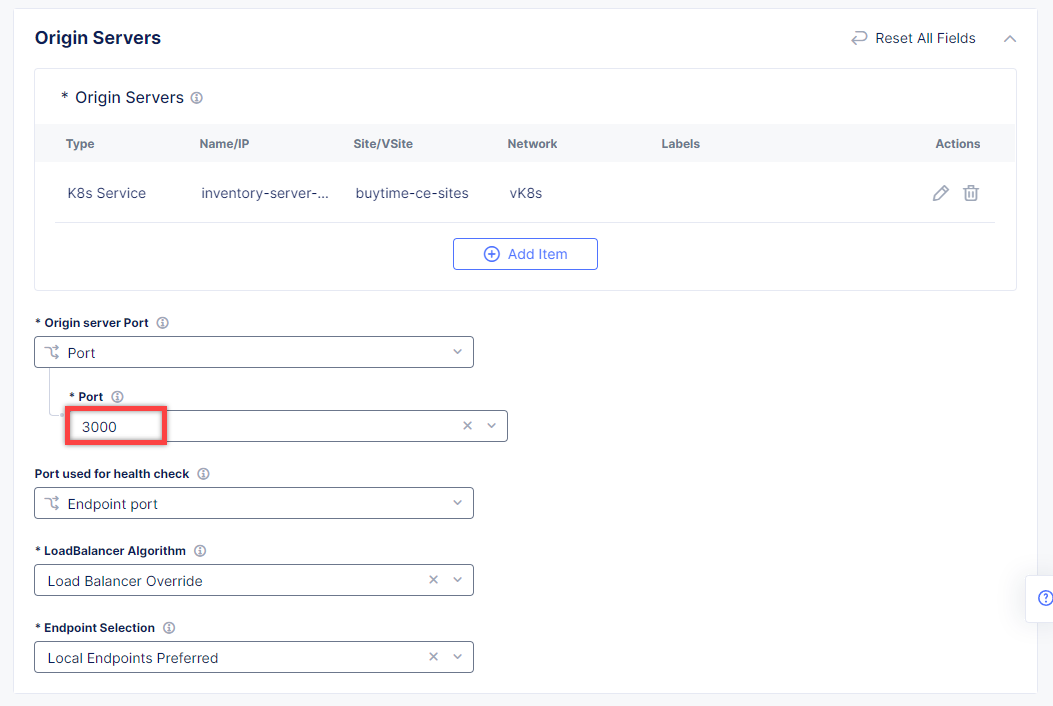
First, from the Select Type of Origin Server menu, select K8s Service Name of Origin Server on given Sites to specify the origin server with its K8s service name. Then enter the inventory-server-service.buytime-online service name in the Service Name field. Next, select the buytime-ce-sites virtual site created earlier. After that open the Select Network on the site menu and select vK8s Networks on Site which means that the origin server is on vK8s network on the site and, finally, click Apply.
Back on the Origin Pool page, type in the 3000 Origin server Port.
Scroll down and click Continue to move on to apply the origin pool configuration.
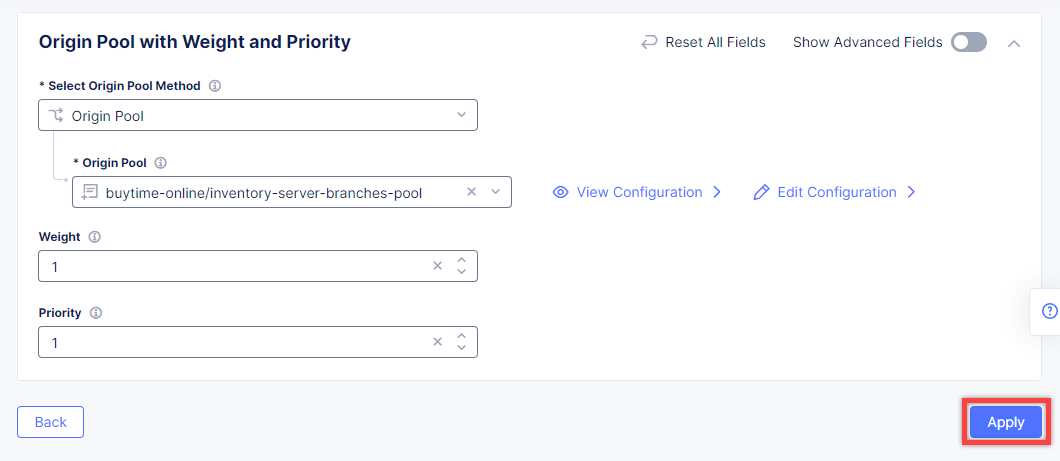
Click the Apply button to apply the origin pool configuration to the TCP Load Balancer.
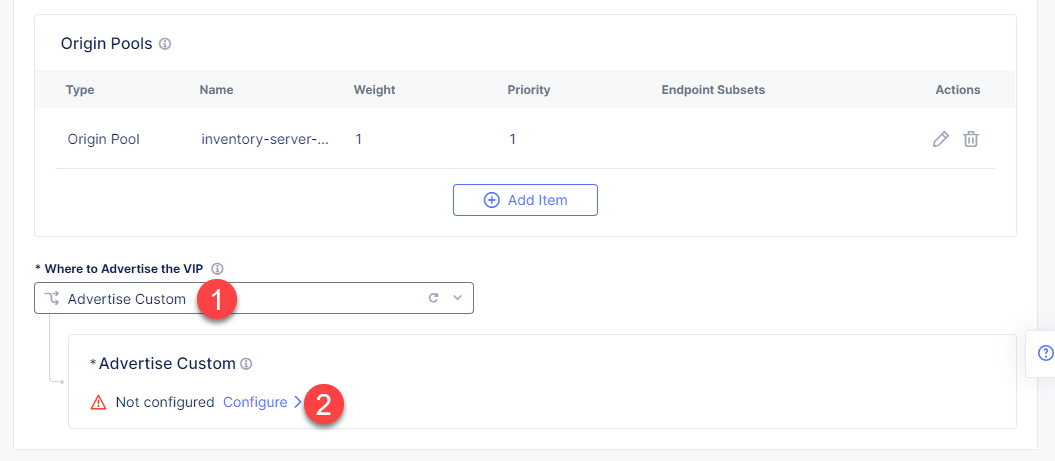
Finally, configure the TCP Load Balancer to Advertise the VIP to the created site. Select Advertise Custom for VIP Advertisement, which configures the specific sites where the VIP is advertised. And then click Configure.
Click Add Item to add the configuration.
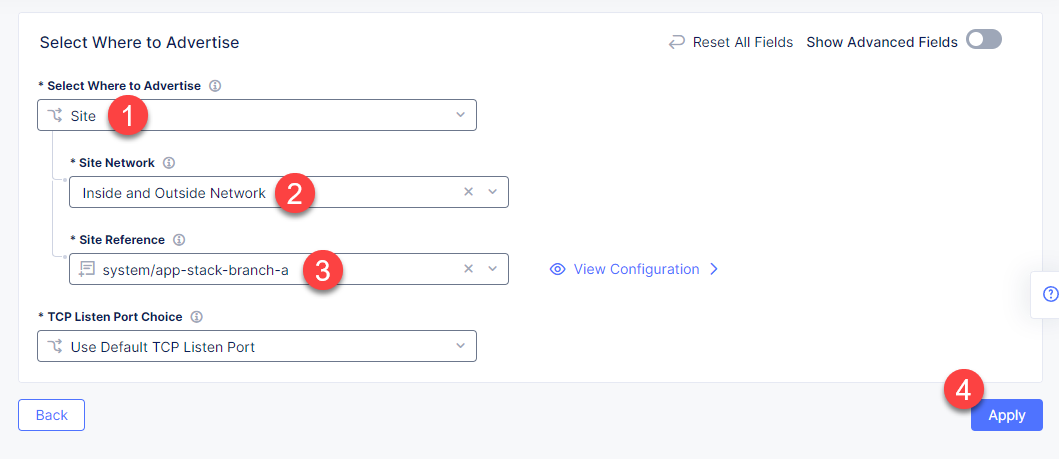
In the drop-down menu select Site as a place to advertise. Then select Inside and Outside Network for the site. And finally, select the created site app-stack-branch-a as site reference. Click Apply to add the specified configuration.
Proceed by clicking Apply. This will apply the VIP Advertisement configuration to the TCP Load Balancer.
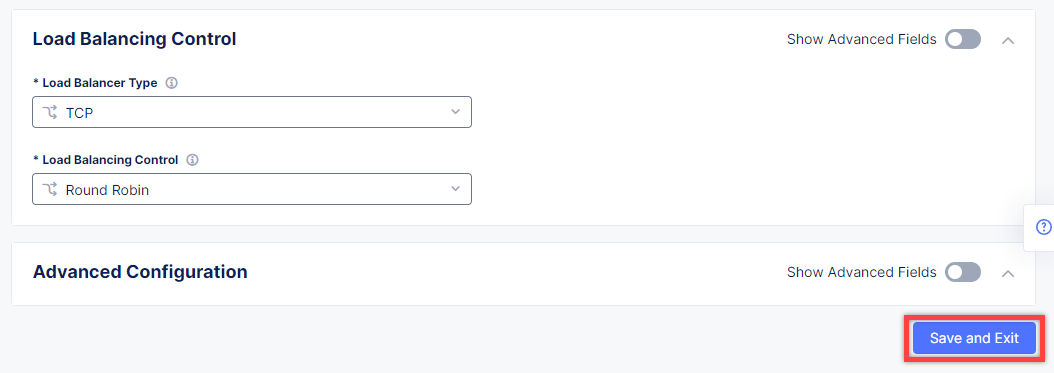
Complete creating the load balancer by clicking the Save and Exit button.
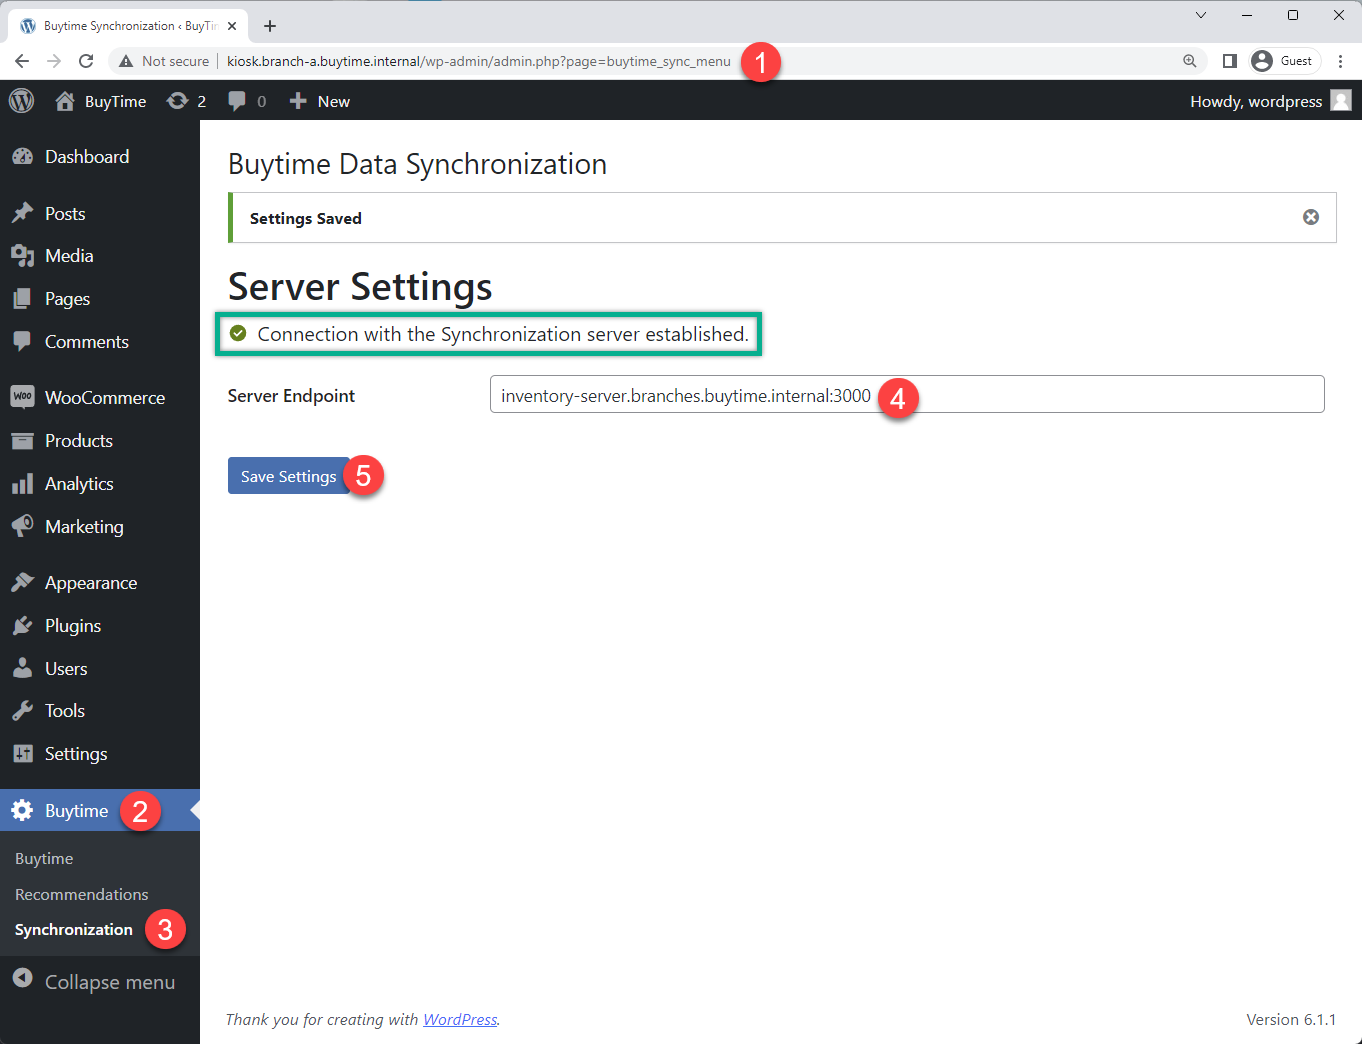
Now that the TCP LB for the synchronization module is created, we can test it. Open a browser window and go to the http://kiosk.branch-a.buytime.internal/wp-admin. In the Wordpress Admin Dashboard navigate to the Buytime option in the left panel and proceed to the Synchronization section. Then paste the inventory-server.branches.buytime.internal:3000 link and click the Save Settings button. If the connection with the synchronization module is established, you will see the corresponding message.
In this Module we are going to use Regional Edge to deploy promo service and use HTTP LB to connect it to the BuyTime Online deployment on CE. In order to do that, we will need to create a RE virtual site, assign the created RE and CE sites to the virtual K8s, after that deploy our deals module and create HTTP LB for the lightning deals.
In order to deploy online store module to the created vK8s, we need to replace online-store.f5-cloud-demo.com string with your domain name in the file ce-vk8s-online-store.yaml before running a deployment. You can do that with the following commands or manually in the text editor.
# For Linux
> sed -i 's/online-store.f5-cloud-demo.com/your_domain.example.com/g' ./deployments/ce-vk8s-online-store.yaml

# For Windows
> (Get-Content ./deployments/ce-vk8s-online-store.yaml) | ForEach-Object { $_ -replace 'online-store.f5-cloud-demo.com', 'your_domain.example.com' } | Set-Content ./deployments/ce-vk8s-online-store.yaml
> kubectl --kubeconfig ./your_vk8s_kubeconfig.yaml apply -f ./deployments/ce-vk8s-online-store.yaml

deployment.apps/mysql-deployment created
service/mysql-service created
deployment.apps/wordpress-deployment created
service/wordpress-service created
deployment.apps/online-store-deployment created
service/online-store-service created
To verify deployment we can execute following command:
> kubectl --kubeconfig ./your_vk8s_kubeconfig.yaml get deployments

NAME                              READY   UP-TO-DATE   AVAILABLE   AGE
inventory-server-deployment       1/1     1            1           15m
mysql-deployment                  1/1     1            1           5m
online-store-deployment           1/1     1            1           5m
wordpress-deployment              1/1     1            1           5m
First of all, make sure you are in the namespace created for the online store - buytime-online. Then navigate to the Load Balancers section in the left-side panel and select the HTTP Load Balancers option. Then click the Add HTTP Load Balancer button to open the creation form.
In the Name field, enter a name for the new load balancer.
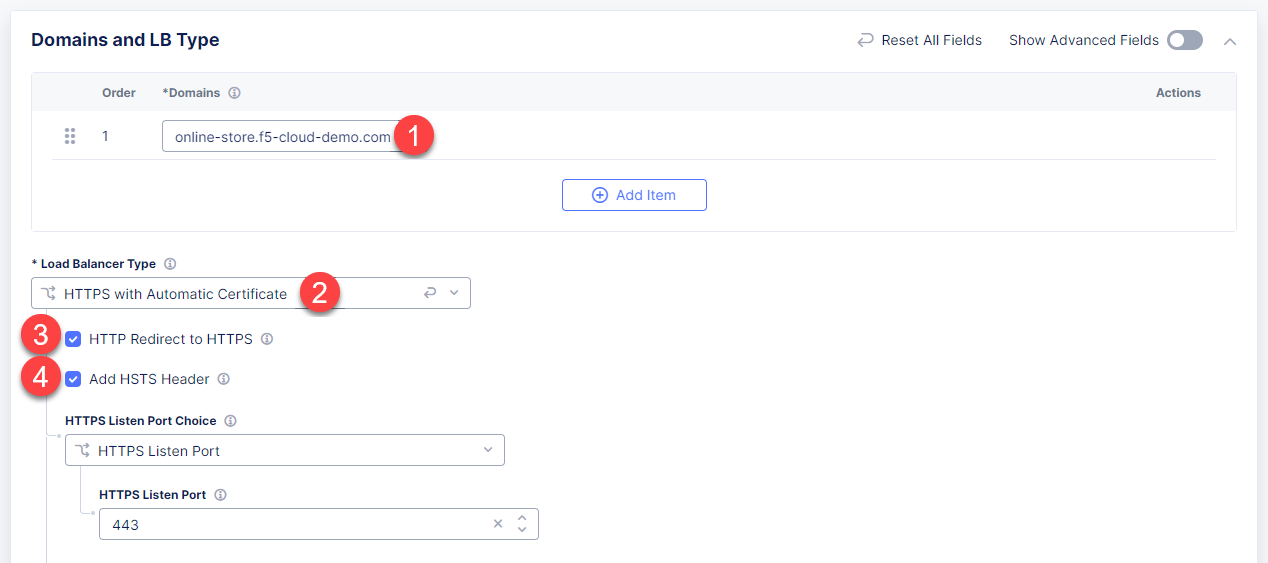
Then proceed to the Domains and LB Type section and fill in the online-store.f5-cloud-demo.com domain. Next, from the Load Balancer Type drop-down menu, select HTTPS with Automatic Certificate and enable HTTP redirecting to HTTPS and adding HSTS header by checking the boxes off.
After that move on to the Origins section and click Add Item to add an origin pool for the HTTP Load Balancer.
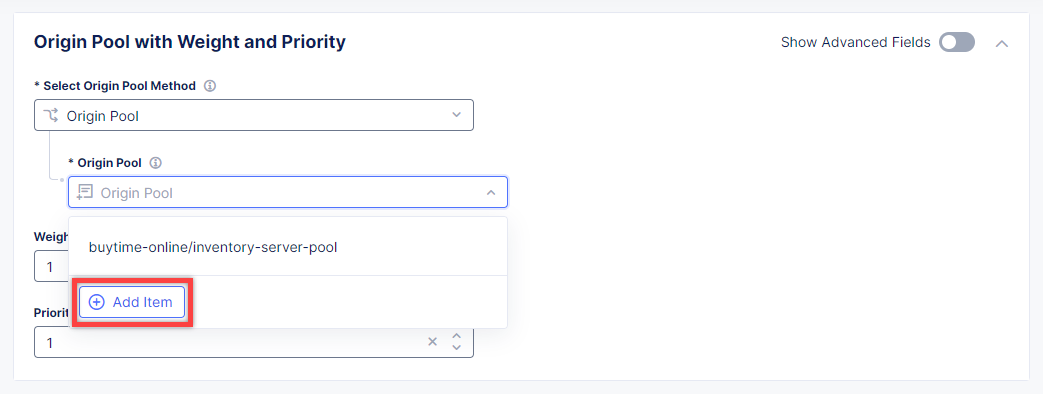
To create a new origin pool, open the drop-down menu and click Add Item.
Give origin pool a name.
To create a new origin server, click Add Item.
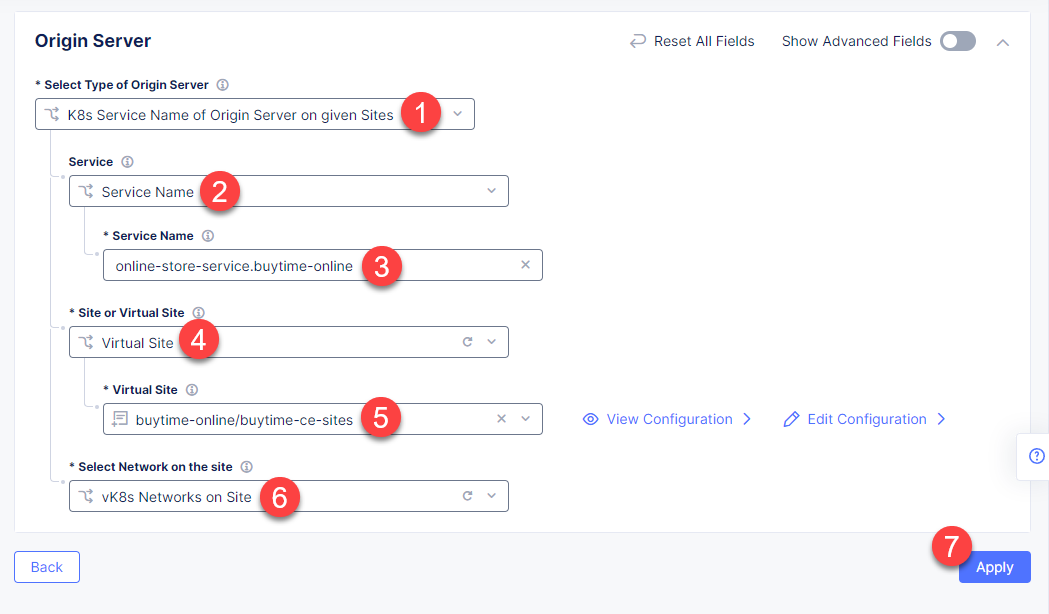
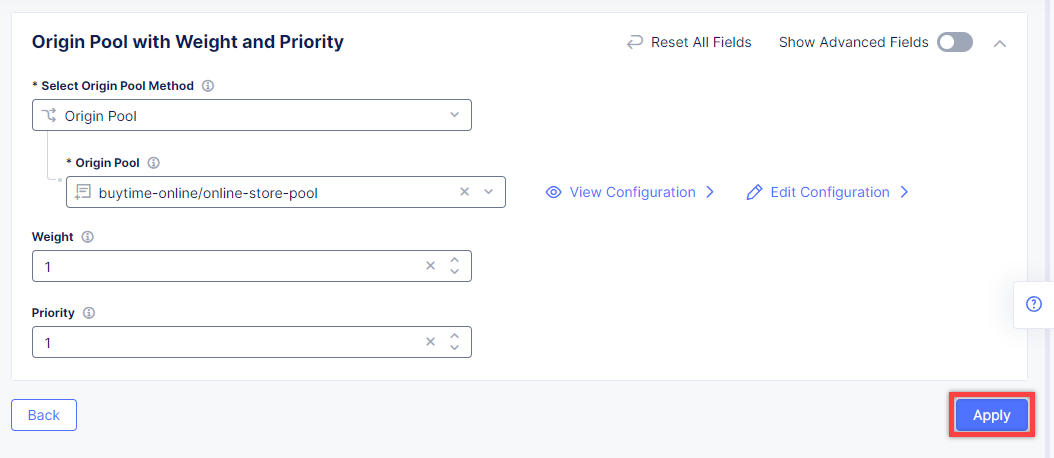
First, from the Select Type of Origin Server menu, select K8s Service Name of Origin Server on given Sites to specify the origin server with its K8s service name. Then enter the online-store-service.buytime-online service name in the Service Name field. Next, select the buytime-online/buytime-ce-sites virtual site created earlier. After that open the Select Network on the site menu and select vK8s Networks on Site which means that the origin server is on vK8s network on the site and, finally, click Apply.
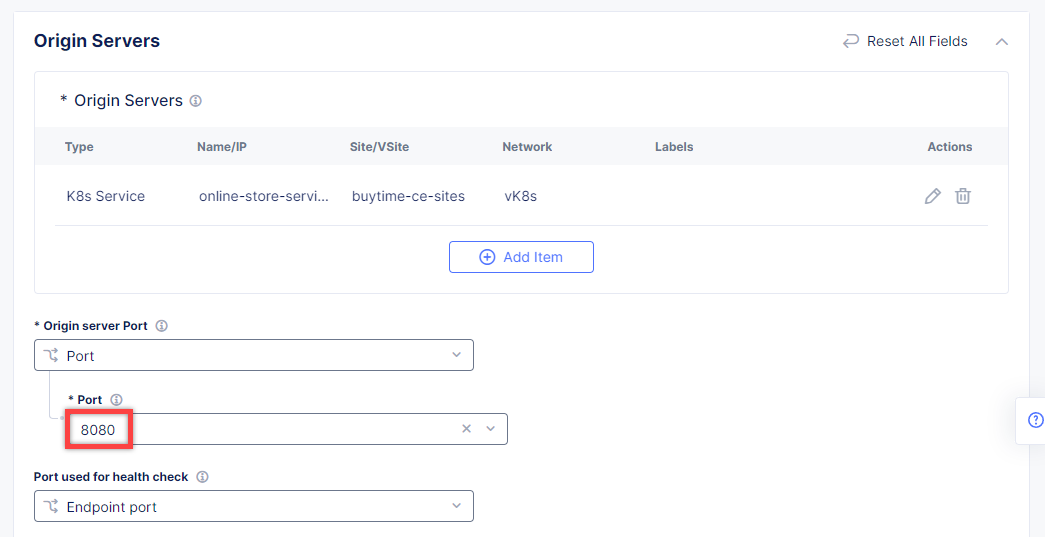
Back on the Origin Pool page, type in the 8080 Origin server Port.
Scroll down and click Continue to move on to apply the origin pool configuration.
Click the Apply button to apply the origin pool configuration to the HTTP Load Balancer.
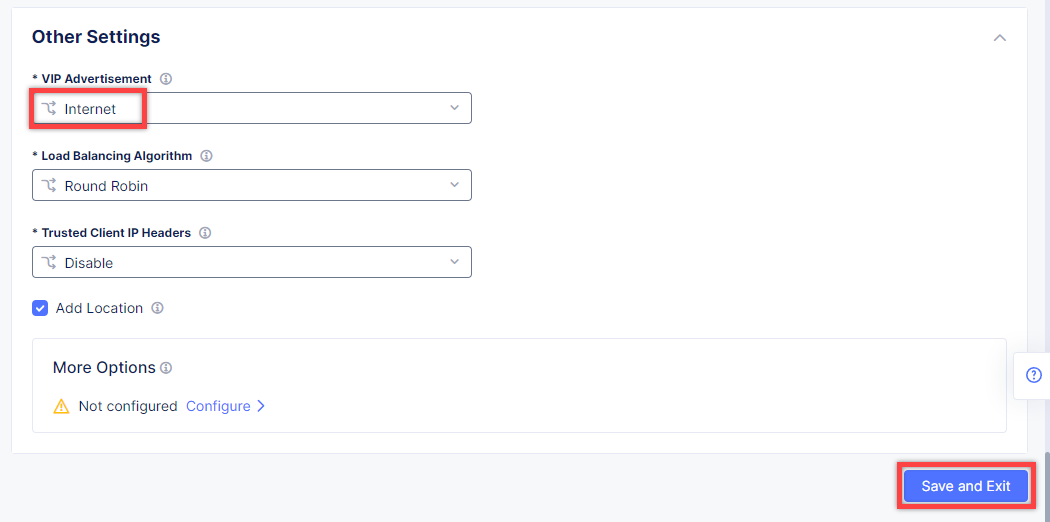
Finally, open the VIP Advertisement menu and select Internet for VIP Advertisement, which will advertise this load balancer on public network with default VIP. Complete creating the load balancer by clicking the Save and Exit button.
Distributed Cloud Services support automatic certificate generation and management. You can either delegate your domain to Distributed Cloud Services or add the CNAME record to your DNS records in case you do not delegate the domain to Distributed Cloud Services. See Automatic Certificate Generation for certificates managed by Distributed Cloud Services. See Delegate Domain for more information on how to delegate your domain to Distributed Cloud Services.
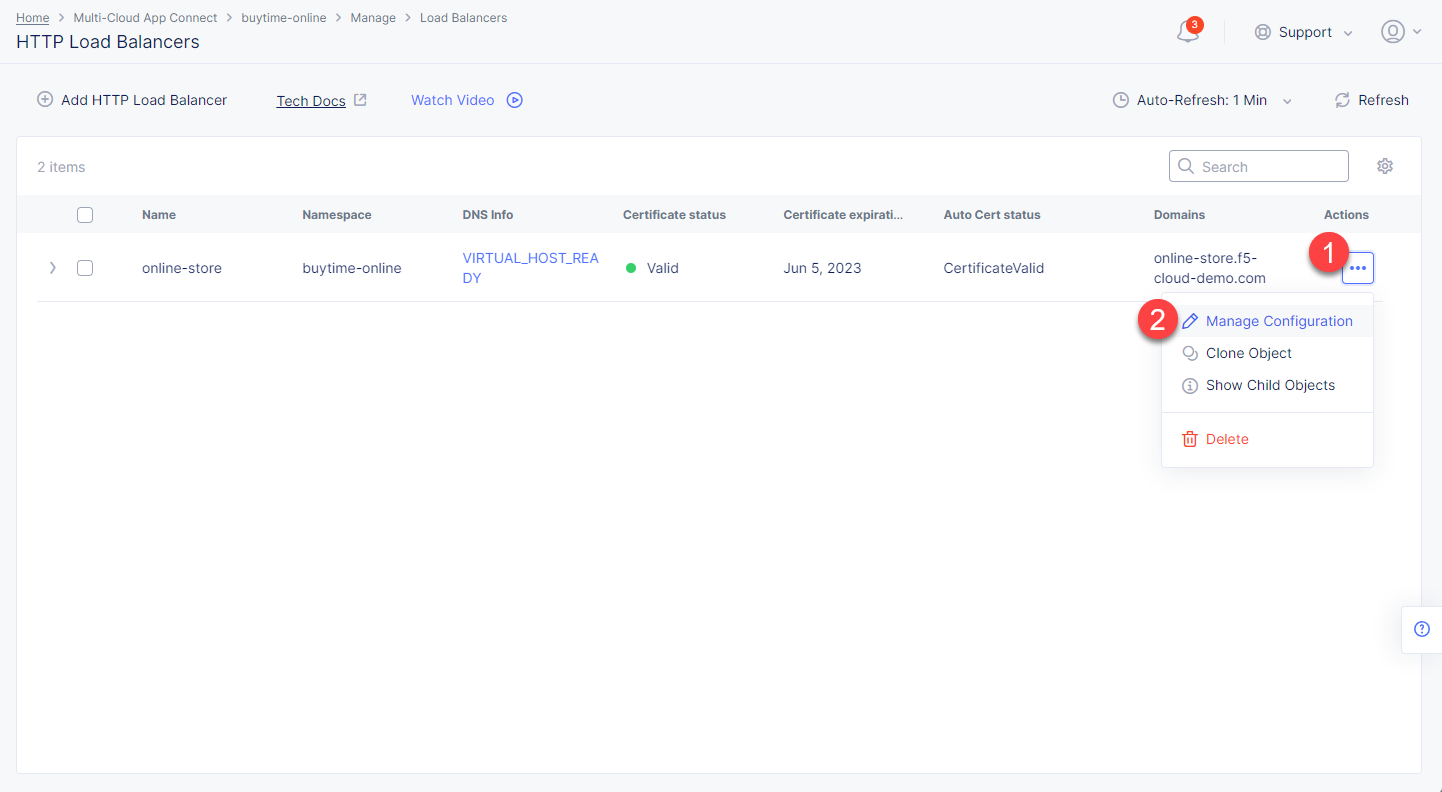
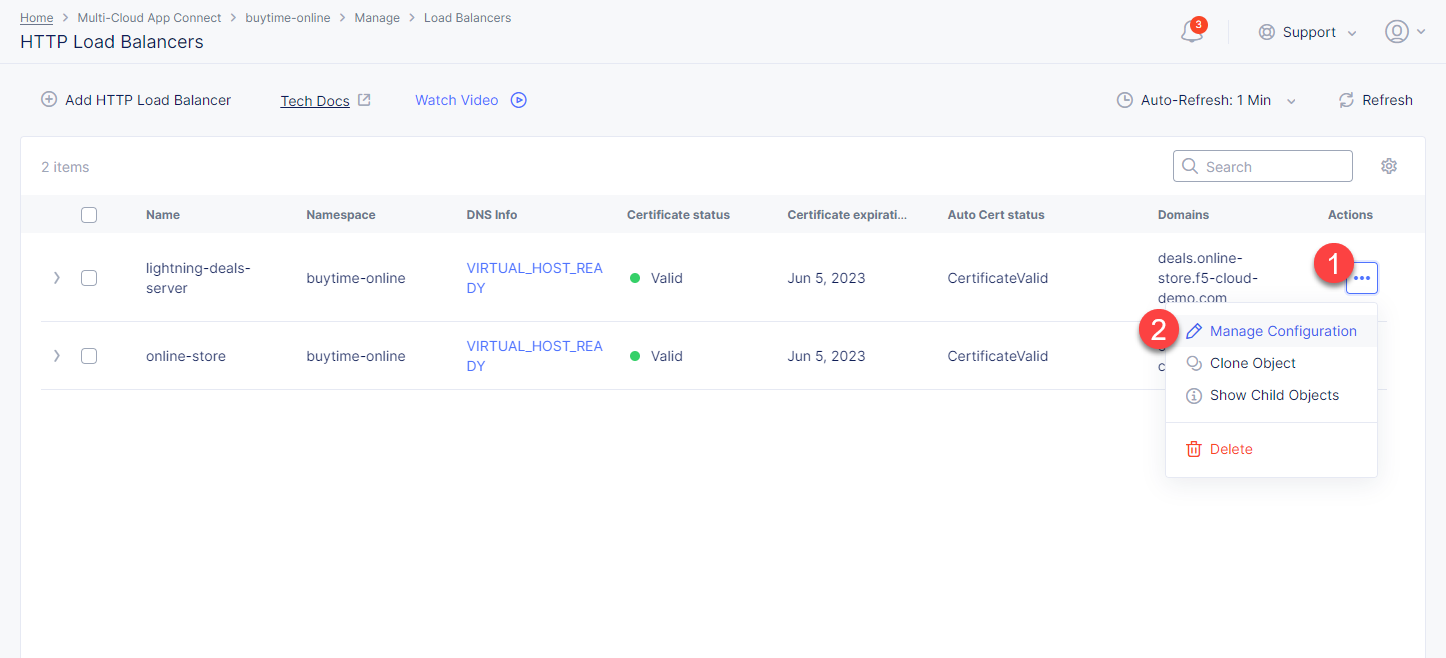
If you don't use Delegated Domain, then open the menu of the created HTTP LB and proceed to Manage Configuration.
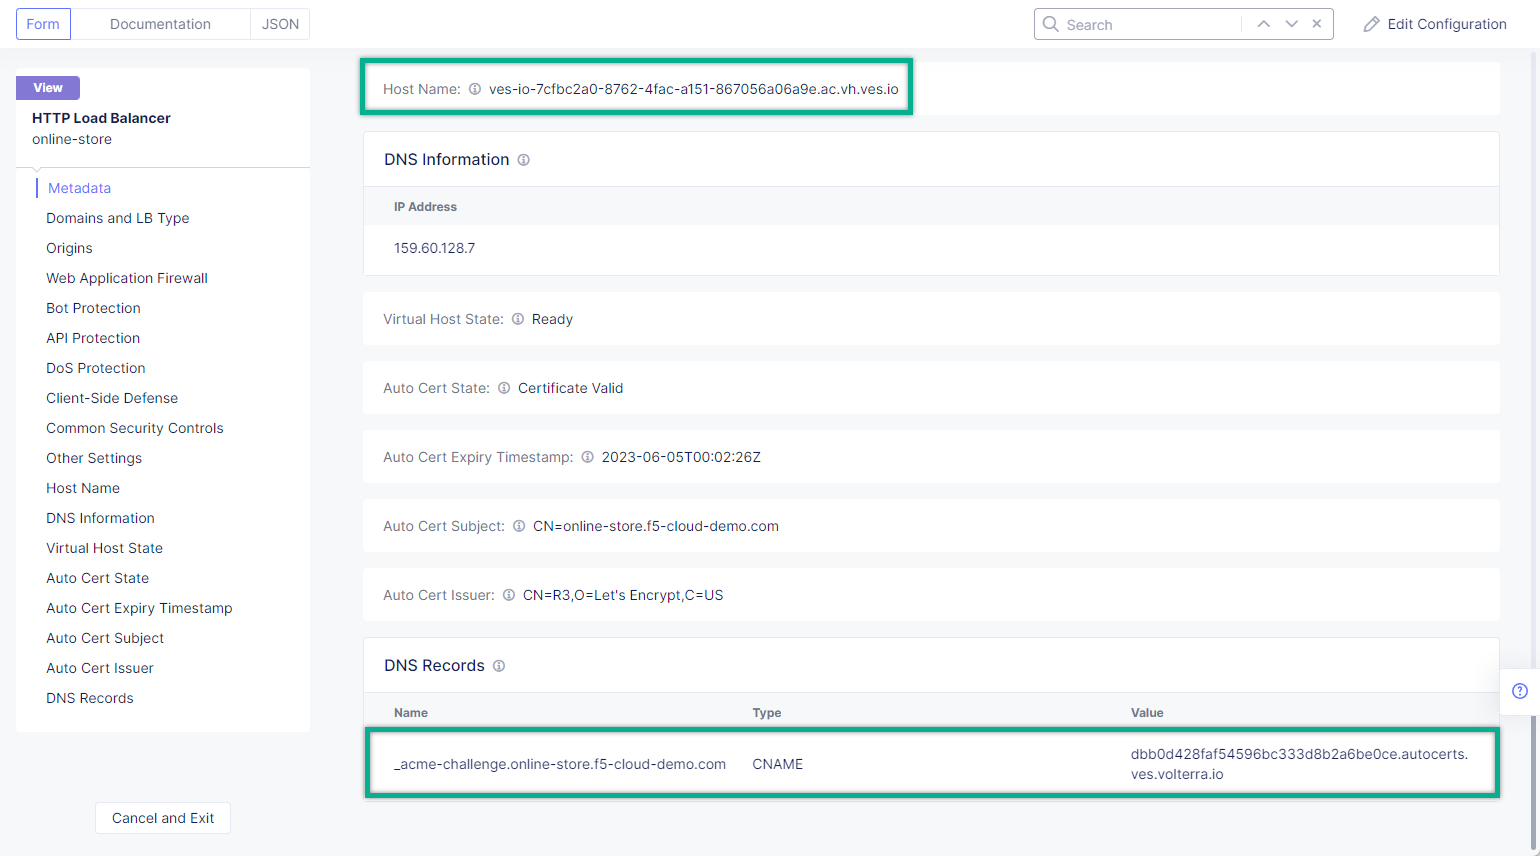
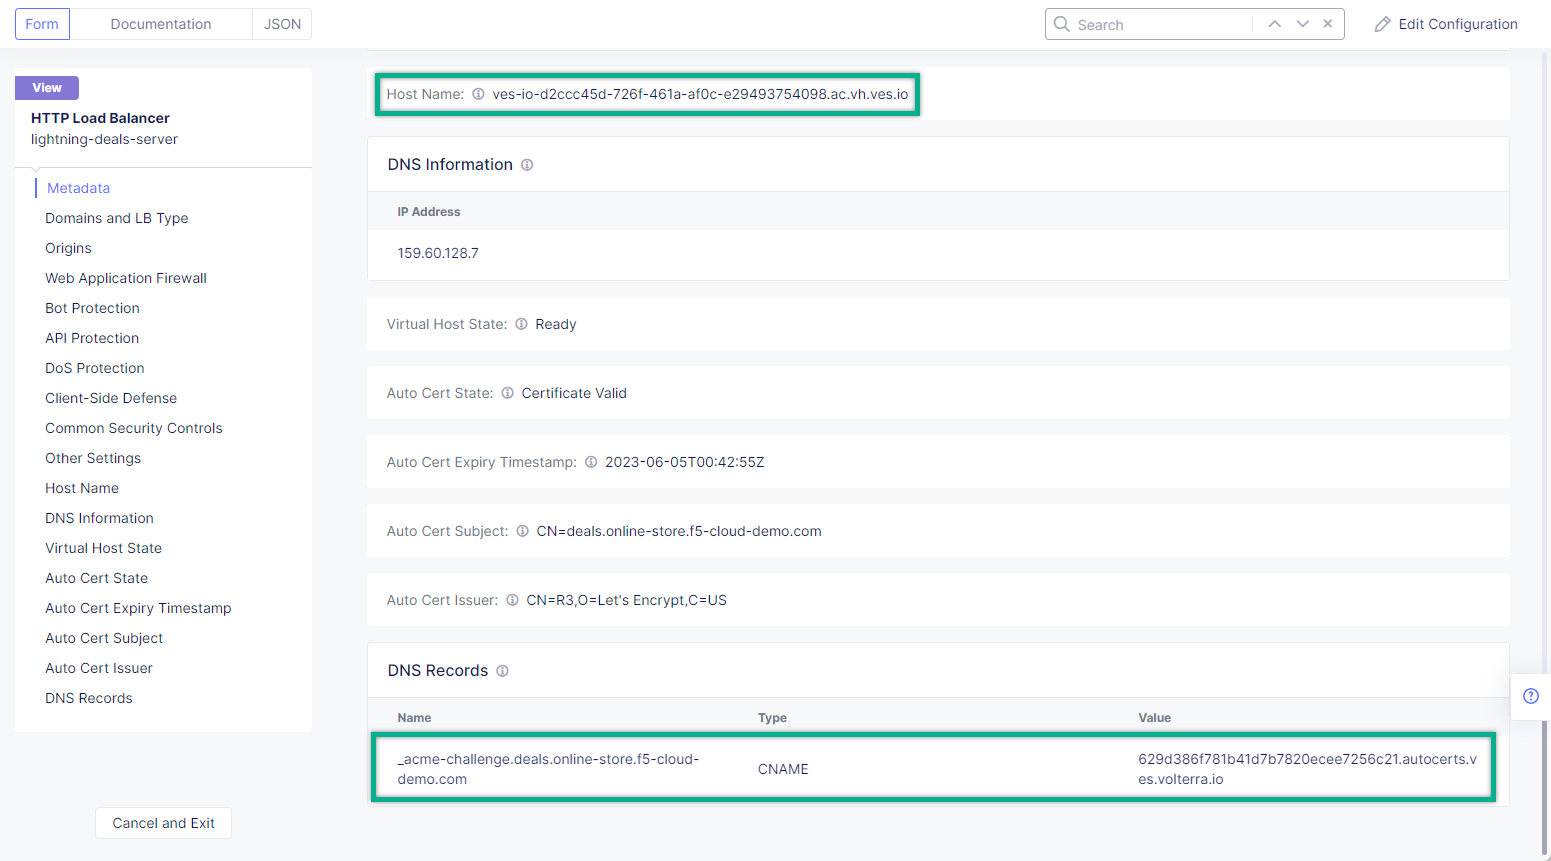
Create required CNAME Records on your DNS Provider.
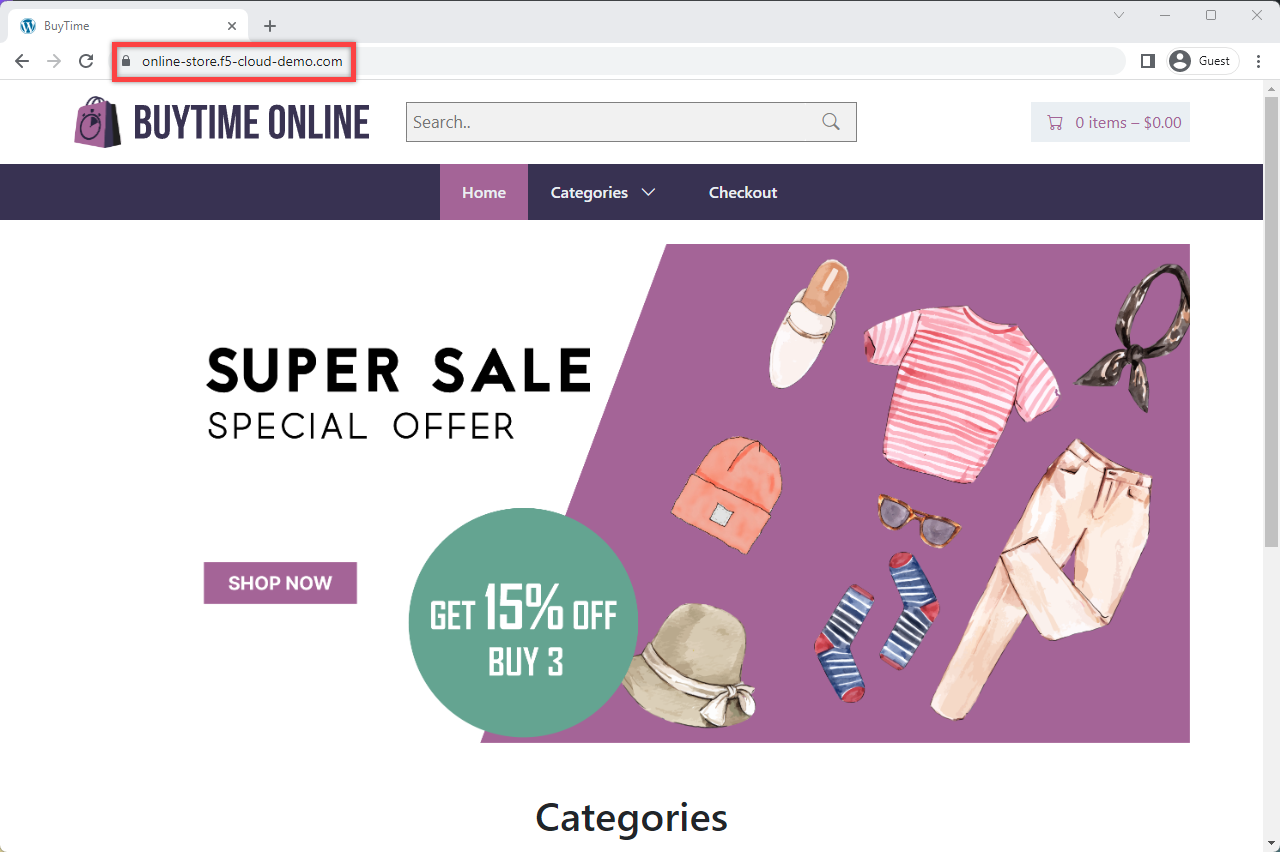
Let's now go to the deployed online store module and test it. Open a browser window and proceed to the http://online-store.f5-cloud-demo.com/ indicated as a domain for the HTTP LB. You can see the online store up and running.
Navigate to Virtual Sites in the Manage section. After that click Add Virtual Site to load the creation form.
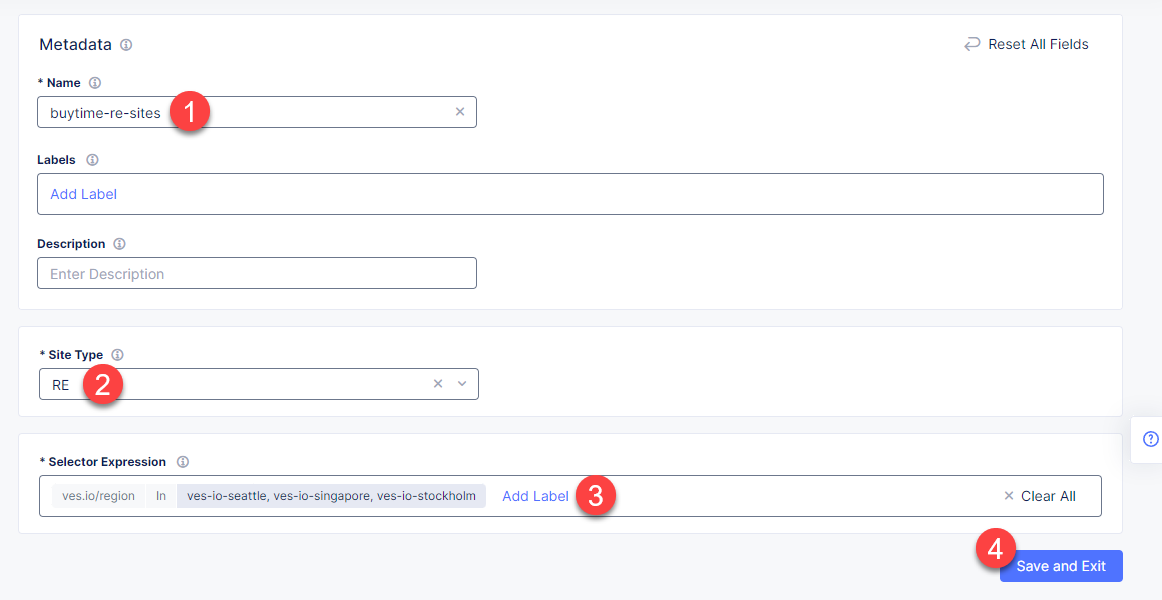
In the Metadata section Name field, enter a virtual site name. In the Site Type section, select the RE site type from the drop-down menu, and then move on to adding label. Select the ves.io/region key identifying region assigned to the site, select the In operator and then select the values ves-io-seattle, ves-io-singapore and ves-io-stockholm. Complete the process by clicking the Save and Exit button.
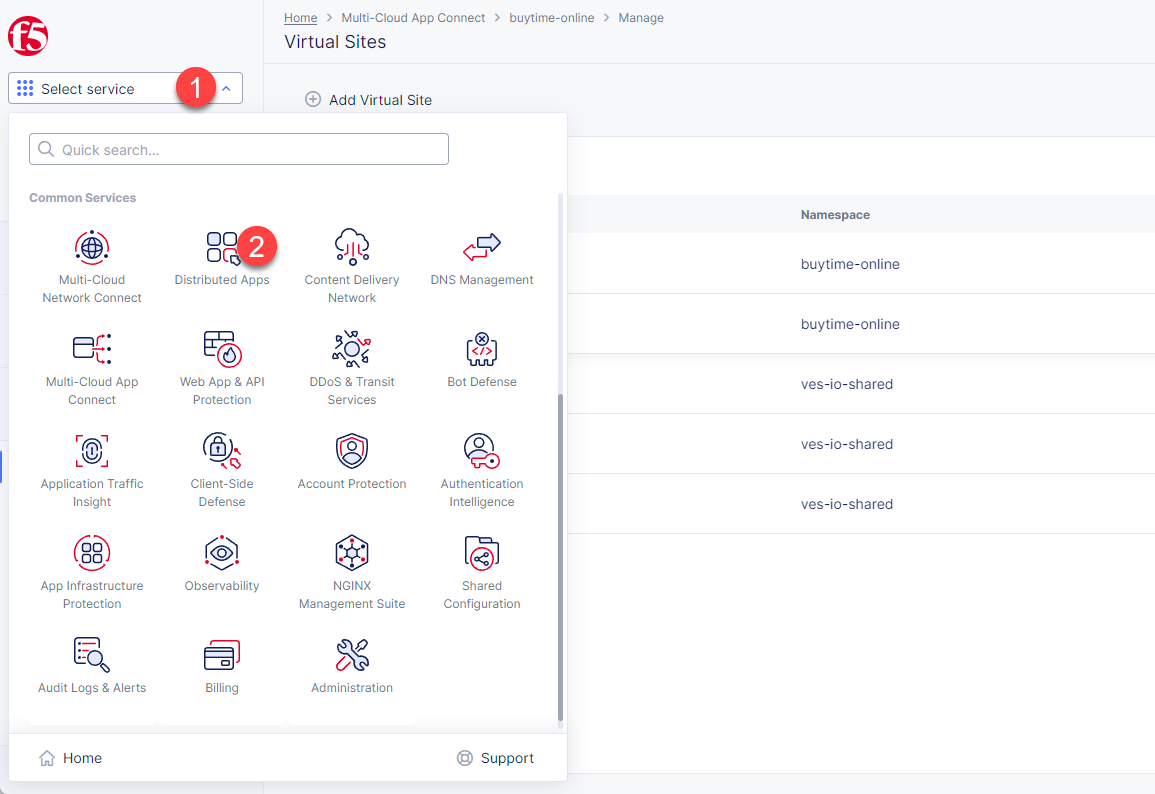
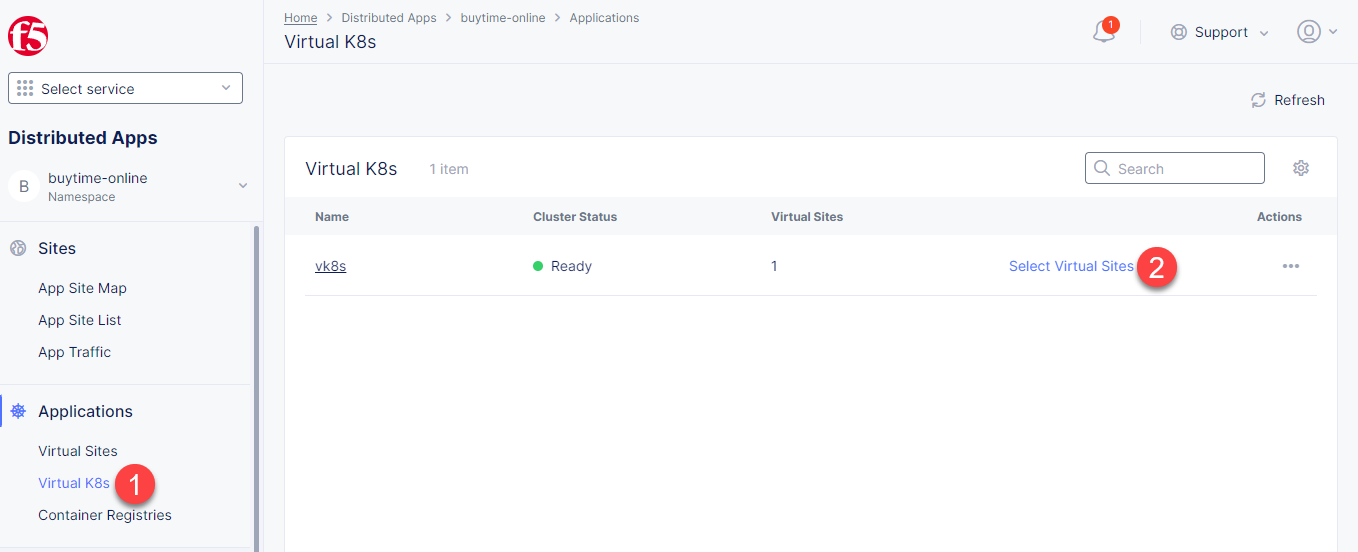
Let's now assign the created RE & CE sites to the virtual K8s. Open the Service menu and proceed to the Distributed Apps service.
Navigate to Virtual K8s in the left-side panel and click Select Virtual Sites.
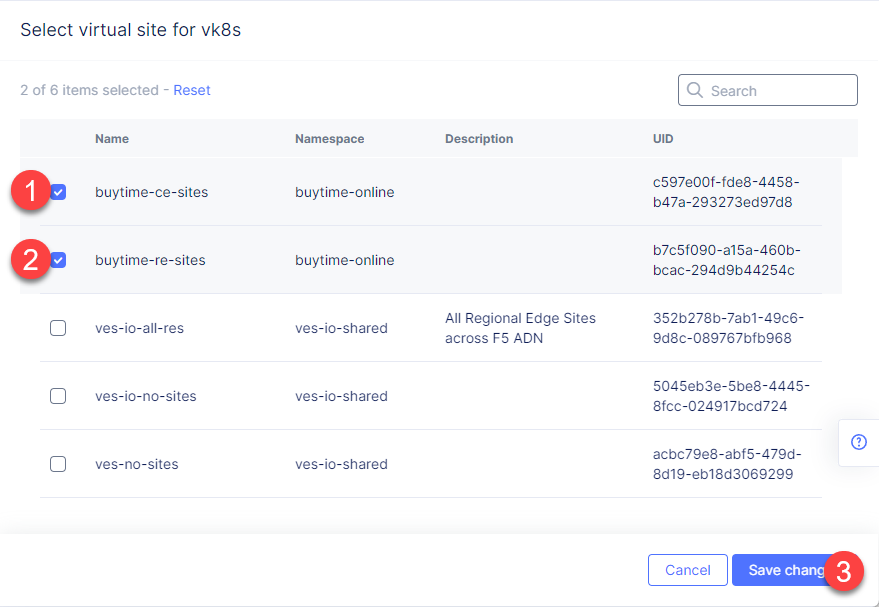
In the opened list select RE and CE sites created earlier and click the Save Changes button.
Next, we need to deploy the deals module to the virtual K8s with the RE and CE assigned virtual sites. To do that, run the following command:
> kubectl --kubeconfig ./your_vk8s_kubeconfig.yaml apply -f ./deployments/re-vk8s-deals.yaml

deployment.apps/deals-server-deployment created
service/deals-server-service created
To verify deployment we can execute the following command:
> kubectl --kubeconfig ./your_vk8s_kubeconfig.yaml get deployments

NAME                              READY   UP-TO-DATE   AVAILABLE   AGE
deals-server-deployment           3/1     3            3           5m
inventory-server-deployment       1/1     1            1           25m
mysql-deployment                  1/1     1            1           10m
online-store-deployment           1/1     1            1           10m
wordpress-deployment              1/1     1            1           10m
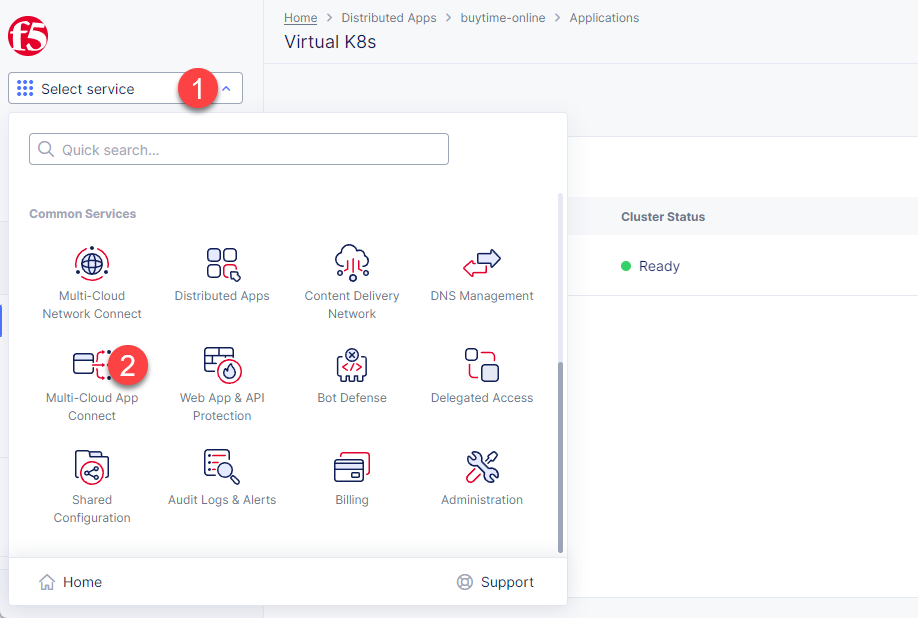
In this section of Module 3 we will create and use HTTP LB to connect the promo service to the BuyTime Online deployment. Open the Service menu and proceed to the Multi-Cloud App Connect service.
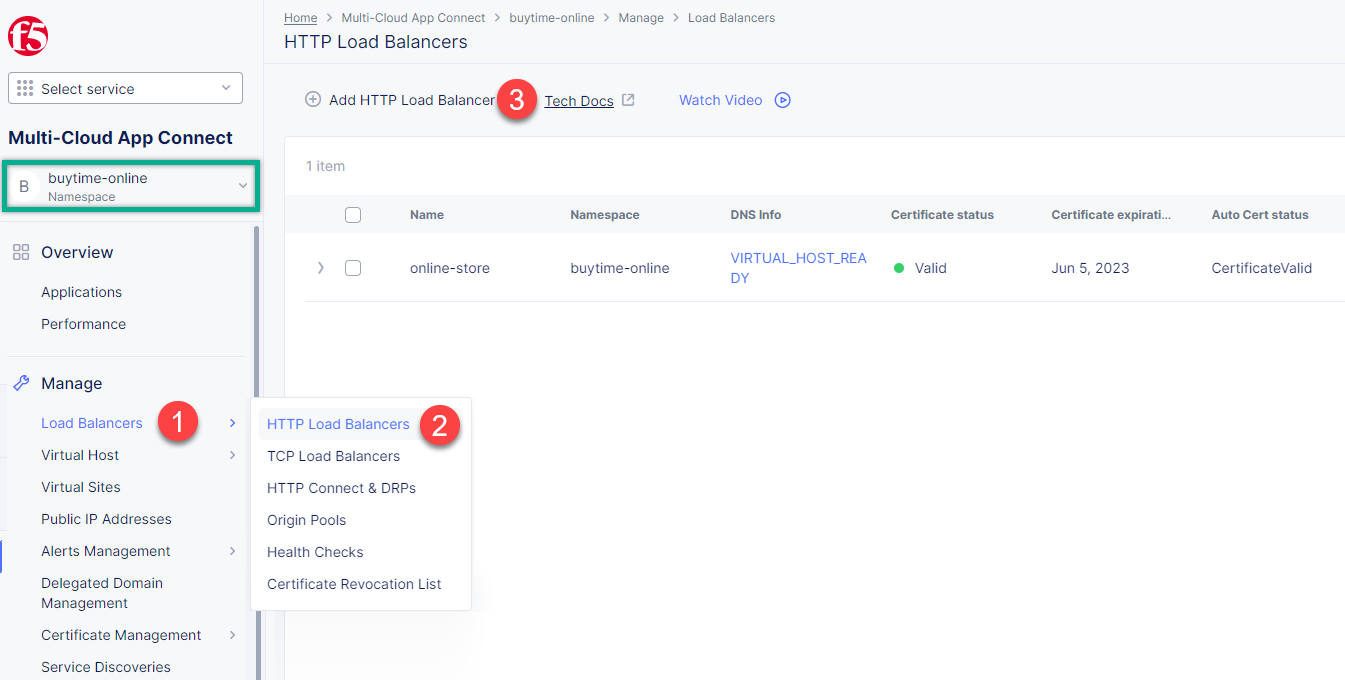
Make sure to select the namespace created for the online store - buytime-online. Then navigate to the Load Balancers section in the left-side panel and select the HTTP Load Balancers option. Then click the Add HTTP Load Balancer button to open the creation form.
In the Name field, enter a name for the new load balancer.
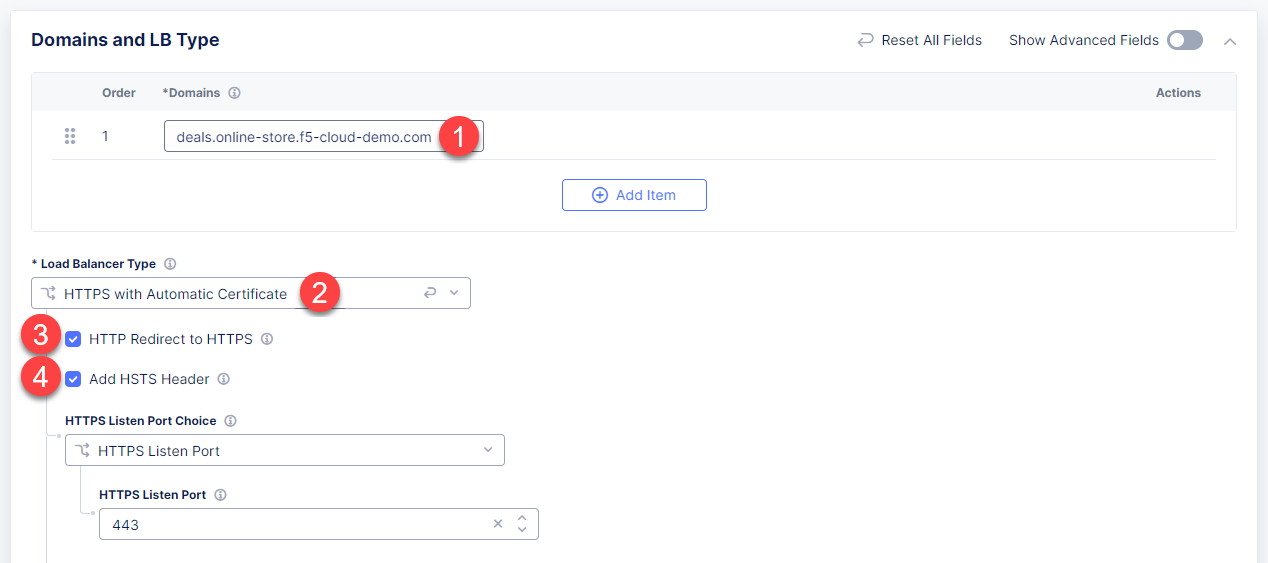
Then proceed to the Domains and LB Type section and fill in the deals.online-store.f5-cloud-demo.com domain. Next, from the Load Balancer Type drop-down menu, select HTTPS with Automatic Certificate and enable HTTP redirecting to HTTPS and adding HSTS header by checking the boxes off.
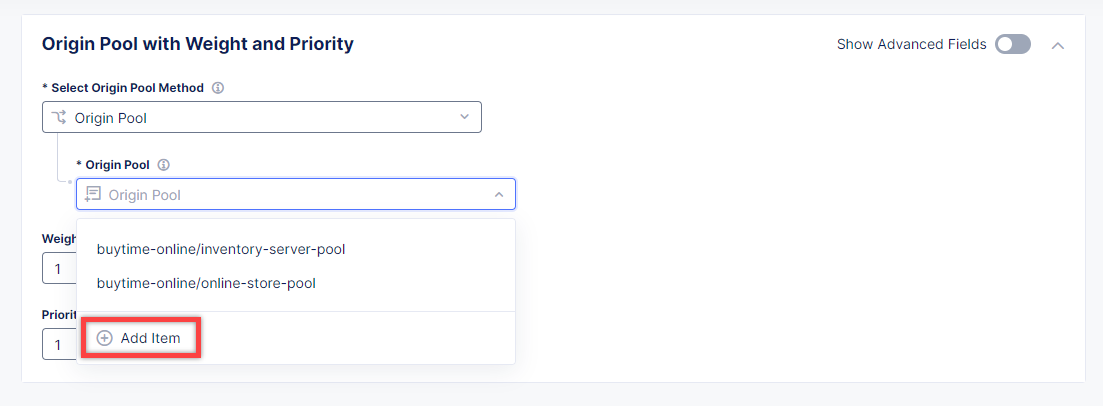
After that move on to the Origins section and click Add Item to add an origin pool for the HTTP Load Balancer.
To create a new origin pool, open the drop-down menu and click Add Item.
Give origin pool a name.
To create a new origin server, click Add Item.
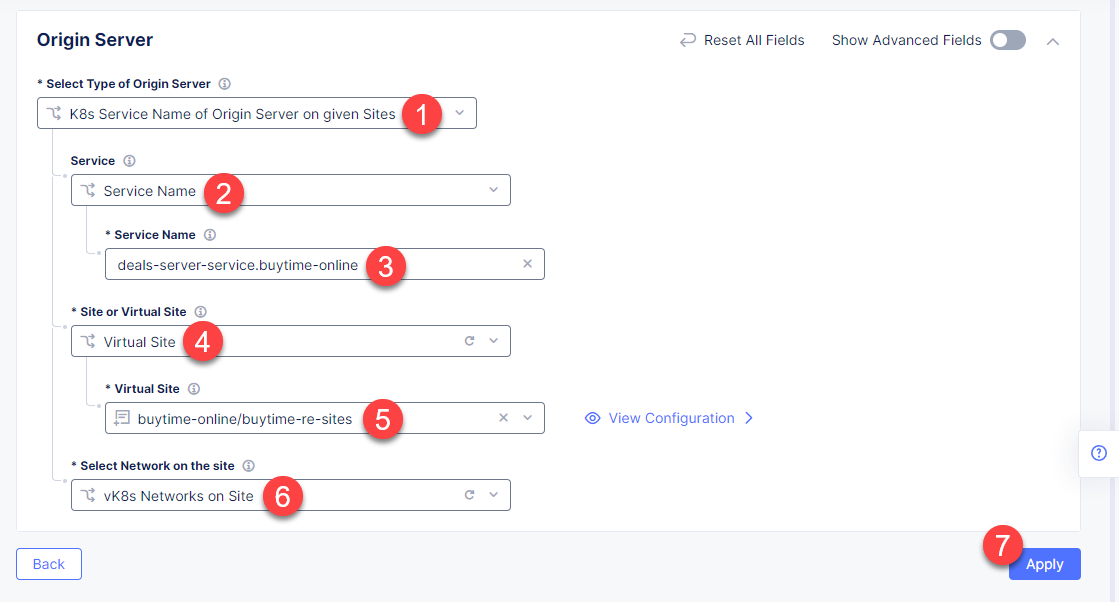
First, from the Select Type of Origin Server menu, select K8s Service Name of Origin Server on given Sites to specify the origin server with its K8s service name. Then enter the deals-server-service.buytime-online service name in the Service Name field. Next, select the buytime-online/buytime-re-sites virtual site created earlier. After that open the Select Network on the site menu and select vK8s Networks on Site which means that the origin server is on vK8s network on the site and, finally, click Apply.
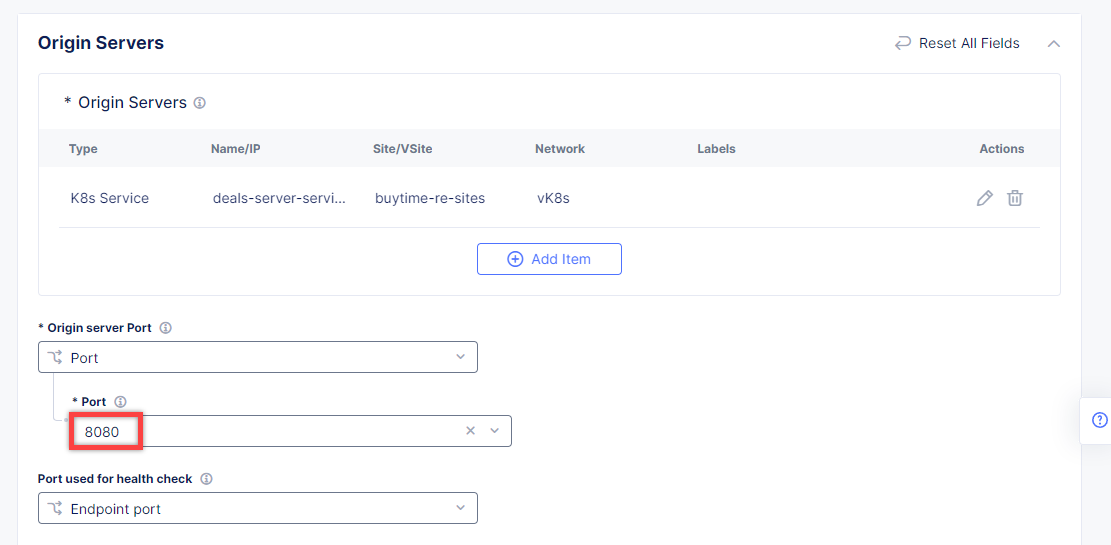
Back on the Origin Pool page, type in the 8080 Origin server Port.
Scroll down and click Continue to move on to apply the origin pool configuration.
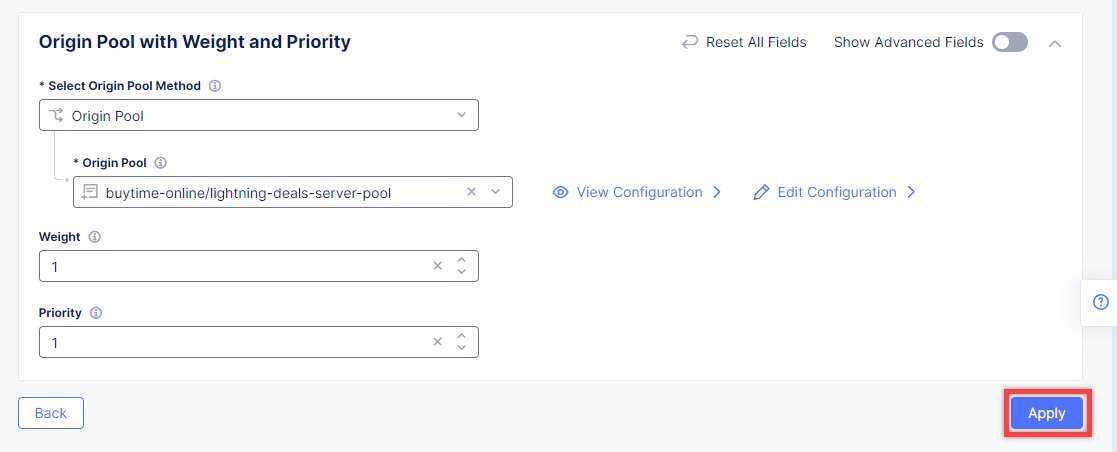
Click the Apply button to apply the origin pool configuration to the HTTP Load Balancer.
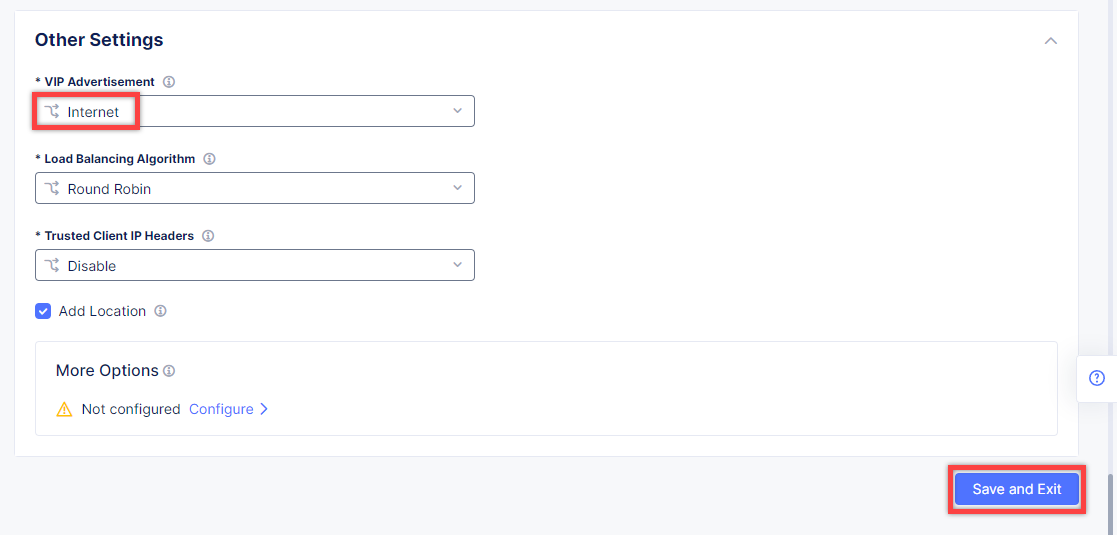
Finally, open the VIP Advertisement menu and select Internet for VIP Advertisement, which will advertise this load balancer on public network with default VIP. Complete creating the load balancer by clicking the Save and Exit button.
Use Delegated Domain or create required CNAME records like in the Create HTTP LB for online store section.
Required CNAME Records are highlighted.
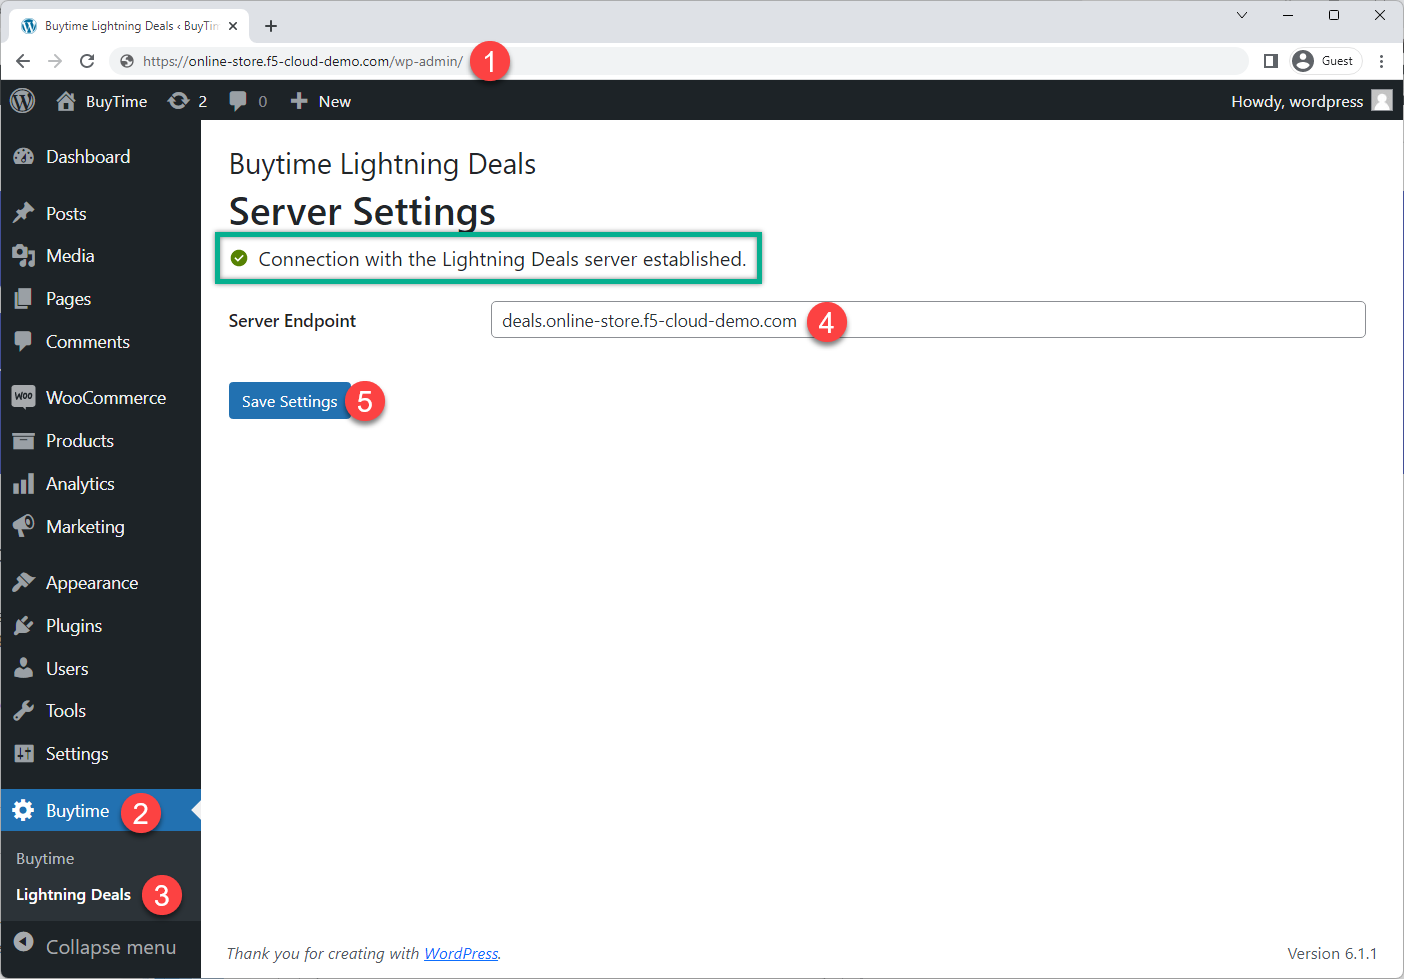
Now that the HTTP LB for the promo service is created and the promo service is connected to the BuyTime Online deployment, we can test it. Open a browser window and go to the http://online-store.f5-cloud-demo.com/wp-admin. In the Wordpress Admin Dashboard navigate to the Buytime plugin in the left panel and proceed to the Lightning Deals section. Then paste the deals.online-store.f5-cloud-demo.com link and click the Save Settings button. If the connection with the Lightning deals module is established, you will see the corresponding message.
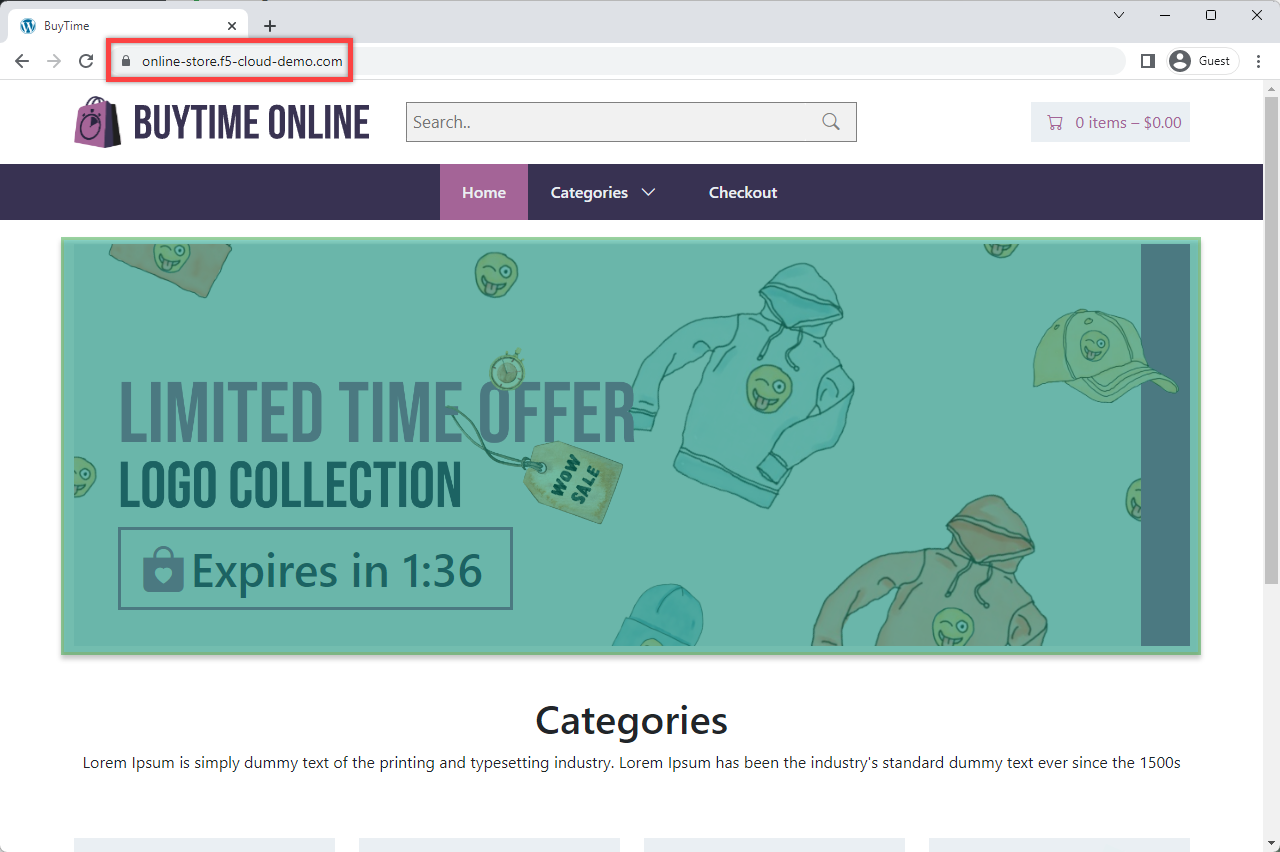
And finally, let's go to the site and test the deployed Lightning deals module. Open a browser window and follow the http://online-store.f5-cloud-demo.com/ link. As we can see, the promo service is up and running.
At this stage, you should have deployed a WooCommerce sample app which is representative of a traditional 3-tier app architecture: backend + database + frontend. The F5 Distributed Cloud Services provided easy deployment and secure networking of these app services to realize a distributed app model, spanning across: CE public cloud, Retail Branch (AppStack on a private cloud), an RE. Our fictitious retailer BuyTime is set up to use xC AppStack and has a consistent deployment topology for an in-store Kiosk shopping experience. This topology can run in multiple Retail Branches with identical configuration, management, and security policy applied.
We hope you have a better understanding of the F5 Distributed Cloud platform (xC) capabilities and are now ready to implement them for your own organization. Should you have any issues or questions, please feel free to raise them via GitHub. Thank you!
