- Develop -

- Staging -

- Production -

ImpactQL is a GraphQL server, that enables rapid development of serverless impact project applications. It does this by taking care of the persistance of impact project data.
git clone git@github.com:topiahq/impact-graph.git
cd impact-graph

// we specified version in .nvmrc file, so when you just enter nvm use it will use exact version of required npm
nvm use

// You should have installed chromium on your system, it can be installed by your or package maneger (apt,brew, ..)
npm i
// If you had problem on npm install, you can see https://stackoverflow.com/a/66044814/9372962 (Mac os users)
cp config/example.env config/development.env
Edit the config/development.env file in your favorite code editor and the environmental variables
Create a database (we recommend Postgres) on your computer or server, we currently support for MySQL, MariaDB, Postgres, MongoDB and SQLite.
Or if you want, you can run the docker-compose like this:
docker-compose -f docker-compose-local-postgres-redis.yml up -d
and put these to your development.env
TYPEORM_DATABASE_TYPE=postgres
TYPEORM_DATABASE_NAME=givethio
TYPEORM_DATABASE_USER=postgres
TYPEORM_DATABASE_PASSWORD=postgres
TYPEORM_DATABASE_HOST=localhost
TYPEORM_DATABASE_PORT=5442
npm start
In localhost and test we put logs in console and file but in production and staging we just use file for writing logs You can see logs beautifully with this command
 npm i -g bunyan
 tail -f logs/impact-graph.log |bunyan
We enable impact projects to use our installation securely and privately for free, reach out for more details
If this is more important you and your have the resources, deploy your own version of this
- An open source solution that enables you to keep control of your data
- Supports Bring Your Own Database (BYOD) and can be used with any database
- Built-in support for MySQL, MariaDB, Postgres, MongoDB and SQLite
- Works great with databases from popular hosting providers
The aim is to give a single entry point into any persistance solution that you want to use for your data.
The aim is for something like this:

We have so far only implemented these databases - MySQL, MariaDB, Postgres, MongoDB and SQLite
The first use case we are building is user registration and putting projects in the database
There are many strategies available for authentication
- Designed to work with any OAuth service, it supports OAuth 1.0, 1.0A and 2.0
- Built-in support for many popular OAuth sign-in services
- Supports both JSON Web Tokens
If you want to see examples you can read test cases or see Graphql queries
We use AdminJS for Admin dashboard
You should navigate to /admin for browsing admin panel.
in your local database you can hash a desired password with BCRYPT_SALT that is in your config/development.env with
bcrypt then you set that value in encryptedPassword of your user in DB and
change role of user to admin in db
Now you can login in admin dashboard with your user's email and the password you already set
We wrote a migration file to create an admin user in local DB to can test it easily, so after executing migrations and run application you can navigate to http://localhost:4000/admin and login with this data
- admin role: *
username: test-admin@giveth.io,password: admin - campaignManager role: *
username: campaignManager@giveth.io,password: admin - reviewer role: *
username: reviewer@giveth.io,password: admin - operator role: *
username: operator@giveth.io,password: admin
PS: A simple script for create encryptedPassword
const bcrypt = require('bcrypt');

bcrypt.hash(
  'yourPassword',
  Number('yourSalt'),
).then(hash => {console.log('hash',hash)}).catch(e=>{console.log("error", e)});
Add admin user to DB query
INSERT INTO public.user (email, "walletAddress", role,"loginType", name,"encryptedPassword") VALUES
('test@giveth.io', 'walletAddress', 'admin','wallet', 'test', 'aboveHash')
Default loggin is done by Apollo Graph Manager To make use of it you need to use register and provide a key in APOLLO_KEY in your .env file.
Dropping and seeding the database can be done like this during testing:
DROP_DATABASE=true
SEED_DATABASE=true
After a site is live or if you want to keep your database you need to use database migrations.
This can be done either by creating a new migration file with:
npx typeorm-ts-node-commonjs migration:create ./migration/create_organization_tokens_token_table
npm run db:migrate:run:local
If you want to revert last migration :
npm run db:migrate:revert:local
For running tests you need to register infura and etherscan api-key, and you should pass this environment variables
PINATA_API_KEY=0000000000000 PINATA_SECRET_API_KEY=00000000000000000000000000000000000000000000000000000000 ETHERSCAN_API_KEY=0000000000000000000000000000000000 XDAI_NODE_HTTP_URL=https://xxxxxx.xdai.quiknode.pro INFURA_API_KEY=0000000000000000000000000000000000 npm run test
Please before committing your changes run
npm run prettify to fix eslint and prettify warnings
You will need to add the above command to your build process so that all database migrations are run upon deployments.
You can generate table with this site https://www.tablesgenerator.com/markdown_tables
| id | symbol | name | description | Who can change to |
|---|---|---|---|---|
| 1 | rejected | rejected | his project has been rejected by Giveth or platform owner, We dont use it now | |
| 2 | pending | pending | This project is created, but pending approval, We dont use it now | |
| 3 | clarification | clarification | Clarification requested by Giveth or platform owner, We dont use it now | |
| 4 | verification | verification | Verification in progress (including KYC or otherwise), We dont use it now | |
| 5 | activated | activated | This is an active project | project owner and admin |
| 6 | deactivated | deactivated | Deactivated with user or Giveth Admin | project owner and admin |
| 7 | cancelled | cancelled | Cancelled by Giveth Admin | admin |
| 8 | drafted | drafted | This project is created as a draft for a potential new project, but can be discarded | project owner |
PS
- If a project is cancelled just admin can activate that
- If project is deactive both admins and project owner can activate it
- Both admins and project owner can deactivate an active project
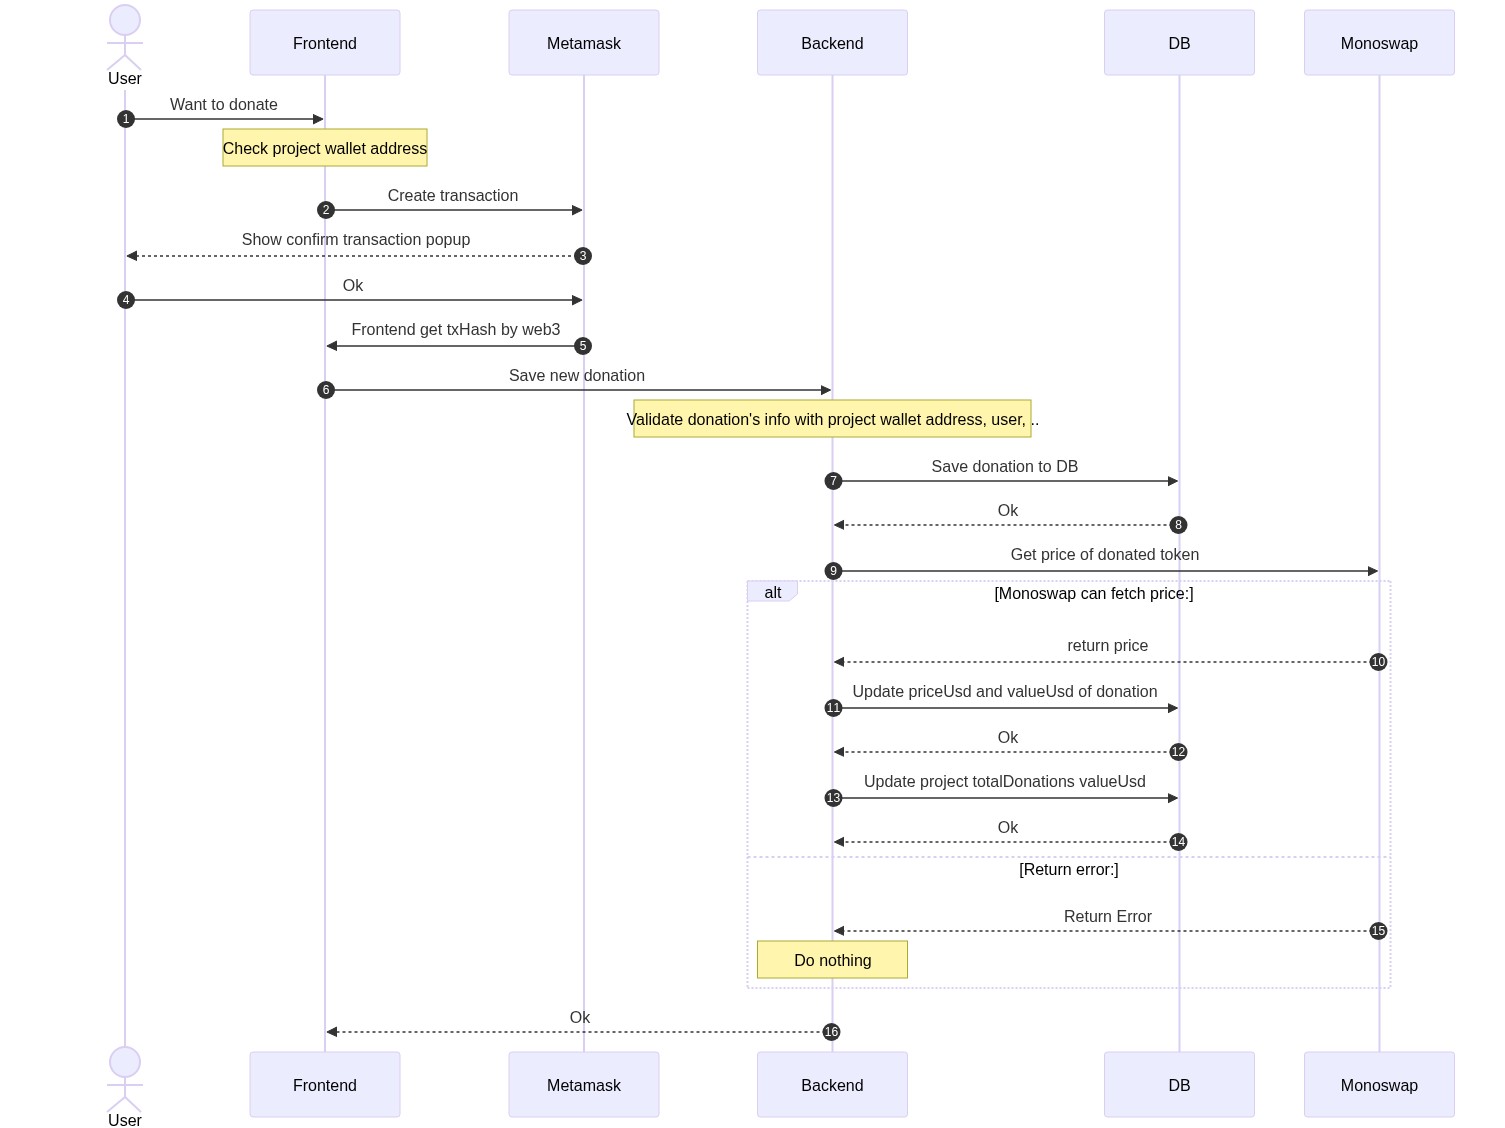
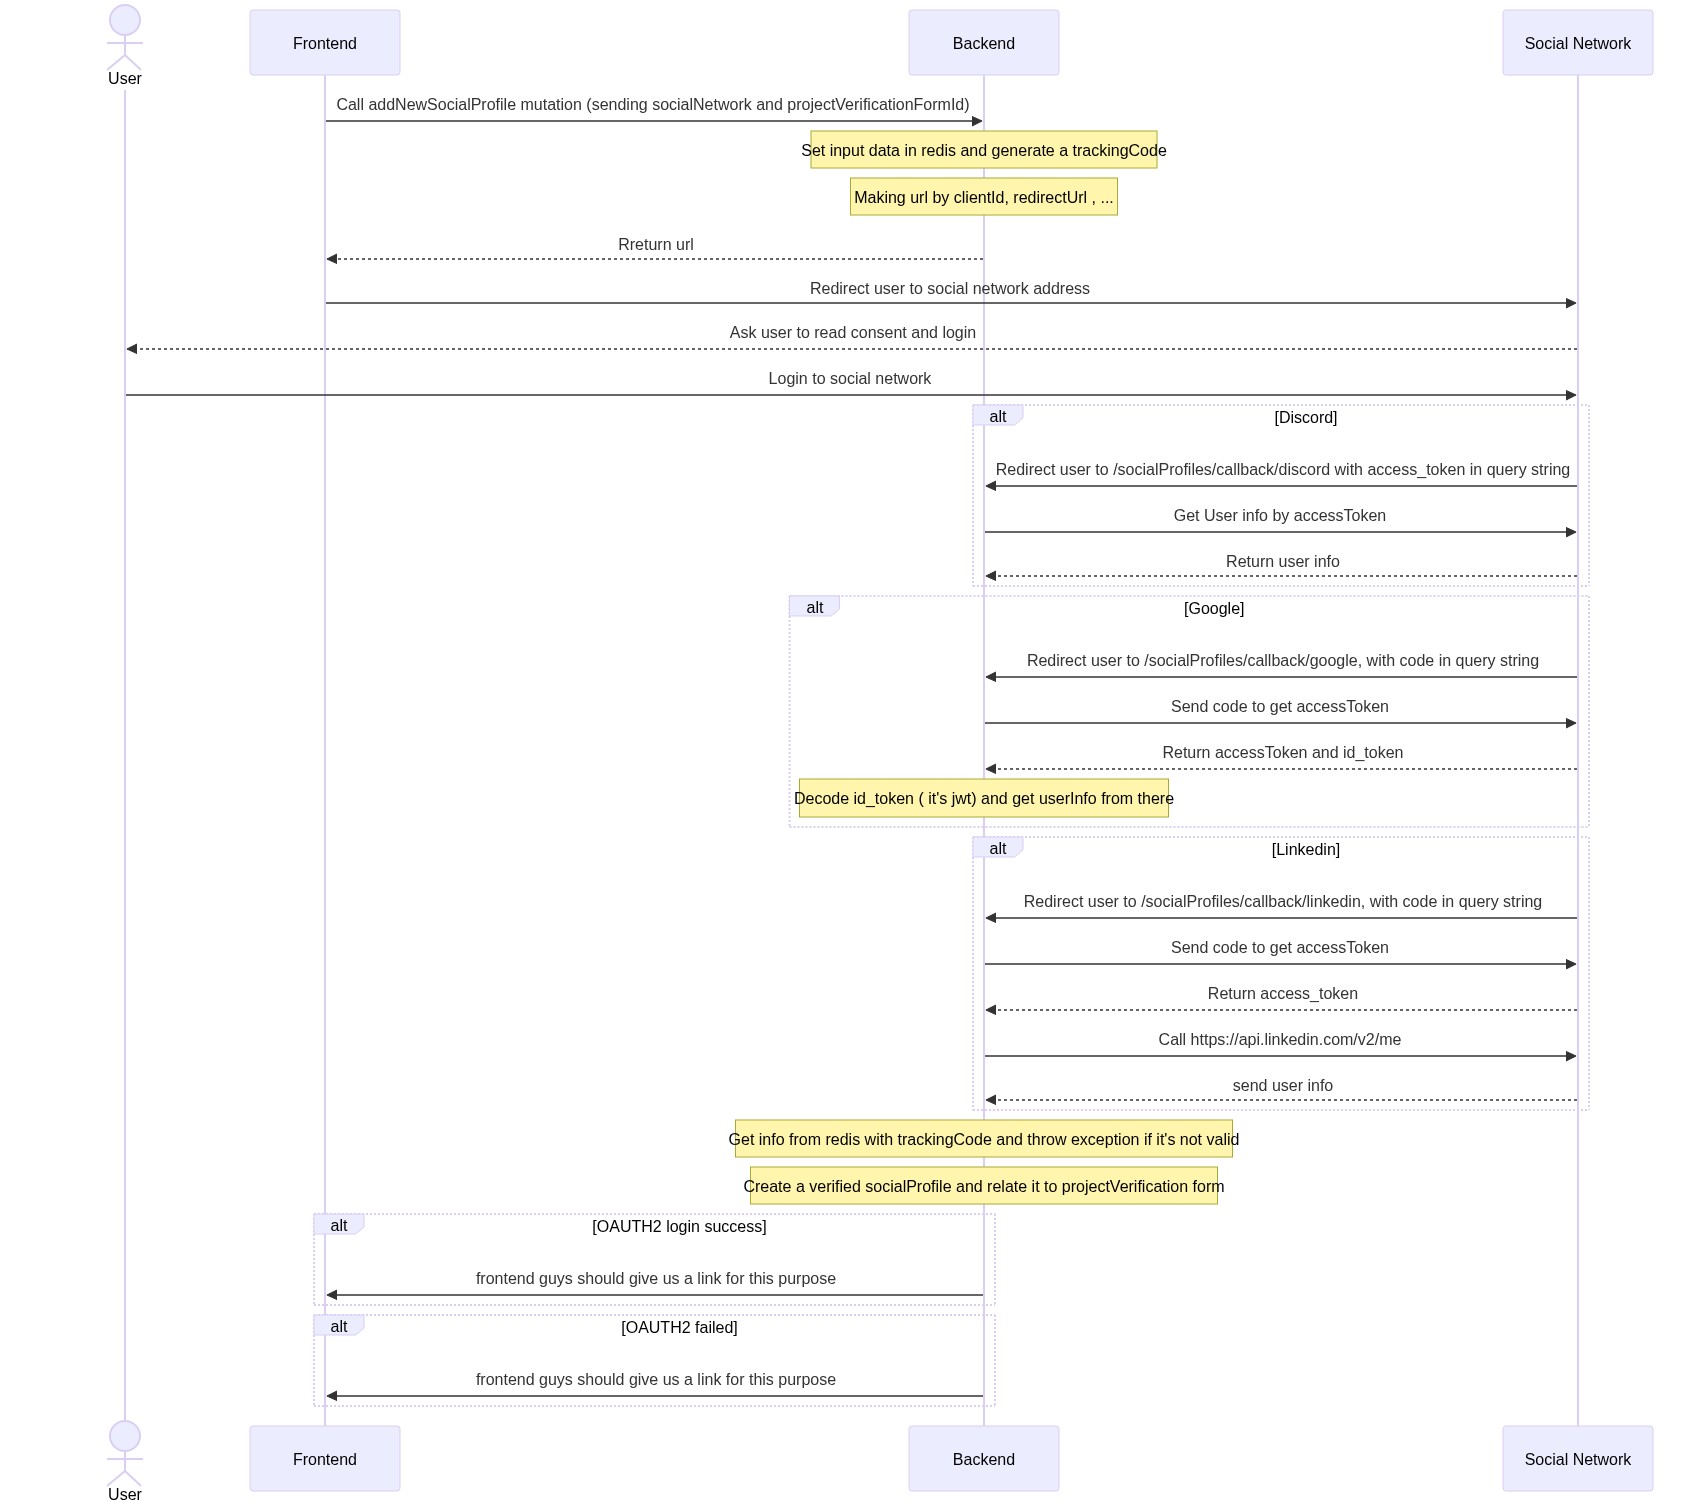
If you want to edit the mermaid diagrams, just replace https://mermaid.ink/img/ with https://mermaid-js.github.io/mermaid-live-editor/edit# in below image links
Impact graph supports ranking projects based on power boosted by users. Users who have GIVpower, can boost a project by allocating a portion (percentage) of their GIVpower to that project and after that impact-graph regularly takes snapshot of user GIVpower balance and boost percentages. At the end of each givback round (14 days), average of allocated power will be the effective power balance of each project.
Snapshotting mechanism is implemented in by the hlp of database cron job and impact graph support of historic user balance on blockchain.
Snapshot taking on database is implemented by the help pg_cron extension on Postgres database.
On regular interval (defined by cron job expression), calls a db procedure called public."TAKE_POWER_BOOSTING_SNAPSHOT".
This procedure creates a new record of power_snapshot and copies power boosting percentages content to another table and associates them to the new power_snapshot record.
Cron job creation for test environment is already implemented in dbCronRepository.ts and a modified docker with enabled pg_cron extension.
Giveth uses digitalocean database in production and staging environment and setting snapshot cron job is done manually there because of the digital ocean restriction on configuring pg_cron extension.
Creating snapshot cronjob on digital ocean postgres database step:
- Connect to database by
doadminuser (database owner). - Create cron job by sql command
CREATE EXTENSION IF NOT EXISTS PG_CRON;
SELECT CRON.schedule(
    'take givpower boosting snapshot - develop',
    '*/5 * * * *',
    $$CALL public."TAKE_POWER_BOOSTING_SNAPSHOT"()$$);
The first parameter is the job name which must be unique per environment. Otherwise, it will override another existing job with the same name.
The cronjob expression above */5 * * * * is for getting snapshot every 5 minutes in the test env. It can be a different schedule based on requirements.
- Find created job id by running
SELECT * FROM cron.job
ORDER BY jobid DESC
4. Alter the job (found its id above, supposed here 1) database to whatever is set for impact-graph, here
 deveop.
select cron.alter_job(job_id:=1,database:='develop');For archiving old givpower snapshots data we must follow the same structure above, except in the 2nd step we must this command instead
CREATE EXTENSION IF NOT EXISTS PG_CRON;
SELECT CRON.schedule(
    '"archive givpower snapshots - develop"',
    '*/5 * * * *',
    $$CALL public."ARCHIVE_POWER_BOOSTING_OLD_SNAPSHOT_DATA"()$$);
impact-graph monitors power_snapshot table and whenever a new record is created it find corresponding ethereum blockchain block number and fills in the snapshot record. Then for every user who has a percentage snapshot, fills balance snapshot table with the user balance at the corresponding block number by the help of impact graph block filter.