Gary Dyrkacz, Oct, 2020
Introduction
With an interest in using an Arduino Uno and an HC-SR04 ultrasonic sensor, I found myself confused by some of the information available on the HC-SR04 ultrasonic sensor. Some confusion was due to my novice status to sensors, the Arduino, and ultrasonics, but some posts and reports online left me uneasy on the characteristics and limitations of the ultrasonic sensor to predict a projects success or failure. This report is a start to answering some details on the detection of certain sizes of objects, materials, and the angles that they could be detected at. In the end, the work answered some of my own questions, and reinforced some information already available. However, the work raised more questions that showed a more focused approach is needed regarding the sensor, which can only be answered with more detailed tests. The result is the following experiments and discussion provide some skeleton framework on what to expect and the direction for more experiments.
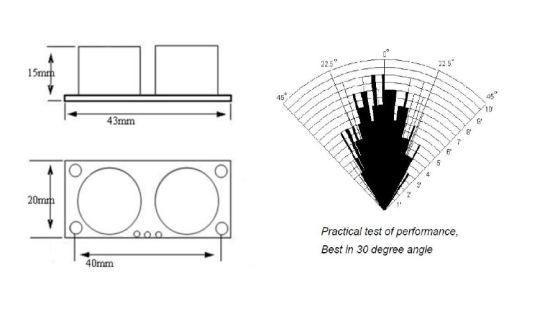
The first and most confusing HC-SR04 characteristic that prompted my skepticism was the following diagram, or versions of it:
This image of the angle performance is ubiquitous in manuals on the specifications of the HC-SR04 from just about every sensor module seller, but I was unable to identify the originator of the data, or just how this data was generated. Even professional journal articles use a copy of the "practical test of performance" plot, without referencing the original producer.
How this beam angle data was measured and what the target material was, is misleading without the details of how the data was generated. The average half angle of detection is around 20 degrees. However, as I found by reading and from my own tests, using an average with an ultrasonic transducer is not necessarily a good measure of a sensor's sound pressure or sound energy beam detection pattern. Clearly, the detection performance angle changes substantially from the centerline as the distance increases out to the maximum of approximately 9 feet (2.74 m); this distance is well within the maximum range of the sensor, which in many cases with a large, good reflecting target may be up to 4-6 meters.
There are many reasons for the lack of a smooth performance shape and drop off with distance:
1. The sound pressure (measured in decibels , dB) transmission pattern out of the emitting transducer is not necessarily a smooth envelope, but often consists of lobes, with the central lobe the most sensitive (most sound energy) for distance. The lack of a smooth envelope for the performance pattern could be displaying some aspect of the lobe patterns.
2. Distance from emitter transducer and back to microphone transducer. Sound pressure decreases as the inverse of distance, but is more complicated because of reason 1.
3. Sound energy absorption by the air has a big effect. (For example, ref (1): https://www.acs.psu.edu/drussell/Demos/Absorption/Absorption.html)
4. Just how "practical" was the test, relative to a target material? Was the material a painted wall, a metal plate, a sheet of wood or plastic, round or flat? How smooth was the surface?
5. We all seem to assume that this pattern was measured as echoes off of some surface, using the microphone pickup of the HC-SR04. Because the diagram is labeled as a "practical" performance test; it would seem to be a safe assumption, but we have no direct statement of that assumption.
6. Assuming the safe assumption in item 5, a bigger issue is how was the target material placed with respect to the microphone? Was the target always kept horizontal to the sensor centerline, or was the target "aimed" at the microphone to maximize sound energy return to the sensor? Later, I will discuss this issue in more detail. All these questions affect the practical performance.
Much later and after I had done the tests described here, a dedicated search turned up a better idea of the target detection performance of an HC-SR04. the Parallax PING))) Ultrasonic Distance Sensor appears to be very similar to most HC-SR04 sensors. The product guide for the Parallax PING))) Ultrasonic Distance Sensor, ref (2)
https://www.parallax.com/sites/default/files/downloads/28015-PING-Sensor-Product-Guide-v2.0.pdf displays the results of two kinds of tests. In one test, it shows a similar pattern to the above, and moreover, specifies the target was a 3.5" dia. cylinder (material unspecified) that was moved laterally from an imaginary centerline from the sensor, to find the detection point at various distances. The beam spread detection point in this case was ~25⁰ up to 24" ((61 cm), then decreased to a fairly constant angle of 20⁰, which rapidly dropped off after 5.5 ft (166 cm) to no detection by 7.5 ft (229 cm). This type of detection, I will refer to as "aimed" detection. It maximizes at any distance the potential for target detection. The Parallax data thus supports a notion that the first image was generated with some sort of aimed target, either intentionally, or as a result of target shape.
Parallax also went a step further, and performed detections where the target surface was kept normal to the centerline from the sensor; a cardboard target was maintained always parallel to the PCB board of the sensor. In this case, the beam spread, starting at 12 inches was ~30⁰ from the origin, decreasing rapidly to 10⁰ at 45 inches. From the drawings of reflection angles, it appears the centerline was taken as coincident with the center of the emitter transducer, with the origin point at the PCB board. (I will show a plot of this data later.)
Some Previous Work
I am not alone in wondering about the details and limitations of the sensor. I will mention a few that I found, and I deem important in guiding my approach to the issues.
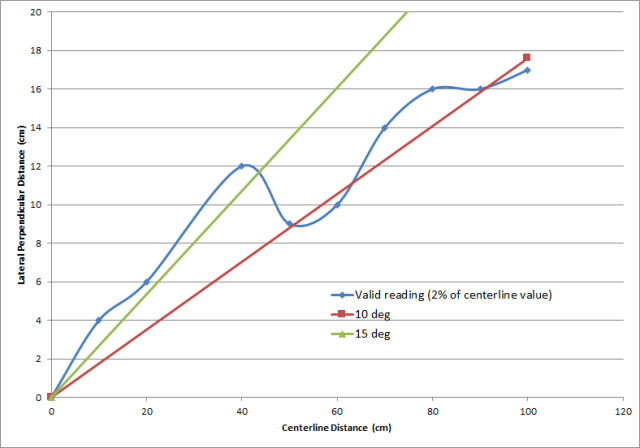
This study ref (3), http://www.fadstoobsessions.com/Learning-Electronics/Component-Testing/HC-SR04-Ultrasonic-Ranging.php I found very interesting. A cardboard target was mounted on a tripod. The cardboard target was moved laterally, i.e., normal to the imaginary HC-SR04 centerline, inward to find the edge of detection. Note that the term "centerline" is the imaginary normal (90⁰) axis to the PCB board of the sensor. Between different tests, the centerline horizontal position may be different, but in just about every case, the target vertical center is in line with the centerline. The cardboard was held normal to the centerline of the sensor, which would be parallel to the sensor's PCB board. (I will use "normal" in this sense, throughout this discussion.) The distances from the sensor, and laterally to the centerline, were then measured. Here are the results from that work:
Figure 1 Lateral Distance versus Centerline distance from reference.
The plot consists of the distance along the centerline from the sensor, and to the centerline from first detection. The lines are where the tangent lines for 10⁰ and 15⁰ would be, which is easily calculated from the 2 distances. Note how the range is wider at close distances, and drops off rapidly after 40 cm (15.748 in). There is another drop off at about 30". The undulating variation of angle is likely evidence of multiple lobes. Also, note that over even 1 meter, the beam appears to quickly tighten up the detection angle, suggesting a higher energy centerline lobe.
As in the Ping))) case, the lobes should mean I would detect something further off angle at close distances, and detection would drop off at high ranges.
I found this, ref(4) https://www.google.com/url?sa=t&rct=j&q=&esrc=s&source=web&cd=11&ved=2ahUKEwj49-fCkZDnAhUCK80KHdzqCAMQFjAKegQIARAB&url=https%3A%2F%2Fwww.mindmeister.com%2Fgeneric_files%2Fget_file%2F7925113%3Ffiletype%3Dattachment_file&usg=AOvVaw09COP-u_3QpDvCgfX73zyv as a PowerPoint presentation.
Relevant conclusions, but with no supporting evidence:
-
Detection could be 45⁰ from centerline at up to 1 meter.
-
Even a pen could be picked up at 30 cm on the centerline.
-
At maximum distances, 3 m, the area of detection is 15⁰, and target angle is critical, with no other object in the area.
ref (5): https://app.box.com/s/4nafz9scusuk4kq1628u is some very detailed work on framing the specifications of an ultrasonic sensor. I have some concern because especially at longer distances, the targets and sensor were near floor level, and some bounce off the floor might have been picked up. The authors goal was to investigate the precision and accuracy of distance measurements, but some of his findings were relevant to the current project. More detail and files can be found in this discussion ref(6): https://forum.arduino.cc/index.php?topic=243076.0
The conclusions drawn for this work were:
-
The best measurement results are obtained by reflection on smooth, flat surfaces.
-
For distances up to 1 m, the surface material of surface is not critical.
-
Over short distances, of less than 1 m, the angle to the object can reach up to 45°.
-
Even quite thin objects are reliably detected. A normal pen, for example, can be detected at a distance of about 30cm.
-
At maximum distance (3 m) the object must be exact targeted and there should be no other object in the area (similar distance) in a emission cone of 15 °.
-
Supposed accuracy is 3 mm widely quoted.
-
FOV (full cone): horizontal ~20⁰, vertical ~13⁰
In comparison to what I found below, I question conclusion number 2. Cloth, especially a loose weave will not show up at all. Even skin is iffy, unless very near the sensor.
As a useful aside, an equation for the speed of sound in air was given as 331.5 + 0.6*T(⁰C). There are numerous cases online where this formula is used. it works quite well, and is within 0.5% of the best values, even though it does not take into account variation with relative humidity or air pressure. In the most common temperature and humidity range during mid-latitude summers, the values are almost spot on. Very accurate predictive equations derived from experimental data are available. From those accurate results and the fitting equation that was derived, I put together a less complicated linear equation than from the original 16 term equation that takes into account temperature, relative humidity, and air pressure. Of course, the equation is a less accurate than the original, but is more accurate than the simple formula above, especially at low or elevated temperature and humidity conditions. It could be argued that more accurate equations are overkill with an HC-SR04. (See the ultrasonic programmable LED parking project in this repository, references therein. See the Excel file for speed of sound versus temp and humidity:
Sound_velocity_T_RH_Calculator.xlsm calculates a reduced equation, based on the most accurate sound velocity data correlation in 1993. See the vba module code.
Experimental Setup and Process
To better frame out the characteristics of the HC-SR04, two types of experiments were performed. In one case, at predetermined distances, a flat target was placed with the face set perpendicular to the sensor imaginary normal centerline. The sensor was then swept in 1 degree increments back and forth across the target. This is designated as the sweep or "aimed" experiments.
In the second experiment, the servo was locked at 90 degrees, which is 0⁰ relative to the normal centerline. At predetermined distances, the target was manually moved back and forth laterally in small increments, to bracket the point at which the sensor registered the correct distance. These are designated as static experiments.
Both experiments used only one sensor, though a cursory check with a second sensor seemed to correlate reasonably well with the detailed results presented here.
In all experiments, whatever the size of the target, the center of the target was maintained coincident with the imaginary centerline vertical height with the vertical center height of the sensor emitter transducer and microphone. The targets were all aligned with the long side vertical.
Independent distance measurements were provided by a tape measure, which was perpendicular to, and coincident with the midpoint between the transmitter and microphone cones, and measured from the PCB board of the sensor. The centerline is defined as the imaginary axis perpendicular to the PCB board, vertically coincident with the center of the cones and horizontally coincident with the middle of the PCB board, which also is the midpoint between the two sensor cones. All measured values were within 2-3 mm of correct position, i.e., 3/16". All targets were checked to ensure they were vertically perpendicular to the floor with an electronic table saw angle detector, accurate to 0.2⁰.
Targets
Five targets were used:
-
Two Dow HP P/P FFF fanfold underlayment insulation panels: 10.5" x 48"x 0.20" (26.7 x 122x0.53 cm) and 24"x 48" (61 x 122); sheet thickness is 0.21" (5.3 mm). This specific underlayment has a thin, smooth plastic coating on both sides, giving it more rigidity, and for the purposes here, a better sound reflectance. The larger sheet of underlayment was only used for the static measurements.
-
A 1" wide, steel yardstick.
-
A 12" x 23" (38.5 x 58.4 cm); 0.027" (23 gauge) aluminum sheet (will use the element symbol - Al).
-
A 1 5/16" x 1 1/2" (3.3 x 3.8 cm) aluminum piece cut from a flat piece of roof flashing.
Sensor Sweep Measurements
With the exception of the small aluminum target, all the targets were mounted in a simple vice like pedestal rigged from several of blocks of wood and a couple of clamps. Additionally, the large aluminum sheet and mount were placed on a step stool; the bottom of the sheet started approximately 18" from the floor and therefore topped out at 41"; this insured the Al sheet was vertically centered on the sensor. The yardstick was mounted like the underlayment, with a total vertical exposure of 34". The maximum detection distance point at 0⁰ for the yardstick was not determined from a sweep measurement. It was determined in a later measurement, where the yardstick was moved along the centerline until no echo was detected. In all cases, the entire pedestal was covered with loose terrycloth, to minimize any reflections from the supporting base itself. The underlayment sheets were further stabilized with the steel yardstick taped to the back of the panels.
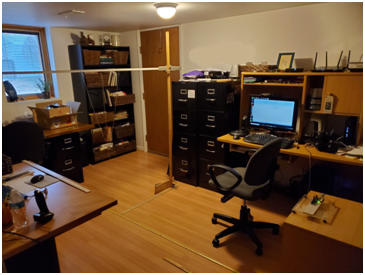
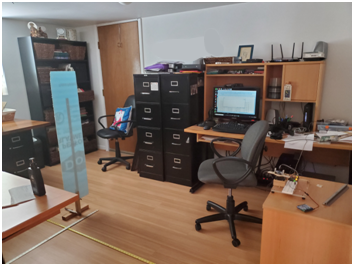
The 1 / 5/16 "x 1 1/2" aluminum sheet was mounted differently, suspended from a cantilever arrangement. Long aluminum screen frame stock was attached horizontally to a vertical support outside the anticipated sensor field. The target was suspended from the screen frame stock ~6 ft off the ground, by two threads taped to the back of the target. A third thread was suspended from the framing stock and centered on the target; this thread acted both as a damper to quickly kill any oscillations of the target, and provided a means to pinpoint the distance measurement on the tape measure on the floor. The thread was heavy weight shoe stitching thread, which was found to not trigger any reading. Below are several photos which should help understand the arrangement. (The setup of the large Al sheet is not shown.)
 |
 |
|---|---|
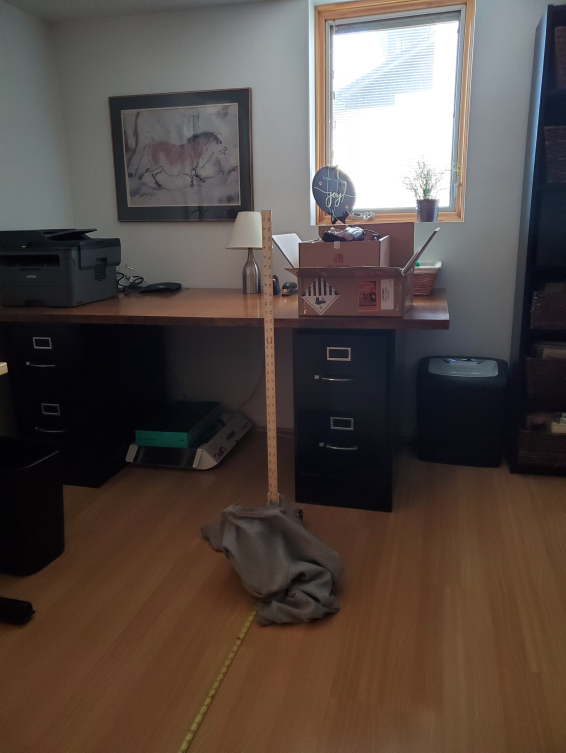 |
The first photo shows the simple cantilever arrangement for the small Al flashing target; the second photo shows the mount for the smaller underlayment panel, and the last photo shows the mounted steel rule. The maximum range that a target could be moved was 109" (277 cm). In the second photo, the steel rule used as a stabilizer and support for the underlayment panel is visible through backlighting.
The first and second photo also show the Arduino and sensor mounted on a cabinet with center of the cones 30.5" above the floor . The temperature and humidity were monitored at the beginning and end of the procedure. and varied about 2 ⁰F, 61 - 63.2 ⁰F throughout the experiments. The relative humidity, Rh, remained constant at 32.1 %.
A typical measurement cycle: Position the target at a specific distance from the sensor. Ensure that the target face was was normal to the imaginary centerline of the sensor, and the center of the sheet horizontally and vertically was coincident with the sensor centerline; check to make sure the servo mounted sensor was normal to the centerline; press the button on the breadboard to initiate the sweep cycle; use CTRL-C to copy the data from the Serial Monitor, and paste it into an Excel 2007 workbook, adding the distance from the sensor.
Static sensor measurements
The 2' x 4' panel used for the static measurements of the detection envelope, had a very slight bow in the long dimension amounting to no more than 1/4" deviation from top to bottom of the panel. There was no horizontal curvature or twist. Errors on horizontal measurements from the center of the sensor (between the receiver and transmitter cones was with a steel yard stick are within 1/16". Zero front distance was set to the plane of the sensor circuit PCB board. At each distance measurement, the panel was always checked to ensure the panel was parallel with the sensor PCB board (perpendicular to the centerline). As needed, this was checked with a large steel square used with the wood floor pattern lines as base to ensure the target was parallel to the sensor PCB board. Estimated variation deflection from parallel between the target panel face and the sensor PCB is less than 2 degrees.
A typical measurement procedure was: Move the panel near the desired centerline distance from the sensor position, and outside the anticipated lateral distance from the centerline. Move the panel in small increments laterally, press the button on the breadboard to trigger a measurement. Continue to move laterally, from or to the centerline in fine steps, until a stable distance value near the measured distance was just located. Use Ctrl-C to copy the data from the IDE Serial Monitor to an Excel spreadsheet, record the actual final distance of the panel from the tape measure on the floor, and the lateral distance from the centerline, coincident with the center point between the two sensor barrels. In all cases, it was necessary to make a number of lateral movements in and out of the stable region to bracket the optimum lateral distance . Generally, variation of the optimum position values was estimated as within 1 cm. This is tedious work, requiring many hours to accomplish. The temperature and humidity were the same as for the sweep measurements.
Arduino Setup and Sensor Hardware Mount
The HC-SR04 sensor was mounted on a large radio control aircraft servo, because this type of servo has a high torque value, and are less likely to be overtaxed by any stiffness in the wires going to the sensor. The servo was powered separately from a standard 2000 mah, 4.8V flight pack for two reasons. One, the Arduino could not supply the current needed to drive the servo, and second, to minimize possible feedback issues from the servo. The same mount for the sensor, was used in both experiments, only the sketches differed.
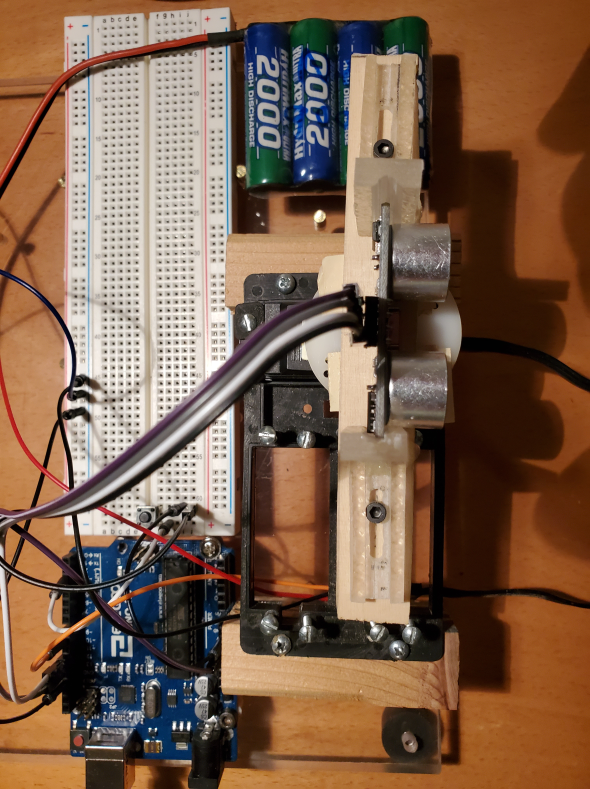
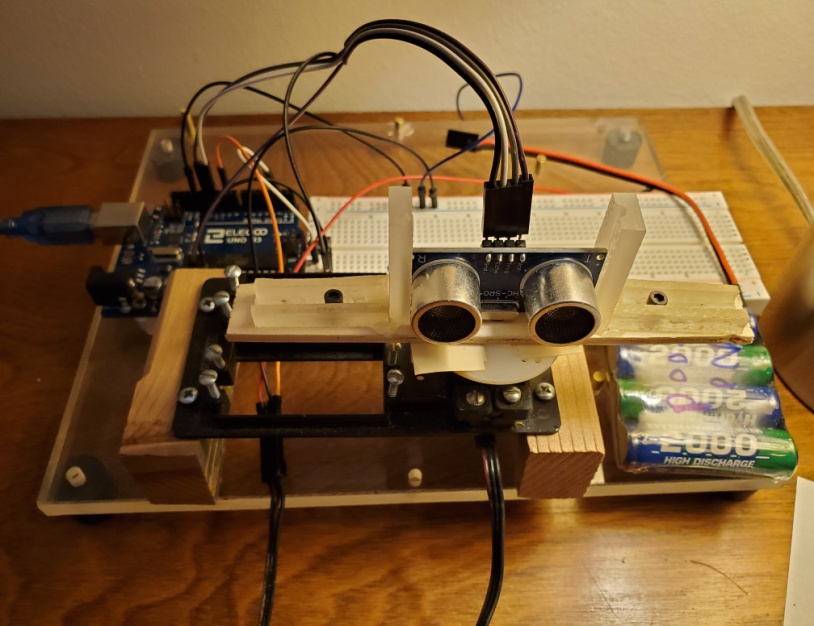
The sensor mount was a DIY special. It consisted of an old Airtronics servo fitted with a flat wheel type servo horn. Over the circular plastic horn, a 1/8" lite-ply round plate of the same size was cut out, and attached with double sided tape. A long arm of 1/8" lite-ply was then attached with double sided tape to the horn lite-ply. The reason for the lite-ply plate was because it provided greater stability to hold the long sensor vice mount with double sided tape, compared to the just the lite-ply arm on the plastic plate. A hole was also drilled in the center of the long arm and the round plate so that the servo arm mounting screw could be accessed for positioning to the correct starting angle. On the lite-ply arm, two homemade Plexiglas movable right angle vise-like brackets were mounted, as a "vise" to rigidly hold the sensor board.
Although overkill information for many, here is how the two L-shaped plastic vise mounts was made: The vertical arms of the Plexiglas holders had V-shaped groves filed into them to rigidly hold the sensor board. The horizontal arms were made from scrap plastic 1/4" sheet that had been run through a table saw with a fine blade to make a slot wide, and deep enough to fit the head of a 4-40 Allen head screw flush with the top surface. The arms were then cut from the sheet into a 1/2" wide strip, and the groove and edges sanded smooth. Through the middle of the slot, a series of holes were drilled to just allow the 4-40 machine screw to pass through. The holes were then filed into a long open slot. The long lite-ply arm fitted to the servo was then drilled, and the 4-40 screws screwed in to self tap the lite-ply. (This was sufficient for this case, but "T" nuts could have been used if the lite-ply threads stripped out.) Finally, the arms of each bracket were epoxied together at right angles to make right angle brackets.
The reason for making an adjustable holder was that it could be used to mount other sized sensors as needed.
The sensor was locked between the brackets, situated so that the sensor PCB board was directly over the servo arm mounting screw and each sound cone was equidistant from the mounting screw. The servo was mounted in a common servo mounting plate used in Radio Control aircraft, which was then screwed to two wood blocks as "legs". (Another hobby to the rescue.) The servo horn assembly was then adjusted to the servo motor tines to be as close as possible to be parallel to the edge of the large clear plastic baseplate mount holding the Uno and the breadboard, which in turn, was adjusted to be perpendicular to wooden floor board pattern.
The images below provide reference for the detailed description above.
 |
 |
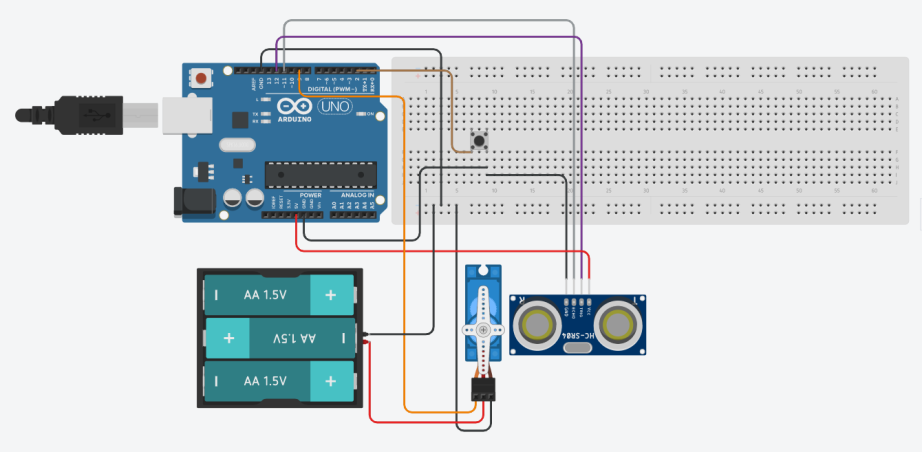
The Arduino Uno R3 operated the servo and HC-SR04 sensor. A pushbutton switch was added to act as trigger to start data acquisition.
Connections
| **Arduino pin ** | **Sensor/Btn/Servo Pin ** |
|---|---|
| 5V Analog | VCC HC-SR04 |
| 12 | TRIG HC-SR04 |
| 11 | ECHO HC-SR04 |
| GND Analog side | HC-SR04 GND |
| Button setup | |
| GND Analog side | Side A; common with HC-SR04 GND common on breadboard |
| 2 | Side B; MUST SET SKETCH FOR INTERNAL PULLUP RESISTOR VIA "INPUT_PULLUP" |
| Servo Setup | |
| 9 | Servo signal Pin 3 for older Airtronics |
| to Arduino GND Digital | Servo GND to breadboard with 4.8V Battery GND + |
| Servo Pin 1 to 4.8V battery red wire (+) | |
| GND Digital through breadboard. | Servo Pin 2 to 4.8V battery black wire (-), + GND common on b breadboard |
The schematic shows the sensor is separate, but as depicted in the images, it is mounted on the servo.
Arduino Uno Sensor sketches
The Arduino sketches were all run using the Arduino IDE under Windows 10. Excel 2007 was used to process and visualize the data.
None of the sketches have any surprises for those familiar with sketches for the ultrasonic sensor, or a servo. The sketch for sweeping the angles was: unsonic_servo_sweep.ino.
The sketch does two sweeps when the button on the breadboard is pressed, moving in 1 degree increments from 20 to 160 degrees, and from 160 to 20 degrees in 1 degree decrements. In this case, the reference point, or centerline through the middle of the sensor board is at 90 degrees, which is servo dead center. However, all angle measurements discussed here are referenced to the centerline as 0 degrees (90 degrees was added or subtracted in Excel from the actual recorded values). At each degree step, five measurements are averaged, and the angle, microseconds, cm distance, and inches distance data were sent to the Serial Monitor of the Arduino IDE (see sketch). The sound velocity was set to 0.03402 cm/μsec for the distance conversions, which is lower than the better value later calculated value of 0.034445 cm/μs. The discrepancy is due to using an online sketch example, in the early stages of the project, before realizing that more exact sound velocity relationships existed, This would amount to a difference of 0.0012 cm/μs or 1.6 cm at the maximum distance of less than 0.4%. Data was transferred from the Arduino IDE Serial Monitor using Ctrl-C to copy the data, and then pasted to an Excel workbook.
A different sketch was used for the static measurements. The sensor assembly, or rather the servo was set to 90 degrees using the sketch, sevo_90_calibration_btn.ino. A second sketch, usonic_static_btn.ino, was then loaded to get the echo data, which averaged 5 echoes and output the distance in cm to the Serial Monitor. When a stable reading was found, the distance from the sensor and lateral distance from the centerline were measured and recorded.
**Results and Discussion **
Two different types of experiments were done, because as described in the Introduction, the angle the target makes with the sensor transducer and microphone will impact the detection beam or cone. In the first case, a servo swept the ultrasonic sensor over a centrally placed static target at 1⁰ increments, and placed specific distances from the sensor. Five echoes were averaged and output to the Arduino IDE Serial Monitor. When both a 160⁰-20 ⁰ and a 20⁰-160⁰ sweep cycle were completed, the data stream was manually copied to an Excel worksheet for analysis. These are "aimed" or sweep experiments.
For the second tests, the HC-SR04 was held constant, and a target was moved laterally and maintained normal to the imaginary centerline of the sensor, while moving it toward the centerline, until the sensor just registered a stable echo. These experiments are called the static experiments, because the sensor was not moving.
One important point about the measurements is that 2D fan-like, detection patterns are displayed, for what is really a set of 3D sound lobes (rings) of detection. Any target has to intersect enough area of the beam cone at a specific angle and distance to trigger a valid echo. None of the experiments here measured the vertical detection pattern. Reference (6) in the Previous Work Section indicates a horizontal range of 20⁰, and a vertical of 13⁰, which would suggest a somewhat flattened vertically non symmetric cone. However, the referenced information does not show the pattern as a function of distance, which is likely to change with distance.
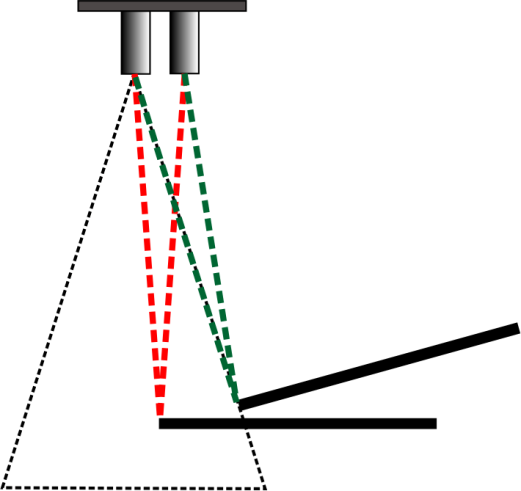
Sweeping the ultrasonic sensor back and forth provides one type of measurement of the detection angle. In this case, the target is aimed at the sensor to find the optimum angle and a certain distance to send maximum sound energy back to the sensor microphone. it does not matter whether we vary the target angle or sensor angle. The difference is the frame of reference, but the conclusions will be the same. The graphic below shows how the two types of measurements will lead to different detection envelopes.
Figure 2. Dependence of Detection on Angle.
The black dotted triangle represents the transducers output that would represent the cone of sound energy that would trigger a positive target distance. The red dotted line represents a transmitted and echoed wave path that would
trigger a positive echo reading for the target maintained normal to the centerline, while the green line represents the first detection point for the target angled, or aimed at the sensor. The target position in the first case, is much closer to the sensor centerline to generate a response than in the angled target case. Thus, the angle from the sensor centerline is much smaller when the target is maintained normal to the centerline, then when it is in the "aimed" target case.
Keep in mind that for the static tests, the detection distances was measured from the edge of the targets. However, the targets must transect a sufficient area of the beam to return a sufficiently energetic echo to be detected. That detection area is not known from the data here. Moreover, it is very likely that the area changes from point to point, which will have an impact of the angles. See the last section of this document for some future tests that the current work suggests as a path forward.
HC-SR04 servo sweep measurements
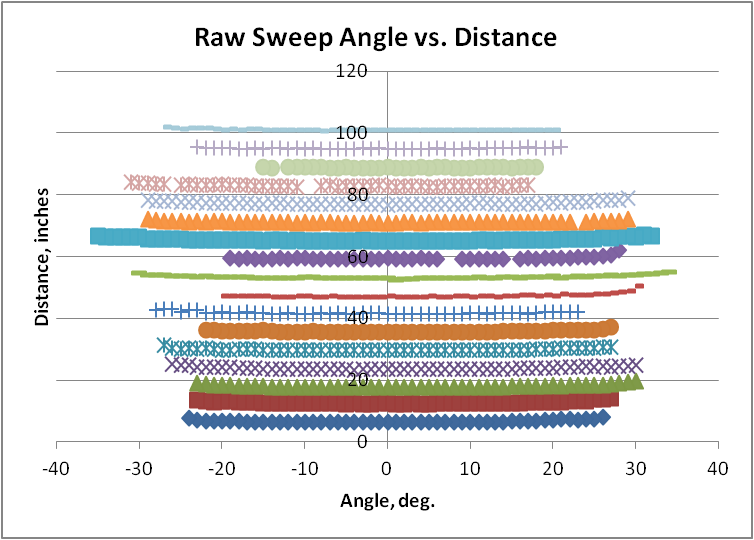
An example of the raw sensor data as the sensor is swept over the underlayment target is shown below.
Figure 3. Plot a Raw Sweep Data
This plot only shows the 20-160 degree cycle. The 160-20 degree cycle shows the same pattern. In practice, other materials in the room also reflected back to the sensor, giving extraneous readings. These echoes were easy to eliminate, because the object distance reported by the sensor were very different than expected, or far outside a reasonable detection angle. The plotted data has those extraneous echoes removed.
Each of these curves has a slight concave upward pattern, indicating an increase in distance. This is expected, because the distance to the target changes slightly depending on the relative angle between the sensor microphone and the target. It is when the centerline of the microphone lines up with the normal of the target that the distance is a minimum.
The critical data are the endpoints of each of these curves. Of some concern, is that several curves show an asymmetric shift, which might be real, or suggest some shifting of the sensor initial position. Although the sensor position was checked repeatedly, it still is possible that, a small shift in the sensor from its expected position escaped notice. For each distance, we get four measurements, 2 angles from the left, and 2 from the right. When we take the difference between each absolute endpoint per cycle, the differences, were all under 5 degrees for the 1/2 angle of the 2 cycle sweep at a certain distance.
Included in these raw endpoint angles is the horizontal width of the target. We need to remove that distance to determine the true angle at which the sensor detected the target. We know the width of the target and the distance from the sensor; the tangent of these values is the angle that the target itself subtends. Subtracting this from the angle endpoint measurements, gives us the true angle of detection.
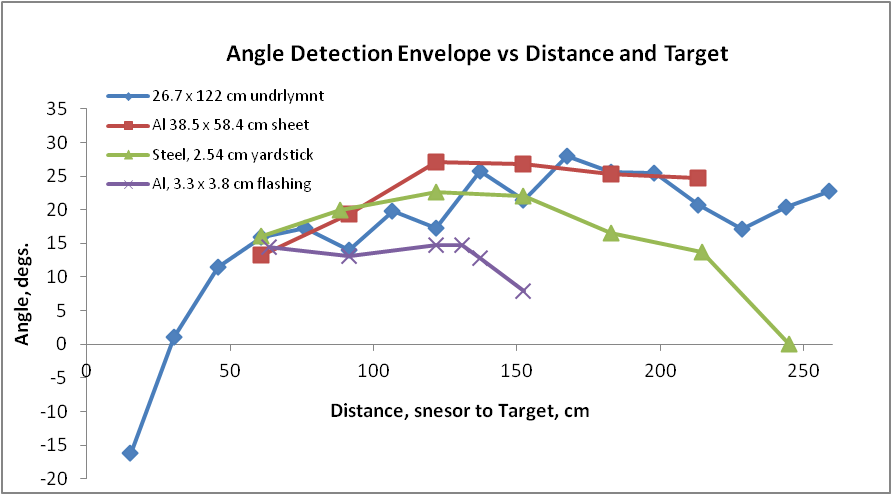
The plot below shows the summary data for the four targets used, with removal of the target width:
Figure 4: Maximum Off-Centerline Angle with "Aimed" Targets
Of course, the negative angle of -16 degrees at 6" (15 cm) is very strange. However, at that small a distance. there may be issues with the very large angle subtended by the target. It is also possible that echoes are being returned at that distance that are from other than the near the edge of the target. Despite the probability that we are measuring something different at these small distances, the data is reported as is.
Starting at 50 cm, the general trend is a rise in angle of detection, followed by a decrease. In the range 60-125 cm, with the exception of the small Al flashing target, the range of slopes is similar for all the targets, 0.10-0.22⁰/cm, with an average of 0.15⁰/cm, Above 1.25 meters, the yardstick, drops off in detection distance much faster than the Al sheet and the underlayment. In the range above 1.25 m, the angle appears to level out to ~23.5 degrees. Note that In the case of the Al flashing, the final distance point represents the last point for which a stable distance reading could be obtained. In the case of the flashing, an attempt to get a stable reading at 185 cm failed, so the true point would be somewhere between 152-185 cm. The zero degree value for the yardstick was defined independently by moving the yardstick at the centerline to find the point where no echo was triggered. Although the widths of the Al flashing and the yardstick are similar, the sound field is a 3D pattern. and therefore, up to some point, the area of the target is an important component of the detection result. In the case of the underlayment, the maximum target range distance shown was dictated by the room size, not a lack of detection.
With a particular target material, the change of the angle is dependent on three factors. The lobe pattern as a function of distance, the sound pressure loss as a function of distance, and some fraction of the area of each target.
The detection pattern displayed by targets indicates that the sound pressure beam or beam energy is not radially uniform. If it were, we would expect to see a constant angle at all distances, and at some distance an abrupt loss of detection. The early increase in angle indicates that there is one or more high sound energy, high sound pressure beams or lobes at distances up to about 1.25 meters at a very wide angle. Within a lobe the sound energy has some maximum and decays and folds into another lobe toward the centerline, ref (7):
The Al flashing and the yardstick are fairly clear indicators of this complex sound field. We see a rise and then a gradual drop off in angle. After ~125 cm, the beam pattern is a gradient of sound pressure with greater energy near the beam centerline. The two larger targets do not exhibit this drop off behavior, because we have not yet reached the limits of their detection, which were constrained by the room size and objects in the room.
With respect to the target area, specular reflection dictates that only a certain area of the target is involved in reflecting sound back to the microphone. Diffuse reflection does contribute to this, but much attenuated.
What is impressive is that even the smallest aluminum target with an area of only 1.97 in2. (12.5 cm2) could be detected out to 1.5 m. For the 12" wide Al target, the maximum distance was limited by the size of the base supporting the sheet. It is not clear why the underlayment appears to show a higher spread in values. At this point, based on the other curves, it would not seem be attributed to issues of different energy lobes emitted by the transducer. However, the dip observed over 200 cm, is real and likely due to asymmetry in the beam spread. This will be more clear from the static measurement results.
HC-SR04 static envelope measurements
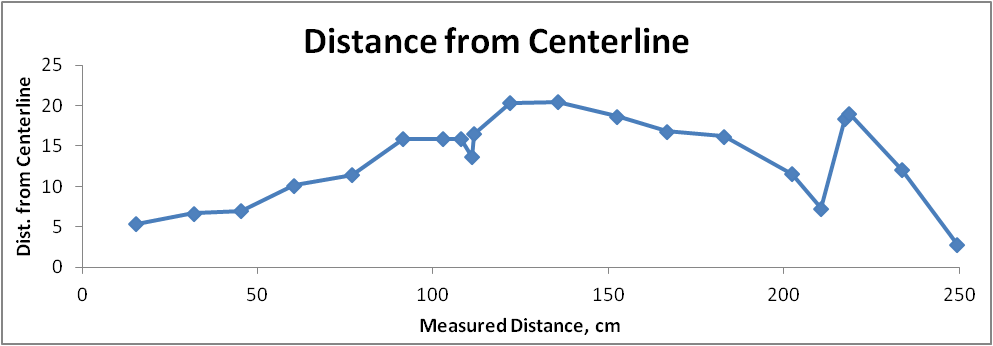
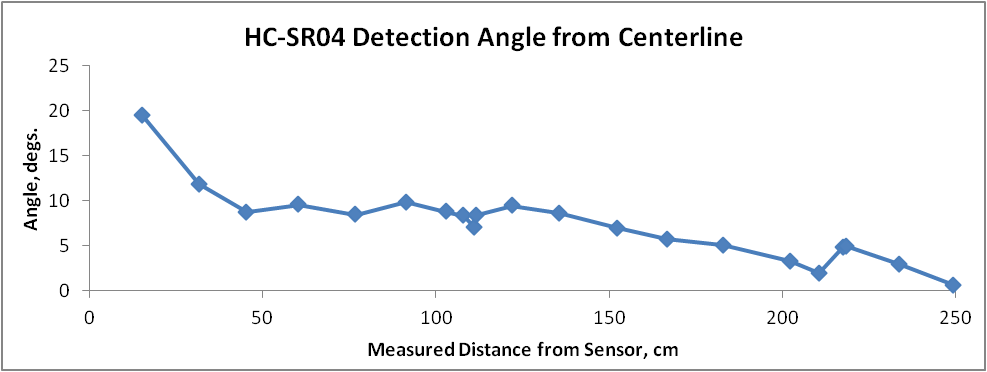
The second set of experiments involved a single 2' x 4' sheet of Dow HP P/P FFF underlayment. In this case, the underlayment, mounted long edge vertically, and centered vertically and horizontally on the sensor, was maintained with the flat face strictly normal to the centerline of the HC-SR04. At prescribed distances from the sensor, the panel was moved until it just registered a stable value. The detection edge was refined by moving the panel back and forth in small increments to bracket the edge. The distance from the sensor and the distance from the panel edge to the centerline was then measured, and using the tangent trigonometry function, the angle was calculated. The data obtained are shown below,
Figure 6. Distance Measured from Centerline with Sensor Static and Target Moved Laterally Normal to Centerline to Find Detection Edge
Figure 7. Angle Measured from Centerline with Sensor Static and Target Moved Laterally Normal to Centerline to Find Detection Edge.
The top plot shows the lateral edge distances measured from the centerline, and the bottom plot is the angle determined at each measured point. The dip in the curves at 110 cm is real. There is clearly a very large drop in beam spread commensurate with target detection up to about 45 cm from the sensor, followed by a slower monotonic decrease, punctuated by two sharp decreases. The behavior suggests that the sensor does have a lobed output, which is not surprising for ultrasonic transducers. What is surprising is just how narrow the beam is at longer distances. From 45 to 145 cm the angle is ~10⁰ then begins dropping steadily for the next meter at a rate of ~ 0.06⁰/cm.
With respect to the work represented in Fig. 1 from ref (3), the data here differ substantially, despite a similar measurement technique. The distance range studied here was approximately 2.7 times greater, so we are comparing only the data in the range up to 100 cm. The current detection in Figs. 6 and 7 show a rapid drop in detection angle of 20⁰ to 9⁰ in the range from 15 to 45 cm, while the Fig. 1 data ref(3) shows a constant detection angle of ~17⁰ in this same range. After 45 cm, the two sets of data still differ substantially. The current data show a relatively constant detection angle of 10⁰, representing a monotonic increase in lateral distance up to ~130 cm. In contrast, Fig. 1 shows a very substantial drop in the lateral detection distance, somewhere between 40-50 cm, with the detection angle dropping to the range ~10-12⁰.
Reconciling these large differences is not straightforward. Both experiments were performed in a similar manner. The reference point for zero distance is different, but that only is ~2 cm shift in centerline distance, which would shift the angle measurements in the present work to a slightly larger angle. The beam spread data in Fig. 1 were determined using a 10 cm x 10 cm square target. The target here is many times larger, although as discussed in the sweep experiments, the area needed to detect a distance is unclear, and because of beam heterogeneity may be highly dependent of target size and shape. The other factor that might influence the results is the target material, cardboard versus plastic coated foam. I would expect the cardboard, if uncoated to reflect less energy back to the sensor, but it is doubtful that the reflectivity would be that dramatically attenuated in the short range observed in Fig. 1 compared to Fig. 6. Of course, these are different sensors. However, the ubiquitous nature of the practical performance plot discussed in the Introduction, that suggests the basic structure of the transducer and microphone all share the same design specifications. In conclusion, we cannot resolve with certainty the reason for the differences in static experiments with absolutely certainty.
Back to the current experiments, we can compare the underlayment sweep results with the static experiment results:
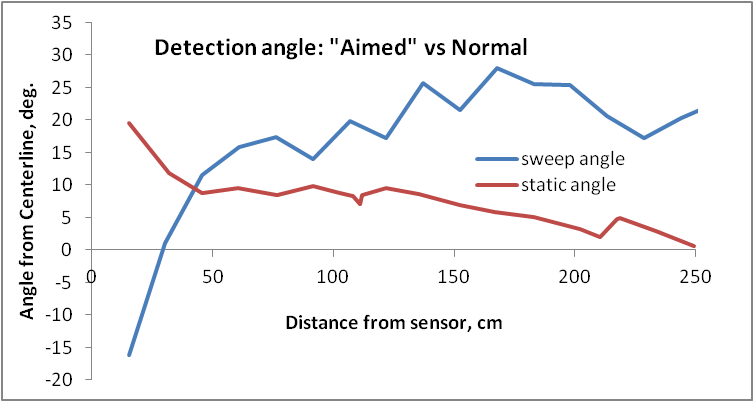
Figure 8. Comparison of Target Edge Detection "Aimed" at sensor versus Target Moved Laterally and Kept Normal to Centerline.
As expected, the results are dramatically different. Compared to the commonly found practical performance pattern found on the internet, and displayed in the Introduction, the sweep data, where the target is deliberately aimed back at the sensor, more closely follows the pattern.
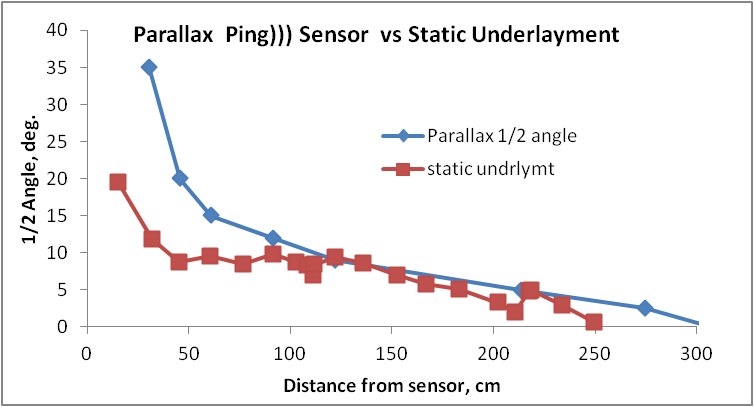
Another comparison is with data I manually interpolated from the detection plots shown in the pdf file on the Parallax PING))) Ultrasonic Distance Sensor ref(2),
Figure 9. Comparison of current HC-SR-04 with Ping)) interpolated data from ref(2).
With the exception of the data below 100 cm, the detection angle envelope is quite similar. Considering these two sensors are not from the same company, the correlation is quite good. One definite reason for the difference is the frame of reference for the centerline. From the Ping))) pdf document, it appeared the centerline was taken as the center of the emitter transducer, while the measurements here were centered between the emitter transducer and the microphone pickup. This amounts to a 15 mm difference, which especially at low angles, will make a difference in the reported angles. However, a quick calculation shows that this shift can account for only about 2.5⁰ of the difference. The target materials, cardboard versus plastic coated underlayment, are also different, although a naive explanation would suggest that this would lead to an even wider difference between the two cases. Of course, neither of these data curves is "wrong", only different in how sensitive they are to off-centerline horizontal surfaces. Minor differences in construction and in circuitry may also be involved. (The sweep data developed here cannot be directly compared with the Parallax Ping))) data, because the targets are very different, an aimed flat surface, versus 3.5" cylindrical post.) More useful is that at longer distance, the two different sensors tend to merge to the same detection sound pressure dispersion.
As the simple graphic diagram, Figure 2, shows in the Introduction, the behavior exhibited in each experiment in Fig. 8 is expected. As already discussed, the sweep data at very close distances, may not be from echoes related to the center of the target, and are suspect; the behavior less than 30 cm, therefore, may be a special case.
The usefulness of this data, depends on the intended project. For distance measurements, off a plane large surface parallel to the PCB board of the sensor, at large distances the narrow detection angle clearly dictates that the sensor angle be dead-on to the plane of the PCB board. Even a few degrees off will give no readings. This narrow detection angle can be an advantage, if there are other nearby objects, as long as the object is large enough to return a strong echo. We must be cognizant of any objects that are far from the centerline that may be within the detection envelope if their flat surface is "aimed" at the sensor. The data suggest a lot of caution and attention be used when fixing the angle between a sensor and target. As a cautionary example, there is a project listed in my repository that failed, because I did not pay close enough attention to the findings here.
In conclusion, it appears the original practical beam performance data was generated most likely with a target aimed at the sensor. More than likely, this was a large target, without a lot of porosity and surface roughness. The data here is also consistent with the data indicated by the Parallax Ping))) detection data.
The sound pressure or sound energy distribution of the beam form the data here and others appears to be very complicated, and would requires much more work to fully understand.
After developing the data, it became clear that it would be useful to understand the relationship between minimum target area and distance, both off centerline and on centerline that can trigger a detectable, consistent distance. Unfortunately, the current set of tests, as a whole, are not designed for this. Because of the obvious non uniform sound pressure, across the sound field, the minimum target area changes not only with distance, but laterally as a function of distance as well. The only case where we can get some idea of the minimum is from the smallest target, which, at an area of 12.5 cm2, becomes undetectable at an extrapolated ~170 cm. The only other potential case, the yardstick, becomes undetectable at 245 cm. However, the actual area detected is not as clear. At a distance of 215 cm, the last reliable distance measurement, the sweep detection angle was 13⁰. If we assume, that the beam energy is distributed uniformly vertically and horizontally, the detected area of the yardstick at 215 cm would be 126 cm2; this area must be considered a maximum value, because we do not know if all that area is effective in returning an echo to the microphone. In terms of a square target, the Al flashing and yardstick targets would be 3.5 and 11.2 cm squares. If the sound pressure beam is really laterally uniform a better target representation at the centerline would be a circle, with diameters, 4.0 and 12.7 cm, respectively.
Further tests that I am not likely to do, but would be valuable information. (Science Projects Alert.)
After analyzing and sweating over the data and its interpretation, it became clear that much more refined experiments need to be done to really define the limits of the sensor's characteristics echo performance. Of course, in hindsight this should have been obvious, and a much modified approach should have been used. If nothing else, I learned more than I thought I would ever need to know about the HC-SR04 sensor. Below are the next level of tests that might be done to really lock down the sensor characteristics:
1. The objects used in this study are a hodge-podge of "things". It would be interesting to take a series of materials, e.g., water, soil, concrete, bricks, cloth (different weaves), painted wall, metal plate, different porosity plastics, etc. with the same texture, shape, and see how detection is attenuated, when they are normal to the centerline. There are really two sets of experiments here. A single size of each object, and several sizes of a sub set of the objects to get some idea of how area affects the results. A more clever (fun?) extension for measurement that requires much more set up, but would allow much faster data collection in the end, would be to mount the sensor on a rail system, (model RR track?) and use a stepper motor with a timing belt to automate the detection process. This is one of those projects that can go from very simple to very complicated, delving into the mysteries of sound penetration with depth and density issues.
2. Clearly, the beam pattern has lobes, which means the energy distribution at any distance is not a uniform across the 2D detection angle slice. A refined 3D representation of the beam pattern with distance would be helpful, especially for targets normal to the sensor centerline. Mapping this field more precisely as a function of distance would allow a better understanding for target detection. The few data points I collected for each experiment set were roughly a half day's work, with a few specific do over's, and not counting building the mounts or set up. This is not a quick and dirty task. Detection depends on the 2D angle from the centerline, the distance from centerline, target material, shape, and target area. This would be a series of experiments that build on each other. For instance, a knowledge of the shape of the field at any distance is necessary. Is it circular or ellipsoid, or even more complicated, such as bifurcated along the centerline (doubtful)? Done manually, these are a set of very tedious experiments, requiring dedicated hours and patience. Of course, some or a lot of automation is possible. I can think of several ways to use stepper motors, and model RR tracks or other track mechanisms, to save time and boredom. At a more advanced level, the entire process could be handled by sending the serial data from the Arduino to a computer, which in turn could analyze the data on the fly and send minimal instructions back to the Arduino to make adjustments to zero in on the detection edge much faster. There are many algorithms for this kind of idea, e.g., simplex optimization, or a Kalman filter. The Python PySerial library can handle this kind of communication very nicely.
3. Of course, sensor aimed experiments, where the target is aimed at the sensor also could be useful. This work puts even more extraordinary stress on data gathering, because angling the target introduces another degree of freedom. So these tests are a function of distance from the sensor, vertical and horizontal position, and target angle to the sensor. If flat targets are used, this would involve a sketch that automatically adjusts the target angle in relation to the distance from the sensor. At first guess, this counter angle problem might be avoided by using various size spherical targets to probe the practical beam pressure field. However, because again we need to be concerned about the effective area that the sphere presents to return an echo, some 3D geometry calculations need to be considered to determine the effective echo return area with distance, at any position from the sensor.
