-
介绍本工作是 NVIDIA TensorRT Hackathon 2023 的参赛题目,本项目将使用TRT-LLM完成对Qwen-7B-Chat实现推理加速。
-
原始模型:Qwen-7B-Chat
-
原始模型URL:Qwen-7B-Chat 🤗 Qwen-7B-Chat Github
-
注:Hugggingface的Qwen-7B-Chat V1.0貌似下架了,需要的可以用网盘下载。
-
注:2023-09-25 Huggingface的Qwen-7B-Chat再次上架,不过这次上架的是V1.1版,其seq_length从2048变成了8192,其他倒是没啥变化。
-
注:2023-09-25 Huggingface的Qwen-14-Chat上架,经测试trt-llm代码完美运行,只需要改一下default_config.py的文件路径就可以运行。
-
选题类型:2+4(注:2指的是TRT-LLM实现新模型。4指的是在新模型上启用了TRT-LLM现有feature)
请简练地概括项目的主要贡献,使读者可以快速理解并复现你的工作,包括:
(例如给出精度和加速比),简单给出关键的数字即可,在这里不必详细展开
- 精度:fp16 基本和原版一样,int8(weight only) / int4(weight only) /int8(smooth quant) Rouge分数略有提高。总的来说,和原版基本相差不大。
- 加速比:吞吐加速比最高4.57倍,生成加速比最高5.56倍。
-
准备工作
- 有一个英伟达显卡,建议12G显存以上,推荐24G(注:12G显存可以用int4, 16G显存可以用int8, 24G显存可以用fp16)。
- 需要Linux系统,WSL或许也可以试试。
- 已经安装了docker,并且安装了nvidia-docker,安装指南
- 需要较大的磁盘空间,最少50G以上,推荐100G。
- 需要较大的CPU内存,最少32G,推荐64G以上。
-
拉取本项目代码
git clone https://github.com/Tlntin/Qwen-7B-Chat-TensorRT-LLM.git
-
拉取docker镜像。
docker pull registry.cn-hangzhou.aliyuncs.com/trt-hackathon/trt-hackathon:final_v1
- 注:该镜像为比赛专用镜像,目前已经下架,需要使用的该镜像的用户可以直接用docker来编译。
- 注:Docker编译时用的TensorRT是9.0.1.4和比赛镜像里面的9.0.0.2略有差异,不过应该不影响。
- 编译方法:
wget https://developer.nvidia.com/downloads/compute/machine-learning/tensorrt/secure/9.0.1/tars/TensorRT-9.0.1.4.Linux.x86_64-gnu.cuda-12.2.tar.gz docker build . -t registry.cn-hangzhou.aliyuncs.com/trt-hackathon/trt-hackathon:final_v1 -
进入项目目录,然后创建并启动容器,同时将本地代码路径映射到
/root/workspace/trt2023路径cd Qwen-7B-Chat-TensorRT-LLM docker run --gpus all \ --name trt2023 \ -d \ --ipc=host \ --ulimit memlock=-1 \ --restart=always \ --ulimit stack=67108864 \ -v ${PWD}:/root/workspace/trt2023 \ registry.cn-hangzhou.aliyuncs.com/trt-hackathon/trt-hackathon:final_v1 sleep 8640000
- 由于本项目采用了RmsNorm和SmoothQuantRmsNorm两个Plugin来加速编译和推理,而比赛镜像原版里面的trt-llm并没有包含这俩plugin,所以需要重新编译该项目源码,并重新安装trt_llm,参考教程
- 如果你是直接用上面的命令编译的docker镜像,则RmsNorm和SmoothQuantRmsNorm两个Plugin已经内置在里面了,不需要再重新编译了。
-
下载模型
QWen-7B-Chat模型(可以参考总述部分),然后将文件夹重命名为qwen_7b_chat,最后放到tensorrt_llm_july-release-v1/examples/qwen/路径下即可。 -
安装根目录的提供的Python依赖,然后再进入qwen路径
pip install -r requirements.txt cd tensorrt_llm_july-release-v1/examples/qwen/ -
将Huggingface格式的数据转成FT(FastTransformer)需要的数据格式(非必选,不convert直接build也是可以的,两种方式都兼容,直接build更省空间,但是不支持smooth quant; 运行该代码默认是需要加载cuda版huggingface模型再转换,所以低于24G显存的显卡建议跳过这步。)
python3 hf_qwen_convert.py
-
修改编译参数(可选)
- 默认编译参数,包括batch_size, max_input_len, max_new_tokens, seq_length都存放在
default_config.py中 - 对于24G显存用户,直接编译即可,默认是fp16数据类型,max_batch_size=2
- 对于低显存用户,可以降低max_batch_size=1,或者继续降低max_input_len, max_new_tokens
- 默认编译参数,包括batch_size, max_input_len, max_new_tokens, seq_length都存放在
-
开始编译。
- 对于24G显存用户,可以直接编译fp16。
python3 build.py
- 对于16G显存用户,可以试试int8 (weight only)。
python3 build.py --use_weight_only --weight_only_precision=int8
- 对于12G显存用户,可以试试int4 (weight only)
python3 build.py --use_weight_only --weight_only_precision=int4
-
试运行(可选)编译完后,再试跑一下,输出
Output: "您好,我是来自达摩院的大规模语言模型,我叫通义千问。<|im_end|>"这说明成功。python3 run.py
-
验证模型精度(可选)。可以试试跑一下
summarize.py,对比一下huggingface和trt-llm的rouge得分。对于网络不好的用户,可以从网盘下载数据集,然后按照使用说明操作即可。- 百度网盘:链接: https://pan.baidu.com/s/1UQ01fBBELesQLMF4gP0vcg?pwd=b62q 提取码: b62q
- 谷歌云盘:https://drive.google.com/drive/folders/1YrSv1NNhqihPhCh6JYcz7aAR5DAuO5gU?usp=sharing
- 跑hugggingface版
python3 summarize.py --backend=hf
- 跑trt-llm版
python3 summarize.py --backend=trt_llm
- 注:如果用了网盘的数据集,解压后加载就需要多两个环境变量了,运行示范如下:
HF_DATASETS_OFFLINE=1 TRANSFORMERS_OFFLINE=1 python3 summarize.py --backend=hf
或者
HF_DATASETS_OFFLINE=1 TRANSFORMERS_OFFLINE=1 python3 summarize.py --backend=trt_llm
- 一般来说,如果trt-llm的rouge分数和huggingface差不多,略低一些(1以内)或者略高一些(2以内),则说明精度基本对齐。
-
测量模型吞吐速度和生成速度(可选)。需要下载
ShareGPT_V3_unfiltered_cleaned_split.json这个文件。- 可以通过wget/浏览器直接下载,下载链接
- 也可通过百度网盘下载,链接: https://pan.baidu.com/s/12rot0Lc0hc9oCb7GxBS6Ng?pwd=jps5 提取码: jps5
- 下载后同样放到
tensorrt_llm_july-release-v1/examples/qwen/路径下即可 - 测量前,如果需要改max_input_length/max_new_tokens,可以直接改
default_config.py即可。一般不推荐修改,如果修改了这个,则需要重新编译一次trt-llm,保证两者输入数据集长度统一。 - 测量huggingface模型
python3 benchmark.py --backend=hf --dataset=ShareGPT_V3_unfiltered_cleaned_split.json --hf_max_batch_size=1
- 测量trt-llm模型 (注意:
--trt_max_batch_size不应该超过build时候定义的最大batch_size,否则会出现内存错误。)
python3 benchmark.py --backend=trt_llm --dataset=ShareGPT_V3_unfiltered_cleaned_split.json --trt_max_batch_size=1
-
尝试终端对话(可选)。运行下面的命令,然后输入你的问题,直接回车即可。
python3 cli_chat.py
-
尝试网页对话(可选)。运行下面的命令,然后打开本地浏览器,访问:http://127.0.0.1:7860 即可
python3 web_demo.py
- 默认配置的web_demo.py如下:
demo.queue().launch(share=True, inbrowser=True)
- 如果是服务器运行,建议改成这样
demo.queue().launch(server_name="0.0.0.0", share=False, inbrowser=False)
- web_demo参数说明
share=True: 代表将网站穿透到公网,会自动用一个随机的临时公网域名,有效期3天,不过这个选项可能不太安全,有可能造成服务器被攻击,不建议打开。inbrowser=True: 部署服务后,自动打开浏览器,如果是本机,可以打开。如果是服务器,不建议打开,因为服务器也没有谷歌浏览器给你打开。server_name="0.0.0.0": 允许任意ip访问,适合服务器,然后你只需要输入http://[你的ip]: 7860就能看到网页了,如果不开这个选择,默认只能部署的那台机器才能访问。share=False:仅局域网/或者公网ip访问,不会生成公网域名。inbrowser=False: 部署后不打开浏览器,适合服务器。
-
部署api,并调用api进行对话(可选)。
- 部署api
python3 api.py
- 另开一个终端,进入
tensorrt_llm_july-release-v1/examples/qwen/client目录,里面有4个文件,分别代表不同的调用方式。 async_client.py,通过异步的方式调用api,通过SSE协议来支持流式输出。normal_client.py,通过同步的方式调用api,为常规的HTTP协议,Post请求,不支持流式输出,请求一次需要等模型生成完所有文字后,才能返回。openai_normal_client.py,通过openai模块直接调用自己部署的api,该示例为非流式调用,请求一次需要等模型生成完所有文字后,才能返回。。openai_stream_client.py,通过openai模块直接调用自己部署的api,该示例为流式调用。
-
前6节和上面一样,参考上面运行就行。
-
将Huggingface格式的数据转成FT(FastTransformer)需要的数据格式
python3 hf_qwen_convert.py --smoothquant=0.5
-
构建TRT Engine前需要编译一下整个项目,这样后面才能加载新增的rmsnorm插件。参考该教程。
-
开始编译trt_engine
- 普通版
python3 build.py --use_smooth_quan
- 升级版(理论上运行速度更快,推理效果更好,强烈推荐)
python3 build.py --use_smooth_quan --per_token --per_channel
-
编译完成,run/summarize/benchmark等等都和上面的是一样的了。
- 请在这一节里总结你的工作难点与亮点。
- 如果使用 TensorRT-LLM 进行优化,描述以下方面可供选手参考:如果搭建了新模型, 请介绍模型结构有无特别之处,在模型的搭建过程中使用了什么算子,有没有通过plugin支持的新算子。如果支持新feature,请介绍这个feature具体需要修改哪些模块才能实现。如果优化已有模型,请介绍模型性能瓶颈以及解决方法。另外还可以包含工程实现以及debug过程中的难点。
-
huggingface转llm-trt比较繁琐。
- 目前只能肉眼观察已有成功案例,例如参考chatglm/llama, 通过debug huggingface版和观察trt-llm版,了解整体思路。
- 然后观察qwen和chatglm/llama的差异,拿这两个案例做魔改。
- 通过对比代码,发现examples下面的chatglm-6b的rope embedding和qwen类似,所以chatglm-6b的rope embedding的trt实现可以作为参考项。
- 移植时发现,rope提前算好了weights,然后分割成了两个cos_embedding和sin_embedding。为确保该方案可行,于是在huggingface版的qwen中实现了类似结构,对比rope_cos和rope_sim的输出结果,以及对应sum值,发现该操作可行,于是将其移植到了qwen trt-llm中。
- 不过需要注意的是,qwen的dim和max_position_dim和chatglm-6b不一样,加上chatglm-6b trt-llm的rope的inv_freq做了一定约分,导致看起来比较奇怪,所以后续我们直接使用了的qwen原版的inv_freq计算,以及qwen原版的apply_rotary_pos_emb方法。
- 整体代码魔改自llama, attention/rope参考了chatglm-6b。
-
首次运行报显存分配错误。
- 在其附近插入可用显存和需要分配的显存代码,发现是显存不够, 将max_batch_size从默认的8改成2后解决。
-
fp16下,模型的logits无法对齐。
- 通过阅读
docs/2023-05-19-how-to-debug.md文档,基本掌握的debug能力,然后按照代码运行顺序,从外到内debug,找到误差所在层。 - 首先我们对比了wte和rope输出,基本确定这两个layer没有问题。
- 然后我们打印了qwen_block的每层输入,其中第一个layer的输入hidden_states正常,后续误差逐步增加,所以初步确定误差在QwenBlock这个类中。
- 由于attention使用了rope相关计算+gpt attention_layer,这里出问题的可能性较大,于是我们在QwenBlock中的attention计算里面加入调试操作,打印其输入与输出结果,并和pytorch做数值对比(主要对比mean, sum数值)。经对比发现QwenBlock的attention输入sum误差在0.2以内,基本ok,但是其输出误差很大,所以需要进一步定位。
- 由于QwenAttention中采用了rope相关计算+gpt attention plugin的方式组合而成,而plugin调试相对困难,所以我们需要进一步测试gpt attention plugin的输入输出。若输入正常,输出异常,则gpt attention plugin异常,反之,则可能是plugin之前的layer有问题。
- 在gpt attention plugin处打印发现输入结果无法对齐,于是逐层对比QwenAttention forward过程,最终定位到下面这段代码输出异常。
qkv = concat([query, key, value], dim=2) qkv = qkv.view( concat([shape(qkv, 0), shape(qkv, 1), self.hidden_size * 3]) )- 在经过2/3天调试后,发现与concat无瓜,是plugin内部再次计算了一次rope,导致qkv结果异常,将
tensorrt_llm.functional.gpt_attention输入的rotary_embedding_dim设置为0后,该问题得到解决。不过最终输出还是有问题,经过对比发现attention输出已经正常,但是QwenBlock里面的self.mlp输出异常,需要进一步对比。 - 经对比发现原来的
GateMLPforward函数中,是对第一个layer输出做了silu激活,而qwen是对第二个layer的输出做silu激活,两者存在区别,所以我们又重新建了一个QwenMLP类用来实现原版的计算过程。 - 经过上述优化,经对比输出的logits平均误差大概在0.002左右,基本完成了精度对齐。
- 通过阅读
-
trt-llm输出结果和pytorch不一致。
- 此时整个模型的计算过程已经没有问题,也对比了不同step的输出,都是可以对上的,但是输出的结果和pytorch还是有区别:
input:
"""
<|im_start|>system
You are a helpful assistant.<|im_end|>
<|im_start|>user
你好,请问你叫什么?<|im_end|>
<|im_start|>assistant
"""

pytorch output:
"""
您好,我是来自达摩院的大规模语言模型,我叫通义千问。<|im_end|>
"""

trt-llm output:
"""
您好,我是来自达摩院的大规模语言模型,我叫通义千问。<|im_end|>
<|im_start|>assistant

很高兴为您服务。<|im_end|>
<|endoftext|> решил купить новый ноутбук, но не могу выбрать между тремя предложениями."
"""
- 经过对比发现是因为sampling config没有对齐,观察了pytorch原版的后处理逻辑,发现其将
tokenizer.im_start_id, tokenizer.im_end_id设置为了end of token,考虑到trt-llm只能设置一个end of token, 而在输出时<|im_end|>先于<|im_start|>,所以我们将将EOS_TOKEN修改为tokenizer.im_end_id对应的数字。并将top-p, top-k设置原pytorch版generation_config.json中对应的数字。 - 改完后我们发现结尾存在大量重复
<|im_end|>(PAD和EOS_TOKEN解码对应的内容),这个主要是前期past_key_value赋值的时候是默认给了最长的长度max_input_length+max_output_length,我们在debug run.py中发现decode的step并不一定输出最大长度,而是经常中途退出循环。所以我们决定将退出时的step返回,如果没有中途退出就返回最大max_output_length, 这样就可以知道模型真实生成的长度。以最大输入长度+真实生成长度做截断,然后再用tokenizer解码,就可以得到最终输出结果了。
Input:
"""
<|im_start|>system
You are a helpful assistant.<|im_end|>
<|im_start|>user
你好,请问你叫什么?<|im_end|>
<|im_start|>assistant
"""

Output
"""
您好,我是来自达摩院的大规模语言模型,我叫通义千问。<|im_end|>
"""
- 此时输出结果和pytorch完全一致。
-
运行
summarize.py无输出。-
由于我们选择qwen-chat-7b是一个chat模型,无法直接输入一段文本做总结,需要写一个专门的prompt(提示语)来让模型做这个总结的工作。
-
于是我们将原版的
make_context移植过来,并设置专门的system_prompt让模型根据用户输入直接做总结,这样将原始输入加工后再输出结果,使得模型有了总结能力。 -
至此,在trt-llm上支持qwen模型的基础工作已经做完
-
- 完整支持原版的logn和ntk(这俩参数是用于增强模型长输入的生成效果,这里的长输入指的是输入长度大于2048小于8192)。不过由于trt-llm的某些bug,导致输入长度>2048时,实际输出会很短甚至为空,详见issue,加上rope放gpt attention plugin里面计算更快,所以我们logn注释掉了。
- 支持
RotaryEmbedding,并且在input_len > 2048时开启ntk相关计算。 - 支持自带的
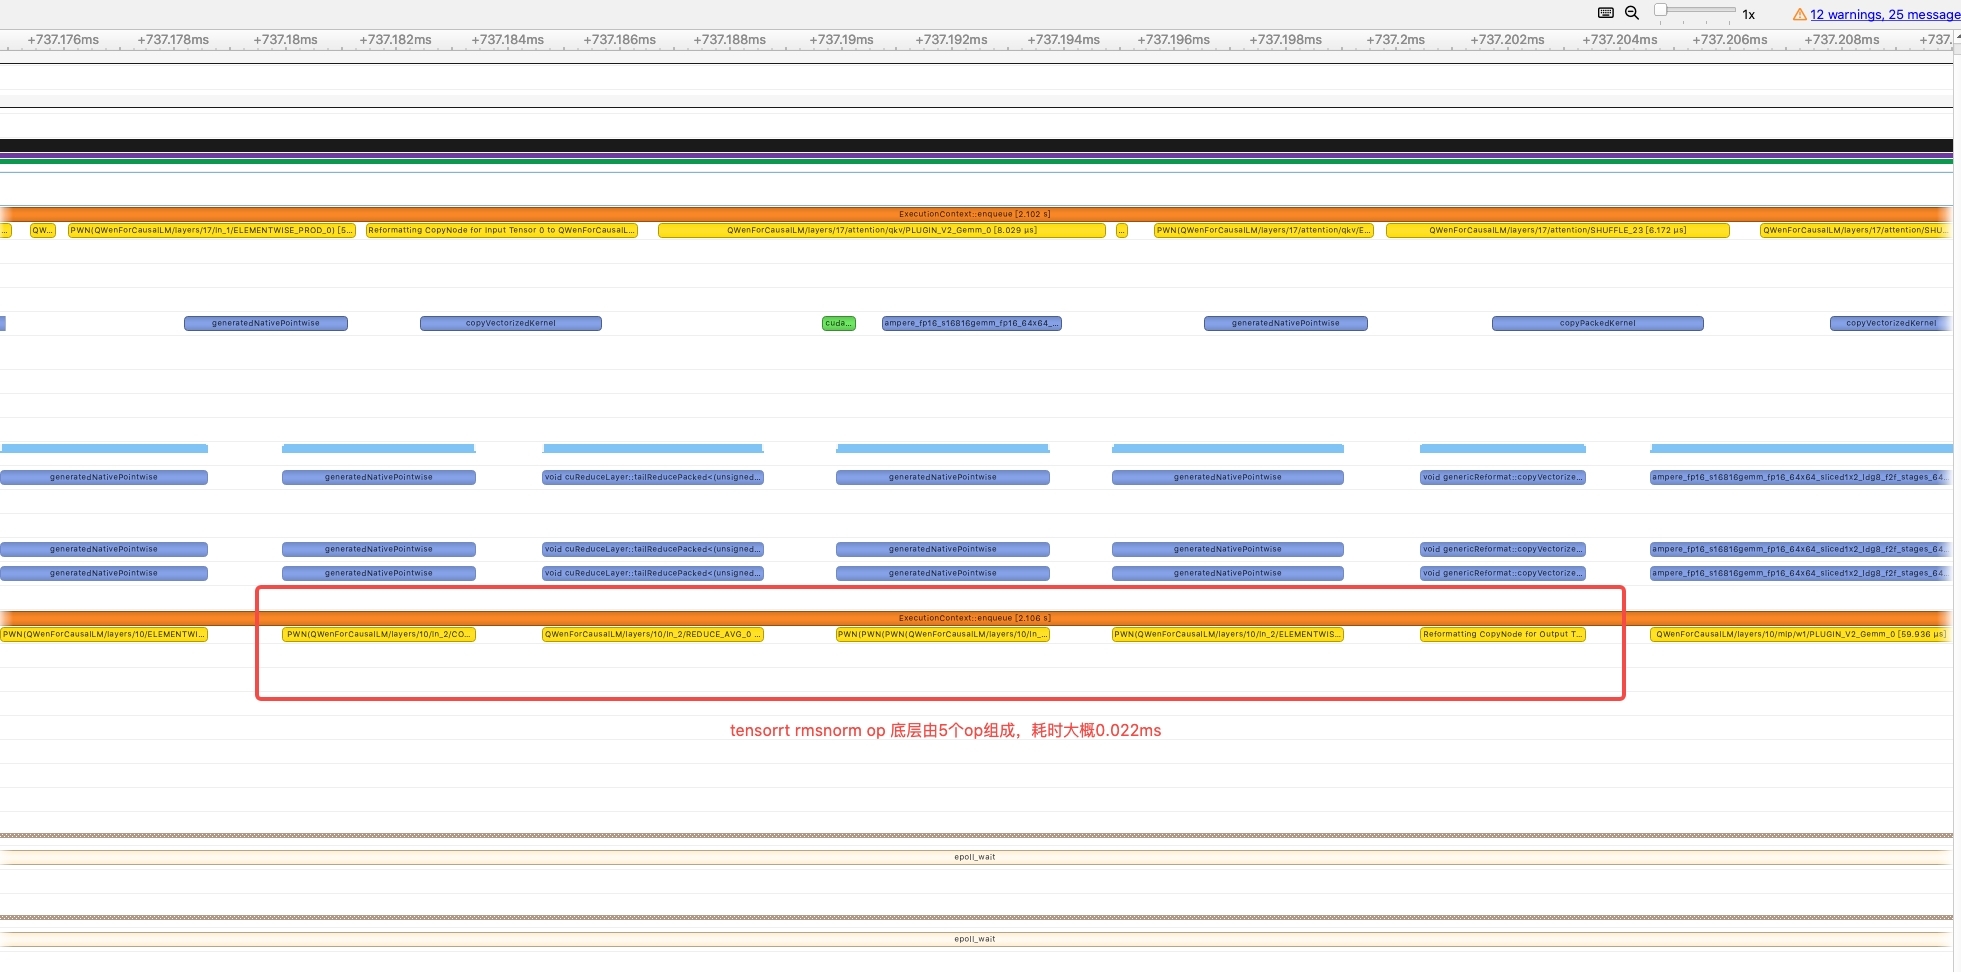
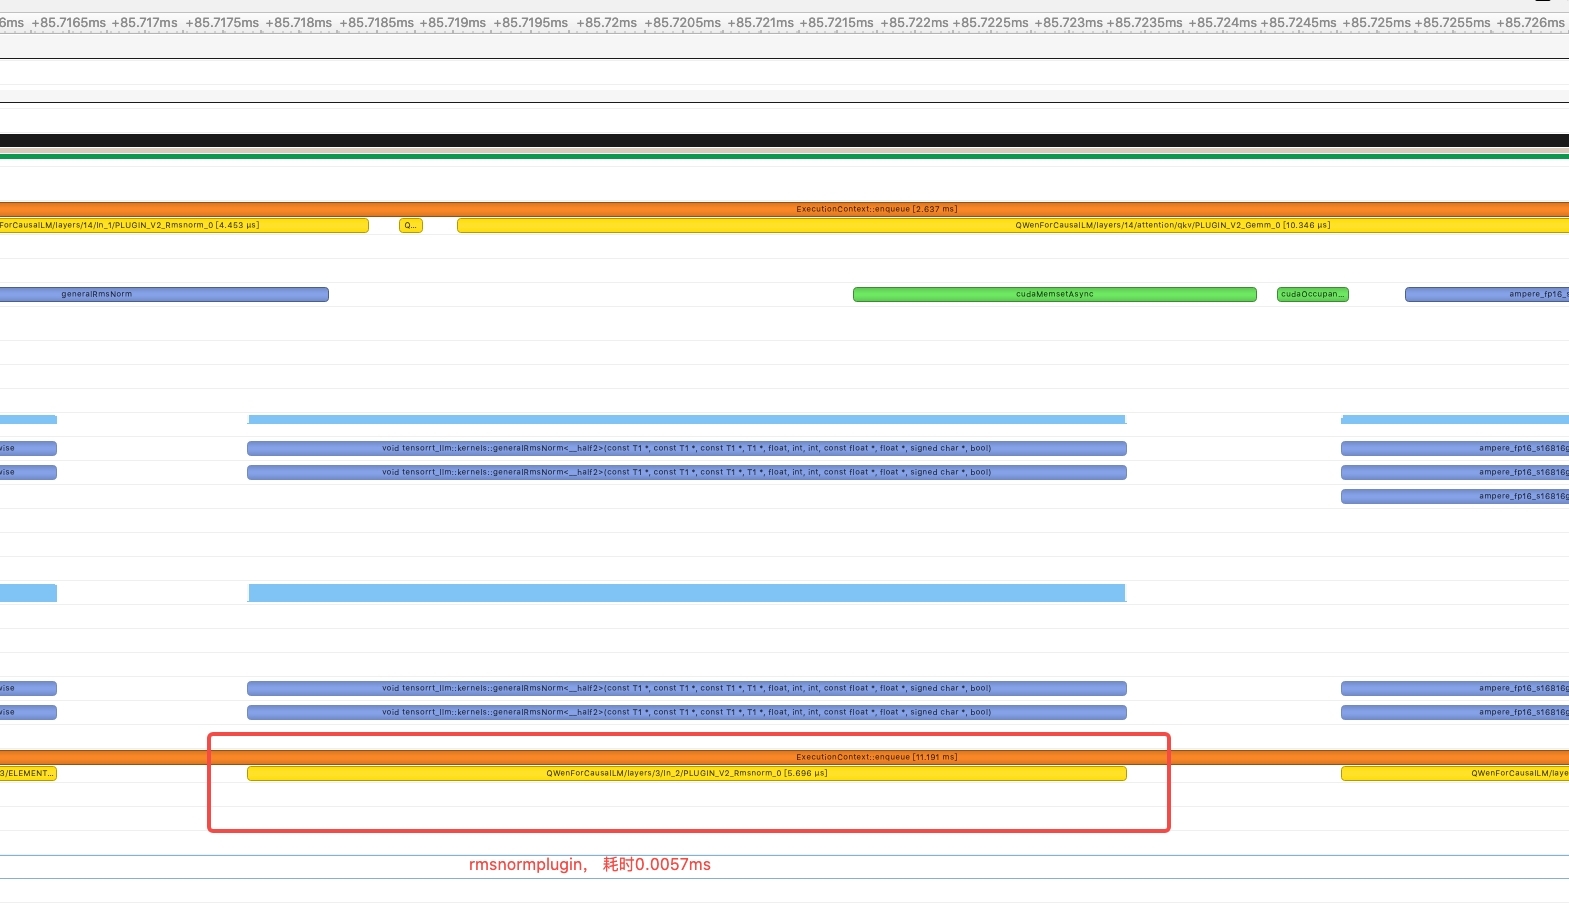
gpt_attention_plugin与gemm_plugin两个plugin。 - 新增支持rmsnorm plugin,在profile过程中发现原生的rmsnorm在底层是由5个op组成,kernel launch占比严重,并且中间数据传递也消耗时间,一次rmsnorm计算大概耗时0.022ms,因此通过cuda的方式实现了rmsnormplugin,减少kernellaunch,加快计算,最终优化后一次rmsnorm的计算时间降低到了0.0057ms。


RmsnormPlugin performance comparison (test on fp16)
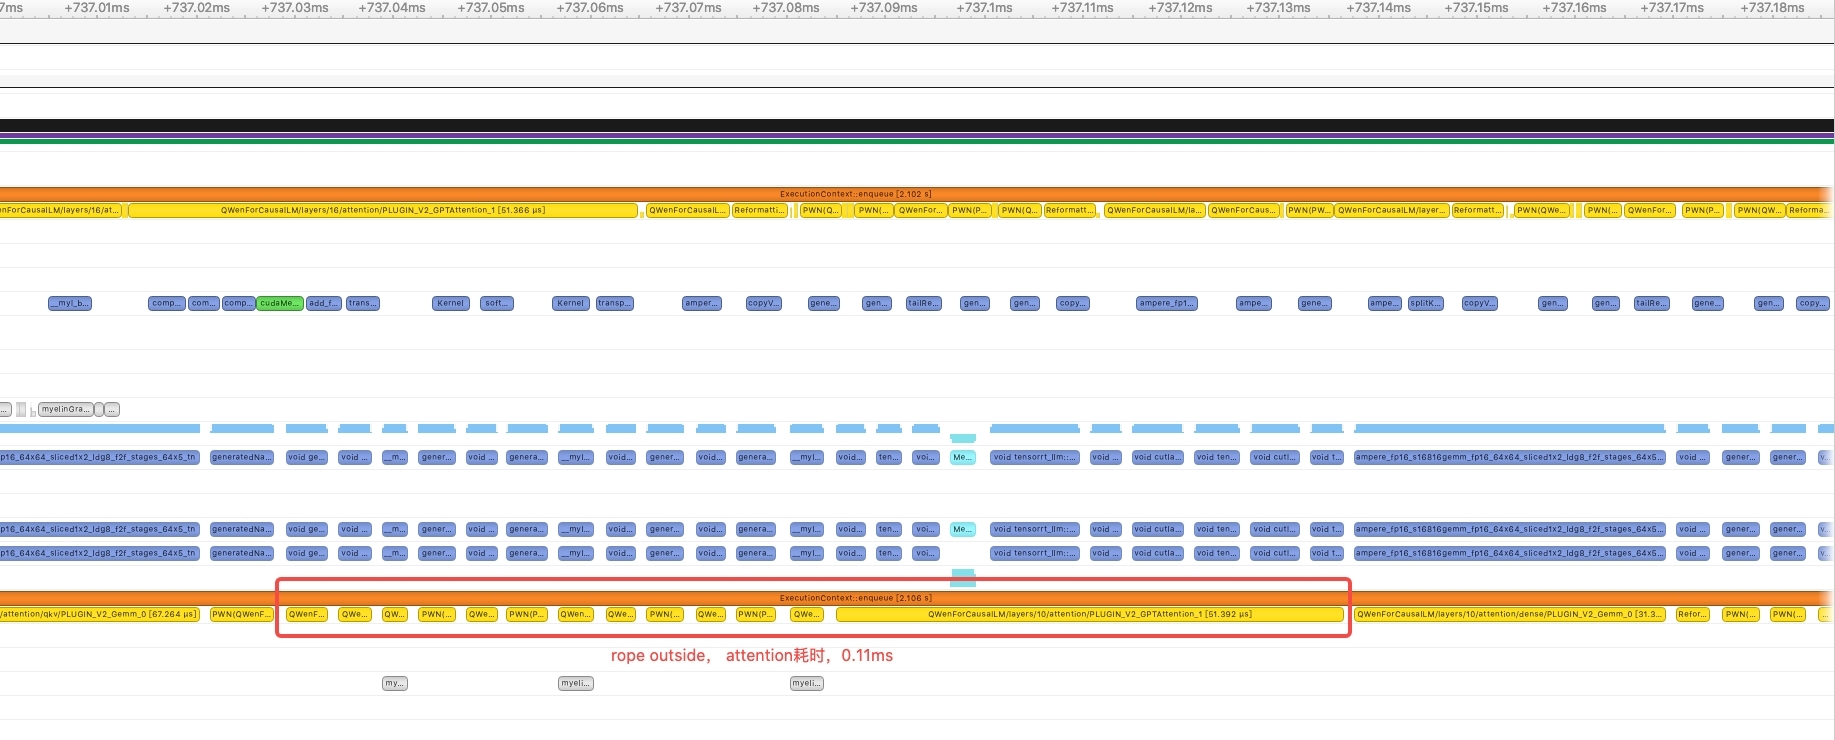
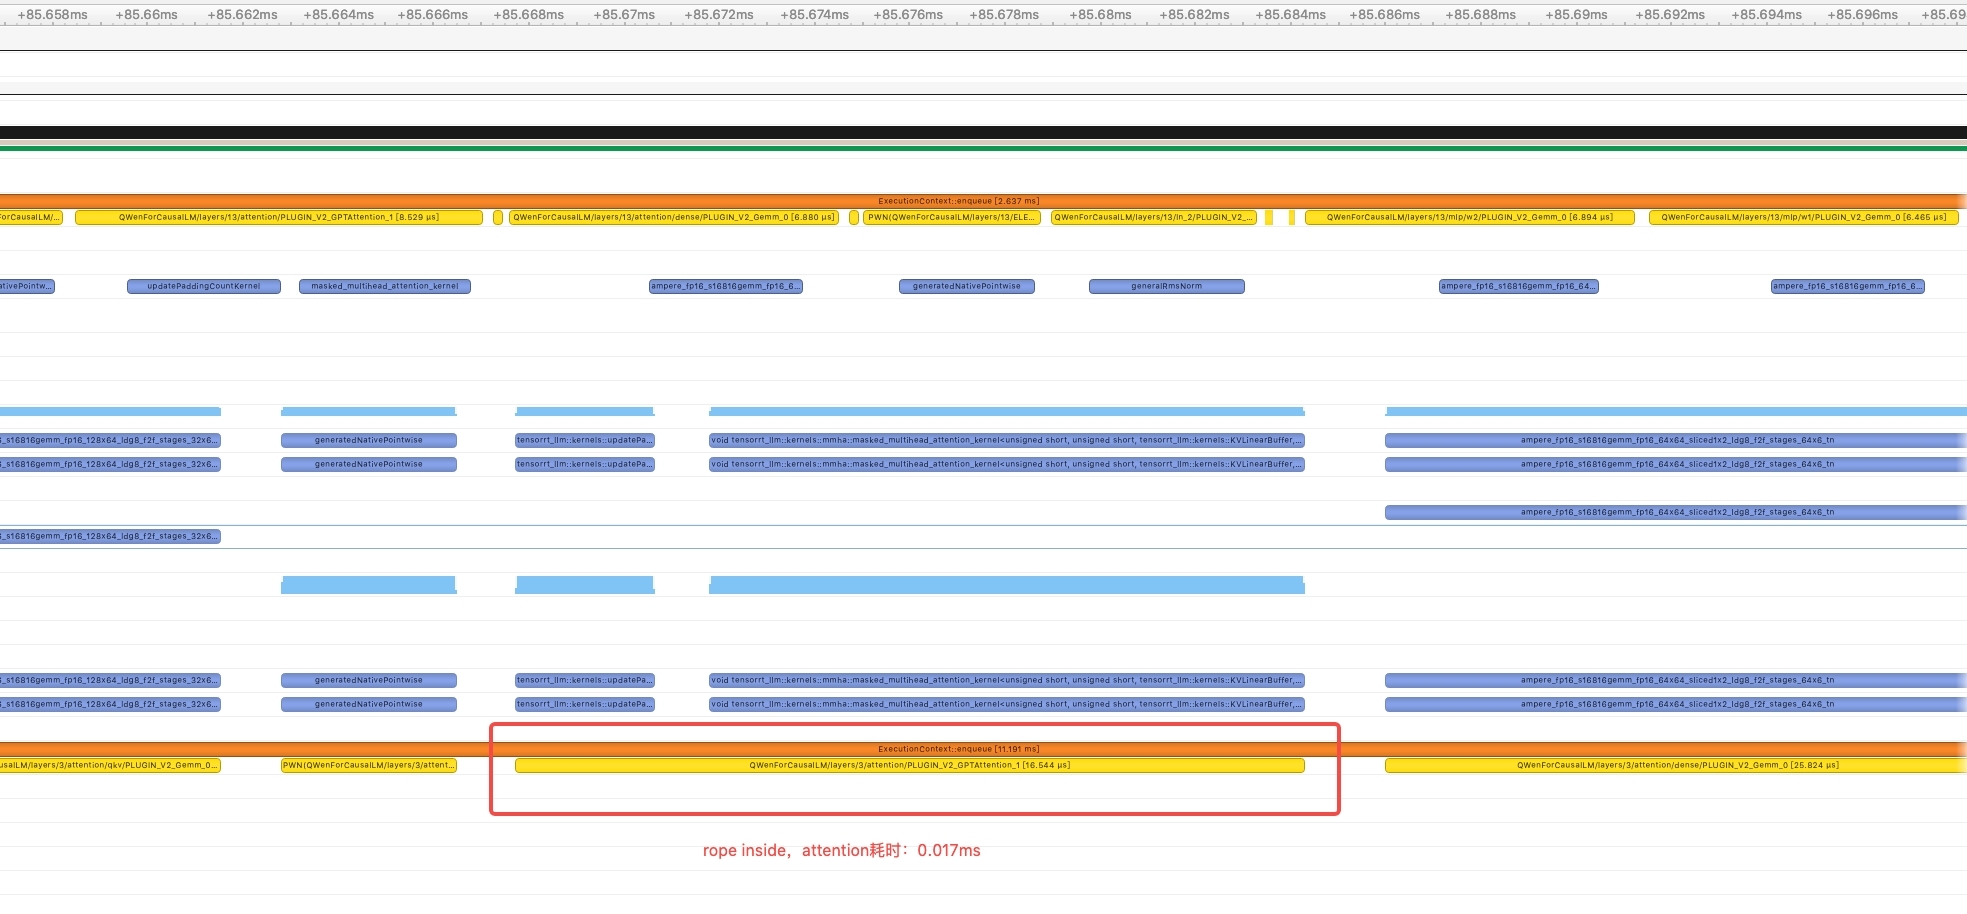
- 使用gpt attention plugin内置的rope计算方法,参考glm,开始也是在gpt attention plugin外面计算的rope,同样profile发现attention部分计算kernel较多,单次计算耗时大概在0.11ms,因此尝试使用gpt attention plugin内置的rope,优化后一次attention的计算大概在0.017ms。


RmsnormPlugin performance comparison (test on fp16)
- 同时将
layernorm_plugin魔改成rmsnorm_plugin以支持smooth_quant量化技术,并且实际测试RmsNorm Plugin也可以给fp16和int8/int4 (wight only)带来不错的提升。 - 同时支持qwen base和chat模型
- 支持fp16 / int8 (weight only) / int4 (weight only), 理论上最低只需要8G消费级显卡就能运行。
- 支持Smooth Quant int8量化。
- 支持在终端对话和使用gradio构建的网页应用中对话,支持流式输出。
- 支持fastapi部署,支持sse协议来实现流式输出,同时兼容OpenAI的api请求。
这一部分是报告的主体。请把自己假定为老师,为 TensorRT 或 TensorRT-LLM 的初学者讲述如何从原始模型出发,经过一系列开发步骤,得到优化后的 TensorRT 或 TensorRT-LLM 模型。或者你是如何一步步通过修改哪些模块添加了新feature的。
建议:
- 分步骤讲清楚开发过程
- 最好能介绍为什么需要某个特别步骤,通过这个特别步骤解决了什么问题
- 比如,通过Nsight Systems绘制timeline做了性能分析,发现attention时间占比高且有优化空间(贴图展示分析过程),所以决定要写plugin。然后介绍plugin的设计与实现,并在timeline上显示attention这一部分的性能改进。
-
跑一下
tensorrt_llm_july-release-v1/examples/gpt的代码,了解一下trt-llm的基本流程。 -
读
QWen-7B-Chat的Readme信息,基本了解它是一个decoder only模型,并且模型结构类llama。 -
将
tensorrt_llm_july-release-v1/examples/llama复制一份,然后重命名为tensorrt_llm_july-release-v1/examples/qwen,将里面的模型带llama的全部替换为qwen。 -
运行
build.py时,发现调用了weight.py,而llama项目里面的weight.py里面有一个load_from_meta_llama函数,函数里面有一个tensorrt_llm.models.LLaMAForCausalLM,里面定义了整个trt的模型结构。我们用vscode进入其中,将里面的LLaMAForCausalLM复制出来,然后新建了一个mode.py,将内容粘贴进去。同样,将里面的模型带llama的全部替换为qwen -
然后我们就开始改本项目的
weight.py的load_from_meta_qwen函数,将huggingface里面的权重名称和trt的权重名称逐步对齐。然后我们运行了一下build.py,发现可以编译通过,但是运行run.py结果不对。 -
我们通过肉眼观察模型结构,发现trt版少了一个
RotaryEmbedding,这个该如何实现了?观察了一下tensorrt_llm_july-release-v1/examples/目录下面的其他项目,突然发现里面的chatglm6b有类似的结构,不过他却分成了position_embedding_cos和position_embedding_sin两个普通的embedding。我们大概知道它或许是一个新的实现方式,但是功能和原版一样。通过观察,我们发现其rope权重是在weight.py里面用numpy手搓直接导入的。导入代码如下:- chatglm6b/hf_chatglm6b_convert.py
nMaxSL = 2048
inv_freq = 10**(-1 / 16 * np.arange(0, 64, 2, dtype=np.float32))
valueTable = np.matmul(
    np.arange(nMaxSL, dtype=np.float32).reshape(-1, 1),
    np.concatenate([inv_freq, inv_freq],
                   axis=0).reshape(1, -1)).reshape(nMaxSL,
                                                   len(inv_freq) * 2)
np.cos(valueTable).astype(storage_type).tofile(saved_dir /
                                               "model.cosTable.weight.bin")
np.sin(valueTable).astype(storage_type).tofile(saved_dir /
                                               "model.sinTable.weight.bin")
print("Save model.cosTable.weight.bin")
print("Save model.sinTable.weight.bin")
- chatglm6b/weight.py
chatglm6bModel.position_embedding_cos.weight.value = (fromfile( dir_path, 'model.cosTable.weight.bin', [n_positions, n_embd // n_head // 2])) chatglm6bModel.position_embedding_sin.weight.value = (fromfile( dir_path, 'model.sinTable.weight.bin', [n_positions, n_embd // n_head // 2]))- 经过和原版ChatGLM-6b进行对比,大概知道了2048是原版的最大输入长度,64是他的per_head_dim//2
- 而qwen里面的apply_rope时的计算和chatglm略有差异,并且qwen的最大输入长度是8192,这些需要略作修改。
- 修改完后利用debug_mode将对应的数值打印出来,与原版进行对比,发现基本一致。
-
再次通过通过肉眼观察模型结构,发现原模型Attention中还有logn以及ntk的计算,再增加这两结构后,再次做了一次编译,可以正常编译。
-
然后就是做fp16对齐了,参考
开发工作的难点中关于fp16下,模型的logits无法对齐部分即可。 -
在fp16对齐,并且run.py/summarize.py都正常后,我们就开始尝试实现weight only in8/int4,我们先直接运行
--use_weight_only --weight_only_precision=int8,编译成功后,再次运行run.py/summarize.py,发现都正常。int4也重复该操作,发现还是正常,说明weight only in8/int4适配成功。 -
weight only 量化完成后我们开始对模型结构进行分析,查看哪些操作在底层比较耗时,发现其中rmsnorm比较琐碎,kernellaunch以及kernel间交互耗时严重,所以提出使用cuda编写rmsnorm plugin,加速计算,RmsNorm相对LayerNorm来说,就是少了一个减均值操作,并且没有bias,所以我们先拷贝了一份layerNorm的kernel。
- 拷贝操作。
cd tensorrt_llm_july-release-v1/cpp/tensorrt_llm/kernels cp layernormKernels.cu rmsnormKernels.cu cp layernormKernels.h rmsnormKernels.h- 拷贝完后我们将里面的mean/bias去掉,并将layernorm关键词换成rmsnorm的关键词。同时我们发现layerNorm的.cu文件里面有个
USE_DIFF_OF_SQUARES,这个值为Ture时是算方差,为False时算平均值。由于我们不需要平均值,所以这个数值常为True,所以我们将为True的部分保留,为Fasle的部位删除,并且删除了这个变量。 - 同理我们对plugins目录下面的layerNormQuant做了同样的操作。
cd tensorrt_llm_july-release-v1/cpp/tensorrt_llm/plugins
cp layernormPlugin/* rmsnormPlugin/
cp layernormQuantizationPlugin/* rmsnormQuantizationPlugin/
- 同样和上面一样做替换,去bias,去mean,去
USE_DIFF_OF_SQUARES(去除这个需要忽略大小写,有的是小写),最终完成plugin的编写,并且精度验证没有问题。
-
参考教程,我们重新编译了TensorRT-LLM,并且加载了自定义的
Rmsnorm和RmsnormQuantization插件,运行测试,发现结果正常,rmsnorm plugin适配成功。 -
在分析过程中同样发现attention计算过程涉及的kernel较多,并且咨询导师后明白gpt attention plugin也支持rope的计算,但是现在我们是放在外面做的计算导致附带了大量的kernel,因此我们把外面的rope计算流程删除,在gpt attebtion plugin中设置正确的rotary_embedding_dim参数,充分利用tensorrt本身的能力,测试后发现生成结果正确,说明qwen模型可以使用gpt attention plugin内置的rope计算方法,rope内置计算方法适配成功。
-
以上工作做完后我们做了统一测试,包括int8/int4 wight only,测试结果表明rouge分数基本和之前一样并且编译Engine速度大幅度提升,而且运行summarize的速度也进一步提高(大概加速1.5秒)。
-
适配完后,发现还有一个smooth_quant量化,可以降低显存,提高推理速度。不过问了导师,说目前只有gpt适配了,后续可能适配bloom和llama,所以我们参考了gpt的代码,新增了一个
hf_qwen_convert.py文件,用于将huggingface的权重导出到FT(FastTransformer)格式的文件。同时我们将gpt/weight.py里面的load_from_ft拷贝到qwen/weight.py,并根据我们导出的权重文件修改进行了简单修改,然后再将build.py里面默认加载函数从load_from_hf_qwen换成load_from_ft,不过当开发者没有导出FT权重的时候,还是会自动加载load_from_hf_qwen来生成engine。 -
在用了新的
load_from_ft方法后,我们又运行了一次run.py和summarize.py,发现输出结果异常,经过对examples/gpt进行调试,发现qwen的attention权重和gpt的attention权重shape顺序略有不同。为了更好的对比差异,我们将load_from_ft的加载权重的代码粘贴到load_from_hf_qwen,然后一个个变量对比其shape以及value值,对比发现load_from_hf_qwen中,非weight_only量化,则权重直接赋值,否则需要多一个转置操作。经过一轮修改,load_from_ft的fp16终于正常。然后我们又顺便编译了weight_only的int8/int4,发现也同样正常。 -
回到smooth quant量化这里,参考example/gpt的smooth quant过程,我们在
hf_qwen_convert.py里面同样加了--smoothquant选项。通过调试example/gpt/hf_gpt_convert.py文件,观察它的smooth_gpt_model函数的计算方法以及参数的shape,不过他它mlp只有一个fc1, 该layer正好对应qwen mlp的w1/w2 layer,而且w1/w2共享一个输入,相当于fc1拆成了两份,其中一份计算后会经过silu激活层。我们发现example/gpt里面的hf_gpt_convert.py文件里面有调用from smoothquant import capture_activation_range, smooth_gemm和from utils.convert import split_and_save_weight,通过调试这些文件,我们写了自己的对应的函数,并且成功导出了和smooth quant密切相关的int8权重。 -
再次观察example/gpt的smooth quant过程,参考其build.py文件,发现里面有一个
from tensorrt_llm.models import smooth_quantize过程,这个函数会将trt-llm原本的模型结构给替换掉,主要替换了layer_norm, attention, 和mlp部分。其中attention基本和我们的qwen一样,只是我们比他多了logn/apply rope/ntk三个,mlp也可以通过简单修改实现。但是关于gpt的layer_norm,我们用的是RmsNorm,还好,我们在之前已经实现了RmsnormQuantization插件。 -
在代码中测试rmsnorm smoothquant的逻辑时,运行build.py编译Engnie后报了一个和cublas相关的错误,错误提示:
terminate called after throwing an instance of 'std::runtime_error' what(): [TensorRT-LLM Error][int8gemm Runner] Failed to initialize cutlass int8 gemm. Error: Error Internal。通过多次排查,以及群友的提醒,我们发现这个不是我们plugin的问题,而是smooth_quant_gemm这个插件的问题。该问题可以通过下面的单元测试复现。cd tensorrt_llm_july-release-v1/tests/quantization python -m unittest test_smooth_quant_gemm.py TestSmoothQuantGemm.test_matmul -
通过参考教程我们重新编译了Debug版的TRT-LLM,并且可以在vscode中调试TRT-LLM代码。在debug中,我们发现了个别较大的shape存在共享显存分配过多而导致cublas初始化失败的问题。通过增加try/catch功能,我们跳过了失败的策略。然后再次跑test发现出现了下面的错误:
terminate called after throwing an instance of 'std::runtime_error'
what():  [TensorRT-LLM Error][int8gemm Runner] Failed to run cutlass int8 gemm. Error: Error Internal
-
直觉告诉我们策略选择器能运行的代码,到插件运行阶段确又失败应该是某个参数过大导致了重复运行,所以我们调整了里面和运行阶段有关的两个参数
warmup和runs,经过多次编译,运行单元测试,发现3和10是比较合适的数字,可以产生较长的日志(说明能运行较长时间)。但是最终单元测试还是未能通过,后面我们还是试了一下smooth quant编译,结果发现可以。所以这个单元测试可能并不适合24G显存的A10来运行,或许是给A100跑的呢,相关变更可以通过该commit查看,此时smooth_quant可以编译与运行,但是结果并不对,需要进一步校准代码。 -
通过逐行对比gpt2的smooth quant过程,我们发现需要smooth的几个layer的weight shape中,qwen和gpt是转置关系。所以导致我们在
capture_activation_range和smooth_qwen_model这两个函数中,关于w的维度要和gpt不一样,gpt是dim=0,我们得改成dim=1。同时在split_and_save_weight这个函数调用前,需要将上面几个特殊layer利用transpose_weights函数将其转成gpt的格式,这样我们就可以复用对应的smooth quant int8的相关函数generate_int8和write_int8了。同时我们再次debug了weight.py,确保形状类型和gpt完全一样。重新build smooth quant的 engene后,我们发现run/smmarize均完全正常。
这一部分介绍你的工作在云主机上的运行效果。如果是优化模型,需要分两部分说明:
- 报告与原始模型进行精度对比测试的结果,验证精度达标(abs(rouge_diff) < 1)。
- 测试平台:NVIDIA A10 (24G显存) | TensorRT 9.0.0.1
- TRT_LLM engine编译时最大输入长度:2048, 最大新增长度:2048
- HuggingFace版Qwen采用默认配置,未安装,未启用FlashAttention相关模块
- 测试时:beam=batch=1,max_new_tokens=100
- 测试结果(该结果由
tensorrt_llm_july-release-v1/examples/qwen/summarize.py生成):
HuggingFace (dtype: bf16 | total latency: 99.70530200004578 sec)
  rouge1 : 28.219357100978343
  rouge2 : 9.369007098940832
  rougeL : 19.198723845033232
  rougeLsum : 22.37342869203733

TensorRT-LLM (dtype: fp16 | total latency: 69.03318905830383 sec)
  rouge1 : 28.24200534394352
  rouge2 : 9.385498589891833
  rougeL : 19.22414575248309
  rougeLsum : 22.408209721264484

TensorRT-LLM (dtype: int8 (weight only) | total latency: 44.45594668388367 sec)
  rouge1 : 29.394430367657716
  rouge2 : 10.363250023233798
  rougeL : 19.980678095850568
  rougeLsum : 23.40562693529992

TensorRT-LLM (dtype: int4 (weight only) | total latency: 31.928248405456543 sec)
  rouge1 : 29.74935421942075
  rouge2 : 11.030115146230957
  rougeL : 19.995706951778946
  rougeLsum : 23.94860303628307

TensorRT-LLM ( dtype: int8 (smooth quant) | total latency: 40.39580488204956 sec)
TensorRT-LLM beam 0 result
  rouge1 : 29.825214246965757
  rouge2 : 11.180882972127817
  rougeL : 21.42468892994786
  rougeLsum : 24.66149284270628
- 例如可以用图表展示不同batch size或sequence length下性能加速效果(考虑到可能模型可能比较大,可以只给batch size为1的数据)
- 一般用原始模型作为baseline
- 一般提供模型推理时间的加速比即可;若能提供压力测试下的吞吐提升则更好。
- 测试平台:NVIDIA A10 (24G显存) | TensorRT 9.0.0.1 | tensorrt-llm 0.1.3
- HuggingFace版Qwen采用默认配置,未安装,未启用FlashAttention相关模块
- 注:int8 smooth quant编译时打开了
--per_token --per_channel选项 - 测试结果(该结果由
tensorrt_llm_july-release-v1/examples/qwen/benchmark.py生成)
- 最大输入长度:2048, 最大新增长度:2048,num-prompts=100, beam=1, seed=0
| 测试平台 | 加速方式 | max_batch_size | 吞吐速度(requests/s) | 生成速度(tokens/s) | 吞吐加速比 | 生成加速比 |
|---|---|---|---|---|---|---|
| HuggingFace | dtype: bf16 | 1 | 0.12 | 60.45 | 1 | 1 |
| HuggingFace | dtype: bf16 | 2 | OOM | OOM | / | / |
| TensorRT-LLM | dtype: fp16 | 1 | 0.18 | 88.73 | 1.50 | 1.46 |
| TensorRT-LLM | dtype: fp16 | 2 | 0.22 | 115.23 | 1.83 | 1.90 |
| TensorRT-LLM | dtype: fp16 | 3 | OOM | OOM | / | / |
| TensorRT-LLM | dtype: int8 (weight only) | 1 | 0.30 | 147.38 | 2.50 | 2.44 |
| TensorRT-LLM | dtype: int8 (weight only) | 2 | 0.31 | 162.60 | 2.58 | 2.69 |
| TensorRT-LLM | dtype: int8 (weight only) | 3 | 0.34 | 185.65 | 2.83 | 3.07 |
| TensorRT-LLM | dtype: int8 (weight only) | 4 | 0.36 | 198.46 | 3.00 | 3.28 |
| TensorRT-LLM | dtype: int8 (weight only) | 5 | OOM | OOM | / | / |
| TensorRT-LLM | dtype: int4 (weight only) | 1 | 0.49 | 239.98 | 4.08 | 3.97 |
| TensorRT-LLM | dtype: int4 (weight only) | 2 | 0.47 | 242.10 | 3.92 | 4.00 |
| TensorRT-LLM | dtype: int4 (weight only) | 3 | 0.50 | 269.89 | 4.17 | 4.46 |
| TensorRT-LLM | dtype: int4 (weight only) | 4 | 0.50 | 273.29 | 4.17 | 4.52 |
| TensorRT-LLM | dtype: int4 (weight only) | 5 | 0.49 | 268.98 | 4.08 | 4.45 |
| TensorRT-LLM | dtype: int4 (weight only) | 6 | 0.51 | 283.53 | 4.25 | 4.69 |
| TensorRT-LLM | dtype: int4 (weight only) | 7 | OOM | OOM | / | / |
| TensorRT-LLM | dtype: int8 (smooth quant) | 1 | 0.29 | 146.98 | 2.42 | 2.43 |
| TensorRT-LLM | dtype: int8 (smooth quant) | 2 | 0.35 | 184.63 | 2.92 | 3.05 |
| TensorRT-LLM | dtype: int8 (smooth quant) | 3 | 0.38 | 209.48 | 3.17 | 3.47 |
| TensorRT-LLM | dtype: int8 (smooth quant) | 4 | 0.42 | 227.64 | 3.5 | 3.77 |
| TensorRT-LLM | dtype: int8 (smooth quant) | 5 | OOM | OOM | / | / |
- 最大输入长度:1024, 最大新增长度:1024,num-prompts=100, beam=1, seed=0
| 测试平台 | 加速方式 | max_batch_size | 吞吐量(requests/s) | 生成速度(tokens/s) | 吞吐加速比 | 生成加速比 |
|---|---|---|---|---|---|---|
| HuggingFace | dtype: bf16 | 1 | 0.14 | 51.48 | 1 | 1 |
| HuggingFace | dtype: bf16 | 2 | 0.12 | 53.87 | 0.86 | 1.05 |
| HuggingFace | dtype: bf16 | 3 | OOM | OOM | / | / |
| TensorRT-LLM | dtype: fp16 | 1 | 0.20 | 74.75 | 1.43 | 1.45 |
| TensorRT-LLM | dtype: fp16 | 2 | 0.23 | 91.80 | 1.64 | 1.70 |
| TensorRT-LLM | dtype: fp16 | 3 | 0.26 | 108.50 | 1.86 | 2.01 |
| TensorRT-LLM | dtype: fp16 | 4 | 0.29 | 123.58 | 2.07 | 2.29 |
| TensorRT-LLM | dtype: fp16 | 5 | 0.31 | 136.06 | 2.21 | 2.53 |
| TensorRT-LLM | dtype: fp16 | 6 | 0.31 | 137.69 | 2.21 | 2.56 |
| TensorRT-LLM | dtype: fp16 | 7 | OOM | OOM | / | / |
| TensorRT-LLM | dtype: int8 (weight only) | 1 | 0.34 | 128.52 | 2.43 | 2.39 |
| TensorRT-LLM | dtype: int8 (weight only) | 2 | 0.34 | 139.42 | 2.43 | 2.59 |
| TensorRT-LLM | dtype: int8 (weight only) | 3 | 0.37 | 158.25 | 2.64 | 2.94 |
| TensorRT-LLM | dtype: int8 (weight only) | 4 | 0.40 | 175.28 | 2.86 | 3.25 |
| TensorRT-LLM | dtype: int8 (weight only) | 5 | 0.44 | 193.93 | 3.14 | 3.60 |
| TensorRT-LLM | dtype: int8 (weight only) | 6 | 0.41 | 184.75 | 2.93 | 3.43 |
| TensorRT-LLM | dtype: int8 (weight only) | 7 | 0.46 | 206.81 | 3.29 | 3.84 |
| TensorRT-LLM | dtype: int8 (weight only) | 8 | 0.43 | 195.05 | 3.07 | 3.62 |
| TensorRT-LLM | dtype: int8 (weight only) | 9 | 0.47 | 208.96 | 3.36 | 4.06 |
| TensorRT-LLM | dtype: int8 (weight only) | 10 | 0.47 | 214.72 | 3.36 | 4.17 |
| TensorRT-LLM | dtype: int8 (weight only) | 11 | 0.45 | 205.00 | 3.21 | 3.98 |
| TensorRT-LLM | dtype: int8 (weight only) | 12 | OOM | OOM | / | / |
| TensorRT-LLM | dtype: int4 (weight only) | 1 | 0.59 | 217.27 | 4.21 | 4.22 |
| TensorRT-LLM | dtype: int4 (weight only) | 2 | 0.54 | 217.12 | 3.86 | 4.22 |
| TensorRT-LLM | dtype: int4 (weight only) | 3 | 0.55 | 235.90 | 3.93 | 4.58 |
| TensorRT-LLM | dtype: int4 (weight only) | 4 | 0.55 | 240.24 | 3.93 | 4.67 |
| TensorRT-LLM | dtype: int4 (weight only) | 5 | 0.61 | 267.75 | 4.36 | 5.20 |
| TensorRT-LLM | dtype: int4 (weight only) | 6 | 0.61 | 271.05 | 4.36 | 5.27 |
| TensorRT-LLM | dtype: int4 (weight only) | 7 | 0.60 | 271.51 | 4.29 | 5.27 |
| TensorRT-LLM | dtype: int4 (weight only) | 8 | 0.60 | 273.13 | 4.29 | 5.31 |
| TensorRT-LLM | dtype: int4 (weight only) | 9 | 0.63 | 279.14 | 4.5 | 5.42 |
| TensorRT-LLM | dtype: int4 (weight only) | 10 | 0.64 | 286.16 | 4.57 | 5.56 |
| TensorRT-LLM | dtype: int4 (weight only) | 11 | 0.58 | 266.91 | 4.14 | 5.18 |
| TensorRT-LLM | dtype: int4 (weight only) | 12 | 0.56 | 254.73 | 4.00 | 4.95 |
| TensorRT-LLM | dtype: int4 (weight only) | 13 | 0.56 | 256.27 | 4.00 | 4.98 |
| TensorRT-LLM | dtype: int4 (weight only) | 14 | OOM | OOM | / | / |
| TensorRT-LLM | dtype: int8 (smooth quant) | 1 | 0.36 | 134.10 | 2.57 | 2.6 |
| TensorRT-LLM | dtype: int8 (smooth quant) | 2 | 0.40 | 161.98 | 2.86 | 3.15 |
| TensorRT-LLM | dtype: int8 (smooth quant) | 3 | 0.45 | 185.56 | 3.21 | 3.6 |
| TensorRT-LLM | dtype: int8 (smooth quant) | 4 | 0.50 | 214.51 | 3.57 | 4.17 |
| TensorRT-LLM | dtype: int8 (smooth quant) | 5 | 0.56 | 240.23 | 4.00 | 4.67 |
| TensorRT-LLM | dtype: int8 (smooth quant) | 6 | 0.53 | 229.17 | 3.79 | 4.45 |
| TensorRT-LLM | dtype: int8 (smooth quant) | 7 | 0.53 | 234.73 | 4.56 | 4.56 |
| TensorRT-LLM | dtype: int8 (smooth quant) | 8 | 0.55 | 245.52 | 3.93 | 4.77 |
| TensorRT-LLM | dtype: int8 (smooth quant) | 9 | 0.56 | 248.33 | 4.00 | 4.82 |
| TensorRT-LLM | dtype: int8 (smooth quant) | 10 | 0.58 | 258.25 | 4.14 | 5.02 |
| TensorRT-LLM | dtype: int8 (smooth quant) | 11 | 0.55 | 245.96 | 3.93 | 4.78 |
| TensorRT-LLM | dtype: int8 (smooth quant) | 12 | OOM | OOM | / | / |
请注意:
- 相关测试代码也需要包含在代码仓库中,可被复现。
- 请写明云主机的软件硬件环境,方便他人参考。
-
提交bug是对TensorRT/TensorRT-LLM的另一种贡献。发现的TensorRT/TensorRT-LLM或cookbook、或文档和教程相关bug,请提交到github issues,并请在这里给出链接。
-
已提交,待复核的bug:Bug3
送分题答案 | 操作步骤
- 第一题。
- 题目内容:
请在报告中写出 /root/workspace/tensorrt_llm_july-release-v1/examples/gpt/README 里面 “Single node, single GPU” 部分如下命令的输出(10分)模型为gpt2-medium
python3 run.py --max_output_len=8
- 输出结果
Input: Born in north-east France, Soyer trained as a
Output: chef and eventually became a chef at a- 第二题
- 题目内容
请在报告中写出 /root/workspace/tensorrt_llm_july-release-v1/examples/gpt/README 里面 “Summarization using the GPT model” 部分如下命令的rouge 分数(10分)模型为gpt2-medium
python3 summarize.py --engine_dirtrt_engine/gpt2/fp16/1-gpu --test_hf --batch_size1 --test_trt_llm --hf_model_location=gpt2 --check_accuracy --tensorrt_llm_rouge1_threshold=14
- 输出结果
TensorRT-LLM (total latency: 3.0498504638671875 sec)
TensorRT-LLM beam 0 result
  rouge1 : 21.869322054781037
  rouge2 : 6.258925475911645
  rougeL : 16.755771650012953
  rougeLsum : 18.68034777724496
Hugging Face (total latency: 9.381023168563843 sec)
HF beam 0 result
  rouge1 : 22.08914935260929
  rouge2 : 6.127009262128831
  rougeL : 16.982143879321
  rougeLsum : 19.04670077160925