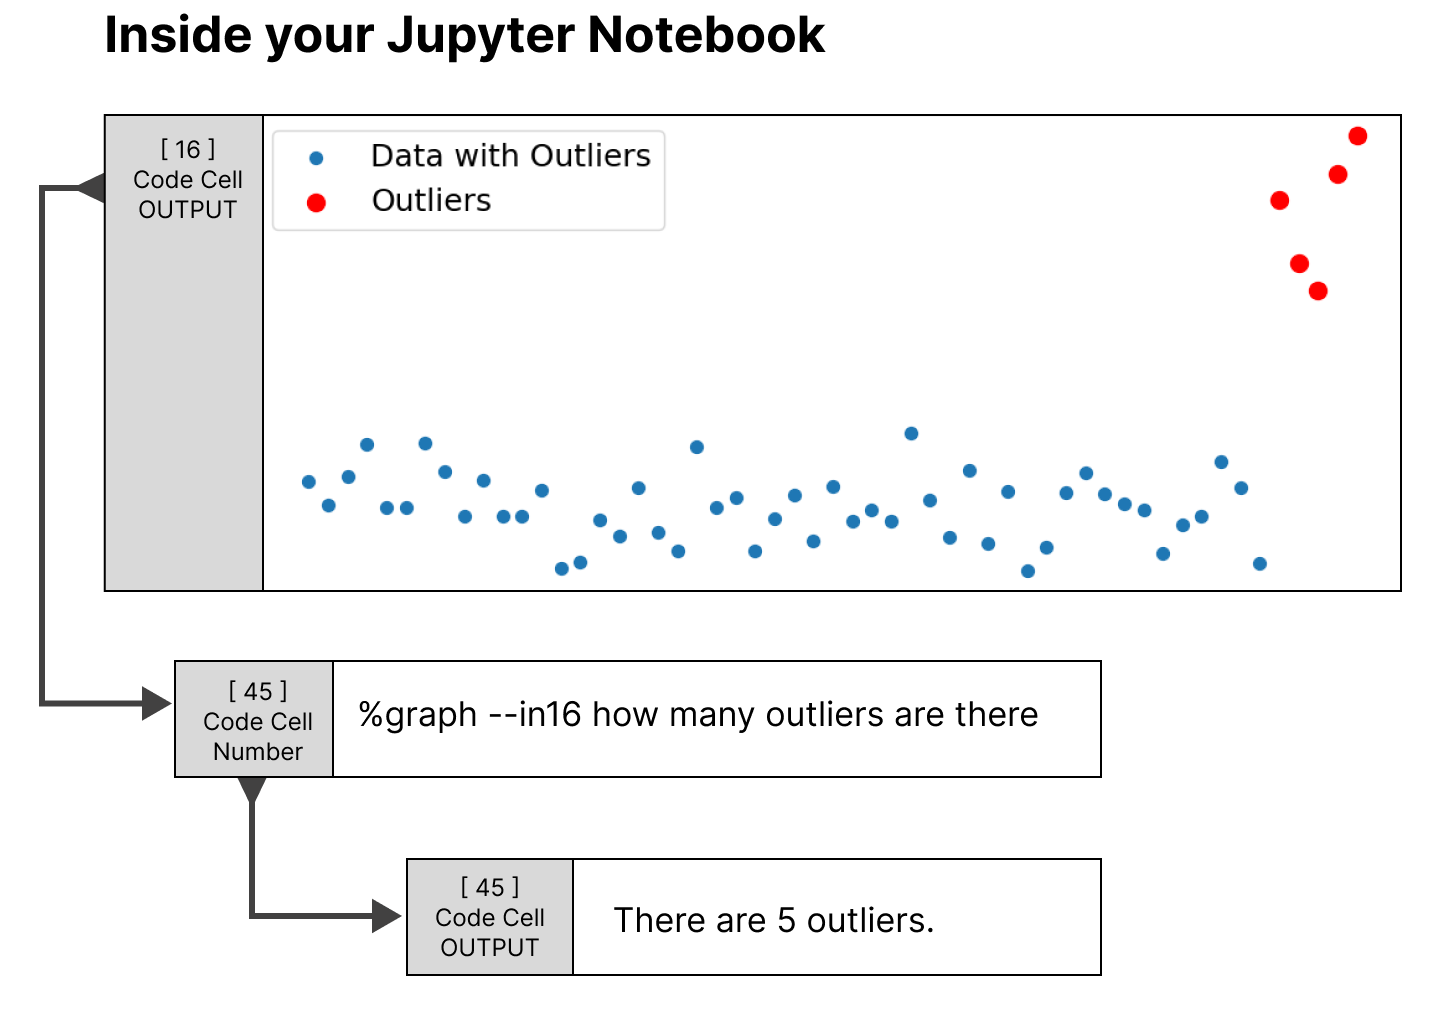
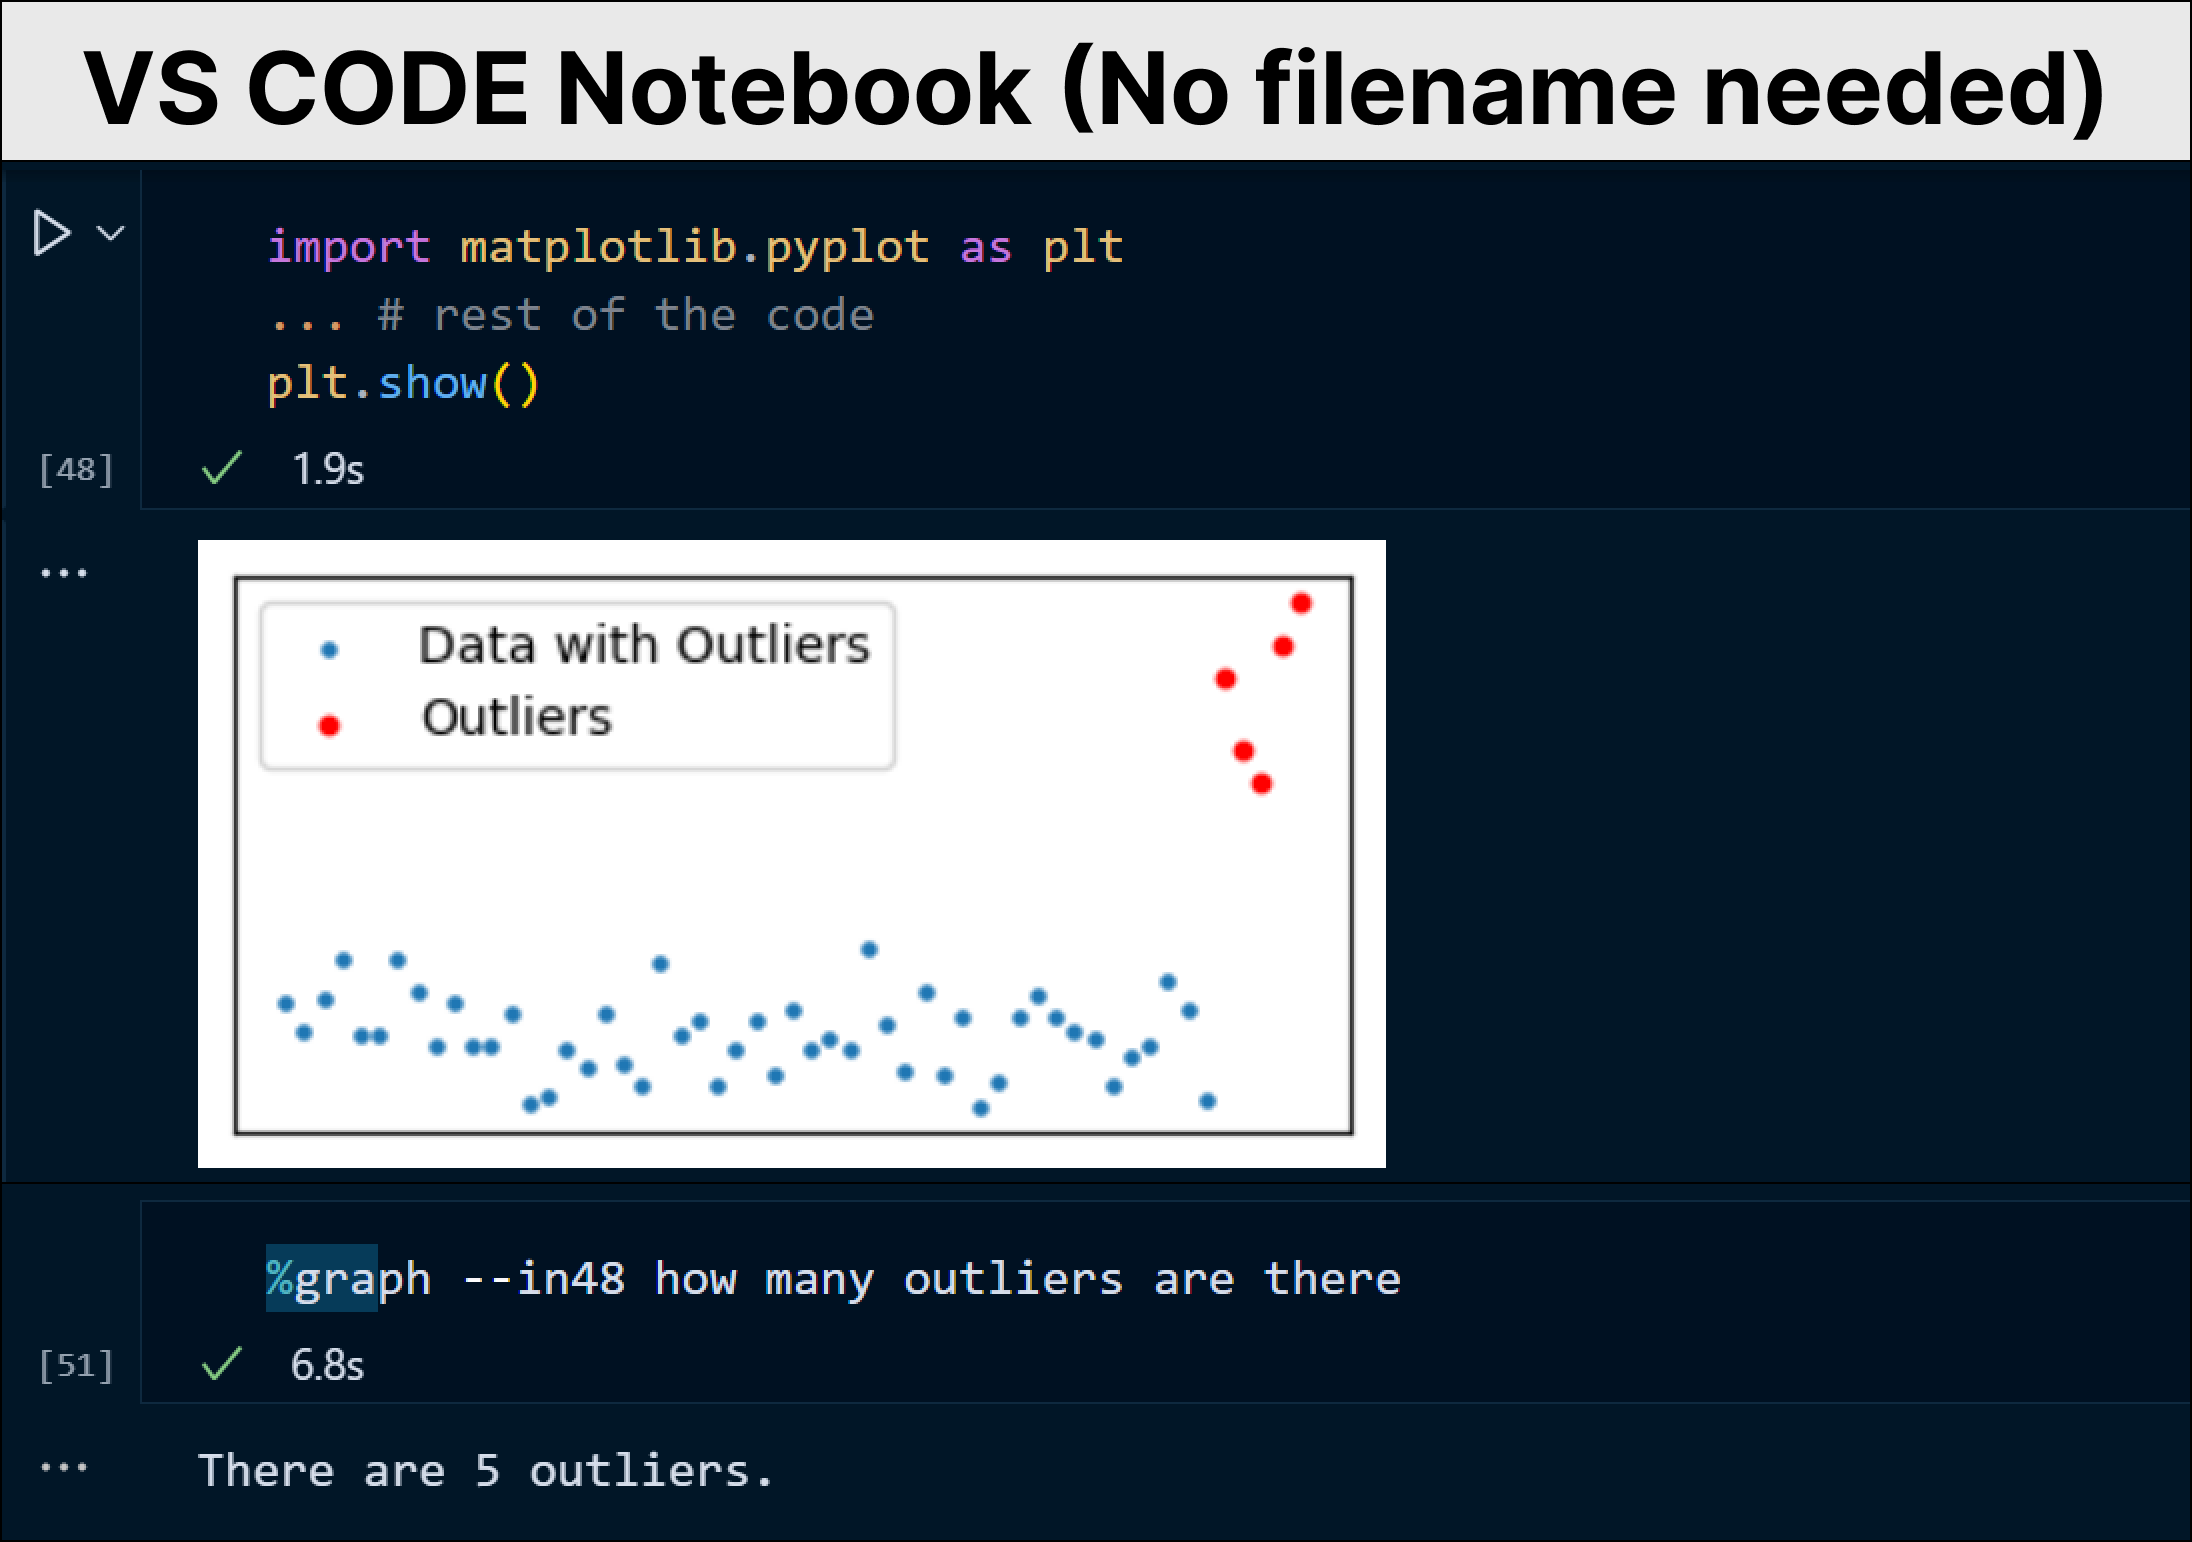
The above is an example of one of the copilot features that you are going to build.%graphsignals to our copilot that I need to ask question related to graphs. It can take a cell reference, such as --in16, which contains the graph we need to analyze. Also, the input prompt specifies what information you need to ask about the graph, and it outputs accurate results. It can operate in Anaconda Jupyter Notebooks, VS Code Notebooks, Jupyter Lab, or any local notebook environment you work in.
GitHub Copilot is free for verified students, teachers, and maintainers of popular open-source projects. Meanwhile, Google is soon expected to release its own version based on Gemini, a recently launched multi-model, but it will likely require a budget-friendly subscription.
What if you don’t fall into any category eligible for GitHub Copilot or you’re not in the mood to pay for Google’s future Copilot release?
I recently explored a project by Jupyter AI that allows you to code through AI, depending on open-source LLM or the OpenAI API. However, a challenge arises with the pricing or suboptimal performance of the open-source LLM. Although it is good, Many of us rely on ChatGPT while coding. What sets Gemini Multi-Model apart is that it provides a free API and a large context window. I used the opportunity and decided to build a Copilot on top of it to test its capabilities.
To create features of our Copilot, the first step is to initialize Gemini MultiModel. For that, you need to install a few libraries:
# Install necessary libraries
pip install -q -U google-generativeai grpcio grpcio-tools
Now, we need to import the necessary library that will fetch Gemini LLM API calls and instantiate the required API key.
# Import the Google Generative AI library
import google.generativeai as genai

# Initialize the GenerativeModel with 'gemini-pro' for chat and code
text_model = genai.GenerativeModel('gemini-pro')

# Initialize the GenerativeModel with 'gemini-pro-vision' for graphs
image_model = genai.GenerativeModel('gemini-pro-vision')

# Configure the library with your API key
genai.configure(api_key="Your-API-key")
We have loaded two models, gemini-pro, which serves as our text model for generating code or engaging in code-related conversations, and gemini-pro-vision, which will be used to manage image-related features of our Copilot. You can obtain your API key from here for free. Next, we need to import the library that we will be using to create Copilot functions.
# Regular expression for pattern matching
import re

# IPython for working with IPython environment
import IPython

# OS for interacting with the operating system
import os

# JSON for working with JSON data
import json

# Base64 for encoding and decoding base64 data
import base64

# Image class from IPython.display for displaying images
from IPython.display import Image

# register_line_magic for registering custom magic commands
from IPython.core.magic import register_line_magic
Let’s start coding a simple feature of our Copilot, which is to chat. The reason for starting with this feature is that it will make it easier to understand later code when we build more complex features.
You are coding in your notebooks, and then you realize you need to ask something to ChatGPT. To avoid switching to a browser tab for chatting, we will create a chat feature that allows you to chat right next to your code cell. Our “chat” function takes one input, which is our prompt, and in response, the Gemini text model will provide an answer.
# Registering a Jupyter Notebook magic command named 'chat'
@register_line_magic
def chat(contents):
    # Generating a response using the 'generate_content' method of the 'text_model' object
    # The method takes a formatted string containing the provided 'contents'
    response = text_model.generate_content(f'''
                                    Answer the question in a short quick readable paragraph, dont provide answer in any format or code
                                    {contents}
                                    ''').text

    # Printing the generated response to the output
    print(response)
there are two important lines in our chat function, one is@register_line_magic decorator. It will help us to call our function with %chat rather than chat( ). This makes it more like an AI-like feel, although this is not necessary. The second important part is the prompt template that is used. The reason for choosing this prompt is that Gemini has a habit to generate chat responses in markdown format most of the time. Therefore, it is necessary to instruct Gemini that the response must not be in markdown or code format. You can update the prompt template based on your needs.
You can use the “chat” feature in any of your code cells. For this, you need to pass %chat [your_question], and it will print the response.
# Running Chat Feature
%chat What are some useful libraries for coding neural networks in Python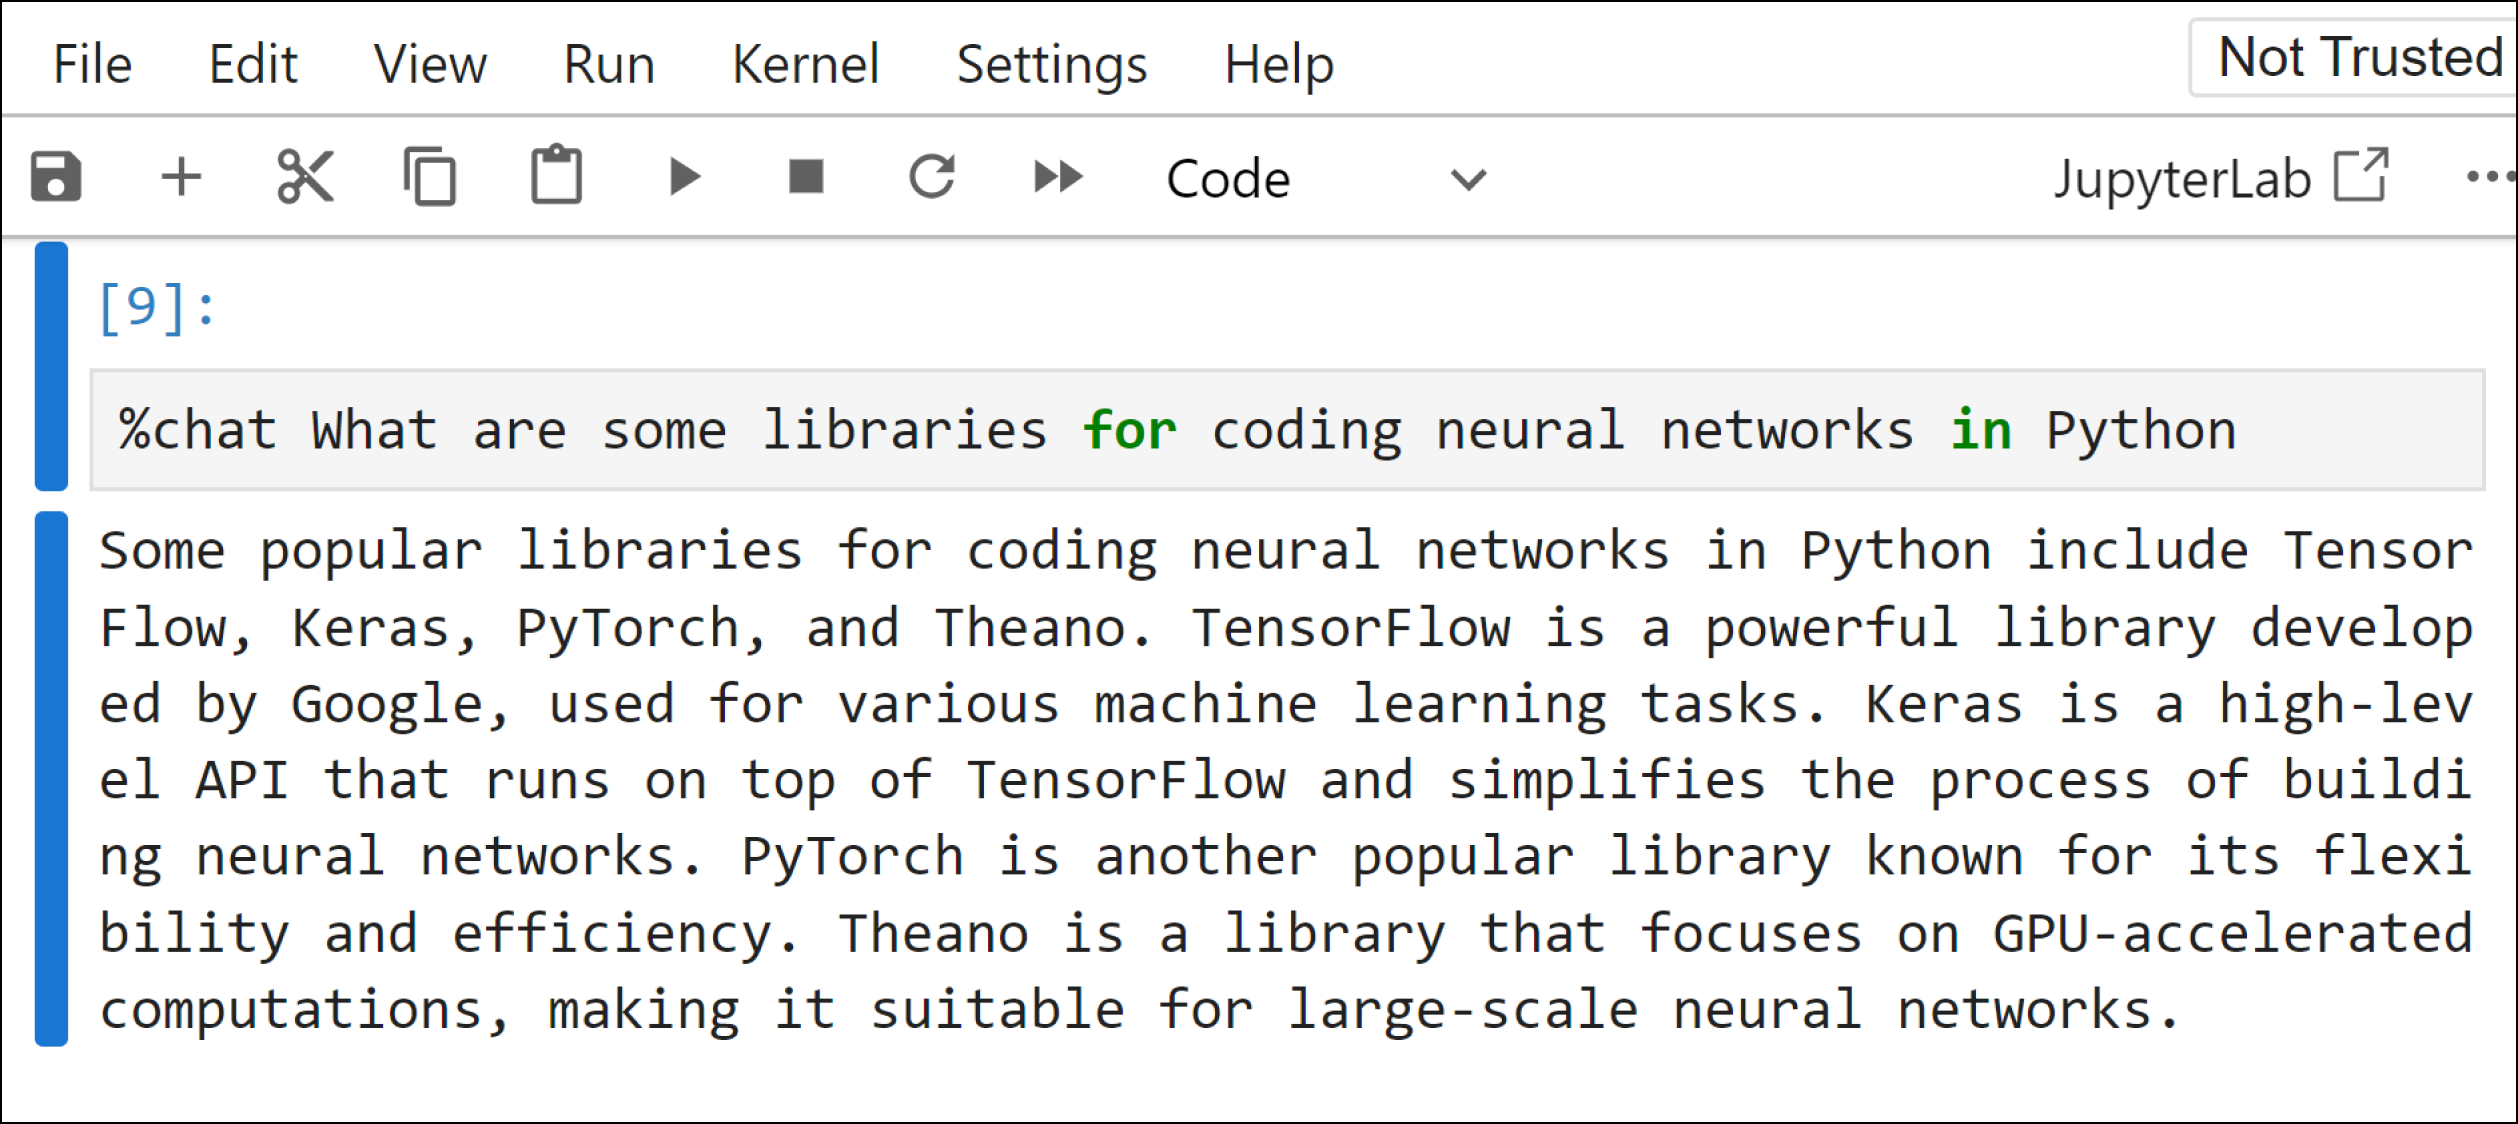
This feature gives you the ability to chat with your code within your notebook, you don’t have to use ChatGPT separately to go there, paste the code, and ask questions. The “Chat with Code” function requires two things, your prompt and the code on which you want to ask a question.
# Define a function named 'chatn' that takes 'contents' as a parameter
@register_line_magic
def chatn(contents):
    try:
        # Use regular expression to find all occurrences of '--in' followed by digits in 'contents'
        numbers = [int(match.group().replace('--in', '')) for match in re.finditer(r'--in\d+', contents)]

        # Remove the found pattern '--in\d+' from 'contents'
        contents_filter = re.sub(r'--in\d+', '', contents)

        # Check if there are any references (numbers) found
        if numbers:
            # Retrieve the current cell contents for all references using the IPython 'In' variable
            current_cell_contents = [In[number] for number in numbers]

            # Combine the contents into a single string with line breaks
            combined_content = '\n'.join(current_cell_contents)

            # Execute the text_model to generate response
            response = text_model.generate_content(f'''
                                            {combined_content}
                                            Answer the question in a short readable paragraph, don't provide the answer in any format or code
                                            {contents_filter}
                                            ''').text

            # Print the generated response
            print(response)

        else:
            # Print an error message if no references are found
            print('Please provide a correct codeblock reference.')

    except Exception as e:
        # Print an error message if an exception occurs
        print('Please provide a correct codeblock reference.')
Let’s understand our chatn function. The try-except block is used to avoid any errors in case you didn't pass a cell reference in it. The first thing we do is use regex to extract all --in patterns for cell references and clean the prompt to avoid passing it in the Gemini API. I have used the --in format for cell number references because it is easier to remember. In[number] will fetch all the code from the cell numbers you mentioned in your prompt, merge it, and pass it along with your cleaned prompt. You can pass as many cell references as you want, and there is no need to order them.
To use the “Chat with Code” feature, you need to pass %chatn [cell references][your_question], and it will print the response.
# Running Chat with Code Feature
%chatn --in17 --in11 I sum element wise but it is not working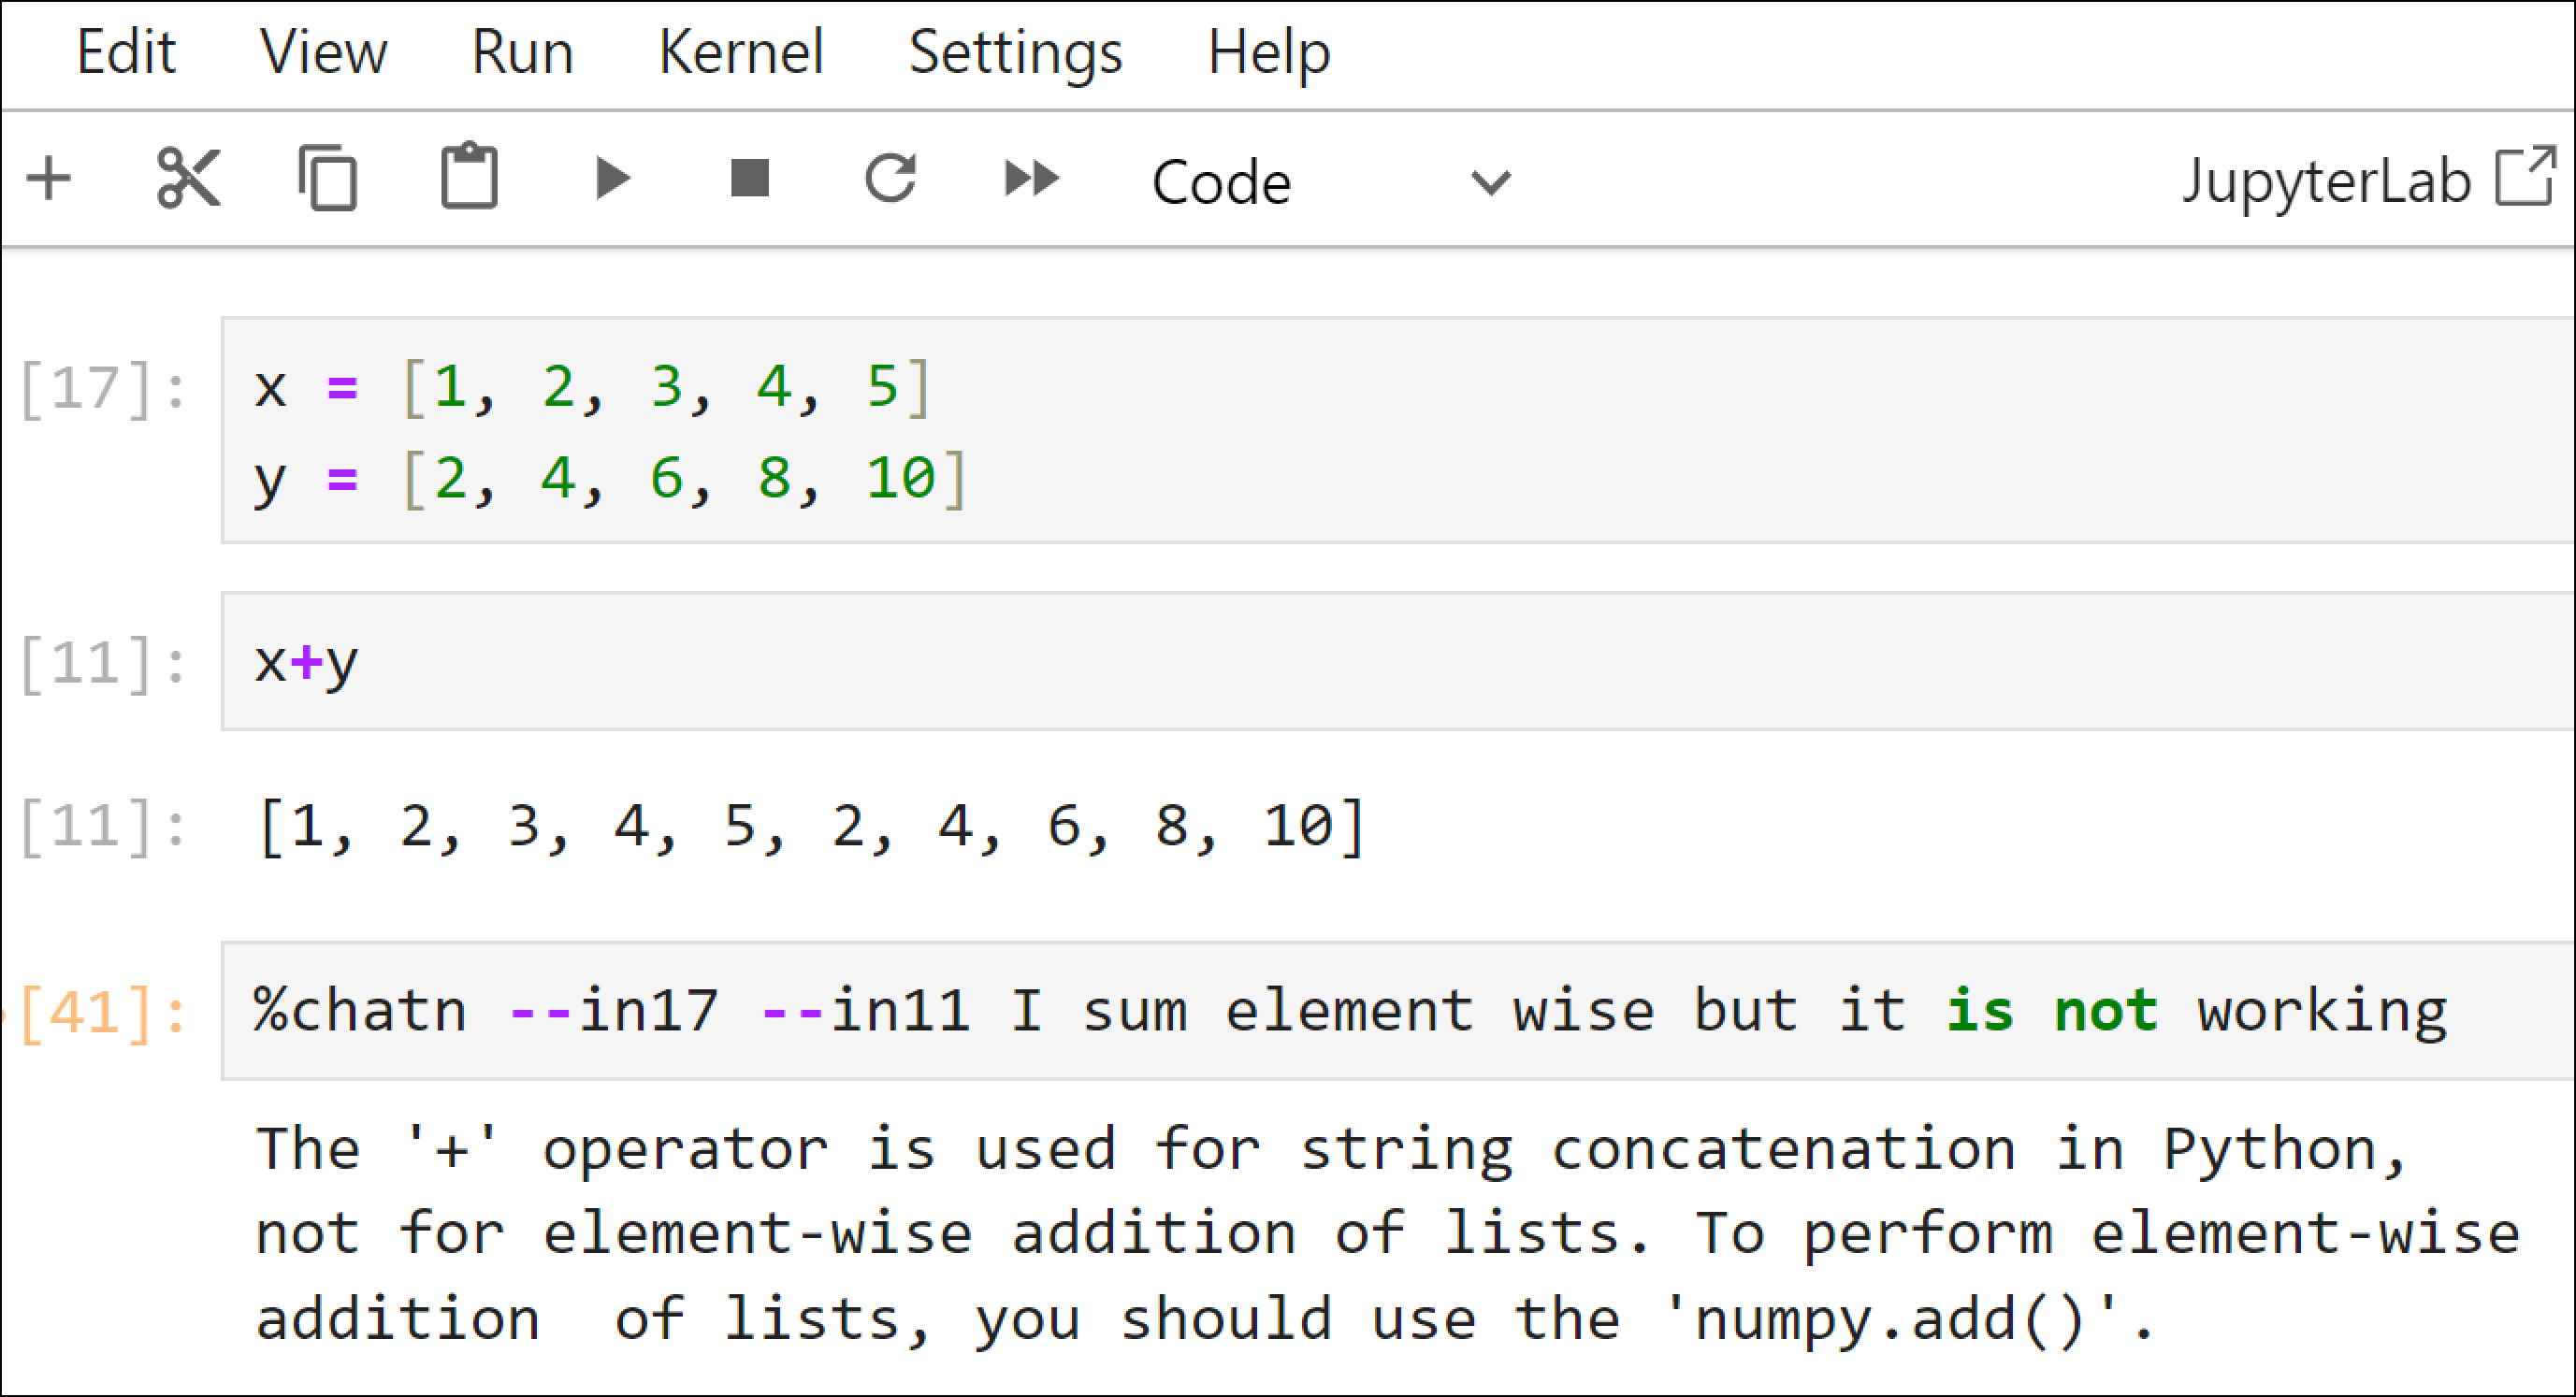
You may think it is a very easy question, but it will work on more complex code.
Generating code is one of the most important features that you will most probably be using every minute. There are two versions we will be coding, one is to generate code based on your prompt, and the second is to generate relational code, which you will see in the next section. The simple “Generate Code” function takes one input, which is your prompt, and it will generate code in the very next cell.
# Register a custom line magic command
@register_line_magic
def code(contents):

    # Get the IPython shell instance
    from IPython.core.getipython import get_ipython
    shell = get_ipython()

    # Generate code content using a text model
    response = text_model.generate_content(f'''
                                    write a python code that and dont answer anything else
                                    {contents}
                                    ''').text

    # Remove ``` and python from the response
    response = response.replace('```', '')

    # Clean up the response
    response = response.replace('python', '').strip('\n').rstrip('\n').replace('```python', '')

    # Prepare payload for setting the next input
    payload = dict(
        source='set_next_input',
        text=response,
        replace=False,
    )

    # Write the payload to the IPython shell
    shell.payload_manager.write_payload(payload, single=False)
In our code function, the get_ipython module is responsible for generating code right next to the current cell where you provide the prompt. Cleaning is necessary because the generated Python code contains some extra characters that need to be removed. The payload is going to take the response of our Gemini model and create a new cell to paste it.
To use the “Generate Code” feature, you need to pass %code [your_prompt], and it will create your requested code in the next cell.
# Running Generate Code Feature
%code load my data.csv and take random sample of 100 rows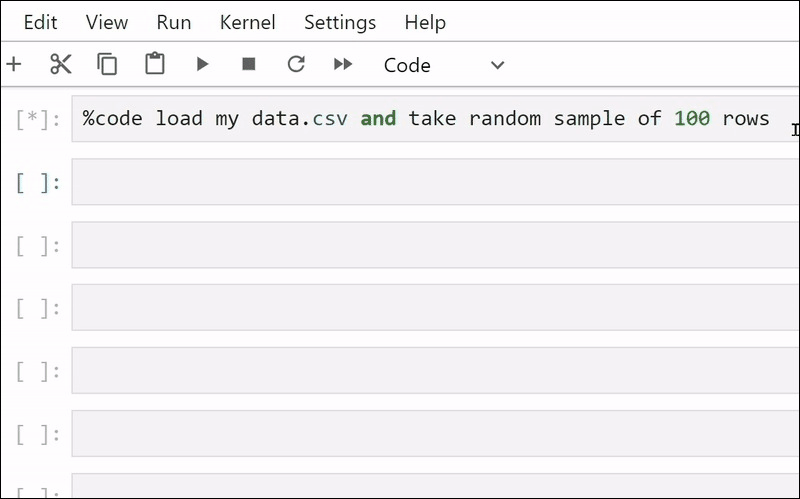
The relational coding feature is very important because most of the time, you will likely be coding on top of some other code. The good thing is that this feature is same as what we use in the chatn function. The “Relational Code” function requires two things, your prompt and the code which you want to relate.
# Define a function named 'coden' that takes 'contents' as a parameter
@register_line_magic
def coden(contents):
    try:

        # Get the IPython shell instance
        from IPython.core.getipython import get_ipython
        shell = get_ipython()

        # Use regular expression to find all occurrences of '--in' followed by digits in 'contents'
        numbers = [int(match.group().replace('--in', '')) for match in re.finditer(r'--in\d+', contents)]

        # Remove the found pattern '--in\d+' from 'contents'
        contents_filter = re.sub(r'--in\d+', '', contents)

        # Check if there are any references (numbers) found
        if numbers:
            # Retrieve the current cell contents for all references using the IPython 'In' variable
            current_cell_contents = [In[number] for number in numbers]

            # Combine the contents into a single string with line breaks
            combined_content = '\n'.join(current_cell_contents)

            # Execute the text_model to generate code
            response = text_model.generate_content(f'''{combined_content}
                                                  {contents_filter}
                                                  please write Python code and don't answer anything else, dont provide output of the code
                                                  ''').text
            # Remove ``` and python from the response
            response = response.replace('```', '')

            # Clean up the response
            response = response.replace('python', '').strip('\n').rstrip('\n').replace('```python', '')

            # Prepare payload for setting the next input
            payload = dict(
                source='set_next_input',
                text=response,
                replace=False,
            )

            # Write the payload to the IPython shell
            shell.payload_manager.write_payload(payload, single=False)

        else:
            # Print an error message if no references are found
            print('Please provide a correct codeblock reference.')

    except Exception as e:
        # Print an error message if an exception occurs
        print('Please provide a correct codeblock reference.')
payload and cleaning text code are used from the code function, while rest of the code is taken from the chatn function. To use the “Relational Code” feature, you need to pass %coden [cell references] [your_prompt], and it will create your requested code in the next cell. You can pass as many cell references as you want.
To use the “Relational Code” feature, you need to pass %code [cell_references] [your_prompt], and it will create your requested code in the next cell.
# Running Relational Code Feature
%coden --in83 --in76 multiply y with each x item
This feature is going to be a complicated one. Let’s build it step by step. First, you have to programmatically fetch the filename in which you are writing code.
# Import the IPython module
import IPython

# Import the os module for interacting with the operating system
import os

# Extract the local variables from the IPython environment
file_path = IPython.extract_module_locals()[1]['__vsc_ipynb_file__']

# Extract the base name (file name) from the file path
file_name = os.path.basename(file_path)

# Return the file name
print(file_name)


############### OUTPUT ###############

      myfile.ipynb

############### OUTPUT ###############
This would only work in VSCode but not in Jupyter Lab or Anaconda notebooks. If you don’t use VSCode, you can skip this step because our final code will have this ability, allowing you to pass the filename manually in your prompt. Next, we need to load this notebook in json.
# Import the json module for working with JSON data
import json

import base64
from IPython.display import Image

# Open the notebook file in read mode
with open(file_name, "r") as f:
    # Load the content of the notebook file as JSON
    notebook_json = json.load(f)
Once we load the notebook file, we can loop through the data and fetch that specific cell output where our graph exists. Suppose our graph exist at cell number 65.
# Import the base64 module for encoding and decoding base64 data
import base64

# Import the Image class from the IPython.display module for displaying images in an IPython environment
from IPython.display import Image

####### Cell Number #######
cell_number = 65

# Find the cell in the notebook JSON with execution count equal to 65
element = next(cell for cell in notebook_json['cells'] if 'execution_count' in cell and cell['execution_count'] == cell_number)

# Extract the base64-encoded PNG image data from the cell's outputs
image_data = element['outputs'][0]['data']['image/png']

# Decode the base64-encoded image data
image_base64 = base64.b64decode(image_data)

# Save the decoded image data as a JPG file in the local directory
with open('img_code.jpg', 'wb') as f:
    f.write(image_base64)

# Assuming 'Image' is imported from the IPython.display module, load the saved image using the Image() function
image = Image(filename='img_code.jpg')
Gemini image model only takes images that are locally stored, you have to save that extracted graph and load the image using the Image module. we can use this approach to build our chat with the graph feature. It will take two inputs, one is the prompt, and the second is the cell reference which contains the graph.
# Try to get the current notebook filename using IPython
try:
    file_name = IPython.extract_module_locals()[1]['__vsc_ipynb_file__']

    # Extract the base name (file name) from the file path
    file_name = os.path.basename(file_name)

except:
    # If an exception occurs, print a message indicating no file
    file_name = None

# Register a custom magic command for the Jupyter notebook
@register_line_magic
def graph(contents):
    # Search for the pattern --in<number>
    pattern = re.compile(r'--in\d+')

    # Find the first occurrence of the pattern in the contents
    match = pattern.search(contents)

    # Remove the pattern from the contents
    contents_filter = pattern.sub('', contents)

    # Define a new pattern for --filename=<word>
    pattern_f = re.compile(r'--filename=\w+')

    # Find the first occurrence of the new pattern in the contents
    match_f = pattern_f.search(contents)

    # Remove the new pattern from the filtered contents
    contents_filter = pattern_f.sub('', contents_filter)

    # If the --in<number> pattern is found
    if match:
        # Get the global variable file_name
        global file_name

        # Check if file_name is available from the IPython magic command
        if file_name:
            notebookName = file_name
            with open(notebookName, "r") as f:
                # Load the notebook JSON data
                notebook_json = json.load(f)
        elif match_f:
            # Extract the filename from the --filename=<word> pattern
            match_c = match_f.group().replace('--filename=', '')
            notebookName = match_c + '.ipynb'
            with open(notebookName, "r") as f:
                # Load the notebook JSON data
                notebook_json = json.load(f)
        else:
            # If neither file_name nor --filename=<word> is provided, print an error message
            return 'Please provide a correct file path using --filename=<filename>.ipynb, e.g., --filename=mycode.ipynb'

        # Extract the number from the --in<number> pattern
        number = int(match.group().replace('--in', ''))

        # Find the cell with the specified execution_count in the notebook JSON data
        element = next(cell for cell in notebook_json['cells'] if 'execution_count' in cell and cell['execution_count'] == number)

        # Extract image data from the cell's output
        image_data = element['outputs'][0]['data']['image/png']

        # Decode base64 image data
        image_base64 = base64.b64decode(image_data)

        # Save the image in the local directory as img_code.jpg
        with open('img_code.jpg', 'wb') as f:
            f.write(image_base64)

        # Load the image using the Image() function
        image = Image(filename='img_code.jpg')

        # extract information using image model
        response = image_model.generate_content([contents_filter, image])
        print(response.text)
    else:
        # If --in<number> pattern is not found, print an error message
        print('Please provide a correct code block reference.')
Conversations with graphs require the image_model, and we have performed text pattern extraction for filename in the same way as we have done for --in cell references. To use the “Chat with Graph” feature, you need to pass %graph [single_cell_reference] [your_prompt] [filename], and it will print the response.
# Running Chat with Image Feature
%coden --in143 how many outliers are there
Small-scale projects often depend on multiple Python files. This feature is helpful when you want to chat with py files within your notebook instead of inspecting their code one by one. The “Chat with Files” function requires two things, your prompt and the folder name which contain py files.
# Register a custom magic command for IPython
@register_line_magic
def chatf(contents):
    try:
        # Parse the folder name from the provided argument
        folder_match = re.search(r'--folder_name=(\S+)', contents)
        if not folder_match:
            # Print an error message if folder name is not provided in the correct format
            print("Please provide a valid folder name using the format '--folder_name=<folder_name>'.")
            return

        # Extract the folder name from the regex match
        folder_name = folder_match.group(1)

        # Get a list of Python files in the specified folder
        python_files = [file for file in os.listdir(folder_name) if file.endswith('.py')]

        # Check if any Python files were found
        if not python_files:
            print(f"No Python files found in the folder '{folder_name}'.")
            return

        # Initialize an empty string to store combined content
        combined_content = ""

        # Iterate through each Python file in the folder
        for file_name in python_files:
            with open(os.path.join(folder_name, file_name), 'r') as file:
                # Read the content of the file
                file_content = file.read()

                # Format the combined content with file name and its code
                combined_content += f"\nfile: {file_name}\n{file_content}\n{'_'*15}\n"

        # Remove the pattern of folder from the input contents
        contents_filter = re.sub(r'--folder_name=\S+', '', contents)

        # Generate content using a model and display the response
        response = text_model.generate_content(f'''
                                        {combined_content}
                                        Answer the question in a short readable paragraph, don't provide the answer in any format or code
                                        {contents_filter}
                                        ''').text
        print(response)

    except Exception as e:
        # Print an error message if an exception occurs
        print(f'An error occurred: {str(e)}')
The chatf function will take a folder reference, similar to the way we provide a cell reference. It will then merge all file names with their content, and rest of the code will remain the same which we use in our chatn function. To use the “Chat with Files” feature, you need to pass %chatf [single_folder_reference] [your_prompt], and it will print the response.
# Running chat with files Feature
%chatf --folder_name=myfolder How to clean and format data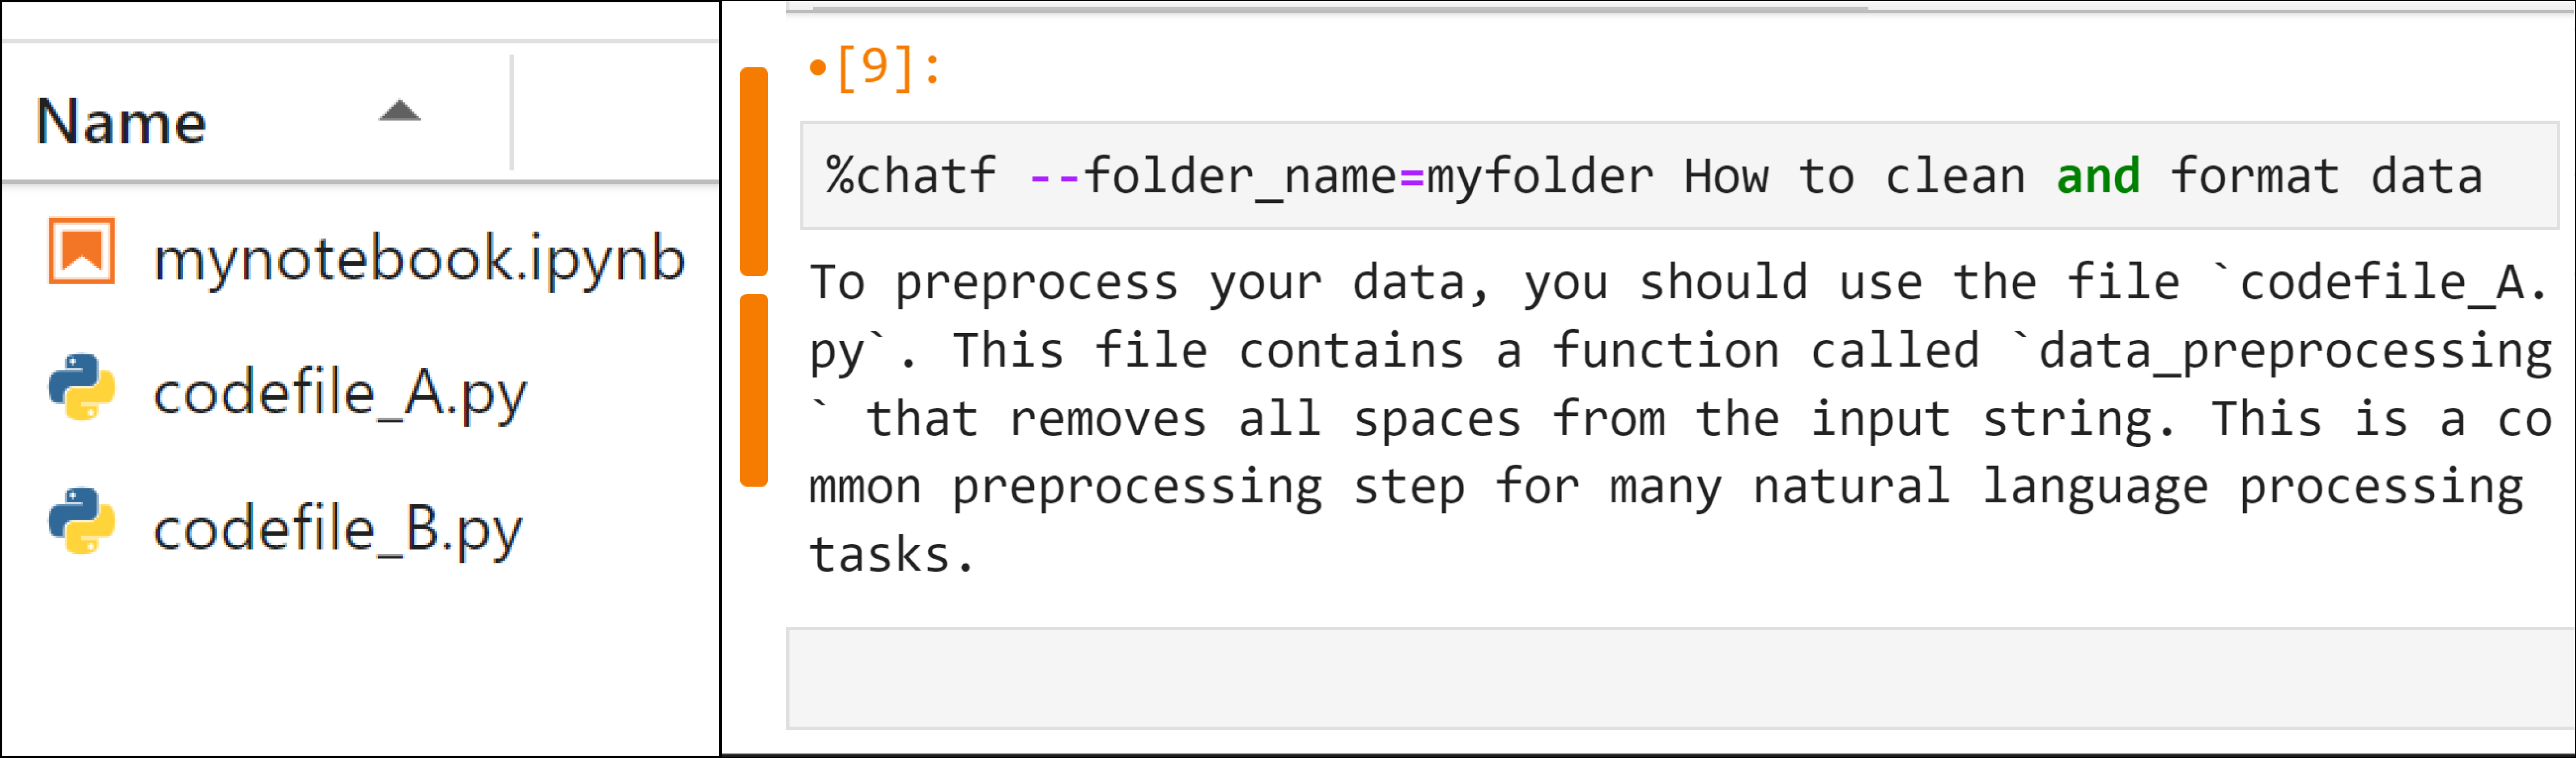
You don’t want to type each feature function again and again for different projects, it will be a time-consuming task. What you can do is simply merge all your functions in one py file. I named it my_copilot.py, and then I can simply import this module and use any feature from it.
# Importing all features of your copilot
from my_copilot import *

# using generate code feature
%code load my data.csv file using pandas
There are many more features you can create with the help of the knowledge and code you have seen in this blog. For example, you can create a multi-graph chat, or instead of chatting with files, you can extend this to code with files and more. The cool thing is that the majority of the tasks you will be creating contain most of the code that you have already seen here.