- you can download this Github repository by clicking here
- based on oekofen-spy (C) Peter Fuerle
- and sources from https://gitlab.com/p3605/oekofen-spy/-/tree/main (C) Peter Fuerle
- fitting to an OekoFEN Smart XS pellets heating
- other OekoFEN heatings would fit after some minor modifications of the Grafana dashboard JSON file, too
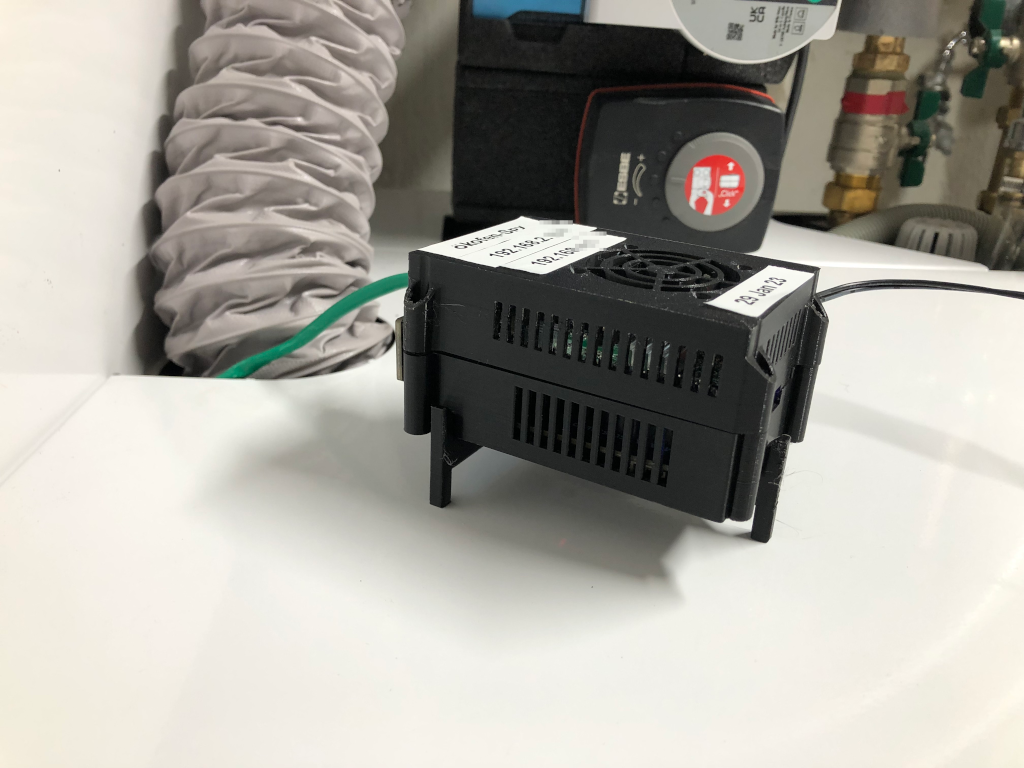
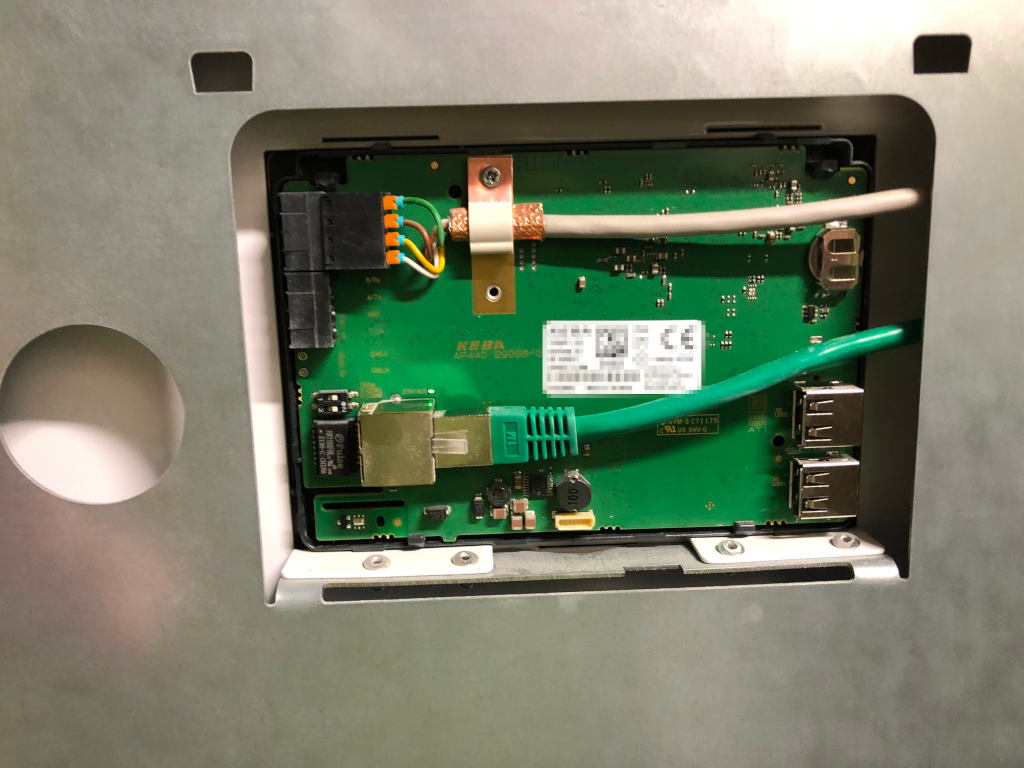
- picture of proxy server:
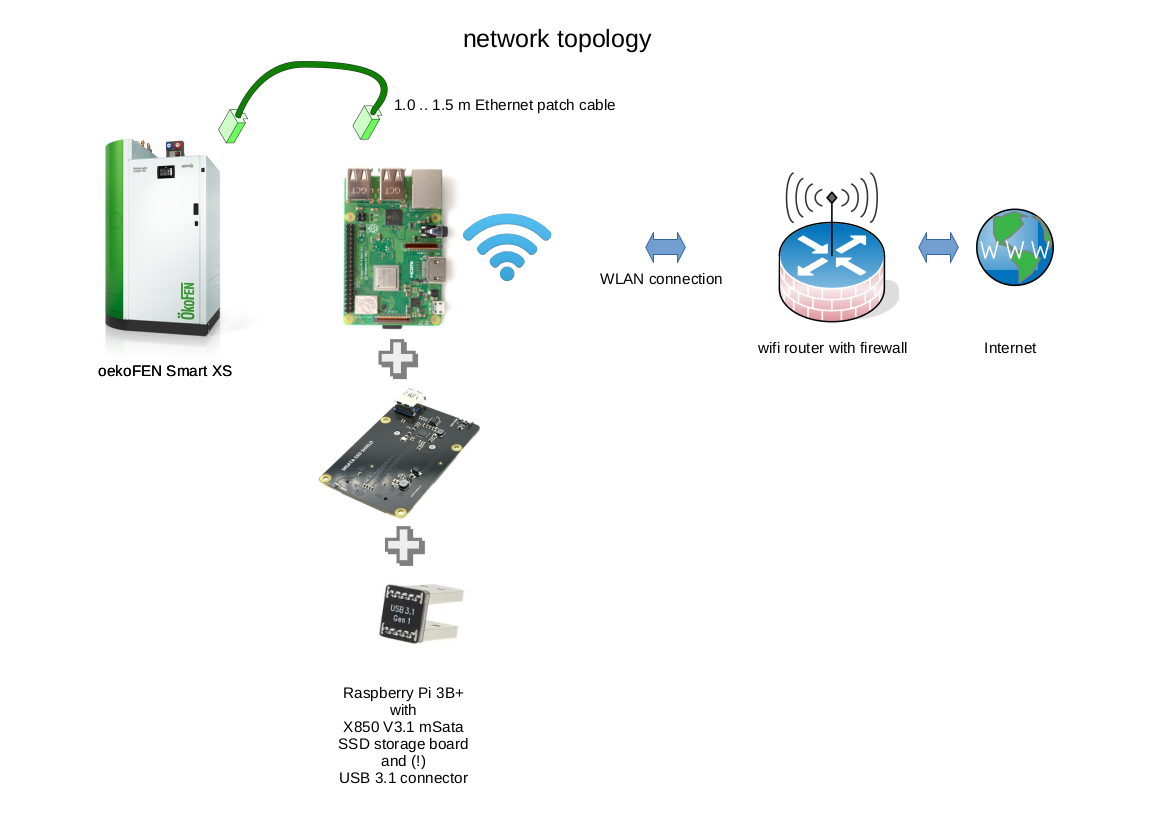
- sketch of the used network topology:
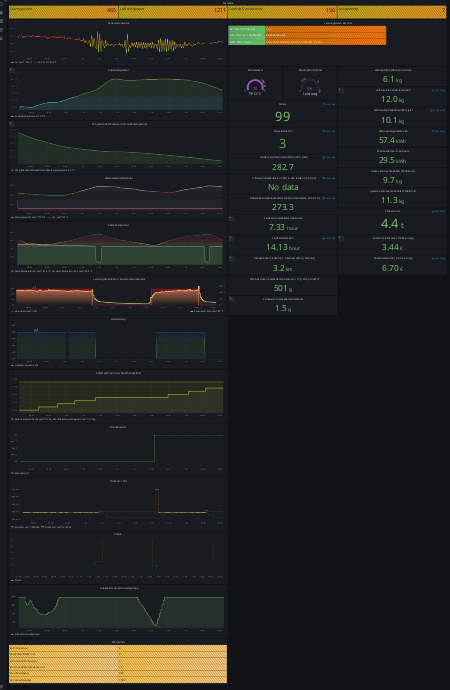
- used Grafana dashboard:
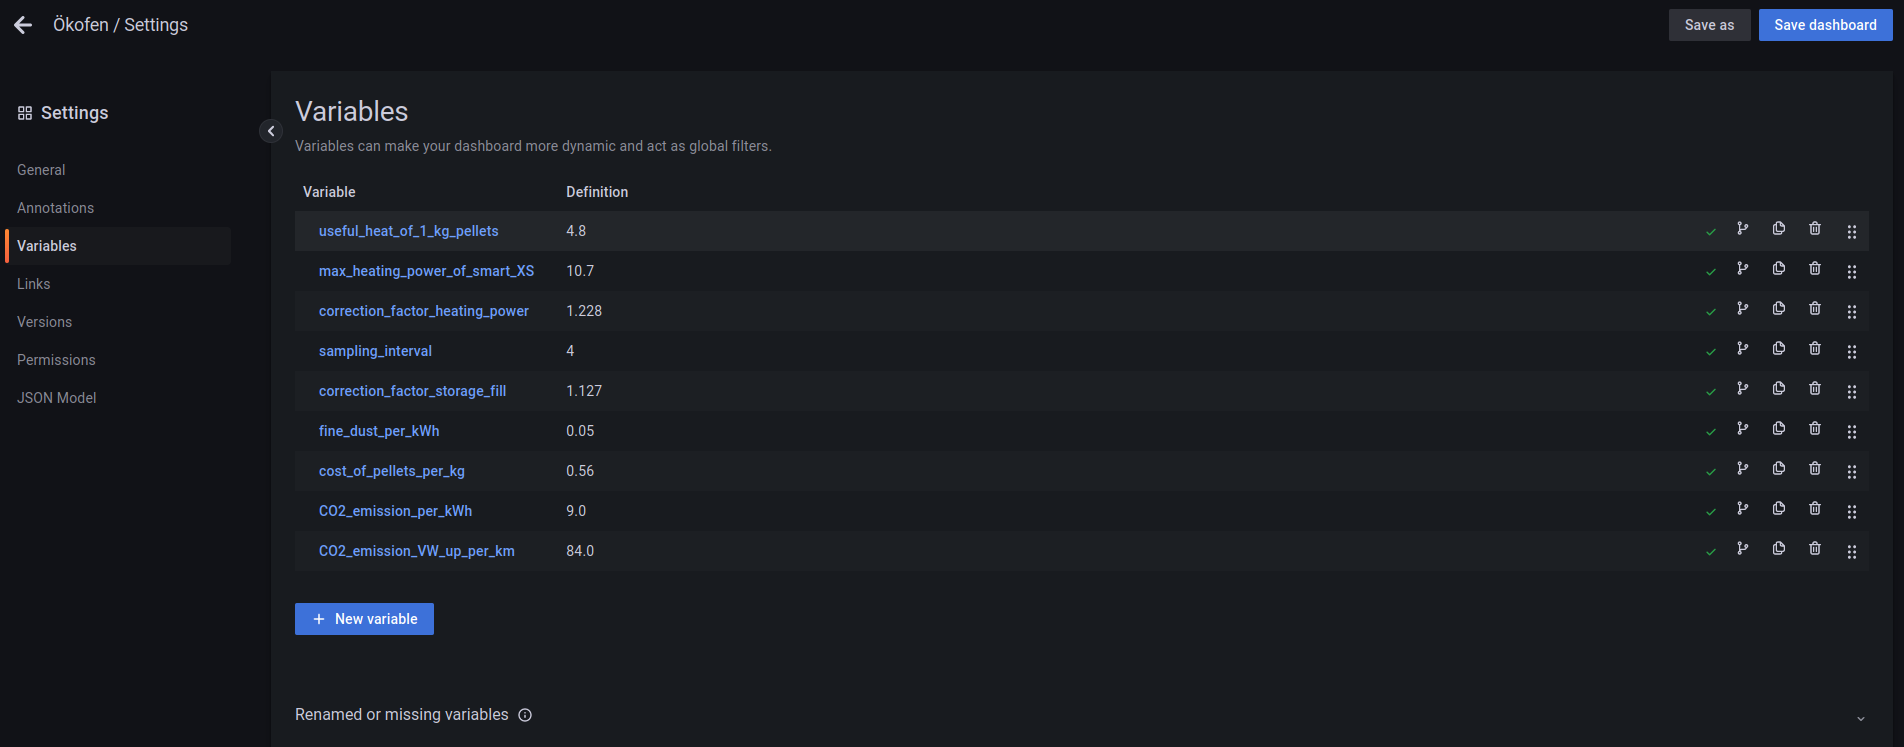
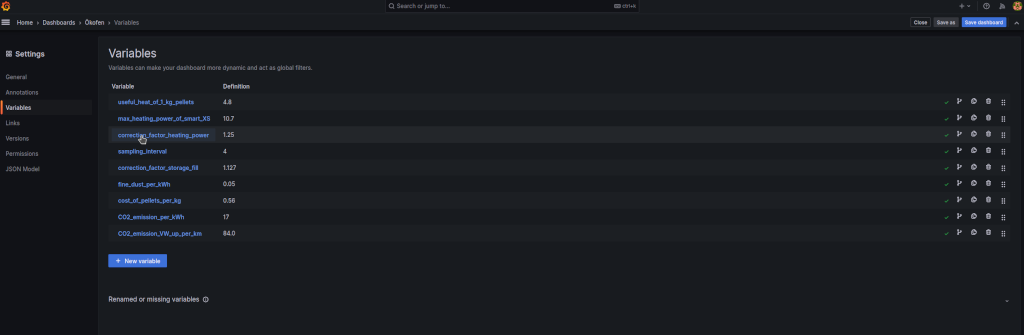
- adjustable Grafana variables:


Objectives of a oekofen_spy, InfluxDB, and Grafana proxy server
- analysis of a Oekofen Smart XS pellets heating by visualizing graphically the data of the Smart XS' Pelletronic Touch JSON interface
- set-up a Raspberrry Pi 3B+ based proxy server with wifi connection to your LAN's router
- that is running the oekofen_spy application
- that is running an InfluxDB data base server
- that is running a Grafana server for visualizing captured data
- the oekofen_spy software can be downloaded from GitLab
- in my case I do not have a wired Ethernet LAN cabling to my cellar
- wired connection to a Oekofen Smart XS pellets heating by a Ethernet patch cable
- Wifi connection to your LAN's router
- bridge functionality between the Raspberry Pi's eth0 and wlan0 interfaces
- support a firewall to isolate and protect the Oekofen Smart XS pellets heating
- the proxy server can be put into a DMZ if your router is supporting a DMZ with a Wifi access point
- support a SSD drive with sufficient storage capacity in order to store measurement data of a longer time frame
- independent stand-alone operation and data collection of the oekofen_spy proxy server even if the WLAN is switched off, e.g. during night time
- automatic unattended updates of the Raspberry Pi OS
- ssh maintenance connection to a dedicated client of your LAN, e.g your laptop
- please carefully follow below recipes for a reduced RF disturbance of the Raspberry Pi's embedded WiFi
- in my case, my WiFi router is located in the attic floor, the Oekofen heating is in the cellar, three reinforced-concrete floors are in between, therefore the WiFi connection is very poor and each dB transmission gain is important
- if your router's antenna is turnable, please adjust it for best wifi transmission to such an angle that a plane perpendicular to the antenna stick is going through the oekofen_spy Raspberry Pi's location in the cellar
- if you are still experiencing too low Wifi signal levels in your cellar, you may experiment with a directional YAGI WLAN Antenna EXTENSION for 2.4 GHz or a directional panel antenna (please note that this panel antenna is radiating only into one direction)
- note: any directional antenna results in worse RF radiation characteristics in non-preferred directions
- despite following these recipes, I am experiencing temporary RF disturbances and connection problems to the oekofen_spy Raspberry Pi in the cellar in the following situations
- my neighbor is using a baby phone which is heavily disturbing the wifi transmission
- the Oekofen Smart XS is igniting, obviously the fan of the Smart XS heating does a lot of RF disturbances
- the Oekofen Smart XS is filling the pellets buffer store. A cleaning with a running fan is part of that process
- in case of such RF disturbances, please just wait until the source of the disturbances is switched off. Then a connection should be possible again without any further action.
- Raspberry Pi 3B+.
- if you can buy or prepare a Raspberry Pi 3B+ board with an U.FL external antenna connector, go for it and enjoy a better WiFi transmission
- Geekworm X850 V3.1 USB 3.0 mSATA SSD Storage Expansion Board for Raspberry Pi 3B+/3B, available e.g at Amazon
- please ensure that you purchase the 3.1 version
- please do not use older versions with higher RF emissions and disturbances
- wiki is here
- installation guide V3.0 version
- mSATA SSD 64 GB 3D NAND MLC SATA III mSATA (30 x 50,9 mm) e.g. from here
- Raspberry Pi USB 2.0 /USB 3.0 Connector Bridge / USB 3.0 Cable for Raspberry Pi 4B / 3B+(Plus)&X180/150 Board
- please do not the connector bridge shipped together with the X850 board since it is not shielded and is causing RF disturbances
- please ensure a USB3.1 version with less disturbance of the Raspberry Pi's WiFi
- if you are experiencing stability problems, then connect decoupling capacitors to the GND and +5.0V GPIO pins of the Raspberry Pi 3B+
- 2x 470 uF electrolytic capacitor, 10V, take care of the polarity!
- 1x 0.15 uF ceramic capacitor
- M2.5 12 mm nylon hexagonal spacers, nuts, and screws, e.g. from here
- please do not use the metal spacers shipped with the X850 board; they would disturb the Raspberry Pi's WiFi
- please use nylon spacers for not disturbing the Raspberry Pi's embedded WiFi
- a plastic case
- please do not use a metal case; it would worsen the Raspberry Pi's WiFi transmission
- I've 3D printed this PI case (room available for X850 Msata and Pi hat)
- however, it did not fit perfectly to the X850 V3.1 board, some tweaking of the case and x850 board was necessary
- I've been to lazy to construct a fitting case
- please be encouraged to share your fitting case
- System-S USB Type C Input to 2X Micro USB Output Y Cable Splitter Adapter Cable from e.g. here
- original Raspberry Pi 4 power supply (yes Raspberry Pi 4 is correct) from e.g. here
- it can supply a higher 3A current than a standard Raspi3 power supply (2.5A) for additionally supplying the SSD
- use in conjunction with above Y splitter cable
- a CAT6 1.5 m Ethernet patch cable, connect the LAN cable as follows:

- since I don't want to break my production system and I do not have a separate test system, I unfortunately can not test the below software installation guidelines
- I had to do a lot of trial and error experiments to get my system up and running
- I am writing below instructions from my memory and may miss some parts in my description
- in case you are experiencing trouble with my instructions, please raise an issue at Github here and ask for help
- please execute these steps at the Touch-display of your heating's Pelletronic
- the firmware version of my Pelletronic is Touch V4.00b
- firstly connect your OekoFEN Smart XS heating Pelletronic temporarily to your LAN network without the WiFi proxy server for Oekofen_Spy in between
- use a looooong Ethernet cable between your OekoFEN Smart XS heating Pelletronic and your router or next LAN network socket
- alternatively as I did, you may use a Universal WiFi Internet Adapter (e.g. Netgear WNCE2001)
- in the Pelletronic menu 'General' touch to 'IP Config'
- set 'JSON Modus' to on (compatible)
- set remote maintenance to on
- set the JSON port, default is '4321', and note it
- set a JSON password and note it
- switch DHCP to on
- set a Web password and note it
- check whether the automatically starting Pellectronic's network configuration is indicating a successful connection to LAN & Internet
- check and note the IP address <ip-address of Pelletronic> of your Pelletronic that has been assigned by your router's DHCP server
- only continue if your Pelletronic has established a successful connection to both LAN and Internet
- if not, please check your router and firewall for correct settings
- enter the URL http://<ip-address of Pelletronic>:<JSON port>/<JSON password>/all
- you should a JSON file output similar to this one
- if you are getting such a JSON file as output your configuration of your OekoFEN Smart XS heating Pelletronic is finished for now
- you can now install the myPelletronic app on your mobile phone and remotely control your OekoFEN Smart XS heating
- For entering the Codelevel of your Pelletronic, you need a time variant 4 digit pass code. Please ask your heating contractor for help if you need it. A bit of googling e.g. for 'Das Kennwort für die Kundendienstebene setzt sich zusammen aus ' may also help you. Handle it with care!
- download the latest version of Raspberry Pi OS (64Bit) from here
- choose 'Raspberry Pi OS with desktop 64-Bit'
- when writing this README.md, the latest version was version 2023-05-03-raspios-bullseye-armhf-full.img.xz
- unpack and install this OS on an appropriate SD card and boot the Raspberry Pi 3B+
- for flashing the SD card balenaEtcher is recommended
- for Linux OS, unpack with xz -d -v <filename>
- a getting-started documentation is available here:
- set location, language, keyboard, and time zone
- as user name, please enter 'smartxslogin'
- choose a safe password with at least 8 characters, write it down
- set-up your Wifi connection
- update the Raspberry Pi OS software
- restart
- login again after the restart
- check that you can access the internet via your WiFi connection
- please follow these instructions
- note: The Raspberry Pi 3 B+ can be USB booted out-of-the-box.
- apply appropriately this hardening guide
- do not disable the Raspberry Pi's WiFi since it is needed for this application
- please follow these instructions
- reboot and check a login
- shutdown
- plug your maSata SSD card into the X850 board
- use balenaEtcher for cloning the SD card#s content to the SSD mSata card
- connect the X850 board with your Raspberry Pi 3B+, ensure that your power supply is strong enough, see above hardware guidelines
- power-up the Raspberry Pi 3B+
- login in
- some guidelines for reducing the write cycles to tthe mSata SSD canb be found here or here (in German language)
- add at the end of '/etc/fstab' the following line
tmpfs /tmp tmpfs defaults,noatime,nosuid,nodev,noexec,mode=1777,size=128M 0 0
- this is mounting /tmp as a ramdrive tmpfs
- disable swapping by entering the following commands in a terminal window
sudo systemctl disable dphys-swapfile
sudo systemctl stop dphys-swapfile
- reboot and login again
- execute the following commands in a LXterminal window:
cd ${HOME}
sudo apt install git
git clone https://github.com/FUEL4EP/oekoFEN_Spy_for_oekoFEN_Smart_XS_pellets_heating.git
- This command sequence will download the repository 'FUEL4EP/oekoFEN_Spy_for_oekoFEN_Smart_XS_pellets_heating' from Github into the directory '${HOME}/oekoFEN_Spy_for_oekoFEN_Smart_XS_pellets_heating'
- These commands are also stored in the script 'git_clone.bsh'. Please note that this script needs to be executed as normal user!
- please open in a text editor the bash script '${HOME}/oekoFEN_Spy_for_oekoFEN_Smart_XS_pellets_heating/customize_installation.bsh'
- at the top you will find a customization section:
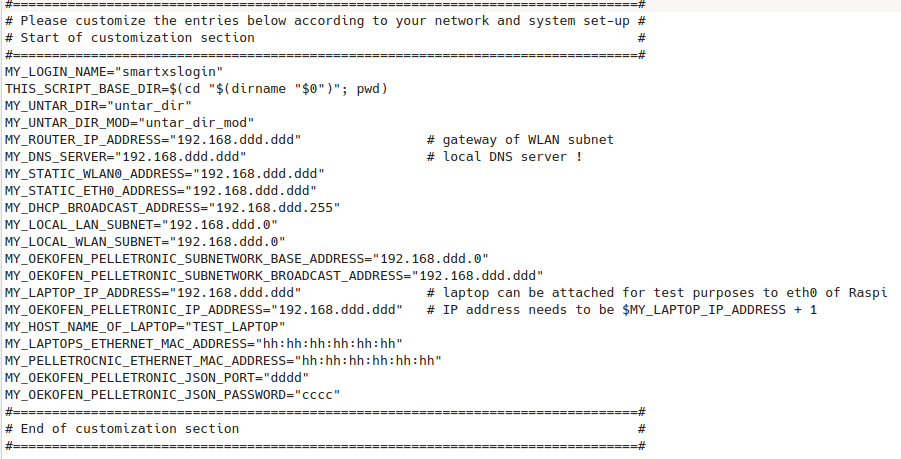
- d:= digit
- h:= hexadecimal character
- please change the entries after the equal sign to fit to your network and system set-up
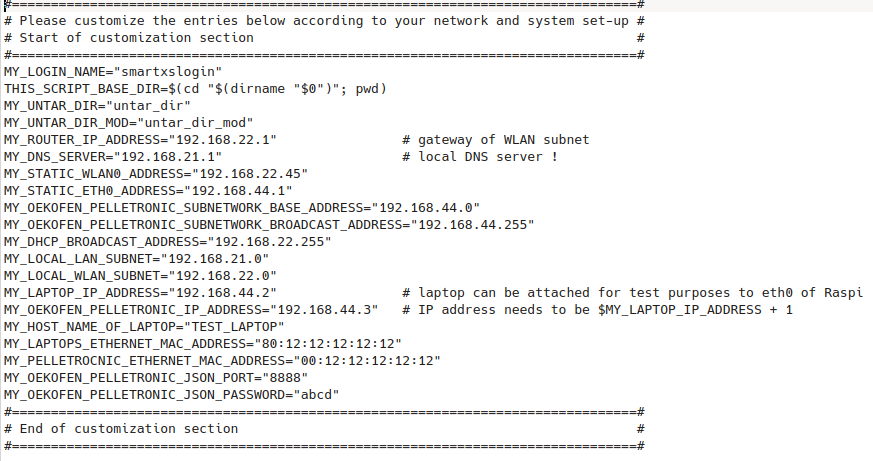
- An example of a customization is here:
- now run the customization script as sudo:


sudo ./customize_installation.bsh
- the script is patching the subdirectory '${HOME}/oekoFEN_Spy_for_oekoFEN_Smart_XS_pellets_heating/${MY_UNTAR_DIR_MOD}'
- please check the patched set-up files in this directory
- ensure that the customization sections in '${HOME}/oekoFEN_Spy_for_oekoFEN_Smart_XS_pellets_heating/install_software_packages_1.bsh' and '${HOME}/oekoFEN_Spy_for_oekoFEN_Smart_XS_pellets_heating/customize_installation.bsh' are consistent
- then execute this script as normal user
bash ${HOME}/oekoFEN_Spy_for_oekoFEN_Smart_XS_pellets_heating/install_software_packages_1.bsh
-
ensure that the customization sections in '${HOME}/oekoFEN_Spy_for_oekoFEN_Smart_XS_pellets_heating/patch_installation.bsh' and '${HOME}/oekoFEN_Spy_for_oekoFEN_Smart_XS_pellets_heating/customize_installation.bsh' are consistent
-
then execute the script that will patch the root directory '/':
sudo ${HOME}/oekoFEN_Spy_for_oekoFEN_Smart_XS_pellets_heating/patch_installation.bsh
- reboot as normal user without sudo:
reboot
- after the reboot you can check part of the new configuration e.g. by the commands
ifconfig
hostname
- please note that sudo is now requiring to enter a password
- for configuration, please execute now the script
sudo ${HOME}/oekoFEN_Spy_for_oekoFEN_Smart_XS_pellets_heating/configure_1.bsh
- this script will reboot the Raspberry Pi 3B+ at the end
- login again after reboot as normal user
- execute the script
sudo ${HOME}/oekoFEN_Spy_for_oekoFEN_Smart_XS_pellets_heating/install_software_packages_2.bsh
- this script will execute a reboot at the end
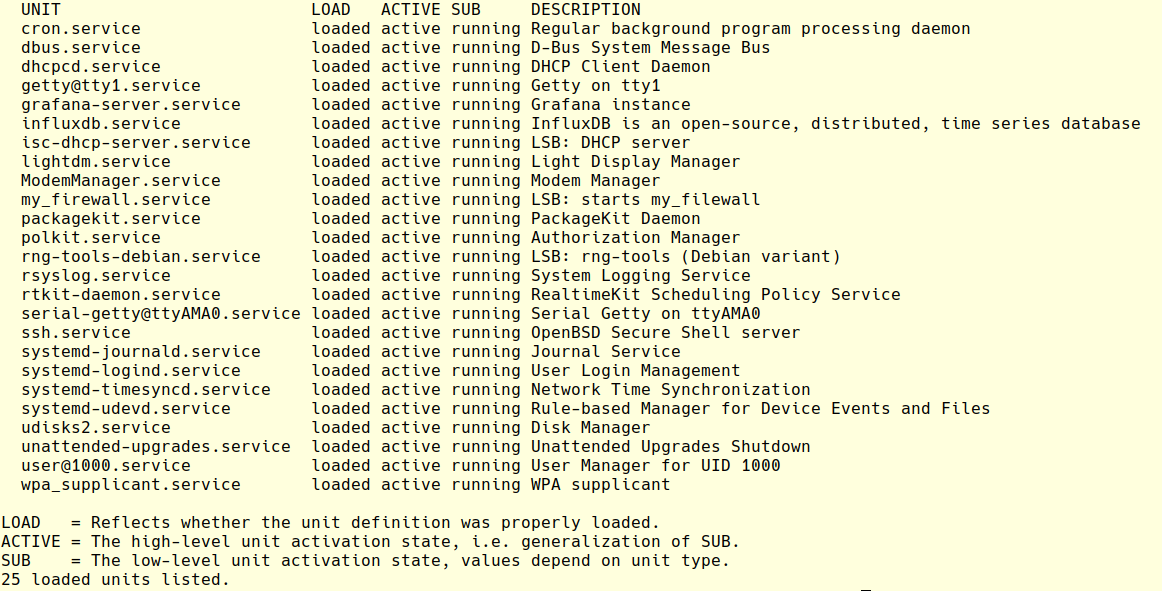
- the execution of
sudo systemctl --type service --state running
- should show these running services:
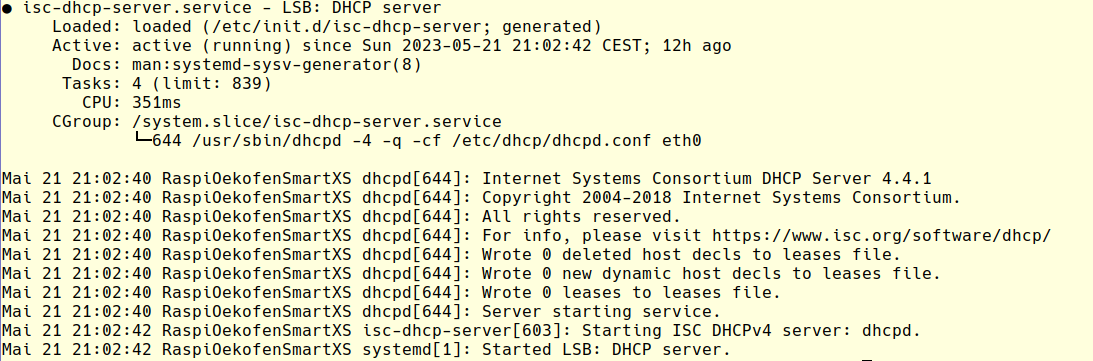
- the execution of

sudo systemctl status isc-dhcp-server.service
- should show an output like this:

- use a PC or laptop connected to your WiFi network
- enter into a browser, e.g. firefox, as URL
http://<MY_STATIC_WLAN0_ADDRESS>:3000
- Note: This is NOT a https, but a http URL!
- MY_STATIC_WLAN0_ADDRESS is the WLAN IP address of the Raspberry Pi specified in the script customize_installation.bsh
- you should get now such a login window
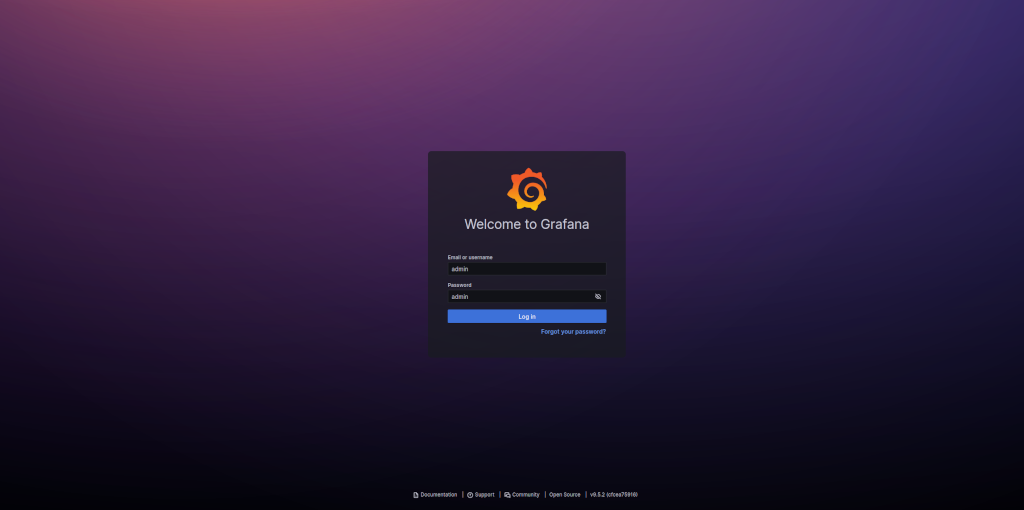
- use as initial username and password

username: admin
password admin
- after a successful login please immediately change the password of the admin account
- Move the mouse cursor on 'Toggle Menu' at the top left
- click 'Administration# sub menu
- click 'Users'
- click to 'admin'
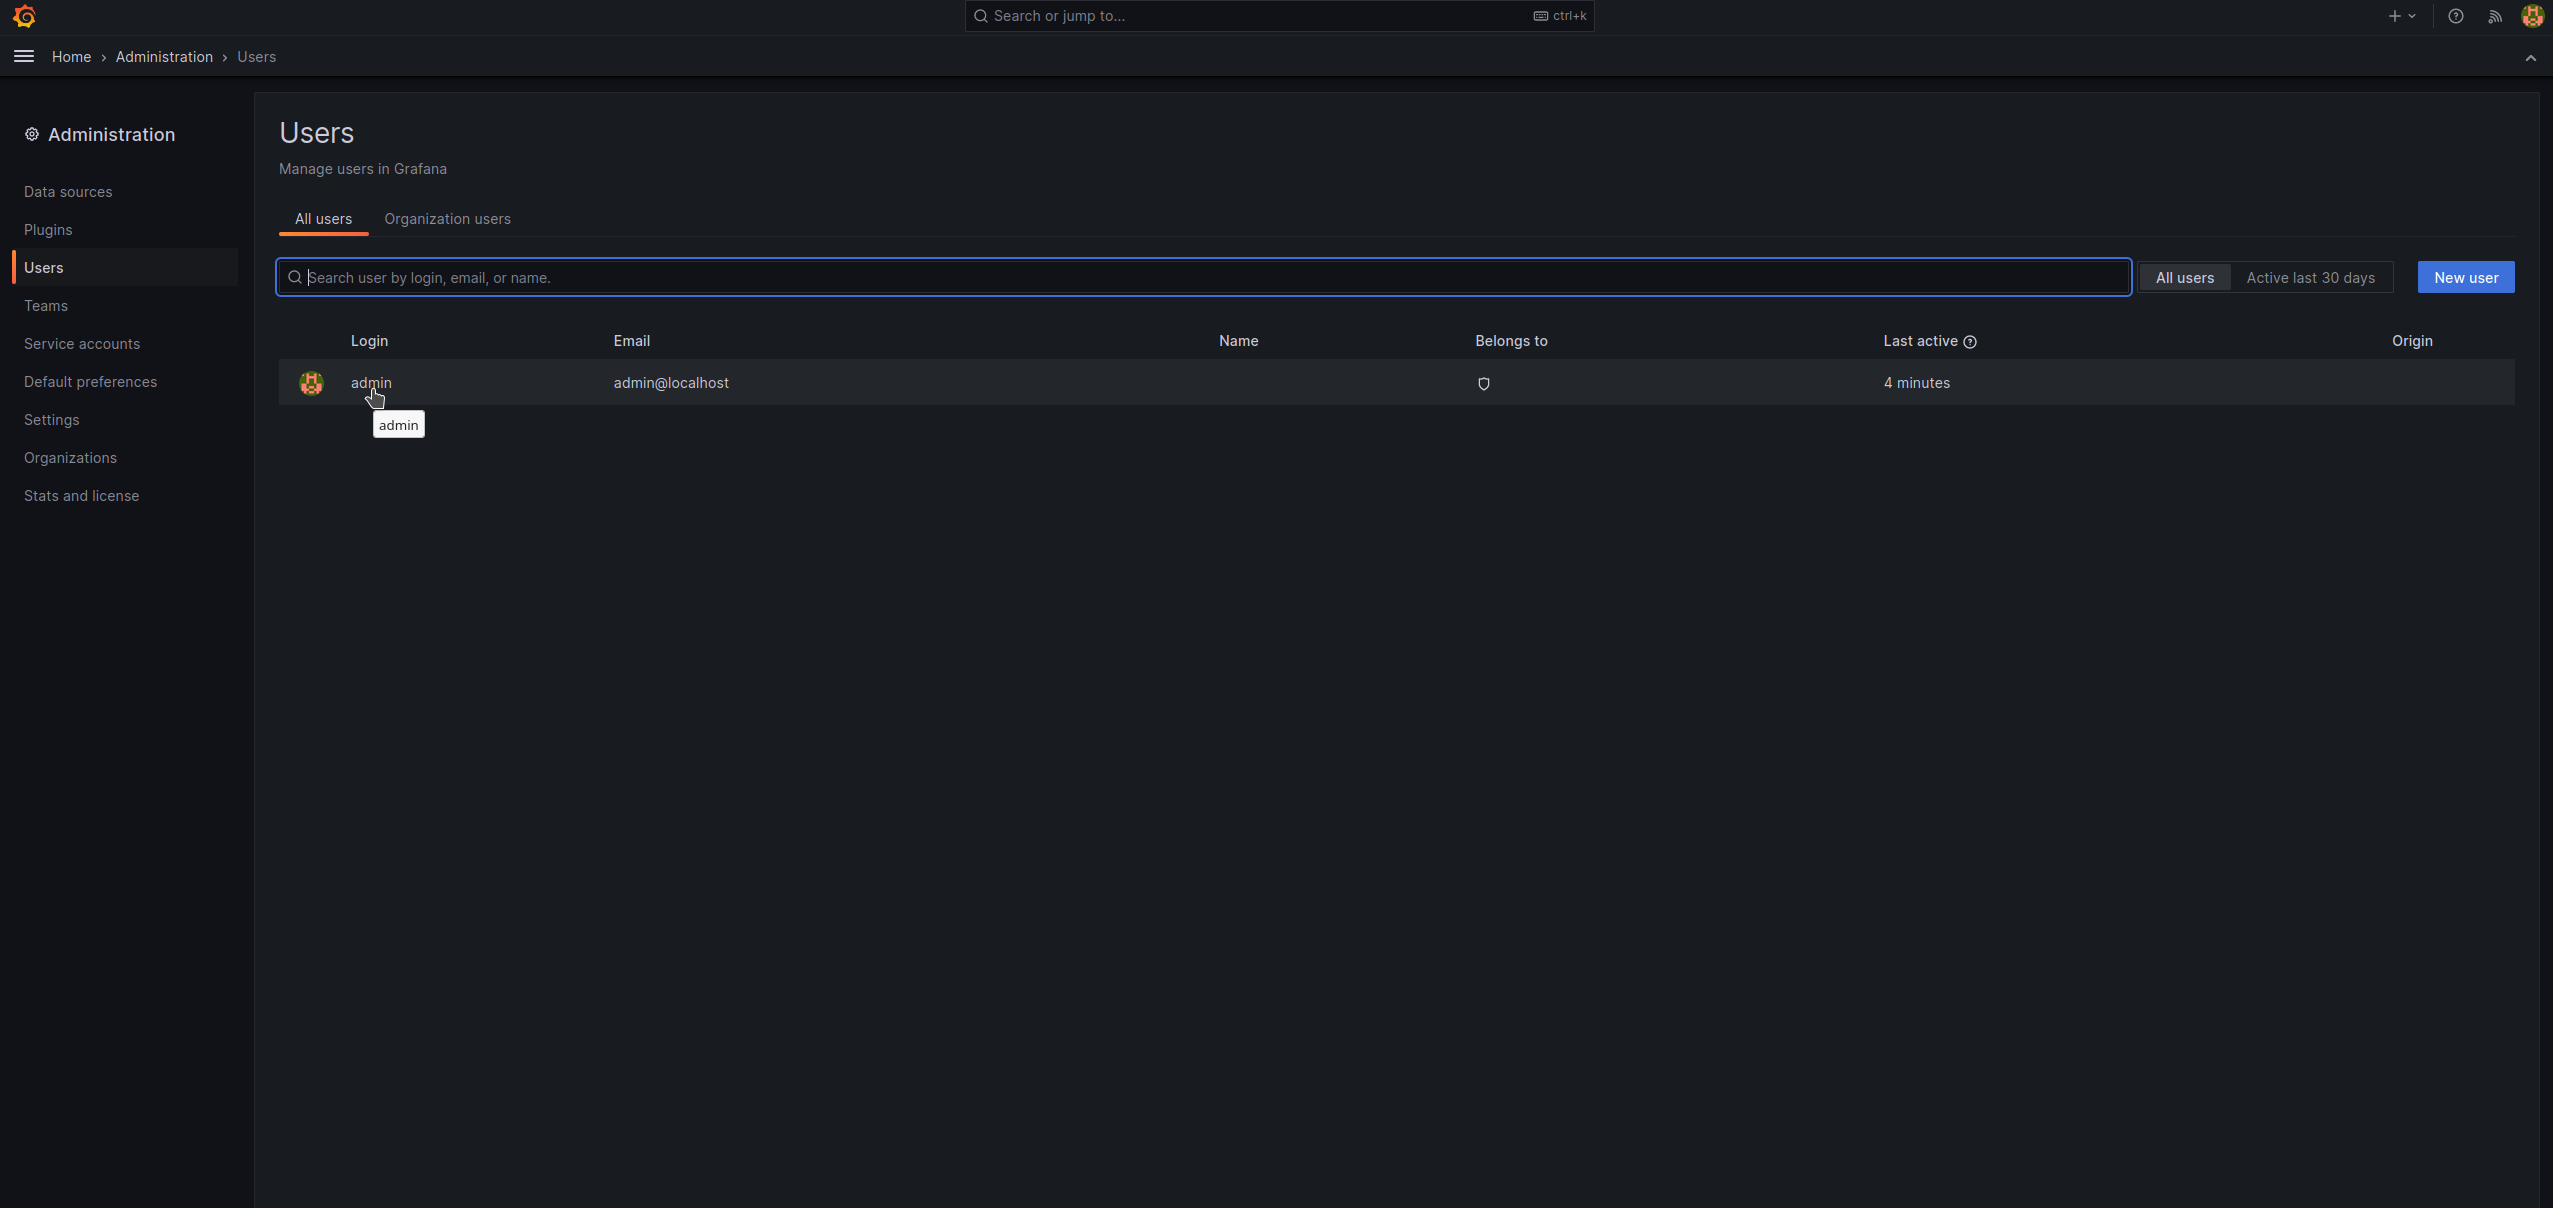
- edit 'password' and change it to a new secure password (> 8 characters)
- note the new admin password

- create new users with limited permissions as needed
- please follow the standard Grafana documentation for that purpose
- always use a non-admin user for viewing Grafana desktops
- please follow the recipe of Peter Fuerle in section 'configure Grafana'
- here as reference a screen dump of the setup of the data source:
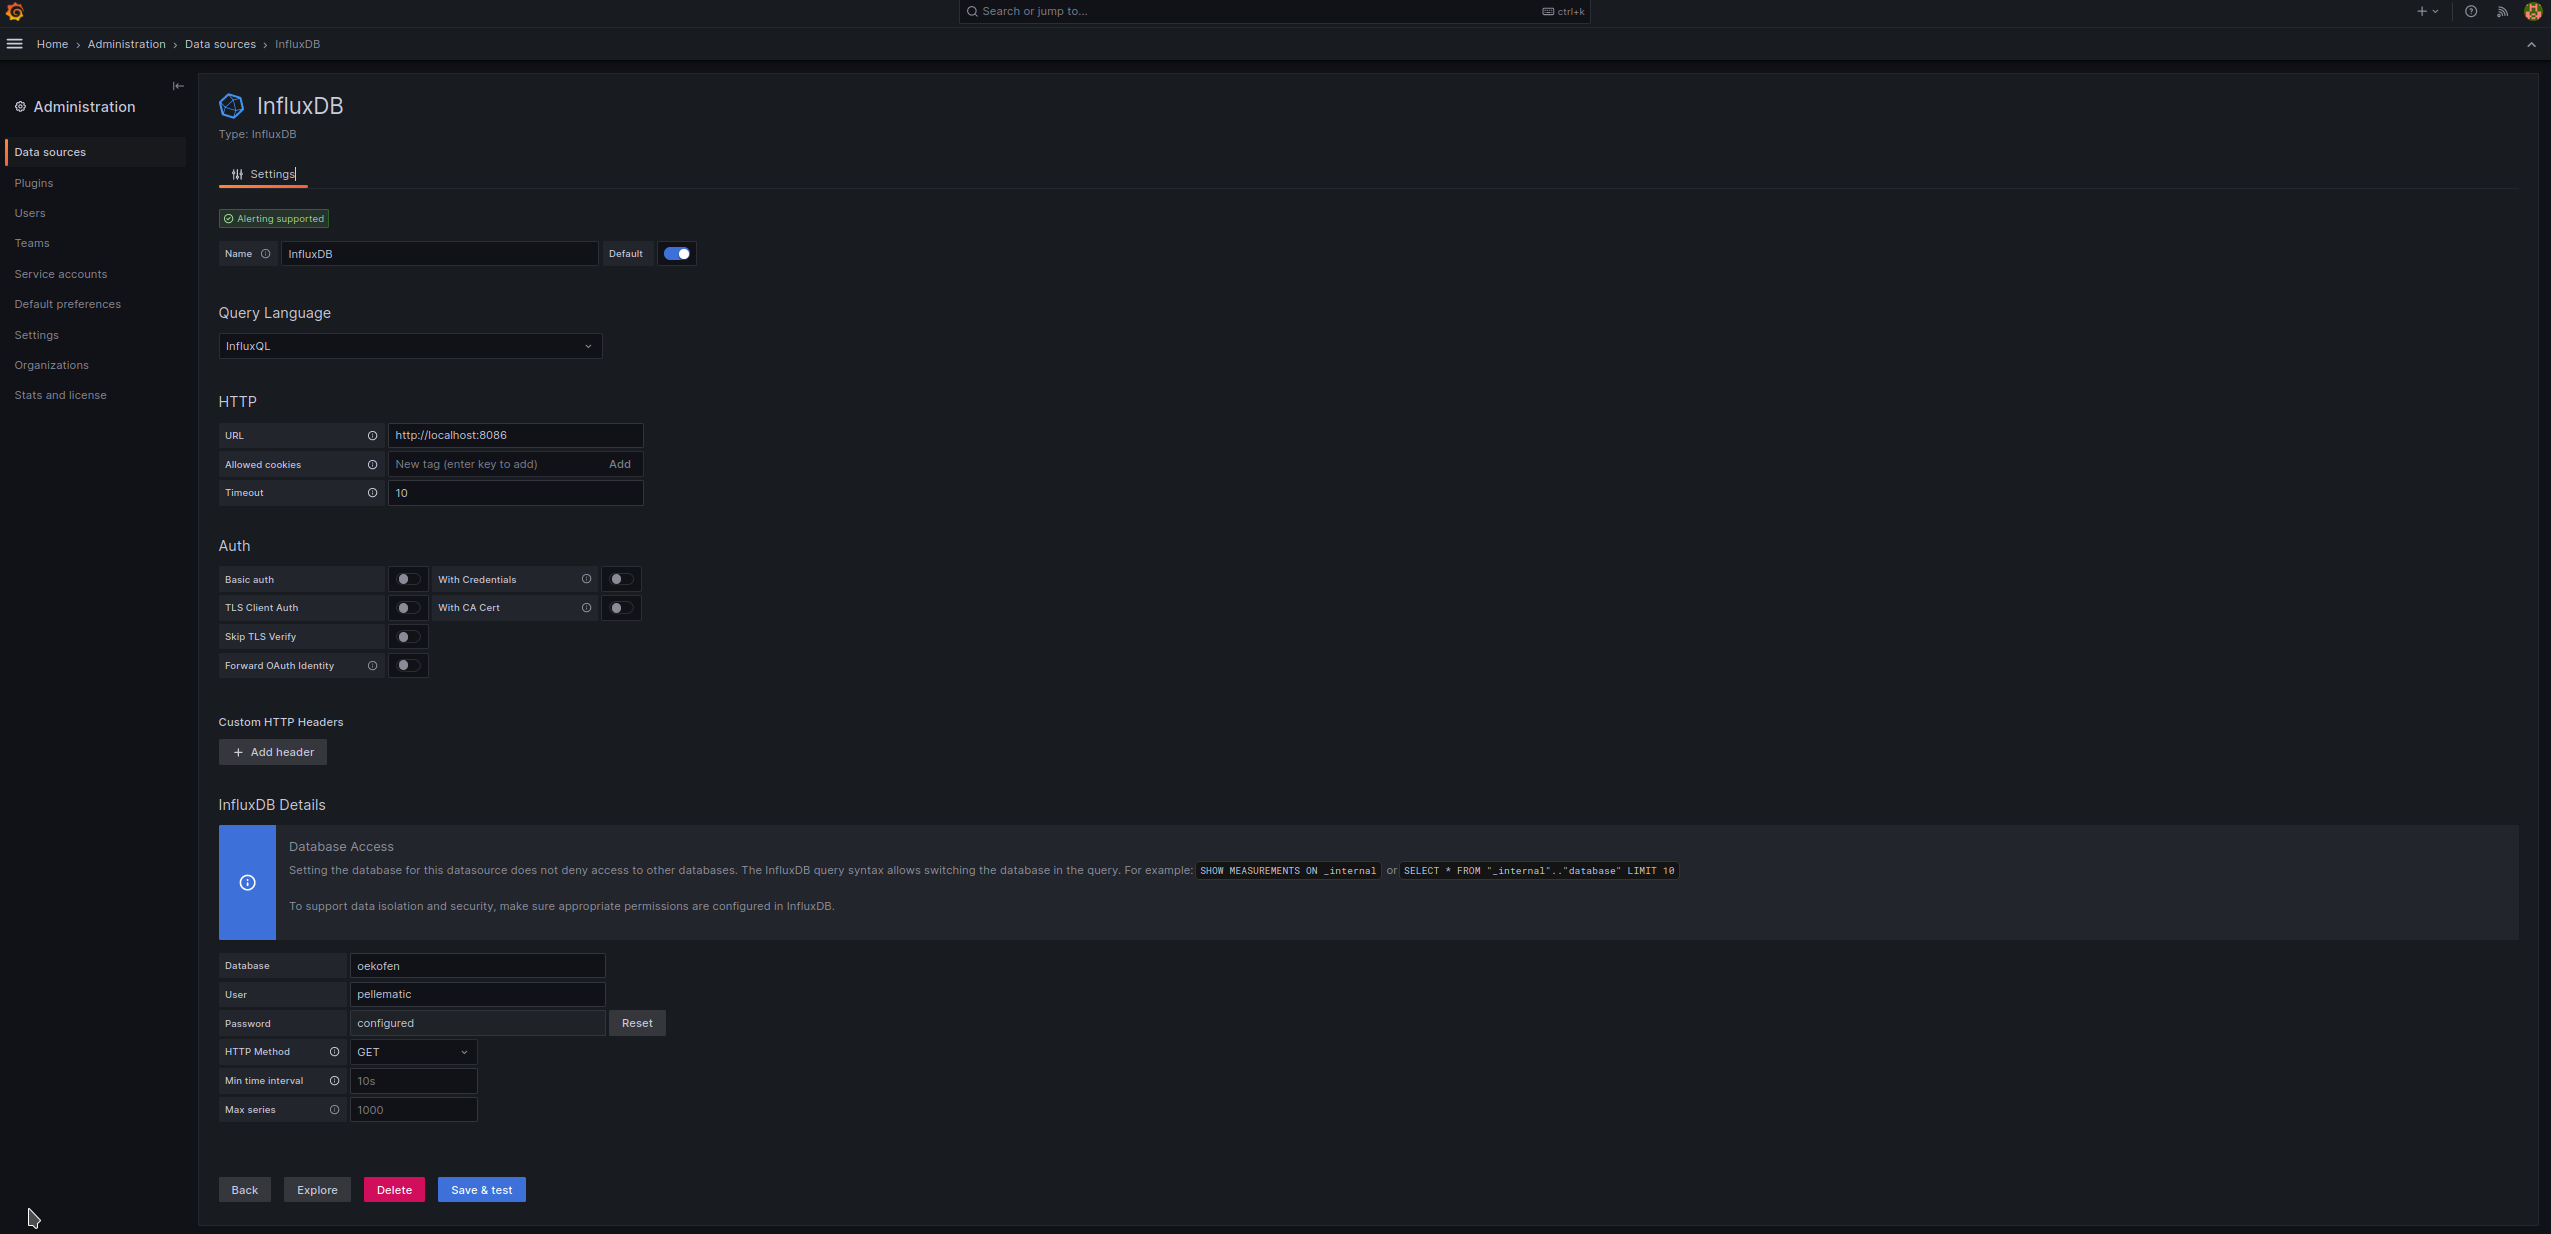
- no other configurations are necessary except those in section 'configure Grafana'
- if you have questions, please raise an issue at my Github repository

-
move the mouse cursor on 'Toggle Menu' at the top left
-
click 'Dashboards' sub menu
- click 'new' => 'import'
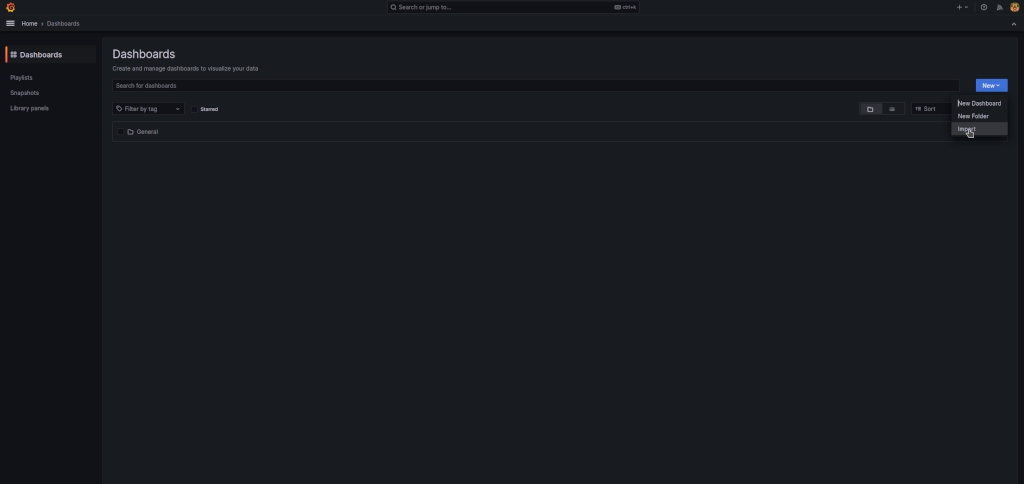
- click 'upload JSON dashboard file' and browse to
${HOME}/oekoFEN_Spy_for_oekoFEN_Smart_XS_pellets_heating/untar_dir_mod/oekofen-spy/my_oekofen_spy_extension/oekoFEN-Spy-Smart_XS.json
- click 'import'
- click 'new' => 'import'
-
save the imported dashboard by clicking to 'save dashboard' at the top right
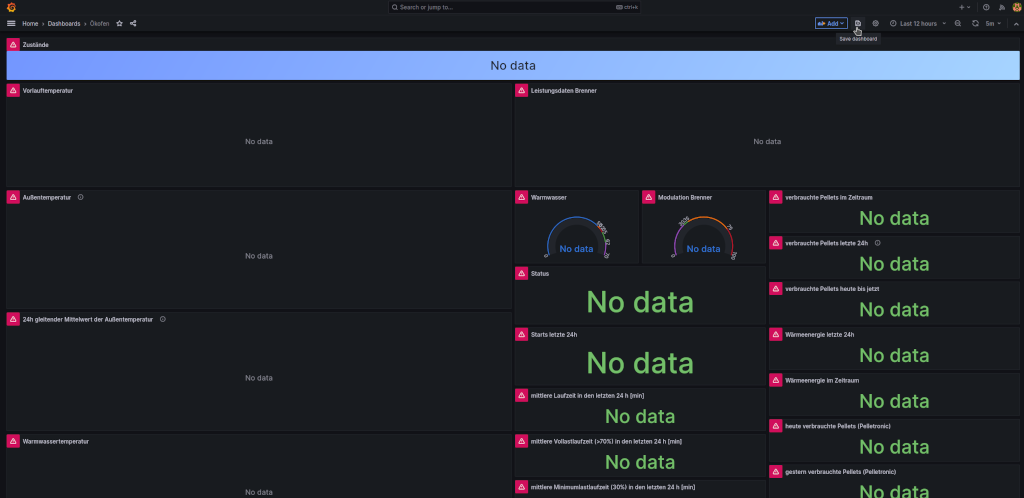
-
this dashboard is now available in Grafana as dashboard 'General:Ökofen'
-
the running cron process should now add every 4 minutes a set of new measurements to the InfluxDB which is then displayed in Grafana


*/4 * * * * smartxslogin /usr/bin/python3 /home/smartxslogin/oekofen-spy/oekofen-spy-main/Python3/oekofen2influx.py
- refresh Grafana as necessary
- You may establish a ssh connection from your PC or laptop connected to the same WiFi network as follows
- ssh <MY_STATIC_WLAN0_ADDRESS> -l <MY_LOGIN_NAME>
- the password is the specified login password of your <MY_LOGIN_NAME> account
- you may need to configure your router's, PC's or laptop's firewalls appropriately for allowing ssh accesses
- connect the Raspberry Pi 3B+ according to the above picture of the network toplogy
- wait a minute ..
- connect with your PC or laptop to the Grafana server using the browser URL
http://<MY_STATIC_WLAN0_ADDRESS>:3000
- good luck and have fun with the Oekofen SPY
- for above configuration you need the Ethernet MAC address of your Pelletronic <MY_PELLETROCNIC_ETHERNET_MAC_ADDRESS>
- one possibility to identify the MAC address is establishing a direct LAN connection, see above, to your LAN router and check the MAC address in your router
- another possibility is to plug in a LAN cable attached to your Pelletronic (see above) into the Raspberry Pi's eth0 LAN socket and check the tail of '/etc/var/syslog' for such a message

- the MAC number is pixelized, enter this MAC address with the colons as <MY_PELLETROCNIC_ETHERNET_MAC_ADDRESS> into the script '${HOME}/oekoFEN_Spy_for_oekoFEN_Smart_XS_pellets_heating/customize_installation.bsh'

- for test purposes you can attach your laptop with an Ethernet patch cable to the Raspberry Pi3+ based WiFi proxy server for Oekofen_Spy. For that purpose edit a sudo the file '/opt/my_firewall/simple_firewall.bsh' as follows:
- comment out line 9:
- comment line 12
- save
- execute 'sudo /etc/init.d/my_firewall restart'
- plug in your laptop and check if you get assigned an IP address
- note that the firewall is limiting the outgoing connections to those defined in the control file '/opt/my_firewall/allowed_urls.txt'
- do not forget to reverse the above commenting back after your tests!
- since I am switching off my WiFi during night, the Raspberry Pi's Tx WLAN power is reduced during night by a cron process:
30 23 * * * root /home/smartxslogin/scripts/wlan_9dbm.bsh
9 07 * * * root /home/smartxslogin/scripts/wlan_31dbm.bsh
- you may change this according to your needs
- the shipped Grafana dashboard variables
- were calibrated to my system and may not fit to your system
- therefore, you may calibrate them if you have a heat meter in your system
- please compare the heat energy calculated by Grafana with the heat energy measured by your heat meter
- please consider the heat energy for hot water appropriately since it is usually not captured by a heat meter
- the update of the Grafana variable is done as follows:
- you need to login as 'admin'
- click to 'Dashboard settings' at the top right

- click to 'Variables'
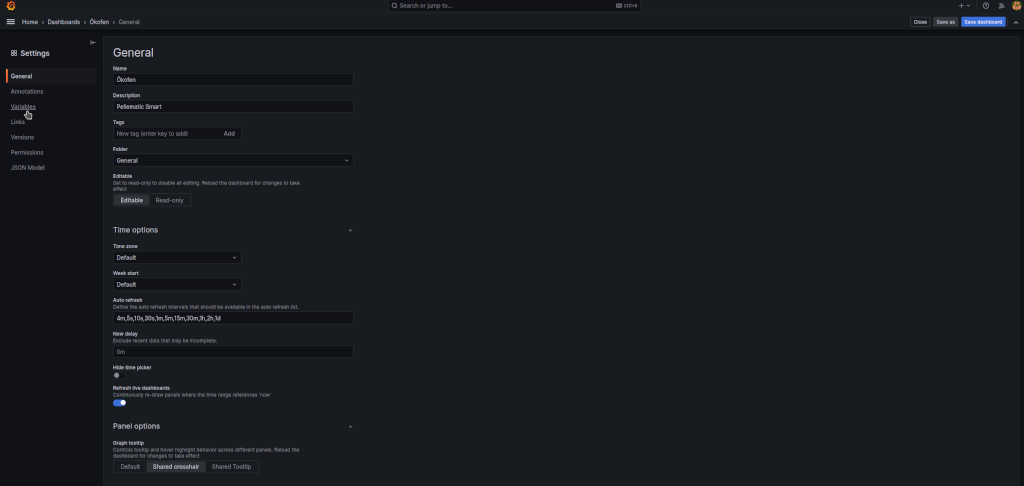
- click on the variable to be changed
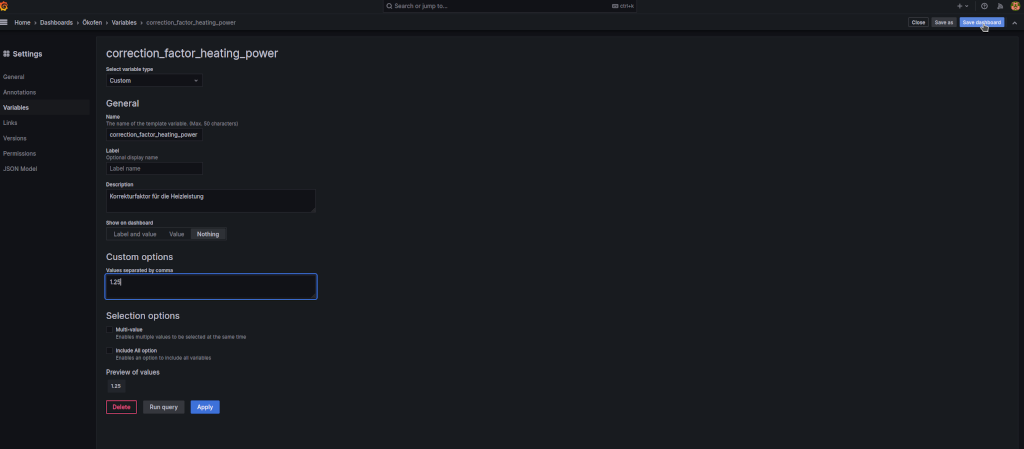
- Change the parameter in the 'Custom options' field
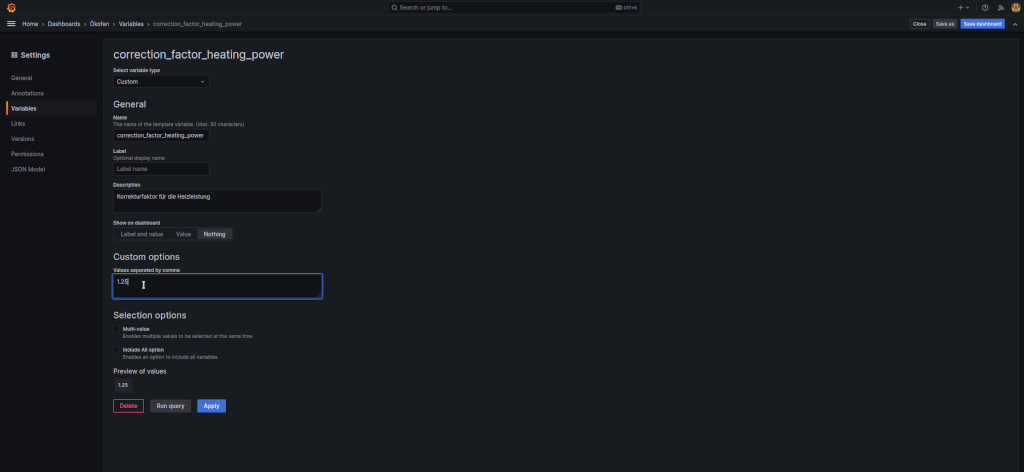
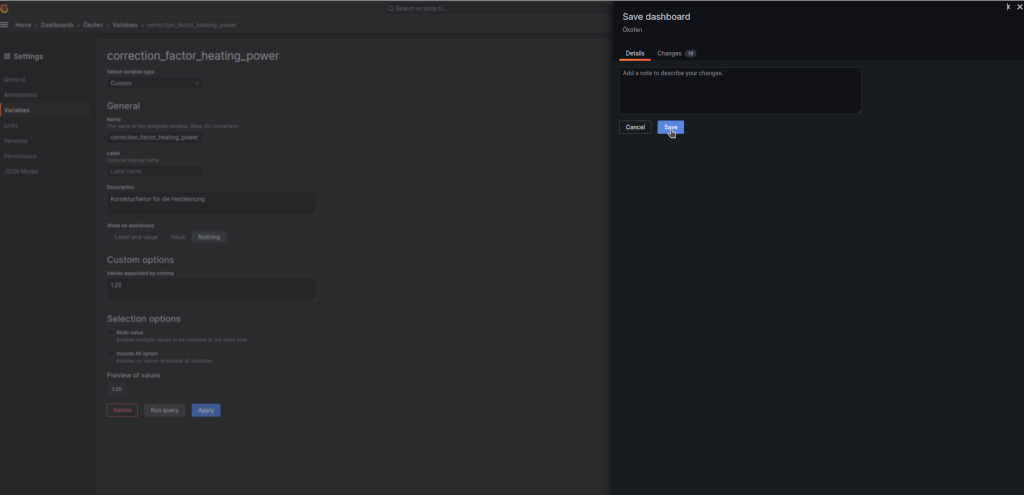
- Click 'Save dashboard' at the top right
- Click 'Save'
- Done, repeat as needed, several days observation and comparison is needed


-
in order to limit the size of the InfluxDB data base 'oekofen', you may add a retention policy as follows
-
a how to reference can be found here
-
execute the following commands for setting a retention period of 56 weeks:
influx -execute 'show retention policies on "oekofen"'
influx -execute 'create retention policy "oekofen_56_weeks" on "oekofen" duration 56w replication 1 default'
influx -execute 'show retention policies on "oekofen"' influx -execute 'alter retention policy "oekofen_56_weeks" on "oekofen" default'
influx -execute 'show retention policies on "oekofen"'
- adapt the retention period to your needs
- some grafana updates are causing a freeze of the Raspberry Pi
- in this case, restart the Raspberry Pi with a power cycle and login by ssh
- then dowwngrade to a working grafana version, e.g. by
sudo apt install grafana=10.0.3
- an example python script for publishing a selection of measurement data to a MQTT broker is provided here
- please adapt it to your needs, see comments inside
- this script can be periodically invoked by a cron process, e.g. once a day
- an exmple of a Homematic / RaspberryMatic integration is shown here (German language)
- the initial settings of my freshly installed Oekofen Smart XS pellets heating resulted in too many unnecessary ignitions
- for a minimum number of ignitions in winter mode, the following parameter settings turned out to be effective for my system:
- your system may require different settings!
- less ignitions will reduce the fine dust emissions
- Pellematic Setting: Switch Off Temp: 77 deg C
- Pellematic Setting: Control Temperature: 53 deg C
- Pellematic Setting: Switch On Hyst: 29 K
- Pellematic Setting: hysteresis shutdown: 8K
- Pellematic Setting: Capacitive Sensor RA Active: On
- Pellematic Setting: Capacitive Sensor ZW Active: On
- Heating Control: Room Temp Heating: 22.5 deg C
- Heating Control: Eco Mode: Ecological
- Heating Water Setting: Op. Mode: Auto
- Heating Water Setting: Time 1: 6:30 - 7:15 (adjust to your needs)
- Heating Water Setting: Time 1: Preference: Off
- Heating Water Setting: Legionella Protection: Off (adjust to your needs)
- Return Pump Settings: Mode: Auto
- Return Pump Settings: Time 1: 6:45 - 7:15 (adjust to your needs)
- Pellematic Setting: adjust your heat curve to a your buildings needs
- try to achieve a minimum flow temperature at a cold day
- my setting is
- Heating Curve: 0.7
- Base Point: 32 deg C
- H Limit Heating: 20 deg C
- I am not using night setback
- your average burn time in winter mode should be > 150 minutes
- at cold days, just one ignition may be necessary
- summer mode is still under investigation at my side
- in summer mode my current Pelletronic settings are:
- Water Temp Set: 70 deg C
- Water Temp Min: 30 deg C
- Water is heated up once a day for max. 2 hours in the morning
- usually we take a shower at the end of this heating time
- the return pump is switched on for 45 minutes during that time frame
- as a first result, the average heat energy per day is about 13 kWh
- a photovoltaics supplied heating rod is planned for summer mode
- in summer mode my current Pelletronic settings are:
- these are just recommendations, see Disclaimer below
- please help to improve this repository by raising a Github issue if you find any deficiency. Thanks a lot in advance.
- as said, I could not validate all instructions of this recipe, but most
- please let your system's settings be checked and confirmed by your heating contractor
- I am not responsible for any of your system's settings
- always ask your heating contractor if you need more information or advice on your system
Creative Commons BY-NC-SA
Give Credit, NonCommercial, ShareAlike
This work is licensed under a Creative Commons Attribution-NonCommercial-ShareAlike 4.0 International License.

-EOF