People Counter App at the Edge
| Details | |
|---|---|
| Programming Language: | Python 3.5 or 3.6 |
Contents
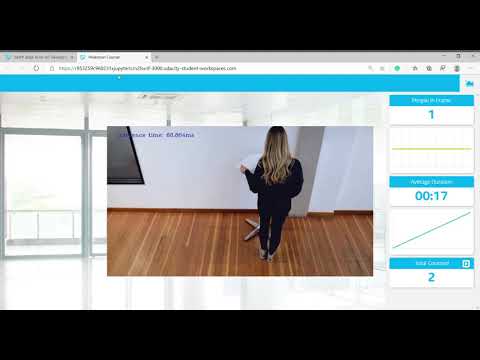
Demo video
What it coes
The people counter application will demonstrate how to create a smart video IoT solution using Intel® hardware and software tools. The app will detect people in a designated area, providing the number of people in the frame, average duration of people in frame, and total count.
How it works
The counter will use the Inference Engine included in the Intel® Distribution of OpenVINO™ Toolkit. The model used should be able to identify people in a video frame. The app should count the number of people in the current frame, the duration that a person is in the frame (time elapsed between entering and exiting a frame) and the total count of people. It then sends the data to a local web server using the Paho MQTT Python package.
Requirements
Hardware
- 6th to 10th generation Intel® Core™ processor with Iris® Pro graphics or Intel® HD Graphics.
- OR use of Intel® Neural Compute Stick 2 (NCS2)
Software
- Intel® Distribution of OpenVINO™ toolkit 2019 R3 release
- Node v6.17.1
- Npm v3.10.10
- CMake
- MQTT Mosca server
Setup
Install Intel® Distribution of OpenVINO™ toolkit
See this guide for installing openvino.
Install Nodejs and its depedencies
-
This step is only required if the user previously used Chris Lea's Node.js PPA.
sudo add-apt-repository -y -r ppa:chris-lea/node.js sudo rm -f /etc/apt/sources.list.d/chris-lea-node_js-*.list sudo rm -f /etc/apt/sources.list.d/chris-lea-node_js-*.list.save -
To install Nodejs and Npm, run the below commands:
 curl -sSL https://deb.nodesource.com/gpgkey/nodesource.gpg.key | sudo apt-key add -
 VERSION=node_6.x
 DISTRO="$(lsb_release -s -c)"
 echo "deb https://deb.nodesource.com/$VERSION $DISTRO main" | sudo tee /etc/apt/sources.list.d/nodesource.list
 echo "deb-src https://deb.nodesource.com/$VERSION $DISTRO main" | sudo tee -a /etc/apt/sources.list.d/nodesource.list
 sudo apt-get update
 sudo apt-get install nodejs
Install the following dependencies
sudo apt update
sudo apt-get install python3-pip
pip3 install numpy
pip3 install paho-mqtt
sudo apt install libzmq3-dev libkrb5-dev
sudo apt install ffmpeg
Install npm
There are three components that need to be running in separate terminals for this application to work:
- MQTT Mosca server
- Node.js* Web server
- FFmpeg server
From the main directory:
-
For MQTT/Mosca server:
cd webservice/server npm install -
For Web server:
cd ../ui
npm install
Note: If any configuration errors occur in mosca server or Web server while using npm install, use the below commands:
sudo npm install npm -g
rm -rf node_modules
npm cache clean
npm config set registry "http://registry.npmjs.org"
npm install
Generating IR files
Step 1
Download the pre-trained model from here
Step 2
Extract the files:-
tar -xvf ssd_mobilenet_v2_coco_2018_03_29.tar.gz
Step 3
Go to the ssd_mobilenet_v2 directory and run the following command line:-
python /opt/intel/openvino/deployment_tools/model_optimizer/mo_tf.py --input_model frozen_inference_graph.pb --tensorflow_object_detection_api_pipeline_config pipeline.config --tensorflow_use_custom_operations_config /opt/intel/openvino/deployment_tools/model_optimizer/extensions/front/tf/ssd_v2_support.json --reverse_input_channel
Step 4
Create model directory in the app directory and move the generated .xml and .bin file into created model directory.
Run the application
From the main directory:
Step 1 - Start the Mosca server
cd webservice/server/node-server
node ./server.js
You should see the following message, if successful:
Mosca server started.
Step 2 - Start the GUI
Open new terminal and run below commands.
cd webservice/ui
npm run dev
You should see the following message in the terminal.
webpack: Compiled successfully
Step 3 - FFmpeg Server
Open new terminal and run the below commands.
sudo ffserver -f ./ffmpeg/server.conf
Step 4 - Run the code
Open a new terminal to run the code.
Setup the environment
You must configure the environment to use the Intel® Distribution of OpenVINO™ toolkit one time per session by running the following command:
source /opt/intel/openvino/bin/setupvars.sh -pyver 3.5
You should also be able to run the application with Python 3.6, although newer versions of Python will not work with the app.
Running on the CPU
When running Intel® Distribution of OpenVINO™ toolkit Python applications on the CPU, the CPU extension library is required. This can be found at:
/opt/intel/openvino/deployment_tools/inference_engine/lib/intel64/
Depending on whether you are using Linux or Mac, the filename will be either libcpu_extension_sse4.so or libcpu_extension.dylib, respectively. (The Linux filename may be different if you are using a AVX architecture)
Though by default application runs on CPU, this can also be explicitly specified by -d CPU command-line argument:
python main.py -i resources/Pedestrian_Detect_2_1_1.mp4 -m your-model.xml -l /opt/intel/openvino/deployment_tools/inference_engine/lib/intel64/libcpu_extension_sse4.so -d CPU -pt 0.6 | ffmpeg -v warning -f rawvideo -pixel_format bgr24 -video_size 768x432 -framerate 24 -i - http://0.0.0.0:3004/fac.ffm
If you are in the classroom workspace, use the “Open App” button to view the output. If working locally, to see the output on a web based interface, open the link http://0.0.0.0:3004 in a browser.
Running on the Intel® Neural Compute Stick
To run on the Intel® Neural Compute Stick, use the -d MYRIAD command-line argument:
python3.5 main.py -d MYRIAD -i resources/Pedestrian_Detect_2_1_1.mp4 -m your-model.xml -pt 0.6 | ffmpeg -v warning -f rawvideo -pixel_format bgr24 -video_size 768x432 -framerate 24 -i - http://0.0.0.0:3004/fac.ffm
To see the output on a web based interface, open the link http://0.0.0.0:3004 in a browser.
Note: The Intel® Neural Compute Stick can only run FP16 models at this time. The model that is passed to the application, through the -m <path_to_model> command-line argument, must be of data type FP16.
Using a camera stream instead of a video file
To get the input video from the camera, use the -i CAM command-line argument. Specify the resolution of the camera using the -video_size command line argument.
For example:
python main.py -i CAM -m your-model.xml -l /opt/intel/openvino/deployment_tools/inference_engine/lib/intel64/libcpu_extension_sse4.so -d CPU -pt 0.6 | ffmpeg -v warning -f rawvideo -pixel_format bgr24 -video_size 768x432 -framerate 24 -i - http://0.0.0.0:3004/fac.ffm
To see the output on a web based interface, open the link http://0.0.0.0:3004 in a browser.
Note:
User has to give -video_size command line argument according to the input as it is used to specify the resolution of the video or image file.
A Note on Running Locally
The servers herein are configured to utilize the Udacity classroom workspace. As such, to run on your local machine, you will need to change the below file:
webservice/ui/src/constants/constants.js
The CAMERA_FEED_SERVER and MQTT_SERVER both use the workspace configuration.
You can change each of these as follows:
CAMERA_FEED_SERVER: "http://localhost:3004"
...
MQTT_SERVER: "ws://localhost:3002"