This repository contains the source code used in the experiments of the Master's Thesis "Tuning of machine learning algorithms for automatic bug assignment" (Daniel Artchounin), conducted on the following open-source software projects: Eclipse JDT and Mozilla Firefox. In this Master's Thesis, a systematic four-step method to find some of the best configurations of several machine learning algorithms intending to solve the automatic bug assignment problem has been introduced. This method has been evaluated on 66 066 bug reports of Ericsson, 24 450 bug reports of Eclipse JDT and 30 358 bug reports of Mozilla Firefox.
Below, there are the instructions to follow in order to install Python 3.6 in a virtual environment:
-
Go to the following web page:
-
Download the TAR.GZ file:
- virtualenv-<desired_version>.tar.gz
-
Untar the aforementioned TAR.GZ file:
tar xvfz virtualenv-<downloaded_version>.tar.gz -
Move to the folder with the content extracted from the TAR.GZ file (using your terminal)
-
Create a virtual environment:
python3.6 virtualenv.py <fancy_name_of_your_virtual_environment>
# example: python3.6 virtualenv.py yo
-
Move to the folder of your virtual environment with the executables:
cd <fancy_name_of_your_virtual_environment>/bin/ -
Read and execute commands from the activate.csh script in your current shell environment (it will activate your virtual environment):
source activate -
Normally, you should see the fancy name of your virtual environment in your shell prompt. If this is the case, you have correctly installed Python 3.6 in a virtual environment. If not, you should go back to one of the previous steps.
Below, there are the instructions to follow in order to install packages in your Python 3.6 virtual environment:
-
First, activate your virtual environment:
source activate -
Install the following packages:
pip install matplotlib
pip install nltk
pip install numpy
pip install pandas
pip install scikit-learn==0.18.1
pip install scipy
pip install scrapy
pip install seaborn
pip install sphinx
pip install wordcloud
pip install selenium
-
Now, verify that you have correctly installed the above-mentioned packages:
-
Start the Python interpreter with the following command line:
python -
Copy/paste the following lines in your interpreter
import matplotlib
import nltk
import numpy
import pandas
import sklearn
import scipy
import scrapy
import seaborn
import sphinx
import wordcloud
import selenium
-
If you get an error message, please go back to the step 1.
-
Copy/paste the code in this page in your Python interpreter. Normally, a window with a cool chart should be opened.
If not, you might have to change a specific line of the file:
<the_path_to_your_fancy_virtual_environment>/lib/python3.6/site-packages/matplotlib/mpl-data/matplotlibrc. You should have a line (inside of it) that looks like the following line:backend: TkAgg -
Copy/paste the following piece of code in your Python interpreter (it will download all the NLTK data packages):
import nltk

nltk.download(“all”, download_dir=”/home/nltk_data”)
If you need to disable SSL verification, copy/paste the following piece of code in your Python interpreter instead:
import nltk
import ssl

try:
    _create_unverified_https_context = ssl._create_unverified_context
except AttributeError:
    pass
else:
    ssl._create_default_https_context = _create_unverified_https_context
nltk.download(“all”, download_dir=”/home/nltk_data”)
-
Below, there are the instructions to follow in order to be able to run the code in the oss-automatic-bug-assignment repository:
-
Clone the repository:
git clone https://github.com/Ericsson/oss-automatic-bug-assignment.git -
Follow the instructions on this page to install Eclipse and PyDev
-
Once, you are done with the above-mentioned installation, switch to PyDev on Eclipse
-
Then, open the oss-automatic-bug-assignment repository from your local copy by opening the window Import Projects from File System or Archive in File > Open Projects from File System... on Eclipse
-
Select the correct folder
-
Click on the Finish button
-
After having imported the project, you should have a cross with a red background on the left of the interpreter in the PyDev Package Explorer
-
To fix that, open the Properties window of the project
-
Move to PyDev-Interpreter/Grammar using the vertical navigation bar on the left of the window
-
Then, click on the Click here to configure an interpreter not listed link (or on the Please configure an interpreter before proceeding. link followed by a click on the Manual Config button)
-
Click on the New button
-
Click on the Browse... button
-
Select the executable of your Python 3.6 interpreter installed in your virtual environment. Don't forget to click on the OK button then
-
Then, click on the Apply button. You will have to wait a bit...
-
Click on the OK button
-
Select your interpreter in the Interpreter drop-down list
-
Don't forget to click on the Apply button. Then, click on the OK button
-
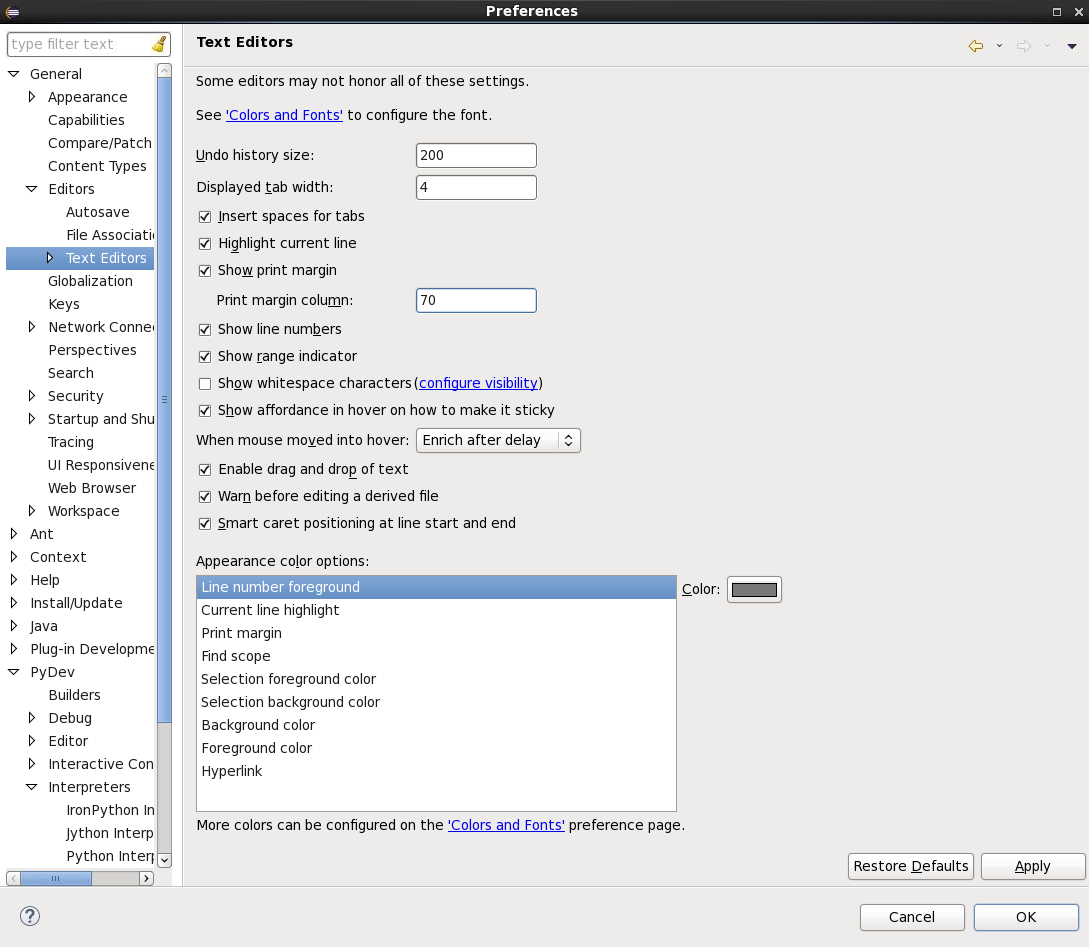
Open the Text Editors window which is here: Window > Preferences >Editors. Update your preferences based on the following screenshot:
-
Don't forget to click on the Apply and OK buttons
-
Move to your local copy of the oss-automatic-bug-assignment repository (with your console)
-
Type the following command:
cp src/final_results/mozilla_firefox/pre_processing_experiments/output_without_cleaning_without_stemming_without_lemmatizing_without_stop_words_removal_without_punctuation_removal_without_numbers_removal.json src/mozilla_firefox/pre_processing_experiments/ -
Open the classify.py file in the oss-automatic-bug-assignment/src/ folder. This module is used to conduct some minor experiments
-
Run it and enjoy! Normally, you should not get any error messages.

The source code has been written Python 3.6. Below, there are the dependencies of the project:
-
matplotlib
-
nltk
-
numpy
-
pandas
-
scikit-learn==0.18.1
-
scipy
-
scrapy
-
seaborn
-
sphinx
-
wordcloud
-
selenium
The section describes how to generate or re-generate the oss-automatic-bug-assignment repository.
The files (doc/source/*.rst, doc/Makefile, doc/make.bat and doc/source/conf.py) needed to generate the documentation are indexed by Git and have been pushed to the remote repository.
If one modifies the code base, the above-mentioned files will have to be re-generated. To do that, one will have to follow the instructions below:
-
Move to your local copy of the oss-automatic-bug-assignment repository (with your console)
-
Type the following command line to delete the doc folder and all its files recursively (be careful when you type it):
rm -rf doc/ -
Then, verify if you need to update the content of the setup_files_for_doc.bash file (more precisely, the content related to the step iv)). This Bash script is used to generate the files needed to generate the documentation. More precisely it does the following things:
-
First, it will launch the sphinx-quickstart script. You will have to type the following things during the execution of the script:
- doc
- y
- _
- OSS Automatic Bug Assignment
- Daniel Artchounin, Ola Leifler and Daniel Nilsson
- 1.0
- 1.0
- en
- .rst
- index
- y
- y
- y
- y
- y
- y
- y
- y
- y
- y
- y
- y
- y
-
The script will then print Please modify the conf.py file before continuing. You will have to modify the doc/source/conf.py file and have to replace the following lines inside of it:
# import os
# import sys
# sys.path.insert(0, os.path.abspath('.'))
by
import os
import sys
sys.path.insert(0, os.path.abspath('../../src'))
-
You will have to press a key to continue the execution of the script
-
Next, the script really generates the files needed to generate the documentation using the sphinx-apidoc tool. Then, this script modifies 4 RST files (to improve the quality of the documentation):
-
doc/source/index.rst: the master document used to generate the documentation. It contains the main TOC tree. This TOC tree mainly includes the doc/source/modules.rst document;
-
doc/source/modules.rst: the document which contains a sub-TOC tree which includes the documents related to each package of the oss-automatic-bug-assignment/src folder;
-
/doc/source/eclipse_jdt.rst: the document which is used to generate the documentation of the oss-automatic-bug-assignment/src/eclipse_jdt folder
-
/doc/source/mozilla_firefox.rst: the document which is used to generate the documentation of the oss-automatic-bug-assignment/src/mozilla_firefox folder
-
doc/source/scikit_learn.rst: the document which is used to generate the documentation of the oss-automatic-bug-assignment/src/scikit_learn folder
Before executing the Bash script, you will have to update its content based on the modifications you have made (if you have removed a Python module mentioned in the script, if you have renamed a Python module mentioned in the script or added a Python module which should be mentioned in the script).
-
-
Then, it will ask you whether or not it should generate the HTML documentation. You will just have to type y. The HTML documentation will be in the doc/build/html folder
-
If one wants to only re-generate the HTML documentation without modifying the files needed to generate it (doc/source/.rst*, doc/Makefile, doc/make.bat and doc/source/conf.py), one will have to follow the instructions below:
-
Move to the edanart/doc folder (with the terminal)
-
Then, type the following command line to generate the HTML documentation:
make html
Description of the different Python packages and Python modules of the oss-automatic-bug-assignment repository
The oss-automatic-bug-assignment repository contains the following Python packages and Python modules:
-
.project: a project description file used by Eclipse;
-
.pydevproject: a PyDev project must have this file. It is used to define which interpreter to use for the project, the location of the project's Python source files, etc.;
-
.settings: this folder contains some Eclipse project specific settings;
-
README.md: the README file of the oss-automatic-bug-assignment repository;
-
.gitignore: the file used by Git to know which files to ignore;
-
doc/: this folder contains all the files of the project related to the documentation ;
-
Makefile: the makefile which might be used to generate the html documentation;
-
make.bat: the batch file that should be used on Windows;
-
source/
-
*.rst: the RST files used to generate the documentation of the different packages of the project;
-
conf.py: it is "called the 'build configuration file' and contains all configuration needed to customize Sphinx input and output behavior" (Sphinx documentation);
-
-
-
setup_files_for_doc.bash: this Bash script is used to generate the files needed to generate the documentation (cf. step 3. of the Section (Re-)generate the documentation of the oss-automatic-bug-assignment repository);
-
src/: this folder contains the source code of the oss-automatic-bug-assignment repository
-
eclipse_jdt/:
-
experiment_3/:
-
eclipse_exp_3_launcher.py: this module contains a class used to conduct the third experiment on the bug reports of Eclipse JDT. The experiment consists mainly of comparing several feature selection techniques and selecting the best one;
-
eclipse_exp_3_results_plotter.py: this module contains a class used to plot the results related to the third experiment conducted on the bug reports of Eclipse JDT. The experiment consists mainly of comparing several feature selection techniques and selecting the best one;
-
-
experiment_1/:
-
eclipse_data_pre_processor.py: this module contains a class used to apply different combinations of pre-processing techniques on the bug reports of Eclipse JDT;
-
eclipse_exp_1_launcher.py: this module contains a class used to conduct the first experiment on the bug reports of Eclipse JDT. The experiment consists mainly of comparing several combinations of pre-processing techniques and selecting the best one;
-
eclipse_exp_1_results_plotter.py: this module contains a class used to plot the results related to the first experiment conducted on the bug reports of Eclipse JDT. The experiment consists mainly of comparing several combinations of pre-processing techniques and selecting the best one;
-
-
preliminary_experiment/:
-
eclipse_sub_exp_1_of_preliminary_exp_launcher.py: this module contains a class used to conduct the first sub experiment of the preliminary experiment on the bug reports of Eclipse JDT. The experiment consists mainly of trying to find the optimal number of bug reports that should be used to train a classifier. In the context of the first sub experiment, all the folds, except the oldest one, are used to evaluate the performance of the classifier (cf. Master's Thesis);
-
eclipse_sub_exp_2_of_preliminary_exp_launcher.py: this module contains a class used to conduct the second sub experiment of the preliminary experiment on the bug reports of Eclipse JDT. The experiment consists mainly of trying to find the optimal number of bug reports that should be used to train a classifier. In the context of the second sub experiment, only the latest fold is used to evaluate the performance of the classifier (cf. Master's Thesis);
-
eclipse_sub_exps_of_preliminary_exp_launcher.py: this module contains a class used to conduct both sub experiments of the preliminary experiment on the bug reports of Eclipse JDT. The experiment consists mainly of trying to find the optimal number of bug reports that should be used to train a classifier;
-
-
experiment_2/:
-
eclipse_exp_2_launcher.py: this module contains a class used to conduct the second experiment on the bug reports of Eclipse JDT. The experiment consists mainly of comparing several feature extraction techniques and selecting the best one;
-
eclipse_exp_2_results_plotter.py: this module contains a class used to plot the results related to the second experiment conducted on the bug reports of Eclipse JDT. The experiment consists mainly of comparing several feature extraction techniques and selecting the best one;
-
-
experiment_4/:
-
eclipse_exp_4_launcher.py: this module contains a class used to conduct the last experiment on the bug reports of Eclipse JDT. The experiment consists mainly of tuning several classifiers and selecting the best performing one;
-
eclipse_exp_4_results_plotter.py: this module contains a class used to plot the results related to the last experiment conducted on the bug reports of Eclipse JDT. The experiment consists mainly of tuning several classifiers and selecting the best performing one;
-
-
scrap_eclipse_jdt/: this folder contains some bug reports of Eclipse JDT and the Python code used to scrap them
-
scrap_eclipse_jdt/: this folder contains the Python code used to scrap some bug reports of Eclipse JDT
-
settings.py: this module contains the Scrapy settings for the scrap_eclipse_jdt project;
-
spiders/: this folder contains the Scrapy spider used to scrap some bug reports of Eclipse JDT
- eclipse_jdt_spider.py: this module contains a class (a Scrapy Spider) used to define how Bugzilla should be scraped;
-
-
brs.json: the Eclipse JDT data set used in this thesis (the bug reports have not been sorted by their ids);
-
eclipse_data_set_sorter.py: this module is used to sort the bug reports of Eclipse JDT (the bug reports in brs.json) by their ids;
-
sorted_brs.json: the Eclipse JDT data set used in this thesis (the bug reports have been sorted by their ids);
-
-
final_results/: this folder contains all the results related to the experiments conducted on the bug reports of Eclipse JDT (the ones in the thesis report);
-
eclipse_exps_launcher.py: this module contains a class used to launch sequentially all the experiments on the bug reports of Eclipse JDT;
-
-
experiment_3/:
-
exp_3_launcher.py: this module contains an abstract class used to conduct the third experiment on any of the data sets of the thesis. The experiment consists mainly of comparing several feature selection techniques and selecting the best one;
-
exp_3_results_plotter.py: this module contains an abstract class used to plot the results related to the third experiment conducted on any of the data sets of the thesis. The experiment consists mainly of comparing several feature selection techniques and selecting the best one;
-
-
experiment_1/:
-
data_pre_processor.py: this module contains an abstract class used to apply different combinations of pre-processing techniques on any of the data sets used in the thesis;
-
exp_1_launcher.py: this module contains an abstract class used to conduct the first experiment on any of the data sets of the thesis. The experiment consists mainly of comparing several combinations of pre-processing techniques and selecting the best one;
-
exp_1_results_plotter.py: this module contains an abstract class used to plot the results related to the first experiment conducted on any of the data sets of the thesis. The experiment consists mainly of comparing several combinations of pre-processing techniques and selecting the best one;
-
-
mozilla_firefox/:
-
experiment_3/:
-
mozilla_exp_3_launcher.py: this module contains a class used to conduct the third experiment on the bug reports of Mozilla Firefox. The experiment consists mainly of comparing several feature selection techniques and selecting the best one;
-
mozilla_exp_3_results_plotter.py: this module contains a class used to plot the results related to the third experiment conducted on the bug reports of Mozilla Firefox. The experiment consists mainly of comparing several feature selection techniques and selecting the best one;
-
-
experiment_1/:
-
mozilla_data_pre_processor.py: this module contains a class used to apply different combinations of pre-processing techniques on the bug reports of Mozilla Firefox;
-
mozilla_exp_1_launcher.py: this module contains a class used to conduct the first experiment on the bug reports of Mozilla Firefox. The experiment consists mainly of comparing several combinations of pre-processing techniques and selecting the best one;
-
mozilla_exp_1_results_plotter.py: this module contains a class used to plot the results related to the first experiment conducted on the bug reports of Mozilla Firefox. The experiment consists mainly of comparing several combinations of pre-processing techniques and selecting the best one;
-
-
preliminary_experiment/:
-
mozilla_sub_exp_1_of_preliminary_exp_launcher.py: this module contains a class used to conduct the first sub experiment of the preliminary experiment on the bug reports of Mozilla Firefox. The experiment consists mainly of trying to find the optimal number of bug reports that should be used to train a classifier. In the context of the first sub experiment, all the folds, except the oldest one, are used to evaluate the performance of the classifier (cf. Master's Thesis);
-
mozilla_sub_exp_2_of_preliminary_exp_launcher.py: this module contains a class used to conduct the second sub experiment of the preliminary experiment on the bug reports of Mozilla Firefox. The experiment consists mainly of trying to find the optimal number of bug reports that should be used to train a classifier. In the context of the second sub experiment, only the latest fold is used to evaluate the performance of the classifier (cf. Master's Thesis);
-
mozilla_sub_exps_of_preliminary_exp_launcher.py: this module contains a class used to conduct both sub experiments of the preliminary experiment on the bug reports of Mozilla Firefox. The experiment consists mainly of trying to find the optimal number of bug reports that should be used to train a classifier;
-
-
experiment_2/:
-
mozilla_exp_2_launcher.py: this module contains a class used to conduct the second experiment on the bug reports of Mozilla Firefox. The experiment consists mainly of comparing several feature extraction techniques and selecting the best one.
-
mozilla_exp_2_results_plotter.py: this module contains a class used to plot the results related to the second experiment conducted on the bug reports of Mozilla Firefox. The experiment consists mainly of comparing several feature extraction techniques and selecting the best one.
-
-
experiment_4/:
-
mozilla_exp_4_launcher.py: this module contains a class used to conduct the last experiment on the bug reports of Mozilla Firefox. The experiment consists mainly of tuning several classifiers and selecting the best performing one;
-
mozilla_exp_4_results_plotter.py: this module contains a class used to plot the results related to the last experiment conducted on the bug reports of Mozilla Firefox. The experiment consists mainly of tuning several classifiers and selecting the best performing one;
-
-
scrap_mozilla_firefox/: this folder contains some bug reports of Mozilla Firefox and the Python code used to scrap them
-
scrap_mozilla_firefox/: this folder contains the Python code used to scrap some bug reports of Mozilla Firefox
-
settings.py: this module contains the Scrapy settings for the scrap_mozilla_firefox project;
-
spiders/: this folder contains the Scrapy spider used to scrap some bug reports of Mozilla Firefox
- mozilla_firefox_spider.py: this module contains a class (a Scrapy Spider) used to define how Bugzilla should be scraped;
-
-
brs.json: the Mozilla Firefox data set used in this thesis (the bug reports have not been sorted by their ids);
-
mozilla_data_set_sorter.py: this module is used to sort the bug reports of Mozilla Firefox (the bug reports in brs.json) by their ids;
-
sorted_brs.json: the Mozilla Firefox data set used in this thesis (the bug reports have been sorted by their ids);
-
-
final_results/: this folder contains all the results related to the experiments conducted on the bug reports of Mozilla Firefox (the ones in the thesis report);
-
mozilla_exps_launcher.py: this module contains a class used to launch sequentially all the experiments on the bug reports of Mozilla Firefox;
-
-
scikit_learn/:
-
_search.py: this module has been downloaded (from the GitHub repository of scikit-learn) to be used in the fourth experiment of the thesis;
-
_validation.py: this module has been downloaded (from the GitHub repository of scikit-learn) to be used in the fourth experiment of the thesis;
-
accuracy_mrr_scoring_object.py: this module contains a scorer callable function used to compute the values of both the accuracy and MRR metrics. The function is mainly used in the fourth experiment of the thesis;
-
rfe.py: this module has been downloaded (from the GitHub repository of scikit-learn) to be used in the fourth experiment of the thesis.
-
-
sort/:
- this module contains a class used to sort any of the data sets used in this thesis (the data should have been scrapped via the Scrapy library and should be in a JSON file);
-
preliminary_experiment/:
-
sub_exp_1_of_preliminary_exp_launcher.py: this module contains an abstract class used to conduct the first sub experiment of the preliminary experiment on any of the data sets of the thesis. The experiment consists mainly of trying to find the optimal number of bug reports that should be used to train a classifier. In the context of the first sub experiment, all the folds, except the oldest one, are used to evaluate the performance of the classifier (cf. Master's Thesis).
-
sub_exp_2_of_preliminary_exp_launcher.py: this module contains an abstract class used to conduct the second sub experiment of the preliminary experiment on any of the data sets of the thesis. The experiment consists mainly of trying to find the optimal number of bug reports that should be used to train a classifier. In the context of the second sub experiment, only the latest fold is used to evaluate the performance of the classifier (cf. Master's Thesis);
-
sub_exp_of_preliminary_exp_launcher.py: this module contains an abstract class used to conduct one of the two sub experiments of the preliminary experiment on any of the data sets of the thesis. The experiment consists mainly of trying to find the optimal number of bug reports that should be used to train a classifier.
-
sub_exps_of_preliminary_exp_launcher.py: this module contains an abstract class used to conduct both sub experiments of the preliminary experiment on any of the data sets of the thesis. The experiment consists mainly of trying to find the optimal number of bug reports that should be used to train a classifier;
-
-
experiment_2/:
-
exp_2_launcher.py: this module contains an abstract class used to conduct the second experiment on any of the data sets of the thesis. The experiment consists mainly of comparing several feature extraction techniques and selecting the best one;
-
exp_2_results_plotter.py: this module contains an abstract class used to plot the results related to the second experiment conducted on any of the data sets of the thesis. The experiment consists mainly of comparing several feature extraction techniques and selecting the best one;
-
-
experiment_4/:
-
exp_4_launcher.py: this module contains an abstract class used to conduct the last experiment on any of the data sets of the thesis. The experiment consists mainly of tuning several classifiers and selecting the best performing one;
-
exp_4_results_plotter.py: this module contains an abstract class used to plot the results related to the last experiment conducted on any of the data sets of the thesis. The experiment consists mainly of tuning several classifiers and selecting the best performing one;
-
log_space_uniform.py: this module contains a class used to generate random numbers uniformly distributed in log space;
-
-
classify.py: this module is used to conduct some minor random experiments on any of the data sets used in the thesis;
-
classify_k_folds.py: this module is used to conduct some minor random experiments on any of the data sets used in the thesis. These experiments should use cross-validation;
-
exp_launcher.py: this module contains an abstract class used to launch any of the experiments on any of the data sets used in the thesis;
-
exps_launcher.py: this module contains an abstract class used to launch sequentially all the experiments on any of the data sets used in the thesis.
-
results_plotter.py: this module contains an abstract class used to plot the results related to any of the experiments of the thesis;
-
utilities.py: this module contains some general-purpose utility functions;
-
This section describes the high-level architecture of the oss-automatic-bug-assignment repository
The figure below shows a simplified package diagram of the src package of the oss-automatic-bug-assignment repository. For readability purposes, the relations between the different packages of the diagram have been omitted. A short description of the content of each package is provided in the section Description of the different Python packages and Python modules of the oss-automatic-bug-assignment repository.

The figure below depicts a simplified class diagram of the src package of the oss-automatic-bug-assignment repository. A short description of the content of each module of the package is provided in the section Description of the different Python packages and Python modules of the oss-automatic-bug-assignment repository.

As mentioned in the section Description of the different Python packages and Python modules of the oss-automatic-bug-assignment repository, the file src/eclipse_jdt/scrap_eclipse_jdt/brs.json contains the bug reports of Eclipse JDT used in this thesis (not sorted by their ids). If you want to scrape some additional bug reports from Bugzilla (the bug reports that have been fixed since the conduct of our experiments), you will have to follow the following steps:
-
Verify that the XPath queries in the file src/eclipse_jdt/scrap_eclipse_jdt/scrap_eclipse_jdt/spiders/eclipse_jdt_spider.py are still relevant : the interface of Bugzilla may have been modified since the bug reports used in this thesis were scraped.
-
Move to the Scrapy project's top level directory:
cd src/eclipse_jdt/scrap_eclipse_jdt/ -
Run the Eclipse JDT spider and store the scraped data into a JSON file:
scrapy crawl eclipse_jdt -o <json_file>"For historic reasons, Scrapy appends to a given file instead of overwriting its contents. If you run this command twice without removing the file before the second time, you'll end up with a broken JSON file." (Scrapy documentation). Therefore, verify that the <json_file> doesn't exist or is empty before typing the command line above.
-
Sort the <json_file> by its bug ids:
python eclipse_data_set_sorter.pyDon't forget to modify the following line of the file src/eclipse_jdt/scrap_eclipse_jdt/eclipse_data_set_sorter.py based on your <json_file> and the JSON file where you want to store the sorted bug reports in:
data_set_sorter = DataSetSorter("brs.json", "sorted_brs.json")
If you want to scrape some other bug reports of Eclipse JDT, don't forget to modify the file src/eclipse_jdt/scrap_eclipse_jdt/scrap_eclipse_jdt/spiders/eclipse_jdt_spider.py before following the above-mentioned steps.
As mentioned in the section Description of the different Python packages and Python modules of the oss-automatic-bug-assignment repository, the file src/mozilla_firefox/scrap_mozilla_firefox/brs.json contains the bug reports of Mozilla Firefox used in this thesis (not sorted by their ids). If you want to scrape some additional bug reports from Bugzilla (the bug reports that have been fixed since the conduct of our experiments), you will have to follow the following steps:
-
Verify that the XPath queries in the file src/mozilla_firefox/scrap_mozilla_firefox/scrap_mozilla_firefox/spiders/scrap_mozilla_firefox are still relevant : the interface of Bugzilla may have been modified since the bug reports used in this thesis were scraped.
-
Move to the Scrapy project's top level directory:
cd src/mozilla_firefox/scrap_mozilla_firefox/ -
Run the Mozilla Firefox spider and store the scraped data into a JSON file:
scrapy crawl mozilla_firefox -o <json_file>"For historic reasons, Scrapy appends to a given file instead of overwriting its contents. If you run this command twice without removing the file before the second time, you'll end up with a broken JSON file." (Scrapy documentation). Therefore, verify that the <json_file> doesn't exist or is empty before typing the command line above.
-
Sort the <json_file> by its bug ids:
python mozilla_data_set_sorter.pyDon't forget to modify the following line of the file src/mozilla_firefox/scrap_mozilla_firefox/mozilla_data_set_sorter.py based on your <json_file> and the JSON file where you want to store the sorted bug reports in:
data_set_sorter = DataSetSorter("brs.json", "sorted_brs.json")
If you want to scrape some other bug reports of Mozilla Firefox, don't forget to modify the file src/mozilla_firefox/scrap_mozilla_firefox/scrap_mozilla_firefox/spiders/mozilla_firefox_spider.py before following the above-mentioned steps.