simpleNMR is a Python/QT5/matPlotlib program. It runs on Windows and MacOS. The aim of the software is to present the information derived from processing NMR spectra using commercial software such as MestReNova (chemical shifts, integrals, coupling patterns, and correlations from standard 2D experiments) in a way that makes it easier for the user to understand and keep track of the information while verifying a proposed structure.
The program displays the data in an interactive manner. The idea behind the program was to position it as an analysis tool between the raw data and the use of pencil and paper to analyze NMR data and commercial, complete black box solutions that can provide an answer with very little manual intervention. The software takes a high-level interactive approach to display the information from the NMR experiments in order quickly check if a proposed structure is consistent with the NMR data.
The screenshot below shows the main user interface of the program. It consists of two panels: The right-hand panel shows the proton and carbon 1-D spectra of the molecule. The left-hand side panel shows an image of the proposed molecule provided by the user on top of which are placed the carbon atoms of the molecule. COSY data is shown as red links between carbon atoms. The carbon atoms/nodes can be moved over the background molecule so that they align with the corresponding atoms in the proposed molecule. HMBC correlations are displayed on the molecule when the cursor is positioned over a carbon atom. The corresponding proton and carbon peaks are highlighted in the spectra panel.
Furthermore, when a peak is highlighted in the spectra panel, the peak is highlighted in red, if the peak has a corresponding carbon/proton peak it is highlighted. HMBC correlations are shown by highlighting further peaks in different colours and showing the links in the molecule panel. Information on what the chemical shift might correspond to in terms of functional group is shown up in a pop-up.
The initial positions of the carbon atom nodes over the background molecule image can be set randomly, from a previously saved session, or by using the JAVA HOSE code that can be found on nmrshiftdb website which has been incorporated into the program.

There are two ways to install simpleNMR, both involve accessing the simpleNMR public GitHub site simpleNMR.
The first involves downloading a packaged executable, either for Windows 10 or macOS. The files can be found in the releases folder. simpleNMR Release latest.
A Python environment is not required to use these executables as all the required modules and Python interpreters come with the executable. The executable takes quite a while to start when the file is first run. The permissions of the file have to be changed for the macOS version and instructions can be found below.
The second method requires a modern Python 3.7 or later working Python environment on the computer. The modules that the program uses are best installed using pip from a requirements file that is part of the GitHub repository
-
Windows 10: simpleNMRwin10
-
macOS simpleNMRmac
-
Change Permissions: In a command line window change the permissions on the file
chmod 744 simpleNMRmacOs
-
Running for the first time: Then, when you try to run it from the finder window (file browser) it won’t run if you just double-click on it because it isn’t certified, so you need to right-click on it and choose “Open” and then confirm that it is OK to run it. You only need to do that the first time you open it. After that, it is fine, though it does take a few (tens of) seconds to start up.
-
There are a number of example problems in the folder exampleProblems. To obtain this folder from the GitHub repository download the zip or tar.gz file of the source code from the releases folder simpleNMR Release v0.0.15 and unzip the file.
To clone the simpleNMR GitHub repository, follow these steps:
-
Install GitHub: Install the command line version of git on your computer Git Guides - install git (github.com)
-
Copy the Repository URL: Go to the simpleNMR GitHub repository and find the green "Code" button. Click on the red circled button to copy the repository URL. If you have not installed the git command line utilities on your computer, the repository can be downloaded in a zip format by clicking on the menu item circled in blue.

-
Open a Terminal/Command Prompt: Open a terminal or command prompt window on your local machine.
-
Navigate to the Destination Directory: Navigate to the directory where you want to clone the repository. You can use the
cdcommand to change directories. For example, if you want to clone the repository into say "mySimpleNMR" folder, you can use the following command:cd mySimpleNMR
-
Clone the Repository: In the terminal, use the
git clonecommand followed by the simpleNMR repository URL you copied in step 1. For example:git clone https://github.com/EricHughesABC/simpleNMR.gitThe command will create a new directory with the same name as the simpleNMR repository and clone the repository contents into that directory.
-
Wait for Cloning to Complete: The
git clonecommand will download all the repository files and history to your local machine. Wait for the cloning process to complete. -
Repository Cloned Successfully: Once the cloning process is finished, you will see a message indicating that the repository has been cloned successfully.

The repository already has the Java runtime environments installed for Windows, macOS, and linux in the folder jre. Unfortunately, for macOS, the environment is corrupted and therefore it needs to be installed manually. Follow the instructions below to install the files directly
-
Move to the jre directory: Open a command line window and move to the
jredirectory. -
Delete the macOS jre directory structure Run the following command to delete the macOs java runtime directory using the following command
rm -rf amazon-corretto-17.jdk
-
Obtain the macOS jre library: using wget obtain the amazon correto java runtime environment
wget https://corretto.aws/downloads/latest/amazon-corretto-17-x64-macos-jdk.tar.gz -
Unzip the file: unzip the contents of the file
tar -xzf amazon-corretto-17-x64-macos-jdk.tar.gz
-
Windows file: If needed
wget https://corretto.aws/downloads/latest/amazon-corretto-17-x64-windows-jdk.zip -
Linux file: if needed
wget https://corretto.aws/downloads/latest/amazon-corretto-17-aarch64-linux-jdk.tar.gz
To set up a Python environment using venv, follow these steps:
-
Install Python: Ensure that Python is installed on your system. You can download and install the latest version of Python from the official Python website (https://www.python.org/) or from Anaconda (Free Download | Anaconda).
-
Create a Project Directory: Create a new directory where you want to set up your Python environment. You can choose any name for the directory or you can install the new virtual environment inside the simpleNMR repository directory that you have just downloaded or cloned.
-
Open a Terminal/Command Prompt: Open a terminal or command prompt window. Navigate to the project directory you created in the previous step.
-
Create a Virtual Environment: In the terminal, use the following command to create a virtual environment using
venv:python3 -m venv mysimpleNMRenv
This command will create a new directory named "mySimpleNMRenv" (you can choose a different name if you prefer) inside your project directory. The virtual environment will be created within this directory.
-
Activate the Virtual Environment: Activate the virtual environment using the appropriate command for your operating system:
-
Windows:
.\mysimpleNMRenv\Scripts\activate
-
Mac/Linux:
source mysimpleNMRenv/bin/activate
After activation, you will notice that the terminal prompt changes to indicate that you are now working within the virtual environment.
-
-
Navigate to the Project Directory: Use the
cdcommand to navigate to thesimpleNMRrepository directory where yourrequirements.txtfile is located. For example:cd path/to/project/simpleNMR
-
Install Python Packages for simpleNMR: With the virtual environment activated, you can now install Python packages specific to the
simpleNMRproject. Usepip(Python package manager) to install the packages you need from the requirements.txt file in the simpleNMR repository. For example:pip install -r requirements.txt
-
Run simpleNMR.py in the new Python virtual environment: Now you can run the simpleNMR.py file using the following command
python simpleNMR.py
or on windows
python simpleNMR.py exampleProblems\2-ethyl-1-indanone
On macOs
python simpleNMR.py exampleProblems/2-ethyl-1-indanone
-
Deactivate the Virtual Environment: Once you are done working with your Python environment, you can deactivate the virtual environment using the following command:
deactivate
After deactivation, the terminal prompt will return to its original state.
In the repo, there are JDK binaries for Windows, macOS, and Linux in the folder jre. The binaries were downloaded from Amazon amazon corretto. The program checks to see if Java is installed by the user and if not, defaults to these binaries to run the Java code.
Sometimes the java code has been compiled for a later version and will not run. An error message will appear in the background terminal. If this happens run the appropriate bat files to recompile the Java code and restart the program simpleNMR.py
CompileJavaMacLinux.batCompileJavaWindows10.bat
An executable of the program can be created using pyinstaller for Windows or macOS. A .spec file for creating a single executable has been created. The command to create an executable is
pyinstaller simpleNMR_with_includes-F.specBefore running the command it is best practice to copy the following files over to a new directory and run the above command from there.
 about_dialog.py
 exampleProblems.py
 excelheaders.py
 expectedmolecule.py
 java.py
 mnovautils.py
 moleculePlot.py
 nmrProblem.py
 nx_pylab.py
 problemtohtml.py
 qt5_tabs_001.py
 qtutils.py
 simpleNMR.py
 simpleNMRutils.py
 smiles_dialog.py
 spectraPlot.py
 xy3_dialog.py
 jre
 csTables
 cdk-2.7.1.jar
 predictorc
 NewTest.class
In the jre folder keep only the java runtime environment that matches the operating system the pyinstaller command is run on.
Make sure that pyinstaller is run from the correct Python environment that simpleNMR.py works on.
The program can be run from the command line by typing
python simpleNMR.pyThen an example Excel file can be opened from the File dropdown menu by clicking the open item.
A problem directory can be opened directly from the command line by starting the program with the path of the example directory on the command line.
python simpleNMR.py exampleProblems\2-ethyl-1-indanoneThere are a number of example problems in the exampleProblems folder. Some are from real data and others are taken from extracting the data from examples in the book:
Guide to NMR Spectral Interpretation A Problem-Based Approach to Determining the Structures of Small Organic Molecules. Antonio Randazzo, 2018, Loghia Publishing.
ISBN: 978-88-95122-40-3In the latest version of the program (no executable version as yet, still testing) users of MestReNova can now peak pick and then synchronize with the program using a two-click process.
A small ECMA script simpleNMR.qs has to be installed into MestreNova for everything to work.
The easiest way to do this is to to cut and paste the simpleNMR.qs script into the MestreNova script editor and then save the file in the default MestreNova script location. The MestreNova script editor can be open from the tools menu.
To install the script so that it has its own menu item and menu bar, the following procedure must be performed:
- Open the Customize dialog

- Create a new simpleNMR menu item by clicking on the new tab button and then renaming the newpage and the new group items to simpleNMR

-
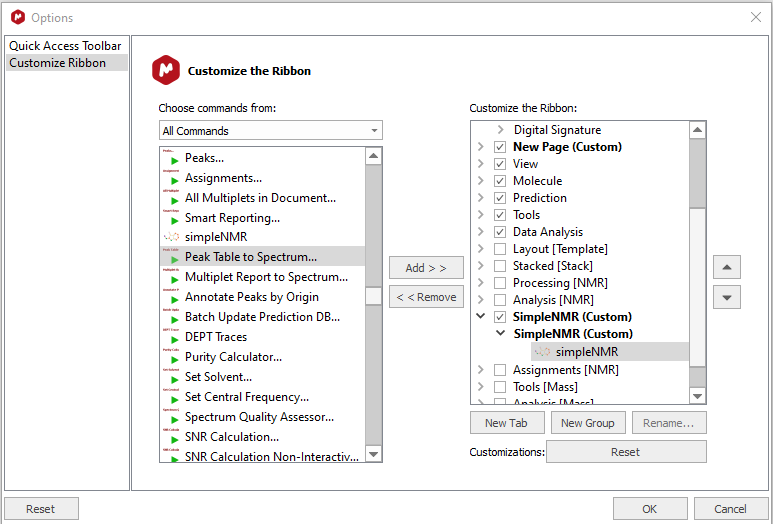
Find the simpleNMR.qs script in the
All Commandslist and then click onAddto transfer it to theCustomize the Ribbonlist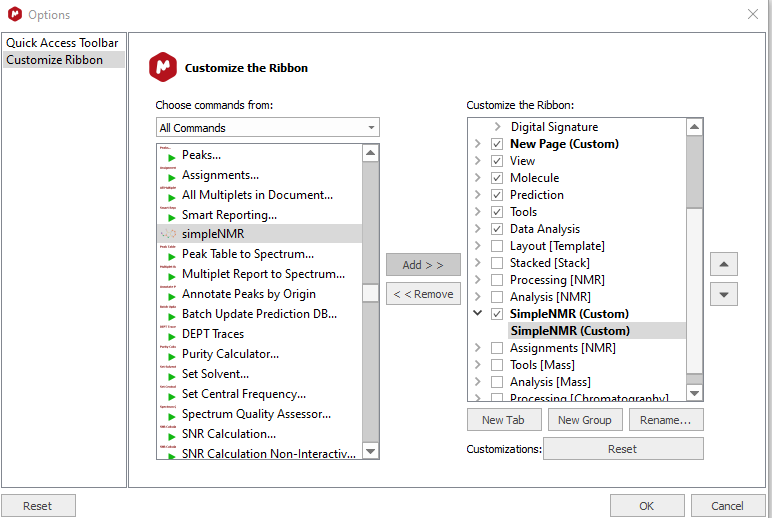
-
Close the dialog and restart MestReNova for simpleNMR to appear under its own menu item and ribbon.
-
If everything works after restarting MestReNova the new simpleNMR menu and command should be present.
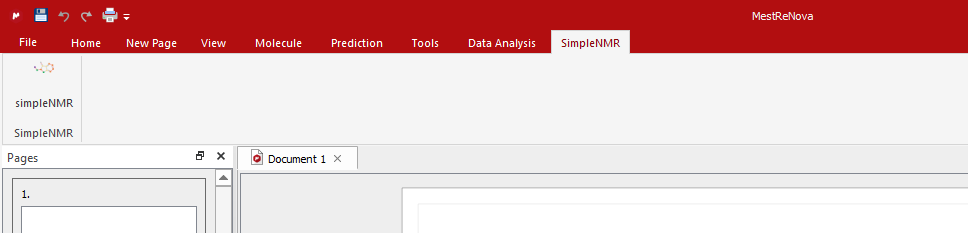
-
The icon will not be displayed as this requires copying the image
simpleNMRlogo.pngto be copied tothe same directory where the script has been installed and changing the first line in the script to point to the same directory.


