- Installing React Native CLI (Windows - Android)
- Creating a new application and running the project
- Debugging
- Project Structure and Dependencies
- Know Issues
Instead of following this instalation part, you can check the original documentation here.
Installing Chocolatey
- Run command line as an administrator.
- Run
@"%SystemRoot%\System32\WindowsPowerShell\v1.0\powershell.exe" -NoProfile -InputFormat None -ExecutionPolicy Bypass -Command "iex ((New-Object System.Net.WebClient).DownloadString('https://chocolatey.org/install.ps1'))" && SET "PATH=%PATH%;%ALLUSERSPROFILE%\chocolatey\bin".
Installing Node, Python2 and JDK
- Run on command line
choco install -y nodejs.install python2 jdk8
If you have already installed Node on your system, make sure it is Node 8.3 or newer.
If you already have a JDK on your system, make sure it is version 8 or newer.
Run on command line npm install -g react-native-cli
Download and Install Android Studio
- Choose a
CustomSetup - Make sure the following are checked
- Android SDK
- Android SDK Platform
- Performance (Intel ® HAXM) See here for AMD
- Android Virtual Device
You can also choose Standart Setup and download what is missing after. If the checkboxes are grayed out or you can't select it, you will have a chance to install these components later on. Check here.
To building a React Native app with native code requires the Android 9 (Pie) SDK in particular.
Additional Android SDKs can be installed through.
The SDK Manager can be accessed from the Welcome to Android Studio screen or in Android Studio Preferences dialog.
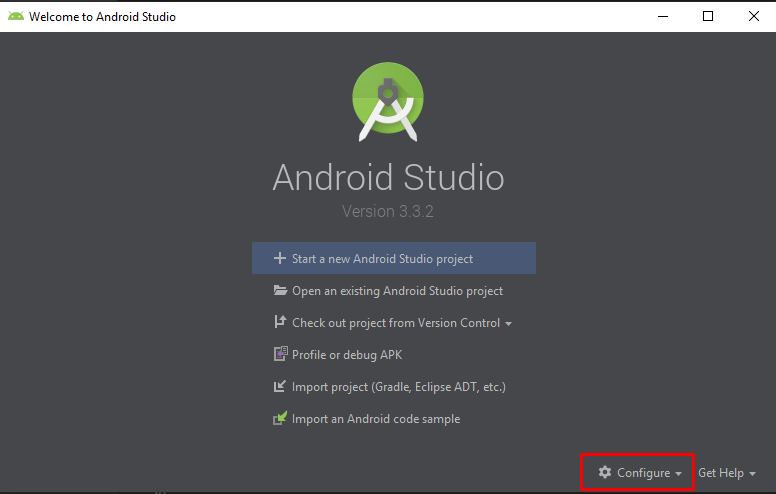
- Open Android Studio
- Click
Configure.
If you don't see this view, go here
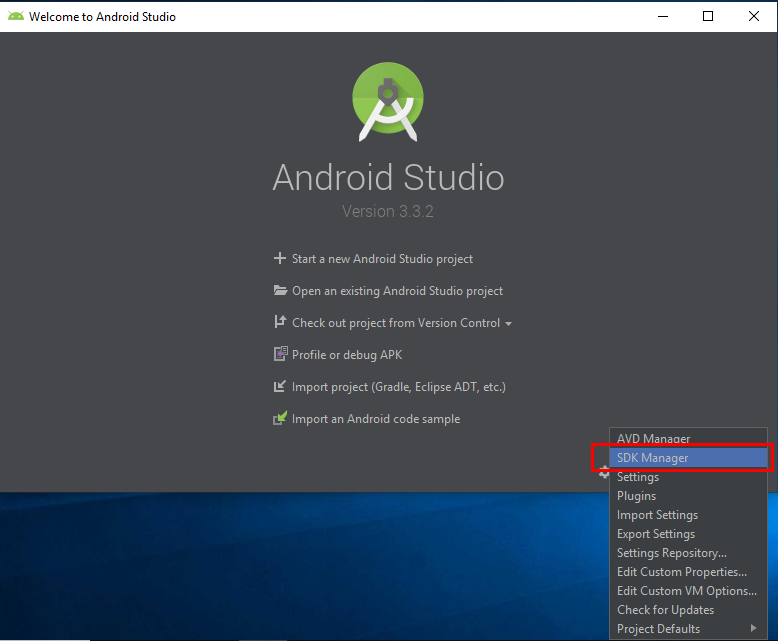
- Select
SDK Manager.
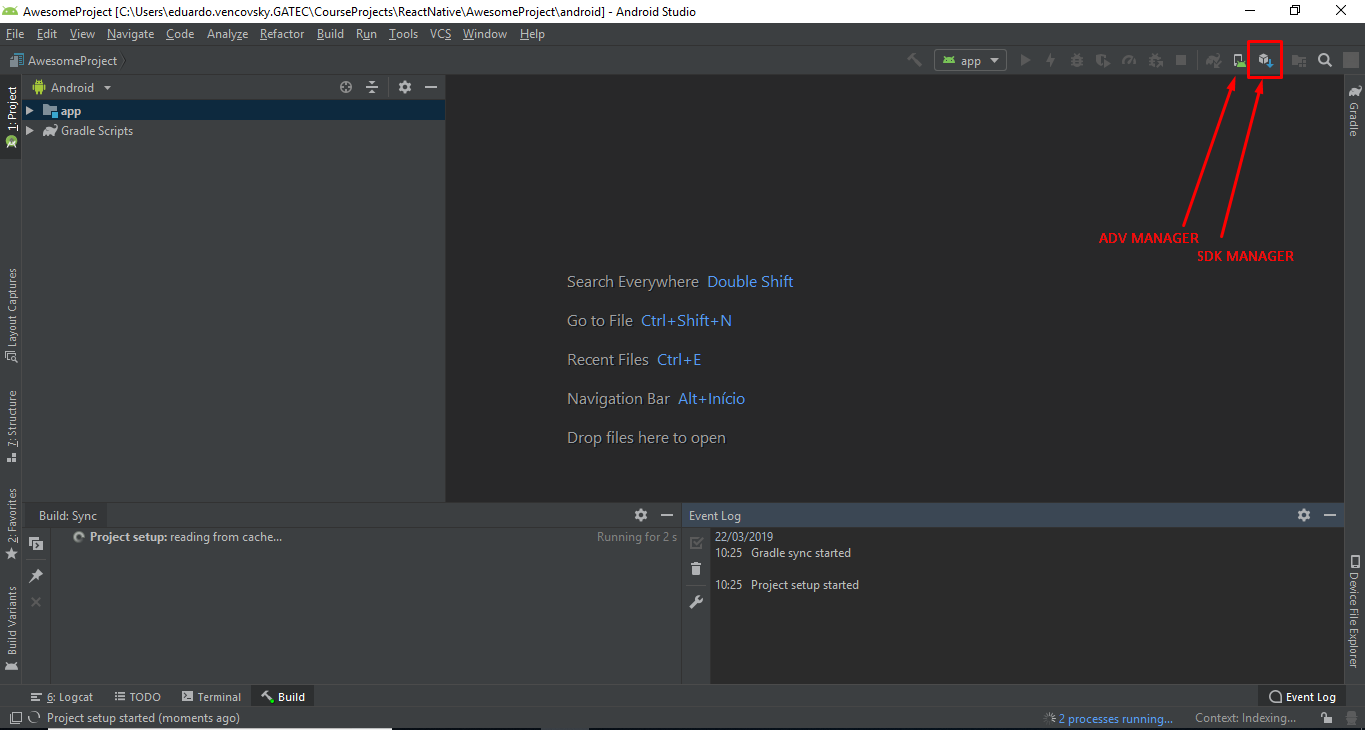
If you don't see the
Welcome ScreenClick theSDK Managericon on the top right
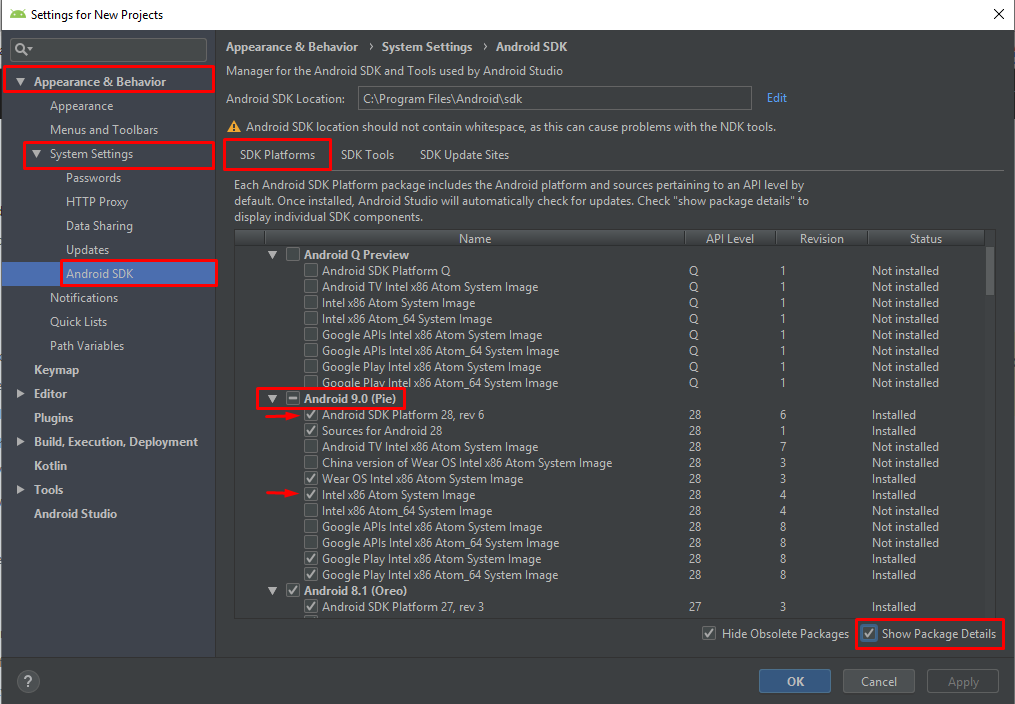
Appearance & Behavior→System Settings→Android SDK.- Select
SDK Plataforms. - Make sure
Show Packages Detailsis selected.
-
Make sure the following are checked
-
Android SDK Platform 28 -
Intel x86 Atom_64 System ImageorGoogle APIs Intel x86 Atom System Image
-
-
Select
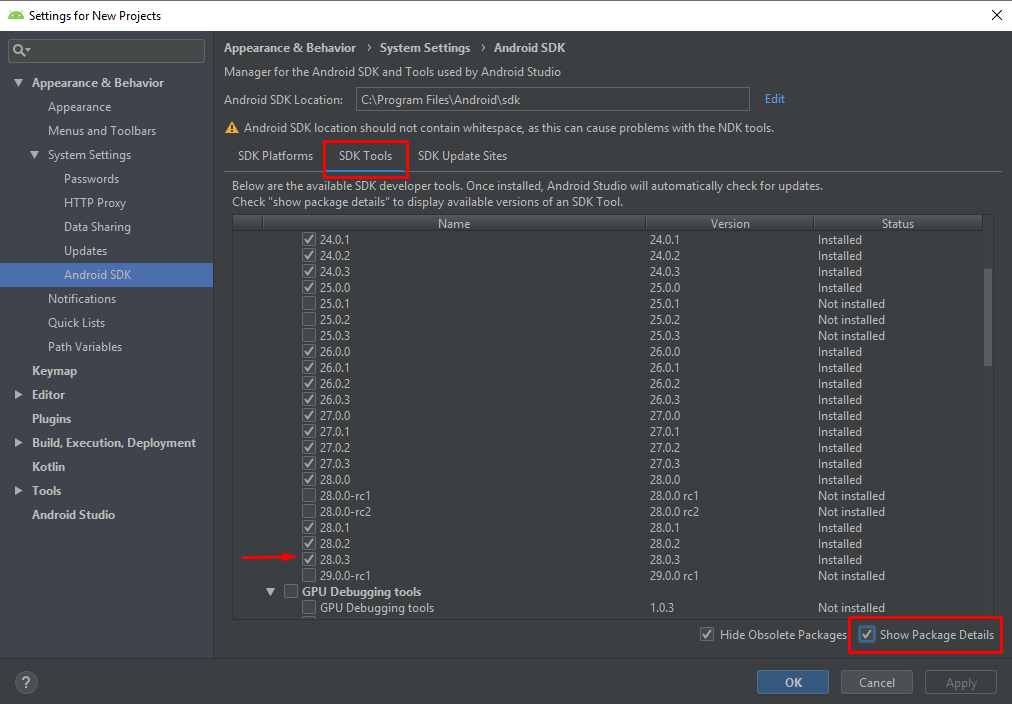
SDK Tools -
Make sure
Show Packages Detailsis selected.
- Make sure
28.0.3is selected.
-
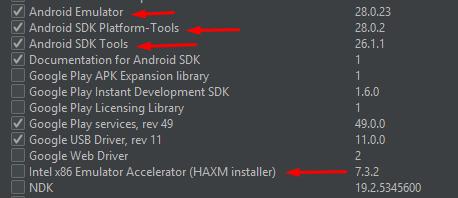
Make sure the following are checked
-
Android Emulator -
Android SDK Plataform-Tools -
Android SDK Tools -
Intel x86 Emulator Accelerator (HAXM installer)
-
-
Click
Applyand proceed with the installation.
If you are getting problems installing, see the know issues.
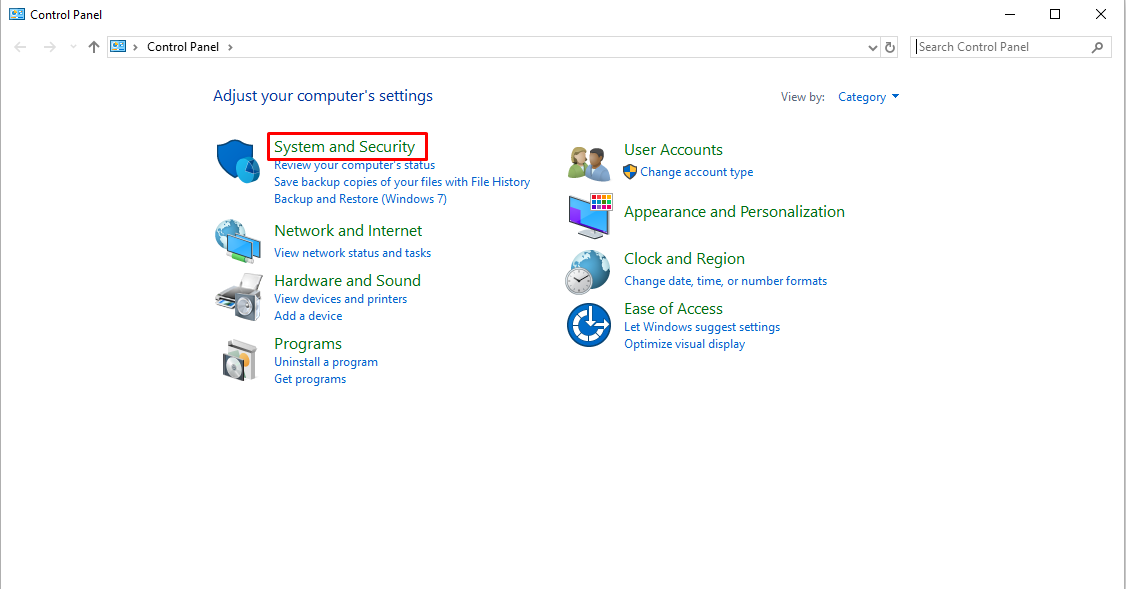
- Open
Control Panelin the Windows. - Click
System and Security.
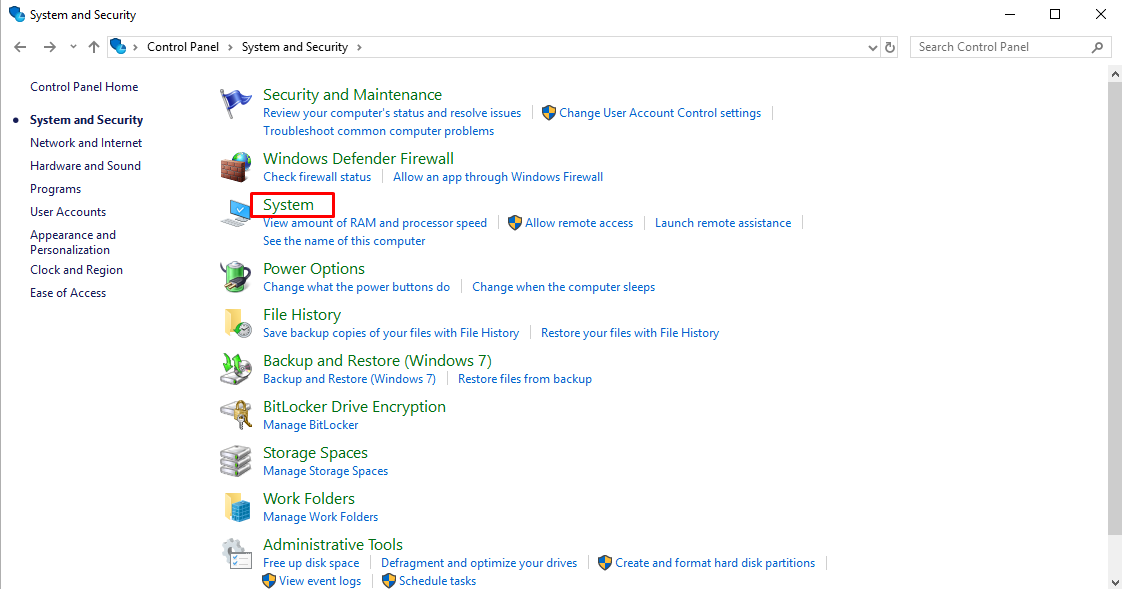
- Click
System.
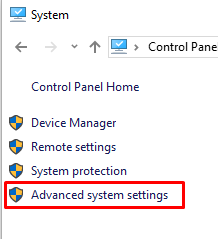
- Click
Advanced System Settings.
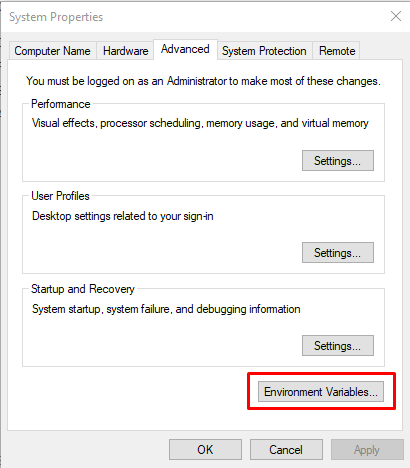
- Click
Environment Variables.
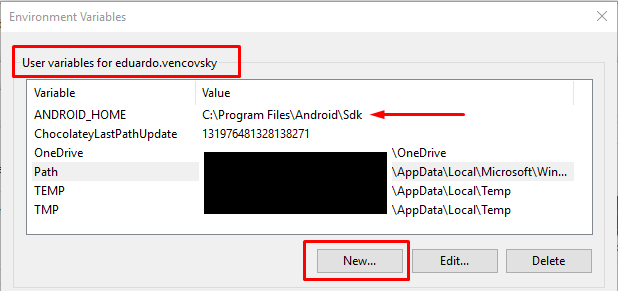
- Create a new
ANDROID_HOMEuser variable that points to the path to yourAndroid SDK.
The SDK is installed, by default, at the following location:
C:\Users\YOUR_USERNAME\AppData\Local\Android\Sdk
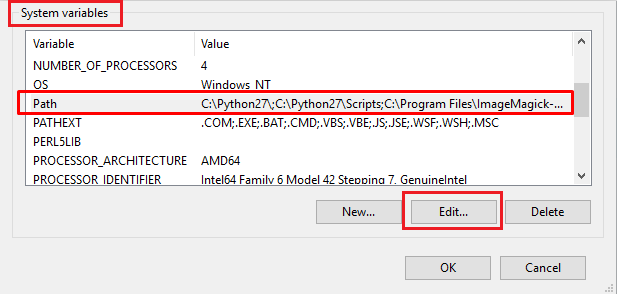
- Select the
Pathvariable.
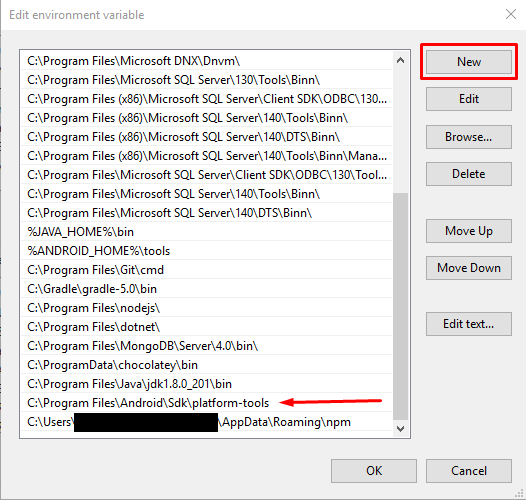
- Click
Newand add the path toplatform-toolsto the list.
The default location for this folder is:
C:\Users\YOUR_USERNAME\AppData\Local\Android\Sdk\platform-tools
- Run on command line
react-native init PROJECT_NAME.
If you are getting problems with
react-nativecommand, see the know issues.
-
Go in your project folder
cd PROJECT_NAMEand Runreact-native run-androidto run your project. -
Make sure your device is open/connected
-
To run on Physical Device check here
-
To run on Virtual Device check here
You can check React Native Debugging for more information.
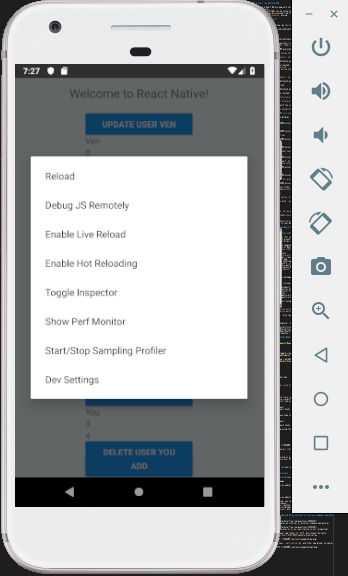
Press Ctrl M if you are running on a Virtual device or shake your phone if it's a physical device to open Developer Menu.
- Debug JS Remotely
This will open a tab in
http://localhost:8081/debugger-ui/where you can debug and see the console.
This can slow your app rendering.
To only see theconsole.logof your app, you can runreact-native log-androidin a new terminal.
Enabling Live Reload makes you app automatically reload once you save a file.
- Enable Hot Reload
Enabling Hot Reload makes you app automatically reload once you change a file.
You can also use the standalone version of react-devtools
All of the source code should be inside src folder in the root.
src
|
│
└── components
│   │
│   └── COMPONENT_NAME
│   |   |   COMPONENT_NAME.js
│   |   │   styles.js
│   |
│   |   ...
|
|
└── hooks
|   │   basicHooks.js
|   │   ...
|
|
└── services
|   |   VIEW_NAMEService.js
|   |   ...
|
|
└── styles
|   |   generalUsedStyle.js
|   |   componentsTheme.js
|   |   viewsTheme.js
|   |   ...
|
|
└── utils
|   |   somethingUtil.js
|   |   ...
|
|
└── views
    |
    └── VIEW_NAME
    |   |   VIEW_NAME.js
    |   |   styles.js
    |   |
    |   └── SUB_VIEW_NAME
    |       |   SUB_VIEW_NAME.js
    |       |   styles.js
    |
    |   ...
Components
This folder is for all components that can be used in other screens and should have the following.
- A
.jsfile to the components, named by the component name. - A
style.jsfile with all of the components style.
Hooks
This folder is to store hooks, each hooks file should be grouped by some logic.
Hooks are a new thing in react. To learn more about it, see the [documentation](https:// reactjs.org/docs/hooks-intro.html).
It's used to reuse stateful logic between components. The same way components are used to reuse renderable objects between views, hooks do the same but with stateful logic.
Services
This folder is where the view calls to an API or external sources (Local DB).
- Each View should have it's own service.
- Shouldn't have more services than views, but some views can have no service.
- Services can call other services (Be careful with Infinty Loops).
Styles
This Folder is to store styles that are used through multiple places in the project and to standardize the project styles. (e.g. used colors in the project).
- Each View should have it's own service.
- Shouldn't have more services than views, but some views can have no service.
- Services can call other services (Be careful with Infinty Loops)
Utils
This folder is to store functions that you will use across all the project. It's like Hooks, but while Hooks is for statefull logic, this folder is to store any function.
Views
This folder is where you have all of your views that will be used by some type of navigation.
- It have folders with the name of each View.
- Each View Folder have a
.jsfile named by the view's name. - Each View Folder have a
styles.jsfile with the view's component. - If you have subviews (e.g. modals), you should create a new folder inside the view's folder with the same structure.
List of Packages that are used.
-
react-native-action-button- Create Floating Button on left corner of the screen.
- Can create Nested Buttons around Floating Button.
-
react-native-elements- Have alot of ready to use Components
- Also have Implementations of Native Components
-
react-native-vector-icons- Have multiple types of Icons.
- Dependencie of
react-native-action-buttonandreact-native-elements.
-
react-navigation- Create Navigation on your App.
- Also have other types of handling Views.
-
react-native-gesture-handler- Gesture Handler aims to replace React Native's built in touch system
- Dependencie of
react-navigation
Installing packages
If you already have all of this packages in your package.json, you can run npm i or npm install
Or you can install each one by running:
npm i --save react-native-elements
npm i --save react-native-action-button
npm i --save react-native-vector-icons
npm i --save react-navigation
npm i --save react-native-gesture-handler
Some packages need more than just using npm install
Linking packages
react-native link react-native-vector-iconsreact-native link react-native-gesture-handler
react-native-gesture-handler also needs you to add some changes to your MainActivity.java
package com.swmansion.gesturehandler.react.example;

import com.facebook.react.ReactActivity;
+ import com.facebook.react.ReactActivityDelegate;
+ import com.facebook.react.ReactRootView;
+ import com.swmansion.gesturehandler.react.RNGestureHandlerEnabledRootView;

public class MainActivity extends ReactActivity {

  @Override
  protected String getMainComponentName() {
    return "Example";
  }

+  @Override
+  protected ReactActivityDelegate createReactActivityDelegate() {
+    return new ReactActivityDelegate(this, getMainComponentName()) {
+      @Override
+      protected ReactRootView createRootView() {
+       return new RNGestureHandlerEnabledRootView(MainActivity.this);
+      }
+    };
+  }
}
Lines with
+are the added code
An essencial dev dependency is prop-types
npm i -D prop-types
If you are using Visual Studio (very recommended), you need to install Eslint Extension and also install the following packages:
npm i -D eslint
npm i -D eslint-plugin-react
npm i -D eslint-plugin-react-hooks
npm i -D babel-eslint
To run eslint from terminal you need to install the packages globally:
npm i -g eslint
npm i -g eslint-plugin-react
npm i -g babel-eslint
npm i -g eslint-plugin-react-hooks
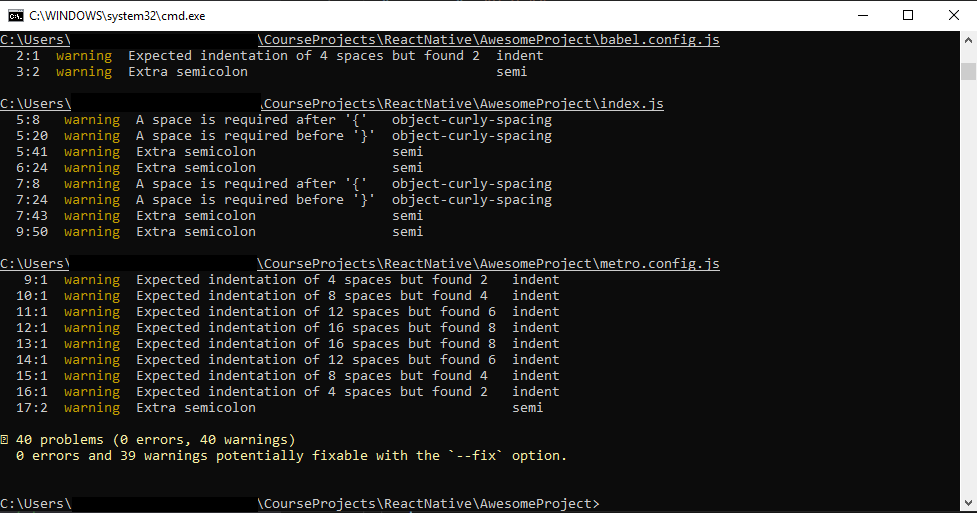
Now you can check for linting using the command:
eslint FILE_TO_LINT
e.g.:
eslint .Lint current folder and show all lint warnings and errors
-
Intel x86 Atom_64 System Image
Run
Android Studioas an administrator.
-
Performance (Intel ® HAXM)
Run
Android Studioas an administrator.If it's still not working, you can install it manually from here.
Also check here to see installation steps. Select the lastestReleaseand downloadhaxm-windows_vx_x_x.zip. *The file name may change.
'react-native' is not recognized as an internal or external command, operable program or batch file.
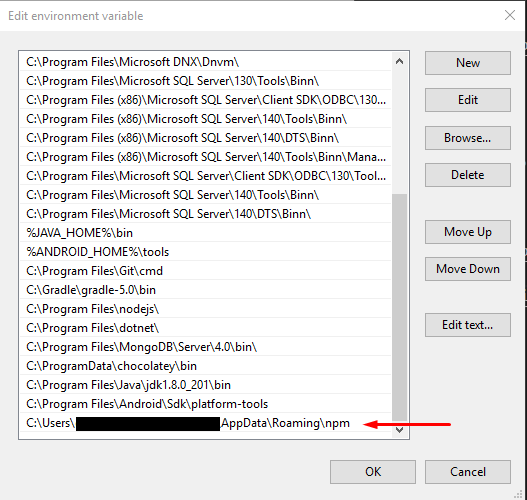
If it still not work, add your npm folder to
PATHEnvironment Variable
Normally it's located atC:Users\USER_NAME\AppData\Roaming\npmIn this folder, you will have
react-native.cmdand other npm global variables
Don't forget to Enable Live Reload
Remote debugger is in a background tab which may cause apps to perform slowly. Fix this by foregrounding the tab (or opening it in a separate window).
Just move the debugger to a separate window
