This simple framework allows you to create a special launchers for Haiku. It can be useful to those engaged in porting games and applications on Haiku and want to place its port in the repository of Haiku packages - Haiku Depot. Such launchers allow you to select a directory with data files or set special game options.

The target application is launched through the Launch() method of BRoster system class or execve() POSIX system call. Passing parameters to the executable file of program (e.g. the path to the directory with data files) is performed with using environment variables or arguments. You can fine-tune the launcher for your application via extending framework classes through a simple C++ methods overriding practice.

Created launchers support the ability to localize into multiple languages via system Locale Kit. User-specified settings are saved after exiting the launcher or starting the target application.
This is my first Haiku project and my first work experience with Haiku API. Perhaps some things were done wrong and not according to well-established canons. I hope the Haiku development community will forgive me for that.
-
Prepare the required files first:
- Banner.png (64x400 px) artwork.
- Icon.png (64x64 px) icon.
- RDef-file with vector icon and executable parameters. See this RDef file from based launcher as an example to follow.
-
When the necessary files are ready, prepare directories for resources. The
%name%is the simplified name of your target application:mkdir -p res/%name%/ mkdir -p locales/%name%/pre/
-
Now you can create a launcher itself. Copy BasedGameLauncher.cpp or GishLauncher.cpp source file to YourAppLauncher.cpp and edit it with using existing code as an example.
-
After your source file is ready, add your launcher and its parameters to the
LAUNCHERS SECTIONSin the CMakeLists.txt file. This will allow you to start building a project. -
Build a project once to generate the special translation cat-keys files. Ignore CMake error about the impossibility of adding cat-keys files to
SOURCESsection. This section is needed to add cat-keys files to the project tree in different IDEs.mkdir build/ cd build/ cmake -DLAUNCHER=%name% .. cmake --build .
-
Optionally, you can translate the generated cat-keys files. They are located in the
locales/%name%/directory. Do not forget to build the project again to add translations to the launcher executable file.
-
You can also open CMakeLists.txt file in Qt Creator or KDevelop IDEs and build your launcher using this program. In addition you can use Paladin IDE to edit the source code. This program is recommended IDE for Haiku.
-
You can create a vector icon for the executable file using standard Icon-O-Matic program which is available in any Haiku distribution. Use export to "HVIF RDef" feature to create a file with specially prepared string of HEX-bytes.
-
You can use Inkscape program for creating a vector icon. However, newer versions of Inkscape generate greatly complicated SVG file (i.e. with viewBox parameter) and it cannot be opened in Icon-O-Matic for export to RDef. But you can cheat and open it in Inkscape this SVG file which was specially prepared by me. Just edit it as you need and be sure to save it as a Plain SVG file in the Inkscape. Such files can be opened in Icon-O-Matic for further editing.
-
In Inkscape you can use a very handy extention that allows you to add perspective to a selected object.
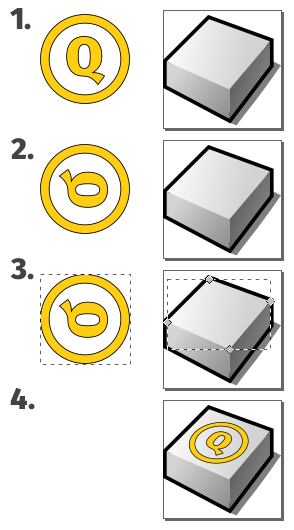
- Create a vector object or group it from several if necessary.
- Flip it vertically "Object => Flip Vertical", rotate 90 degrees CW "Object => Rotate 90* CW" then convert all objects to paths via "Path => Object to Path" feature.
- Using "Select and Transform objects (F1)" tool select your object then hold Shift button and using "Edit path by nodes (F2)" tool select the face of the base object which you need. It will be highlighted in red frame.
- It's time to act! Choose "Extentions => Modify Path => Perspective" and then click on the object to which the perspective was applied and select "Object => Transform => Scale => Width and Height = 80% => Apply", it should look like the image above.
Note: to use the perspective extention you need to install various Python libs and dependencies. Inkscape itself should prompt you how to do this.
-
You can use special pixel-stylized font "Visitor TT1 BRK" for creating inscriptions on the banner. This font looks pretty cute and earlier it was used to create a forum userbars. You can download this font from www.userbars.be site which is dedicated to creating forum userbars.

Please read BeGameLauncher Creating Guide (in Russian) for more information about creating the BeGameLauncher framework for Haiku.