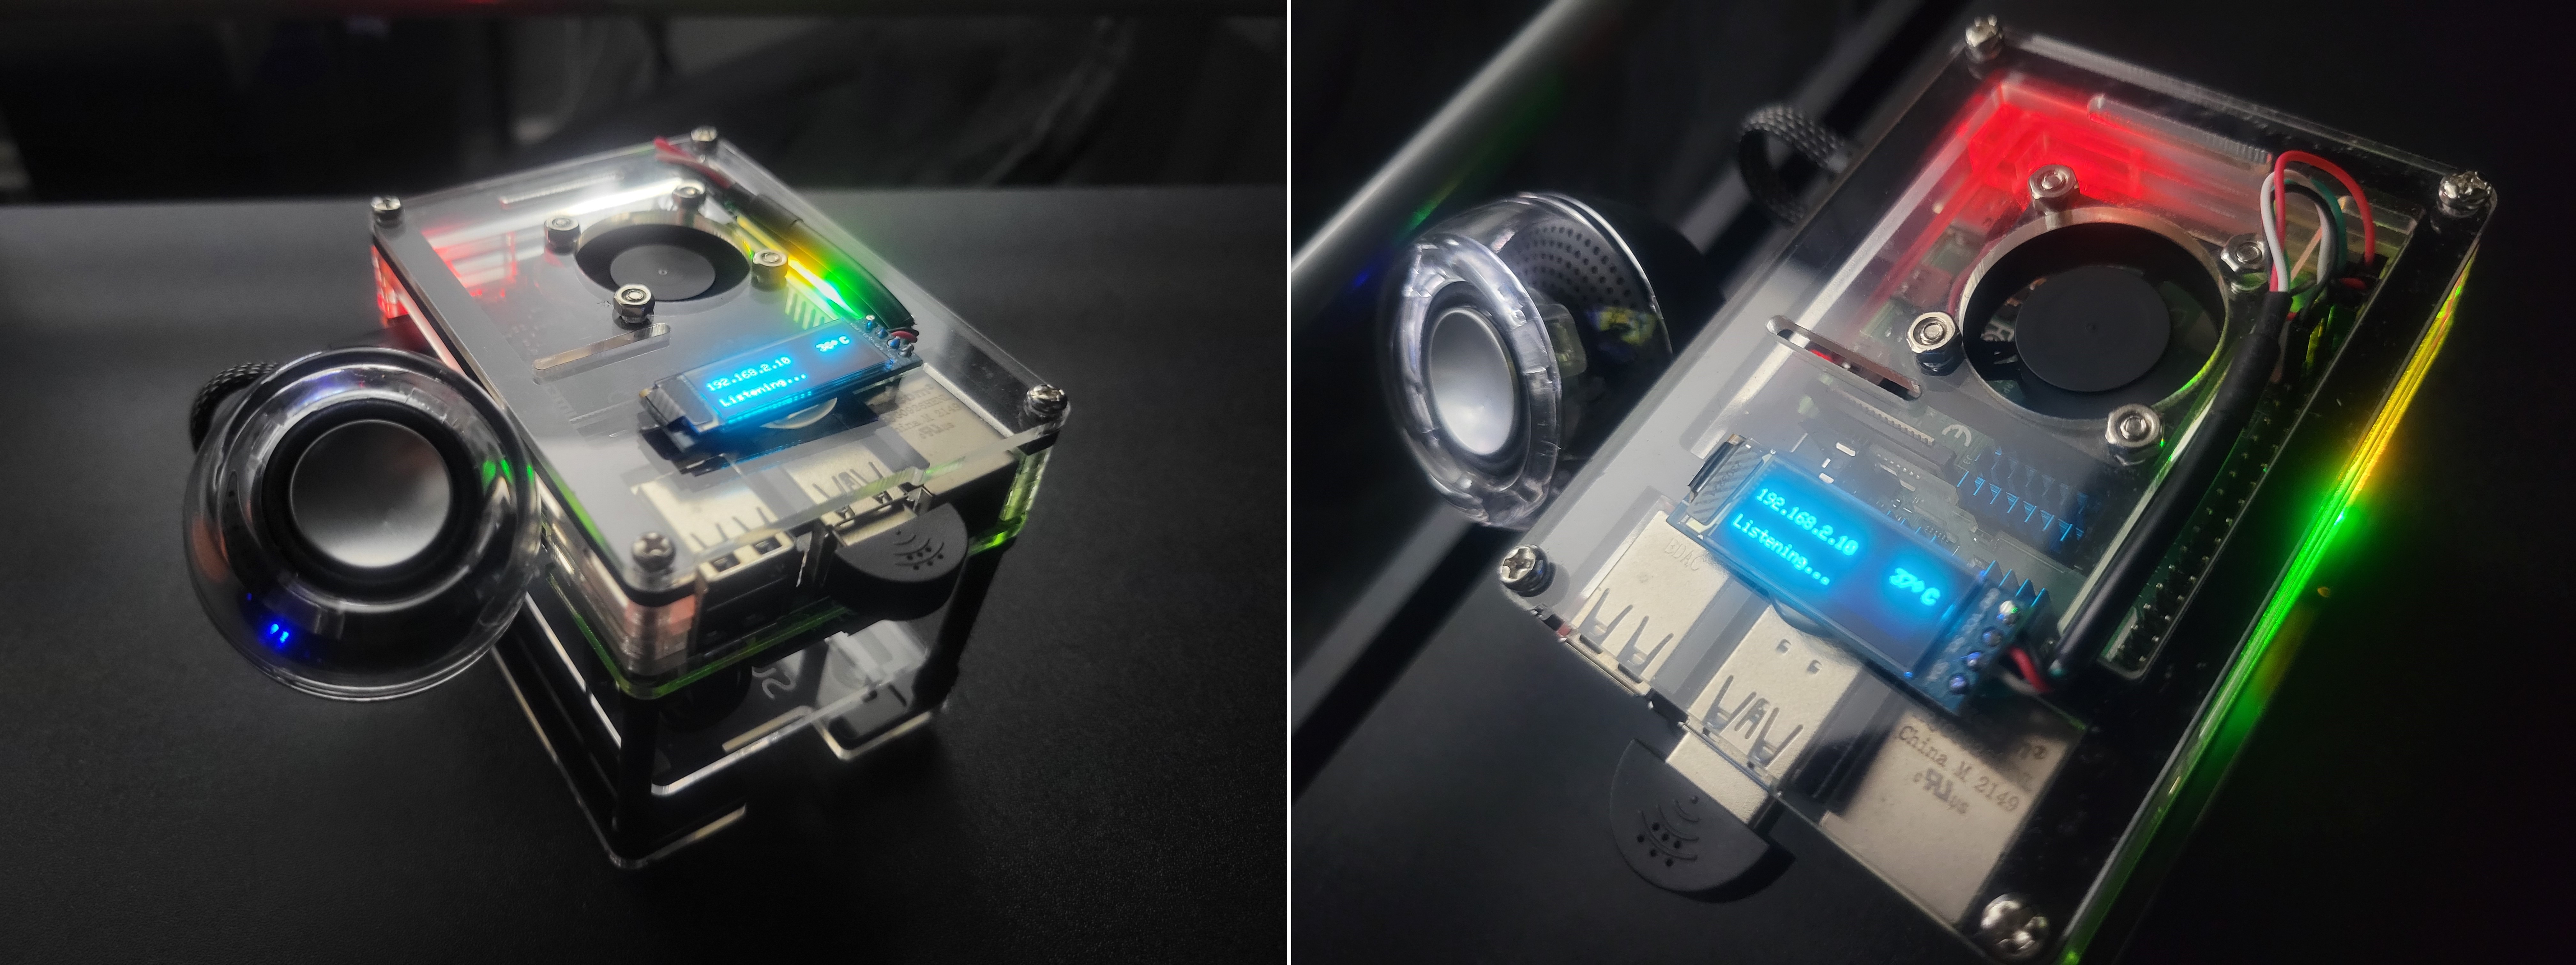
ChatGPT at home! Basically a better Google Nest Hub or Amazon Alexa home assistant. Built on the Raspberry Pi using the OpenAI API.
This guide will explain how to build your own. It's pretty straight forward. You can also use this as a reference for building other projects on the Raspberry Pi.
- This guide assumes you're using Ubuntu Server as your Raspberry Pi's operating system. You may need to make certain modifications to accommodate other operating systems. See Issue #12.
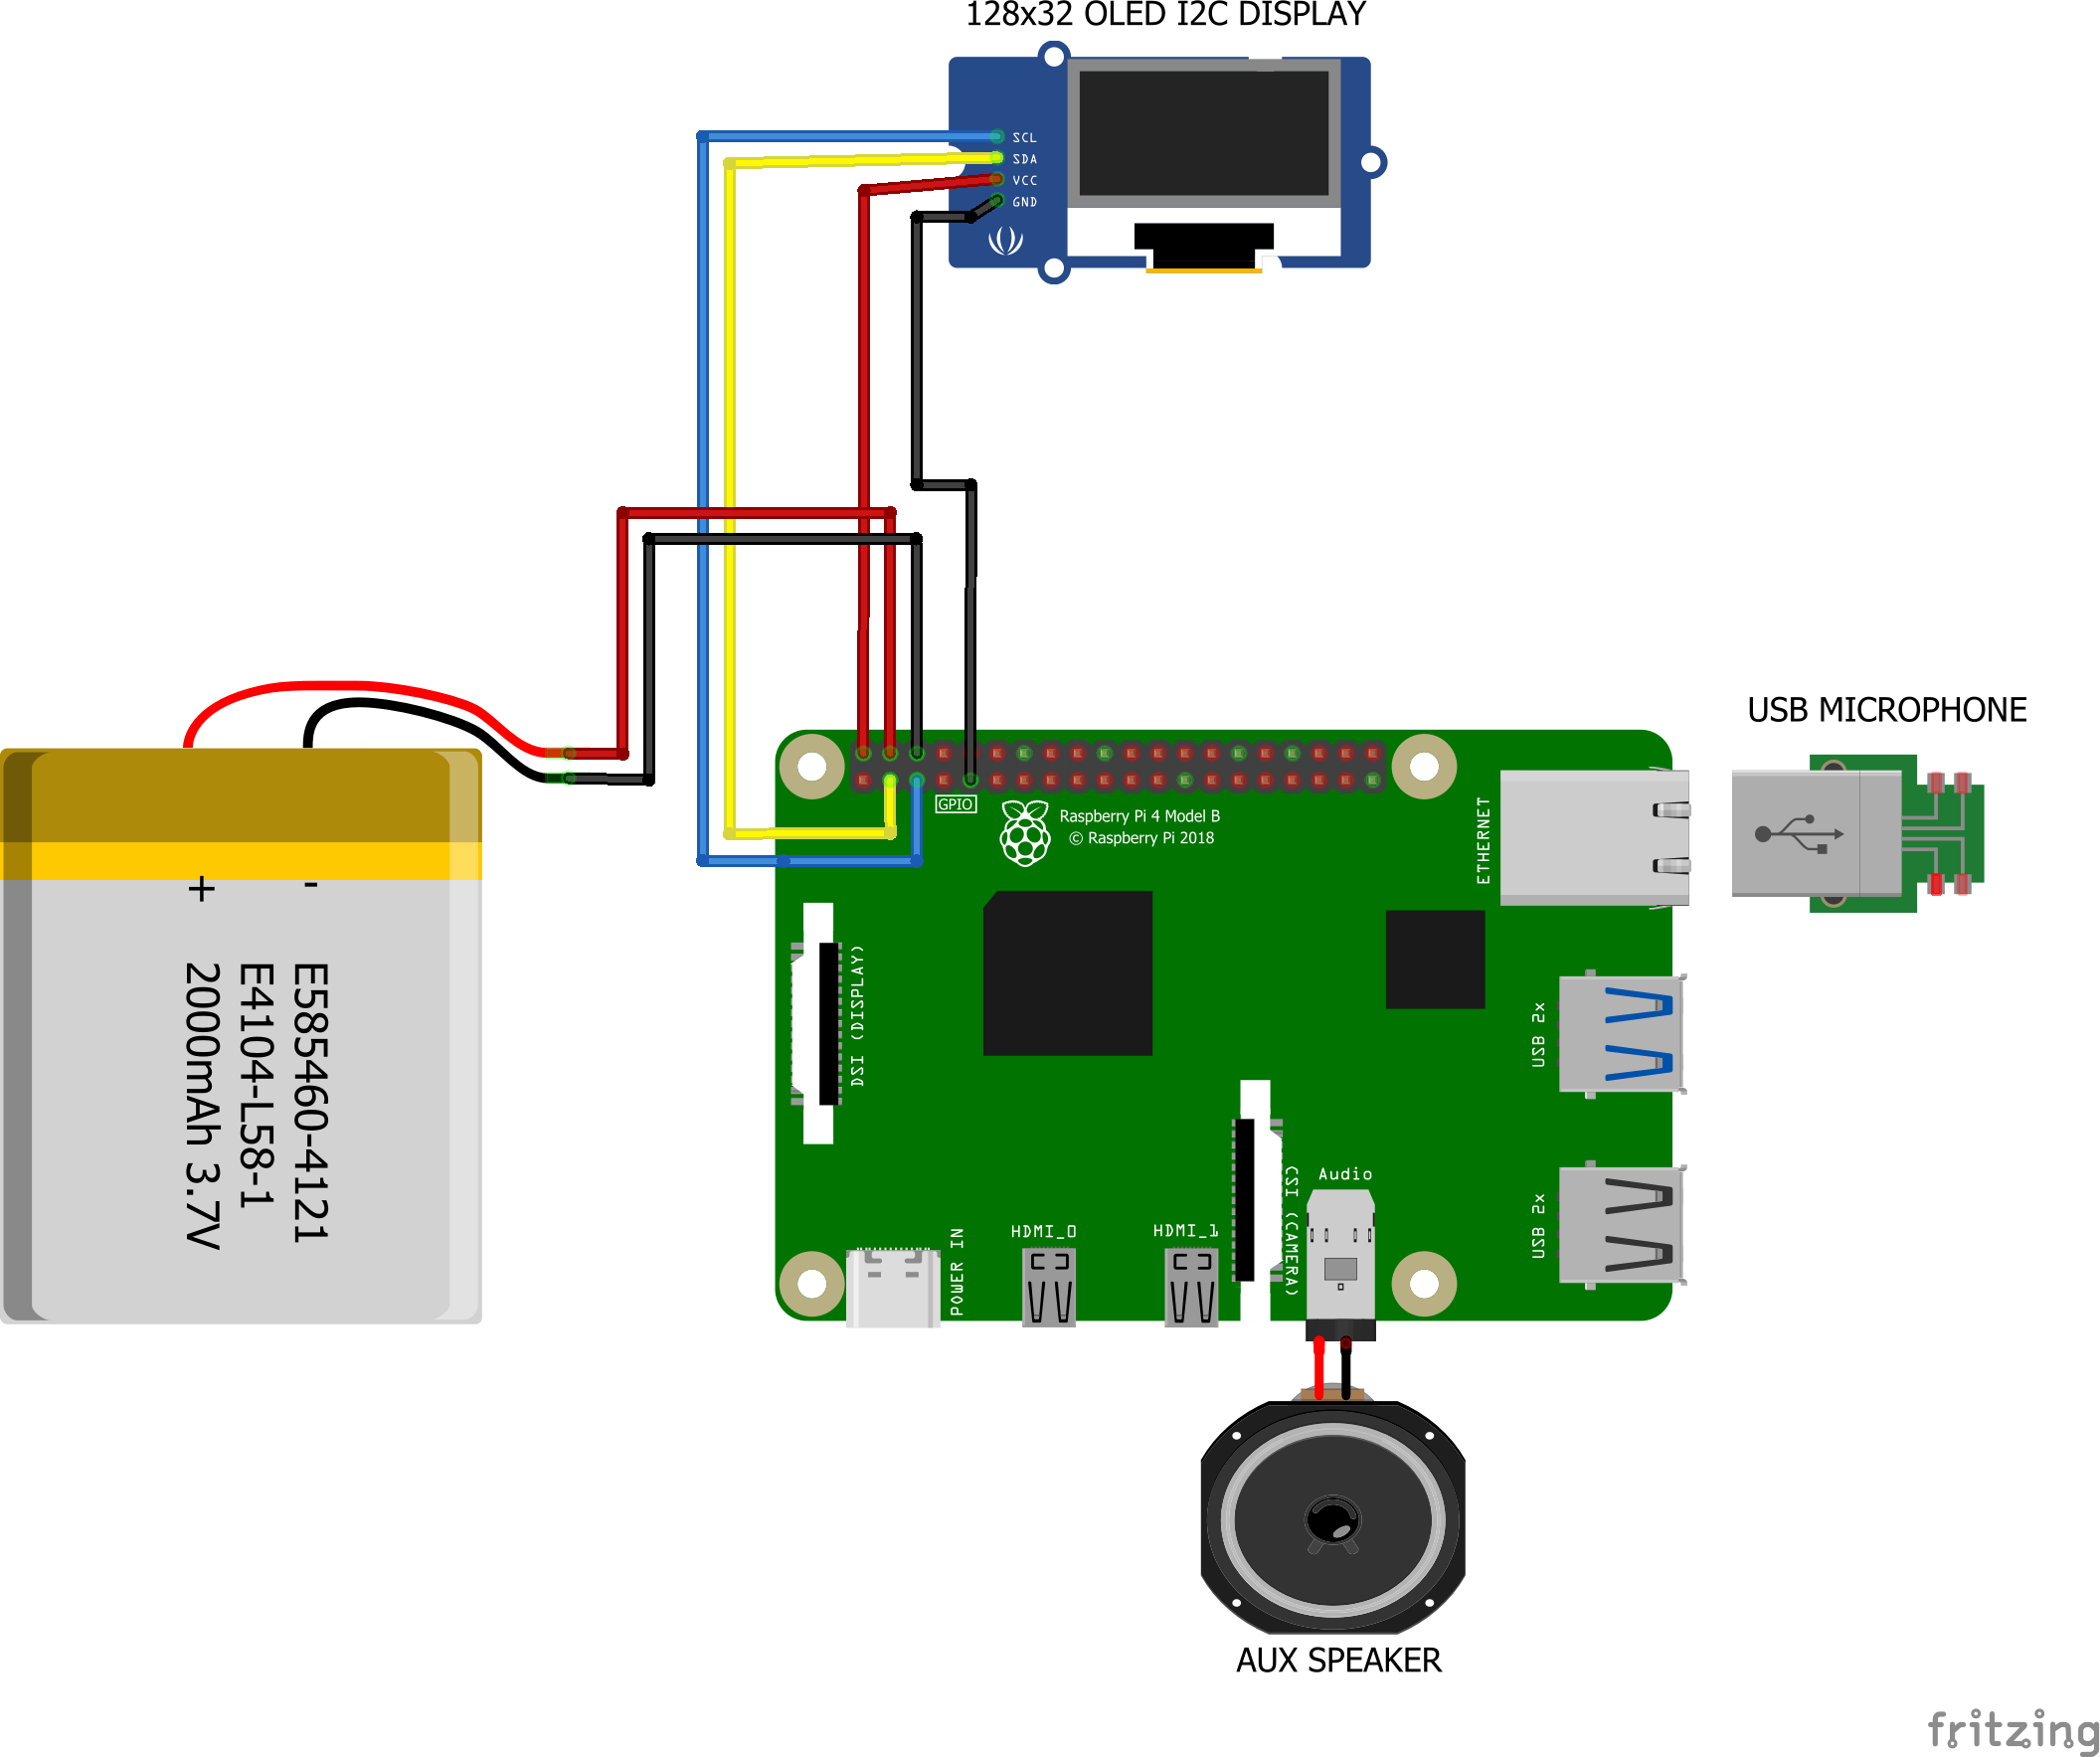
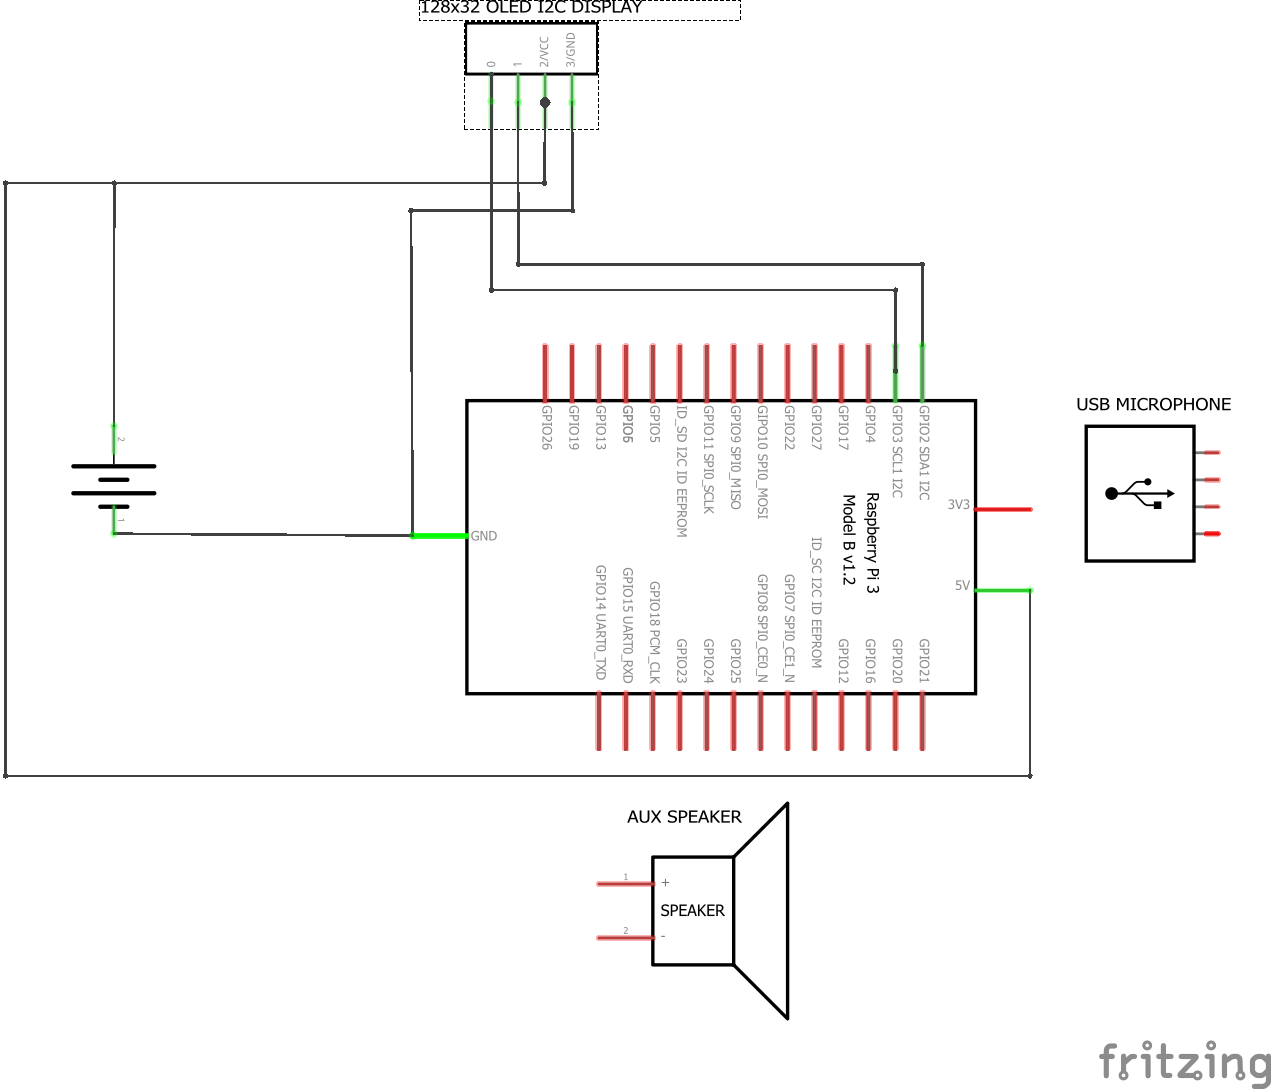
IMPORTANT: Before connecting the battery, ensure that the polarity is correct to avoid damage to your Raspberry Pi or other components. Disconnect power sources before making changes.
 |
 |
- Raspberry Pi 4B: Link - $50-$70
- Mini Speaker: Link - $18
- 128x32 OLED Display: Link - $13-$14
- 128 GB MicroSD card: Link - $13
- USB 2.0 Mini Microphone: Link - $8
- Standoff Spacer Column M3x40mm: Link - $14
- M1.4 M1.7 M2 M2.5 M3 Screw Kit: Link - $15
- Raspberry Pi UPS Power Supply with Battery: Link - $30
- Cool Case for Raspberry Pi 4B: Link - $16
- Core Components: $102-$123
- Optional Components: $75
- Total (Without Optional): $102-$123
- Total (With Optional): $177-$198
To configure Wi-Fi on your Raspberry Pi, you'll need to edit the wpa_supplicant.conf file and ensure the wireless interface is enabled at boot.
-
Install
net-toolsto get theifconfigcommand:sudo apt install net-tools
-
To enable the wireless interface (
wlan0in most cases) at boot, add the following command to/etc/rc.localbefore theexit 0line:
Create the file if it doesn't existsudo vim /etc/rc.local
Add the following contents:
#!/bin/bash
sudo ifconfig wlan0 up &
sudo wpa_supplicant -i wlan0 -c /etc/wpa_supplicant/wpa_supplicant.conf -B &
sudo dhclient wlan0 &
exit 0
Ensure the file has executable permissions and is enabled as a service:
sudo chmod +x /etc/rc.local sudo systemctl enable rc-local.service sudo systemctl start rc-local.service -
Open the configuration file in a text editor:
sudo vim /etc/wpa_supplicant/wpa_supplicant.conf
-
Add the following lines at the end of the file:
You can define multiplenetworkblocks for multiple Wi-Fi networksnetwork={ ssid="Your_Wi-Fi_Name" psk="Your_Wi-Fi_Password" key_mgmt=WPA-PSK }Replace
Your_Wi-Fi_NameandYour_Wi-Fi_Passwordwith your actual Wi-Fi credentials. -
Ensure
wpa_supplicantservice starts at boot:sudo systemctl enable wpa_supplicant.service -
Start
wpa_supplicantservice:sudo systemctl start wpa_supplicant.service
Your Raspberry Pi should now connect to the Wi-Fi network automatically on boot. If you face issues, refer to the official Raspberry Pi documentation on wireless connectivity.
Before running this project on your Raspberry Pi, you'll need to install some system-level dependencies in addition to the Python packages.
-
Synchoronize your system clock:
sudo timedatectl set-ntp on
-
Update your package list:
sudo apt update
-
Make sure the Universe repository is enabled:
sudo add-apt-repository universe
sudo apt update
If you want to use the setup.sh script, you can skip this section. Otherwise, you can install the dependencies manually.
-
OpenAI API Key: Required for OpenAI's GPT API.
Setup: Set up as an environment variable. -
Python 3.x: Required for running the Python code.
Installation:sudo apt-get install -y python3 python3-dev -
PortAudio: Required for
pyttsx3(text-to-speech).
Installation:sudo apt-get install -y portaudio19-dev -
ALSA Utilities: Required for audio configuration.
Installation:sudo apt-get install -y alsa-utils -
JPEG Library: Required for Pillow.
Installation:sudo apt-get install -y libjpeg-dev -
Build Essentials: Required for building packages.
Installation:sudo apt-get install -y build-essential -
vcgencmd: Comes pre-installed on Raspberry Pi OS. Used for fetching CPU temperature.
-
Speech Recognition Libraries: Required for
speech_recognition.
Installation:sudo apt-get install -y libasound2-dev -
I2C Support: Required for
adafruit_ssd1306(OLED display).
Enable viaraspi-configor install packages:sudo apt-get install -y i2c-tools sudo apt-get install -y python3-smbus
-
eSpeak Library: Required for text-to-speech (
pyttsx3).
Installation:sudo apt-get install -y libespeak1 -
JACK Audio Connection Kit: Required for handling audio.
Installation:sudo apt-get install -y jackd2
SelectYeswhen prompted to enable realtime privileges. -
FLAC Libraries: Required for handling FLAC audio formats.
Installation:sudo apt-get install -y flac libflac12:armhf -
Git: Required for cloning the repository.
Installation:sudo apt-get install -y git -
Node.js and npm: Required for the web interface.
Installation: Follow NodeSource Installation Guide -
NGINX: Required for reverse proxy for the web interface. Installation:
sudo apt-get install -y nginx -
Rust and Cargo: Required for installing
spotifyd.
Installation: Follow Rust Installation Guide -
Spotifyd: Required for Spotify Connect.
-
Virtual Environment: Recommended for Python package management.
Installation:sudo apt-get install -y python3-venv
This script will install all the dependencies and completely set up the project for you. The first time you run it, it will take a while to install all the dependencies. After that, it will be much faster and you can just run it to reinstall the project if you make any changes to the code or want the latest version of the project.
You will need to initialize an environment variable with your OpenAI API Key.
- Note: Executing
exportdirectly in the terminal does not persist after reboot.
export OPENAI_API_KEY="your_openai_api_key_here"Alternatively, you set up the variable in .bashrc file. (recommended)
- Put this at the end of your
~/.bashrcfile
# export your OpenAI API Key in here to initialize it at boot
export OPENAI_API_KEY="your_openai_api_key_here"

# Optional: Add these aliases to your .bashrc file for easier management
alias gpt-start="sudo systemctl start gpt-home"
alias gpt-restart="sudo systemctl restart gpt-home"
alias gpt-stop="sudo systemctl stop gpt-home"
alias gpt-disable="sudo systemctl disable gpt-home"
alias gpt-status="sudo systemctl status gpt-home"
alias gpt-enable="sudo systemctl enable gpt-home"
alias gpt-log="tail -n 100 -f /home/ubuntu/gpt-home/events.log"

alias web-start="sudo systemctl start gpt-web"
alias web-restart="sudo systemctl restart gpt-web && sudo systemctl restart nginx"
alias web-stop="sudo systemctl stop gpt-web"
alias web-disable="sudo systemctl disable gpt-web"
alias web-status="sudo systemctl status gpt-web"
alias web-enable="sudo systemctl enable gpt-web"
alias web-log="tail -n 100 -f /var/log/nginx/access.log"
alias web-error="tail -n 100 -f /var/log/nginx/error.log"Create a script outside the local repo folder with vim setup.sh
#!/bin/bash

# Function to check and install a package if it's not installed
check_and_install() {
    package=$1
    install_cmd=$2

    if ! dpkg -l | grep -q $package; then
        echo "Installing $package..."
        eval $install_cmd
    else
        echo "$package is already installed."
    fi
}

# Function to update the system time
update_system_time() {
    echo "Updating system time..."
    check_and_install "ntpdate" "sudo apt-get install -y ntpdate"
    sudo ntpdate -u ntp.ubuntu.com
}

# Update system time
update_system_time

# Update package list
sudo apt update

# Check and install missing dependencies
check_and_install "python3" "sudo apt-get install -y python3 python3-dev python3-venv"
check_and_install "portaudio19-dev" "sudo apt-get install -y portaudio19-dev"
check_and_install "alsa-utils" "sudo apt-get install -y alsa-utils"
check_and_install "libjpeg-dev" "sudo apt-get install -y libjpeg-dev"
check_and_install "build-essential" "sudo apt-get install -y build-essential"
check_and_install "libasound2-dev" "sudo apt-get install -y libasound2-dev"
check_and_install "i2c-tools" "sudo apt-get install -y i2c-tools"
check_and_install "python3-smbus" "sudo apt-get install -y python3-smbus"
check_and_install "libespeak1" "sudo apt-get install -y libespeak1"
check_and_install "jackd2" "sudo apt-get install -y jackd2"
check_and_install "flac" "sudo apt-get install -y flac"
check_and_install "libflac12:armhf" "sudo apt-get install -y libflac12:armhf"
check_and_install "cmake" "sudo apt-get install -y cmake"
check_and_install "openssl" "sudo apt-get install -y openssl"
check_and_install "git" "sudo apt-get install -y git"
check_and_install "nginx" "sudo apt-get install -y nginx"
check_and_install "expect" "sudo apt-get install -y expect"
check_and_install "avahi-daemon" "sudo apt-get install -y avahi-daemon avahi-utils"

# Install cargo and rust
if ! command -v cargo &> /dev/null; then
    echo "Installing cargo and rust..."
    curl --proto '=https' --tlsv1.2 -sSf https://sh.rustup.rs | sh -s -- -y

    # Source the environment for cargo and rust
    if [ -f "$HOME/.cargo/env" ]; then
        source $HOME/.cargo/env
    else
        echo "Error: Unable to source Rust environment. Installation may have failed or path is incorrect."
    fi
else
    echo "cargo is already installed."
fi

# Ensure directory exists for the configuration
mkdir -p $HOME/.config/spotifyd

# Install spotifyd using Rust's Cargo
if ! command -v spotifyd &> /dev/null; then
    echo "Installing spotifyd..."
    cargo install spotifyd
    sudo mv $HOME/.cargo/bin/spotifyd /usr/local/bin/
else
    echo "spotifyd is already installed."
fi

# Create Spotifyd configuration (this is just a basic config; adjust accordingly)
cat <<EOF > $HOME/.config/spotifyd/spotifyd.conf
[global]
backend = "alsa" # Or pulseaudio if you use it
device_name = "GPT Home" # Name your device shows in Spotify Connect
bitrate = 320 # Choose bitrate from 96/160/320 kbps
cache_path = "/home/ubuntu/.spotifyd/cache"
discovery = false
EOF

# Function to setup a systemd service
setup_service() {
    # Parameters
    local SERVICE_NAME=$1
    local EXEC_START=$2
    local AFTER=$3
    local ENV=$4
    local HOSTNAME=$5
    local LMEMLOCK=$6

    # Stop the service if it's already running
    sudo systemctl stop "$SERVICE_NAME" &>/dev/null

    echo "Creating and enabling $SERVICE_NAME..."
    # Create systemd service file
    cat <<EOF | sudo tee "/etc/systemd/system/$SERVICE_NAME" >/dev/null
[Unit]
Description=$SERVICE_NAME
After=$AFTER
StartLimitIntervalSec=500
StartLimitBurst=10

[Service]
User=ubuntu
WorkingDirectory=/home/ubuntu/gpt-home
ExecStart=$EXEC_START
$ENV
$HOSTNAME
Restart=always
Type=simple
$LMEMLOCK

[Install]
WantedBy=multi-user.target
EOF

    # Reload systemd to recognize the new service, then enable and restart it
    sudo systemctl daemon-reload
    sudo systemctl enable "$SERVICE_NAME"
    sudo systemctl restart "$SERVICE_NAME"

    # Wait for 5 seconds and then show the service status
    echo ""
    sleep 5
    sudo systemctl status "$SERVICE_NAME" --no-pager
    echo ""
}

# Setup UFW Firewall
sudo ufw allow ssh
sudo ufw allow 80,443/tcp
sudo ufw allow 5353/udp
echo "y" | sudo ufw enable

# Setup NGINX for reverse proxy
echo "Setting up NGINX..."
sudo tee /etc/nginx/sites-available/gpt-home <<EOF
server {
    listen 80;

    location / {
        proxy_pass http://localhost:8000/;
        proxy_set_header Host \$host;
        proxy_set_header X-Real-IP \$remote_addr;
        proxy_set_header X-Forwarded-For \$proxy_add_x_forwarded_for;
    }
}
EOF

# Remove existing symlink if it exists
[ -L "/etc/nginx/sites-enabled/gpt-home" ] && sudo unlink /etc/nginx/sites-enabled/gpt-home

# Symlink the site configuration
sudo ln -s /etc/nginx/sites-available/gpt-home /etc/nginx/sites-enabled

# Test the NGINX configuration
sudo nginx -t

# Remove the default site if it exists
[ -L "/etc/nginx/sites-enabled/default" ] && sudo unlink /etc/nginx/sites-enabled/default

# Reload NGINX to apply changes
sudo systemctl reload nginx

# Remove existing local repo if it exists
[ -d "gpt-home" ] && rm -rf gpt-home

# Clone gpt-home repo and navigate into its directory
git clone https://github.com/judahpaul16/gpt-home.git
cd gpt-home

## Setup main app
# Create and activate a virtual environment, then install dependencies
python3 -m venv env
source env/bin/activate
pip install --upgrade pip setuptools
pip install --use-pep517 -r requirements.txt

## Setup Web Interface
# Navigate to gpt-web and install dependencies
cd gpt-web
npm install

# Configure Avahi for gpt-home.local
sudo sed -i 's/#host-name=.*$/host-name=gpt-home/g' /etc/avahi/avahi-daemon.conf
sudo systemctl restart avahi-daemon

# Build the React App
npm run build

## Setup Services
# Set up spotifyd service
setup_service "spotifyd.service" "/usr/local/bin/spotifyd --no-daemon" "network.target" "" "" ""

# Setup gpt-home service
setup_service "gpt-home.service" "/bin/bash -c 'source /home/ubuntu/gpt-home/env/bin/activate && python /home/ubuntu/gpt-home/app.py'" "" "Environment=\"OPENAI_API_KEY=$OPENAI_API_KEY\"" "Environment=\"HOSTNAME=$HOSTNAME\"" "LimitMEMLOCK=infinity"

# Setup fastapi service for FastAPI backend
setup_service "gpt-web.service" "/bin/bash -c 'source /home/ubuntu/gpt-home/env/bin/activate && uvicorn gpt-web.backend:app --host 0.0.0.0 --port 8000'" "" "Environment=\"OPENAI_API_KEY=$OPENAI_API_KEY\"" "Environment=\"HOSTNAME=$HOSTNAME\"" ""

# Mask systemd-networkd-wait-online.service to prevent boot delays
sudo systemctl mask systemd-networkd-wait-online.service
Be sure to make the script executable to run it
chmod +x setup.sh
./setup.shContributions are certainly welcome! Please read the contributing guidelines for more information on how to contribute.
This project is licensed under the GNU GPL v3.0 License - see the LICENSE file for details.


