
MyApp
![]()
Conventions
- Don't copy/paste files, use generators and Hygen templates.
- Use a single command to run Next, generate Nexus types, and GraphQL types for the frontend.
- Don't manually type GraphQL responses... use the generated query hooks from GraphQL Codegen.
- All frontend pages are static by default. If you need something server rendered, just add
getServerSidePropslike you would in a any Next app.
Tradeoffs
- To reduce complexity, Bison avoids yarn workspaces and separate top-level folders. Think of your app more like a traditional monolith, but with a separate frontend and API. This means that folders may be a little more "intermingled" than your used to.
Getting Started
Clone this repo.
Configure Vercel
Make sure you have a Vercel account.
To run the app locally:
- Run
vercelorvc - Choose the appropriate scope / organization. If you don't see the organization, ask someone to invite you.
- If this is a new project, keep all the build defaults. If this is an existing project, choose "link to an existing project" when prompted.
- If setting up an existing project, run
vc env pull. This will sync your dev env vars and save them to .env.
Setup the database
- Setup your local database with
yarn db:setup. You'll be prompted to create it if it doesn't already exist:

If you'd like to change the database name or schema, change the DATABASE_URL in prisma/.env.
Run the app
From the root, run yarn dev. This:
- runs
next devto run the frontend and serverless functions locally - starts a watcher to generate the Prisma client on schema changes
- starts a watcher to generate TypeScript types for GraphQL files
Recommended Dev Workflow
You're not required to follow this exact workflow, but we've found it gives a good developer experience.
API
- Generate a new GraphQL module using
yarn g:graphql. - Write a type, query, input, or mutation using Nexus
- Create a new request test using
yarn g:test:request - Run
yarn testto start the test watcher - Add tests cases and update schema code accordingly
- The GraphQL playground (localhost:3000/api/graphql) can be helpful to form the proper queries to use in tests.
types.tsandapi.graphqlshould update automatically as you change files. Sometimes it's helpful to open these as a sanity check before moving on to the frontend code.
Frontend
- Generate a new page using
yarn g:page - Generate a new component using
yarn g:component - If you need to fetch data in your component, use a cell. Generate one using
yarn g:cell(TODO) - To generate a typed GraphQL query, simply add it to the component or page:
export const SIGNUP_MUTATION = gql`
  mutation signup($data: SignupInput!) {
    signup(data: $data) {
      token
      user {
        id
      }
    }
  }
`;- Use the newly generated types from codegen instead of the typical
useQueryoruseMutationhook. For the example above, that would beuseSignupMutation. You'll now have a fully typed response to work with!
import { User, useMeQuery } from './types';

// adding this will auto-generate a custom hook in ./types
export const ME_QUERY = gql`
  query me {
    me {
      id
      email
    }
  }
`;

// an example of taking a user as an argument with optional attributes
function noIdea(user: Partial<User>) {
  console.log(user.email);
}

function fakeComponent() {
  // use the generated hook
  const { data, loading, error } = useMeQuery();

  if (loading) return <Loading />;

  // data.user will be fully typed
  return <Success user={data.user}>
}
Set up CI
This project uses GitHub actions for CI.
To ensure your project can run on CI for E2E tests, you need to add a few ENV vars to GitHub Secrets.
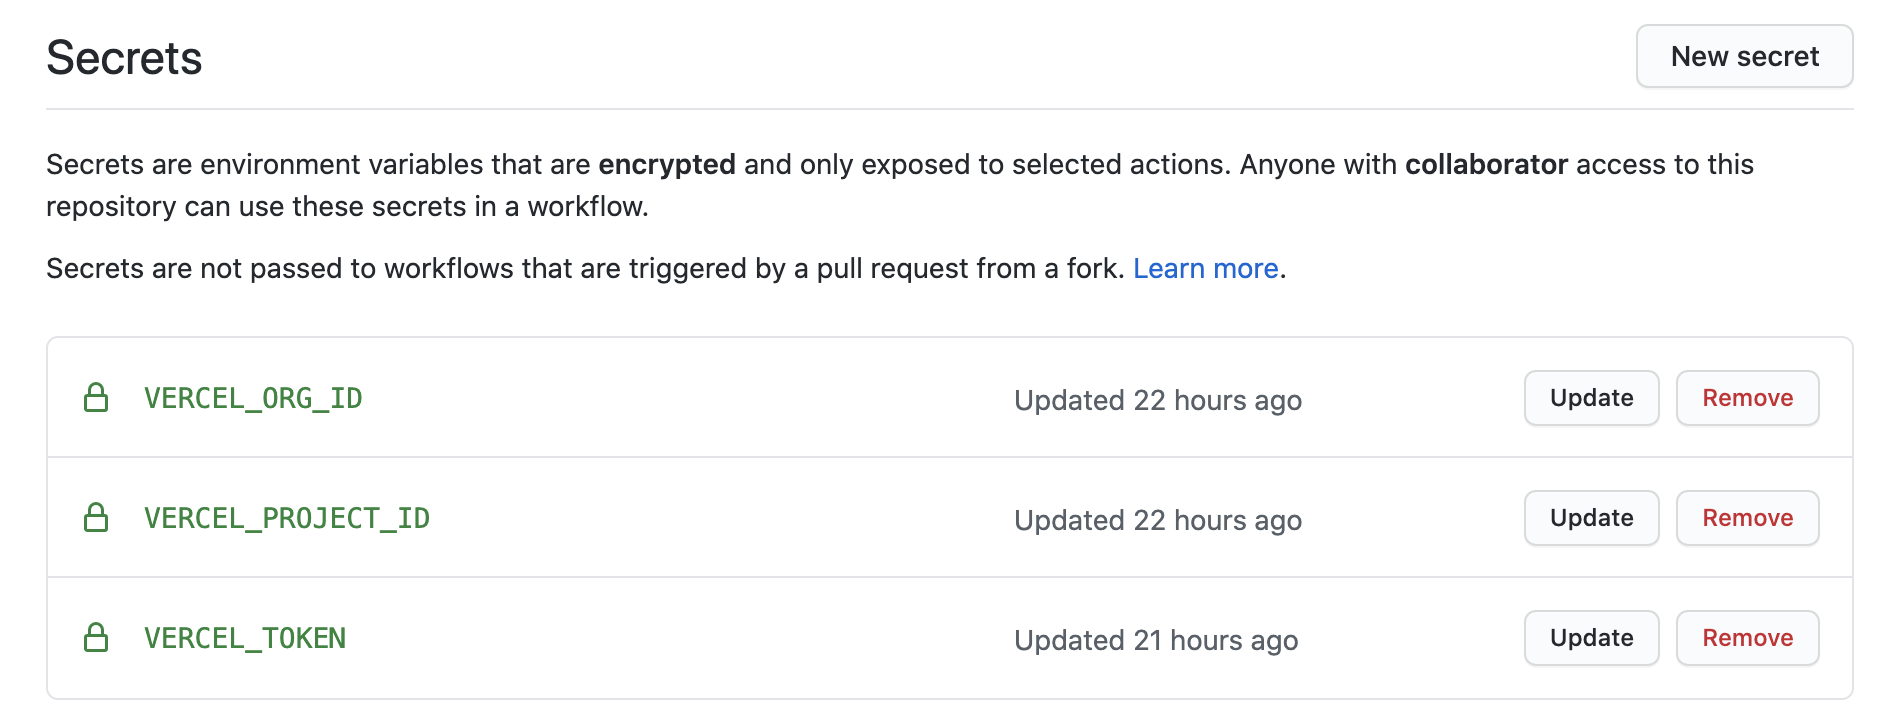
The Vercel project and org id, can be copied from .vercel/project.json. You can generate a token from https://vercel.com/account/tokens.
Setup Preview / Production Deployments
After tests pass, the app will deploy to Vercel. By default, every push creates a preview deployment. Merging to the main branch will deploy to staging, and pushing to the production branch will deploy to production. To configure deployments:
- Make sure you've set the variables above
- Configure the branches in the workflow:
## For a typical JAMstack flow, this should be your default branch.
## For a traditional flow that auto-deploys staging and deploys prod is as needed, keep as is
if: github.ref != 'refs/heads/production' # every branch EXCEPT production
FAQ
Where are the generated types?
TypeScript Types for GraphQL types, queries, and mutations are generated automatically and placed in ./types.ts. To use these in your code, import like so:
My types aren't working, even though they are in ./types.ts
Try reopening VSCode.