Here is a link to the live project. (https://pocket-bookcase.herokuapp.com/)
This website was created for Milestone 3 - Datacentric Development project, as part of the Code Institutes diploma in Software development.
I love books and have the problem of never remembering what book I'm on in the numerous series that I'm in the middle of reading. This means I often start to read a book I've already read and buy books I already have at home.
I was inspired by an app I used to have which doesn't seem to exist now which was for keeping track of which Terry Pratchett Discworld books that the user had read. It was just a simple list of the books with a checkbox beside them, but it did the trick and I thought how useful it would be to have it for any books.
Upon pitching my idea to a few people, I was met with how useful that would be and how much they would use it, and so Pocket Bookcase was born.

-
User goals
- As a user I want help keeping track of my books.
- As a user I want to save my money and time by not buying books I already own or have read.
-
Site owner/ business goals
- As the site owner I want my site to be responsive to different screen sizes.
- As the site owner I want my site to be accessible to my visitors.
- As the site owner I want to build up media presence, to ultimately build up users so that I can earn money from affiliate links.
- Ultimately though I want to use the application to track my own books.
-
- As a first time visitor, I want to easily understand the main purpose of the site.
- As a first time visitor, I want to be able to intuitively use the site.
- As a first time visitor, I expect to see an attractive, visually appealing site.
- As a first time visitor, I expect an accessible site.
- As a first time visitor, I expect the site to look good on my mobile device.
- As a first time visitor, I want to easily search the books.
- As a first time visitor, I want to easily register.
-
- As a returning visitor, I want to add books to my "bookshelves".
- As a returning visitor, I want to follow on social media so I can hear of any new features.
- As a returning visitor, I want to be able to add books to the applications library.
- As a returning visitor, I want to be able to change my password.
- As a returning visitor, I want to be able to rate the app.
- As a returning visitor, I want to get feedback so I know that something has went through or if i've been redirected, why.
-
- As a frequent visitor, I want to be able to edit a book that I've added to the applications library.
- As a frequent visitor, I want to be able to contact the owner with suggestions.
- As a frequent visitor, I want to be able to move or delete books on my "bookshelves".
- As a frequent visitor, I want to be able to update my profile.
- As a frequent visitor, I want to be able to change my account information
- As a frequent visitor, I don't want to have never ending scrolling up or down.
-
- As admin, I want to be able to add, delete or edit a book.
- As admin, I want to be able to add, delete or edit a genre.
- As admin, I want to be able to delete a user.
- As admin, I want to be able to make another user an admin.
- As admin, I want to be able to reset a users password if they're having trouble logging in.
Within project conception, a list of features were compiled, these were the scored between 1 & 5 for importance and feasibility/ viability which then decided which features could be included for initial launch.
-
Responsive on all device sizes
-
Accessible
-
Easy to navigate (Single use learning)
-
Interactive elements
-
Social Links (build up media presence)
-
Ability to contact owner via contact page.
-
Contact form prefills the personal information for logged in users.
-
Flash messages for feedback
-
Confirmation modal and email on submission of contact form
-
Tooltips on registration form to help users complete it correctly
-
Changing nav menu and footer links and buttons in library depending on the users log in status, admin status and what books they have added.
-
Search bar in home/library can be used to search for genre, title, author, added_by and series name.
-
'Back to top' footer link on each page, saves users from having to scroll up to Nav bar especially on mobile devices.
-
Logged in users can add books to the Library.
-
Logged in user can add any book from library on home page to their profile.
-
User can edit books in library that they themselves added.
-
User can move or delete books on their profile. Can move books they have read from the 'Books To Read' bookshelf to the 'Read Books' bookshelf and vice versa. Books they don't own can be added to 'Books I Own' bookshelf.
-
User can edit their own account via the 'Edit Account' footer link. Put this in footer because I hate having to hunt for this on other sites. Here they can change their password, email address etc or delete their account if they so wish.
-
Admin users can add, edit and delete any books.
-
Admin user can add, edit and delete any genre.
-
Admin user can search for other admins or for a username on Manage Genre page. They can make other users admin, reset another users password and edit their email if required.
-
Before anything is deleted a confirmation is required preventing accidental deletion.
-
Cancel buttons on edit pages in case user changed their mind or got there accidentally.
- Book suggestions based on the users favourite genre, which will crosscheck which books are in the library of that genre, which books they have on their profile and display 1 or 2 books at random so they also aren't seeing the same suggestions everytime they log in.
- Users can add a review to books they didn't add. As its a book tracker rather than review site this wasn't top priority for initial launch,likewise for the ratings below.
- Users can rate books they didn't add, the rating displayed will then be the average.
- Home/library page all users will be able to use regardless of whether they are logged in or not. The home page will have an add book button and add to profile buttons visible for logged in users. Those books that were added by the user will also have an edit button visible and admin will have a delete button in addition to the rest.
- Add book button allows logged in users to add a new book to the library by filling out the form on the add-book page.
- The add to profile buttons beside the books allows the user to add a book to their profile bookshelves, the profile-add page has two questions requiring a yes or no which determines which bookshelf(or bookshelves) the book gets added to.
- The edit button beside a book allows the user that added it or admin to edit it on the edit-book page. The user can't change the title as they could potentially change it to a completely different book. The admin however can change the title i.e in the case of a spelling mistake.
- The delete button beside the books are to allow admin to delete a book from the database, if required for any reason.
- All users will have access to About and Contact pages. The nav links to these are therefore also seen by all. The about page explains to users what the purpose of the site is and how to use it and benefits of registering.
- For logged in users the nav menu will change, sign-in and sign-up will be replaced with sign-out and profile, and the footer links will also change to sign me out and edit account links
- Profile page has got the users name at the top and three collapsible bookshelves for their saved books, these books can be moved between bookshelves or removed entirely from the profile using the buttons beside the books themselves.
- The edit-account page allows a user to change everything except their username, this was because any books they had added to the library would then not be available to them to edit as the username would not match up to the the added_by field attached to the books. They can also delete their account from this page, a confirmation of deletion is requested so that user can't accidentally delete account.
- Admin users have additional nav links of manage genre and manage users. Manage user allows admin to delete a user, requiring confirmation prior to deletion. Edit will take admin to edit-user page. Here admin can make another user an admin, change their email address for them or their password if required. They are then prompted to contact user with password and the user would then log in and change their password again. Have put change password in a collapsible so that its not filled in by accident.
- The manage genre page has a section at top to add a new genre wih submit button and edit just opens up an edit genre collapsible. I felt what with genre information being just that, the genre neither adding or editing warranted a seperate page.
- Have added in error pages so that the user is shown a comforting error message and a button back to home, which in the event of an error doesn't put the user off from using again.
- Created a database schema using dbdiagram, see below.

Wireframes were created on Balsamiq (see links below)
Changed a few things from the wireframes:
- Realised that having icons instead of buttons, may have looked better but felt if I needed a key to tell the users what they all meant it wasn't intuitive. Similarly for the checkboxes on the profile page, if the user had a small device and a few books they would have to scroll up to see the checkbox column titles.
- Incorporated the add and edit genre pages into the manage genres page and added a manage users page.
- Changed the look of the manage genres page to match that of the manage users page to keep things simple to use.
- On mobile devices the cover image had to be really small to be side by side with the book information, toyed with the idea of not having the book cover image, but felt without the images, all the text was off putting, an image pulls you in. Due to the same issue for desktop, didn't have two books side by side as originally had planned, I think it definately looks better for it.
-
In the past few years I have started collecting nice editions of the classics, I have always loved old books, the smell, the textures and the colours. This started with a weekly magazine that I collected as a child, you would get the magazine that told you all about the book and a nice copy of the book itself, bold colours with gold embellishment.
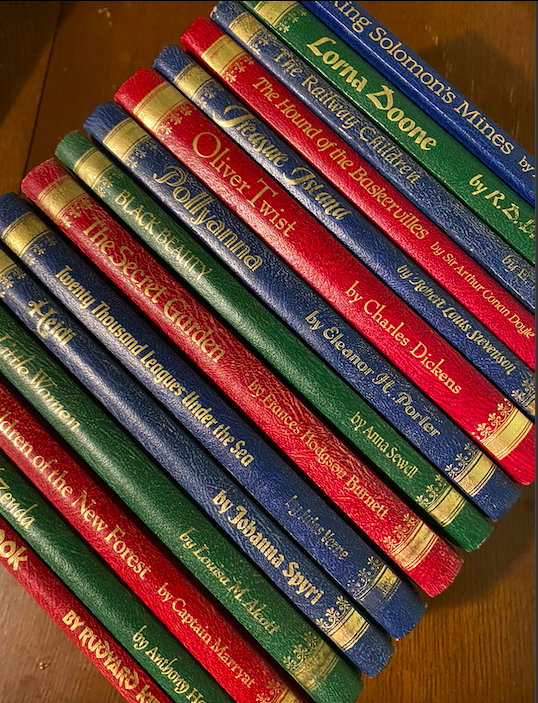
I used this to style my site, off white background colour to represent the colour of aged pages, the red, green, blue and gold for the numerous types of buttons as theses colours draw attention. In place of black I have used a dark brown to soften while retaining contrast, I have also used a warm brown for the horizontal rule to emulate the wooden shelves of a bookcase. Used convertingcolors.com to create the image below to show the colors I took from the inspo image.

-
Used Google Fonts to import the fonts used for this site. I used 'Tangerine' for the titles and logo as it has that ornate handwriting style that you would often see on the cover of vintage books. For the main text I chose 'Gentium Book Basic' which does exactly what it says on the tin, it looks like the writing you would see inside any book, plain and easy to read.
-
The picture I have chosen for the site on every page is that of a full to the brim, bookcase. I want the user to feel like they are surrounded by books, books of adventure, romance, fantasy all at hand waiting for them to reach out and immerse themselves in another world so they can forget about theirs for a time.
It invokes memories of excitment of being in a book shop deciding what book to get next, or in a second hand or antique book shop wondering what treasure they'll find, or in the peacefulness of the library surrounded by knowledge just waiting to be gained. The other images on the site are the book covers which speak for themselves, I have got a backup image incase a url is not provided or doesn't work, it's a close up of a pile of books, which you can almost smell, adding to the feel of the site.


- Bootstrap v4.6.0
- Bootstrap was used for the initial layout and styling before customising it.
- Google Fonts
- Google fonts were used to import the Tangerine and Gentium Book Basic.
- Font Awesome
- The icons used throughout.
- Git
- Version control.
- GitHub
- For storing project.
- Gitpod
- Used for editing my code.
- Balsamiq
- Wireframe creation
- TinyJPG
- TinyJPG was used to optimise the images I used on my site to minimise loading time.
- Am I responsive
- This was used to generate the image at the top of this README.
- Chrome devtools
- This was used massively throughout development to troubleshoot, try out changes before changing code, to test responsiveness and for testing performance of the final site with lighthouse.
- jQuery
- Required for some of the bootstrap elements such as collapsibles, modal and tooltips.
- Heroku
- For deploying the application
- MongoDB
- Database used for our data
- Flask
- Micro framework for building applications.
- Emailjs
- Used to link the contact form to my emails
- RandomKeygen
- Used to generate secret key
- dbdiagram
- Used to create the database schema.
- Werkzeug
- Dependency of Flask and used security helpers.
- Jinja
- Dependency of Flask, templating language used in all my pages.
- convertingcolors.com
- For making my colour palette picture
These are aspects of the development that took me a while to figure out due to inexperience.
- Getting background image on my-btn's. Wanted to see an ornate spine on my page so thought it would be nice to use as the buttons, upladed an image that I had cropped, tried to rotate it using transform:rotate(90deg) but wasn't filling the button and looked a bit rubbish.
- Solution: Edited the picture and re-uploaded
- CSS wasn't working on my profile page but the styling was working on other templates fine so didn't think it was anything to do with file path.
- Solution: Added / to begininning of file path as seen on stack overflow
- Getting logic to work for menu nav items. Tried if session.user && admin and session["user]["admin"] before realising the user document isn't getting passed in so you can't access that information. I then passed in admin into template and used if admin but this didn't work either as admin key having a string (true of false) wouldn't matter both would be true.
- Solution: Got admin status of user and passed into template and changed data type of admin in database to boolean and then if admin works. Realised later that admin would have to get passed into all templates so that the menu would be correct across the board for an admin user, so refactured admin check into its own function as same line of code was in alot of functions. Repeated this for genre aswell.
- Is this a series switch on add-book page wasn't working. This was a custom checkbox from bootstrap, checked the script link, removed outer div to make it a normal checkbox, this also did not check. Went back to basics and wrote in a normal checkbox input, which could check and then added in the bootstrap classes this stopped it from working again. Found code online which pointed out I had missed the input id which now allowed it to check.
- Solution: Added name and id attributes into input, matching for attribute in label.
- On manage users page wanted search bar to look for admin or a username. In search_users function had if search == "admin": users = list(mongo.db.users.find({"admin": "true"})), this wasn't doing anything and none of the flash messages were coming up from the elif or else statements or anything. Figured out the search was working,it was just returning all the users as they all had an entry for admin and thus were deemed true.
- Solution: Changed to {"admin": bool("true")} and then only users that were admin got returned.
- Had issues getting profile-add template to render, had written alot of the function (daft I now know) and so had to delete it and go back to the bare bones to fins an issue as it was indicating no errors in console and no jinja errors page.
- Solution: I hadn't put " " around base.html in {% extends "base.html" %}
- Had issues getting profile-add template to render again when I started passing in book_id, passing in book_id worked fine for edit_book and delete_book, so couldn't figure out what I had done, was staring at the code and could not see a difference between them and profile_add code.
- Solution: I had clearly gone eye tired, I had put book_id = book.id it should have been book._id, had missed the underscore. May have missed ObjectId in one of the many iterations I tried aswell.
- Took me hours to push a book to the profile, so many issues, I hadn't put user_id data type in profile as ObjectId, also profiles didn't exist as I had neglected to create them so added in register function to create profile with the three empty arrays at that point. This was still not creating profiles yet.
- Solution: Create profiles in register function, change data type of user_id to Object_Id and add in a missing bracket into register function.
- On manage genre page, not all my genre edit collapsibles were working. Realised it was only Science Fiction which was the only genre that I had at the time that was two words. Realised that the issue lay in that my id's were genre.name and therefore the space was causing the problem.
- Solution: Used genre.name.replace(' ','') to remove the white space from the name to use as the id.
- Books to read on profile page wasn't displaying anything even when books had been added to it.
- Solution: Had given the field the wrong name in the profile_add function.
- Pagination. I knew I didn't want to put all the books on one long page and so I wanted to either limit the books which meant the user wouldn't be able to browse the library so pagination was the answer. I used a tutorial and its comments and I got library showing the 5 books but that was it, couldn't see the next page as either the pagination links weren't there or they didn't do anything. Found a fellow students who had done pagination. One who's code was exactly the same as mine (obviously had used the same tutorial) but with one function inside the other so I moved mine in too, still didn't work. Found another student who's pagination code was split up into numerous functions but code again was very similar overall but one line of code stood out as different form mine, popped that in and it worked.
- Solution: get_books function inside the library function, added in offset = page * per_page - per_page. Moved things about and tried different versions to see if this was the only way I could get it to work and it was.
Testing and results can be found here
-
I created this repository by:
(a) Logging into Github and clicked the green new button.
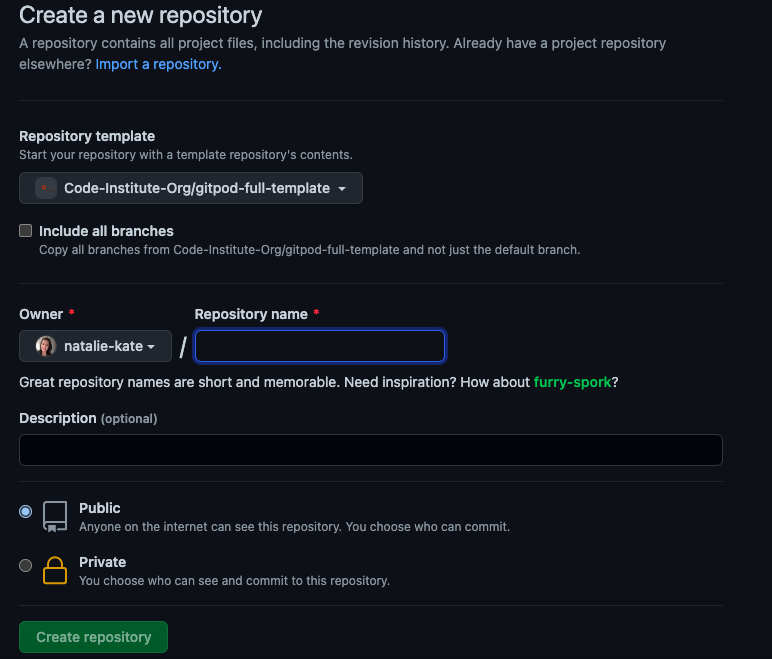
(b) This took me to the page below. I selected the code institute template, input a repository name and clicked the green create repository button.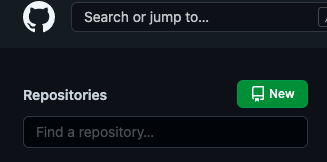
(c) Opened new repository and clicked green Gitpod button to create a workspace in Gitpod for editing.
-
(a) To fork my project sign in to Github and go to my repository
(b) Above and to the right of the settings there are three options and the far right one says Fork, select this.
(c) The fork is now in your repositories.
-
To clone my project sign in to Github and go to my repository
See Setting up MongoDB, Setting Up App, Connecting to MongoDB and Heroku Deployment for more information about what will be required to run Pocket Bookcase.-
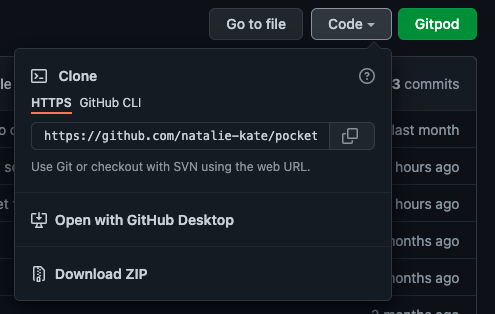
Clone using command line
- Next to the green Gitpod button is a button that says code, select this. There is a few options as to how you would like to clone, if you choose https, SSH or Github CLI, select the clipboard icon to copy the URL.
- In your workspace that you've created, in the terminal , type git clone, paste the URL and enter.
-
Desktop Github
- If you choose to clone by selecting open with desktop Github, it will guide you through the clone with prompts.
- If you choose to clone by selecting open with desktop Github, it will guide you through the clone with prompts.
For more information or troubleshooting see the Github documentation here
-
-
-
Create account, create cluster, I used the free tier, so chose the region closest to me that had it, gave cluster a name and clicked green 'Create Cluster' button.
-
In menu, choose Database Access then select green 'Add New Database User'. Here choose a username and password(use only numbers and letters) and under priviledges select 'read and write to any database' and then click the green 'Add user' button at bottom.
-
Now back in menu select Network Access and then Add IP address, I selected Allow access from anywhere & then clicked green confirm button.
-
Next choose collections and click 'Create Database', see picture below.
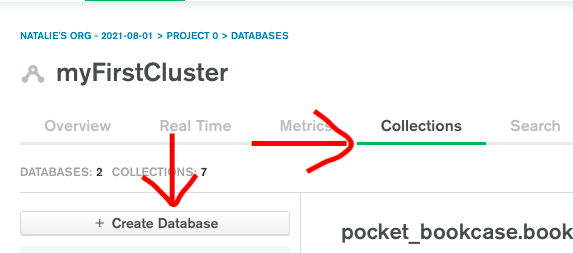
-
Complete the form that open up wth a name for your database and a collection name, mine was pocket-bookcase and my first collection for it was books and we want to use our own data. Click create button.
-
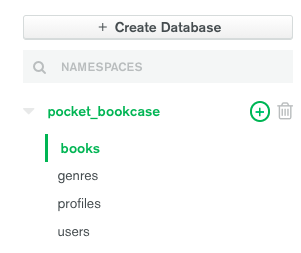
Then add the rest of our collections, by the '+' button, see picture below for collections used.
-
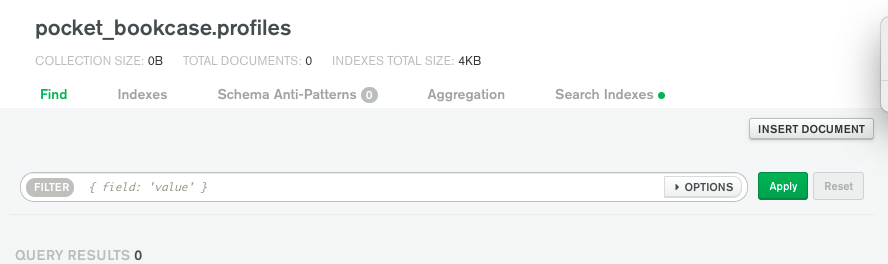
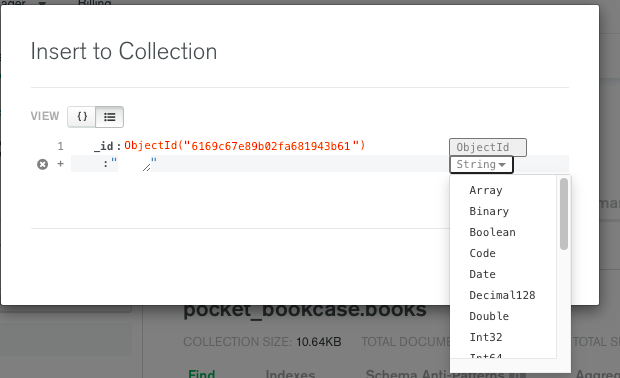
To create a document, click 'Insert Document' button, a window will open, _id will already be present and the fields, data and data type can be completed.
-
I also set up a text search on the book collection by selecting indexes and clicking create index button.

Within fields fill in the following: { "title": "text", "author": "text", "genre": "text", "series_name": "text", "added_by": "text" } Select review and then confirm to add.
-
-
-
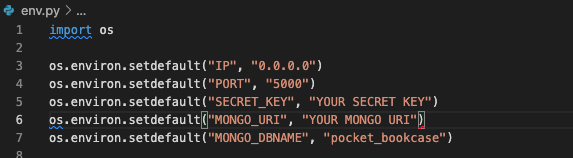
Create env.py file containing the following and add to .gitignore. I created my secret key using RandomKeygen. The mongo URI we get when we connect MongoDB to our app.
-
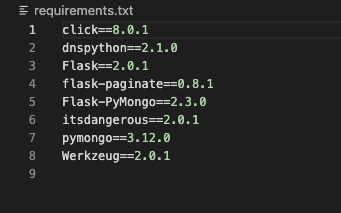
Install requirements in terminal using pip3 install, see requirements below.
-
Create requirements.txt file and Procfile by typing below into the console. These are required by Heroku so ensure these are pushed to github prior to deployment.

-
-
-
Back in mongoDB on your cluster page select connect button.

-
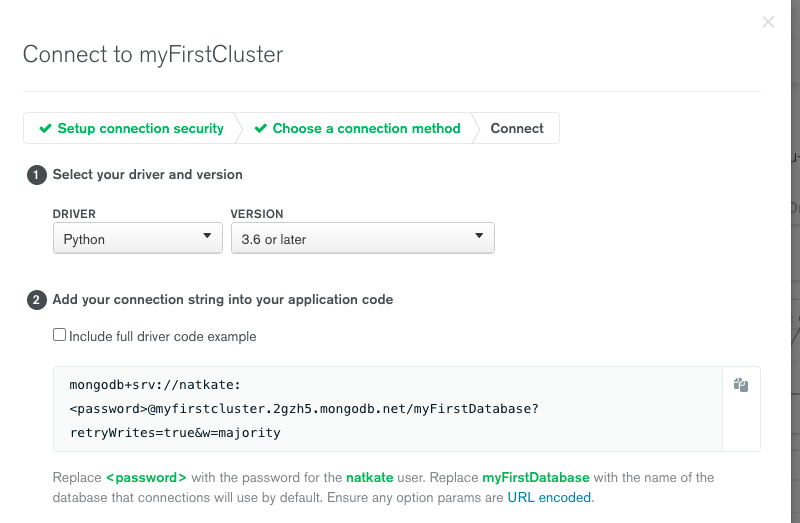
In the window that appears, select 'Connect Your Application and on the next page, select Python and version, you can then copy the connection string it supplies.
-
Go back into the env.py file and paste in the connection string in the space left for the MONGO_URI. As outlined in the connect to cluster page, "password" needs replaced with the password created on the database access page. "myFirstDatabase" in the connection string also needs replaced with the actual database name. Copy this amended URI and paste it into the config vars in heroku.
-
-
-
Log in to Heroku, click 'New' and select 'Create New App'. In window give the app a name and choose region closest to you and then click 'Create App'.
-
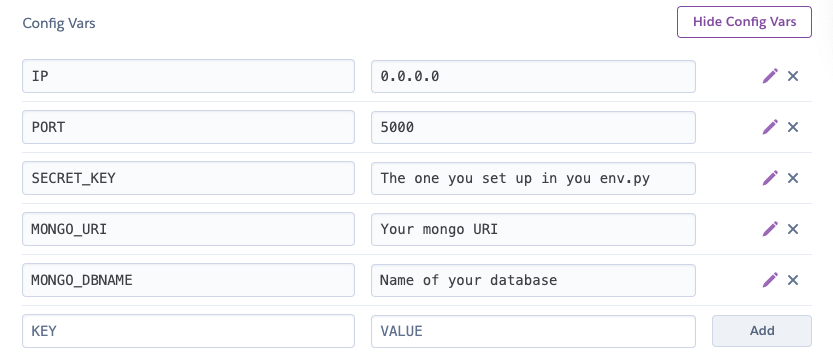
In new app page select settings from menu, click reveal config vars and complete the following
-
Next select 'Deploy' from menu, three options of deployment are available. If you select Heroku Git, it gives you step by step of what you need to do.

-
I chose to use Github, so you have to search and connect to your github repository.

-
Click enable automatic deployment, below that in manual deploy section, you can pick and deploy a branch to ensure everything is et up correctly.

-


- Bootstrap4: Bootstrap Library used for the layout and styling and modals.
- Anthony Mouse on Stack Overflow: For preventing people from entering spaces in some of the text input boxes.
- Iklinac on Stack Overflow: Fix for CSS not loading for profile page when fine on others.
- Joyrex on Github: Fix for my custom checkbox switch not working
- Color Meanings: Fothe hex code for the dark brown I used instead of black throughout the site.
- Josh Comeau: Hover effect on buttons.
- MongoDb documentation: Used for push, pull, and addToSet.
- Maya and Claire on Slack: $set operator was Claires suggestion for Maya's question and it looked useful so I took note of it and ended up using it.
- Grepper: Used to check that book title was not just spaces as user can't edit book title once added, only admin can.
- Cédric Julien on stack overflow: Used to change genre names to one word e.g in the case of science fiction to sciencefiction as use the genre name as id and the space doesn't work for that.
- mozillazg on Github(https://github.com/: Pagination code, but also needed Sam Laubscher's and Russ Oakham's pagination code to figure out why mine wasn't working.
- Etdashou on stack overflow: Attributes to add to my book images. In case the url provided by a user doesn't work, the backup image will show instead.
- Sunil Kumar B M on stack overflow: Pattern attribute to allow letters and spaces only
- Yeong Jong Lim on Stack overflow:For 'if "user" in session' idea to fix search_library redirect for user not logged in.
-
Content was created by Natalie Alexander.
-
README and TESTING layout and content from my MS1 which took inspirations and ideas from these excellent examples
- Stanislav Kondratiev: Main Bookcase Image
- Jess Bailey Designs: Pile of books used for back up image.
- Book cover images I have used to start the database have came from wikipedia.
- Book synopsis text have come from Waterstones
- Some reviews are quotes and so are within quotation marks and attributed.
- Code Institute and Tim Nelson for task manager walk through project. Used the videos a fair bit to get me started.
- My mentor Spencer Barriball for his time and feedback.
- My mini feb 2021 team on slack for their feedback and support.
- The slack community.
- My partner for taking the lions share of raising our baby and the cooking so that I can study.