- Empowers researchers and other non-IT professionals to deploy their code and run services on OpenStack-based cloud infrastructure without advanced knowledge of virtualization or networking concepts
- Fills the gap between interfaces built for system administrators like OpenStack Horizon, and intuitive-but-proprietary services like DigitalOcean
- Enables cloud operators to deliver a user-friendly, powerful interface to their community with customized branding, nomenclature, and single sign-on integration

- try.exosphere.app in your browser, if you have access to an existing OpenStack cloud with internet-facing APIs
- Use exosphere.jetstream-cloud.org if you have an allocation on Jetstream Cloud
Wait, what is OpenStack? OpenStack is the operating system and APIs that power public research clouds at Jetstream and CyVerse, private clouds at organizations like Wikimedia and CERN, and public commercial clouds like OVH, Fuga, and Vexxhost. You can also run OpenStack on your own hardware to provide cloud infrastructure-as-a-service for your organization!
OK, what can I do with Exosphere?
- Easily create instances to run your code, and volumes to manage your data
- Works great for containers, intensive compute jobs, disposable experiments, and persistent web services
- Get one-click, browser-based shell access to cloud resources with Exosphere's Apache Guacamole integration
- One-click graphical desktop as well! (for CentOS 8 and Ubuntu 20.04)
- Pretty graphs show resource utilization of each instance at a glance
- If you're a cloud operator, deliver a customized interface with white-labeling, localized nomenclature, and single sign-on
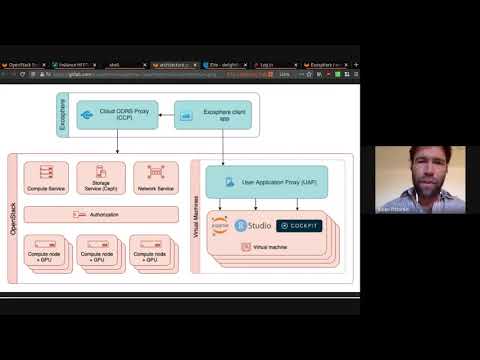
- 100% self-hostable, 99% standalone client application
- Two small proxy servers facilitate secure web browser connections to OpenStack APIs and services running on user-launched cloud instances
- On the roadmap:
- First-class support for containers and data science workbenches
- Cluster orchestration
- Community-curated deployment automations for scientific workflows and custom services
- Fully open source and open development process -- come hack with us!
- See Exosphere's values and goals
Exosphere will be a primary user interface for Jetstream 2, an NSF-funded science and engineering cloud. Jetstream 2 will be available to any US-based researcher starting late 2021.
To start a conversation or ask for help, talk to us in real-time on Matrix / Element. You can also browse an archive of the chat history.
We use GitLab to track issues and contributions. To request a new feature or report a bug, create a new issue on our GitLab project.
We discuss project progress and priorities on a weekly video call Mondays at 16:00 UTC. The whole community is invited! Join at https://meet.jit.si/exosphere, or dial in at +1.512.647.1431, PIN: 3037 7824 88#. Find the agenda and notes from previous meetings here.
- Nomenclature Reference
- Values and Goals of the Exosphere Project
- Cockpit Deprecation and Manual Installation
- Installing Exosphere Progressive Web Application
- User Application Proxy (UAP)
- Solving the CORS Problem (Cloud CORS Proxy)
- Configuring Instance Types
- Federated Login Support
- Contributing to Exosphere
- UI, Layout, and Style
- Architecture Decision Records
- Exosphere Tests
- Browser Integration Tests
- Exosphere Project License
- Acceptable Use Policy for Exosphere Hosted Sites
- Privacy Policy for Exosphere Hosted Sites
The following techniques are intended for cloud operators, advanced users, and for development purposes. We suggest that new users start with one of the hosted applications linked above.
You can run Exosphere using a Docker container. The Docker container includes a Cloud CORS Proxy (CCP) through which Exosphere communicates with OpenStack API endpoints. This has the following benefits:
- You can use Exosphere to access OpenStack APIs which are not accessible from outside an organization's secure network (as long as the computer running the container can access the OpenStack APIs)
- Your cloud credentials will never pass through the proxy servers managed by the Exosphere project for the convenience of most users
Note: See solving-cors-problem.md for background information about the Cloud CORS Proxy (CCP).
docker run --publish 127.0.0.1:8000:8000 registry.gitlab.com/exosphere/exosphereOpen URL in a browser: http://127.0.0.1:8000/
git clone https://gitlab.com/exosphere/exosphere.git
cd exosphere
docker build -t exosphere -f ./docker/standalone.Dockerfile .
docker run --publish 127.0.0.1:8000:8000 exosphere
Open URL in a browser: http://127.0.0.1:8000/
If you want to work on the Exosphere code but do not want to install node on your system, then you can use the Dockerfile in the root directory of the repository to build a development container instead.
First, build the container:
docker build -t exosphere .And then run, binding port 8000 to 8000 in the container:
docker run --rm -it --name exosphere --publish 127.0.0.1:8000:8000 exosphereYou should see elm-live starting:
elm-live:
  Hot Reloading is ON

  Warning: Hot Reloading does not replay the messages of the app.
  It just restores the previous state and can lead to bad state.
  If this happen, reload the app in the browser manually to fix it.


elm-live:
  Server has been started! Server details below:
    - Website URL: http://0.0.0.0:8000
    - Serving files from: /usr/src/app
    - Proxying requests starting with /proxy to https://try-dev.exosphere.app/proxy

elm-live:
  The build has succeeded.

elm-live:
  Watching the following files:
    - src/**/*.elm
You can open your browser to http://app.exosphere.localhost:8000/ to see the interface.
If you want a development environment to make changes to files, you can run the container and bind the src directory:
$ docker run --rm -v $PWD/src:/usr/src/app/src -it --name exosphere -p 8000:8000 exosphereYou can then edit the Elm source code on your host using your favorite editor and elm-live inside the container will
detect the changes, automatically recompile the source code, and then reload the app in your browser.
If you need changes done to other files in the root, you can either bind them or make changes and rebuild the base. You generally shouldn't make changes to files from inside the container that are bound to the host, as the permissions will be modified.
If you want to copy the elm-web.js from inside the container (or any other file) you can do the following in another terminal window:
docker cp exosphere:/usr/src/app/elm-web.js my-elm.jsWhen it's time to cleanup, press Ctrl-C in the terminal window running elm-live.
First install node.js + npm. (If you use Ubuntu/Debian you may also need to apt-get install nodejs-legacy.)
Then install the project's dependencies (including Elm). Convenience command to do this (run from the root of the exosphere repo):
npm installTo compile the app and serve it using a local development server run this command:
npm start
Then browse to http://app.exosphere.localhost:8000/
To enable the Elm Debugger in the local development server run the following command instead:
npm run live-debug
Note: The local development server uses elm-live. It detects changes to the Exosphere source code, recompiles it, and refreshes the browser with the latest version of the app. See elm-live.com for more information.
- Exosphere works with OpenStack Queens version (released February 2018) or later.
- Exosphere works best with clouds that have automatic allocation of network topology enabled.
Exosphere works best with instances launched from images based on Ubuntu 20.04 LTS, CentOS 8, AlmaLinux, and Rocky Linux. Ubuntu 18.04 and CentOS 7 are also supported, but they receive less attention when testing new features. Exosphere can launch instances that run other operating systems, but some features and integrations are likely to not work.
One exception to the above: the one-click graphical desktop feature, only works with CentOS 8 and Ubuntu 20.04.
If your community relies on an operating system that we don't currently support, please create an issue explaining your need! It's probably not hard to add support for Linux distros that use systemd and an APT/YUM/DNF package system.
- The Exosphere client-side application can be served as static content from any web server.
- Exosphere's two supporting proxy servers (Cloud CORS Proxy and User Application Proxy) require Nginx configured with browser-accepted TLS (e.g. via Let's Encrypt). The User Application Proxy requires a wildcard TLS certificate; Let's Encrypt issues these free of charge.
These options are primarily intended for cloud operators who wish to offer a customized deployment of Exosphere to their user community. Set these in config.js.
| Option | Possible Values | Description |
|---|---|---|
| showDebugMsgs | false, true | |
| cloudCorsProxyUrl | null, string | See docs/solving-cors-problem.md; required to use app in web browser |
| clouds | array | Imported from cloud_configs.js; see example below |
| palette | null, JSON object | Pass custom colors to style Exosphere, see example below |
| logo | null, string | Path to custom logo to show in top-left corner of app |
| favicon | null, string | Path to custom favicon |
| appTitle | null, string | Title to show throughout the app |
| topBarShowAppTitle | true (default), false | Whether to show or hide appTitle in the top navigation bar |
| defaultLoginView | null, openstack, jetstream1, oidc | Which login view to display by default |
| aboutAppMarkdown | null, string (markdown) | What to show in the "About the app" section of Help/About view |
| supportInfoMarkdown | null, string (markdown) | What to show when user clicks "Get support" button |
| userSupportEmail | null, string (markdown) | Email address to ask users to send problem report |
| openIdConnectLoginConfig | null, JSON object | See docs/federated-login.md for more info and example JSON |
| localization | null, JSON object | Pass custom localization strings for the UI, see example below |
| instanceConfigMgtRepoUrl | null, string | Set a custom repository to use for instance provisioning code |
| instanceConfigMgtRepoCheckout | null, string | Check out specific branch/tag/commit of instance provisioning code |
The clouds flag is an array containing JSON objects for each cloud with a custom configuration.
By default, the clouds flag is imported from cloud_configs.js. As a deployer, you can add your own cloud(s) to that file, or override it entirely by defining a clouds member of the config object in config.js.
Each of these JSON objects contains the following properties:
keystoneHostname(string): Used to look up the custom configuration for a cloud, e.g.openstack.example.cloudfriendlyName(string): Name of cloud to display to userfriendlySubName(null, string): Optional name of cloud location, region, etc.userAppProxy(null, string): The hostname of the User Application proxy (UAP), e.g.uap.openstack.example.cloud. Seedocs/user-app-proxy.mdfor more information. This must be set for Guacamole support (in-browser shell and desktop) to work on a given cloud.imageExcludeFilter(null, JSON object): A key:value property to exclude images from UI, see example belowfeaturedImageNamePrefix(null, string): A (public) image is 'featured' if the name starts with this stringinstanceTypes(array): An array of instance types specific to this cloud, can be left empty. Seedocs/instance-types.mdfor more information.
var cloud_configs = {
  "clouds":[
    {
      "keystoneHostname":"openstack.example.cloud",
      "friendlyName":"My Example Cloud 1",
      "friendlySubName":null,
      "userAppProxy":"uap.openstack.example.cloud",
      "imageExcludeFilter":null,
      "featuredImageNamePrefix":null,
      "instanceTypes":[

      ]
    },
    {
      "keystoneHostname":"iu.jetstream-cloud.org",
      "friendlyName":"Jetstream Cloud",
      "friendlySubName":"Indiana University",
      "userAppProxy":"proxy-j7m-iu.exosphere.app",
      "imageExcludeFilter":{
        "filterKey":"atmo_image_include",
        "filterValue":"true"
      },
      "featuredImageNamePrefix":"JS-API-Featured",
      "instanceTypes":[
        {
          "friendlyName":"Ubuntu",
          "description":"Wide compatibility with community software packages, good choice for new users",
          "logo":"assets/img/ubuntu.svg",
          "versions":[
            {
              "friendlyName":"20.04 (latest)",
              "isPrimary":true,
              "imageFilters":{
                "name":"JS-API-Featured-Ubuntu20-Latest",
                "visibility":"public"
              },
              "restrictFlavorIds":null
            }
          ]
        }
      ]
    }
  ]
}This excludes images built by, and intended for the Atmosphere platform.
  imageExcludeFilter: {
    filterKey: "atmo_image_include",
    filterValue: "true"
  }
This declares a primary and secondary color in the app.
palette: { primary: {r: 0, g: 108, b: 163 }, secondary : {r: 96, g: 239, b: 255 } }
This allows a deployer to customize terms used by Exosphere for their organization or community.
localization: {
    openstackWithOwnKeystone: "cloud",
    openstackSharingKeystoneWithAnother: "region",
    unitOfTenancy: "project",
    maxResourcesPerProject: "resource limits",
    pkiPublicKeyForSsh: "SSH public key",
    virtualComputer: "instance",
    virtualComputerHardwareConfig: "size",
    cloudInitData: "boot script",
    commandDrivenTextInterface: "terminal",
    staticRepresentationOfBlockDeviceContents: "image",
    blockDevice: "volume",
    nonFloatingIpAddress: "internal IP address",
    floatingIpAddress: "floating IP address",
    publiclyRoutableIpAddress: "public IP address",
    graphicalDesktopEnvironment: "graphical desktop environment"
    }
Exosphere uses Ansible to configure and provision new instances. (Among other things, it installs and configures Docker and Apache Guacamole server for the one-click terminal and remote desktop environment.) The provisioning code is stored in the ansible/ directory of the Exosphere repository.
By default, new instances pull this code from the master branch of the upstream exosphere/exosphere repository. This is true even for instances which are launched using a different branch or fork of Exosphere.
You may wish to configure Exosphere to deploy instances using your own (modified) instance provisioning code, for development/testing purposes or as customized for your own organization. To do that, you must push the code to a git repository somewhere that new instances can download from, and then set two options in config.js:
instanceConfigMgtRepoUrlto the git repository URL that new instances can download your provisioning code frominstanceConfigMgtRepoCheckoutto the repository branch/tag/commit that should be checked out (defaults to master if leftnull)
Note that Exosphere downloads the specified repo and runs the playbook stored at ansible/playbook.yml, so implement your changes by modifying that playbook.
To test the instance provisioning code locally on a cloud instance, do this:
virtualenv /opt/ansible-venv
. /opt/ansible-venv/bin/activate
pip install ansible-core
ansible-pull --url https://gitlab.com/exosphere/exosphere.git --directory /opt/instance-config-mgt -i /opt/instance-config-mgt/ansible/hosts /opt/instance-config-mgt/ansible/playbook.yml
Optionally, pass the --checkout argument to specify a git branch/tag or commit hash.
For now, we are using only built-in Ansible modules, because Exosphere uses the lightweight ansible-core package.
Exosphere sets these variables when running the instance provisioning code on a new instance.
| variable | type | required | description |
|---|---|---|---|
| guac_enabled | boolean | no | deploys Apache Guacamole to serve terminal (and optionally desktop) |
| gui_enabled | boolean | no | deploys VNC server, configures Guacamole to serve graphical desktop |