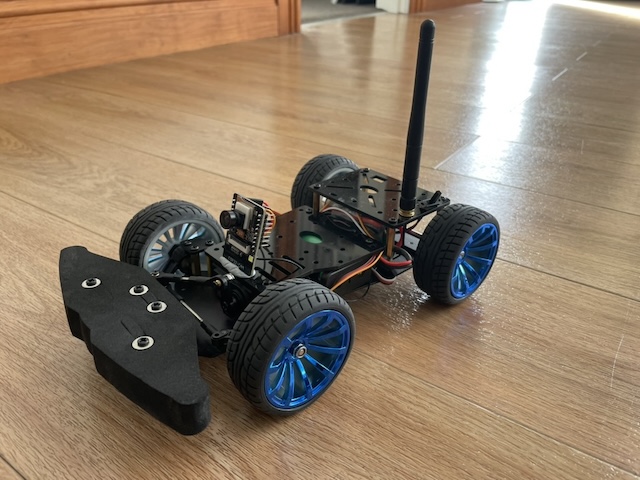
This project demonstrates an ESP32-based remote-controlled camera system capable of transmitting live video streams over WebSockets and controlling motors and servos. A Python server application manages WebSocket communication and provides a web interface to view and control the ESP32 devices.
- Live video streaming from an ESP32-CAM to a web server.
- Remote control of a motor and a servo via WebSocket commands.
- Automatic timeout to reset motor and servo to default states.
- Dynamic multi-client video feed canvas on the server.
- ESP32-CAM (AI Thinker module or compatible board).
- Motor and servo connected to appropriate GPIO pins.
- Stable 5V power supply for the ESP32-CAM.
- Optional SD card (if required for other functionalities).
- Wi-Fi network for communication.
I bought everything for this kit from aliexpress:
- Car chassis: https://www.aliexpress.com/item/32830665408.html
- Electronic speed control: https://www.aliexpress.com/item/1005007716682815.html
- Battery holder: https://www.aliexpress.com/item/1005006283625827.html
- 2 18650 3.6v cells or 7.4v battery pack (I have used both, cells are more flexible for other projects)
- ESP32-CAM: https://www.aliexpress.com/item/1005001468076374.html (Very important to get one with external antenna and and I used the 170 degree fisheye camera)
- Bluetooth Gamepad (I used a PS4 controller)
WiFi.hfor Wi-Fi connectivity.ArduinoWebsockets.hfor WebSocket communication.esp_camera.hfor ESP32-CAM camera control.ServoControl.handEsc.hfor controlling the servo and motor.Arduino.hfor standard Arduino functions.
Install the following Python libraries:
pip3 install aiohttp opencv-python numpy- Modify the
secrets.hfile to include your Wi-Fi credentials and WebSocket server URL:
#define WIFI_SSID "YourWiFiSSID"
#define WIFI_PASSWORD "YourWiFiPassword"
#define WS_SERVER_URL "ws://YourServerIP:Port"- Ensure the GPIO pins for the camera module, motor, and servo match your hardware setup:
- Camera GPIO pins are pre-configured for the AI Thinker ESP32-CAM board.
- Update motor and servo pins if necessary.
- Place the server script in a directory with an
index.htmlfile for the web interface. - Start the server:
python3 server.pyThe server will be accessible on http://localhost:8080/.
- Upload the provided sketch to your ESP32-CAM using the Arduino IDE or a compatible platform.
- Monitor the serial output to ensure successful connection to Wi-Fi and the WebSocket server.
- Run the Python server script.
- Open the web interface in a browser to view the live video streams.
- Send control commands via the WebSocket connection.
MOTOR:<speed>: Set motor speed (-255 to 255).SERVO:<angle>: Set servo angle (0 to 180).CONTROL:<speed>:<angle>: Control both motor speed and servo angle simultaneously.
- Wi-Fi: Connects to the specified Wi-Fi network.
- Camera: Configures the ESP32-CAM with the appropriate settings for video streaming.
- WebSocket: Establishes a WebSocket connection with the server.
If no control commands are received within a predefined timeout period, the motor speed resets to 0, and the servo angle resets to 90.
- Handles WebSocket communication with multiple ESP32 clients.
- Processes incoming video frames and dynamically arranges them in a grid.
- Streams the grid of video frames to the web interface.
-
Connection Issues:
- Verify Wi-Fi credentials in
secrets.h. - Check that the WebSocket server is running and accessible.
- Verify Wi-Fi credentials in
-
Video Stream Issues:
- Ensure proper power supply to the ESP32-CAM.
- Verify camera initialization settings.
This project is open-source and available under the MIT License.
Feel free to submit issues or pull requests to improve the application!

